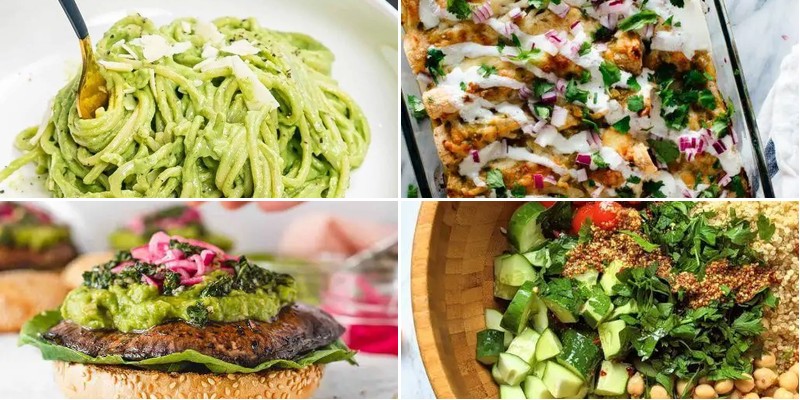
When the weather turns chilly or you simply need a cozy pick-me-up, nothing satisfies quite like comforting food that’s actually good for you. We’ve gathered 24 nourishing recipes that deliver all the warmth and satisfaction of traditional comfort foods—without the guilt. Get ready to discover delicious, wholesome dishes that will become your new go-tos for cozy nights in.
Quinoa and Vegetable Stuffed Bell Peppers
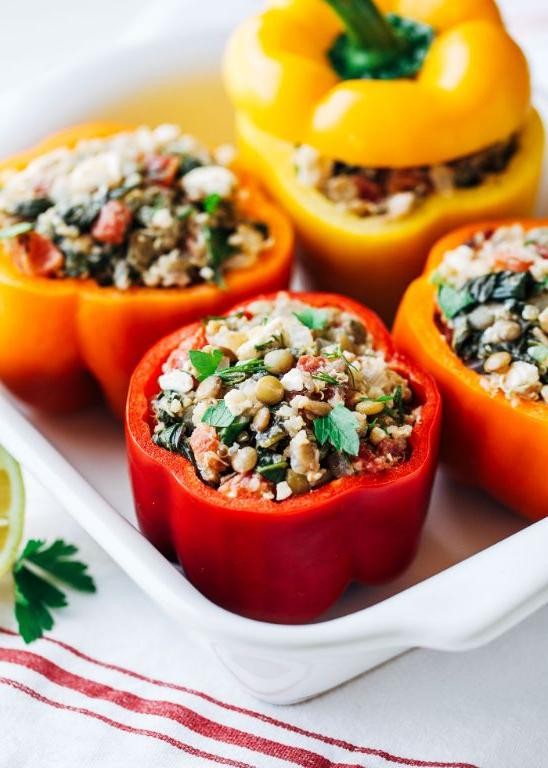
Diving into stuffed bell peppers offers a wonderful opportunity to master a complete meal in one colorful package. Today we’ll create quinoa and vegetable stuffed bell peppers that balance nutrition with vibrant flavors through careful preparation and precise cooking techniques. Follow each step methodically to achieve perfectly tender peppers with a savory, textured filling.
2
portions25
minutes60
minutesIngredients
– 4 large bell peppers, mixed colors
– 1 cup uncooked quinoa, rinsed thoroughly
– 2 cups vegetable broth, simmering
– 1 medium yellow onion, finely diced
– 3 garlic cloves, minced
– 2 medium carrots, small dice
– 1 zucchini, small dice
– 1 cup cherry tomatoes, quartered
– 2 tablespoons extra virgin olive oil
– 1 teaspoon smoked paprika
– ½ teaspoon dried oregano
– ¼ cup fresh parsley, chopped
– 4 ounces feta cheese, crumbled
– Kosher salt to season
Instructions
1. Preheat your oven to 375°F and lightly grease a baking dish with olive oil.
2. Carefully slice the tops off the bell peppers and remove all seeds and membranes.
3. Place the hollowed peppers upright in the prepared baking dish.
4. Heat 2 tablespoons of extra virgin olive oil in a large skillet over medium heat until shimmering.
5. Add the finely diced yellow onion and cook for 4-5 minutes until translucent.
6. Stir in the minced garlic and cook for 1 minute until fragrant.
7. Add the diced carrots and cook for 3 minutes until slightly softened.
8. Incorporate the diced zucchini and cook for 2 additional minutes.
9. Mix in the rinsed quinoa, smoked paprika, and dried oregano, stirring to coat evenly.
10. Pour in the 2 cups of simmering vegetable broth and bring to a gentle boil.
11. Reduce heat to low, cover the skillet, and simmer for 15 minutes until quinoa is tender and liquid is absorbed.
12. Remove from heat and fold in the quartered cherry tomatoes, chopped fresh parsley, and crumbled feta cheese.
13. Season the filling mixture with kosher salt until properly balanced.
14. Spoon the quinoa mixture evenly into the prepared bell peppers, packing gently.
15. Cover the baking dish with aluminum foil and bake at 375°F for 25 minutes.
16. Remove the foil and continue baking for 10-15 minutes until pepper edges begin to caramelize.
17. Let the stuffed peppers rest for 5 minutes before serving to allow filling to set.
Here’s why this dish succeeds: the quinoa maintains a pleasant chew against the meltingly soft peppers, while the feta provides salty bursts that contrast the sweet vegetables. Consider serving these peppers alongside a simple arugula salad dressed with lemon vinaigrette to complement the earthy flavors, or top with additional fresh herbs for a vibrant presentation that highlights the colorful ingredients.
Hearty Lentil and Vegetable Stew
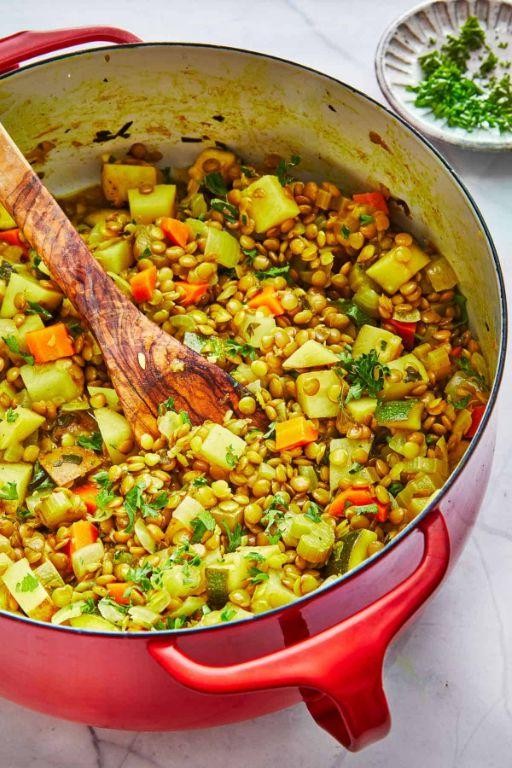
Looking for a comforting, nutrient-dense meal that builds foundational cooking skills? This methodical guide will walk you through creating a deeply satisfying lentil and vegetable stew from start to finish.
6
servings15
minutes55
minutesIngredients
– 2 tablespoons extra-virgin olive oil
– 1 large yellow onion, finely diced
– 3 cloves garlic, minced
– 2 medium carrots, peeled and cut into ¼-inch rounds
– 2 celery stalks, cut into ¼-inch slices
– 1½ cups brown lentils, rinsed and drained
– 6 cups vegetable broth
– 1 (14.5-ounce) can fire-roasted diced tomatoes, undrained
– 1 teaspoon dried thyme
– ½ teaspoon smoked paprika
– 2 bay leaves
– 1 tablespoon apple cider vinegar
– ½ cup fresh flat-leaf parsley, chopped
Instructions
1. Heat 2 tablespoons extra-virgin olive oil in a large Dutch oven over medium heat until shimmering.
2. Add 1 large finely diced yellow onion and sauté for 5-7 minutes until translucent and fragrant.
3. Stir in 3 minced garlic cloves and cook for 60 seconds until aromatic but not browned.
4. Add 2 medium carrot rounds and 2 celery slices, cooking for 4 minutes until slightly softened.
5. Incorporate 1½ cups rinsed brown lentils, toasting for 2 minutes to enhance their nutty flavor.
6. Pour in 6 cups vegetable broth and 1 can fire-roasted diced tomatoes with their juices.
7. Add 1 teaspoon dried thyme, ½ teaspoon smoked paprika, and 2 bay leaves, stirring to combine.
8. Bring the stew to a boil, then immediately reduce heat to maintain a gentle simmer.
9. Cover and cook for 35-40 minutes until lentils are tender but not mushy.
10. Remove from heat and discard the 2 bay leaves.
11. Stir in 1 tablespoon apple cider vinegar to brighten the flavors.
12. Fold in ½ cup chopped fresh flat-leaf parsley just before serving.
The finished stew achieves a thick, spoon-coating consistency with lentils that retain slight toothiness against the softened vegetables. Earthy notes from the smoked paprika and thyme balance the bright acidity from the tomatoes and vinegar, creating complex layers of flavor. For a creative presentation, serve over creamy polenta or with crusty artisan bread to soak up the richly developed broth.
Zucchini Noodles with Turkey Bolognese
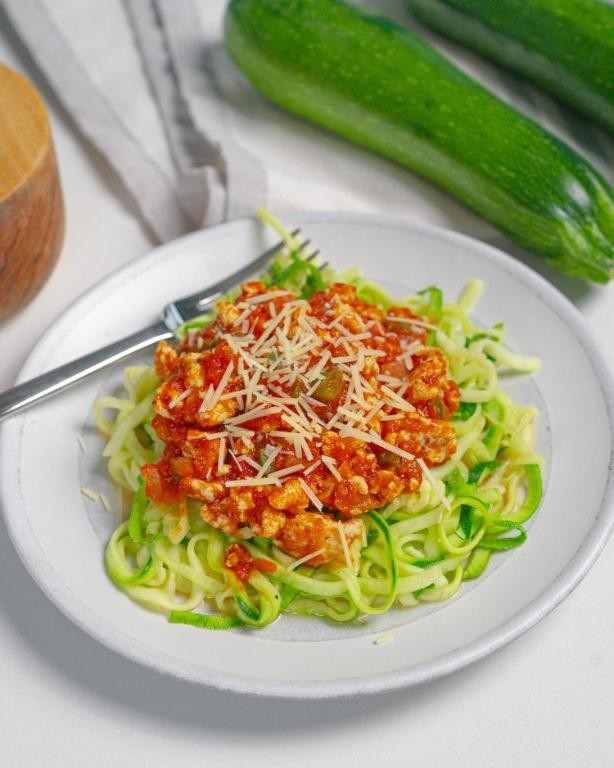
Often overlooked in favor of traditional pasta, zucchini noodles offer a fresh, vegetable-forward alternative that pairs beautifully with rich sauces. Our turkey bolognese brings depth and heartiness to this light base, creating a balanced meal that satisfies without weighing you down. Let’s walk through each step methodically to ensure perfect results.
3
servings15
minutes65
minutesIngredients
- 2 tablespoons extra virgin olive oil
- 1 medium yellow onion, finely diced
- 2 cloves garlic, minced
- 1 pound ground turkey (93% lean)
- 1 cup dry red wine
- 28 ounces canned San Marzano tomatoes, crushed
- 1/4 cup heavy cream
- 4 medium zucchini, spiralized
- 1/4 cup fresh basil leaves, chiffonade
- 1/2 cup Parmigiano-Reggiano, freshly grated
- Kosher salt to season
- Freshly cracked black pepper to season
Instructions
- Heat 2 tablespoons extra virgin olive oil in a large Dutch oven over medium heat until shimmering.
- Add 1 finely diced yellow onion and cook for 5-7 minutes until translucent and fragrant.
- Stir in 2 minced garlic cloves and cook for 1 minute until aromatic but not browned.
- Add 1 pound ground turkey, breaking it apart with a wooden spoon, and cook for 6-8 minutes until no pink remains.
- Pour in 1 cup dry red wine, scraping the bottom of the pot to incorporate any browned bits.
- Simmer the wine for 4-5 minutes until reduced by half, concentrating the flavor.
- Add 28 ounces crushed San Marzano tomatoes and bring to a gentle simmer.
- Reduce heat to low, cover partially, and simmer for 45 minutes to develop deep flavors.
- Stir in 1/4 cup heavy cream until fully incorporated and simmer for 5 more minutes.
- Season the bolognese with kosher salt and freshly cracked black pepper to your preference.
- While sauce simmers, spiralize 4 medium zucchini into noodles using the medium blade.
- Heat a large skillet over medium-high heat and add the zucchini noodles.
- Sauté the zucchini noodles for 2-3 minutes just until tender but still al dente.
- Divide the sautéed zucchini noodles evenly among four warmed serving bowls.
- Ladle the hot turkey bolognese over the zucchini noodles in each bowl.
- Garnish each serving with 1 tablespoon chiffonade fresh basil leaves.
- Sprinkle 2 tablespoons freshly grated Parmigiano-Reggiano over each portion.
Zucchini noodles maintain a delightful crunch that contrasts beautifully with the silky, slow-simmered bolognese. The turkey provides lean protein while allowing the San Marzano tomatoes’ bright acidity to shine through. For an elegant presentation, twirl the zucchini noodles around your fork before topping with sauce, or serve family-style in a large shallow bowl for casual gatherings.
Sweet Potato and Black Bean Enchiladas

Haven’t you found yourself craving a comforting, nutrient-dense meal that comes together with minimal fuss? Sweet potato and black bean enchiladas deliver exactly that—a vibrant, satisfying dish perfect for weeknight dinners or casual gatherings. Let’s walk through each step methodically to ensure perfect results every time.
8
enchiladas20
minutes43
minutesIngredients
– 2 medium sweet potatoes, peeled and diced into ½-inch cubes
– 1 tablespoon extra-virgin olive oil
– 1 teaspoon ground cumin
– ½ teaspoon smoked paprika
– ½ teaspoon fine sea salt
– 1 (15-ounce) can black beans, drained and rinsed
– 1 cup shredded Monterey Jack cheese
– 8 (6-inch) corn tortillas
– 2 cups red enchilada sauce
– ¼ cup crumbled queso fresco
– 2 tablespoons fresh cilantro leaves
Instructions
1. Preheat your oven to 400°F (204°C) and line a baking sheet with parchment paper.
2. Toss the diced sweet potatoes with extra-virgin olive oil, ground cumin, smoked paprika, and fine sea salt until evenly coated.
3. Spread the seasoned sweet potatoes in a single layer on the prepared baking sheet.
4. Roast for 20–25 minutes, or until the sweet potatoes are tender and lightly caramelized at the edges.
5. Transfer the roasted sweet potatoes to a mixing bowl and gently fold in the drained black beans.
6. Warm the corn tortillas by heating them individually in a dry skillet over medium heat for 15–20 seconds per side to make them pliable.
7. Spread ½ cup of red enchilada sauce evenly across the bottom of a 9×13-inch baking dish.
8. Spoon approximately ⅓ cup of the sweet potato and black bean mixture onto the center of each warmed tortilla.
9. Sprinkle 1 tablespoon of shredded Monterey Jack cheese over the filling in each tortilla.
10. Roll each tortilla tightly around the filling and place seam-side down in the prepared baking dish.
11. Pour the remaining 1½ cups of red enchilada sauce over the assembled enchiladas, ensuring they’re fully covered.
12. Sprinkle the remaining shredded Monterey Jack cheese evenly over the top.
13. Bake at 400°F (204°C) for 18–22 minutes, until the sauce is bubbling and the cheese is fully melted with golden spots.
14. Remove from the oven and let rest for 5 minutes before serving.
15. Garnish with crumbled queso fresco and fresh cilantro leaves.
Decadently creamy sweet potatoes contrast beautifully with the firm texture of black beans, while the smoky cumin and paprika create depth against the tangy enchilada sauce. For a stunning presentation, serve these enchiladas alongside a crisp jicama slaw or topped with a drizzle of crema and pickled red onions. The melted Monterey Jack provides a satisfying stretch with every bite, making this dish as visually appealing as it is delicious.
Whole Wheat Margherita Pizza with Fresh Basil

H
3
servings75
minutes14
minutesIngredients
- 2 cups whole wheat bread flour
- 1 teaspoon fine sea salt
- 1 teaspoon active dry yeast
- ¾ cup warm water (110°F)
- 1 tablespoon extra virgin olive oil
- ½ cup San Marzano tomato purée
- 8 ounces fresh mozzarella di bufala, thinly sliced
- ¼ cup fresh basil leaves
- 1 tablespoon grated Parmigiano-Reggiano
Instructions
- Combine 2 cups whole wheat bread flour, 1 teaspoon fine sea salt, and 1 teaspoon active dry yeast in a large mixing bowl.
- Pour ¾ cup warm water (110°F) and 1 tablespoon extra virgin olive oil into the dry ingredients.
- Mix with a wooden spoon until a shaggy dough forms, about 2 minutes.
- Transfer the dough to a lightly floured surface and knead for 8-10 minutes until smooth and elastic. Tip: The dough should spring back slowly when pressed with a finger.
- Place the dough in a lightly oiled bowl, cover with a damp kitchen towel, and let rise in a warm place for 1 hour or until doubled in size.
- Preheat your oven to 475°F with a pizza stone or baking sheet inside for 30 minutes.
- Punch down the risen dough and roll it into a 12-inch circle on a floured surface.
- Spread ½ cup San Marzano tomato purée evenly over the dough, leaving a ½-inch border.
- Arrange 8 ounces thinly sliced fresh mozzarella di bufala over the tomato purée. Tip: Pat the mozzarella dry with paper towels to prevent excess moisture.
- Slide the pizza onto the preheated stone and bake for 12-14 minutes until the crust is golden and cheese is bubbly with brown spots.
- Remove the pizza from the oven and immediately top with ¼ cup fresh basil leaves and 1 tablespoon grated Parmigiano-Reggiano. Tip: Adding basil after baking preserves its vibrant color and fresh aroma.
D
Cauliflower Mac and Cheese with Chickpea Pasta
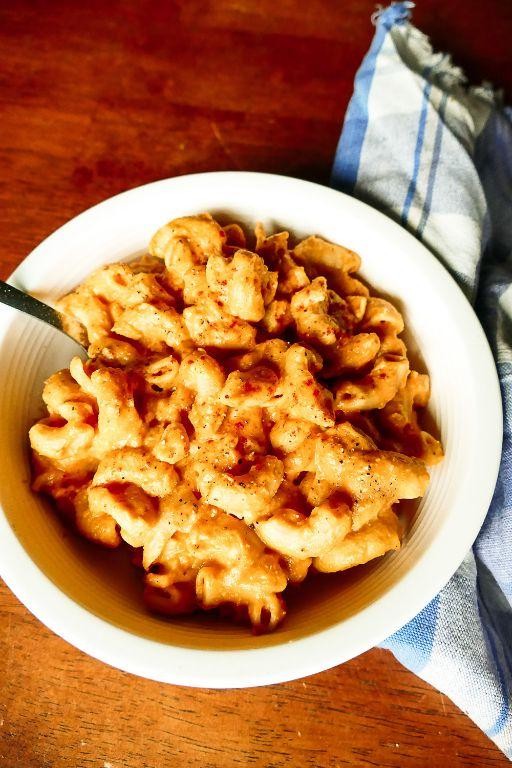
Let’s transform humble cauliflower into a velvety sauce that will redefine your mac and cheese expectations. This version swaps traditional pasta for protein-rich chickpea pasta, creating a dish that’s both comforting and nourishing. Following these precise steps will ensure perfect results every time.
6
servings20
minutes50
minutesIngredients
– 8 ounces dried chickpea rotini pasta
– 1 medium head cauliflower, cut into 1-inch florets
– 2 cups whole milk
– 4 tablespoons unsalted European-style butter
– 3 tablespoons all-purpose flour
– 1 teaspoon Dijon mustard
– ¼ teaspoon freshly grated nutmeg
– 8 ounces sharp white cheddar cheese, freshly grated
– 4 ounces Gruyère cheese, freshly grated
– ½ cup panko breadcrumbs
– 2 tablespoons extra virgin olive oil
– 1 teaspoon kosher salt
– ½ teaspoon freshly ground black pepper
Instructions
1. Preheat your oven to 375°F and position the rack in the center.
2. Bring a large pot of salted water to a rolling boil over high heat.
3. Add the chickpea rotini pasta and cook for exactly 8 minutes, stirring occasionally to prevent sticking.
4. While the pasta cooks, steam the cauliflower florets in a steamer basket over boiling water for 12 minutes until fork-tender.
5. Drain the pasta in a colander and return it to the warm pot.
6. Transfer the steamed cauliflower to a high-speed blender and add whole milk.
7. Blend on high speed for 90 seconds until completely smooth and velvety.
8. In a medium saucepan, melt the European-style butter over medium heat until foaming subsides.
9. Whisk in the all-purpose flour and cook for exactly 2 minutes to create a pale golden roux.
10. Gradually whisk in the cauliflower-milk puree until the mixture is completely smooth.
11. Continue cooking the sauce for 5 minutes, whisking constantly, until it thickens enough to coat the back of a spoon.
12. Remove the saucepan from heat and whisk in Dijon mustard, freshly grated nutmeg, kosher salt, and black pepper.
13. Stir in the grated sharp white cheddar and Gruyère cheeses until fully melted and incorporated.
14. Pour the cheese sauce over the drained pasta and fold gently to combine thoroughly.
15. Transfer the mixture to a 9×13-inch baking dish and spread into an even layer.
16. In a small bowl, combine panko breadcrumbs with extra virgin olive oil and mix until evenly moistened.
17. Sprinkle the breadcrumb mixture evenly over the pasta surface.
18. Bake for 25 minutes until the topping is golden brown and the edges are bubbling.
19. Let the dish rest for 10 minutes before serving to allow the sauce to set properly.
Gorgeously creamy with a satisfying crunch from the panko topping, this mac and cheese delivers complex nutty notes from the Gruyère balanced by the sharp cheddar. The chickpea pasta maintains perfect al dente texture despite the rich sauce, creating a delightful contrast in every bite. For an elegant presentation, serve in individual cast iron skillets garnished with fresh chive blossoms.
Savory Herb-Roasted Chicken and Vegetables

Now, let’s create a perfectly roasted chicken with vegetables that will fill your kitchen with the most incredible aromas. This methodical approach ensures crispy skin, juicy meat, and caramelized vegetables every single time.
4
portions20
minutes80
minutesIngredients
- 1 whole chicken (3-4 pounds), patted dry with paper towels
- 3 tablespoons extra virgin olive oil, divided
- 2 teaspoons kosher salt
- 1 teaspoon freshly cracked black pepper
- 4 fresh rosemary sprigs
- 6 fresh thyme sprigs
- 4 garlic cloves, smashed
- 1 lemon, quartered
- 1 pound baby potatoes, halved
- 3 large carrots, peeled and cut into 2-inch pieces
- 1 large yellow onion, cut into 8 wedges
Instructions
- Preheat your oven to 425°F and position the rack in the center.
- Pat the chicken completely dry with paper towels, including the cavity.
- Rub 2 tablespoons of olive oil evenly over the entire chicken surface.
- Season the chicken inside and out with kosher salt and freshly cracked black pepper.
- Stuff the cavity with rosemary sprigs, thyme sprigs, smashed garlic cloves, and quartered lemon.
- Truss the chicken by tying the legs together with kitchen twine and tucking the wing tips underneath.
- Place the halved baby potatoes, carrot pieces, and onion wedges in a large roasting pan.
- Toss the vegetables with the remaining 1 tablespoon of olive oil until evenly coated.
- Position the trussed chicken breast-side up on top of the vegetables in the roasting pan.
- Roast at 425°F for 20 minutes to crisp the skin.
- Reduce the oven temperature to 375°F and continue roasting for 50-60 minutes.
- Check for doneness by inserting an instant-read thermometer into the thickest part of the thigh, which should register 165°F.
- Remove the pan from the oven and transfer the chicken to a cutting board.
- Let the chicken rest undisturbed for 15 minutes before carving.
- Toss the roasted vegetables in the pan juices while the chicken rests.
Golden, crispy skin gives way to incredibly moist, herb-infused meat that practically falls off the bone. The vegetables become tender and caramelized, having absorbed all the flavorful chicken drippings. For an elegant presentation, arrange the carved chicken over the vegetables and drizzle with the pan juices, or shred the meat for a rustic family-style meal.
Creamy Avocado and Spinach Pasta
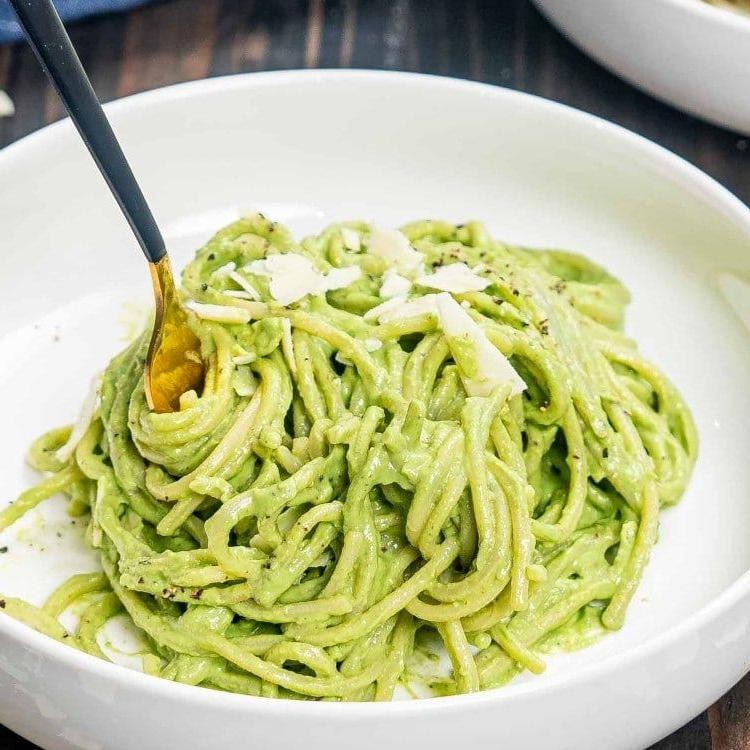
Let’s create a vibrant, nutrient-packed pasta dish that transforms simple ingredients into something extraordinary. This creamy avocado and spinach pasta comes together in under 30 minutes, making it perfect for busy weeknights when you want something both wholesome and satisfying.
3
portions10
minutes11
minutesIngredients
- 8 ounces dried linguine pasta
- 2 ripe Hass avocados, pitted and peeled
- 3 cups fresh baby spinach leaves
- 2 cloves garlic, minced
- 1/4 cup extra virgin olive oil
- 2 tablespoons freshly squeezed lemon juice
- 1/4 cup grated Parmigiano-Reggiano cheese
- 1/4 teaspoon fine sea salt
- 1/8 teaspoon freshly ground black pepper
- 2 tablespoons toasted pine nuts
Instructions
- Bring 4 quarts of salted water to a rolling boil in a large stockpot over high heat.
- Add linguine to the boiling water and cook for 9-11 minutes until al dente, stirring occasionally to prevent sticking.
- While pasta cooks, combine avocados, spinach, garlic, olive oil, lemon juice, Parmigiano-Reggiano, salt, and pepper in a food processor.
- Process the mixture for 45-60 seconds until completely smooth and creamy, scraping down the sides once during processing.
- Drain the cooked pasta, reserving 1/2 cup of pasta water before draining completely.
- Return the drained pasta to the warm pot off the heat.
- Pour the avocado-spinach sauce over the hot pasta and toss vigorously to coat every strand.
- Add reserved pasta water 2 tablespoons at a time, tossing between additions, until the sauce reaches your desired consistency.
- Divide the pasta among four warmed bowls and garnish each serving with 1/2 tablespoon of toasted pine nuts.
Velvety smooth avocado creates an incredibly rich sauce that clings beautifully to each strand of pasta, while the fresh spinach adds vibrant color and subtle earthiness. The toasted pine nuts provide delightful crunch against the creamy texture, making this dish feel both luxurious and nourishing. For an elegant presentation, serve in shallow pasta bowls with an extra sprinkle of Parmigiano-Reggiano and a drizzle of high-quality olive oil.
Spaghetti Squash with Mushroom and Spinach Sauce
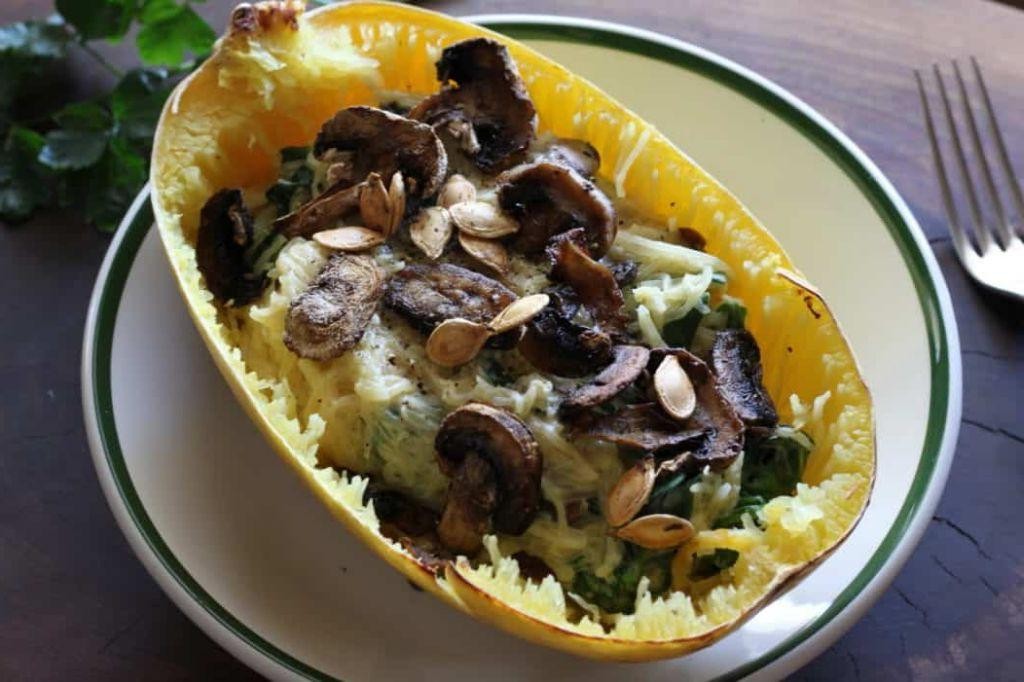
Versatile and nutritious, spaghetti squash makes an excellent low-carb alternative to traditional pasta. This recipe transforms the mild-flavored squash into a satisfying meal with an earthy mushroom and spinach sauce that comes together beautifully. Let’s walk through each step methodically to ensure perfect results every time.
4
servings20
minutes50
minutesIngredients
– 1 large spaghetti squash (approximately 3 pounds)
– 3 tablespoons extra virgin olive oil, divided
– 1 teaspoon fine sea salt, divided
– ½ teaspoon freshly cracked black pepper
– 12 ounces cremini mushrooms, thinly sliced
– 3 cloves garlic, minced
– ¼ cup dry white wine
– 1 cup heavy cream
– 4 cups fresh spinach leaves
– ½ cup freshly grated Parmigiano-Reggiano cheese
– 2 tablespoons unsalted butter
– 1 tablespoon fresh thyme leaves
Instructions
1. Preheat your oven to 400°F and line a baking sheet with parchment paper.
2. Carefully slice the spaghetti squash in half lengthwise using a sharp chef’s knife.
3. Scoop out the seeds and stringy pulp from both squash halves with a metal spoon.
4. Brush the cut surfaces with 2 tablespoons of olive oil and season with ½ teaspoon salt and ¼ teaspoon black pepper.
5. Place the squash halves cut-side down on the prepared baking sheet.
6. Roast for 35-40 minutes until the flesh easily shreds with a fork.
7. While the squash roasts, heat the remaining 1 tablespoon olive oil in a large skillet over medium-high heat.
8. Add the sliced cremini mushrooms and cook for 8-10 minutes, stirring occasionally, until deeply browned and any released liquid has evaporated.
9. Add the minced garlic and cook for 1 minute until fragrant.
10. Pour in the dry white wine to deglaze the pan, scraping up any browned bits from the bottom.
11. Reduce the wine by half, about 2-3 minutes of simmering.
12. Stir in the heavy cream and bring to a gentle simmer.
13. Add the fresh spinach leaves and cook for 2-3 minutes until just wilted.
14. Remove the skillet from heat and stir in the Parmigiano-Reggiano cheese, unsalted butter, and fresh thyme leaves until the sauce becomes creamy and emulsified.
15. Season the sauce with the remaining ½ teaspoon salt and ¼ teaspoon black pepper.
16. Remove the roasted squash from the oven and let cool for 5 minutes until safe to handle.
17. Use a fork to scrape the squash flesh into spaghetti-like strands, transferring to a serving bowl.
18. Pour the warm mushroom and spinach sauce over the spaghetti squash strands and toss gently to combine.
Just pulled from the oven, the spaghetti squash offers tender, slightly al dente strands that perfectly cradle the rich, creamy sauce. The earthiness of the mushrooms balances beautifully with the subtle bitterness of wilted spinach, while the Parmigiano-Reggiano adds a salty, nutty complexity. For an elegant presentation, serve in the roasted squash shells garnished with extra thyme sprigs and a drizzle of truffle oil.
Baked Salmon with Dijon and Garlic
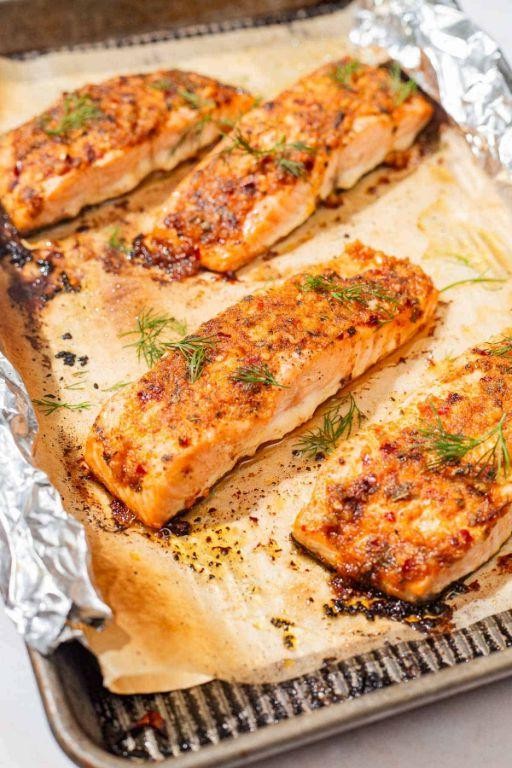
Mastering perfectly cooked salmon begins with this elegant yet approachable recipe that combines the rich umami of fresh fish with the bold flavors of Dijon and garlic. Many home cooks find fish intimidating, but this methodical approach ensures flaky, moist results every single time. Let’s walk through each step together to create a restaurant-quality dish in your own kitchen.
4
servings10
minutes15
minutesIngredients
– 1.5 pounds wild-caught salmon fillet, skin-on
– 3 tablespoons Dijon mustard
– 4 cloves garlic, finely minced
– 2 tablespoons extra virgin olive oil
– 1 tablespoon fresh lemon juice
– 1 teaspoon fresh thyme leaves
– ½ teaspoon kosher salt
– ¼ teaspoon freshly cracked black pepper
– Lemon wedges for serving
Instructions
1. Preheat your oven to 400°F and position the rack in the center of the oven.
2. Pat the salmon fillet completely dry using paper towels to ensure proper browning.
3. Place the salmon skin-side down on a parchment-lined baking sheet.
4. Whisk together Dijon mustard, minced garlic, olive oil, and lemon juice in a small bowl until emulsified.
5. Brush the mustard mixture evenly over the entire surface of the salmon fillet.
6. Sprinkle fresh thyme leaves, kosher salt, and cracked black pepper over the coated salmon.
7. Bake for 12-15 minutes until the internal temperature reaches 125°F for medium-rare or 135°F for medium.
8. Remove from oven and let rest for 5 minutes to allow juices to redistribute.
9. Transfer to a serving platter using a fish spatula to keep the fillet intact.
10. Serve immediately with fresh lemon wedges for squeezing over the top.
Creating this dish yields salmon with a beautifully caramelized crust that gives way to tender, flaky flesh beneath. The garlic-infused Dijon creates a tangy, aromatic coating that complements the fish’s natural richness without overpowering it. Consider serving over creamy polenta or alongside roasted asparagus for a complete meal that showcases the salmon as the star ingredient.
Butternut Squash Soup with Coconut Milk

Venturing into autumn cooking calls for comforting bowls of creamy butternut squash soup, and this version with coconut milk offers a dairy-free richness that’s both velvety and satisfying. Let’s build this soup methodically, focusing on developing deep, caramelized flavors while maintaining a smooth, luxurious texture.
4
servings20
minutes55
minutesIngredients
– 1 large butternut squash (about 3 pounds), peeled, seeded, and cubed
– 2 tablespoons extra-virgin olive oil
– 1 large yellow onion, finely diced
– 3 cloves garlic, minced
– 4 cups vegetable broth
– 1 (13.5-ounce) can full-fat coconut milk
– 1 teaspoon ground cumin
– ½ teaspoon smoked paprika
– ½ teaspoon fine sea salt
– ¼ teaspoon freshly ground black pepper
– 2 tablespoons fresh sage leaves, thinly sliced
Instructions
1. Preheat your oven to 400°F and line a baking sheet with parchment paper.
2. Toss the cubed butternut squash with 1 tablespoon of olive oil and spread it in a single layer on the prepared baking sheet.
3. Roast the squash for 30–35 minutes, or until the edges are caramelized and a knife pierces the cubes easily.
4. While the squash roasts, heat the remaining 1 tablespoon of olive oil in a large Dutch oven or heavy-bottomed pot over medium heat.
5. Add the diced onion and cook for 6–8 minutes, stirring occasionally, until translucent and lightly golden.
6. Stir in the minced garlic and cook for 1 minute, just until fragrant.
7. Add the roasted squash, vegetable broth, coconut milk, cumin, smoked paprika, salt, and pepper to the pot.
8. Bring the mixture to a gentle boil, then reduce the heat to low and simmer for 15 minutes to allow the flavors to meld.
9. Carefully transfer the soup in batches to a high-speed blender and blend until completely smooth, holding the lid firmly with a towel to prevent steam buildup.
10. Return the blended soup to the pot and stir in the fresh sage.
11. Warm the soup over low heat for 2–3 minutes, until the sage is just wilted and aromatic.
12. Ladle the soup into bowls and serve immediately. Garnishing with a drizzle of coconut cream or toasted pumpkin seeds adds both visual appeal and textural contrast. Glistening with a silky, velvety consistency, this soup balances the natural sweetness of roasted squash with the earthy warmth of cumin and sage. For a creative twist, try serving it in hollowed-out mini pumpkins or alongside crusty sourdough bread for dipping.
Veggie-Packed Quinoa Salad with Lemon Dressing
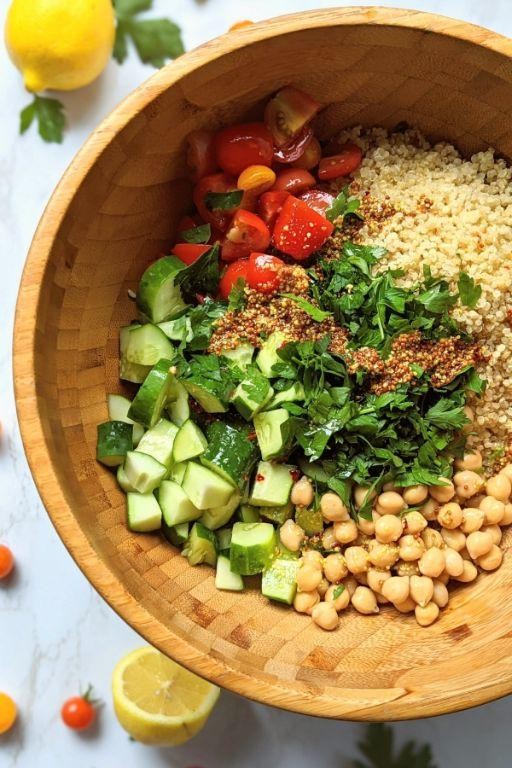
Just when you need a vibrant, nutrient-dense meal that comes together with ease, this veggie-packed quinoa salad delivers. Perfect for meal prep or a quick lunch, it combines wholesome grains with crisp vegetables and a zesty lemon dressing. Let’s walk through each step methodically to ensure your salad turns out perfectly every time.
2
servings25
minutes15
minutesIngredients
- 1 cup uncooked quinoa, rinsed thoroughly
- 2 cups filtered water
- 1 English cucumber, finely diced
- 1 cup cherry tomatoes, halved
- 1/2 cup finely chopped red onion
- 1/4 cup extra-virgin olive oil
- 3 tbsp freshly squeezed lemon juice
- 1 tsp Dijon mustard
- 1/2 tsp fine sea salt
- 1/4 tsp freshly cracked black pepper
- 1/4 cup chopped fresh parsley
- 2 tbsp chopped fresh mint
Instructions
- Combine rinsed quinoa and filtered water in a medium saucepan.
- Bring to a boil over high heat, then immediately reduce heat to low and cover.
- Simmer for 15 minutes until all liquid is absorbed and quinoa grains display little tails.
- Spread cooked quinoa in a thin layer on a baking sheet to cool completely to room temperature, about 20 minutes.
- While quinoa cools, whisk together extra-virgin olive oil, freshly squeezed lemon juice, and Dijon mustard in a small bowl until emulsified.
- Season the dressing with fine sea salt and freshly cracked black pepper, whisking to incorporate.
- Transfer cooled quinoa to a large mixing bowl.
- Add finely diced English cucumber, halved cherry tomatoes, and finely chopped red onion to the quinoa.
- Pour the prepared lemon dressing over the quinoa and vegetable mixture.
- Gently toss all ingredients until evenly coated with dressing.
- Fold in chopped fresh parsley and chopped fresh mint until distributed throughout.
- Chill the salad in the refrigerator for at least 30 minutes to allow flavors to meld.
Perfectly balanced between fluffy quinoa and crisp vegetables, this salad offers a delightful textural contrast with every bite. The bright lemon dressing cuts through the earthiness of the grains while the fresh herbs provide aromatic complexity. Serve it alongside grilled chicken or stuffed into pita pockets for a complete meal that stays refreshing for days.
Black Bean and Corn Stuffed Sweet Potatoes

Let’s create a satisfying vegetarian meal that transforms humble sweet potatoes into a vibrant, protein-packed main dish. Looking for a wholesome dinner that comes together with minimal effort? This recipe delivers both comfort and nutrition in every bite.
4
portions15
minutes60
minutesIngredients
- 4 medium sweet potatoes, scrubbed
- 2 tablespoons extra-virgin olive oil
- 1 medium yellow onion, finely diced
- 2 cloves garlic, minced
- 1 teaspoon ground cumin
- 1/2 teaspoon smoked paprika
- 1 (15-ounce) can black beans, rinsed and drained
- 1 cup frozen corn kernels
- 1/4 cup fresh cilantro, chopped
- 1 tablespoon fresh lime juice
- 1/2 teaspoon fine sea salt
- 1/4 teaspoon freshly ground black pepper
- 1/2 cup crumbled queso fresco
- 1/4 cup sour cream
Instructions
- Preheat your oven to 400°F and line a baking sheet with parchment paper.
- Pierce each sweet potato 6-8 times with a fork to allow steam to escape during baking.
- Place the sweet potatoes on the prepared baking sheet and bake for 45-55 minutes until they yield easily when squeezed with oven mitts.
- While the sweet potatoes bake, heat olive oil in a large skillet over medium heat until shimmering.
- Add the diced onion and cook for 5-7 minutes until translucent and lightly golden around the edges.
- Stir in the minced garlic and cook for 30 seconds until fragrant but not browned.
- Sprinkle in the ground cumin and smoked paprika, toasting the spices for 30 seconds to release their essential oils.
- Add the rinsed black beans and frozen corn to the skillet, cooking for 3-4 minutes until heated through.
- Remove the skillet from heat and stir in the chopped cilantro, fresh lime juice, sea salt, and black pepper.
- When the sweet potatoes are fully baked, carefully slice each one lengthwise down the center without cutting completely through the bottom skin.
- Gently press the ends of each sweet potato toward the center to create an opening for the filling.
- Spoon the black bean and corn mixture evenly into each sweet potato cavity.
- Top each stuffed sweet potato with crumbled queso fresco and a dollop of sour cream.
Vibrant and satisfying, these stuffed sweet potatoes offer a delightful contrast between the creamy interior flesh and the toothsome bean-corn filling. The smoky cumin and bright lime create layers of flavor that make this dish feel both comforting and exciting. For a beautiful presentation, garnish with additional cilantro sprigs and serve alongside a crisp green salad dressed with lime vinaigrette.
Oven-Baked Eggplant Parmesan with Marinara Sauce

You’ve probably stared at that beautiful purple eggplant in the produce aisle, wondering how to transform it into something truly spectacular. Today, we’ll methodically build layers of flavor and texture to create a comforting, restaurant-quality Oven-Baked Eggplant Parmesan that will become your new go-to meatless masterpiece.
6
portions45
minutes60
minutesIngredients
– 2 large globe eggplants, sliced into ½-inch rounds
– 1 cup all-purpose flour
– 3 pasture-raised eggs, lightly beaten
– 2 cups panko breadcrumbs
– 1 cup freshly grated Parmigiano-Reggiano
– 2 cups high-quality marinara sauce
– 8 ounces fresh mozzarella, thinly sliced
– ¼ cup extra virgin olive oil
– 1 teaspoon fine sea salt
– ½ teaspoon freshly cracked black pepper
Instructions
1. Arrange eggplant slices in a single layer on a wire rack set over a baking sheet and sprinkle both sides with fine sea salt.
2. Let the eggplant rest for 30 minutes to draw out excess moisture, then pat each slice completely dry with paper towels.
3. Preheat your oven to 400°F and line two baking sheets with parchment paper.
4. Place all-purpose flour in a shallow dish and season with freshly cracked black pepper.
5. Pour lightly beaten pasture-raised eggs into a second shallow dish.
6. Combine panko breadcrumbs with freshly grated Parmigiano-Reggiano in a third shallow dish.
7. Dredge each eggplant slice first in the seasoned flour, shaking off any excess.
8. Dip the floured eggplant into the beaten eggs, allowing excess to drip back into the dish.
9. Press the eggplant firmly into the panko-Parmigiano mixture, ensuring complete coverage on both sides.
10. Arrange breaded eggplant in a single layer on prepared baking sheets and drizzle with extra virgin olive oil.
11. Bake for 20 minutes at 400°F until the coating is golden brown and crisp.
12. Flip each eggplant slice using tongs and bake for an additional 15 minutes.
13. Spread ½ cup of high-quality marinara sauce in the bottom of a 9×13-inch baking dish.
14. Arrange half of the baked eggplant slices in a single layer over the sauce.
15. Top with ¾ cup marinara sauce and half of the thinly sliced fresh mozzarella.
16. Repeat layers with remaining eggplant, sauce, and mozzarella.
17. Bake uncovered at 375°F for 25 minutes until the cheese is bubbly and slightly browned.
18. Let the dish rest for 10 minutes before serving to allow the layers to set.
Here’s what makes this version exceptional: the eggplant maintains a firm, meaty texture while the panko creates an audible crunch that contrasts beautifully with the molten cheese. Consider serving individual portions over creamy polenta or alongside a bitter greens salad to cut through the richness—the interplay of textures and temperatures elevates this classic to new heights.
Hearty Mushroom and Barley Risotto
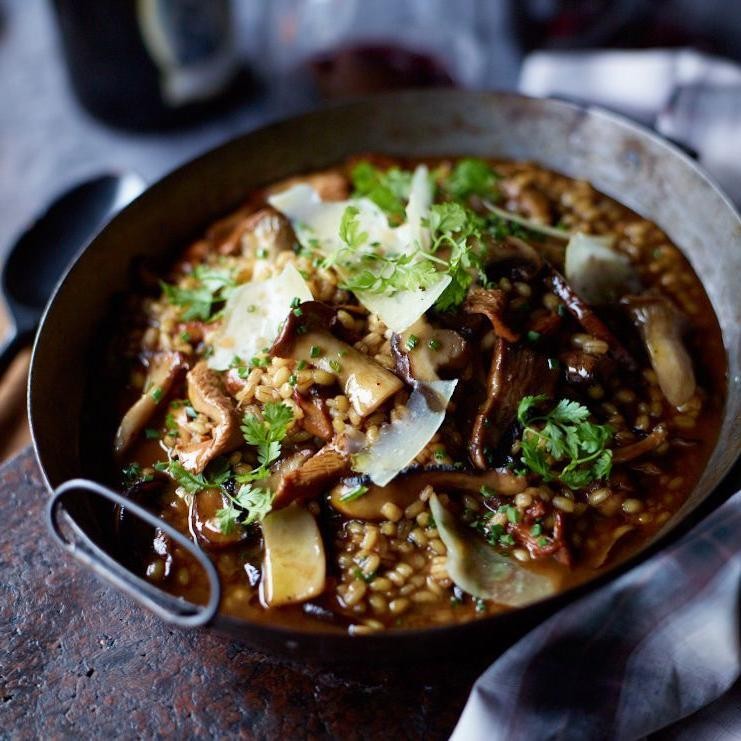
Hearty mushroom and barley risotto offers a satisfying twist on the classic Italian dish, using nutty pearl barley instead of traditional Arborio rice for extra texture and nutritional benefits. Here’s how to create this comforting vegetarian main that’s perfect for autumn evenings when you want something substantial yet wholesome.
3
servings20
minutes60
minutesIngredients
– 1 cup pearl barley, rinsed
– 8 ounces mixed wild mushrooms (cremini, shiitake, and oyster), thinly sliced
– 1 medium yellow onion, finely diced
– 3 cloves garlic, minced
– 4 cups vegetable stock, kept at a gentle simmer
– ½ cup dry white wine
– 2 tablespoons unsalted butter
– 2 tablespoons extra-virgin olive oil
– ½ cup freshly grated Parmigiano-Reggiano cheese
– 2 tablespoons fresh thyme leaves
– Kosher salt to season
– Freshly cracked black pepper to season
Instructions
1. Heat the olive oil in a heavy-bottomed Dutch oven over medium heat until shimmering.
2. Add the diced onion and cook for 5-7 minutes, stirring occasionally, until translucent and fragrant.
3. Stir in the minced garlic and cook for 1 minute until aromatic but not browned.
4. Add the sliced mushrooms and cook for 8-10 minutes, stirring frequently, until they release their liquid and develop golden-brown edges.
5. Incorporate the rinsed pearl barley and toast for 2 minutes, stirring constantly to coat each grain with oil.
6. Pour in the white wine and cook for 2-3 minutes, scraping the bottom of the pot until the liquid is nearly evaporated.
7. Add 1 cup of simmering vegetable stock and cook, stirring occasionally, until most liquid is absorbed (approximately 8-10 minutes).
8. Continue adding stock in ½-cup increments, stirring frequently and waiting until each addition is nearly absorbed before adding the next.
9. After 35-40 minutes, test the barley for doneness—it should be tender but still slightly chewy with a creamy sauce surrounding the grains.
10. Remove from heat and stir in the butter, grated Parmigiano-Reggiano, and fresh thyme leaves until fully incorporated.
11. Season with kosher salt and freshly cracked black pepper to taste.
Luxuriously creamy with a satisfying chew from the barley, this risotto delivers earthy mushroom flavors enhanced by the sharpness of Parmigiano-Reggiano. For an elegant presentation, garnish with additional thyme sprigs and shaved Parmesan, or top with a poached pasture-raised egg for extra richness. The dish holds its texture well, making it excellent for next-day lunches when the flavors have further melded.
Grilled Portobello Mushroom Burgers with Avocado
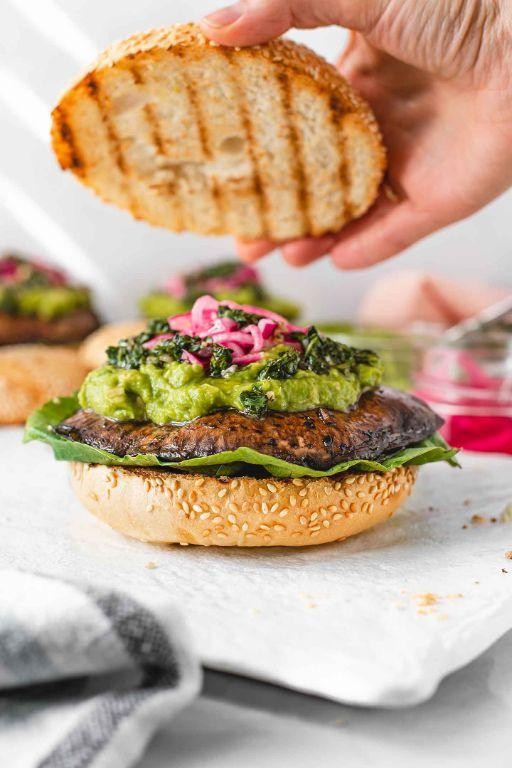
Now, let’s master the art of creating perfectly grilled portobello mushroom burgers with creamy avocado—a vegetarian delight that satisfies even the most devoted meat lovers. This recipe guides you through each precise step to achieve a juicy, smoky mushroom cap and harmonious toppings. Follow these instructions carefully for a restaurant-quality burger at home.
3
sandwiches15
minutes11
minutesIngredients
- 4 large portobello mushroom caps, stems and gills removed
- 2 tablespoons extra-virgin olive oil
- 1 tablespoon balsamic vinegar
- 1 teaspoon smoked paprika
- ½ teaspoon garlic powder
- ¼ teaspoon fine sea salt
- 4 brioche burger buns, split
- 1 ripe Hass avocado, halved and pitted
- 4 slices aged provolone cheese
- ¼ cup mayonnaise
- 1 cup baby arugula
- 4 slices heirloom tomato, ¼-inch thick
Instructions
- Preheat your grill to medium-high heat, maintaining a consistent 400°F temperature.
- Whisk together the extra-virgin olive oil, balsamic vinegar, smoked paprika, garlic powder, and fine sea salt in a small bowl until fully emulsified.
- Brush both sides of each portobello mushroom cap generously with the marinade mixture.
- Place the mushroom caps gill-side down on the preheated grill grates.
- Grill for 5 minutes until distinct grill marks appear and the edges begin to soften.
- Flip the mushrooms using grill tongs and continue grilling for another 4 minutes.
- Place one slice of aged provolone cheese on each mushroom cap during the final 2 minutes of grilling to melt evenly.
- Toast the split brioche buns on the upper grill rack for 1-2 minutes until golden brown.
- Spread 1 tablespoon of mayonnaise evenly on the bottom half of each toasted bun.
- Arrange ¼ cup of baby arugula over the mayonnaise on each bun.
- Place one grilled portobello mushroom cap with melted cheese atop the arugula.
- Add one slice of heirloom tomato directly over each mushroom cap.
- Scoop the flesh from the Hass avocado and slice it into ¼-inch thick pieces.
- Layer the avocado slices evenly over the tomato on each burger.
- Cap each burger with the top half of the toasted brioche bun.
Yield a burger with remarkable textural contrast—the meaty, umami-rich mushroom pairs beautifully with the creamy avocado and sharp provolone. For an elevated presentation, serve these burgers open-faced with a drizzle of truffle oil or alongside sweet potato fries dusted with smoked sea salt. The smoky grill marks and layered flavors create a sophisticated vegetarian option that stands up to any traditional beef burger.
Conclusion
Comforting, nourishing meals await in this collection of 24 healthy comfort food recipes. We hope these dishes bring warmth and satisfaction to your table. Try them out, leave a comment sharing your favorites, and don’t forget to pin this article on Pinterest to save these delicious recipes for later!


