Unleash your inner kitchen witch this Halloween with rice krispie treats that are so delightfully spooky, they might just come to life and start telling ghost stories. Usually relegated to the realm of basic bake sales, these marshmallow marvels are about to get a major Halloween makeover that will have both kids and adults screaming for seconds. Forget boring squares—we’re crafting edible monsters that are almost too cute to eat (almost being the operative word here).
Why This Recipe Works
- Marshmallow magic meets Halloween madness: The perfect ratio of melted marshmallows to crispy rice cereal creates that iconic chewy-yet-crunchy texture that serves as the ideal canvas for your spooky creations, holding shapes better than your average ghost story holds water.
- Color coordination that would make a witch jealous: Using gel food coloring instead of liquid prevents that dreaded soggy cereal situation while delivering vibrant hues that pop brighter than a jack-o’-lantern on a moonless night.
- Structural integrity worthy of Frankenstein’s monster: The addition of extra marshmallows and careful temperature control ensures your creepy creations maintain their shape better than a vampire maintains his complexion—no melting into sad puddles here.
- Customization station central: This recipe serves as the ultimate foundation for your Halloween imagination, allowing you to morph simple squares into everything from ghostly apparitions to pumpkin patches with minimal effort and maximum spook factor.
- Kid-friendly fright fest: With no baking required and minimal supervision needed for the decorating phase, even the littlest goblins can join the fun without turning your kitchen into a scene from a horror movie.
Ingredients
- 6 cups crispy rice cereal
- 10 ounces mini marshmallows
- 3 tablespoons unsalted butter
- 1 teaspoon vanilla extract
- 1/4 teaspoon salt
- Orange gel food coloring
- Black gel food coloring
- Green gel food coloring
- White candy melts
- Black decorating icing
- Candy eyes (assorted sizes)
- Green fruit leather
- Orange sprinkles
Equipment Needed
- Large microwave-safe bowl
- 9×13 inch baking pan
- Parchment paper
- Rubber spatula
- Measuring cups and spoons
- Small microwave-safe bowls
- Cookie cutters (ghost, pumpkin, bat shapes)
- Offset spatula
- Kitchen scissors
- Pastry bags or zip-top bags
Instructions
Prepare Your Cauldron and Concoct the Base Mixture
First, line your 9×13 inch baking pan with parchment paper, making sure there’s enough overhang on two opposite sides to create handy little handles for later removal—think of it as building escape routes for your future edible monsters. In your large microwave-safe bowl, combine those 3 tablespoons of unsalted butter with 8 ounces of the mini marshmallows. Microwave this dynamic duo on high power for 1 minute, then pause to stir with your rubber spatula. If the marshmallows haven’t completely melted into a smooth, buttery pool of deliciousness, continue microwaving in 15-second intervals, stirring after each burst until you achieve a consistency smoother than a vampire’s pick-up line. Now stir in that 1 teaspoon of vanilla extract and 1/4 teaspoon of salt—this tiny amount of salt works like magic to balance the sweetness, making your treats more addictive than a zombie’s craving for brains. Tip: Resist the urge to microwave for longer intervals, as marshmallows can go from perfectly melted to rubbery disaster faster than you can say “Boo!”
Incorporate Cereal and Create Your Colorful Canvas
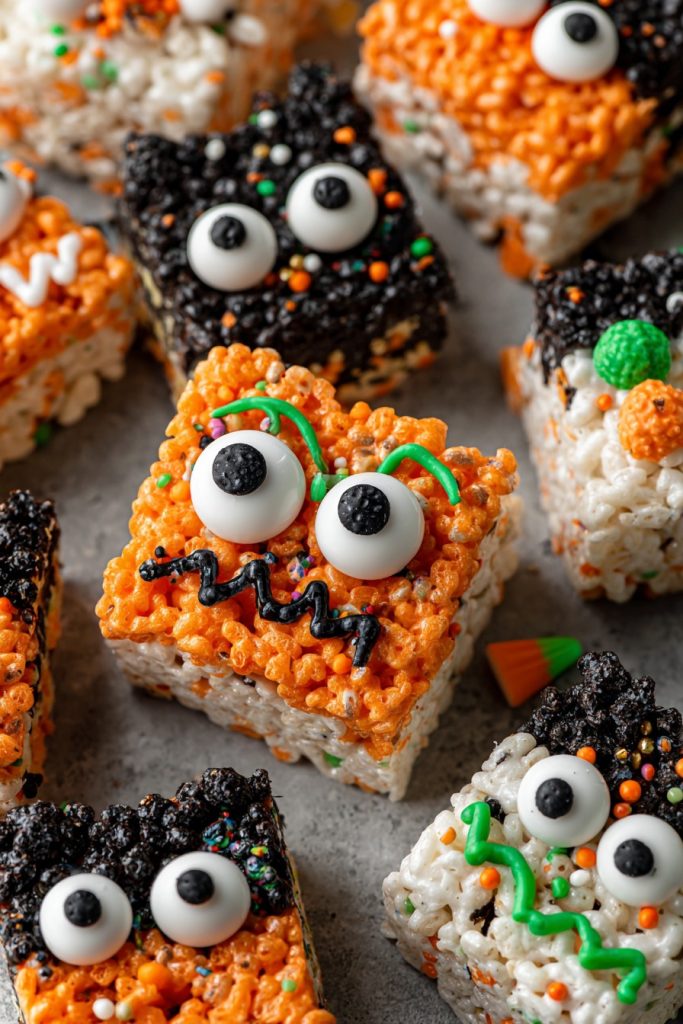
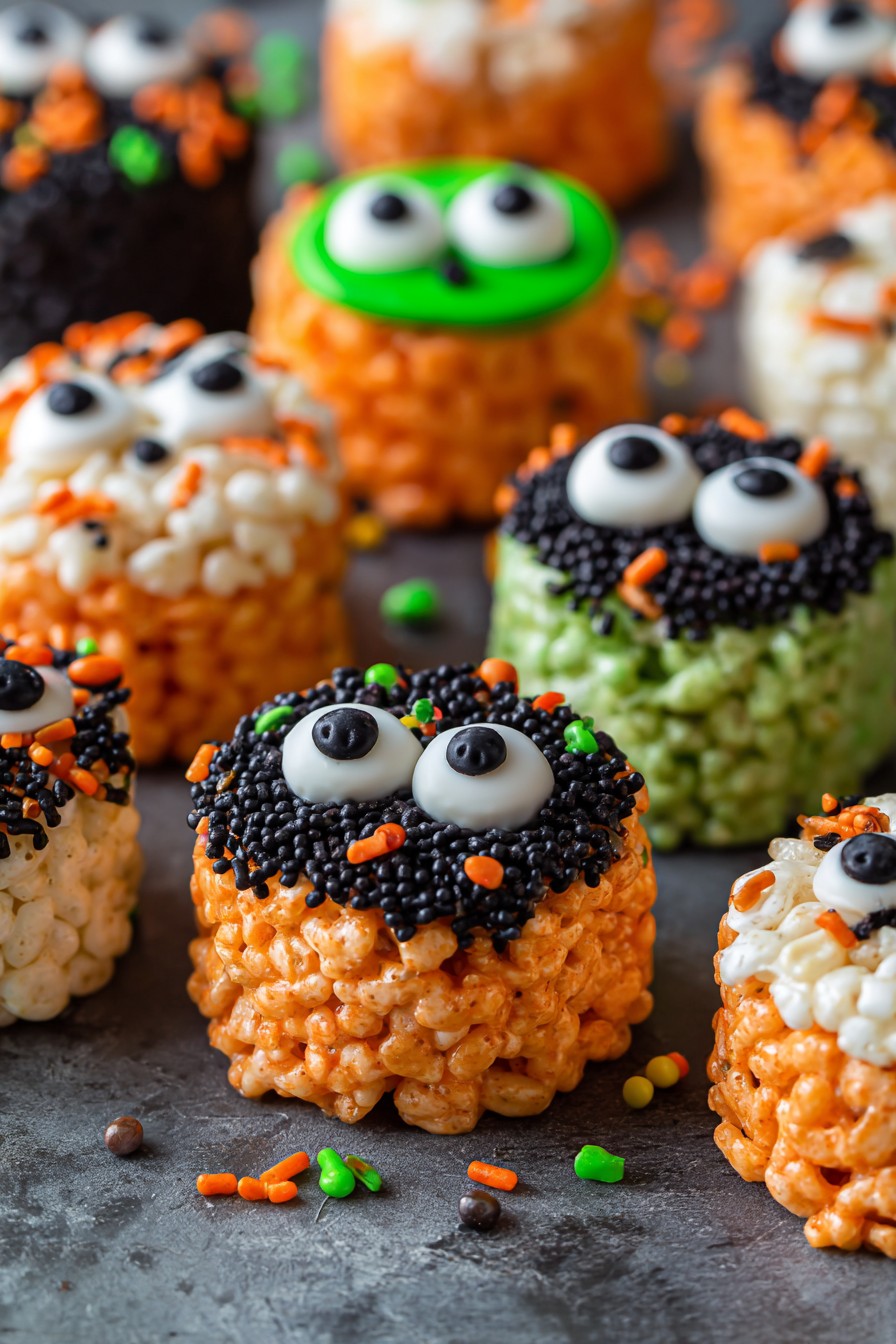
Slowly pour your 6 cups of crispy rice cereal into the marshmallow mixture, folding gently with your rubber spatula as if you’re tucking little cereal ghosts into their marshmallow beds. Work quickly but carefully to ensure every single cereal piece gets coated in that sticky-sweet marshmallow blanket—no naked cereal allowed in this haunted house! Once combined, divide your mixture into three equal portions. Now for the fun part: add orange gel food coloring to one portion, black to another, and leave the third portion its natural ghostly white. Use gloves if you’re fancy, or just embrace the temporary Halloween-themed hands—either way, knead the color in until distributed more evenly than candy distribution on Halloween night. Tip: Gel food coloring works better than liquid because it won’t make your cereal soggy, maintaining that perfect crispy texture that makes these treats worth their weight in gold (or candy corn).
Shape Your Spooky Creatures with Precision and Panache
Take your orange-colored mixture and press it into the prepared pan using your hands or an offset spatula, creating an even layer about 1-inch thick—this will become your pumpkin patch foundation. For the white mixture, roll portions between your palms to create ghost shapes, making some tall and slender like they’re floating through walls, others round and plump like they’ve been enjoying too many treats themselves. The black mixture can be pressed into bat shapes using cookie cutters or free-formed into creepy spiders. Work relatively quickly as the mixture will begin to set, but if it becomes too stiff, microwave the portion for 5-10 seconds to restore pliability. The key is creating distinct shapes that maintain their structural integrity better than a haunted mansion’s reputation.
Add Decorative Details That Scream Halloween
Melt your white candy melts according to package directions, then transfer to a pastry bag or zip-top bag with a small corner snipped off. Pipe ghostly faces onto your white ghost shapes—classic O-shaped mouths for surprised specters or wavy lines for singing spirits. For your orange pumpkin shapes, use black decorating icing to create jack-o’-lantern faces ranging from friendly to frightening. Press candy eyes onto bat shapes and use kitchen scissors to cut green fruit leather into stem shapes for your pumpkins. Don’t be afraid to get creative here—some ghosts might want eyelashes, some bats might need fangs, and some pumpkins might sport mischievous grins that suggest they know where all the good candy is hidden.
Final Assembly and Setting for Maximum Spookiness
Arrange your completed creatures on a serving platter or baking sheet lined with parchment paper. If you’re creating a scene, position your ghosts hovering above your pumpkins and bats flying between them. Sprinkle orange sprinkles around your pumpkin patch for added texture and visual appeal. Now comes the hardest part: waiting. Allow your creations to set at room temperature for at least 1 hour, or until firm to the touch. The setting time is crucial—if you try to move them too soon, you’ll have deformed ghosts and lopsided pumpkins that look like they’ve seen better centuries. Once set, these treats can be stored in an airtight container at room temperature for up to 3 days, though they rarely last that long before being devoured by hungry little monsters.
Tips and Tricks
If your marshmallow mixture starts setting up too quickly while you’re working with it, don’t panic—this isn’t a horror movie where everything goes wrong simultaneously. Simply place the portion you’re working with back in the microwave for 5-10 second bursts until it becomes pliable again. The key is working in smaller batches rather than trying to color and shape the entire mixture at once. Think of yourself as a mad scientist creating multiple monsters rather than assembling an army in one fell swoop. When using gel food coloring, start with a small amount and add more as needed—these colors are more potent than a witch’s strongest potion, and you can always add more but you can’t take it away once incorporated. If you find the mixture sticking to your hands while shaping, lightly coat your palms with cooking spray or butter—this creates a non-stick barrier that would make even the slipperiest ghost jealous. For perfectly clean cuts if you’re making squares instead of shapes, use a knife sprayed with cooking spray and wipe it clean between cuts. When storing your finished treats, place parchment paper between layers to prevent them from sticking together—nobody wants ghost faces melted onto pumpkin backsides. If you’re making these ahead of time for a party, you can prepare the undecorated shapes up to 2 days in advance and add the decorative elements the day of serving to keep everything looking fresh and vibrant. For extra flavor dimensions, consider adding 1/2 teaspoon of cinnamon to the orange mixture for pumpkin spice vibes, or a pinch of cayenne to the black mixture for a devilishly subtle heat. If you’re working with younger children, pre-shape the main forms yourself and let them handle the decorating—this prevents frustration and keeps the experience more fun than frightening.
Recipe Variations
- Chocolate haunted house: Replace 2 cups of crispy rice cereal with cocoa rice cereal and add 1/2 cup of chocolate chips to the marshmallow mixture for a richer, darker base perfect for creating haunted houses, tombstones, or witch’s hats that taste as good as they look.
- Monster mash-up: Create a marbled effect by gently combining small amounts of differently colored mixtures before shaping into monster blobs. Add various sizes of candy eyes and use licorice strings for crazy hair—each monster will have its own unique personality, much like the creatures under your bed.
- Spider web sensation: Press the white mixture into a round cake pan to create a full moon base, then use black decorating icing to pipe concentric circles and drag a toothpick from center to edge to create web patterns. Place black spider shapes around the edges for a dramatic centerpiece.
- Candy corn conversion: Layer yellow, orange, and white mixtures in a pan to recreate the classic candy corn look, then cut into triangles. The traditional hat-shaped treat gets a rice krispie makeover that might just convert candy corn skeptics into believers.
- Mummy madness: Shape the white mixture into rectangular logs, then use thin strips of fruit leather or white decorating icing to create wrapped mummy effects. Add two candy eyes peeking through the wrappings for an adorable undead treat that’s wrapped up delicious.
Frequently Asked Questions
Can I make these rice krispie treats ahead of time for my Halloween party?
Absolutely! These spooky treats are actually better when made a day in advance because it gives them time to fully set and develop their signature texture. Prepare them completely, including decorations, then store in an airtight container at room temperature with parchment paper between layers to prevent any spooky smudging. They’ll maintain their perfect haunting quality for up to 3 days, though I’ve never known them to last that long when there are hungry trick-or-treaters around. The key is keeping them away from heat and humidity, which can turn your perfectly formed ghosts into sad, melty puddles faster than you can say “double, double, toil and trouble.”
What can I use if I don’t have gel food coloring?
How can I make these treats less messy for young children to decorate?
For little hands that tend to create more mess than masterpiece, try pre-portioning the decorating elements into small cups or muffin tins. Use thicker decorating icings rather than runny ones, and consider having them apply elements like candy eyes and sprinkles rather than handling piping bags. You can also shape the main treats yourself and let the kids stick on pre-cut elements—think of yourself as the head monster maker and them as the creative directors. Setting up a dedicated decorating station with plenty of paper towels and maybe even some disposable gloves can turn potential chaos into organized fun.
Can I make these rice krispie treats gluten-free or with dietary restrictions?
Most crispy rice cereals are naturally gluten-free, but always check the specific brand to be certain. For vegan variations, use vegan marshmallows (now widely available) and plant-based butter. The decorations can be trickier—many candy melts contain dairy, but there are vegan chocolate coating options available. Candy eyes often contain gelatin, but you can create eyes using white chocolate and dark chocolate chips for a completely plant-based spooky treat. The basic recipe is surprisingly adaptable to various dietary needs with just a few thoughtful substitutions.
Summary
Transform ordinary rice krispie treats into extraordinary Halloween creations with colorful mixtures shaped into ghosts, pumpkins, and bats. These no-bake delights combine easy preparation with endless creative possibilities for spooky seasonal fun that both kids and adults will devour with ghoulish glee.
Halloween Rice Krispie Treats
4
servings30
minutes5
minutesIngredients
Instructions
- 1 Line 9x13 inch pan with parchment paper with overhang on two sides
- 2 Microwave butter and 8 ounces marshmallows in large bowl for 1 minute, stir, then continue in 15-second intervals until smooth
- 3 Stir in vanilla and salt, then gradually fold in cereal until evenly coated
- 4 Divide mixture into three portions, color one orange, one black, leave one white
- 5 Shape mixtures into Halloween shapes, decorate with melted candy, icing, and candy elements
- 6 Allow to set at room temperature for 1 hour before serving


