Every October, there’s a magical moment when your kitchen transforms into a spooky bakery—and what better way to celebrate than with decadent, fudgy brownies? From ghostly swirls to spiderweb designs, these 32 Halloween-inspired treats are perfect for parties, trick-or-treaters, or just indulging your sweet tooth. Get ready to bake up some frightfully delicious fun—your next favorite recipe is waiting!
Witch’s Cauldron Black Cocoa Brownies
Kicking off spooky season right calls for something dark, decadent, and downright magical. You’re going to love these Witch’s Cauldron Black Cocoa Brownies—they’re fudgy, intensely chocolatey, and perfect for sharing (or not!). Let’s get brewing.
16
servings15
minutes30
minutesIngredients
– 1 cup (2 sticks) unsalted butter, melted (I like to brown it slightly for a nutty depth)
– 2 cups granulated sugar
– 4 large eggs, at room temperature for easier mixing
– 1 tsp vanilla extract
– ¾ cup black cocoa powder (this gives that deep, almost-black color)
– 1 cup all-purpose flour
– ½ tsp salt
– ½ cup dark chocolate chips, because extra chocolate is never a bad idea
Instructions
1. Preheat your oven to 350°F and line an 8×8-inch baking pan with parchment paper, leaving some overhang for easy removal.
2. In a large bowl, whisk together the melted butter and granulated sugar until fully combined and smooth.
3. Add the room temperature eggs one at a time, whisking well after each addition until the mixture is glossy.
4. Stir in the vanilla extract.
5. Sift the black cocoa powder, all-purpose flour, and salt directly into the wet ingredients to avoid lumps.
6. Use a spatula to fold the dry ingredients into the wet until just combined—don’t overmix!
7. Gently fold in the dark chocolate chips.
8. Pour the batter into the prepared pan and spread it evenly into the corners.
9. Bake for 25–30 minutes, until the top is set and a toothpick inserted into the center comes out with a few moist crumbs (not wet batter).
10. Let the brownies cool completely in the pan on a wire rack before slicing.
Craving that perfect crackly top and fudgy center? These brownies deliver with an intense chocolate flavor that’s not too sweet. Serve them warm with a scoop of vanilla ice cream for a magical contrast, or crumble them over yogurt for a spooky breakfast treat.
Jack-o’-Lantern Pumpkin Swirl Brownies
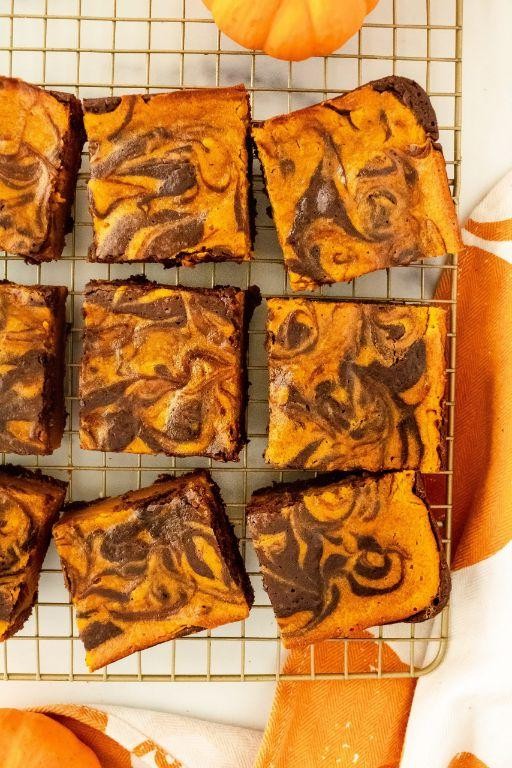
Now that fall is in full swing, you’re probably craving something cozy and festive. These Jack-o’-Lantern Pumpkin Swirl Brownies combine rich chocolate with spiced pumpkin for the ultimate seasonal treat. They’re surprisingly easy to make and perfect for Halloween parties or just enjoying with a cup of coffee.
24
brownies20
minutes35
minutesIngredients
– 1 cup all-purpose flour (I like to spoon and level it for accuracy)
– 3/4 cup unsweetened cocoa powder (Dutch process gives the best rich flavor)
– 1/2 teaspoon salt
– 1 cup unsalted butter, melted (I find melted works better than softened here)
– 2 cups granulated sugar
– 4 large eggs (room temperature helps them incorporate smoothly)
– 2 teaspoons vanilla extract
– 1 cup canned pumpkin puree (not pumpkin pie filling)
– 1 teaspoon pumpkin pie spice
– 1/2 cup semi-sweet chocolate chips (I prefer these over milk chocolate for balance)
Instructions
1. Preheat your oven to 350°F and line a 9×13 inch baking pan with parchment paper, leaving some overhang for easy removal.
2. Whisk together the flour, cocoa powder, and salt in a medium bowl until well combined and no lumps remain.
3. In a large bowl, combine the melted butter and sugar, stirring for about 1 minute until fully incorporated.
4. Add the eggs one at a time to the butter mixture, mixing well after each addition until the batter looks smooth.
5. Stir in the vanilla extract until evenly distributed throughout the batter.
6. Gradually add the dry ingredients to the wet ingredients, folding gently until just combined—be careful not to overmix.
7. Remove 1 cup of the brownie batter and set it aside in a small bowl.
8. To the remaining brownie batter, fold in the pumpkin puree and pumpkin pie spice until you have a uniform orange batter.
9. Pour the pumpkin brownie batter into your prepared pan, spreading it evenly to all corners.
10. Drop spoonfuls of the reserved plain brownie batter randomly over the pumpkin layer.
11. Use a knife or skewer to swirl the two batters together, creating a marbled pattern—make about 8-10 passes through the batter.
12. Sprinkle the chocolate chips evenly over the top of the swirled batter.
13. Bake for 30-35 minutes, until the edges are set and a toothpick inserted in the center comes out with moist crumbs (not wet batter).
14. Cool completely in the pan on a wire rack for at least 2 hours before cutting.
What you get is the perfect marriage of fudgy chocolate and spiced pumpkin in every bite. The swirl pattern makes each piece look like a mini work of art, and the chocolate chips add little pockets of melty goodness. Try serving them slightly warm with a scoop of vanilla ice cream for the ultimate fall dessert experience.
Zombie Graveyard Dirt Brownies
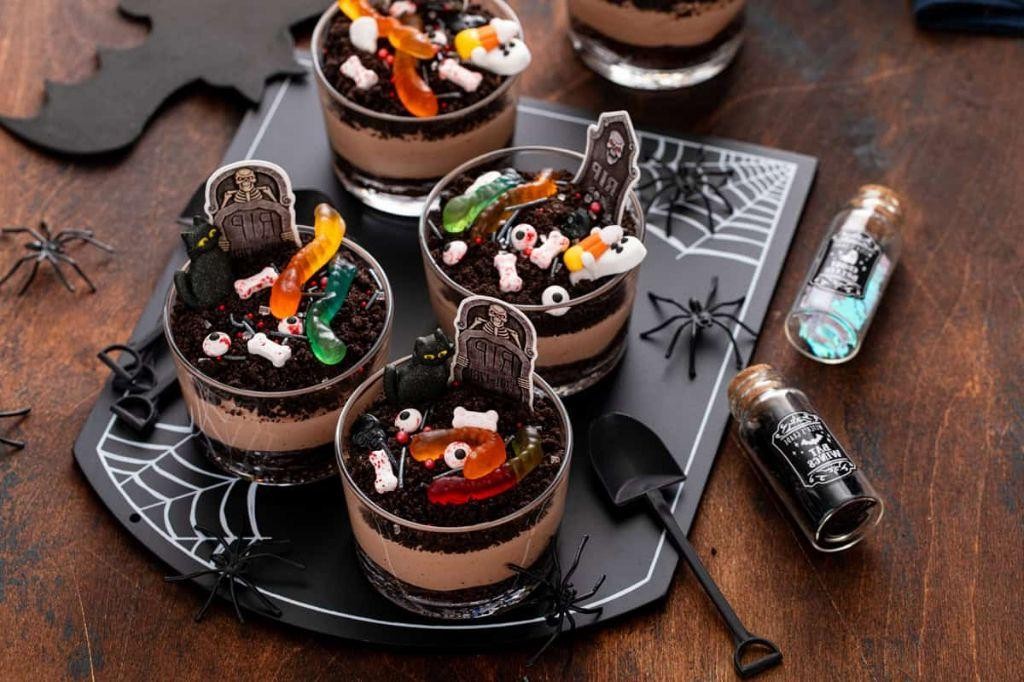
Wondering what to make for Halloween that’s both spooky and delicious? These zombie graveyard dirt brownies are the perfect creepy treat that’ll have everyone digging in. They combine fudgy brownies with a graveyard theme that’s surprisingly easy to pull off.
16
squares20
minutes30
minutesIngredients
– 1 cup all-purpose flour (I like to sift mine first for extra fluffiness)
– 1 cup granulated sugar (regular white sugar works perfectly here)
– 1/2 cup unsalted butter, melted (I prefer unsalted to control the saltiness)
– 2 large eggs at room temperature (they incorporate better when not cold)
– 1/2 cup cocoa powder (the darker, the spookier looking!)
– 1 tsp vanilla extract (pure vanilla makes all the difference)
– 1/2 tsp baking powder
– 1/4 tsp salt
– 1 cup chocolate frosting (store-bought works great for convenience)
– 1 cup crushed chocolate cookies (Oreos with cream removed are perfect)
– 6-8 Milano cookies for tombstones
– Black decorating gel for writing RIP
Instructions
1. Preheat your oven to 350°F and grease an 8×8 inch baking pan.
2. Whisk together the melted butter and sugar in a large bowl until well combined.
3. Add the room temperature eggs one at a time, mixing thoroughly after each addition.
4. Stir in the vanilla extract until fully incorporated.
5. In a separate bowl, sift together the flour, cocoa powder, baking powder, and salt.
6. Gradually add the dry ingredients to the wet ingredients, mixing just until combined—don’t overmix!
7. Pour the brownie batter into your prepared pan and spread it evenly.
8. Bake at 350°F for 25-30 minutes, until a toothpick inserted comes out with moist crumbs.
9. Let the brownies cool completely in the pan on a wire rack, about 1 hour.
10. Spread the chocolate frosting evenly over the cooled brownies.
11. Sprinkle the crushed chocolate cookies over the frosting to create “dirt.”
12. Stand the Milano cookies upright in the dirt to make tombstones.
13. Use black decorating gel to write “RIP” on each tombstone.
14. Cut into squares and serve immediately, or refrigerate until ready to serve.
Zombie-approved and kid-friendly, these brownies deliver that perfect fudgy texture with a crunchy cookie dirt topping. The contrast between the rich chocolate base and the sweet frosting makes each bite irresistible. Try serving them at your Halloween party with gummy worms crawling out of the dirt for an extra creepy touch!
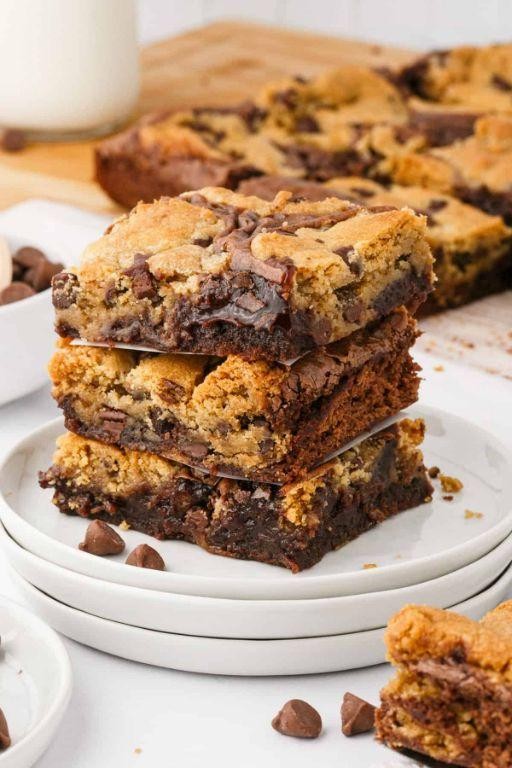
Ghostly White Chocolate Peanut Butter Brownies
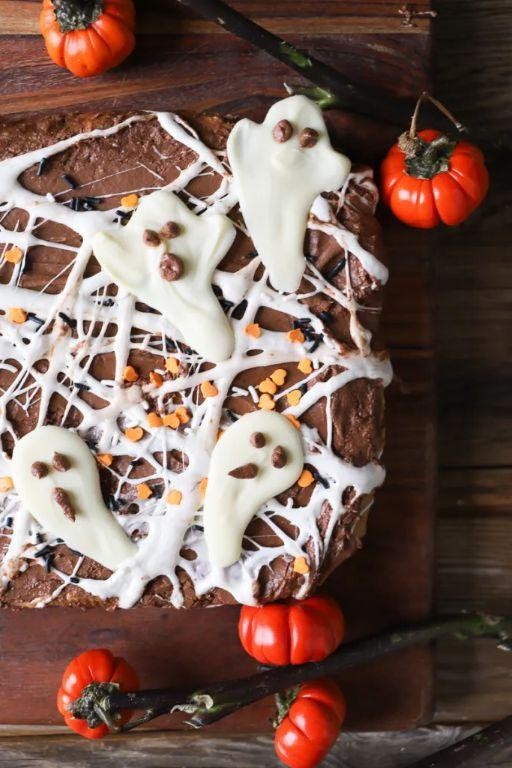
Haven’t you been craving something that’s both spooky and spectacular for Halloween? These ghostly white chocolate peanut butter brownies are the perfect treat to satisfy your sweet tooth while getting into the festive spirit. They’re fudgy, decadent, and surprisingly easy to whip up for any Halloween gathering.
16
brownies15
minutes30
minutesIngredients
– 1 cup all-purpose flour (I always spoon and level mine to avoid dense brownies)
– ½ cup unsweetened cocoa powder (Dutch-processed gives the richest color)
– ½ tsp baking powder
– ¼ tsp salt
– ¾ cup unsalted butter, melted (I prefer using melted butter for that chewy texture)
– 1 cup granulated sugar
– 2 large eggs, at room temperature (they incorporate much better when not cold)
– 1 tsp vanilla extract
– ½ cup creamy peanut butter (the kind without added sugar works best here)
– 1 cup white chocolate chips (I like the extra melty ones for maximum ghostly effect)
Instructions
1. Preheat your oven to 350°F and line an 8×8 inch baking pan with parchment paper, leaving some overhang for easy removal.
2. Whisk together the flour, cocoa powder, baking powder, and salt in a medium bowl until no lumps remain.
3. In a separate large bowl, combine the melted butter and sugar, stirring vigorously for about 1 minute until fully incorporated.
4. Add the room temperature eggs one at a time to the butter mixture, beating well after each addition until the mixture becomes pale and slightly thickened.
5. Stir in the vanilla extract until just combined.
6. Gradually fold the dry ingredients into the wet ingredients using a spatula, mixing just until no flour streaks remain—be careful not to overmix.
7. Dollop the peanut butter over the brownie batter in several spots, then use a knife to swirl it through the batter in a figure-eight pattern for that marbled effect.
8. Sprinkle the white chocolate chips evenly over the top, gently pressing them into the batter so they don’t all sink to the bottom.
9. Bake for 25-30 minutes, until the edges are set but the center still appears slightly underdone—a toothpick inserted should come out with a few moist crumbs attached.
10. Let the brownies cool completely in the pan on a wire rack for at least 2 hours before slicing.
Perfectly fudgy with pockets of melted white chocolate that create ghostly white swirls when you break them apart. The peanut butter adds a salty contrast that cuts through the sweetness beautifully. Try serving them slightly warmed with a scoop of vanilla ice cream for the ultimate Halloween dessert experience.
Candy Corn Layered Brownies
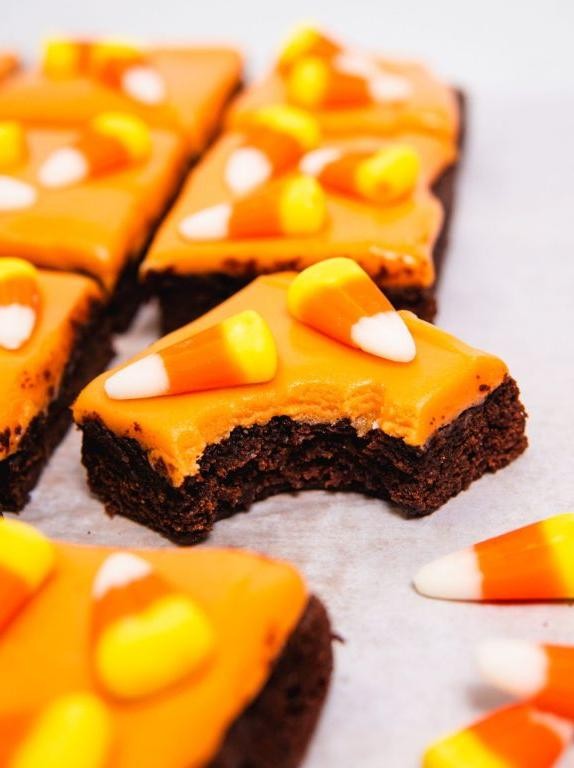
Ever find yourself staring at that leftover Halloween candy corn, wondering what magical creation you could whip up? These candy corn layered brownies are your answer—they’re festive, fudgy, and so easy to make. You’ll love how the sweet candy corn melts right into that rich chocolate base.
16
portions15
minutes30
minutesIngredients
– 1 cup all-purpose flour (I always spoon and level mine for accuracy)
– 1 cup granulated sugar
– 1/2 cup unsalted butter, melted (I use salted if that’s all I have—still works great)
– 2 large eggs, at room temperature for easier mixing
– 1/3 cup cocoa powder
– 1/2 tsp baking powder
– 1/4 tsp salt
– 1 tsp vanilla extract
– 1 cup candy corn
Instructions
1. Preheat your oven to 350°F and grease an 8×8-inch baking pan.
2. In a medium bowl, whisk together the melted butter and granulated sugar until smooth.
3. Add the room temperature eggs one at a time, mixing well after each addition.
4. Stir in the vanilla extract until fully incorporated.
5. Sift in the all-purpose flour, cocoa powder, baking powder, and salt. Tip: Sifting prevents lumps and gives you a smoother batter.
6. Gently fold the dry ingredients into the wet mixture until just combined—don’t overmix.
7. Pour half of the brownie batter into your prepared pan and spread it evenly.
8. Sprinkle 1/2 cup of candy corn in a single layer over the batter.
9. Carefully spread the remaining brownie batter over the candy corn layer.
10. Top with the remaining 1/2 cup of candy corn, pressing them lightly into the batter. Tip: Space them out so every bite gets some candy.
11. Bake for 25-30 minutes, or until a toothpick inserted into the center comes out with a few moist crumbs. Tip: Don’t overbake—these should be fudgy, not cakey.
12. Let the brownies cool completely in the pan before slicing.
Nothing beats that fudgy, melt-in-your-mouth texture with pockets of gooey candy corn throughout. They’re perfect for Halloween parties or just treating yourself—serve them warm with a scoop of vanilla ice cream for the ultimate indulgence.
Bloody Red Velvet Cheesecake Brownies
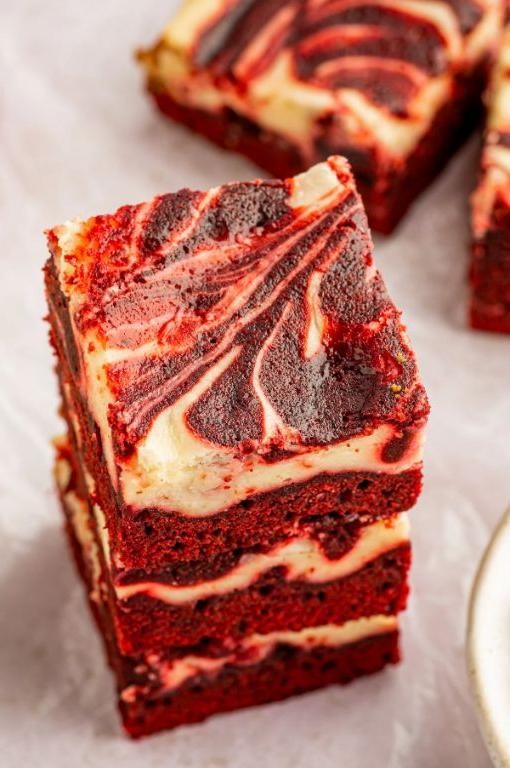
You know those moments when you want something decadent but can’t decide between cake, cheesecake, or brownies? Yeah, this recipe solves that delicious dilemma perfectly. It’s the ultimate treat that combines rich chocolate flavor with creamy cheesecake swirls in every bite.
16
portions20
minutes30
minutesIngredients
– 1 cup all-purpose flour (I like to spoon and level it for accuracy)
– 1 cup granulated sugar (regular white sugar works great here)
– 1/2 cup unsalted butter, melted (I always use unsalted to control the saltiness)
– 2 large eggs at room temperature (they incorporate much better when not cold)
– 1/4 cup cocoa powder (Dutch process gives the deepest color)
– 1 tsp vanilla extract (the real stuff makes all the difference)
– 1 tbsp red food coloring (I use gel for vibrant color without thinning the batter)
– 8 oz cream cheese, softened (leave it out for 30 minutes before starting)
– 1/4 cup powdered sugar (sift it to avoid lumps in the swirl)
Instructions
1. Preheat your oven to 350°F and line an 8×8 inch baking pan with parchment paper, leaving some overhang for easy removal.
2. Whisk together the melted butter and granulated sugar in a large bowl until fully combined and smooth.
3. Add the room temperature eggs one at a time, whisking thoroughly after each addition until the mixture is pale and slightly thickened.
4. Stir in the vanilla extract and red food coloring until the batter is uniformly bright red.
5. Sift the flour and cocoa powder directly into the wet ingredients to prevent lumps.
6. Gently fold the dry ingredients into the wet mixture until just combined, being careful not to overmix.
7. In a separate medium bowl, beat the softened cream cheese with an electric mixer on medium speed until smooth and creamy.
8. Add the sifted powdered sugar to the cream cheese and beat until completely incorporated and fluffy.
9. Spread about two-thirds of the red velvet batter evenly into the prepared pan using a spatula.
10. Drop spoonfuls of the cream cheese mixture randomly over the red velvet layer.
11. Dollop the remaining red velvet batter between the cream cheese mounds.
12. Use a knife or skewer to gently swirl the layers together, creating a marbled pattern without overmixing.
13. Bake at 350°F for 25-30 minutes until the edges are set but the center still has a slight jiggle.
14. Cool completely in the pan on a wire rack for at least 2 hours before slicing.
Really, the contrast between the fudgy brownie base and the tangy cream cheese swirl is what makes these unforgettable. They’re perfect slightly chilled with a glass of cold milk, or you could even crumble them over ice cream for the ultimate dessert mashup.
Monster Mashup M&M Brownies
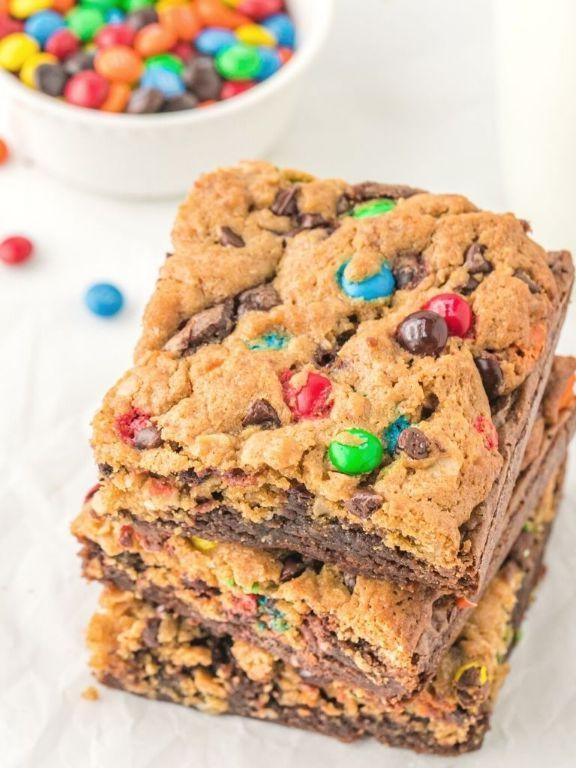
Just when you thought brownies couldn’t get any better, we’re throwing in a monster mashup of M&Ms that takes this classic to a whole new level. You’re going to love how the melty chocolate pockets play against that fudgy brownie base. Seriously, these disappear faster than you can say “more please” at any gathering.
24
portions15
minutes30
minutesIngredients
– 1 cup all-purpose flour (I always spoon and level mine for accuracy)
– ¾ cup unsweetened cocoa powder (the good dark stuff makes all the difference)
– ½ teaspoon salt (I prefer fine sea salt for even distribution)
– 1 cup unsalted butter, melted (this gives that rich, fudgy texture we crave)
– 2 cups granulated sugar
– 4 large eggs (room temperature eggs incorporate so much better)
– 2 teaspoons vanilla extract
– 1½ cups M&Ms (I use the regular kind, but peanut butter M&Ms are amazing here too)
Instructions
1. Preheat your oven to 350°F and line a 9×13 inch baking pan with parchment paper, leaving some overhang for easy removal.
2. Whisk together the flour, cocoa powder, and salt in a medium bowl until no lumps remain.
3. In a large bowl, combine the melted butter and sugar, stirring vigorously for about 2 minutes until well blended.
4. Add the eggs one at a time, mixing thoroughly after each addition until the batter becomes smooth and slightly glossy.
5. Stir in the vanilla extract until fully incorporated.
6. Gradually fold the dry ingredients into the wet mixture using a spatula, being careful not to overmix—just until no flour streaks remain.
7. Gently fold in 1 cup of the M&Ms, reserving the remaining ½ cup for the top.
8. Spread the batter evenly into your prepared pan using an offset spatula for smooth results.
9. Sprinkle the remaining ½ cup of M&Ms evenly over the top, pressing them lightly into the surface.
10. Bake at 350°F for 25-30 minutes, until the edges are set but a toothpick inserted about 2 inches from the edge comes out with moist crumbs.
11. Cool completely in the pan on a wire rack for at least 2 hours before slicing—this patience pays off with clean cuts.
Keep these beauties at room temperature for that perfect fudgy-chewy texture, or warm individual squares for 15 seconds in the microwave to get those M&Ms extra melty. They’re fantastic with a scoop of vanilla ice cream, but honestly, they’re pretty incredible all on their own too.
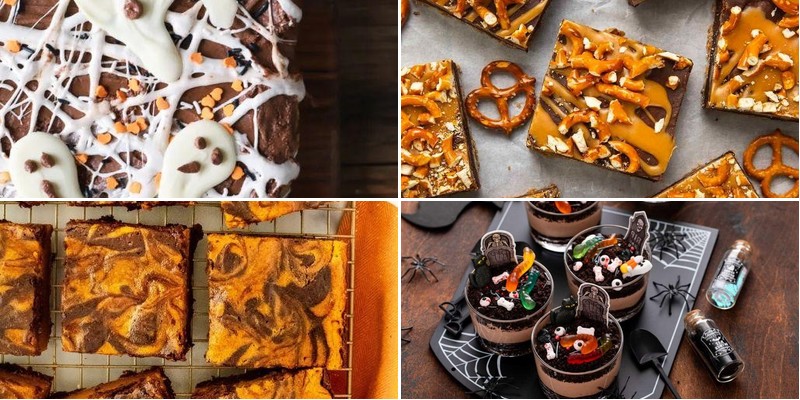
Spidery Chocolate Caramel Web Brownies
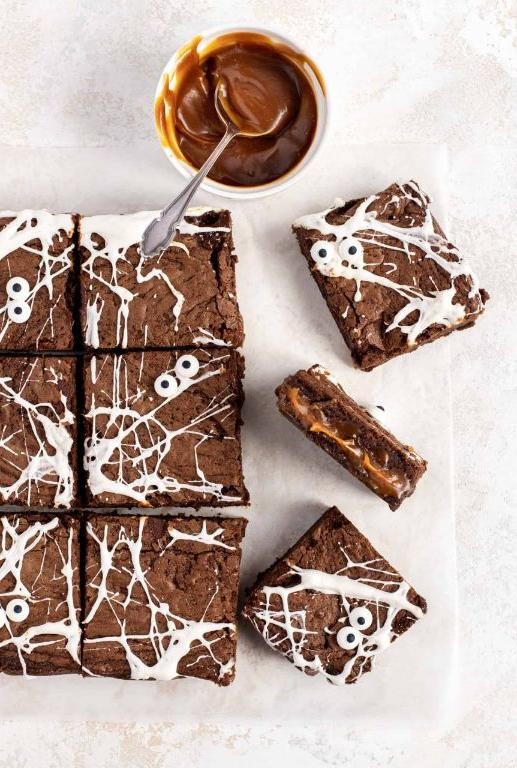
Diving into Halloween baking is one of my favorite October traditions, and these spidery chocolate caramel web brownies are the perfect festive treat. You get that rich, fudgy brownie base with a gooey caramel swirl that creates the perfect “web” pattern when you slice into them. They’re surprisingly simple to make but look impressively spooky!
Ingredients
– 1 cup all-purpose flour (I always spoon and level mine for accuracy)
– ¾ cup unsweetened cocoa powder (Dutch process gives the deepest chocolate flavor)
– ½ teaspoon salt
– 1 cup unsalted butter, melted (I use the microwave in 30-second bursts)
– 2 cups granulated sugar
– 4 large eggs at room temperature (they incorporate better when not cold)
– 2 teaspoons vanilla extract
– ½ cup semi-sweet chocolate chips (I prefer the mini ones for better distribution)
– ¾ cup thick caramel sauce (the kind that holds its shape, not the runny ice cream topping)
Instructions
1. Preheat your oven to 350°F and line a 9×13 inch baking pan with parchment paper, leaving some overhang on two sides for easy removal.
2. Whisk together the flour, cocoa powder, and salt in a medium bowl until no lumps remain.
3. In a large bowl, combine the melted butter and sugar, stirring vigorously for about 1 minute until well blended.
4. Add the eggs one at a time to the butter mixture, mixing thoroughly after each addition.
5. Stir in the vanilla extract until fully incorporated.
6. Gradually add the dry ingredients to the wet ingredients, folding gently until just combined—don’t overmix.
7. Fold in the chocolate chips until evenly distributed throughout the batter.
8. Pour the brownie batter into your prepared pan and spread it into an even layer with a spatula.
9. Drop spoonfuls of caramel sauce evenly across the surface of the brownie batter.
10. Use a knife or toothpick to swirl the caramel into the batter, creating a web-like pattern by making connected zigzag motions.
11. Bake for 25-30 minutes until the edges are set but the center still looks slightly underdone—a toothpick inserted should come out with moist crumbs, not wet batter.
12. Transfer the pan to a wire rack and let the brownies cool completely in the pan, about 2 hours.
13. Use the parchment paper overhang to lift the cooled brownies from the pan onto a cutting board.
14. Cut into squares using a sharp knife, wiping it clean between cuts for neat edges.
Absolutely magical how the caramel creates those intricate web patterns when you slice into these brownies! The texture is wonderfully fudgy with pockets of gooey caramel throughout. Try serving them on a black platter with plastic spider rings for the ultimate Halloween party treat—they disappear faster than ghosts at sunrise!
Eyeball Gummy Candy Brownies
Tired of the same old Halloween treats? These eyeball gummy candy brownies are the perfect spooky-but-delicious dessert that’ll have everyone grabbing seconds. You get that classic fudgy brownie base with a fun, creepy twist that’s surprisingly easy to pull off.
16
portions15
minutes30
minutesIngredients
– 1 cup all-purpose flour (I like to spoon and level it for accuracy)
– 1 cup granulated sugar (regular white sugar works perfectly)
– 1/2 cup unsalted butter, melted (I find melting it first makes mixing easier)
– 2 large eggs at room temperature (they incorporate better when not cold)
– 1/3 cup cocoa powder (Dutch process gives that rich chocolate flavor)
– 1/2 tsp baking powder
– 1/4 tsp salt (I always use kosher salt for baking)
– 1 tsp vanilla extract (real vanilla makes all the difference)
– 24 eyeball gummy candies (the ones with colored centers look most realistic)
Instructions
1. Preheat your oven to 350°F and grease an 8×8 inch baking pan.
2. Whisk together the melted butter and granulated sugar in a large bowl until well combined.
3. Add the room temperature eggs one at a time, mixing thoroughly after each addition.
4. Stir in the vanilla extract until the mixture is smooth.
5. In a separate bowl, combine the all-purpose flour, cocoa powder, baking powder, and salt.
6. Gradually add the dry ingredients to the wet ingredients, mixing just until no flour streaks remain.
7. Spread the brownie batter evenly into your prepared baking pan using a spatula.
8. Arrange the eyeball gummy candies evenly across the top of the batter, pressing them in slightly.
9. Bake at 350°F for 25-30 minutes until a toothpick inserted near the center comes out with moist crumbs.
10. Let the brownies cool completely in the pan on a wire rack before cutting.
Expect super fudgy brownies with that perfect crackly top, where the gummy eyebals add a fun chewy texture contrast. These look especially creepy when you cut them into squares and watch those candy eyes stare back from every piece.
Vampire Bat Blackout Brownies
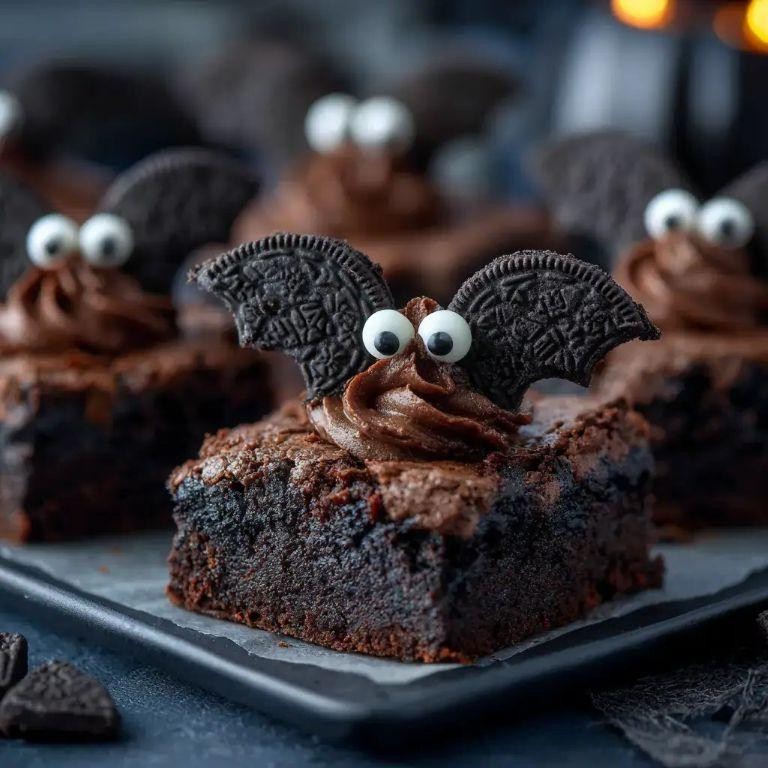
You know those days when you just need something rich, dark, and completely indulgent? Yeah, these vampire bat blackout brownies are exactly that kind of treat—so intensely chocolatey they practically disappear into the shadows.
16
brownies15
minutes30
minutesIngredients
– 1 cup unsalted butter (I prefer to melt it first for easier mixing)
– 2 cups granulated sugar (this gives that perfect crackly top)
– 4 large eggs (room temperature helps them incorporate smoothly)
– 1 tsp vanilla extract (the real stuff makes all the difference)
– 1 cup all-purpose flour (spoon and level it for accuracy)
– 1 cup unsweetened cocoa powder (I use Dutch-processed for extra depth)
– ½ tsp salt (a pinch of kosher salt balances the sweetness)
– 1 cup semi-sweet chocolate chips (these create those melty pockets)
Instructions
1. Preheat your oven to 350°F and line an 8×8 inch baking pan with parchment paper.
2. Melt 1 cup unsalted butter in a microwave-safe bowl for 45 seconds, or until fully liquid.
3. Tip: Let the melted butter cool slightly before adding eggs to avoid scrambling them.
4. Whisk 2 cups granulated sugar into the melted butter until the mixture looks glossy.
5. Crack in 4 large eggs one at a time, whisking thoroughly after each addition.
6. Stir in 1 tsp vanilla extract until just combined.
7. Sift 1 cup all-purpose flour, 1 cup unsweetened cocoa powder, and ½ tsp salt directly into the wet ingredients.
8. Tip: Sifting prevents lumps and ensures a fudgy, not cakey, texture.
9. Fold the dry ingredients into the wet mixture using a spatula until no flour streaks remain.
10. Gently mix in 1 cup semi-sweet chocolate chips until evenly distributed.
11. Spread the batter evenly into the prepared pan with your spatula.
12. Bake at 350°F for 28–30 minutes, or until a toothpick inserted near the center comes out with moist crumbs.
13. Tip: Don’t overbake—the brownies will firm up as they cool, keeping them fudgy.
14. Let the brownies cool completely in the pan on a wire rack before slicing.
Here’s the best part: these brownies are outrageously fudgy with a crackly top that gives way to a dense, melt-in-your-mouth interior. Serve them warm with a scoop of vanilla ice cream for the ultimate midnight snack, or cut them into bat shapes for a spooky Halloween treat that’s sure to disappear fast.
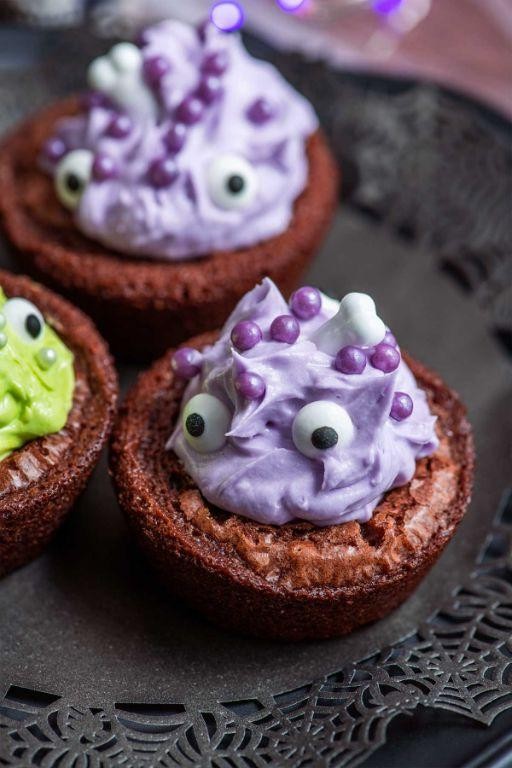
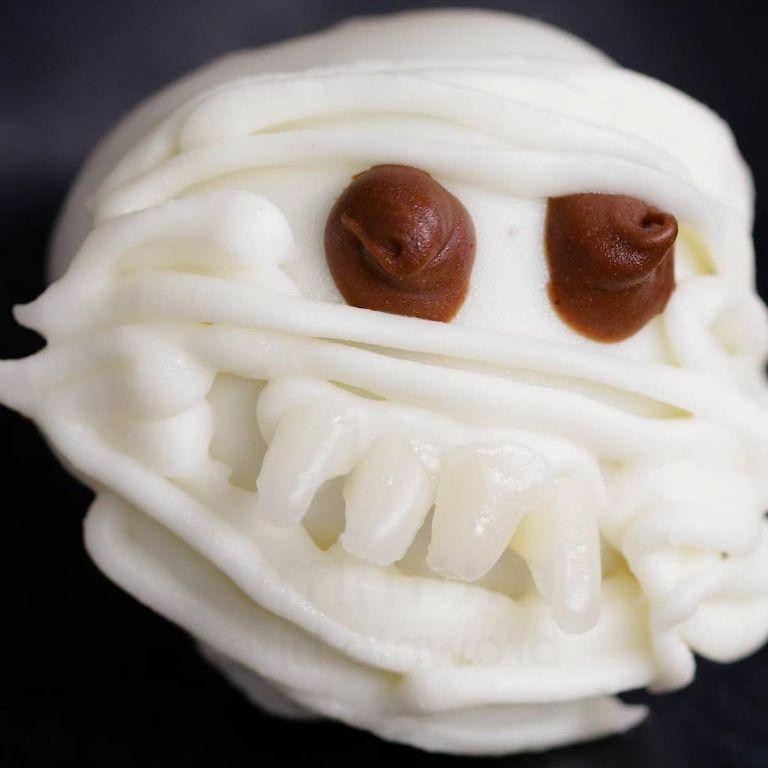
Mummy’s Mystery Filled Brownie Cups
N
Nothing beats the surprise of biting into something delicious and finding an unexpected treasure inside. These Mummy’s Mystery Filled Brownie Cups are exactly that—rich, fudgy brownies hiding a gooey, mysterious center that’ll have everyone guessing. You’re going to love how easy they are to make and how impressive they look when you break them open.
12
cups15
minutes20
minutesIngredients
– 1 cup all-purpose flour (I like to spoon and level it for accuracy)
– ¾ cup unsweetened cocoa powder (the good stuff makes all the difference)
– 1 cup granulated sugar (this creates that perfect crackly top)
– ½ cup melted unsalted butter (I always use salted for that sweet-salty balance)
– 2 large eggs at room temperature (they incorporate so much better this way)
– 1 tsp vanilla extract (pure vanilla is worth the splurge here)
– ½ cup milk chocolate chips (these melt into the mystery filling)
– ½ cup creamy peanut butter (this creates that surprise center)
– ½ tsp baking powder (helps them rise just enough)
– ¼ tsp salt (enhances all the chocolate flavor)
Instructions
1. Preheat your oven to 350°F and line a 12-cup muffin tin with paper liners.
2. Whisk together the flour, cocoa powder, baking powder, and salt in a medium bowl until no streaks remain.
3. In a separate large bowl, combine the melted butter and sugar, stirring for about 1 minute until well blended.
4. Add the room temperature eggs one at a time, mixing thoroughly after each addition until the batter is smooth.
5. Stir in the vanilla extract until fully incorporated into the wet ingredients.
6. Gradually add the dry ingredients to the wet mixture, folding gently until just combined—don’t overmix.
7. Spoon 1 tablespoon of brownie batter into the bottom of each prepared muffin cup.
8. Create the mystery filling by placing 1 teaspoon of peanut butter and 5-6 chocolate chips in the center of each brownie cup.
9. Cover the filling completely with remaining brownie batter, filling each cup about ⅔ full.
10. Bake for 18-20 minutes until the tops look set and a toothpick inserted near the edge comes out with moist crumbs.
11. Let the brownie cups cool in the pan for 10 minutes before transferring to a wire rack.
Zesty and fudgy with that incredible molten center, these brownie cups deliver serious chocolate satisfaction. The peanut butter filling stays wonderfully soft against the dense brownie texture, creating that perfect contrast in every bite. Try serving them slightly warm with a scoop of vanilla ice cream for the ultimate dessert experience.
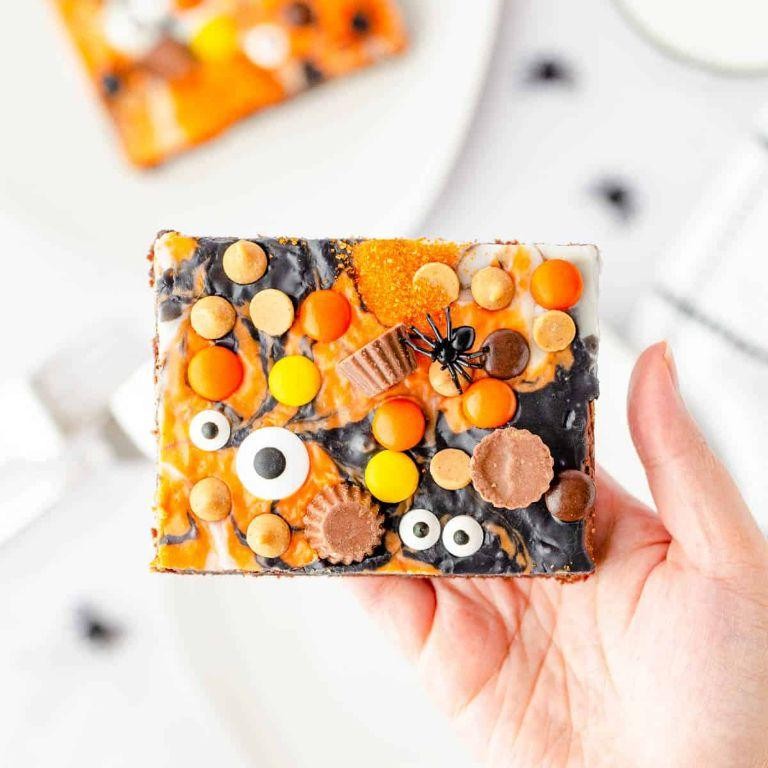
Eerie Cookie Crust Brownie Bars
Now, if you’re looking for a spooky-season treat that’s easier than carving pumpkins but just as festive, these Eerie Cookie Crust Brownie Bars are your answer. They combine a crisp cookie base with fudgy brownie topping for the ultimate Halloween dessert.
9
bars15
minutes40
minutesIngredients
– 1 ½ cups chocolate cookie crumbs (I use Oreos with the filling scraped out for that classic look)
– 6 tablespoons unsalted butter, melted (salted works too if that’s what you have)
– 1 box fudge brownie mix (I prefer the family-size for extra thick bars)
– 2 large eggs, at room temperature for better mixing
– ½ cup vegetable oil
– ¼ cup water
– ½ cup semi-sweet chocolate chips (because more chocolate is always better)
– Orange and black sprinkles for that Halloween vibe
Instructions
1. Preheat your oven to 350°F and line an 8×8 inch baking pan with parchment paper, leaving some overhang for easy removal.
2. Combine the chocolate cookie crumbs and melted butter in a medium bowl until the mixture resembles wet sand.
3. Press the cookie mixture firmly into the bottom of your prepared pan using the bottom of a measuring cup to create an even layer.
4. Bake the crust for 8 minutes exactly until it’s slightly set but not browned.
5. While the crust bakes, whisk together the brownie mix, eggs, vegetable oil, and water in a large bowl until just combined—don’t overmix!
6. Gently fold in the chocolate chips until evenly distributed throughout the batter.
7. Remove the crust from the oven and immediately pour the brownie batter over the hot crust, spreading it evenly to the edges.
8. Sprinkle the orange and black sprinkles generously over the top of the brownie batter.
9. Return the pan to the oven and bake for 28-32 minutes until the edges are set but the center still looks slightly underdone.
10. Place the pan on a wire rack and let the bars cool completely for at least 2 hours before slicing.
Let these bars cool completely before cutting—they’ll be fudgy in the center with that satisfying cookie crunch underneath. The chocolate layers play off each other beautifully, and they’re even better with a scoop of vanilla ice cream for that warm-cold contrast.
Dracula’s Raspberry Blood Brownies
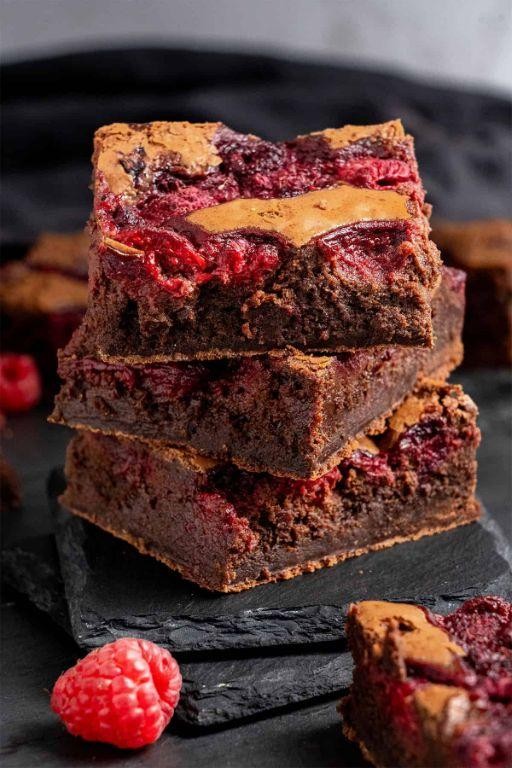
Oh my gosh, you have to try these brownies—they’re the perfect spooky season treat that’s actually delicious! Picture rich, fudgy brownies swirled with vibrant raspberry “blood” that oozes into every bite. Seriously, they’re almost too pretty to eat, but trust me, you’ll get over that quickly once you taste them.
16
portions20
minutes30
minutesIngredients
– 1 cup all-purpose flour (I like to spoon and level it for accuracy)
– ¾ cup unsweetened cocoa powder (the good dark kind makes all the difference)
– ½ teaspoon salt (just a pinch to balance the sweetness)
– 1 cup unsalted butter, melted (I always melt mine and let it cool slightly)
– 2 large eggs at room temperature (they incorporate so much better this way)
– 1 ½ cups granulated sugar (this gives that perfect crackly top)
– 1 teaspoon vanilla extract (pure vanilla is worth the splurge here)
– ½ cup fresh raspberries (frozen work too if that’s what you have)
– 2 tablespoons powdered sugar (for that blood-like consistency)
Instructions
1. Preheat your oven to 350°F and line an 8×8 inch baking pan with parchment paper, leaving some overhang for easy removal.
2. Whisk together 1 cup flour, ¾ cup cocoa powder, and ½ teaspoon salt in a medium bowl until no lumps remain.
3. In a separate large bowl, combine 1 cup melted butter, 2 eggs, 1 ½ cups sugar, and 1 teaspoon vanilla, whisking vigorously for about 1 minute until smooth and slightly thickened.
4. Tip: Don’t overmix once you add the dry ingredients—just fold until combined to keep the texture fudgy.
5. Gently fold the dry ingredients into the wet mixture using a spatula until just incorporated with no flour streaks visible.
6. Spread about two-thirds of the brownie batter evenly into your prepared pan using an offset spatula.
7. Mash ½ cup raspberries with 2 tablespoons powdered sugar in a small bowl until you get a chunky, blood-like sauce.
8. Dollop the raspberry mixture randomly over the brownie layer, then swirl gently with a knife.
9. Tip: Use a toothpick for finer swirls if you want that dramatic blood vessel effect.
10. Spread the remaining brownie batter over the top, covering most of the raspberry swirls.
11. Bake at 350°F for 25-30 minutes until the edges are set but the center still has a slight jiggle.
12. Tip: The toothpick test works best—it should come out with moist crumbs, not clean.
13. Let the brownies cool completely in the pan on a wire rack for at least 2 hours before slicing.
You won’t believe how the raspberry “blood” seeps into the rich chocolate base, creating these gorgeous marbled layers when you cut into them. They’re fudgy with just the right chew, and the tart raspberry cuts through the sweetness perfectly. Try serving them slightly warm with a dollop of whipped cream for that extra dramatic blood-and-cream effect!
Ghastly Matcha Green Tea Brownies
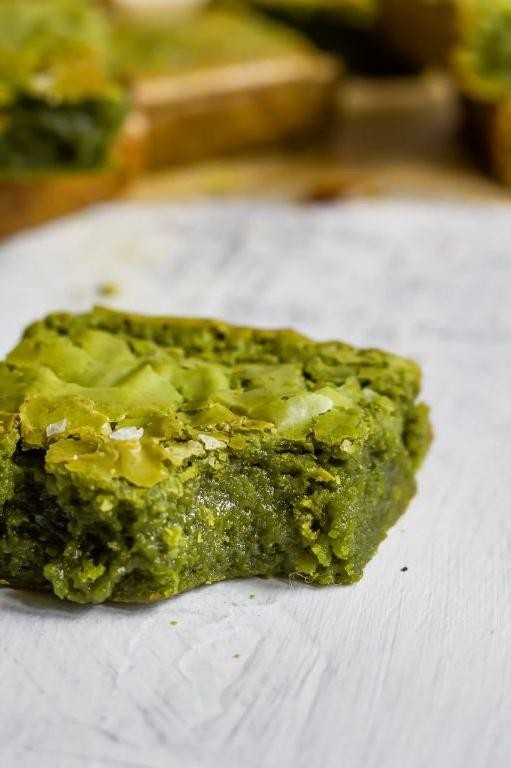
Mmm, you know those days when you want something sweet but also want to feel a little sophisticated? These ghastly matcha green tea brownies are your perfect solution—they’re fudgy, earthy, and just spooky enough for Halloween vibes without being overly sweet. Trust me, they disappear fast at parties!
16
brownies15
minutes25
minutesIngredients
– 1 cup all-purpose flour (I like to sift mine first for extra fluffiness)
– 1 cup granulated sugar (don’t skimp—this balances the matcha’s bitterness)
– 1/2 cup unsalted butter, melted (I always use the real stuff for that rich flavor)
– 2 large eggs, at room temperature (they blend so much smoother this way)
– 2 tbsp high-quality matcha powder (go for ceremonial grade if you can—it makes all the difference)
– 1/2 cup dark chocolate chips (I prefer Ghirardelli for that deep cocoa kick)
– 1/4 tsp salt (just a pinch to heighten all the flavors)
– 1 tsp vanilla extract (pure vanilla is my secret weapon here)
Instructions
1. Preheat your oven to 350°F and grease an 8×8-inch baking pan lightly with butter or line it with parchment paper.
2. In a medium bowl, whisk together the melted butter and granulated sugar until the mixture looks smooth and slightly glossy.
3. Crack in the room-temperature eggs one at a time, whisking vigorously after each addition until fully incorporated.
4. Stir in the vanilla extract until just combined—don’t overmix at this stage.
5. Sift the all-purpose flour, matcha powder, and salt directly into the wet ingredients to avoid lumps.
6. Gently fold the dry ingredients into the wet mixture using a spatula until no flour streaks remain. Tip: Stop mixing as soon as it’s combined to keep the brownies tender.
7. Fold in the dark chocolate chips evenly throughout the batter.
8. Pour the batter into your prepared pan and spread it into an even layer with the spatula.
9. Bake at 350°F for 20–25 minutes, or until the edges are set and a toothpick inserted into the center comes out with a few moist crumbs. Tip: Avoid overbaking—they’ll firm up as they cool!
10. Let the brownies cool completely in the pan on a wire rack for about 1 hour before slicing. Tip: For clean cuts, chill them in the fridge for 15 minutes first.
Here’s the best part: these brownies are dense and fudgy with a subtle grassy note from the matcha that pairs wonderfully with the dark chocolate. Serve them slightly chilled with a dollop of whipped cream or crumble them over vanilla ice cream for an eerie-but-elegant dessert.
Frankenstein Marshmallow Topped Brownies
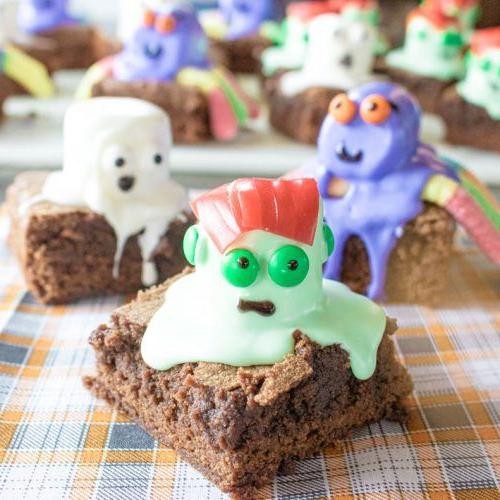
Gosh, you know those days when you want something chocolatey but also want to play with your food? These Frankenstein marshmallow brownies are exactly that kind of fun project—spooky enough for Halloween but delicious any time of year.
16
portions15
minutes30
minutesIngredients
– 1 cup all-purpose flour (I like to spoon and level it for accuracy)
– 1 cup granulated sugar
– 1/2 cup unsalted butter, melted (I always use the real stuff for that rich flavor)
– 2 large eggs at room temperature (they incorporate so much better this way)
– 1/2 cup cocoa powder
– 1 tsp vanilla extract
– 1/4 tsp salt
– 12 large marshmallows
– Black decorating gel
– Green food coloring
Instructions
1. Preheat your oven to 350°F and line an 8×8 inch baking pan with parchment paper.
2. Whisk together the melted butter and sugar in a large bowl until fully combined.
3. Beat in the eggs one at a time, mixing thoroughly after each addition.
4. Stir in the vanilla extract until incorporated.
5. Sift the flour, cocoa powder, and salt directly into the wet ingredients.
6. Fold the dry ingredients into the wet mixture until no flour streaks remain, being careful not to overmix.
7. Pour the brownie batter into your prepared pan and spread it evenly with a spatula.
8. Bake at 350°F for 25-30 minutes until a toothpick inserted in the center comes out with moist crumbs.
9. Remove the brownies from the oven and immediately place marshmallows on top in two vertical rows to create Frankenstein’s “bolts.”
10. Let the brownies cool completely in the pan on a wire rack, about 1 hour.
11. Use black decorating gel to draw Frankenstein’s face and stitches on the marshmallows.
12. Mix a drop of green food coloring with water and lightly brush it over the brownie surface between the marshmallows for that classic green monster skin effect.
Kind of amazing how these turn from simple brownies into edible art, right? The fudgy brownie base stays wonderfully moist beneath the toasted marshmallows, creating this fantastic contrast between rich chocolate and sweet, pillowy topping. They’re perfect for cutting into squares and arranging on a platter with other Halloween treats, or just enjoying as your secret midnight snack—no judgment here!
Sinister Salted Caramel Pretzel Brownies
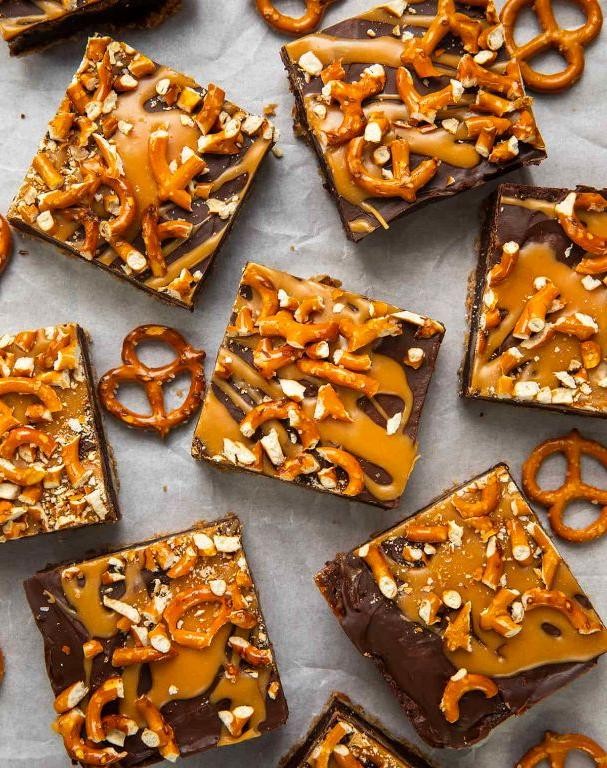
Sometimes you need a dessert that walks the line between sweet and salty perfection. These brownies deliver that addictive combination with a dark chocolate base, gooey caramel, and crunchy pretzel topping that’ll have you sneaking just one more piece. They’re dangerously easy to make but look impressively gourmet.
16
portions15
minutes32
minutesIngredients
– 1 cup unsalted butter (I prefer European-style for richer flavor)
– 1 ½ cups granulated sugar
– ¾ cup cocoa powder (Dutch-processed gives that deep chocolate color)
– 3 large eggs at room temperature (they incorporate better into the batter)
– 1 tsp vanilla extract
– 1 cup all-purpose flour
– ½ tsp salt
– 1 cup salted caramel sauce (store-bought works great for convenience)
– 1 ½ cups mini pretzel twists (the tiny ones nestle perfectly into the batter)
– Flaky sea salt for sprinkling (Maldon salt creates beautiful texture)
Instructions
1. Preheat your oven to 350°F and line an 8×8 inch baking pan with parchment paper, leaving some overhang for easy removal.
2. Melt 1 cup unsalted butter in a medium saucepan over low heat until completely liquid.
3. Remove the saucepan from heat and whisk in 1 ½ cups granulated sugar until the mixture looks glossy.
4. Add ¾ cup cocoa powder and whisk vigorously until no dry spots remain.
5. Crack 3 room temperature eggs into the mixture one at a time, whisking thoroughly after each addition.
6. Stir in 1 teaspoon vanilla extract until just combined.
7. Switch to a spatula and gently fold in 1 cup all-purpose flour and ½ teaspoon salt until you no longer see white streaks.
8. Pour half the brownie batter into your prepared pan and spread it evenly with the spatula.
9. Drizzle ½ cup salted caramel sauce over the first layer in zigzag patterns.
10. Carefully pour the remaining brownie batter over the caramel layer.
11. Arrange 1 ½ cups mini pretzel twists across the top surface, pressing them lightly into the batter.
12. Drizzle the remaining ½ cup caramel sauce over the pretzels.
13. Sprinkle flaky sea salt generously over the entire surface.
14. Bake at 350°F for 28-32 minutes until the edges are set but the center still has a slight jiggle.
15. Cool the brownies completely in the pan on a wire rack for at least 2 hours before slicing.
What you get is this incredible textural experience – the fudgy brownie base gives way to pockets of melted caramel, while the pretzels stay surprisingly crisp. Warm individual squares for 15 seconds in the microwave and serve with vanilla ice cream for the ultimate indulgence, or pack them in lunch boxes for a special treat that travels surprisingly well.
Conclusion
Excitingly, these 32 spooky brownie recipes offer endless inspiration for your Halloween celebrations! Whether you’re baking for a party or a cozy night in, there’s something here to delight every sweet tooth. We’d love to hear which recipes become your favorites—leave a comment below and don’t forget to share this delicious roundup on Pinterest for fellow bakers to discover!