Nestled in the heart of South America, Guyana’s cuisine is a vibrant fusion of flavors waiting to be discovered in your kitchen. From comforting stews to quick, aromatic curries, these dishes bring a taste of the tropics to your table. Let’s dive into 33 delicious recipes that will transform your meals and inspire your cooking adventures—get ready to savor every bite!
Guyanese Pepperpot
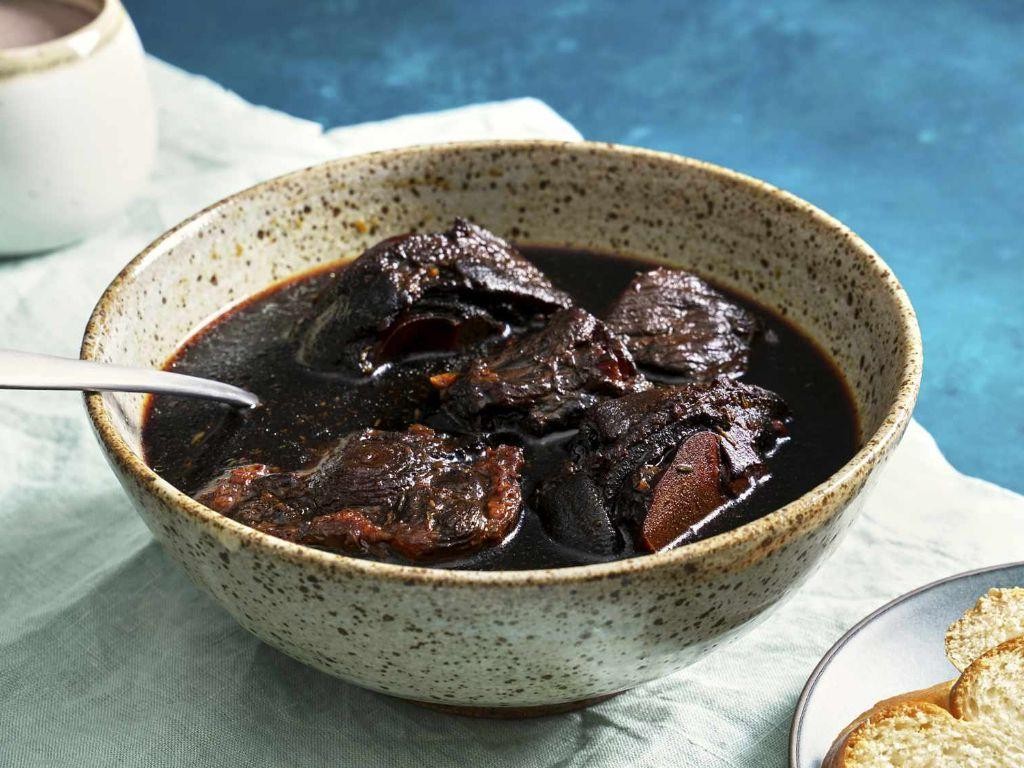
Mmm, imagine a stew so rich and complex it could probably solve world peace—or at least make your Monday feel like a holiday. That’s Guyanese Pepperpot, a slow-simmered marvel that’s equal parts comfort food and culinary adventure, guaranteed to make your kitchen smell like a Caribbean dream. Think of it as the ultimate cozy hug in a pot, with a kick that’ll have you doing a happy dance (just watch out for that spice!).
Serving: 6 | Pre Time: 20 minutes | Cooking Time: 3 hours
Ingredients
– 2 lbs beef stew meat, cut into 1-inch cubes
– 1 lb pork shoulder, cut into 1-inch cubes
– 2 tbsp vegetable oil
– 1 large onion, finely chopped
– 4 cloves garlic, minced
– 2 tbsp cassareep
– 2 cinnamon sticks
– 4 whole cloves
– 2 scotch bonnet peppers, whole
– 4 cups beef broth
– 1 cup water
– 1 tsp salt
– 1/2 tsp black pepper
– 2 tbsp brown sugar
Instructions
1. Heat 2 tbsp vegetable oil in a large Dutch oven over medium-high heat until shimmering, about 2 minutes.
2. Add 2 lbs beef stew meat and 1 lb pork shoulder to the pot, searing until browned on all sides, approximately 8-10 minutes total. (Tip: Don’t overcrowd the pot—work in batches if needed for a better sear.)
3. Remove the meat and set aside, then add 1 large onion to the pot, sautéing until softened and translucent, about 5 minutes.
4. Stir in 4 cloves garlic and cook for 1 minute until fragrant.
5. Return the meat to the pot, then add 2 tbsp cassareep, 2 cinnamon sticks, 4 whole cloves, 2 scotch bonnet peppers, 4 cups beef broth, 1 cup water, 1 tsp salt, and 1/2 tsp black pepper.
6. Bring the mixture to a boil, then reduce heat to low, cover, and simmer for 2.5 hours, stirring occasionally. (Tip: Keep the scotch bonnet peppers whole to control the heat—they’ll infuse flavor without making it too fiery.)
7. After 2.5 hours, stir in 2 tbsp brown sugar and continue simmering uncovered for 30 minutes, until the sauce thickens to a gravy-like consistency. (Tip: Taste and adjust seasoning if needed, but avoid breaking the peppers to maintain spice level.)
8. Remove from heat and discard the cinnamon sticks, cloves, and scotch bonnet peppers before serving.
Certainly, this Pepperpot emerges with a deep, glossy sauce that clings lovingly to tender meat, offering a sweet-spicy balance from the cassareep and peppers. Serve it over fluffy rice or with dense bread to soak up every last drop, and maybe save leftovers—it tastes even better the next day as the flavors meld into something truly magical!
Metemgee with Dumplings
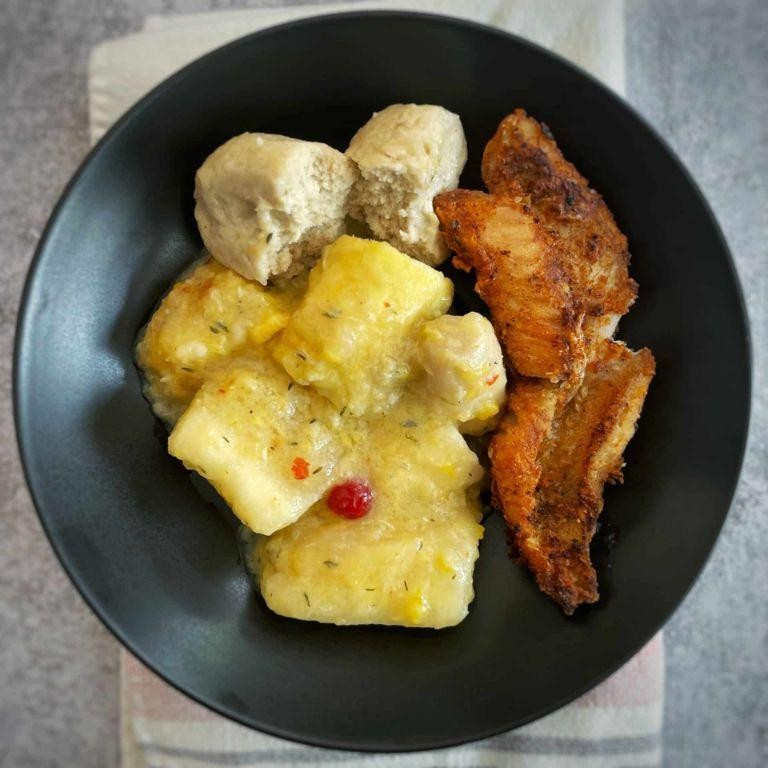
Yikes, you’re about to dive into a pot of pure comfort that’ll make your taste buds do a happy dance—Metemgee with Dumplings is the Caribbean hug you never knew your soul needed, blending creamy coconut, hearty root veggies, and fluffy dumplings in a one-pot wonder that’s basically a party in a bowl.
Serving: 4 | Pre Time: 20 minutes | Cooking Time: 40 minutes
Ingredients
– 1 tbsp vegetable oil
– 1 onion, chopped
– 2 cloves garlic, minced
– 1 tsp ground turmeric
– 4 cups vegetable broth
– 1 (13.5 oz) can coconut milk
– 2 sweet potatoes, peeled and cubed
– 2 plantains, peeled and sliced
– 1 cup all-purpose flour
– 1/2 tsp salt
– 1/2 cup water
– Salt to taste
Instructions
1. Heat 1 tbsp vegetable oil in a large pot over medium heat until shimmering, about 2 minutes.
2. Add 1 chopped onion and cook, stirring frequently, until softened and translucent, 5-7 minutes.
3. Stir in 2 minced garlic cloves and 1 tsp ground turmeric, cooking for 1 minute until fragrant to bloom the spices.
4. Pour in 4 cups vegetable broth and 1 can coconut milk, bringing the mixture to a gentle boil over high heat.
5. Add 2 cubed sweet potatoes and 2 sliced plantains, reducing heat to medium-low to simmer uncovered for 15 minutes until vegetables are tender.
6. In a medium bowl, combine 1 cup all-purpose flour and 1/2 tsp salt, then gradually mix in 1/2 cup water to form a soft dough—don’t overmix to keep dumplings light.
7. Pinch off small pieces of dough, rolling them into 1-inch balls between your palms for even cooking.
8. Gently drop the dumplings into the simmering pot, spacing them apart, and cook uncovered for 10 minutes until they float to the surface and double in size.
9. Season the stew with salt to taste, simmering for an additional 5 minutes to meld flavors, and remove from heat.
10. Ladle the Metemgee into bowls, ensuring each serving gets a mix of dumplings, vegetables, and broth.
Mmm, this dish delivers a creamy, velvety broth that hugs each fluffy dumpling, with sweet potatoes and plantains adding a subtle earthy sweetness—try serving it with a squeeze of lime for a zesty kick or alongside grilled fish to turn it into a hearty feast.
Guyanese Chicken Curry
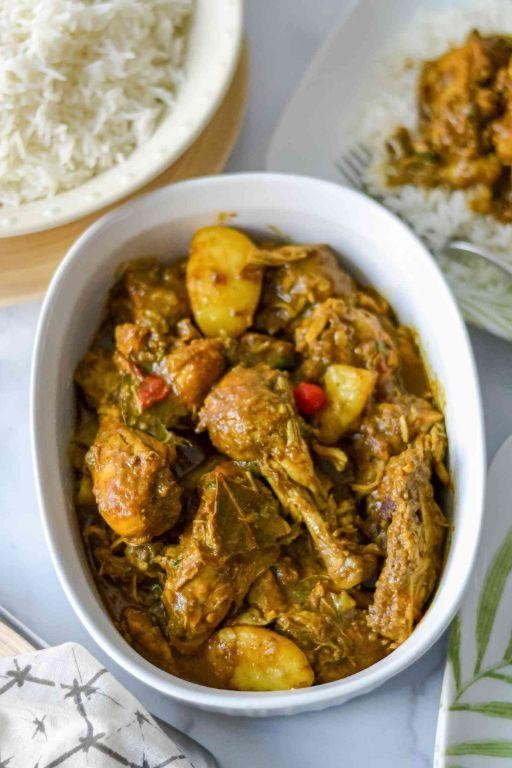
Zesty and zippy, this Guyanese Chicken Curry is the weeknight hero you never knew you needed—it’s like a cozy hug from the Caribbean, minus the airfare! Packed with warm spices and tender chicken, it’s a one-pot wonder that’ll have your taste buds doing a happy dance. Serving: 4 | Pre Time: 15 minutes | Cooking Time: 45 minutes
Ingredients
– 2 lbs chicken thighs, bone-in and skin-on
– 2 tbsp vegetable oil
– 1 large onion, finely chopped
– 4 cloves garlic, minced
– 1 tbsp fresh ginger, grated
– 2 tbsp curry powder
– 1 tsp ground cumin
– 1 tsp ground turmeric
– 1 (14.5 oz) can diced tomatoes
– 1 cup coconut milk
– 1 cup chicken broth
– 2 potatoes, peeled and cubed
– 1 tsp salt
– 1/2 tsp black pepper
– 2 tbsp fresh cilantro, chopped
Instructions
1. Pat the chicken thighs dry with paper towels to ensure a crisp sear.
2. Heat the vegetable oil in a large pot over medium-high heat until shimmering, about 2 minutes.
3. Add the chicken thighs, skin-side down, and cook for 5–7 minutes until golden brown, then flip and cook for another 5 minutes; remove and set aside.
4. Tip: Use the rendered fat from the chicken to sauté the aromatics for extra flavor.
5. Reduce heat to medium, add the onion, and cook for 5 minutes until softened.
6. Add the garlic and ginger, and cook for 1 minute until fragrant.
7. Stir in the curry powder, cumin, and turmeric, and toast for 30 seconds to bloom the spices.
8. Pour in the diced tomatoes, coconut milk, and chicken broth, scraping the bottom of the pot to deglaze.
9. Return the chicken thighs to the pot, add the potatoes, salt, and black pepper, and bring to a simmer.
10. Cover and simmer over low heat for 30 minutes, until the chicken is cooked through and the potatoes are tender.
11. Tip: Check the chicken’s doneness by inserting a thermometer—it should read 165°F internally.
12. Remove from heat, stir in the cilantro, and let rest for 5 minutes before serving.
13. Tip: For a thicker sauce, uncover and simmer for an additional 5 minutes at the end.
Now, this curry boasts a rich, velvety sauce that clings to every bite, with tender chicken that falls right off the bone. Naturally, it’s divine over fluffy rice or with roti for scooping up every last drop—trust me, you’ll want to lick the bowl clean!
Baked Salt Fish

Brace yourselves, flavor adventurers, because we’re about to transform the humble salt fish from a pantry staple into a crispy, golden revelation that’ll have you questioning every other weeknight dinner. This baked version ditches the fuss of frying for a hands-off, oven-baked miracle that delivers maximum crunch with minimal cleanup—your future self will thank you. Get ready to meet your new favorite ‘fancy-but-easy’ centerpiece that’s secretly a breeze.
Serving: 4 | Pre Time: 15 minutes | Cooking Time: 25 minutes
Ingredients
– 1.5 lbs salt cod fillets
– 2 cups cold water
– 1 cup all-purpose flour
– 2 large eggs
– 1 cup panko breadcrumbs
– 1 tsp garlic powder
– 1 tsp smoked paprika
– 1/2 tsp black pepper
– 2 tbsp olive oil
– 1 lemon, cut into wedges
Instructions
1. Place 1.5 lbs salt cod fillets in a large bowl and cover completely with 2 cups cold water; soak for 10 minutes to remove excess salt, then drain and pat very dry with paper towels. (Tip: Patting the fish thoroughly dry is crucial for the coating to stick properly.)
2. Preheat your oven to 425°F and line a large baking sheet with parchment paper.
3. In a shallow dish, combine 1 cup all-purpose flour, 1 tsp garlic powder, 1 tsp smoked paprika, and 1/2 tsp black pepper.
4. In a second shallow dish, lightly beat 2 large eggs with a fork until uniform.
5. In a third shallow dish, place 1 cup panko breadcrumbs.
6. Dredge each dried salt cod fillet first in the flour mixture, shaking off any excess.
7. Dip the floured fillet into the beaten eggs, coating it evenly and letting any drip off.
8. Press the fillet firmly into the panko breadcrumbs, ensuring full coverage on all sides.
9. Place the coated fillets on the prepared baking sheet, leaving about 1 inch of space between them.
10. Drizzle 2 tbsp olive oil evenly over the top of each fillet.
11. Bake at 425°F for 20-25 minutes, or until the coating is deep golden brown and crispy. (Tip: For extra even browning, rotate the baking sheet halfway through the cooking time.)
12. Remove from the oven and let rest on the sheet for 3 minutes before serving. (Tip: This brief rest allows the crust to set and prevents it from becoming soggy.)
13. Serve immediately with fresh lemon wedges for squeezing over the top.
Perfectly baked, this salt fish boasts a shatteringly crisp panko crust that gives way to tender, flaky meat inside—a textural dream team. The smoky paprika and garlic whisper through each bite, balanced by a bright squeeze of lemon that cuts through the richness beautifully. Try it tucked into soft brioche buns with a swipe of garlic aioli for a next-level fish sandwich, or simply devour it straight off the pan while pretending you have more willpower.
Guyanese Roti Wrap
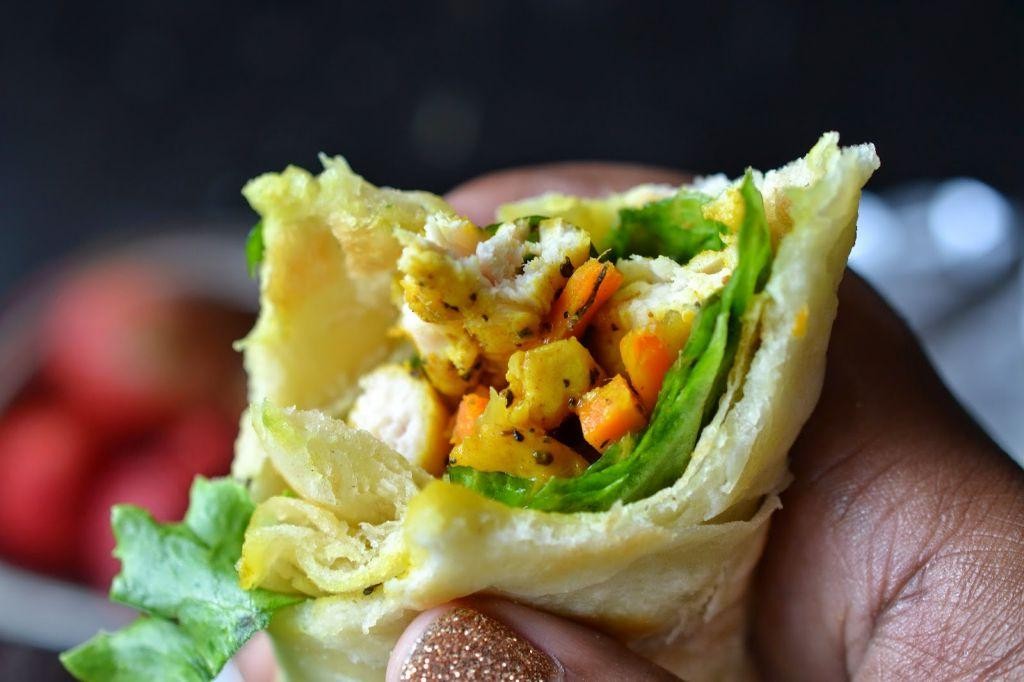
Forget everything you thought you knew about wraps, because this Guyanese Roti Wrap is about to rock your world with its fluffy, flaky layers and bold, savory fillings—it’s basically a cozy blanket for your favorite curry, and who doesn’t love a tasty hug? Serving: 4 | Pre Time: 30 minutes | Cooking Time: 20 minutes
Ingredients
– 2 cups all-purpose flour
– 1/2 tsp salt
– 1 tbsp vegetable oil
– 3/4 cup warm water (about 110°F)
– 1 tbsp ghee or butter
– 1 lb boneless chicken thighs, cut into 1-inch pieces
– 1 tbsp curry powder
– 1/2 tsp ground cumin
– 1/4 tsp turmeric
– 1 onion, finely chopped
– 2 garlic cloves, minced
– 1 cup coconut milk
– 1 potato, peeled and diced into 1/2-inch cubes
– 1/2 cup frozen peas
– Salt to taste
Instructions
1. In a large mixing bowl, combine 2 cups all-purpose flour and 1/2 tsp salt.
2. Add 1 tbsp vegetable oil and 3/4 cup warm water to the bowl, then mix with your hands until a shaggy dough forms.
3. Knead the dough on a lightly floured surface for 5 minutes until smooth and elastic, then cover with a damp cloth and let rest for 20 minutes at room temperature.
4. Divide the dough into 4 equal balls, then roll each ball into a 6-inch circle on a floured surface.
5. Brush each circle with 1 tbsp ghee or butter, then fold the dough into a square and roll it out again to a 8-inch circle—this creates flaky layers.
6. Heat a large skillet or tawa over medium-high heat (about 375°F), then cook each roti for 2 minutes per side until golden brown and puffed, flipping once.
7. In a separate large pot, heat 1 tbsp vegetable oil over medium heat, then add 1 lb boneless chicken thighs and cook for 5 minutes until browned on all sides.
8. Add 1 tbsp curry powder, 1/2 tsp ground cumin, 1/4 tsp turmeric, 1 onion, and 2 garlic cloves to the pot, then sauté for 3 minutes until fragrant.
9. Pour in 1 cup coconut milk and 1 diced potato, then bring to a simmer and cook for 10 minutes until the potato is tender.
10. Stir in 1/2 cup frozen peas and salt to taste, then cook for an additional 2 minutes until heated through.
11. Place a roti on a plate, spoon the chicken curry mixture into the center, and fold the sides over to form a wrap.
12. Serve immediately while warm.
Every bite of this Guyanese Roti Wrap delivers a delightful contrast: the soft, layered roti cradles a rich, aromatic curry that’s packed with tender chicken and hearty veggies. Get creative by adding a dollop of mango chutney or serving it with a side of cool cucumber raita for an extra burst of flavor.
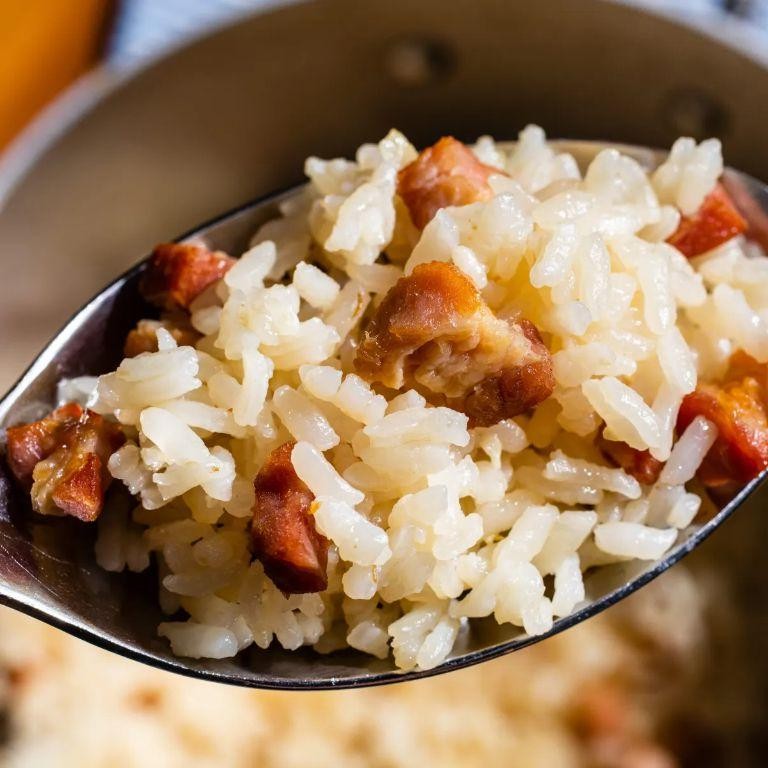
Cook-up Rice with Salt Pork
Let’s be real: sometimes you need a meal that’s less ‘Instagram-worthy’ and more ‘I-want-to-eat-this-while-wearing-sweatpants’ glorious. Cook-up Rice with Salt Pork is that comforting hug in a bowl, a one-pot wonder where humble ingredients transform into something magically satisfying. It’s the culinary equivalent of finding money in your winter coat—unexpectedly delightful and deeply rewarding.
Serving: 4 | Pre Time: 15 minutes | Cooking Time: 45 minutes
Ingredients
– 1/2 lb salt pork, diced
– 1 medium yellow onion, diced
– 2 cloves garlic, minced
– 1 cup long-grain white rice
– 2 cups chicken broth
– 1/2 tsp black pepper
– 2 tbsp vegetable oil
– 1/4 cup fresh parsley, chopped
Instructions
1. Place the diced salt pork in a medium saucepan, cover with 1 inch of cold water, and bring to a boil over high heat. Boil for 5 minutes to remove excess salt, then drain and pat dry with paper towels.
2. Heat the vegetable oil in a large, heavy-bottomed pot or Dutch oven over medium-high heat. Add the blanched salt pork and cook, stirring occasionally, for 5-7 minutes until the pieces are crispy and golden brown. Use a slotted spoon to transfer the pork to a plate, leaving the rendered fat in the pot.
3. Add the diced onion to the pot and cook in the pork fat over medium heat for 4-5 minutes, stirring frequently, until softened and translucent.
4. Stir in the minced garlic and cook for 1 minute until fragrant. Tip: Don’t let the garlic brown, or it will turn bitter.
5. Add the white rice to the pot. Stir constantly for 2 minutes to toast the grains lightly in the fat, which helps prevent a gummy texture.
6. Pour in the chicken broth and add the black pepper. Bring the mixture to a boil.
7. Once boiling, reduce the heat to low, cover the pot with a tight-fitting lid, and simmer for 18 minutes. Do not lift the lid during this time to trap the steam.
8. After 18 minutes, remove the pot from the heat. Let it stand, covered and undisturbed, for 10 minutes. This allows the rice to finish steaming and absorb any remaining liquid.
9. Fluff the rice gently with a fork. Tip: Fluffing separates the grains instead of mashing them.
10. Fold the crispy salt pork and chopped parsley into the rice until evenly distributed.
11. Serve immediately. Tip: For an extra layer of flavor, a squeeze of fresh lemon juice over the top just before serving brightens the whole dish.
Oh, the magic that happens in that pot! The rice emerges perfectly separate and fluffy, each grain infused with the deep, savory essence of the pork. You get pops of salty, crispy pork contrasting with the soft, aromatic rice, creating a symphony of textures in every bite. Try serving it alongside a simple, vinegary coleslaw to cut through the richness, or crown it with a perfectly fried egg for the ultimate comfort-food upgrade.
Guyanese Black Cake

Unwrap your holiday expectations, because this isn’t your average fruitcake—it’s a boozy, deeply spiced Guyanese Black Cake that’s so rich, it practically needs its own passport. Think of it as the dessert that spent a semester abroad, soaking up dark rum and cherry brandy until it achieves a nearly black, fudgy texture that’s more decadent than your favorite chocolate cake. Seriously, one bite and you’ll forget all those sad, dry fruitcakes of Christmases past.
Serving: 12 | Pre Time: 30 minutes | Cooking Time: 90 minutes
Ingredients
– 2 cups dried mixed fruit (raisins, currants, prunes)
– 1 cup dark rum
– 1/2 cup cherry brandy
– 1 cup unsalted butter, softened
– 1 cup granulated sugar
– 4 large eggs
– 2 cups all-purpose flour
– 1 tsp baking powder
– 1/2 tsp ground cinnamon
– 1/4 tsp ground nutmeg
– 1/4 tsp ground cloves
– 1/4 cup browning sauce (or burnt sugar syrup)
Instructions
1. In a large bowl, combine 2 cups dried mixed fruit, 1 cup dark rum, and 1/2 cup cherry brandy; cover and let soak overnight at room temperature to plump the fruit and infuse flavor—this step is non-negotiable for that signature boozy kick.
2. Preheat your oven to 325°F and grease a 9-inch round cake pan, then line it with parchment paper to prevent sticking.
3. In a stand mixer, cream together 1 cup unsalted butter and 1 cup granulated sugar on medium speed for 3-4 minutes until light and fluffy, which incorporates air for a tender crumb.
4. Add 4 large eggs one at a time, beating well after each addition to ensure the batter emulsifies smoothly.
5. In a separate bowl, whisk together 2 cups all-purpose flour, 1 tsp baking powder, 1/2 tsp ground cinnamon, 1/4 tsp ground nutmeg, and 1/4 tsp ground cloves.
6. Gradually fold the dry ingredients into the wet mixture using a spatula until just combined, being careful not to overmix to avoid a tough cake.
7. Drain any excess liquid from the soaked fruit, then fold it into the batter along with 1/4 cup browning sauce until evenly distributed, which gives the cake its deep, dark color.
8. Pour the batter into the prepared pan and smooth the top with a spatula.
9. Bake at 325°F for 85-90 minutes, or until a toothpick inserted into the center comes out clean—start checking at 80 minutes to prevent overbaking.
10. Let the cake cool in the pan for 15 minutes, then transfer it to a wire rack to cool completely before slicing.
Let this cake rest for a day wrapped in rum-soaked cheesecloth to let the flavors meld into a moist, almost fudgy texture with hints of spice and caramel. Serve it in thin slices with a dollop of whipped cream or alongside a strong coffee to balance its intense richness—it’s so good, you might just start a new holiday tradition.
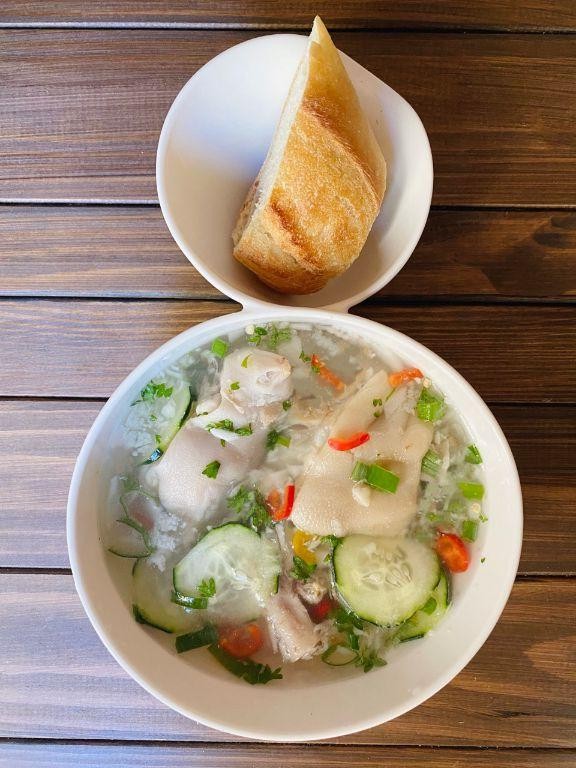
Beef Souse
Mmm, if you’ve ever wanted to taste a party in a bowl—a tangy, savory, melt-in-your-mouth fiesta—then let’s talk about the glorious, gelatinous wonder that is Beef Souse. It’s the cold-cut hero your charcuterie board has been dreaming of, a jiggly masterpiece that turns humble ingredients into a show-stopping centerpiece.
Serving: 8 | Pre Time: 30 minutes | Cooking Time: 3 hours
Ingredients
– 3 lbs beef shank
– 1 gallon water
– 2 tbsp apple cider vinegar
– 1 large onion, chopped
– 3 cloves garlic, minced
– 2 bay leaves
– 1 tbsp whole black peppercorns
– 1 tbsp salt
– 1 lemon, juiced
– 1 tbsp unflavored gelatin powder
Instructions
1. Place 3 lbs beef shank and 1 gallon water in a large stockpot over high heat.
2. Bring the water to a boil, then immediately reduce the heat to low for a gentle simmer.
3. Skim off any gray foam that rises to the surface with a slotted spoon during the first 30 minutes to ensure a clear broth.
4. Add 2 tbsp apple cider vinegar, 1 large chopped onion, 3 minced garlic cloves, 2 bay leaves, 1 tbsp whole black peppercorns, and 1 tbsp salt to the pot.
5. Cover the pot and let it simmer for 2.5 hours until the beef is fork-tender and easily shreds.
6. Remove the beef shank from the broth and set it aside on a cutting board to cool slightly.
7. Strain the broth through a fine-mesh sieve into a clean bowl, discarding the solids.
8. Shred the beef meat into bite-sized pieces, discarding any bones and excess fat.
9. Sprinkle 1 tbsp unflavored gelatin powder over 0.5 cup of the cooled broth in a small bowl and let it bloom for 5 minutes.
10. Heat the bloomed gelatin mixture in the microwave for 15 seconds until fully dissolved, then stir it back into the main broth.
11. Stir the shredded beef and juice from 1 lemon into the broth mixture until well combined.
12. Pour the mixture into a 9×5 inch loaf pan and refrigerate it for at least 6 hours until completely set and firm.
13. To unmold, dip the bottom of the loaf pan in warm water for 10 seconds, then invert it onto a serving plate.
14. Slice the souse into 0.5-inch thick pieces with a sharp knife wiped clean between cuts for neat edges.
15. Arrange the slices on a platter and serve immediately.
Tangy and savory, this souse boasts a firm, sliceable texture that jiggles just right, with the lemon and vinegar cutting through the rich beefiness. Serve it chilled on crackers with a dash of hot sauce for a kick, or layer it in sandwiches with crisp lettuce—it’s a versatile star that shines bright on any table!
Guyana Style Chow Mein
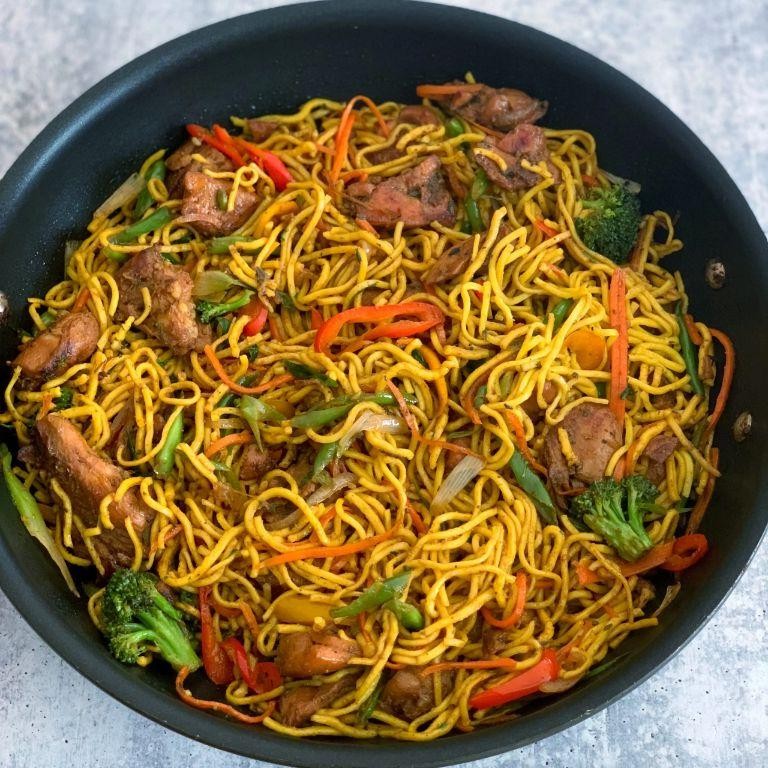
So, you think you know chow mein? Prepare for a flavor-packed plot twist that’ll have your taste buds doing the cha-cha. This Guyana-style version tosses the usual takeout script out the window with a vibrant, saucy stir-fry that’s equal parts comfort and carnival.
Serving: 4 | Pre Time: 20 minutes | Cooking Time: 25 minutes
Ingredients
– 8 oz dried chow mein noodles
– 2 tbsp vegetable oil
– 1 lb boneless, skinless chicken thighs, cut into 1-inch pieces
– 1 tsp salt
– 1/2 tsp black pepper
– 1 medium yellow onion, thinly sliced
– 3 cloves garlic, minced
– 1 bell pepper, thinly sliced
– 2 medium carrots, julienned
– 1 cup green cabbage, shredded
– 1/4 cup soy sauce
– 2 tbsp ketchup
– 1 tbsp Worcestershire sauce
– 1 tsp hot sauce (like Scotch bonnet pepper sauce)
– 1/2 cup chicken broth
– 2 green onions, sliced
Instructions
1. Bring a large pot of water to a rolling boil over high heat.
2. Add the 8 oz dried chow mein noodles and cook for 4 minutes, stirring occasionally to prevent sticking.
3. Drain the noodles in a colander, rinse under cold water for 30 seconds to stop cooking, and set aside. (Tip: Rinsing keeps noodles from getting mushy later.)
4. Heat 2 tbsp vegetable oil in a large wok or skillet over medium-high heat until it shimmers, about 1 minute.
5. Add the 1 lb chicken pieces, 1 tsp salt, and 1/2 tsp black pepper, stirring to coat.
6. Cook the chicken for 6-8 minutes, turning pieces occasionally, until browned and cooked through with no pink inside.
7. Transfer the cooked chicken to a plate using a slotted spoon, leaving oil in the wok.
8. Add the sliced onion and minced garlic to the wok, stirring constantly for 2 minutes until fragrant and slightly softened.
9. Add the bell pepper, carrots, and cabbage, stirring for 4-5 minutes until vegetables are tender-crisp. (Tip: Keep the heat high to avoid soggy veggies.)
10. In a small bowl, whisk together 1/4 cup soy sauce, 2 tbsp ketchup, 1 tbsp Worcestershire sauce, 1 tsp hot sauce, and 1/2 cup chicken broth until smooth.
11. Pour the sauce mixture into the wok, stirring to combine with the vegetables.
12. Add the cooked noodles and chicken back to the wok, tossing everything together with tongs for 3-4 minutes until heated through and well-coated. (Tip: Toss gently to avoid breaking the noodles.)
13. Remove from heat and garnish with sliced green onions.
Hearty and saucy, this dish delivers a tender noodle bite with a kick of heat that’s balanced by sweet veggies. Serve it straight from the wok for a family-style feast, or top with a fried egg for a next-level brunch twist that’ll make you forget all about boring old takeout.
Fried Bangamary
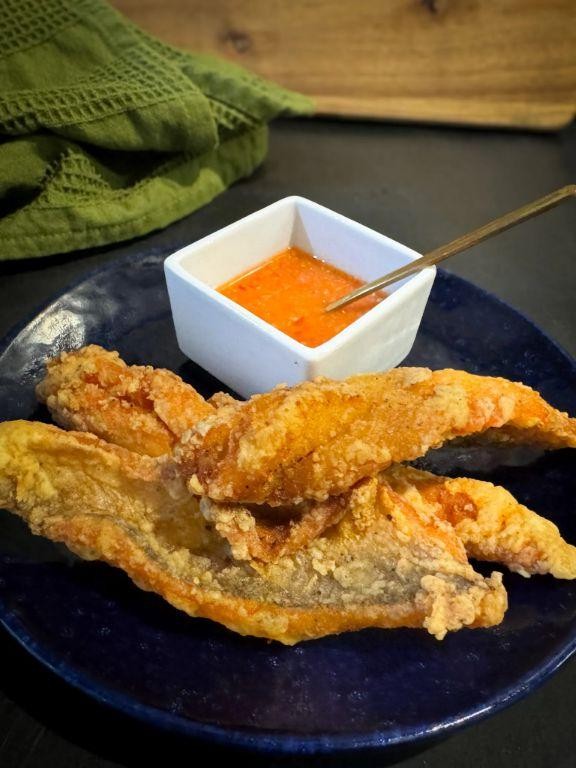
Mmm, have you ever met a fish so delightfully flaky and crispy that it practically begs to be devoured straight from the skillet? Meet fried bangamary, the unsung hero of the seafood world that’s about to become your new weeknight obsession. This dish is a masterclass in simplicity, transforming humble fillets into golden, crunchy perfection with a tender, melt-in-your-mouth interior that’ll have you questioning every other fish fry you’ve ever had.
Serving: 4 | Pre Time: 15 minutes | Cooking Time: 10 minutes
Ingredients
– 1.5 lbs bangamary fillets
– 1 cup all-purpose flour
– 2 large eggs
– 1 cup panko breadcrumbs
– 1 tsp garlic powder
– 1 tsp paprika
– 1 tsp salt
– 1/2 tsp black pepper
– 1 cup vegetable oil
– 1 lemon
Instructions
1. Pat the 1.5 lbs bangamary fillets completely dry with paper towels to ensure maximum crispiness.
2. In a shallow dish, combine 1 cup all-purpose flour, 1 tsp garlic powder, 1 tsp paprika, 1 tsp salt, and 1/2 tsp black pepper.
3. In a second shallow dish, whisk 2 large eggs until smooth.
4. Place 1 cup panko breadcrumbs in a third shallow dish.
5. Dredge each fillet first in the flour mixture, shaking off any excess.
6. Dip the floured fillet into the whisked eggs, coating it evenly.
7. Press the egg-coated fillet into the panko breadcrumbs, ensuring a full, even layer adheres to all sides.
8. In a large skillet, heat 1 cup vegetable oil over medium-high heat to 350°F, using a thermometer for accuracy.
9. Carefully place 2-3 breaded fillets into the hot oil, avoiding overcrowding the pan.
10. Fry for 3-4 minutes per side until the coating is deep golden brown and crispy.
11. Transfer the cooked fillets to a wire rack set over a baking sheet to drain, which keeps them from getting soggy.
12. Repeat steps 9-11 with the remaining fillets, allowing the oil to return to 350°F between batches.
13. Cut the 1 lemon into wedges for serving.
14. Serve the fried bangamary immediately with the lemon wedges.
So, what’s the final verdict? You’re greeted by an audibly crunchy shell that gives way to impossibly tender, flaky fish inside. The subtle seasoning lets the bangamary’s mild, sweet flavor shine, while a squeeze of bright lemon cuts through the richness perfectly. Try stacking these crispy planks on a soft brioche bun with tangy slaw for an epic fish sandwich, or simply enjoy them as-is with a side of creamy remoulade for dipping—either way, they’re guaranteed to disappear fast!
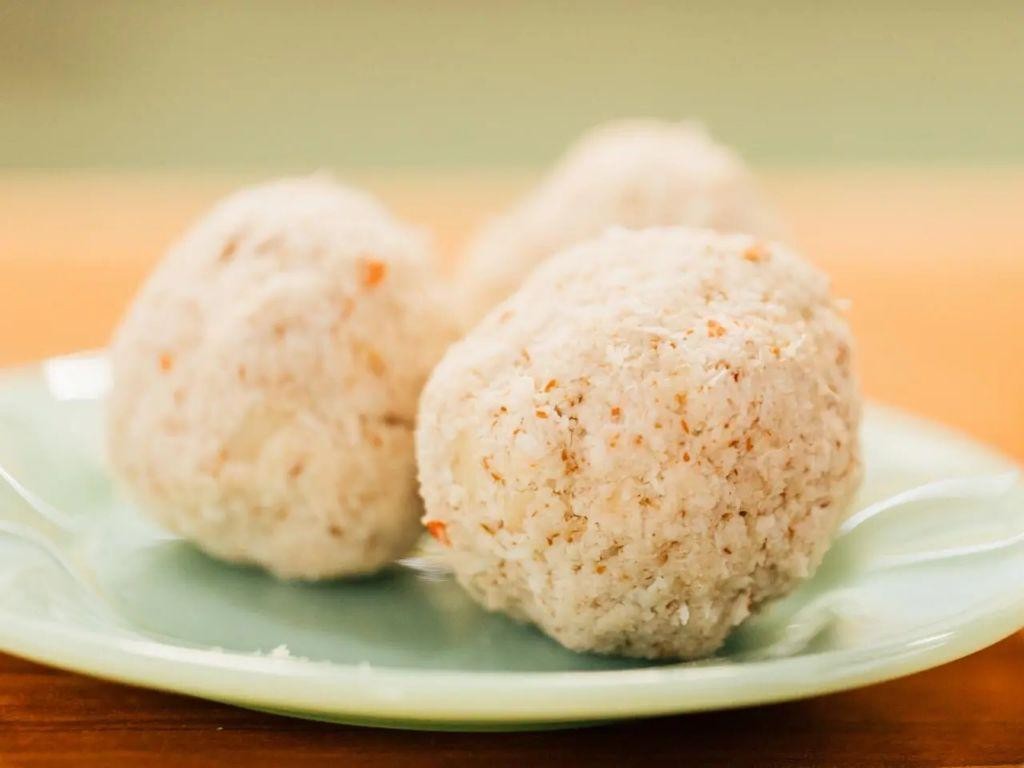
Cassava Pone

Picture this: a dessert so delightfully dense and sweet it could double as a building material, yet so irresistibly comforting it’s basically a hug from your Caribbean grandma. Cassava pone is the unsung hero of the root vegetable world, a chewy, coconutty slab of joy that’s easier to make than pronouncing its name correctly on the first try.
Serving: 12 | Pre Time: 20 minutes | Cooking Time: 75 minutes
Ingredients
- 4 cups grated cassava
- 1 cup granulated sugar
- 1 cup coconut milk
- 1/2 cup unsweetened shredded coconut
- 1/4 cup melted unsalted butter
- 1 tsp vanilla extract
- 1 tsp ground cinnamon
- 1/2 tsp ground nutmeg
- 1/4 tsp salt
Instructions
- Preheat your oven to 350°F and grease a 9×9 inch baking pan.
- In a large bowl, combine the 4 cups grated cassava, 1 cup granulated sugar, 1 cup coconut milk, 1/2 cup unsweetened shredded coconut, 1/4 cup melted unsalted butter, 1 tsp vanilla extract, 1 tsp ground cinnamon, 1/2 tsp ground nutmeg, and 1/4 tsp salt. Tip: Squeeze excess liquid from the grated cassava with your hands first to prevent a soggy pone.
- Mix all ingredients thoroughly until a thick, cohesive batter forms, about 2-3 minutes.
- Pour the batter into the prepared pan and spread it evenly with a spatula.
- Bake at 350°F for 70-75 minutes, or until the top is golden brown and a toothpick inserted into the center comes out clean. Tip: If the top browns too quickly, loosely tent it with aluminum foil halfway through baking.
- Remove the pan from the oven and let it cool completely in the pan on a wire rack for at least 2 hours. Tip: Don’t rush the cooling—this allows the pone to set properly for clean slicing.
- Once cooled, slice into 12 squares and serve.
Let’s be real: this pone is a textural triumph, boasting a firm, fudgy bite that gives way to sweet, spiced coconut notes. Serve it warm with a scoop of vanilla ice cream for a decadent twist, or enjoy it at room temperature as the perfect afternoon pick-me-up that sticks to your ribs (and maybe your teeth, in the best way).
Guyanese Garlic Pork
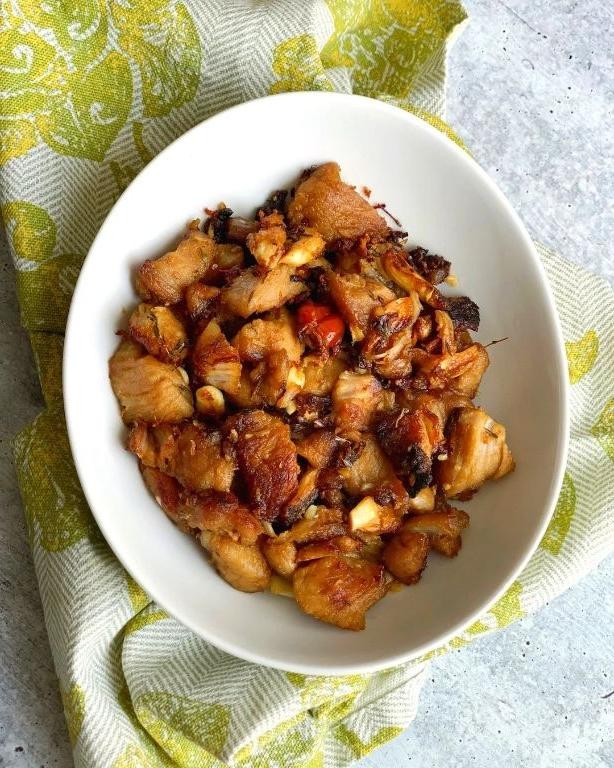
Venture beyond your usual pork routine with this Guyanese garlic pork—a dish so packed with flavor, it might just make your taste buds do a happy dance. Imagine tender pork swimming in a garlicky, spicy marinade that’s been working its magic for days, then fried to crispy perfection. It’s the kind of meal that turns a regular Tuesday into a Caribbean-inspired feast, no passport required.
Serving: 4 | Pre Time: 1440 minutes | Cooking Time: 20 minutes
Ingredients
– 2 pounds pork shoulder, cut into 1-inch cubes
– 1 cup white vinegar
– 1/2 cup water
– 1/4 cup vegetable oil
– 8 cloves garlic, minced
– 2 scotch bonnet peppers, minced
– 1 tablespoon salt
– 1 teaspoon black pepper
– 1 teaspoon dried thyme
Instructions
1. In a large bowl, combine 2 pounds pork shoulder cubes, 1 cup white vinegar, 1/2 cup water, 8 cloves minced garlic, 2 minced scotch bonnet peppers, 1 tablespoon salt, 1 teaspoon black pepper, and 1 teaspoon dried thyme.
2. Mix thoroughly until the pork is evenly coated with the marinade.
3. Cover the bowl with plastic wrap and refrigerate for 24 hours to allow the flavors to penetrate deeply—this marinating time is key for maximum taste.
4. After 24 hours, remove the pork from the refrigerator and drain the marinade completely, discarding the liquid.
5. Pat the pork cubes dry with paper towels to ensure they fry up crispy instead of steaming.
6. Heat 1/4 cup vegetable oil in a large skillet over medium-high heat until it shimmers, about 350°F.
7. Add the pork cubes to the hot oil in a single layer, working in batches if necessary to avoid overcrowding the pan.
8. Fry the pork for 8-10 minutes, turning occasionally, until all sides are golden brown and crispy.
9. Use a slotted spoon to transfer the fried pork to a plate lined with paper towels to drain excess oil, which helps keep it from getting soggy.
10. Serve immediately while hot for the best texture and flavor.
This dish boasts a delightful contrast: crispy, caramelized edges give way to juicy, garlic-infused meat inside. The heat from the scotch bonnet peppers adds a gentle kick that lingers without overwhelming. Try serving it over fluffy rice or with fried plantains for a complete meal that’s sure to impress.
Guyanese Pholourie

Get ready to ditch your boring snack routine, because we’re diving into the crispy, golden world of Guyanese pholourie—these little fried dough balls are about to become your new obsession. Think of them as the ultimate party starter: fluffy on the inside, delightfully crunchy on the outside, and begging to be dunked into a tangy sauce. They’re so addictive, you might need to hide a batch for yourself before your friends descend like snack-seeking missiles!
Serving: 4 | Pre Time: 15 minutes | Cooking Time: 20 minutes
Ingredients
– 2 cups all-purpose flour
– 1 tablespoon baking powder
– 1 teaspoon ground turmeric
– 1 teaspoon ground cumin
– 1 teaspoon salt
– 1 cup warm water (about 110°F)
– 1 tablespoon vegetable oil, plus more for frying
– 2 cloves garlic, minced
– 1 small onion, finely chopped
– 1 scotch bonnet pepper, seeded and minced (optional)
– 1 cup mango chutney (for serving)
Instructions
1. In a large mixing bowl, whisk together 2 cups all-purpose flour, 1 tablespoon baking powder, 1 teaspoon ground turmeric, 1 teaspoon ground cumin, and 1 teaspoon salt until evenly combined.
2. Add 1 tablespoon vegetable oil, 2 cloves minced garlic, 1 small finely chopped onion, and 1 minced scotch bonnet pepper (if using) to the dry ingredients, stirring gently to distribute.
3. Gradually pour in 1 cup warm water (110°F) while mixing with a spoon or your hands until a soft, sticky dough forms—it should pull away from the bowl but still be tacky to the touch.
4. Cover the bowl with a damp kitchen towel and let the dough rest at room temperature for 10 minutes to allow the flavors to meld and the baking powder to activate.
5. While the dough rests, pour vegetable oil into a deep skillet or pot to a depth of 2 inches and heat it over medium-high heat until it reaches 350°F on a kitchen thermometer.
6. Lightly oil your hands to prevent sticking, then pinch off small pieces of dough (about 1 tablespoon each) and roll them into smooth balls between your palms.
7. Carefully drop 4-5 dough balls into the hot oil at a time, frying them for 3-4 minutes until they puff up and turn a deep golden brown, flipping occasionally with a slotted spoon for even cooking.
8. Remove the fried pholourie from the oil using the slotted spoon and drain them on a paper towel-lined plate to absorb excess grease.
9. Repeat steps 6-8 with the remaining dough, allowing the oil to return to 350°F between batches to ensure consistent crispiness.
10. Serve the pholourie immediately while hot, accompanied by 1 cup mango chutney for dipping.
Zesty and utterly satisfying, these pholourie boast a warm, earthy flavor from the turmeric and cumin, with a fluffy interior that contrasts perfectly with their crackly exterior. For a fun twist, try stuffing a few with a bit of cheese before frying, or serve them alongside a cooling cucumber raita to balance the heat—they’re guaranteed to disappear faster than you can say “more, please!”
Masala Fish with Mango Chutney
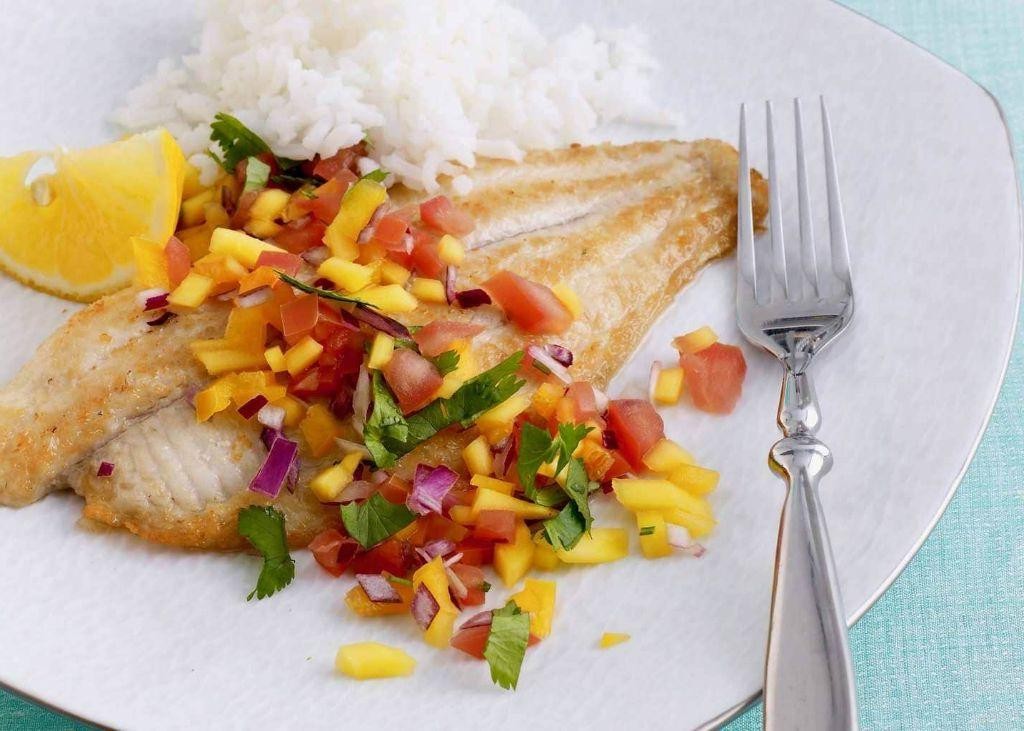
Tired of the same old fish dishes? Let’s shake things up with a vibrant, flavor-packed Masala Fish with Mango Chutney that’s so good, it might just make your taste buds do a happy dance. This dish combines tender, spice-rubbed fish with a sweet-tangy homemade chutney—perfect for when you want a restaurant-worthy meal without leaving your kitchen. Trust me, it’s a game-changer for weeknight dinners or impressing your foodie friends!
Serving: 4 | Pre Time: 15 minutes | Cooking Time: 20 minutes
Ingredients
– 4 (6-ounce) white fish fillets (like cod or tilapia)
– 1 tablespoon vegetable oil
– 2 teaspoons garam masala
– 1 teaspoon ground turmeric
– 1 teaspoon ground cumin
– 1/2 teaspoon salt
– 1/4 teaspoon cayenne pepper
– 1 ripe mango, peeled and diced
– 1/4 cup red onion, finely chopped
– 2 tablespoons fresh cilantro, chopped
– 1 tablespoon lime juice
– 1 teaspoon grated fresh ginger
– 1/2 teaspoon sugar
Instructions
1. Pat the fish fillets dry with paper towels to ensure a crisp sear.
2. In a small bowl, combine the garam masala, turmeric, cumin, salt, and cayenne pepper to make the spice rub.
3. Rub the spice mixture evenly over both sides of each fish fillet, coating them thoroughly.
4. Heat the vegetable oil in a large skillet over medium-high heat until it shimmers, about 2 minutes.
5. Place the fish fillets in the skillet and cook for 4-5 minutes per side, or until the fish flakes easily with a fork and reaches an internal temperature of 145°F.
6. While the fish cooks, prepare the mango chutney by combining the diced mango, red onion, cilantro, lime juice, ginger, and sugar in a medium bowl.
7. Stir the chutney ingredients until well mixed, then let it sit for 5 minutes to allow the flavors to meld.
8. Transfer the cooked fish to a serving platter and spoon the mango chutney over the top.
9. Serve immediately for the best texture and flavor.
Here’s the delicious payoff: the fish turns out flaky and aromatic with a warm spice kick, while the chutney adds a refreshing burst of sweetness and tang. For a fun twist, try serving it over a bed of fluffy rice or with naan bread to soak up all those incredible juices—it’s a combo that’ll have everyone asking for seconds!
Coconut Choka
Just when you thought coconut couldn’t get any more exciting, meet Coconut Choka—the smoky, spicy, and utterly addictive Trinidadian side dish that’s about to become your new kitchen obsession. This isn’t your average coconut situation; it’s a flavor explosion that’ll have you questioning why you ever settled for plain shredded coconut in the first place. Get ready to char, smash, and savor your way to a truly unforgettable culinary experience.
Serving: 4 | Pre Time: 10 minutes | Cooking Time: 15 minutes
Ingredients
– 1 whole fresh coconut
– 2 tablespoons vegetable oil
– 1 small onion, finely chopped
– 2 cloves garlic, minced
– 1 Scotch bonnet pepper, finely chopped (seeds removed for less heat)
– 1 teaspoon ground cumin
– 1/2 teaspoon salt
– 2 tablespoons fresh lime juice
– 2 tablespoons chopped fresh cilantro
Instructions
1. Preheat your oven’s broiler to 500°F and position the rack 6 inches from the heat source.
2. Crack the whole fresh coconut open using a hammer, drain the water, and remove the white flesh from the shell.
3. Cut the coconut flesh into 1-inch thick slices.
4. Place the coconut slices on a baking sheet in a single layer and broil for 5-7 minutes until deeply charred and smoky, flipping once halfway through.
5. Remove the charred coconut from the oven and let it cool for 3 minutes until safe to handle.
6. Chop the cooled coconut into small, rough pieces using a sharp knife.
7. Heat 2 tablespoons vegetable oil in a skillet over medium heat until it shimmers, about 1 minute.
8. Add 1 small finely chopped onion to the hot oil and cook for 4-5 minutes until translucent and slightly golden.
9. Stir in 2 cloves minced garlic and 1 finely chopped Scotch bonnet pepper (tip: wear gloves when handling hot peppers to avoid skin irritation).
10. Cook the garlic-pepper mixture for 1 minute until fragrant but not browned.
11. Add the chopped charred coconut to the skillet along with 1 teaspoon ground cumin and 1/2 teaspoon salt.
12. Cook the mixture for 3-4 minutes, stirring constantly, until everything is well combined and heated through.
13. Remove the skillet from heat and stir in 2 tablespoons fresh lime juice (tip: fresh lime juice brightens the dish better than bottled).
14. Transfer the Coconut Choka to a serving bowl and fold in 2 tablespoons chopped fresh cilantro just before serving (tip: adding cilantro at the end preserves its fresh flavor).
Zesty lime and fiery pepper cut through the coconut’s rich smokiness, creating a texture that’s both tender and satisfyingly chunky. Serve it warm with flatbread for scooping, or get creative by stuffing it into roasted sweet potatoes for a Caribbean-inspired twist that’ll make your taste buds dance.
Conclusion
Overall, this collection offers a vibrant taste of Guyana’s rich culinary heritage. We hope these 33 delicious recipes inspire your next kitchen adventure. Give them a try, leave a comment telling us which dish you loved most, and don’t forget to share your favorites on Pinterest to spread the joy of Guyanese cooking!


