Hey there, grill masters and smoke enthusiasts! Get ready to fire up your taste buds with these incredible recipes perfect for backyard barbecues and flavorful feasts. From juicy smoked brisket to perfectly charred veggies, we’ve gathered the most mouthwatering dishes that will make you the hero of every cookout. Let’s dive into these sizzling creations that will have everyone asking for seconds!
Smoky Chipotle BBQ Ribs
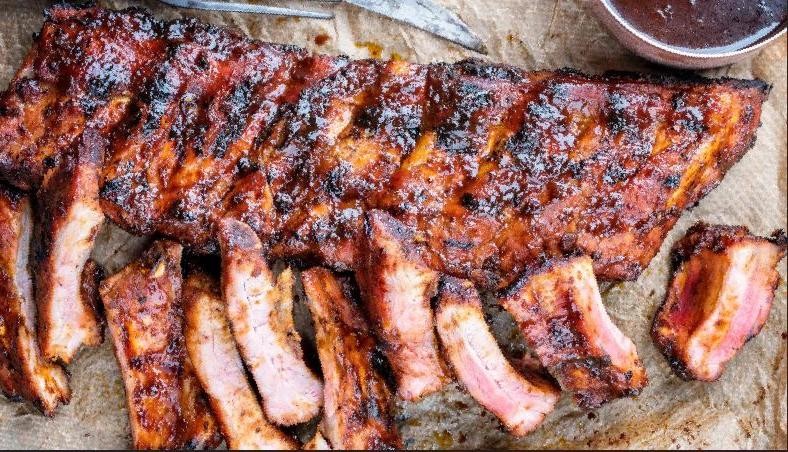
So you think you can handle ribs that’ll make your taste buds do a happy dance and possibly start a family feud over the last piece? These smoky chipotle BBQ ribs are the culinary equivalent of a fireworks show in your mouth—minus the danger, plus the deliciousness.
Ingredients
- 2 racks of pork baby back ribs (because bigger is definitely better here)
- A generous ½ cup of brown sugar for that sweet, sweet love
- 2 tablespoons of smoked paprika (we’re going for drama)
- 1 tablespoon of garlic powder (the breath is worth it)
- 1 tablespoon of onion powder (its more polite cousin)
- 2 teaspoons of salt (to balance out all that sweetness)
- A couple of teaspoons of black pepper for a little kick
- 2-3 chipotle peppers in adobo sauce, finely chopped (handle with care, spicy pants)
- A good ¼ cup of apple cider vinegar for tang
- 1 cup of your favorite BBQ sauce (no judgment if it’s from a bottle)
- A splash of Worcestershire sauce because why not?
Instructions
- Preheat your oven to 275°F—low and slow is the name of the game here.
- Remove the membrane from the back of the ribs by sliding a knife under it and pulling it off with a paper towel for grip.
- Mix together the brown sugar, smoked paprika, garlic powder, onion powder, salt, and black pepper in a small bowl.
- Rub this spice mixture evenly over both sides of the ribs, really working it in like you mean it.
- Place the ribs on a baking sheet lined with foil, meaty side up.
- Tightly cover the ribs with another piece of foil, creating a sealed packet to trap steam.
- Bake the ribs at 275°F for 2.5 hours until the meat is tender but not falling off the bone.
- While the ribs bake, combine the chopped chipotle peppers, apple cider vinegar, BBQ sauce, and Worcestershire sauce in a saucepan.
- Simmer the sauce over medium heat for 10 minutes until slightly thickened, stirring occasionally.
- Remove the ribs from the oven and carefully uncover them—watch for steam!
- Brush a thick layer of the chipotle BBQ sauce over the top of the ribs.
- Increase the oven temperature to 400°F and return the uncovered ribs to the oven.
- Bake for 15-20 minutes until the sauce is sticky and caramelized with some charred edges.
- Let the ribs rest for 10 minutes before slicing between the bones.
Heavenly doesn’t even begin to cover it—these ribs emerge with meat so tender it practically sighs when you bite, wrapped in a smoky-sweet glaze with just enough chipotle heat to keep things interesting. Serve them with extra sauce for dipping, a stack of napkins the size of your head, and maybe a disclaimer that you’re not responsible for any sauce-related clothing casualties.
Grilled Honey Bourbon Chicken Wings
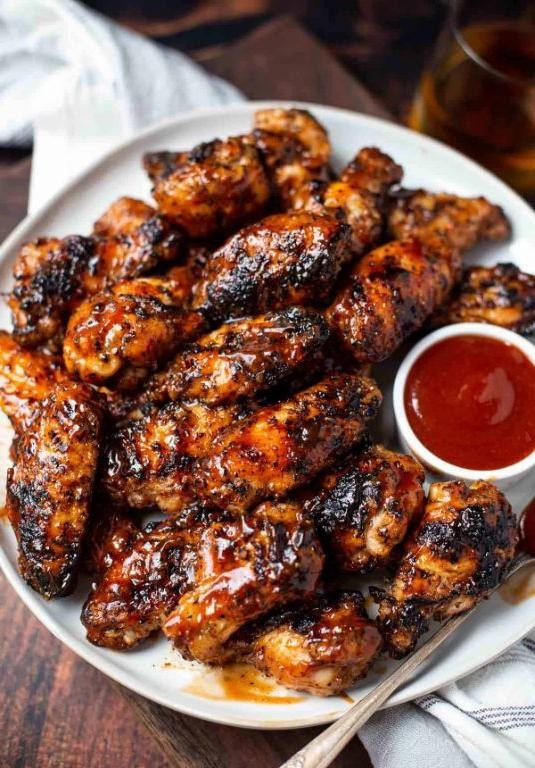
Unbelievably good doesn’t even begin to cover these wings—they’re the kind of sticky, smoky, sweet-and-savory magic that’ll make you the hero of any game day or backyard bash. Seriously, your friends might start charging admission for these bad boys.
Ingredients
– A couple of pounds of chicken wings
– A good glug of olive oil (about 2 tablespoons)
– A generous sprinkle of salt and black pepper (about 1 tsp each)
– A cup of your favorite bourbon
– A half cup of honey
– A quarter cup of soy sauce
– 3 cloves of garlic, minced
– A splash of apple cider vinegar (about 2 tablespoons)
– A pinch of red pepper flakes (optional, for heat)
Instructions
1. Pat the chicken wings completely dry with paper towels—this helps them get extra crispy on the grill.
2. Toss the wings in a large bowl with the olive oil, salt, and black pepper until evenly coated.
3. Preheat your grill to medium-high heat, around 375°F, and lightly oil the grates to prevent sticking.
4. Place the wings on the grill and cook for 10–12 minutes per side, flipping once, until the skin is golden and slightly charred.
5. While the wings grill, combine the bourbon, honey, soy sauce, minced garlic, apple cider vinegar, and red pepper flakes in a small saucepan.
6. Bring the sauce to a simmer over medium heat, then reduce heat to low and let it bubble gently for 8–10 minutes until it thickens slightly (it should coat the back of a spoon).
7. Brush the thickened sauce generously over the wings during the last 5 minutes of grilling, turning them to coat evenly.
8. Transfer the wings to a serving platter and drizzle with any remaining sauce from the pan.
Now, take a bite—that sticky, caramelized glaze gives way to juicy, smoky meat with a hint of bourbon warmth. Serve these piled high with crunchy celery sticks and a cool blue cheese dip for the ultimate flavor showdown.
Slow-Smoked Pulled Pork Shoulder
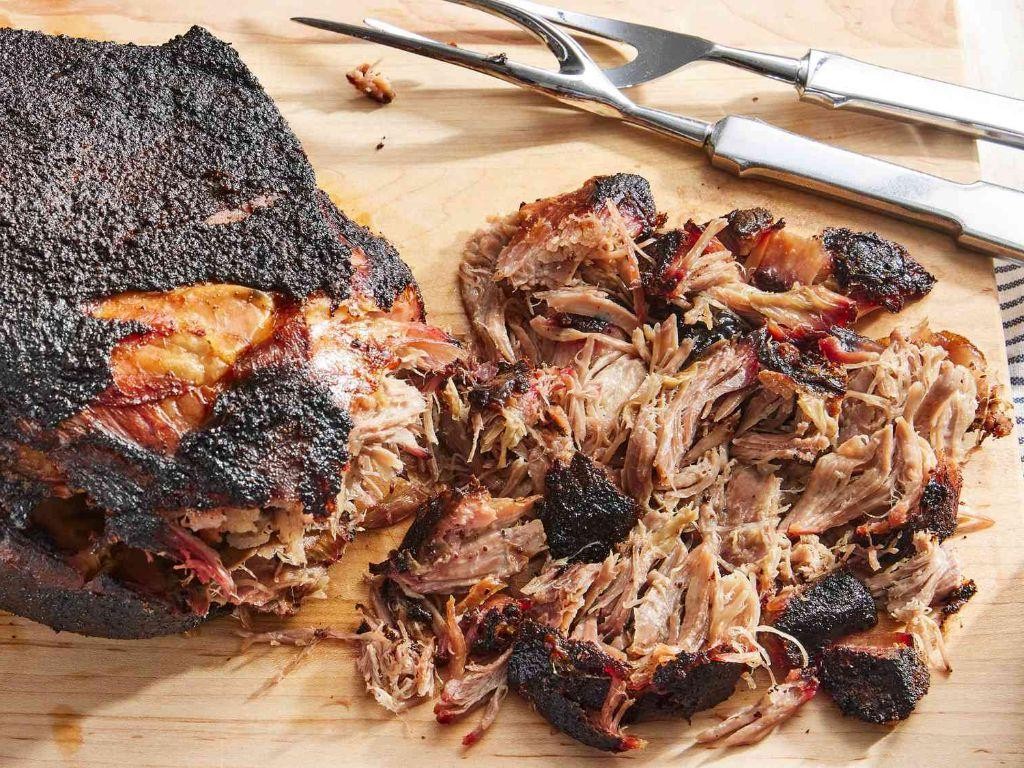
Jeez, if there’s a more satisfying way to spend a weekend than coaxing a massive hunk of pork into smoky, pull-apart perfection, we haven’t found it. This isn’t just cooking; it’s a deliciously slow-motion magic trick that turns a humble shoulder into a feast worthy of a standing ovation. Get ready to become the undisputed BBQ hero of your friend group.
Ingredients
– One big ol’ 8-pound pork shoulder (also called a Boston butt)
– A generous ¼ cup of your favorite BBQ rub
– A couple of tablespoons of yellow mustard (trust me, it’s just for glue!)
– A full cup of apple juice in a spray bottle
– A good splash of apple cider vinegar
– A handful of wood chunks (hickory or applewood are our faves)
Instructions
1. Pat your 8-pound pork shoulder completely dry with paper towels.
2. Slather the entire surface of the pork shoulder with a couple of tablespoons of yellow mustard—this creates a “glue” for the rub.
3. Massage a generous ¼ cup of your favorite BBQ rub onto every inch of the mustard-coated pork, pressing it in firmly.
4. Fire up your smoker and stabilize the temperature at a steady 225°F.
5. Place the seasoned pork shoulder directly on the smoker grate, fat-side up.
6. Add a handful of your chosen wood chunks (hickory or applewood) to the coals for smoke.
7. Close the smoker lid and let the pork smoke undisturbed for 3 hours. Pro Tip: Don’t peek! Every time you open the lid, you let out heat and smoke, adding cooking time.
8. After 3 hours, spritz the entire surface of the pork with a mixture of one cup of apple juice and a good splash of apple cider vinegar.
9. Continue smoking the pork at 225°F, spritzing it with the apple juice mixture every 45 minutes.
10. Smoke until the internal temperature of the pork reaches 165°F, which typically takes about 6-7 hours total.
11. Tightly wrap the pork shoulder in two layers of heavy-duty aluminum foil. Pro Tip: This “Texas Crutch” step helps power through the stall and keeps the meat incredibly juicy.
12. Return the foil-wrapped pork to the smoker (or a 225°F oven) and continue cooking until the internal temperature hits 203°F, about 2-3 more hours.
13. Remove the wrapped pork from the smoker and let it rest, still wrapped in the foil, for a full hour. Pro Tip: This rest is non-negotiable—it lets the juices redistribute, making every bite moist.
14. Unwrap the pork and use two forks to shred the meat, discarding any large fat pockets.
Zesty, tangy, and impossibly tender, this pulled pork boasts a beautiful smoke ring and a bark that crackles with flavor. Pile it high on soft buns for classic sandwiches, or get wild and use it as a topping for loaded nachos or stuffed inside crispy potato skins.
Herb-Marinated Grilled Tofu Skewers
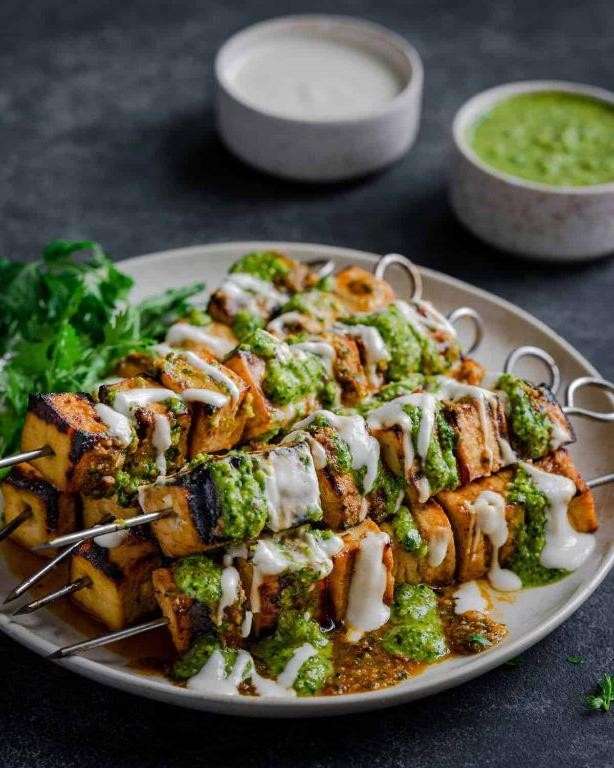
Finally, a tofu recipe that won’t make your carnivorous friends side-eye your grill! Forget bland blocks—we’re transforming humble tofu into flavor-packed skewers that’ll have everyone fighting for the last bite. This herb-marinated magic proves plant-based eating can be downright delicious and seriously fun.
Ingredients
– 1 block of extra-firm tofu (about 14 ounces), pressed and cubed
– A generous ¼ cup of olive oil
– 3 tablespoons of soy sauce (or tamari if you’re feeling fancy)
– 2 tablespoons of fresh lemon juice
– 2 cloves of garlic, minced until they’re practically gossiping
– 1 tablespoon of maple syrup for that sweet whisper
– 1 teaspoon of dried oregano
– A couple of bamboo skewers, soaked in water for 30 minutes
– A pinch of salt and a few cracks of black pepper
Instructions
1. Press your tofu for 30 minutes using a tofu press or by wrapping it in a clean kitchen towel and placing a heavy pan on top to remove excess water.
2. Cut the pressed tofu into 1-inch cubes—uniform pieces ensure even cooking and prevent some from turning into charcoal while others stay pale.
3. In a medium bowl, whisk together ¼ cup olive oil, 3 tablespoons soy sauce, 2 tablespoons lemon juice, 2 minced garlic cloves, 1 tablespoon maple syrup, 1 teaspoon dried oregano, a pinch of salt, and a few cracks of black pepper until well combined.
4. Add the tofu cubes to the marinade, gently tossing to coat every surface, then cover and refrigerate for at least 1 hour (or up to 4 hours for maximum flavor penetration).
5. While the tofu marinates, soak 8-10 bamboo skewers in water for 30 minutes to prevent them from burning on the grill—this simple step saves you from ashy skewer disasters.
6. Thread 4-5 marinated tofu cubes onto each soaked skewer, leaving a small space between cubes for heat circulation.
7. Preheat your grill to medium-high heat (about 400°F) and lightly oil the grates to prevent sticking.
8. Place the skewers on the grill and cook for 3-4 minutes per side, or until you see distinct grill marks and the edges become slightly crispy.
9. Use tongs to rotate the skewers carefully—don’t force them if they stick, as they’ll release naturally when properly seared.
10. Remove the skewers from the grill when all sides are nicely charred and the tofu feels firm to the touch.
Heavenly doesn’t begin to describe these skewers—they’re firm yet tender with crispy, caramelized edges that give way to a herb-infused interior. Serve them over quinoa with a squeeze of lemon, or tuck them into warm pitas with tzatziki for a handheld feast that’ll make your taste buds do a happy dance.
Maple-Glazed Cedar Plank Salmon
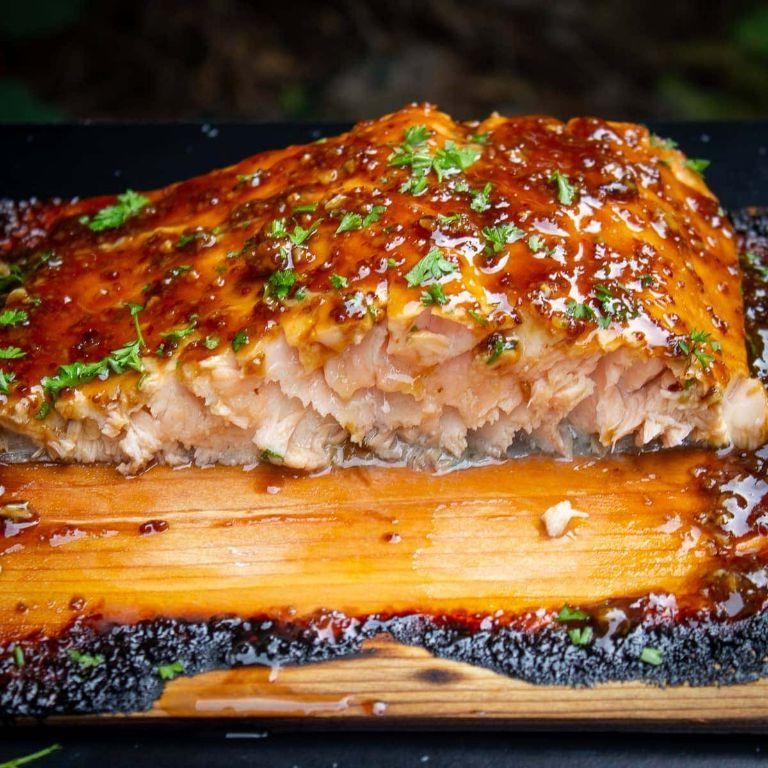
Mmm, get ready to make your taste buds do a happy dance with this cedar plank salmon that’s basically wearing a sweet maple syrup sweater. This isn’t just dinner—it’s a flavor vacation that’ll have you feeling like a gourmet chef without the stress. Seriously, your grill is about to become your new best friend.
Ingredients
– One beautiful 1.5-pound salmon fillet with the skin on (trust me on this)
– A generous ¼ cup of pure maple syrup (the real stuff, not pancake impostor)
– A couple of tablespoons of soy sauce for that salty-sweet magic
– A tablespoon of Dijon mustard to cut through the sweetness
– A couple of minced garlic cloves because everything’s better with garlic
– A good sprinkle of black pepper
– One untreated cedar plank, soaked for at least 2 hours (this is non-negotiable)
Instructions
1. Soak your cedar plank in water for at least 2 hours before you even think about grilling—this prevents it from becoming a fiery mess.
2. Preheat your grill to medium-high heat, aiming for 400°F, and get those grates nice and hot.
3. Whisk together the maple syrup, soy sauce, Dijon mustard, minced garlic, and black pepper in a small bowl until it’s perfectly combined.
4. Pat your salmon fillet completely dry with paper towels—this helps the glaze stick like glitter on a craft project.
5. Brush half of the maple glaze evenly over the top of the salmon fillet, making sure every inch is covered.
6. Place the soaked cedar plank directly on the grill grates and close the lid for 3 minutes until it starts to lightly smoke and smell amazing.
7. Carefully place the glazed salmon skin-side down on the hot cedar plank using tongs.
8. Close the grill lid and cook for 12-15 minutes—the salmon is done when it flakes easily with a fork and reaches 145°F internally.
9. Brush the remaining glaze over the salmon during the last 3 minutes of cooking for an extra glossy finish.
10. Use a wide spatula to transfer the salmon from the plank to a serving platter, leaving the skin behind on the cedar.
Oh my goodness, that flaky, moist salmon with its caramelized maple crust is pure magic. The cedar smoke gives it this earthy depth that pairs perfectly with the sweet-salty glaze—serve it over a bed of wild rice or with roasted asparagus for a meal that’ll have everyone asking for seconds.
Garlic-Butter Grilled Lobster Tails
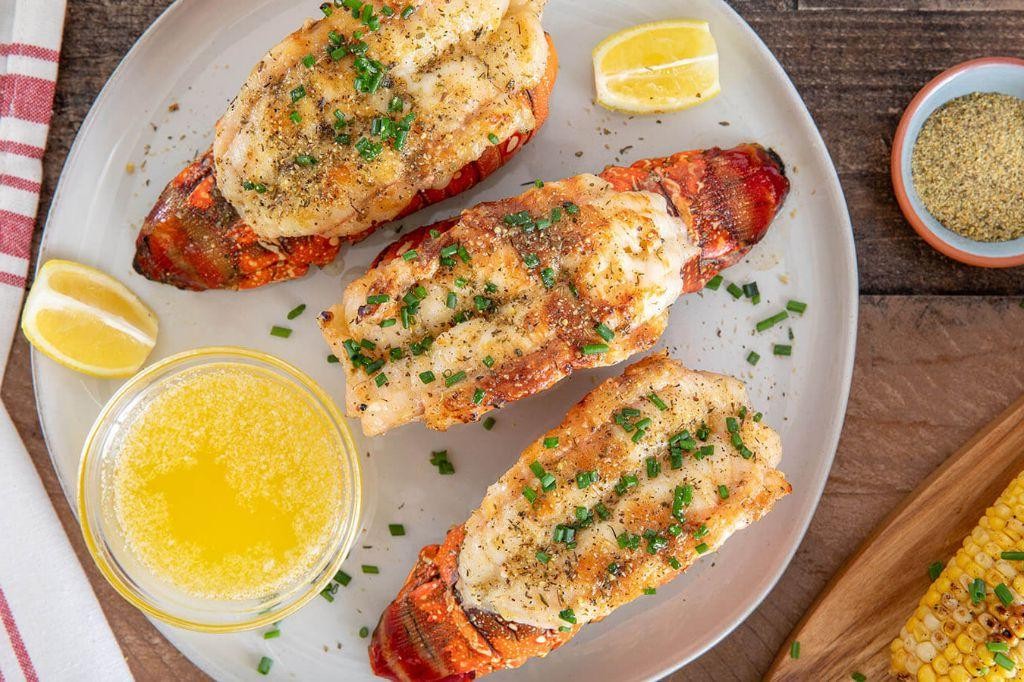
Now, let’s talk about the ocean’s answer to filet mignon—these garlic-butter grilled lobster tails that’ll make you feel like a seaside chef without the pesky seagulls stealing your lunch. Get ready to transform those fancy-looking crustaceans into your new backyard showstopper!
Ingredients
– 4 lobster tails (about 6 ounces each, because size matters)
– 1/2 cup of unsalted butter (the good stuff)
– 4 garlic cloves, minced until they can’t gossip anymore
– A generous squeeze of fresh lemon juice (about 2 tablespoons)
– A pinch of salt and a couple of cracks of black pepper
– A handful of fresh parsley, chopped like confetti
– A light drizzle of olive oil (about 1 tablespoon)
Instructions
1. Preheat your grill to medium-high heat, aiming for 400°F—hot enough to sizzle but not incinerate.
2. Using kitchen shears, carefully cut through the top shell of each lobster tail lengthwise, stopping at the tail fin. Pro tip: Keep the shell intact at the bottom to create a perfect butter pocket!
3. Gently loosen the meat from the shell by running your fingers underneath, then lift it up and rest it on top of the split shell—this creates that gorgeous restaurant-style presentation.
4. In a small saucepan over low heat, melt the butter completely, then stir in the minced garlic and cook for exactly 1 minute until fragrant but not browned.
5. Remove the butter mixture from heat and immediately stir in the lemon juice, salt, pepper, and chopped parsley.
6. Lightly brush the lobster meat with olive oil to help it get those beautiful grill marks.
7. Place the lobster tails meat-side down on the preheated grill and cook for 5-6 minutes until you see those characteristic char marks develop.
8. Flip the lobster tails so they’re shell-side down, then generously brush the garlic-butter mixture over the exposed meat. Pro tip: Reserve about 1/4 of the butter for serving—future you will thank past you!
9. Close the grill lid and continue cooking for another 4-5 minutes until the meat is opaque and registers 145°F on an instant-read thermometer.
10. Remove from grill and immediately drizzle with the remaining garlic-butter sauce.
Get ready for that magical moment when the sweet, firm lobster meat meets the rich, garlicky butter in a texture party that’s both succulent and satisfying. Serve these beauties over creamy polenta to catch every drop of that glorious butter sauce, or go full coastal vibe with corn on the cob and a crisp white wine that won’t judge your butter consumption.
Smoked Applewood Bacon-Wrapped Corn
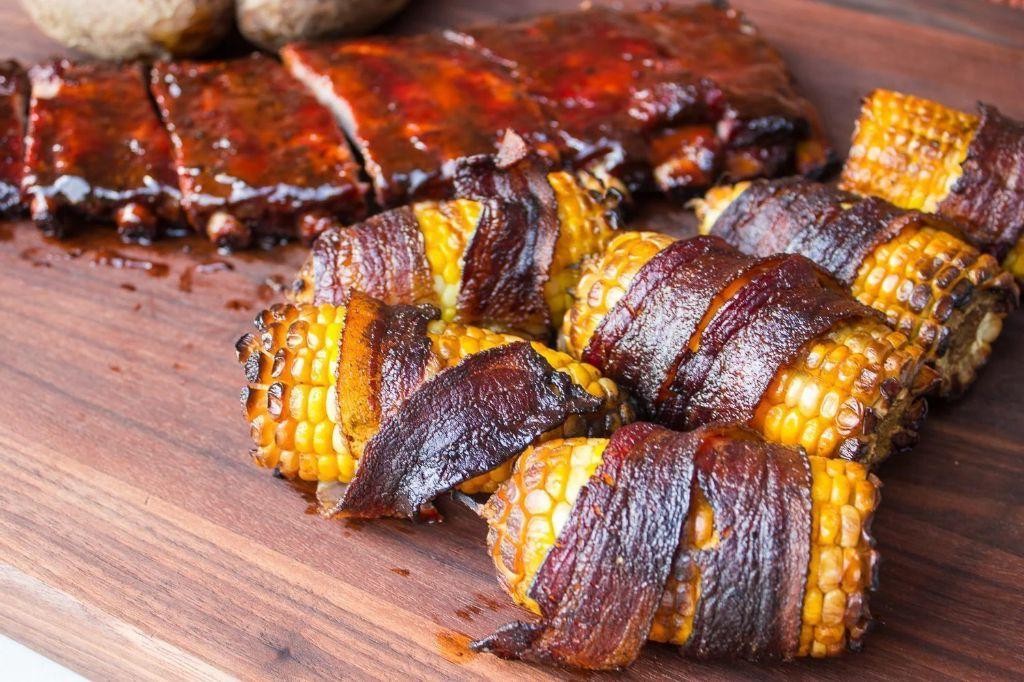
Aren’t you tired of the same old corn on the cob? Prepare to meet its smoky, bacon-clad cousin that’s about to become your new backyard BBQ superstar. This smoked applewood bacon-wrapped corn is the culinary equivalent of putting a tuxedo on your favorite summer vegetable—suddenly everything feels fancier and more delicious!
Ingredients
– 4 ears of fresh corn, husks removed
– 8 slices of that glorious applewood smoked bacon
– 2 tablespoons of melted butter (because everything’s better with butter)
– A generous sprinkle of brown sugar (about ¼ cup)
– A couple of teaspoons of smoked paprika for that extra smoky kick
– A pinch of salt to balance the sweetness
Instructions
1. Preheat your smoker or grill to 250°F for that low-and-slow magic.
2. Brush each ear of corn evenly with melted butter using a pastry brush.
3. Combine brown sugar, smoked paprika, and salt in a small bowl, then sprinkle this sweet-spicy mixture generously over all sides of each corn cob.
4. Wrap each corn cob with 2 slices of applewood bacon, slightly overlapping the slices and tucking the ends underneath to secure them.
5. Place the bacon-wrapped corn directly on the smoker grates, making sure they’re not touching each other for even cooking.
6. Smoke for 45-60 minutes, turning every 15 minutes with tongs to ensure the bacon crisps evenly on all sides.
7. Check for doneness—the bacon should be crispy and caramelized, and the corn kernels should be tender when pierced with a fork.
8. Remove from heat using heatproof gloves and let rest for 5 minutes before serving.
Doesn’t that first bite just make your taste buds do a happy dance? The corn stays juicy and sweet while the bacon gets irresistibly crispy with that signature applewood smoke flavor. Try serving these beauties alongside grilled steak or chop them up to create the most epic corn and bacon salad you’ve ever encountered!
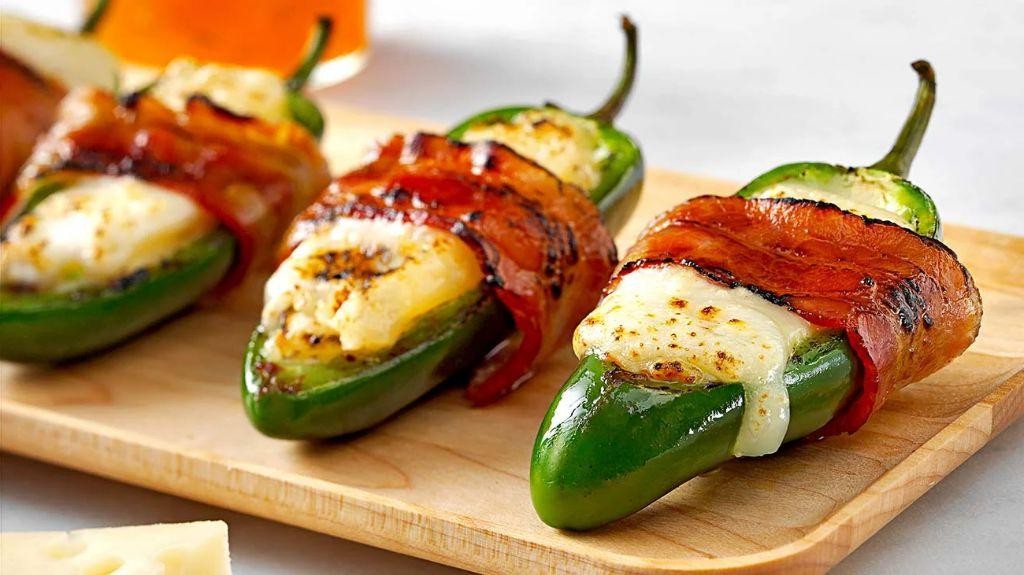
Spicy Grilled Jalapeño Popper Burgers

Man, do we have a burger that’ll make your taste buds do a happy dance! These Spicy Grilled Jalapeño Popper Burgers are the love child of your favorite bar snack and backyard BBQ—packed with cheesy, spicy, smoky goodness that’s guaranteed to level up your burger game.
Ingredients
- 1 pound of ground beef (80/20 blend for juiciness)
- 4 slices of thick-cut bacon
- 2 fresh jalapeños
- 4 ounces of cream cheese, softened
- 1/2 cup of shredded sharp cheddar cheese
- 1/4 cup of finely diced onion
- 1 tablespoon of your favorite BBQ rub
- 4 brioche burger buns
- A splash of olive oil
- A couple of pickle slices for serving
Instructions
- Preheat your grill to medium-high heat, around 400°F, and lightly oil the grates with a splash of olive oil to prevent sticking.
- Cook the bacon in a skillet over medium heat for 8–10 minutes until crispy, then drain on paper towels and crumble once cool.
- Slice the jalapeños in half lengthwise, remove the seeds for less heat (or leave them in if you’re brave!), and chop finely.
- In a medium bowl, mix the softened cream cheese, shredded cheddar, crumbled bacon, diced jalapeños, and diced onion until well combined.
- Divide the ground beef into 4 equal portions and form each into a patty about 1/2-inch thick, creating a slight indentation in the center with your thumb to prevent puffing.
- Season both sides of each patty generously with 1 tablespoon of BBQ rub, pressing it in lightly.
- Grill the patties for 4–5 minutes per side, or until the internal temperature reaches 160°F for well-done, flipping only once to get those perfect grill marks.
- During the last 2 minutes of grilling, place a generous scoop of the jalapeño popper mixture on top of each patty and close the grill lid to let it melt and get bubbly.
- Toast the brioche buns on the grill for about 1 minute until lightly golden and warm.
- Assemble the burgers by placing each cheesy patty on a bun bottom, topping with a couple of pickle slices, and crowning with the bun top.
Forget boring burgers—this one’s a flavor explosion with a creamy, spicy kick and smoky bacon crunch that’ll have you coming back for seconds. Serve it up with extra napkins and a cold drink to tame the heat, or get fancy by slicing it into sliders for your next game day spread.
Rosemary and Garlic Smoked Lamb Chops
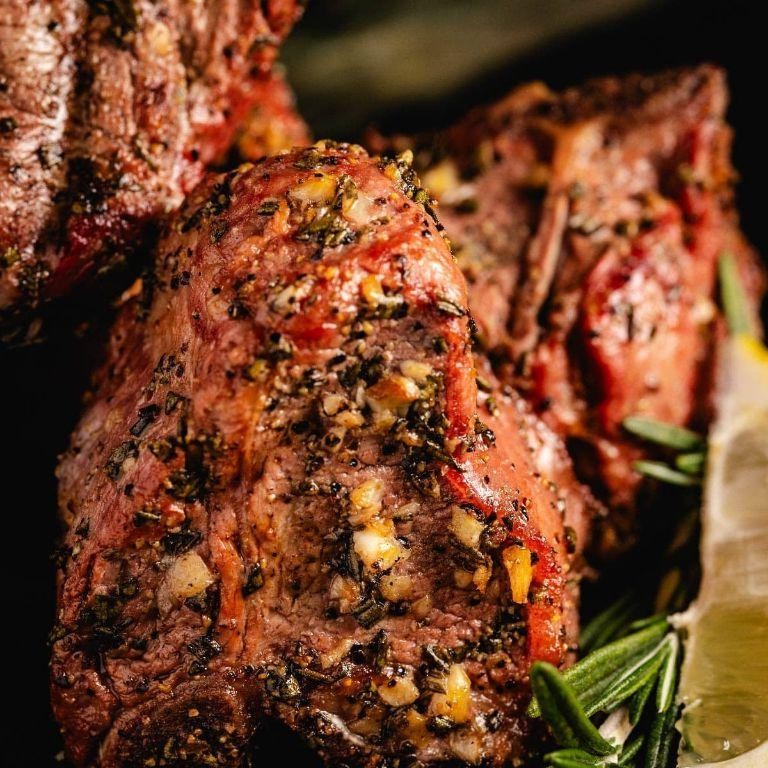
Oh my carnivorous friends, prepare to have your taste buds do a happy dance! These rosemary and garlic smoked lamb chops are about to become the rockstars of your dinner table—juicy, fragrant, and so ridiculously flavorful you’ll want to write them a thank-you note.
Ingredients
– A couple of lamb chops (about 1.5 pounds total)
– 2 tablespoons of olive oil
– 3 cloves of garlic, minced
– 1 tablespoon of fresh rosemary, chopped
– A generous pinch of salt
– A good crack of black pepper
Instructions
1. Pat the lamb chops completely dry with paper towels—this helps them get a beautiful sear instead of steaming.
2. Rub the olive oil all over both sides of each lamb chop.
3. Sprinkle the minced garlic, chopped rosemary, salt, and black pepper evenly over the chops, pressing gently so the seasoning sticks.
4. Let the chops sit at room temperature for 20 minutes to take the chill off—this helps them cook more evenly.
5. Preheat your smoker to 225°F using your favorite wood chips (hickory or applewood work wonderfully here).
6. Place the lamb chops directly on the smoker grate and close the lid.
7. Smoke the chops for 45 minutes, resisting the urge to peek too often—every time you open the lid, heat and smoke escape.
8. Check the internal temperature with a meat thermometer; you’re aiming for 135°F for medium-rare perfection.
9. Remove the chops from the smoker and let them rest on a cutting board for 5 minutes—this allows the juices to redistribute throughout the meat.
10. Serve immediately while they’re still warm and fragrant.
Zesty and tender, these chops boast a smoky crust that gives way to rosy-pink, garlic-infused interior. The rosemary adds an herby punch that plays beautifully with the rich lamb flavor—try serving them over creamy polenta or alongside a bright arugula salad to cut through the richness. You’ll be fighting over who gets the last bite!
Cajun Grilled Shrimp and Pineapple Skewers

Just when you thought your grill couldn’t get any more exciting, these skewers crash the party like a Mardi Gras parade in your mouth. Jumbo shrimp and sweet pineapple get a spicy Cajun makeover that’ll have your taste buds doing the cha-cha.
Ingredients
- A pound of those big, beautiful shrimp (peeled and deveined, because nobody wants to do surgery while eating)
- A couple of cups of fresh pineapple chunks (about 1-inch pieces)
- A good glug of olive oil (about 2 tablespoons)
- 2 tablespoons of your favorite Cajun seasoning (the spicier, the better!)
- A squeeze of lime juice (about 1 tablespoon)
- 1 teaspoon of honey (for that sweet talk)
- Metal or soaked wooden skewers (so they don’t turn into tiny torches)
Instructions
- If using wooden skewers, soak them in water for at least 30 minutes to prevent them from burning on the grill.
- Thread the shrimp and pineapple chunks alternately onto the skewers, leaving a little space between each piece for even cooking.
- In a small bowl, whisk together the olive oil, Cajun seasoning, lime juice, and honey until well combined.
- Brush the marinade generously all over the shrimp and pineapple skewers, making sure every nook and cranny gets some love.
- Preheat your grill to medium-high heat (about 400°F) and lightly oil the grates to prevent sticking.
- Place the skewers on the hot grill and cook for 2-3 minutes per side, until the shrimp turn pink and opaque and develop nice grill marks.
- Flip the skewers carefully using tongs and cook for another 2-3 minutes on the other side.
- Remove the skewers from the grill when the shrimp are fully cooked and the pineapple has caramelized edges.
Every bite delivers that perfect contrast—juicy, slightly charred pineapple against plump, spicy shrimp with just enough kick to keep things interesting. Serve these bad boys over cilantro lime rice or stuff them into warm tortillas for the ultimate beach-in-your-mouth tacos.
Hickory-Smoked Beef Brisket
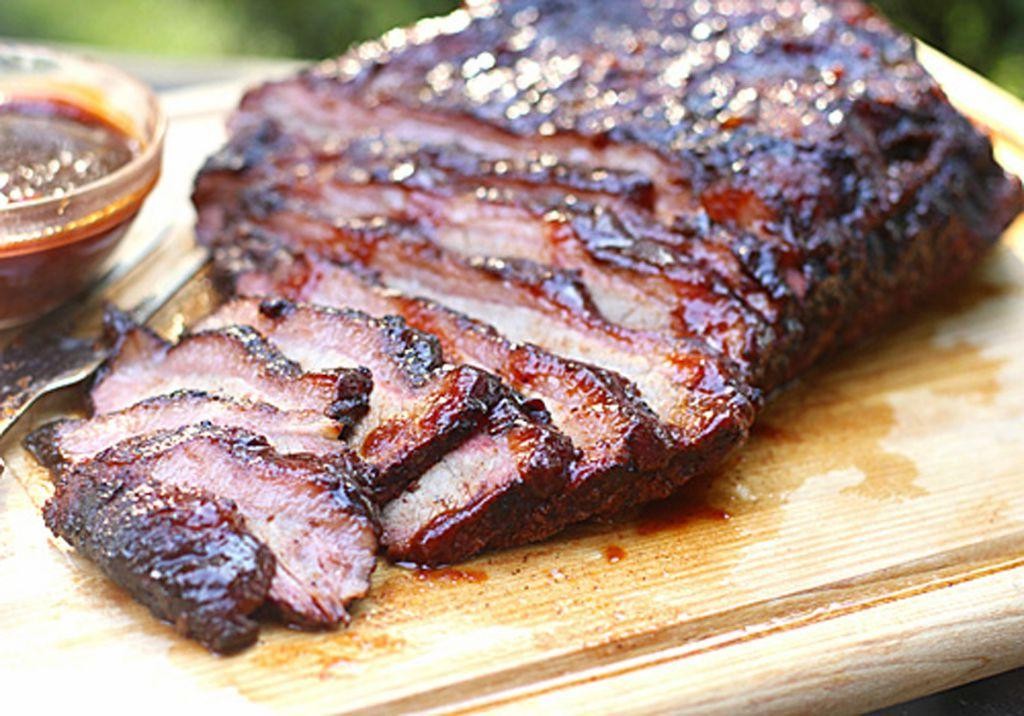
Zesty, smoky, and downright addictive—this hickory-smoked beef brisket is the weekend project your soul (and stomach) has been begging for. It’s the kind of low-and-slow magic that turns tough cuts into tender, juicy perfection, with a bark so good you’ll want to write it a love letter. Trust me, your grill is about to become your new best friend.
Ingredients
– One hefty beef brisket (around 10–12 pounds)
– A generous ½ cup of coarse kosher salt
– A couple of tablespoons of freshly cracked black pepper
– A splash of olive oil (about 2 tablespoons)
– A handful of hickory wood chunks (soaked in water for 30 minutes)
Instructions
1. Trim any thick fat caps from the brisket, leaving about ¼ inch for flavor and moisture.
2. Rub the entire brisket with olive oil to help the seasoning stick.
3. Massage the kosher salt and black pepper evenly over all sides of the brisket.
4. Fire up your smoker to a steady 225°F, using indirect heat.
5. Add the soaked hickory wood chunks to the coals for that deep, smoky flavor.
6. Place the brisket fat-side up on the grill grate, close the lid, and let it smoke for about 1.5 hours per pound (or until the internal temperature hits 165°F).
7. Wrap the brisket tightly in butcher paper once it reaches 165°F internal temperature to power through the stall and keep it juicy.
8. Continue smoking until the internal temperature reaches 203°F, which usually takes another 3–4 hours.
9. Remove the brisket from the smoker and let it rest, still wrapped, for at least 1 hour to redistribute the juices.
10. Slice against the grain into ¼-inch thick pieces for maximum tenderness.
Seriously, that bark is a crispy, peppery dream, and the meat pulls apart with a gentle tug. Serve it piled high on toasted buns with pickles, or go rogue and chop it into tacos—either way, it’s a flavor explosion worth every minute of patience.
Grilled Portobello Mushrooms with Balsamic Glaze
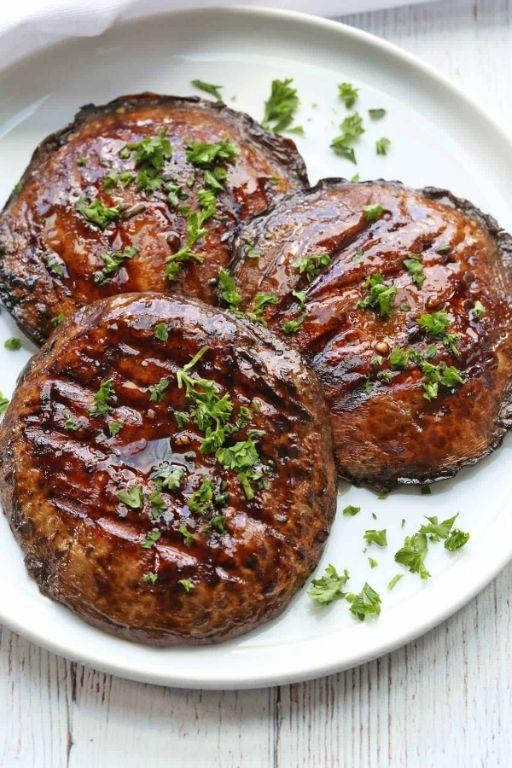
Brace yourselves, mushroom lovers—these grilled portobellos are about to become your new backyard obsession, turning even the most devoted carnivores into fungi fanatics with their meaty texture and tangy-sweet glaze. Seriously, these caps are so flavorful they might just start demanding their own spot at the dinner table. Get ready to fire up the grill and watch these humble mushrooms steal the show.
Ingredients
– 4 large portobello mushroom caps (stems removed)
– 2 tablespoons of olive oil
– A couple of cloves of garlic, minced
– A generous sprinkle of salt and black pepper
– 1/4 cup of balsamic vinegar
– A tablespoon of honey
– A splash of water
Instructions
1. Preheat your grill to medium-high heat, around 400°F—this ensures those beautiful grill marks without burning.
2. Gently wipe the portobello caps clean with a damp paper towel (no soaking—mushrooms are like sponges and will get soggy!).
3. In a small bowl, whisk together the olive oil, minced garlic, salt, and pepper.
4. Brush both sides of each mushroom cap evenly with the olive oil mixture.
5. Place the mushrooms gill-side up on the preheated grill and close the lid.
6. Grill for 5–7 minutes until the caps start to soften and release moisture.
7. Flip the mushrooms carefully using tongs and grill for another 5–7 minutes until tender and lightly charred.
8. While grilling, combine balsamic vinegar, honey, and water in a small saucepan over medium heat.
9. Simmer the glaze for 3–5 minutes, stirring constantly, until it thickens slightly and coats the back of a spoon.
10. Brush the balsamic glaze generously over the grilled mushrooms during the last 2 minutes of cooking.
11. Remove the mushrooms from the grill and let them rest for 2–3 minutes to absorb the flavors.
Glazed and glorious, these portobellos boast a juicy, steak-like bite with a caramelized edge that pairs perfectly with the tangy-sweet balsamic punch. Serve them stacked on toasted ciabatta with arugula for a killer sandwich, or slice them over creamy polenta—either way, they’re a veggie powerhouse that’ll have everyone asking for seconds.
Smoked Gouda and Chive-Stuffed Peppers
Oh, the humble bell pepper—nature’s edible bowl that’s just begging to be stuffed with something spectacular. Today, we’re loading these colorful cuties with a smoky, cheesy, herby filling that’ll make your taste buds do a happy dance. Trust me, these peppers are about to become the life of your party platter.
Ingredients
- 4 medium bell peppers (any color you fancy)
- 1 cup of shredded smoked Gouda cheese
- 1/4 cup of fresh chives, finely chopped
- 1/2 cup of breadcrumbs
- 1/4 cup of heavy cream
- 2 tablespoons of olive oil
- A pinch of salt and a crack of black pepper
Instructions
- Preheat your oven to 375°F and grab a baking dish that fits all four peppers snugly.
- Slice each bell pepper in half lengthwise, then scoop out the seeds and membranes with a spoon—don’t be shy, get in there! (Tip: A melon baller works wonders for this if you have one handy.)
- Drizzle the olive oil over the pepper halves, making sure to coat both the inside and outside for even roasting.
- In a medium bowl, mix the shredded smoked Gouda, chopped chives, breadcrumbs, heavy cream, salt, and pepper until everything is happily combined.
- Spoon the cheesy filling into each pepper half, packing it down gently but leaving a little mound on top for that golden-brown finish.
- Arrange the stuffed peppers in your baking dish, then pop them into the preheated oven.
- Bake for 25–30 minutes, or until the peppers are tender with slightly charred edges and the filling is bubbly and golden. (Tip: Rotate the dish halfway through for even cooking if your oven has hot spots.)
- Let them cool for 5 minutes before serving—patience, friend! They’re molten lava hot straight out of the oven. (Tip: A sprinkle of extra chives right before serving adds a fresh pop of color and flavor.)
Just out of the oven, these peppers offer a tender-crisp bite with a gooey, smoky center that’s pure comfort. Serve them alongside a zesty salad for a light lunch, or stack them on a platter as the star appetizer at your next gathering—either way, they’re guaranteed to disappear fast.
Sweet and Spicy Grilled Peach Salad
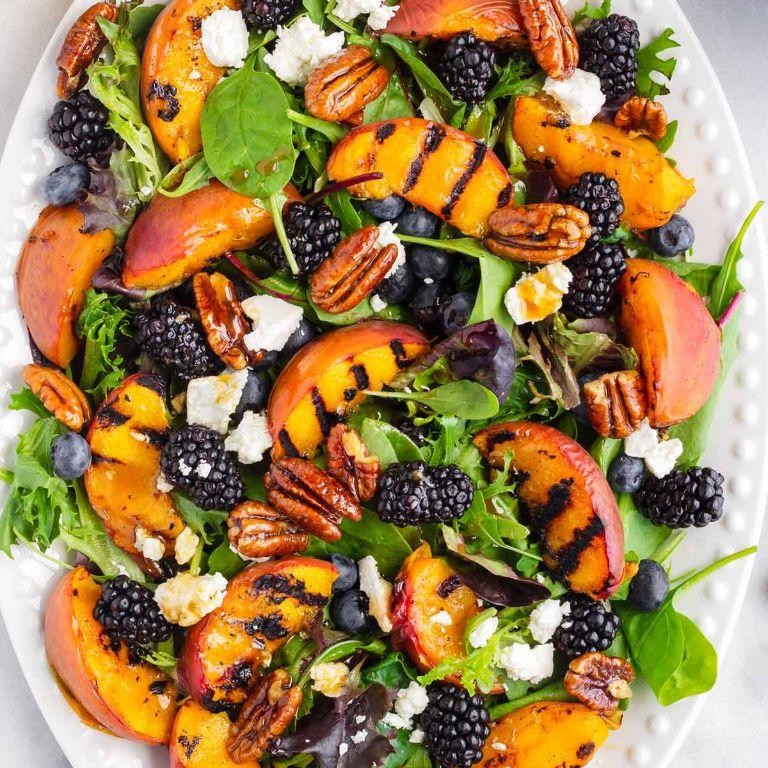
Ready to turn your salad game from ‘meh’ to ‘more please’? This sweet and spicy grilled peach situation is about to become your new summer obsession—it’s like a party in a bowl where peaches bring the sweetness and a kick of heat crashes in uninvited but totally welcome.
Ingredients
– 4 ripe but firm peaches, halved and pitted
– 6 cups of fresh arugula
– 1/2 cup of crumbled goat cheese
– 1/4 cup of chopped toasted pecans
– 2 tablespoons of olive oil
– 1 tablespoon of honey
– 1 teaspoon of chili flakes
– A big pinch of salt
Instructions
1. Preheat your grill to medium-high heat, around 400°F—you want those sexy grill marks without incinerating your peaches.
2. Brush the cut sides of the peach halves with 1 tablespoon of olive oil to prevent sticking and encourage caramelization.
3. Place peaches cut-side down on the grill grates and cook for 3–4 minutes until you see defined char lines and the edges soften.
4. Flip peaches carefully using tongs and grill for another 2 minutes on the skin side just to warm through.
5. Remove peaches from the grill and let them cool on a cutting board for 2 minutes—this makes them easier to slice without squishing.
6. While peaches cool, whisk together the remaining 1 tablespoon of olive oil, honey, chili flakes, and salt in a small bowl until emulsified.
7. Thinly slice grilled peaches into half-moons, about 1/4-inch thick, to maximize surface area for dressing cling.
8. In a large salad bowl, toss arugula with half of the dressing, massaging gently to coat every leaf.
9. Arrange dressed arugula on a platter, then artfully scatter sliced peaches, crumbled goat cheese, and toasted pecans over the top.
10. Drizzle with remaining dressing right before serving to keep the arugula perky and the peaches shining.
So there you have it—each bite is a textural fiesta with juicy peaches, peppery greens, creamy cheese, and crunchy nuts. Serve this beauty alongside grilled chicken or pile it onto a crusty baguette for a next-level peach salad sandwich situation that’ll have everyone asking for the recipe.
Mesquite-Smoked Turkey Breast

Settle in, my smoke-curious friends, because we’re about to turn a humble turkey breast into the star of your next backyard shindig. This isn’t your average, dry bird situation—we’re talking juicy, mesquite-kissed perfection that’ll have your guests begging for the secret.
Ingredients
– One big ol’ turkey breast (about 5 to 6 pounds)
– A generous ¼ cup of olive oil
– 2 tablespoons of your favorite smoky BBQ rub
– A couple of hearty cups of mesquite wood chips, soaked in water
Instructions
1. Pat your turkey breast completely dry with paper towels—this is the golden rule for getting that crispy, beautiful skin we all crave.
2. Rub the entire surface of the turkey breast with the ¼ cup of olive oil, making sure every nook and cranny is coated.
3. Massage the 2 tablespoons of smoky BBQ rub evenly all over the oiled turkey breast, front and back.
4. Let the seasoned turkey breast sit uncovered in your refrigerator for at least 4 hours, or ideally overnight, to let those flavors really get to know each other.
5. Fire up your smoker and stabilize the temperature at a steady 250°F.
6. Drain your soaked 2 cups of mesquite wood chips and add them to the smoker box or directly onto the coals for that signature smoky flavor.
7. Place the turkey breast directly on the smoker grate, skin-side up, and close the lid.
8. Smoke the turkey breast for approximately 3 to 4 hours, maintaining that 250°F temperature, until a meat thermometer inserted into the thickest part reads 165°F.
9. Pro tip: Resist the urge to constantly peek! Every time you open the lid, you let out heat and smoke, slowing down the cooking process.
10. Once it hits 165°F, carefully remove the turkey breast from the smoker and let it rest on a cutting board for a solid 20 minutes before slicing—this lets the juices redistribute so they end up in your mouth, not on the cutting board.
Heavenly doesn’t even begin to cover it. The texture is impossibly juicy with a smoky bark that crackles with each bite, while the mesquite infuses a robust, almost bacon-like depth. Slice it thin for epic sandwiches, chunk it over a crisp salad, or just stand over the cutting board and devour it with your fingers—we won’t judge.
Tangy Grilled Pineapple Chicken
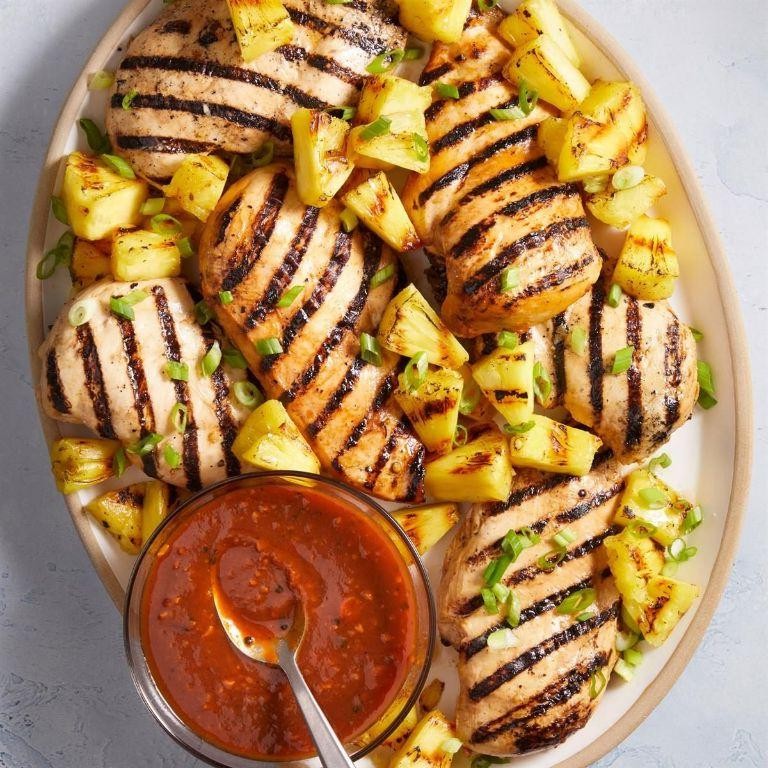
Let’s be real—most grilled chicken recipes are about as exciting as watching paint dry, but this tangy pineapple situation is here to rescue your taste buds from boredom. Picture sweet, caramelized pineapple mingling with savory chicken in a dance so delicious, you’ll forget you ever settled for plain poultry. Trust me, your grill (and your stomach) will thank you for this flavor fiesta.
Ingredients
– 4 boneless, skinless chicken breasts
– 1 cup pineapple juice
– ¼ cup soy sauce
– 2 tablespoons olive oil
– 2 tablespoons brown sugar
– 2 minced garlic cloves
– A generous pinch of red pepper flakes
– 1 fresh pineapple, sliced into 1-inch rings
– A couple of lime wedges for squeezing
Instructions
1. Whisk together 1 cup pineapple juice, ¼ cup soy sauce, 2 tablespoons olive oil, 2 tablespoons brown sugar, 2 minced garlic cloves, and a generous pinch of red pepper flakes in a medium bowl.
2. Place 4 boneless, skinless chicken breasts in a resealable bag and pour the marinade over them, ensuring each piece is fully coated.
3. Seal the bag and refrigerate for at least 30 minutes—pro tip: marinate for up to 4 hours for maximum flavor penetration without the chicken getting mushy.
4. Preheat your grill to medium-high heat, aiming for 400°F, and lightly oil the grates to prevent sticking.
5. Remove the chicken from the marinade, letting excess drip off, and discard the used marinade for food safety.
6. Grill the chicken for 6-7 minutes per side, or until the internal temperature reaches 165°F on a meat thermometer.
7. While the chicken cooks, place 1 fresh pineapple, sliced into 1-inch rings, on the grill and cook for 3-4 minutes per side until grill marks appear and the edges caramelize.
8. Transfer the grilled chicken and pineapple to a serving platter and squeeze a couple of lime wedges over the top for a zesty kick.
9. Let the chicken rest for 5 minutes before slicing to keep the juices locked in—this step is non-negotiable for tender results.
Get ready for a texture party: the chicken stays juicy with a slightly charred crust, while the pineapple adds a sweet-tart burst that cuts through the savory notes. Serve it over rice to soak up every last drop of tangy goodness, or chop it into tacos for a fun twist that’ll have everyone asking for seconds.
Smoked Maple-Bacon Brussels Sprouts
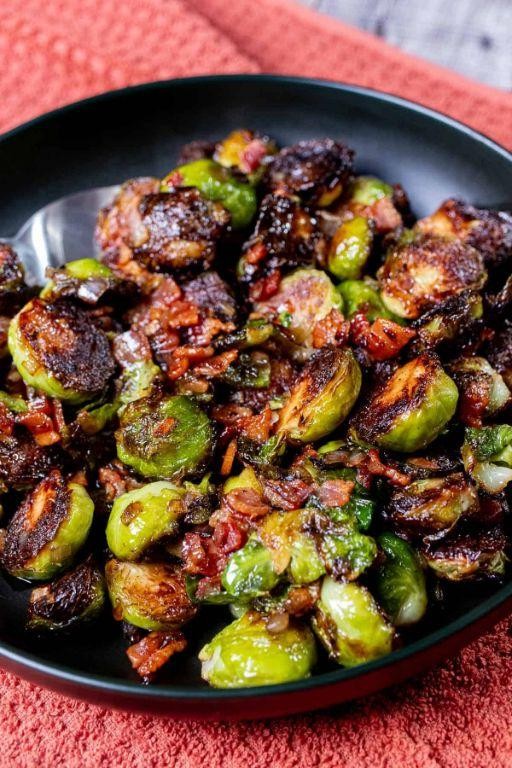
Just when you thought Brussels sprouts couldn’t get any more addictive, along comes this smoky, sweet, bacon-y revelation that’ll make you forget every sad, steamed sprout of your childhood. Seriously, these little cabbages never had it so good!
Ingredients
– A pound and a half of Brussels sprouts, trimmed and halved
– A generous half-pound of thick-cut bacon, chopped into bite-sized pieces
– A good glug (about 2 tablespoons) of pure maple syrup
– A couple of tablespoons of olive oil
– A solid teaspoon of smoked paprika
– A big pinch of kosher salt and a few good cracks of black pepper
Instructions
1. Preheat your oven to 400°F and line a large baking sheet with parchment paper for easy cleanup.
2. Toss the halved Brussels sprouts and chopped bacon with olive oil, smoked paprika, salt, and pepper in a large bowl until everything is evenly coated.
3. Spread the mixture in a single layer on your prepared baking sheet, making sure the sprouts are cut-side down for maximum caramelization.
4. Roast for 20 minutes, then pull the sheet out and drizzle the maple syrup evenly over everything.
5. Give everything a good stir with a spatula to coat it in that sweet, sticky syrup.
6. Return the pan to the oven and roast for another 10-15 minutes, until the bacon is crispy and the sprouts are tender with deeply browned, almost charred edges.
7. Let the sprouts rest on the pan for about 5 minutes before serving—this helps the flavors settle and prevents burning your mouth on molten maple.
What emerges from your oven is nothing short of magical: crispy bacon bits clinging to caramelized sprouts with a perfect balance of smoky, salty, and sweet. Try serving these beauties piled high on a platter with extra maple syrup for dipping, or crumble them over a fall salad for the ultimate texture party.
Honey Soy Glazed Grilled Pork Chops
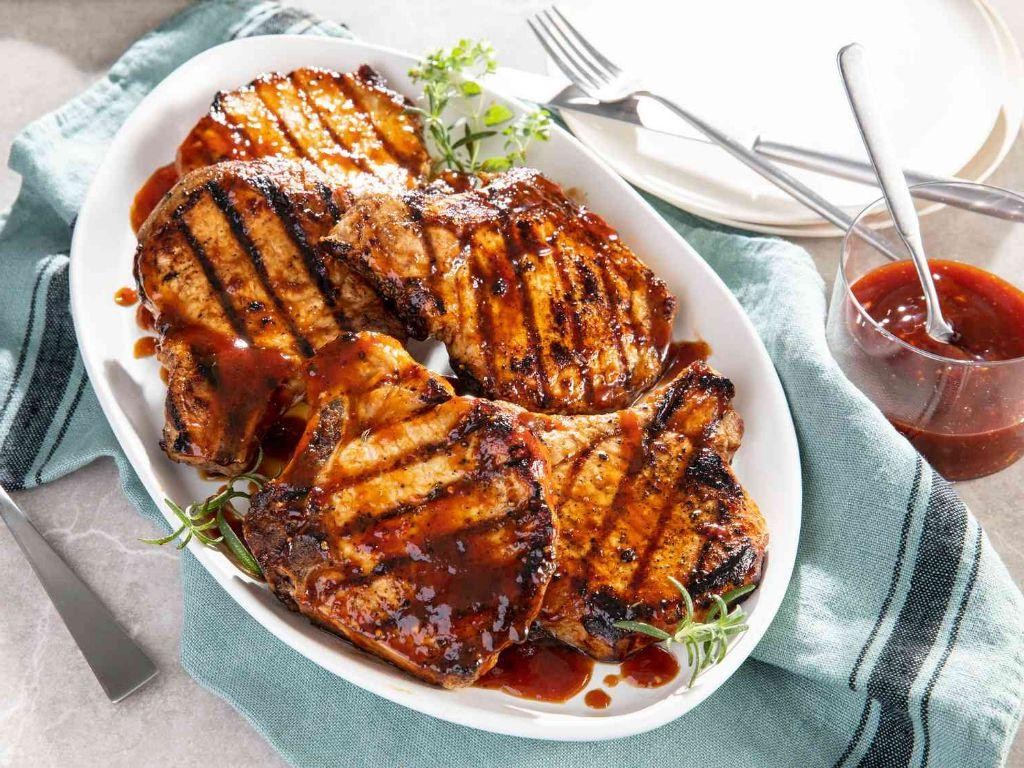
Now, let’s talk about that magical moment when sweet honey and savory soy sauce decide to throw a flavor party on your pork chops. These aren’t your average grilled chops—they’re about to become the superstar of your dinner table, guaranteed to make your taste buds do a happy dance and have your neighbors secretly wondering what smells so incredible.
Ingredients
– 4 bone-in pork chops (about 1-inch thick, because thin chops are overachievers who cook too fast)
– A generous 1/4 cup of soy sauce (the salty superhero of this operation)
– 3 tablespoons of honey (nature’s liquid gold that makes everything better)
– 2 minced garlic cloves (because everything tastes better with garlic, let’s be real)
– A tablespoon of olive oil (the trusty sidekick that prevents sticking drama)
– A teaspoon of grated fresh ginger (the zesty friend who brings the party)
– A pinch of black pepper (just enough to keep things interesting)
Instructions
1. In a medium bowl, whisk together the 1/4 cup soy sauce, 3 tablespoons honey, 2 minced garlic cloves, 1 tablespoon olive oil, 1 teaspoon grated ginger, and pinch of black pepper until fully combined.
2. Place the 4 pork chops in a shallow dish and pour the marinade over them, turning to coat completely. (Pro tip: Let them marinate for at least 30 minutes—this is when the flavor magic happens!)
3. Preheat your grill to medium-high heat, about 400°F, and lightly oil the grates to prevent sticking.
4. Remove the pork chops from the marinade, letting excess drip off, and reserve the remaining marinade in a small saucepan.
5. Place the pork chops on the preheated grill and cook for 5-6 minutes without moving them to develop those beautiful grill marks.
6. Flip the pork chops and cook for another 5-6 minutes on the second side. (Watch for juices running clear—that’s your visual cue they’re getting close!)
7. While the pork chops grill, bring the reserved marinade to a boil over medium heat and simmer for 3 minutes to create your glazing sauce.
8. Brush the simmered glaze onto both sides of the pork chops during the last 2 minutes of grilling. (This double-layer technique builds incredible flavor depth!)
9. Check that the internal temperature reaches 145°F using a meat thermometer, then transfer to a clean plate.
10. Let the pork chops rest for 3 minutes before serving to allow juices to redistribute evenly.
That glorious caramelized crust gives way to incredibly juicy pork that’ll have you questioning all other chop recipes. The sweet-savory balance is so perfect, you might catch yourself licking the plate—we won’t judge. Try serving these beauties over fluffy rice to catch every last drop of that addictive glaze, or slice them thin for next-level sandwiches that’ll make your lunchbox the envy of the breakroom.
Conclusion
Kick your grilling game up a notch with these 31 incredible recipes! From juicy smoked brisket to perfectly grilled veggies, there’s something here for every cookout. We’d love to hear which recipes become your favorites—drop us a comment below and share this delicious collection with fellow food lovers on Pinterest. Happy grilling!