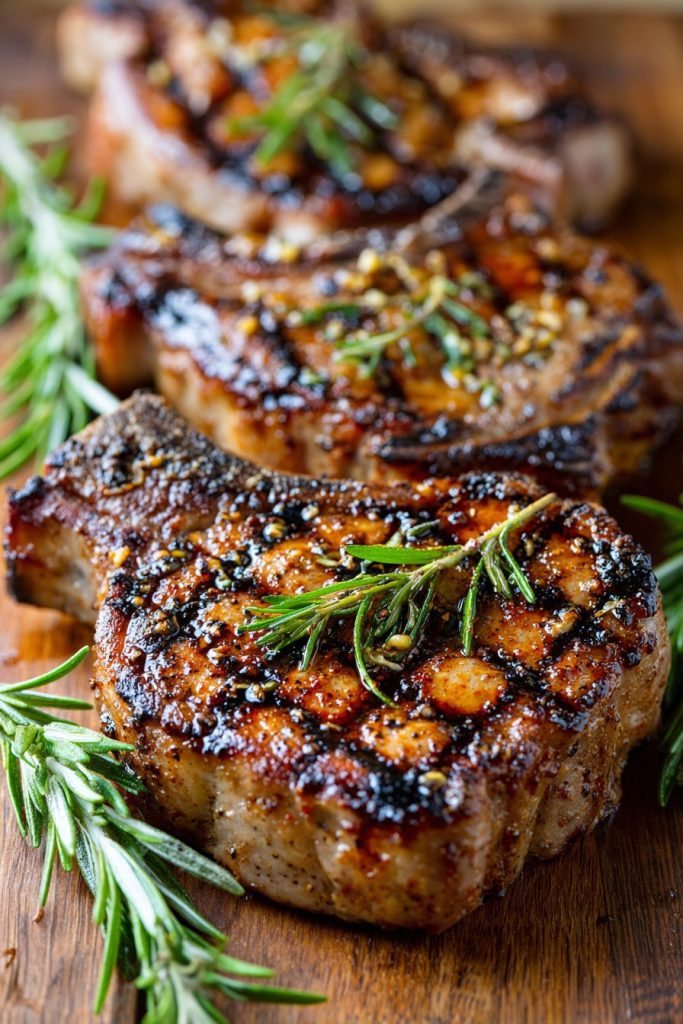
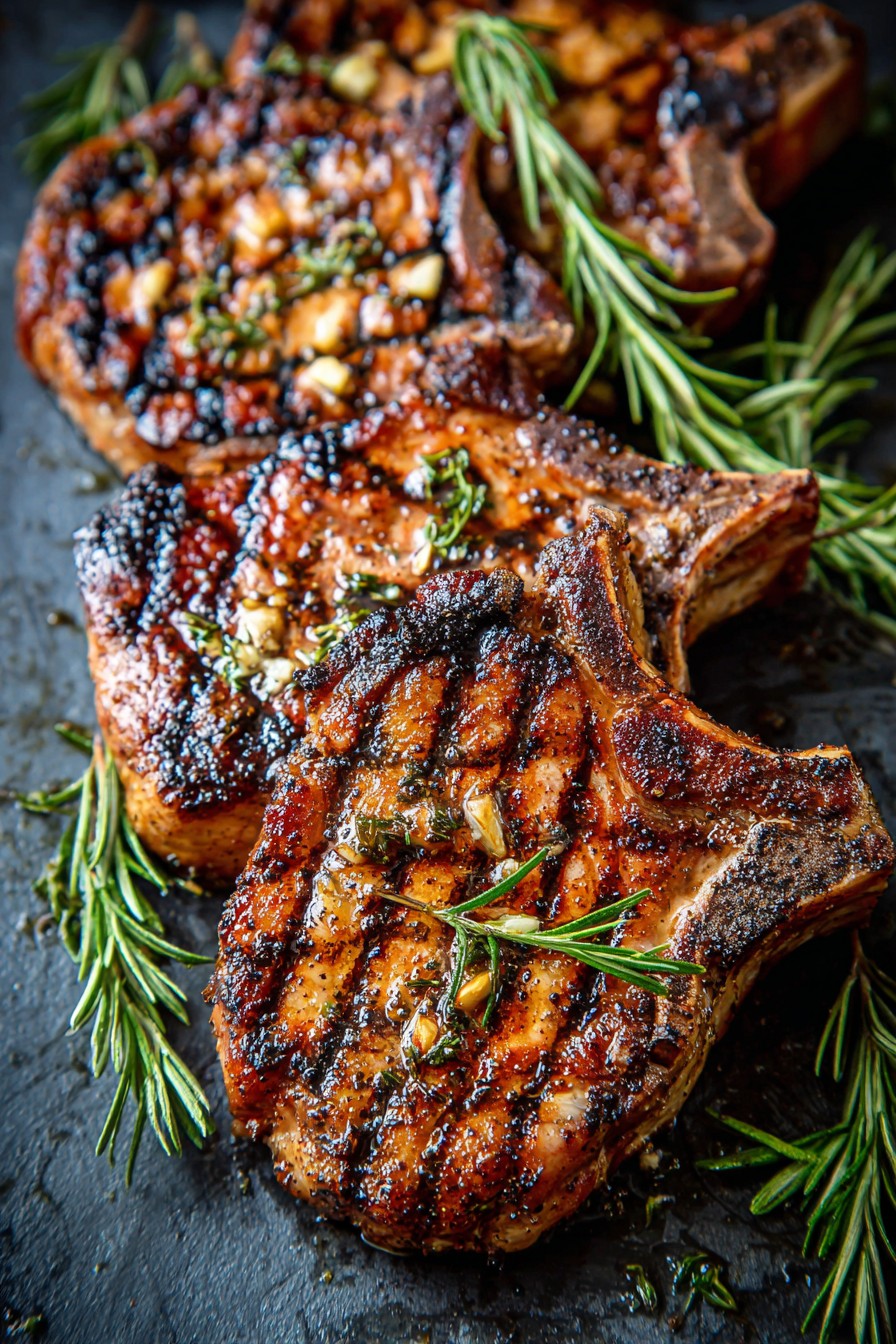
Pulling these beautiful bone-in pork chops from the grill takes me right back to my grandpa’s farmhouse kitchen, where the scent of sizzling pork and woodsmoke meant Sunday supper was nearly ready. Perfectly charred on the outside while staying wonderfully juicy inside, these chops capture that timeless comfort we all crave. There’s something special about cooking meat right on the bone that just makes everything taste more like home.
Why This Recipe Works
- The bone-in cut provides natural insulation that keeps the pork incredibly moist and flavorful throughout the grilling process, preventing that dreaded dryness that can ruin lesser chops.
- Our simple but powerful brine solution works magic by tenderizing the meat from the inside out while infusing it with just the right amount of seasoning that penetrates deep into every bite.
- Starting with a hot sear creates that beautiful caramelized crust we all love, then moving to indirect heat allows the chops to cook through gently without burning the exterior.
- Resting the chops properly after grilling lets the juices redistribute evenly throughout the meat, ensuring each slice is as succulent as the last when you finally cut into them.
- The combination of smoke from the grill and the natural pork flavor creates that authentic backyard barbecue taste that simply can’t be replicated indoors.
Ingredients
- 4 bone-in pork chops, about 1 ½ inches thick
- ½ cup kosher salt
- ¼ cup brown sugar
- 2 quarts cold water
- 3 tablespoons olive oil
- 2 teaspoons freshly ground black pepper
- 1 teaspoon garlic powder
- 1 teaspoon smoked paprika
- ½ teaspoon dried thyme
- 2 tablespoons unsalted butter
- 2 cloves garlic, smashed
- 2 sprigs fresh rosemary
Equipment Needed
- Charcoal or gas grill
- Large bowl or container for brining
- Instant-read thermometer
- Tongs
- Basting brush
- Small saucepan
- Cutting board
- Aluminum foil
Instructions
Prepare the Brine and Season the Chops
Begin by creating your brine in a large bowl that can comfortably hold all four pork chops submerged in liquid. Combine the cold water with the kosher salt and brown sugar, stirring vigorously until both the salt and sugar have completely dissolved into the water. The brine might look cloudy at first, but keep stirring until it clears up nicely. Carefully place each pork chop into the brine solution, making sure they’re fully covered by the liquid. If they tend to float, you can place a small plate on top to keep them submerged properly. Let them brine in the refrigerator for exactly two hours – this timing is crucial because it gives the salt enough time to work its tenderizing magic without making the pork too salty. After brining, remove the chops and pat them thoroughly dry with paper towels, which helps create that beautiful sear we’re after. Now mix together the black pepper, garlic powder, smoked paprika, and dried thyme in a small bowl, then rub this seasoning blend generously over all surfaces of each pork chop, including the edges and around the bone.
Heat the Grill and Create Cooking Zones
While your pork chops are brining, it’s the perfect time to prepare your grill for the cooking process ahead. If you’re using a charcoal grill, light your charcoal about 30 minutes before you plan to start cooking, allowing the coals to develop a nice gray ash coating that indicates they’re at the perfect temperature. For gas grill users, preheat your grill on high for about 15 minutes with the lid closed to get everything nice and hot. The key here is creating two distinct temperature zones – one side of your grill should be very hot for searing (around 450-500°F), while the other side should be medium heat for finishing the cooking process (around 325-350°F). You can achieve this on a charcoal grill by piling most of the coals on one side, and on a gas grill by turning some burners to high and others to medium. Use your grill brush to clean the grates thoroughly while they’re heating up, which prevents sticking and gives you those beautiful grill marks we all love to see.
Sear the Pork Chops Over High Heat
Once your grill is properly heated and your pork chops are seasoned and ready, it’s time to create that perfect crust. Place the chops directly over the high-heat zone of your grill, arranging them so they’re not touching each other to ensure even cooking and proper air circulation. Close the lid and let them sear for exactly 3-4 minutes without moving them – this initial contact time is crucial for developing those dark, caramelized grill marks and sealing in the juices. After the first side has developed a nice brown crust, use your tongs to flip each chop carefully, making sure not to pierce the meat itself as this would let precious juices escape. Let the second side sear for another 3-4 minutes with the lid closed, until you’ve achieved that beautiful color on both sides. You should notice the meat beginning to pull away from the bone slightly, which is a good visual indicator that things are progressing nicely.
Finish Cooking Over Indirect Heat
Now that both sides have a beautiful sear, it’s time to move the pork chops to the medium-heat zone of your grill to finish cooking through without burning the exterior. This indirect cooking method allows the heat to circulate around the meat gently, cooking it evenly from all sides. Close the grill lid and let the chops cook for another 8-12 minutes, depending on their thickness and your desired doneness. While they’re cooking, prepare your herb butter by melting the unsalted butter in a small saucepan over low heat, then adding the smashed garlic cloves and rosemary sprigs to infuse the butter with their wonderful flavors. After about 5 minutes of indirect cooking, begin basting the chops with this aromatic butter mixture every few minutes using your basting brush, which adds incredible flavor and helps keep the surface moist.
Check Temperature and Rest the Meat
Serve and Enjoy Your Masterpiece
After the pork chops have rested properly, they’re ready to be served and enjoyed while they’re still wonderfully warm. Arrange them on a beautiful platter or individual plates, spooning any accumulated juices from the resting plate over the top for extra flavor and moisture. The bone-in chops make for a stunning presentation that really showcases your grilling skills, with that beautiful caramelized exterior and juicy interior that cuts like butter. Serve them alongside your favorite summer sides – maybe some creamy potato salad, grilled corn on the cob, or a fresh garden salad. That little extra tip I learned from my grandmother: save one of the rosemary sprigs from your butter infusion to use as a garnish on the platter, which adds a lovely aromatic touch and makes everything look even more inviting.
Tips and Tricks
If you find yourself without time for the full brine, a quick 30-minute dry brine can work wonders too. Simply rub the kosher salt mixture directly onto the pork chops and let them sit uncovered in the refrigerator. This draws out moisture which then gets reabsorbed along with the salt, resulting in better seasoning and texture. The uncovered part is important as it helps dry the surface for better browning.
When selecting your pork chops at the market, look for ones with a nice pink color and some visible marbling throughout the meat. That intramuscular fat will render down during cooking, keeping everything moist and flavorful. Avoid chops that look pale or have dark spots, and try to find ones that are relatively uniform in thickness for even cooking.
For an extra layer of flavor, consider adding wood chips to your grill. Soak a handful of hickory or apple wood chips in water for 30 minutes, then drain and place them directly on the hot coals if using charcoal, or in a smoker box if using gas. The subtle smoke flavor complements the pork beautifully without being overwhelming.
If you’re cooking for a crowd and need to keep chops warm, never hold them at a high temperature as this will continue cooking them. Instead, place them in a single layer on a baking sheet in an oven set to the lowest possible temperature (usually 170-200°F) with the door slightly ajar. This keeps them warm without further cooking.
Leftover pork chops make fantastic sandwiches the next day. Slice the meat thinly against the grain and pile it high on crusty bread with some mayonnaise, crisp lettuce, and maybe a slice of tomato. The flavor actually improves overnight as the seasonings continue to meld together.
For the absolute best crust, make sure your pork chops are completely dry before they hit the grill. After patting them dry with paper towels, you can even let them air-dry in the refrigerator for 15-20 minutes. Moisture is the enemy of browning, so the drier the surface, the better the sear you’ll achieve.
Recipe Variations
- For a sweet and spicy twist, create a glaze by combining ¼ cup maple syrup, 2 tablespoons Dijon mustard, and 1 teaspoon crushed red pepper flakes. Brush this onto the chops during the last few minutes of cooking, being careful not to let it burn. The sugar in the maple syrup will caramelize beautifully while the mustard adds tang and the red pepper provides just enough heat to keep things interesting.
- If you’re craving Mediterranean flavors, skip the brine and instead marinate the chops in a mixture of ½ cup olive oil, juice of one lemon, 3 minced garlic cloves, 1 tablespoon dried oregano, and 1 teaspoon each of salt and pepper. Let them marinate for at least 4 hours or overnight, then grill as directed. The acid in the lemon juice helps tenderize the meat while the oregano gives it that classic Greek taverna flavor.
- For a smoky barbecue version, replace the seasoning rub with 2 tablespoons of your favorite barbecue dry rub. During the last 10 minutes of cooking, baste the chops with your preferred barbecue sauce, applying multiple thin layers rather than one thick coating to prevent burning. The sugar in the sauce will create a sticky, caramelized coating that’s absolutely irresistible.
- If you want to go full herb garden, create an herb paste by blending ¼ cup fresh parsley, 2 tablespoons fresh rosemary leaves, 2 tablespoons fresh thyme leaves, 3 garlic cloves, and ¼ cup olive oil in a food processor. Rub this paste all over the chops before grilling, and you’ll be rewarded with incredibly fragrant, garden-fresh flavor in every bite.
- For a creamy mushroom sauce variation, while your chops are resting, sauté 8 ounces of sliced mushrooms in the same saucepan you used for the herb butter. Add ½ cup of heavy cream and ¼ cup of chicken broth, simmer until slightly thickened, then spoon over the chops just before serving. The earthy mushrooms complement the pork perfectly.
Frequently Asked Questions
How long should I brine pork chops?
For bone-in pork chops that are about 1 ½ inches thick, I recommend brining for exactly 2 hours in the refrigerator. This gives the salt enough time to penetrate the meat and work its tenderizing magic without making the pork too salty. If you brine for less time, you won’t get the full benefit of the tenderizing effect, but if you brine for too long (more than 4 hours), the texture can become somewhat ham-like and the saltiness might become overpowering. The bone actually helps regulate this process by slowing down the salt absorption slightly, which is one reason I prefer bone-in cuts for brining.
Can I cook these pork chops indoors if I don’t have a grill?
Absolutely! While you’ll miss out on that wonderful smoky flavor, you can achieve excellent results using a cast-iron skillet or grill pan on your stovetop. Heat your skillet over medium-high heat until it’s very hot, then add a tablespoon of oil and sear the chops for 3-4 minutes per side until nicely browned. Then transfer the entire skillet to a 400°F oven to finish cooking for about 8-10 minutes, or until they reach 145°F internally. The cast iron does a wonderful job of creating that beautiful crust we’re after, and finishing in the oven ensures even cooking without burning the exterior.
What’s the ideal internal temperature for pork chops?
The USDA now recommends cooking pork to 145°F followed by a 3-minute rest, which results in juicy, slightly pink meat that’s both safe to eat and incredibly flavorful. I like to remove my chops from the grill at around 140-142°F since the temperature will continue to rise during the resting period. Cooking pork beyond 145°F will cause it to become dry and tough, which is why so many people grew up thinking they didn’t like pork chops. Using an instant-read thermometer is absolutely essential for hitting this perfect temperature every single time.
Why do my pork chops always end up dry?
Dry pork chops are usually the result of three common mistakes: overcooking, not brining or properly seasoning, and skipping the resting period. The brine in this recipe addresses the seasoning issue by ensuring flavor and moisture penetration throughout the meat. Using a thermometer prevents overcooking by taking the guesswork out of doneness. And the resting period allows the juices to redistribute instead of running out when you cut into the meat. Also, choosing thicker, bone-in chops gives you more margin for error than thin, boneless cuts.
Can I prepare these pork chops ahead of time?
You can definitely do some advance preparation to make grilling day easier. The brine can be prepared up to 2 days ahead and stored in the refrigerator, and you can brine the chops overnight if that works better for your schedule. You can also mix the dry seasoning rub ahead of time and store it in an airtight container. However, I don’t recommend seasoning the chops more than an hour before cooking as the salt can begin to draw out moisture. The herb butter can be made a day ahead and gently reheated before using.
Summary
These grilled bone-in pork chops capture the essence of hearty, home-cooked comfort with their perfect balance of smoky char and juicy tenderness. From the simple brine that ensures flavor in every bite to the careful temperature control that guarantees perfect doneness, this recipe delivers restaurant-quality results in your own backyard. Serve them with your favorite summer sides for a meal that feels both special and wonderfully familiar.
Grilled Bone-In Pork Chops
4
servings2
minutes20
minutesIngredients
Instructions
- 1 Combine salt, sugar, and water for brine, stir until dissolved. Add pork chops and refrigerate for 2 hours.
- 2 Remove chops from brine, pat dry, and rub with oil and seasoning mixture of pepper, garlic powder, paprika, and thyme.
- 3 Heat grill with two zones: high heat (450-500°F) and medium heat (325-350°F).
- 4 Sear chops over high heat for 3-4 minutes per side until well-browned.
- 5 Move to medium heat zone, cook 8-12 minutes while basting with herb butter (melted butter with garlic and rosemary).
- 6 Remove when internal temperature reaches 140-145°F, rest for 5-7 minutes before serving.


