
Baking with graham wafer crumbs opens up a world of sweet possibilities! Whether you’re craving quick treats, seasonal favorites, or comforting desserts, these versatile crumbs are your secret weapon. Get ready to transform simple ingredients into show-stopping creations that’ll delight family and friends. Let’s dive into these 26 delicious ideas that prove graham crumbs are the ultimate dessert foundation!
Graham Wafer Crumb Cheesecake Bars
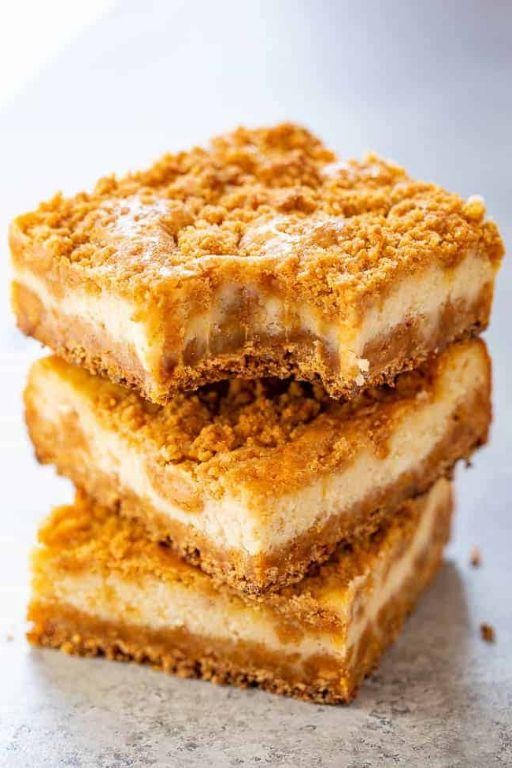
Picture a dessert that marries the nostalgic crunch of childhood snacks with the sophisticated creaminess of a classic cheesecake—these Graham Wafer Crumb Cheesecake Bars are precisely that delightful fusion. Perfect for gatherings or a quiet indulgence, they offer a harmonious balance of textures and flavors that will elevate any occasion. With a buttery graham cracker base and a velvety filling, each bite is a testament to simple ingredients transformed into something extraordinary.
Serving: 16 | Pre Time: 20 minutes | Cooking Time: 35 minutes
16
bars20
minutes35
minutesIngredients
– A couple of cups of graham cracker crumbs (about 12 whole crackers)
– A half cup of unsalted butter, melted
– A quarter cup of granulated sugar
– Two 8-ounce packages of cream cheese, softened at room temperature
– A splash of vanilla extract (about 1 teaspoon)
– Two large eggs
– A half cup of sour cream
– A third cup of all-purpose flour
Instructions
1. Preheat your oven to 350°F and line an 8×8-inch baking pan with parchment paper, leaving an overhang for easy removal later.
2. In a medium bowl, combine the graham cracker crumbs, melted butter, and granulated sugar until the mixture resembles wet sand.
3. Press the crumb mixture firmly into the bottom of the prepared pan to form an even layer, using the back of a spoon or a measuring cup to compact it—this ensures a sturdy base that won’t crumble when sliced.
4. Bake the crust for 10 minutes at 350°F until it’s lightly golden and set, then remove it from the oven and let it cool slightly on a wire rack while you prepare the filling.
5. In a large mixing bowl, beat the softened cream cheese with an electric mixer on medium speed for about 2 minutes until it’s smooth and creamy, scraping down the sides of the bowl as needed to avoid lumps.
6. Add the vanilla extract and eggs one at a time, beating well after each addition until fully incorporated, which helps create a silky texture without overmixing.
7. Gently fold in the sour cream and all-purpose flour with a spatula until just combined, being careful not to deflate the mixture—this step adds richness and helps the bars set properly without cracking.
8. Pour the filling over the cooled crust and spread it evenly with an offset spatula.
9. Bake at 350°F for 25-30 minutes, or until the edges are set but the center still has a slight jiggle when gently shaken; avoid overbaking to prevent a dry texture.
10. Turn off the oven, crack the door open, and let the bars cool inside for 1 hour to gradually reduce the temperature and minimize cracking.
11. Transfer the pan to a wire rack to cool completely, then refrigerate for at least 4 hours or overnight until fully chilled and firm.
12. Use the parchment paper overhang to lift the bars from the pan, place them on a cutting board, and slice into 16 squares with a sharp knife wiped clean between cuts for neat edges.
Zesty with a hint of vanilla, these bars boast a creamy, dense filling that contrasts beautifully with the crisp, buttery crust. Serve them chilled, perhaps garnished with a drizzle of caramel or a sprinkle of fresh berries, to highlight their indulgent yet approachable charm.
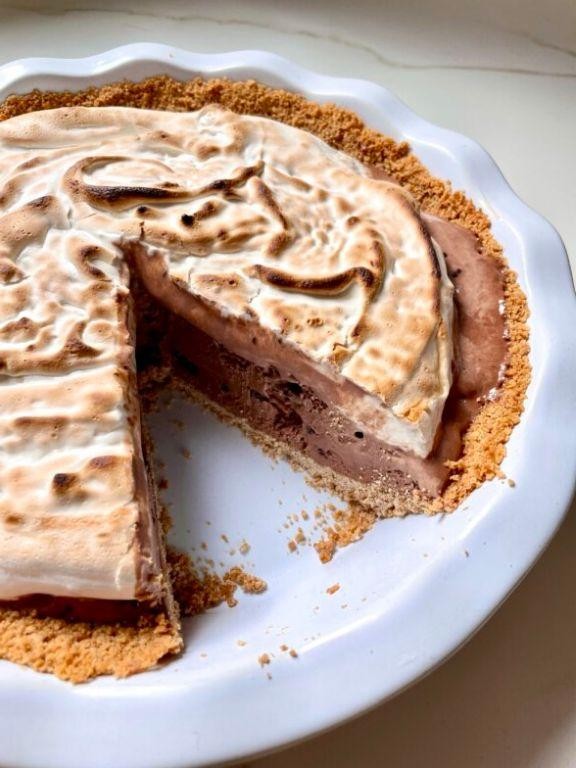
No-Bake Chocolate Graham Wafer Crumb Pie
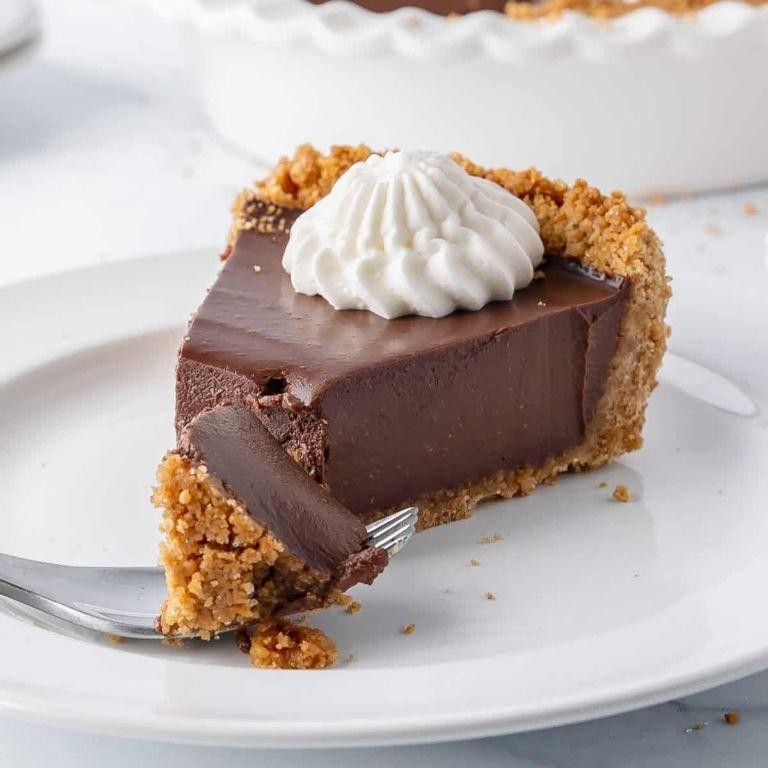
This decadent no-bake creation transforms humble graham wafers into a sophisticated, velvety chocolate pie that requires no oven time—perfect for impressing guests without heating up the kitchen. Serving: 8 | Pre Time: 25 minutes | Cooking Time: 0 minutes
8
servings25
minutesIngredients
– About 2 cups of graham wafer crumbs (from roughly 15 whole wafers, give or take)
– A stick of unsalted butter, melted
– A generous pinch of salt
– A 14-ounce can of sweetened condensed milk
– A couple of cups of semi-sweet chocolate chips
– A splash of pure vanilla extract
– A tub of heavy whipping cream (you’ll need 1 ½ cups)
Instructions
1. Place about 15 whole graham wafers in a large zip-top bag and crush them finely with a rolling pin until you have roughly 2 cups of fine crumbs.
2. Tip: For the neatest crust, ensure your crumbs are uniform and fine, like sand, to help them pack together well.
3. Transfer the crumbs to a medium bowl and pour in the melted stick of unsalted butter and a generous pinch of salt.
4. Stir the mixture with a fork until all the crumbs are evenly moistened and it resembles wet sand.
5. Press the crumb mixture firmly and evenly into the bottom and up the sides of a standard 9-inch pie plate, using the bottom of a measuring cup to compact it.
6. Tip: Chill the crust in the refrigerator for at least 10 minutes to set it before adding the filling, which prevents sogginess.
7. In a medium saucepan over low heat, combine the 14-ounce can of sweetened condensed milk and the 2 cups of semi-sweet chocolate chips.
8. Stir constantly with a silicone spatula for about 5–7 minutes, until the chocolate is fully melted and the mixture is smooth and glossy.
9. Remove the saucepan from the heat and stir in a splash of pure vanilla extract until well incorporated.
10. Pour the warm chocolate filling into the chilled graham crust, spreading it evenly with a spatula.
11. Let the pie sit at room temperature for 10 minutes to cool slightly, then transfer it to the refrigerator.
12. While the pie chills, pour 1 ½ cups of heavy whipping cream into a large, cold mixing bowl.
13. Using an electric mixer on medium-high speed, whip the cream for 3–5 minutes until stiff peaks form that hold their shape when the beaters are lifted.
14. Tip: For best results, ensure your bowl and beaters are chilled beforehand to help the cream whip up faster and more voluminously.
15. Spread or pipe the whipped cream over the top of the chilled chocolate pie.
16. Return the assembled pie to the refrigerator and chill for at least 4 hours, or until the filling is completely set and firm to the touch.
Now, slice into this luscious dessert to reveal its rich, fudgy layers—the crisp, buttery crust contrasts beautifully with the smooth, dense chocolate filling, all lightened by the cloud-like whipped cream. For a festive twist, garnish with chocolate shavings or a drizzle of caramel just before serving to elevate its elegant simplicity.
Graham Wafer Crumb Key Lime Tarts
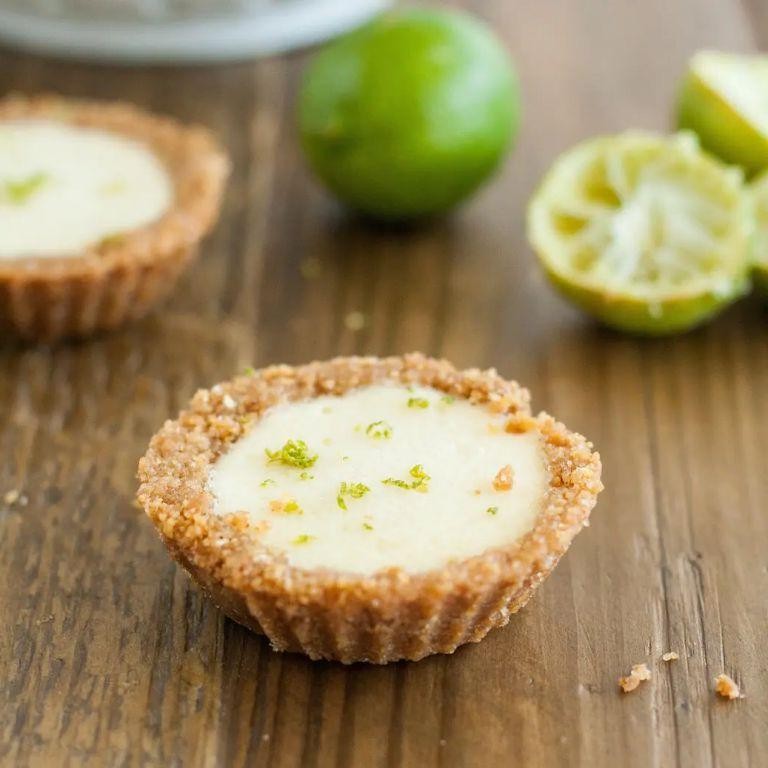
Beneath a delicate, crumbly crust lies the vibrant, tangy essence of Florida’s most celebrated citrus, transformed into elegant individual tarts that are as refreshing as a coastal breeze. These Graham Wafer Crumb Key Lime Tarts offer a perfect balance of sweet and tart, with a texture that contrasts creamy filling with a buttery, sandy base, making them an ideal finale for any sophisticated gathering.
Serving: 12 | Pre Time: 25 minutes | Cooking Time: 15 minutes
12
tarts25
minutes15
minutesIngredients
– A couple of sleeves of graham crackers (about 2 cups of fine crumbs)
– A good ½ cup of melted unsalted butter
– A 14-ounce can of sweetened condensed milk
– ¾ cup of freshly squeezed key lime juice (from about 20-25 key limes)
– 4 large egg yolks
– A pinch of fine sea salt
– A dollop of whipped cream for serving
Instructions
1. Preheat your oven to 350°F (175°C) and line a 12-cup muffin tin with paper liners.
2. In a food processor, pulse the graham crackers until they form fine, even crumbs—this ensures a uniform crust that won’t crumble apart.
3. Transfer the crumbs to a mixing bowl and stir in the melted butter and a pinch of salt until the mixture resembles wet sand and holds together when pinched.
4. Press about 2 tablespoons of the crumb mixture firmly into the bottom and slightly up the sides of each muffin cup, using a flat-bottomed glass to compact it evenly for a sturdy base.
5. Bake the crusts for 8 minutes, just until they are lightly golden and set, then remove from the oven and let them cool on a wire rack for 10 minutes.
6. In a separate bowl, whisk together the sweetened condensed milk, key lime juice, and egg yolks until smooth and fully combined, about 2 minutes—avoid overmixing to prevent air bubbles.
7. Pour the filling into the cooled crusts, filling each nearly to the top but leaving a tiny gap to prevent overflow during baking.
8. Bake the tarts for 12-15 minutes, until the edges are set but the centers still have a slight jiggle when gently shaken, which indicates a creamy texture once chilled.
9. Let the tarts cool completely at room temperature for 1 hour, then refrigerate them for at least 4 hours, or preferably overnight, to allow the flavors to meld and the filling to firm up.
10. Before serving, top each tart with a dollop of whipped cream for an extra touch of indulgence.
Silky and bright, the filling melts on the tongue with a zesty punch that’s perfectly cut by the rich, buttery crust. For a creative twist, garnish with a sprinkle of lime zest or serve alongside a glass of chilled prosecco to elevate this dessert into a truly memorable experience.
Peanut Butter Graham Wafer Crumb Sandwiches
Delightfully nostalgic yet elegantly simple, these Peanut Butter Graham Wafer Crumb Sandwiches transform humble pantry staples into a sophisticated treat that balances creamy richness with satisfying crunch. Drawing inspiration from classic American flavors, this no-bake confection offers a refined twist on childhood favorites, perfect for impromptu gatherings or a moment of quiet indulgence.
Serving: 12 | Pre Time: 15 minutes | Cooking Time: 0 minutes
12
sandwiches15
minutesIngredients
- A couple of sleeves of graham crackers (about 24 whole crackers)
- A generous cup of creamy peanut butter
- A half cup of unsalted butter, softened
- A splash of pure vanilla extract
- A pinch of fine sea salt
- A quarter cup of powdered sugar
Instructions
- Place the graham crackers in a large resealable plastic bag and seal it tightly.
- Use a rolling pin to crush the crackers into fine crumbs, applying even pressure until you have about 2 cups of crumbs.
- Tip: For extra-uniform crumbs, pulse the crackers briefly in a food processor instead.
- In a medium mixing bowl, combine the softened butter and creamy peanut butter.
- Beat the mixture with a hand mixer on medium speed for 1-2 minutes until completely smooth and well blended.
- Add the powdered sugar, vanilla extract, and fine sea salt to the peanut butter mixture.
- Beat again on low speed for 30 seconds, then increase to medium and beat for 1 full minute until the filling is fluffy and holds its shape.
- Tip: If the filling seems too soft, chill it in the refrigerator for 10 minutes to firm up slightly for easier handling.
- Line a baking sheet with parchment paper.
- Scoop about 1 tablespoon of the peanut butter filling and roll it into a compact ball between your palms.
- Roll the ball thoroughly in the graham cracker crumbs until fully coated.
- Place the coated ball on the prepared baking sheet and gently flatten it with your fingers to about a ½-inch thickness.
- Repeat with the remaining filling and crumbs, spacing the sandwiches about 1 inch apart on the sheet.
- Tip: For a decorative finish, press the tines of a fork lightly around the edges of each sandwich.
- Transfer the baking sheet to the refrigerator and chill the sandwiches for at least 30 minutes to set completely.
Offering a delightful contrast, these sandwiches feature a velvety, lightly sweetened peanut butter center encased in a rustic, toasty crumb shell. The vanilla subtly enhances the nutty richness, while the salt prevents cloying sweetness. For an elegant presentation, arrange them on a vintage platter and drizzle with a whisper of melted dark chocolate just before serving.
Graham Wafer Crumb Berry Parfaits
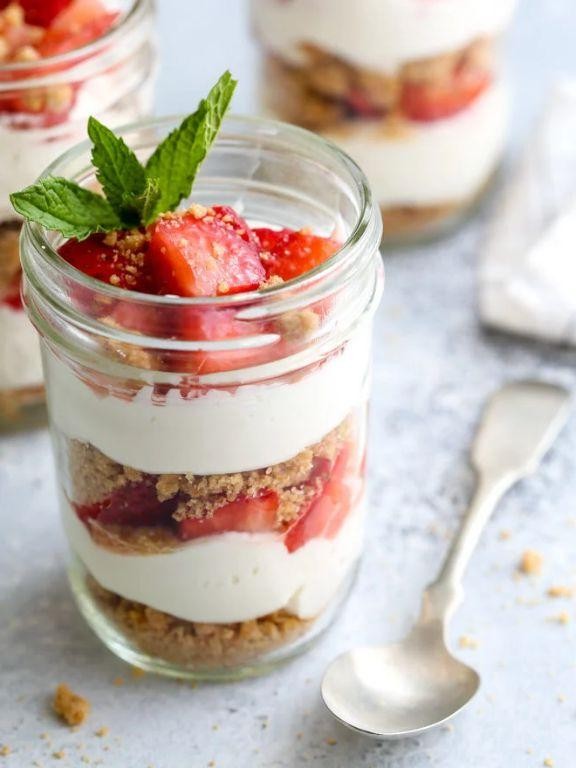
Fragrant layers of sweet-tart berries, creamy vanilla filling, and buttery graham crumbs come together in these elegant Graham Wafer Crumb Berry Parfaits, a dessert that transforms simple components into a stunning finale worthy of any celebration. This no-bake assembly requires minimal effort yet delivers maximum visual appeal and flavor complexity, making it an ideal choice for both impromptu gatherings and planned dinner parties where a touch of sophistication is desired. The contrasting textures and vibrant colors create a dessert that’s as delightful to behold as it is to savor, promising to become a cherished addition to your repertoire of effortless yet impressive treats.
Serving: 4 | Pre Time: 20 minutes | Cooking Time: 0 minutes
5
servings20
minutesIngredients
– About 2 cups of fresh mixed berries (like strawberries, blueberries, and raspberries), hulled and sliced if needed
– A generous 1 1/2 cups of graham wafer crumbs (from about 12 whole sheets, finely crushed)
– 1 1/2 cups of heavy whipping cream, very cold
– A heaping 1/4 cup of granulated sugar
– A good splash of pure vanilla extract (about 1 teaspoon)
– A pinch of fine salt
Instructions
1. Place the cold heavy whipping cream, granulated sugar, vanilla extract, and a pinch of salt in a large, clean mixing bowl.
2. Using a hand mixer or stand mixer fitted with the whisk attachment, whip the cream mixture on medium-high speed until stiff peaks form, which should take about 3-4 minutes; for best results, ensure your bowl and beaters are chilled beforehand to help the cream whip faster and hold its shape.
3. Gently fold half of the prepared mixed berries into the whipped cream until just combined, being careful not to overmix and deflate the cream.
4. Spoon a layer of the remaining plain graham wafer crumbs into the bottom of four serving glasses or jars, using about 2 tablespoons per glass to create an even base.
5. Add a layer of the berry-cream mixture on top of the crumbs in each glass, dividing it evenly among the four servings.
6. Sprinkle another layer of graham wafer crumbs over the cream in each glass, using about 1 tablespoon per glass.
7. Top each parfait with the remaining fresh mixed berries, arranging them artfully for a beautiful presentation.
8. For added texture, lightly crush a few extra graham wafers and sprinkle them over the berries just before serving to prevent them from becoming soggy.
9. Serve the parfaits immediately, or refrigerate them for up to 1 hour if preparing ahead; avoid longer storage as the crumbs will soften.
The resulting dessert offers a delightful contrast between the crisp, buttery graham crumbs, the light and airy vanilla cream, and the juicy burst of fresh berries. Each spoonful delivers a harmonious blend of sweet and tart flavors, with the creamy layer acting as a perfect bridge between the crunchy base and the vibrant fruit topping. For a creative twist, consider drizzling a little honey over the berries or adding a sprinkle of lemon zest to the cream for a bright, citrusy note that enhances the overall freshness.
Graham Wafer Crumb Ice Cream Cake
Zestfully elegant yet delightfully nostalgic, this Graham Wafer Crumb Ice Cream Cake transforms simple pantry staples into a showstopping dessert. With its buttery crumb base, creamy frozen layers, and playful textures, it’s the perfect make-ahead treat for any celebration, effortlessly bridging the gap between childhood joy and sophisticated indulgence.
Serving: 12 | Pre Time: 25 minutes | Cooking Time: 0 minutes
12
servings25
minutes10
minutesIngredients
– A couple of sleeves of graham crackers (about 2 cups of crumbs)
– A generous half cup of unsalted butter, melted
– A quarter cup of granulated sugar
– A pinch of fine sea salt
– A quart of high-quality vanilla ice cream, slightly softened
– A cup of heavy whipping cream
– Two tablespoons of powdered sugar
– A splash of pure vanilla extract
Instructions
1. Preheat your oven to 350°F and line a 9-inch springform pan with parchment paper.
2. Place the graham crackers in a food processor and pulse until you achieve fine, even crumbs—about 15 pulses.
3. In a medium bowl, combine the graham cracker crumbs, melted butter, granulated sugar, and sea salt, stirring until the mixture resembles wet sand.
4. Firmly press the crumb mixture into the bottom of the prepared pan, using the back of a measuring cup to create a compact, level layer.
5. Bake the crust for 10 minutes, until fragrant and lightly golden, then transfer it to a wire rack to cool completely.
6. While the crust cools, scoop the slightly softened vanilla ice cream into a large bowl and let it sit at room temperature for 5 minutes to become spreadable.
7. Spread the softened ice cream evenly over the cooled crust, smoothing the top with an offset spatula.
8. Cover the pan tightly with plastic wrap and freeze the cake for at least 4 hours, or until the ice cream layer is firm.
9. Just before serving, combine the heavy whipping cream, powdered sugar, and vanilla extract in a chilled bowl.
10. Whip the cream on medium-high speed for 2–3 minutes, until stiff peaks form that hold their shape when the whisk is lifted.
11. Unmold the cake from the springform pan and spread the whipped cream over the top in decorative swirls.
12. Return the assembled cake to the freezer for 15 minutes to set the topping before slicing.
Joyfully, each slice reveals a delightful contrast: the crisp, buttery crust gives way to the smooth, creamy ice cream, all crowned with a cloud-like whipped topping. For a festive twist, garnish with fresh berries or a drizzle of warm chocolate sauce just before serving, allowing the cold cake to slightly soften the toppings for an irresistible texture play.
Classic Graham Wafer Crumb Apple Crisp
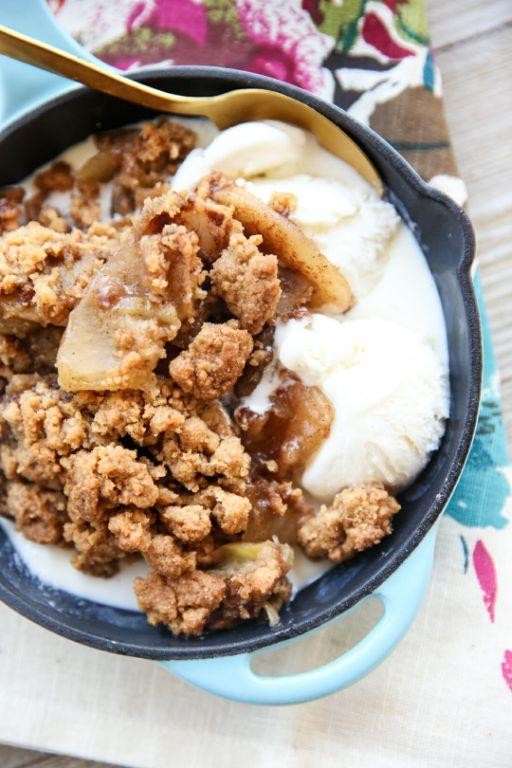
Fragrant with the warm embrace of cinnamon and nutmeg, this Classic Graham Wafer Crumb Apple Crisp transforms humble autumn apples into a dessert of rustic elegance. The buttery graham cracker topping bakes into a golden, crisp crust that shatters delightfully against the tender, spiced fruit beneath. It’s the kind of comforting bake that fills your kitchen with an irresistible, homey aroma, promising a simple yet deeply satisfying finish to any meal.
Serving: 6 | Pre Time: 20 minutes | Cooking Time: 45 minutes
6
servings20
minutes45
minutesIngredients
– For the filling: about 6 cups of thinly sliced tart apples (like Granny Smith), a good squeeze of fresh lemon juice (about 1 tablespoon), a third of a cup of granulated sugar, a couple of tablespoons of all-purpose flour, a generous teaspoon of ground cinnamon, and a pinch of ground nutmeg.
– For the topping: a sleeve and a half of graham crackers (crushed to make 1½ cups of fine crumbs), half a cup of all-purpose flour, half a cup of packed light brown sugar, a good pinch of salt, and a stick (½ cup) of cold unsalted butter, cut into small cubes.
Instructions
1. Preheat your oven to 375°F (190°C) and lightly grease an 8×8-inch baking dish.
2. In a large bowl, toss the 6 cups of thinly sliced apples with the 1 tablespoon of lemon juice to prevent browning.
3. Sprinkle the ⅓ cup granulated sugar, 2 tablespoons flour, 1 teaspoon cinnamon, and pinch of nutmeg over the apples and toss until every slice is evenly coated. Tip: Using a mix of apple varieties can add complexity to the flavor and texture.
4. Pour the apple mixture into the prepared baking dish and spread it into an even layer.
5. In a separate medium bowl, combine the 1½ cups graham cracker crumbs, ½ cup flour, ½ cup packed brown sugar, and pinch of salt.
6. Add the ½ cup of cold, cubed butter to the crumb mixture.
7. Using your fingertips or a pastry cutter, work the butter into the dry ingredients until the mixture resembles coarse crumbs with some pea-sized pieces remaining. Tip: Keeping the butter cold ensures a flakier, crisper topping.
8. Sprinkle the crumb topping evenly over the apple filling, covering it completely.
9. Place the baking dish in the preheated oven and bake for 40-45 minutes. Tip: Bake until the topping is a deep golden brown and the filling is visibly bubbling around the edges.
10. Remove the crisp from the oven and let it cool on a wire rack for at least 15-20 minutes before serving.
Delightfully contrasting textures define this dessert: the tender, spiced apples meld into a luscious filling, while the graham cracker crumb topping offers a sweet, buttery crunch with every bite. For an extra touch of indulgence, serve it warm with a scoop of vanilla bean ice cream, allowing the cold creaminess to melt into the fragrant, bubbling crisp.
Layered Graham Wafer Crumb Trifle
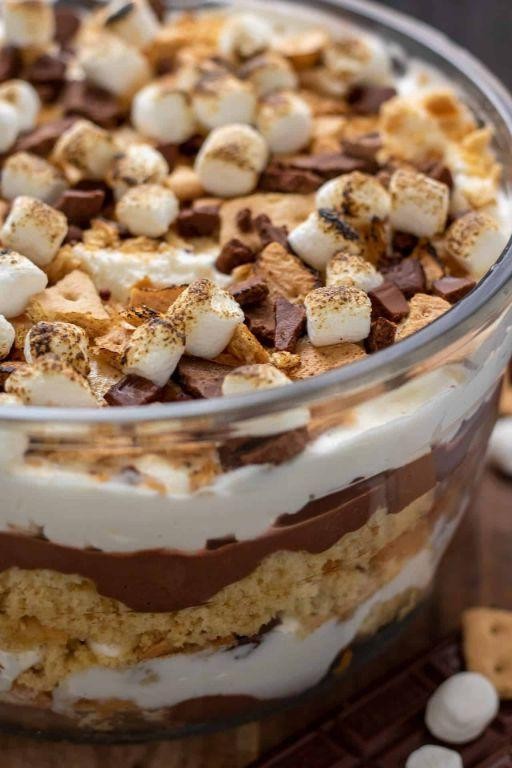
Fusing the nostalgic crunch of childhood treats with the sophisticated allure of a layered dessert, this graham wafer crumb trifle transforms simple components into an elegant centerpiece. Imagine a glass vessel revealing alternating strata of buttery crumbs, velvety cream, and bursts of fruit—a dessert that promises both visual drama and delightful contrast in every spoonful. It’s the perfect make-ahead showstopper for gatherings, where its composed beauty belies the straightforward assembly.
Serving: 8 | Pre Time: 25 minutes | Cooking Time: 0 minutes
8
servings25
minutesIngredients
– A couple of sleeves of graham crackers (about 24 whole crackers)
– A stick of unsalted butter (that’s 1/2 cup), melted
– A 1/4 cup of granulated sugar
– Two 8-ounce blocks of cream cheese, softened to room temp
– A cup of powdered sugar
– Two cups of heavy whipping cream, chilled
– A splash of pure vanilla extract (about 1 teaspoon)
– Two cups of fresh mixed berries (like strawberries and blueberries), hulled and sliced if large
– A handful of fresh mint leaves for garnish, if you’re feeling fancy
Instructions
1. Place the graham crackers in a large zip-top bag and crush them into fine crumbs using a rolling pin until you have about 3 cups.
2. In a medium bowl, combine the graham cracker crumbs, melted butter, and granulated sugar, mixing with a fork until the crumbs are evenly moistened and resemble wet sand.
3. In a separate large bowl, beat the softened cream cheese and powdered sugar with an electric mixer on medium speed for 2 minutes until smooth and fluffy, scraping down the sides as needed.
4. In another chilled bowl, whip the heavy cream and vanilla extract on high speed for 3-4 minutes until stiff peaks form that hold their shape when the beaters are lifted.
5. Gently fold the whipped cream into the cream cheese mixture using a rubber spatula until fully incorporated and no white streaks remain, being careful not to deflate the airiness.
6. To assemble, spoon a layer of the graham cracker crumb mixture into the bottom of a trifle dish or large glass bowl, pressing it down lightly with the back of a spoon to create an even base.
7. Spread half of the cream cheese mixture over the crumb layer smoothly with an offset spatula.
8. Scatter half of the mixed berries evenly over the cream layer.
9. Repeat the layers: add another layer of graham cracker crumbs, the remaining cream cheese mixture, and the rest of the berries.
10. Top with a final sprinkle of any leftover graham cracker crumbs for texture and garnish with fresh mint leaves.
11. Cover the trifle with plastic wrap and refrigerate for at least 4 hours, or ideally overnight, to allow the flavors to meld and the crumbs to soften slightly.
Layers of creamy indulgence give way to the subtle sweetness of softened crumbs, while the berries add a tangy freshness that cuts through the richness. For a festive twist, drizzle each serving with a touch of chocolate sauce or sprinkle with toasted coconut, making this trifle as versatile as it is delicious.
Graham Wafer Crumb Lemon Bars
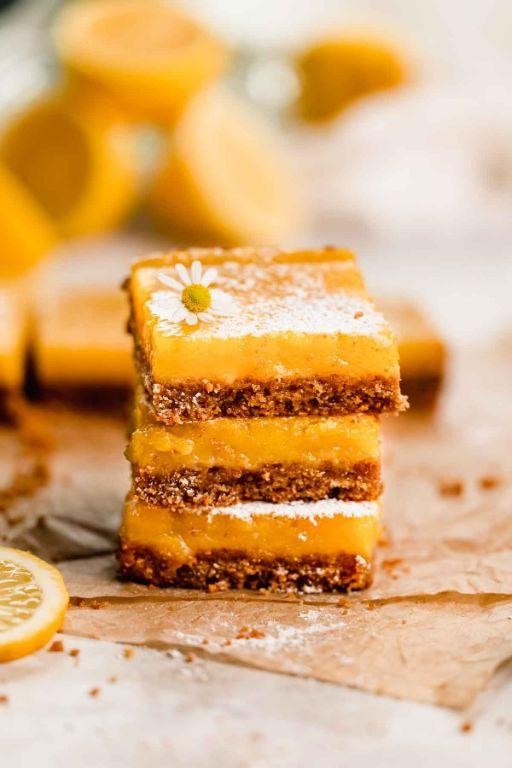
Oozing with bright citrus flavor and nestled atop a buttery, crumbly graham wafer crust, these lemon bars offer a delightful twist on a classic dessert. Their vibrant yellow filling strikes a perfect balance between sweet and tart, while the golden-brown crust provides a satisfying textural contrast. Ideal for afternoon tea or a sophisticated potluck contribution, they’re as pleasing to the eye as they are to the palate.
Serving: 16 | Pre Time: 20 minutes | Cooking Time: 35 minutes
16
servings20
minutes35
minutesIngredients
– A couple of cups of graham wafer crumbs
– A stick of unsalted butter, melted
– A quarter cup of granulated sugar
– Four large eggs
– One and a half cups of granulated sugar
– A half cup of fresh lemon juice (about 3–4 lemons)
– A quarter cup of all-purpose flour
– A pinch of salt
– A dusting of powdered sugar for finishing
Instructions
1. Preheat your oven to 350°F (175°C) and line an 8×8-inch baking pan with parchment paper, leaving an overhang on two sides for easy removal later.
2. In a medium bowl, combine the graham wafer crumbs, melted butter, and a quarter cup of granulated sugar until the mixture resembles wet sand.
3. Firmly press the crumb mixture into the bottom of the prepared pan in an even layer, using the bottom of a measuring cup to compact it—this ensures a sturdy base that won’t crumble when cut.
4. Bake the crust for 10 minutes, until it’s lightly golden and set; remove from the oven and let it cool slightly while you prepare the filling.
5. In a large bowl, whisk together the eggs and one and a half cups of granulated sugar until smooth and slightly thickened, about 2 minutes.
6. Gradually whisk in the fresh lemon juice, then sift in the flour and salt, mixing just until no lumps remain—overmixing can incorporate too much air and lead to a puffy texture.
7. Pour the lemon filling over the warm crust, spreading it evenly with a spatula.
8. Bake for 25–30 minutes, until the filling is set and the edges are lightly browned; it should jiggle slightly in the center when gently shaken, as it will firm up as it cools.
9. Transfer the pan to a wire rack and let the bars cool completely at room temperature for at least 2 hours, then refrigerate for another hour to ensure clean slices.
10. Use the parchment overhang to lift the bars from the pan, dust the top generously with powdered sugar, and cut into 16 squares with a sharp knife wiped clean between cuts for neat edges.
Velvety and luscious, the lemon filling melts on the tongue with a zesty punch, while the graham crust adds a toasty, nutty crunch. For an elegant presentation, garnish each bar with a twist of lemon zest or a dollop of whipped cream, making them a standout at any gathering.
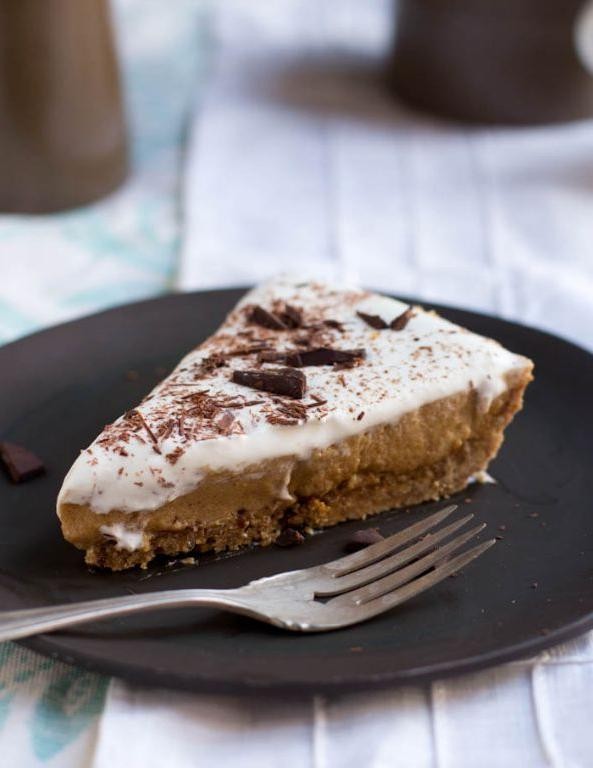
Graham Wafer Crumb Pumpkin Pie
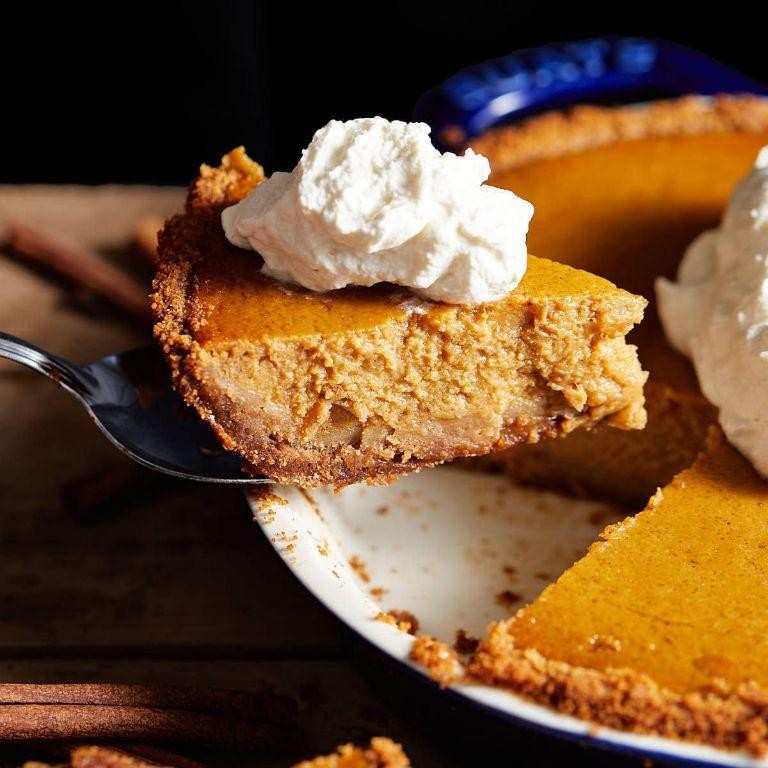
Nestled between the crisp autumn air and the warmth of holiday gatherings, this graham wafer crumb pumpkin pie offers a delightful twist on a classic dessert, blending the nostalgic crunch of graham crackers with the creamy, spiced richness of pumpkin filling for a treat that feels both familiar and refreshingly new. Its golden crust and velvety interior promise a comforting slice that’s perfect for cozy evenings or festive tables, elevating simple ingredients into something truly special.
Serving: 8 | Pre Time: 20 minutes | Cooking Time: 55 minutes
8
servings20
minutes55
minutesIngredients
– A couple of cups of graham wafer crumbs (about 2 cups)
– A good splash of melted butter (½ cup)
– A pinch of granulated sugar (2 tablespoons)
– A can of pumpkin puree (15 ounces)
– A couple of large eggs
– A generous pour of heavy cream (¾ cup)
– A spoonful of brown sugar (¾ cup)
– A dash of ground cinnamon (1 teaspoon)
– A sprinkle of ground ginger (½ teaspoon)
– A tiny bit of ground nutmeg (¼ teaspoon)
– A pinch of salt (¼ teaspoon)
Instructions
1. Preheat your oven to 350°F (175°C) to ensure it’s ready for baking.
2. In a medium bowl, combine the graham wafer crumbs, melted butter, and granulated sugar until the mixture resembles wet sand.
3. Press the crumb mixture firmly into a 9-inch pie dish, covering the bottom and sides evenly to form the crust.
4. Bake the crust for 10 minutes at 350°F until lightly golden, then remove it from the oven and let it cool slightly on a wire rack.
5. In a large mixing bowl, whisk together the pumpkin puree, eggs, heavy cream, brown sugar, cinnamon, ginger, nutmeg, and salt until smooth and well-blended.
6. Pour the pumpkin filling into the pre-baked crust, smoothing the top with a spatula for an even layer.
7. Bake the pie at 350°F for 45-55 minutes, or until the edges are set and the center jiggles slightly when gently shaken.
8. Remove the pie from the oven and let it cool completely on a wire rack for at least 2 hours to allow the filling to firm up.
9. Chill the pie in the refrigerator for 4 hours or overnight before serving to enhance the flavors and texture.
10. Slice and serve the pie as is, or garnish with whipped cream for an extra touch of indulgence.
Remarkably smooth and subtly spiced, this pie boasts a buttery graham crust that adds a satisfying crunch against the creamy pumpkin filling. For a creative twist, try drizzling it with caramel sauce or pairing it with a scoop of vanilla ice cream to highlight its warm, autumnal notes.
Creamy Graham Wafer Crumb Eclairs
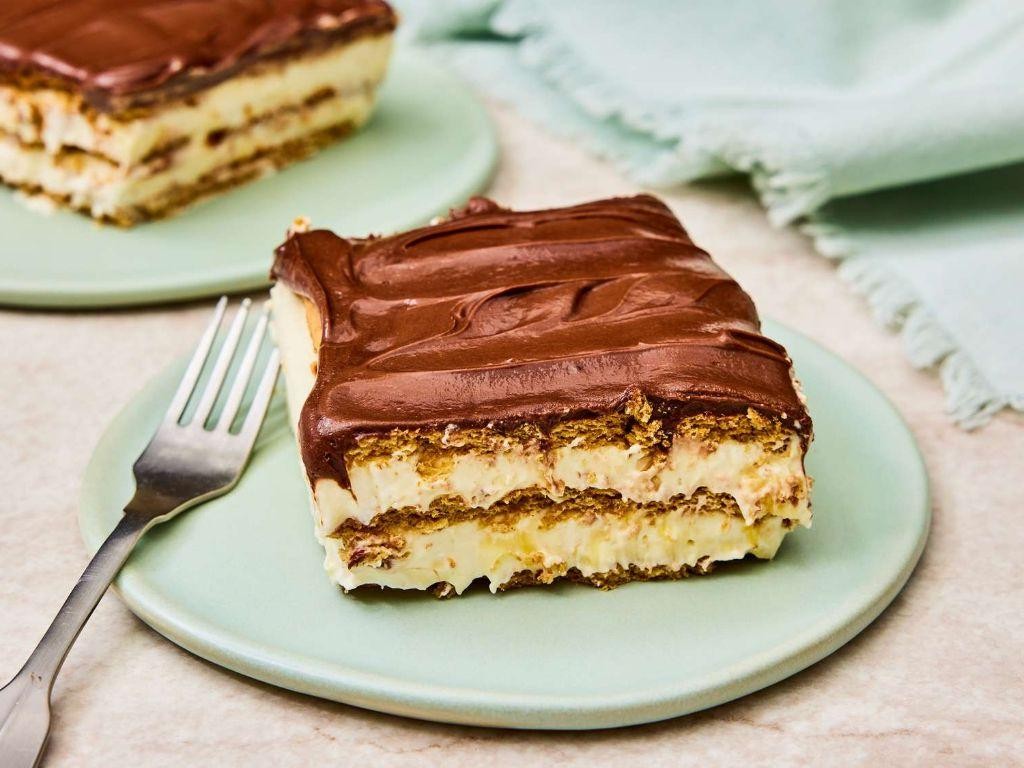
Venturing beyond the classic eclair, this sophisticated dessert marries the nostalgic crunch of graham crackers with a silky cream filling, all encased in a delicate choux pastry shell. It’s an elegant twist that transforms familiar flavors into something truly special for your next gathering. The result is a dessert that feels both comforting and refined, perfect for impressing guests or treating yourself to something extraordinary.
Serving: 12 | Pre Time: 30 minutes | Cooking Time: 35 minutes
12
servings30
minutes35
minutesIngredients
– A cup of water
– A stick of unsalted butter
– A pinch of salt
– A cup of all-purpose flour
– Four large eggs
– A cup of heavy cream
– A quarter cup of powdered sugar
– A teaspoon of vanilla extract
– A couple of graham crackers, finely crushed
– A splash of milk for brushing
Instructions
1. Preheat your oven to 425°F and line a baking sheet with parchment paper.
2. In a medium saucepan, combine 1 cup of water, 1 stick of unsalted butter, and a pinch of salt over medium heat until the butter melts completely.
3. Tip: Bring the mixture to a rolling boil before adding flour to ensure proper pastry rise.
4. Reduce heat to low and stir in 1 cup of all-purpose flour with a wooden spoon until a smooth dough forms and pulls away from the sides, about 2 minutes.
5. Transfer the dough to a mixing bowl and let it cool for 5 minutes to avoid cooking the eggs.
6. Beat in 4 large eggs, one at a time, until fully incorporated and the dough is glossy and thick.
7. Pipe or spoon 12 even mounds of dough onto the prepared baking sheet, spacing them 2 inches apart.
8. Brush the tops lightly with a splash of milk for a golden finish.
9. Bake at 425°F for 15 minutes, then reduce the temperature to 375°F and bake for another 20 minutes until puffed and golden brown.
10. Tip: Do not open the oven during the first 15 minutes to prevent the shells from collapsing.
11. Remove from the oven and immediately poke a small hole in each eclair to release steam, then cool completely on a wire rack.
12. While cooling, whip 1 cup of heavy cream with 1/4 cup of powdered sugar and 1 teaspoon of vanilla extract until stiff peaks form, about 3-4 minutes.
13. Fold in the finely crushed graham crackers gently to maintain the cream’s lightness.
14. Tip: Chill the cream mixture for 10 minutes before piping for easier handling.
15. Pipe the graham cracker cream into the cooled eclairs through the holes.
An airy choux shell gives way to a creamy filling studded with graham cracker crumbs, offering a delightful contrast of textures. The subtle sweetness and hint of vanilla make these eclairs irresistible, especially when dusted with extra powdered sugar or drizzled with caramel for an extra touch of indulgence.
Banana Split Graham Wafer Crumb Delights
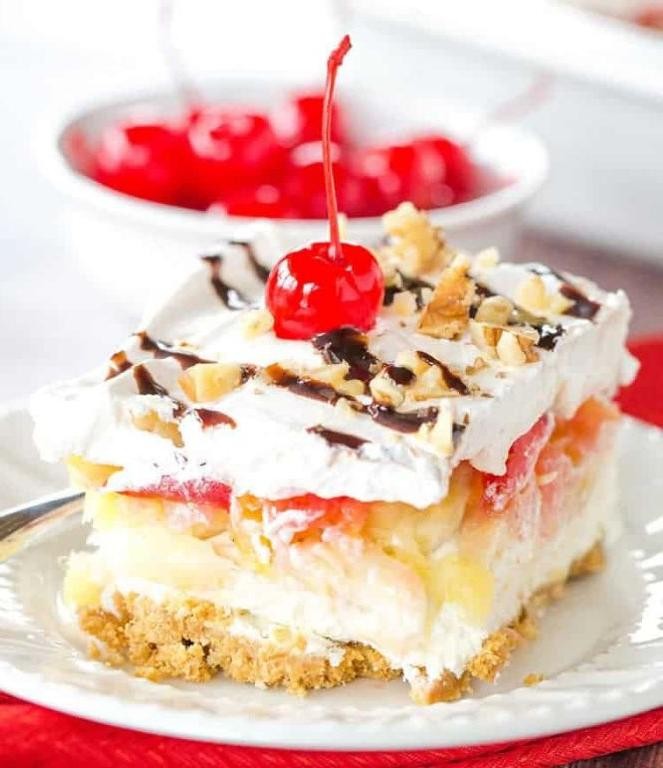
Fusing nostalgic charm with contemporary elegance, this Banana Split Graham Wafer Crumb Delights recipe transforms classic dessert flavors into a sophisticated, shareable treat. Imagine layers of buttery graham cracker crumbs, creamy banana-infused filling, and decadent chocolate drizzle—all harmonizing in a delightful bite-sized creation that’s perfect for gatherings or a refined indulgence at home. It’s a playful yet polished twist on the beloved banana split, designed to impress with minimal effort.
Serving: 12 | Pre Time: 20 minutes | Cooking Time: 0 minutes
12
servings20
minutesIngredients
– A couple of cups of graham cracker crumbs (about 2 cups)
– A stick of unsalted butter, melted (½ cup)
– A splash of vanilla extract (1 teaspoon)
– A couple of ripe bananas, mashed (2 medium)
– A tub of cream cheese, softened (8 ounces)
– A cup of powdered sugar (1 cup)
– A cup of heavy whipping cream (1 cup)
– A handful of semisweet chocolate chips (½ cup)
– A drizzle of vegetable oil (1 teaspoon)
– A sprinkle of chopped walnuts for topping (¼ cup)
Instructions
1. In a medium bowl, combine the graham cracker crumbs and melted unsalted butter until the mixture resembles wet sand, pressing it firmly into a 9×13-inch baking dish to form an even crust layer.
2. Chill the crust in the refrigerator for exactly 10 minutes to set it, which helps prevent crumbling later—this tip ensures a sturdy base for the layers.
3. In a large mixing bowl, beat the softened cream cheese with an electric mixer on medium speed for about 2 minutes until smooth and fluffy.
4. Add the mashed ripe bananas and vanilla extract to the cream cheese, mixing on low speed until fully incorporated, which should take roughly 1 minute.
5. Gradually sift in the powdered sugar while continuing to mix on low speed, then increase to medium and beat for another 2 minutes until the mixture is creamy and lump-free.
6. In a separate chilled bowl, whip the heavy whipping cream with clean beaters on high speed for 3–4 minutes until stiff peaks form, being careful not to over-whip to avoid a grainy texture—this tip guarantees a light, airy filling.
7. Gently fold the whipped cream into the banana-cream cheese mixture using a spatula until no white streaks remain, ensuring an even, fluffy consistency.
8. Spread this filling evenly over the chilled graham cracker crust, smoothing the top with the spatula.
9. In a microwave-safe bowl, combine the semisweet chocolate chips and vegetable oil, microwaving in 30-second intervals, stirring after each, until fully melted and smooth, which typically takes about 1 minute total.
10. Drizzle the melted chocolate over the filling in a zigzag pattern, then immediately sprinkle the chopped walnuts on top before the chocolate sets, adding a crunchy contrast—this tip enhances both texture and visual appeal.
11. Refrigerate the dish for at least 4 hours, or until fully set and firm to the touch.
12. Cut into 12 even squares using a sharp knife wiped clean between slices for neat edges.
Notably, these delights boast a creamy, velvety texture from the banana-infused filling, punctuated by the satisfying crunch of graham cracker crumbs and walnuts. The rich chocolate drizzle melts subtly on the tongue, balancing the sweetness with a hint of bitterness. For a creative twist, serve them chilled on a platter garnished with fresh banana slices or a dollop of whipped cream, making them an elegant centerpiece at brunches or dinner parties.
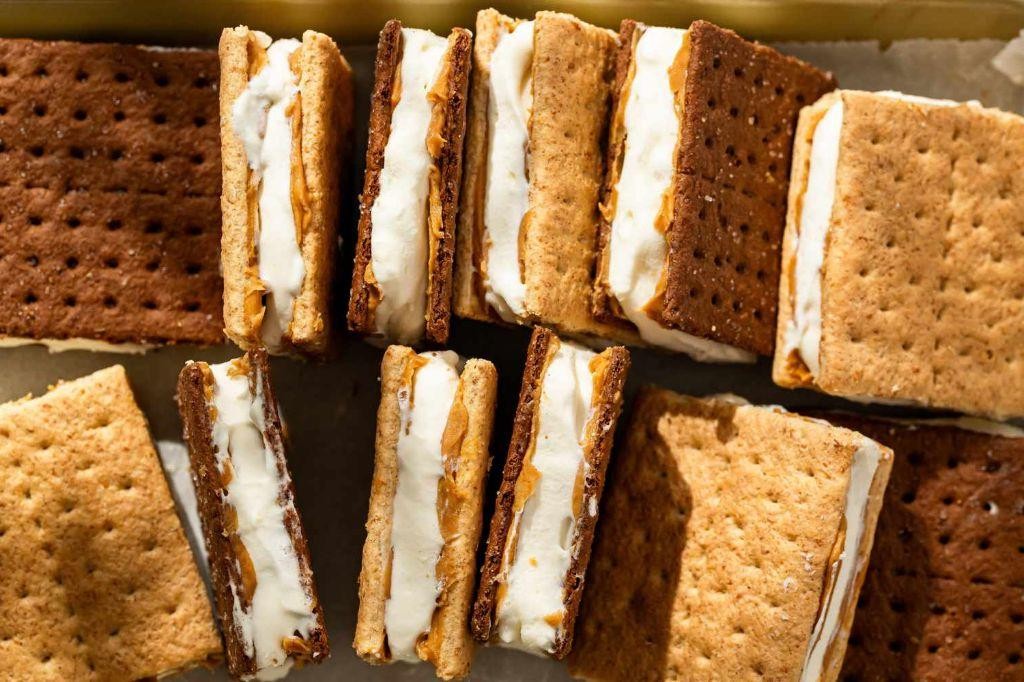
S’mores Graham Wafer Crumb Squares
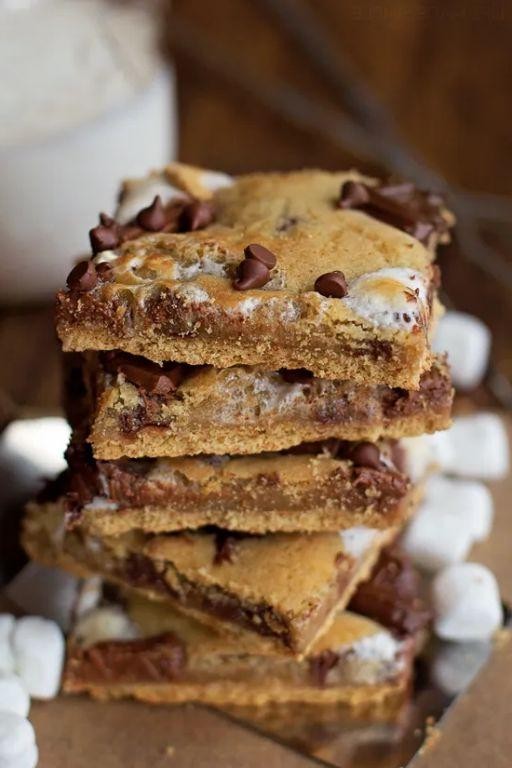
A sophisticated twist on the classic campfire treat, these S’mores Graham Wafer Crumb Squares transform nostalgic flavors into an elegant dessert. Imagine a buttery graham cracker crust layered with velvety chocolate and toasted marshmallow, all baked to golden perfection. This recipe delivers the essence of s’mores in a refined, shareable form that’s perfect for gatherings or a cozy night in.
Serving: 16 | Pre Time: 15 minutes | Cooking Time: 25 minutes
16
servings15
minutes25
minutesIngredients
– A couple of sleeves of graham crackers (about 2 cups when crushed)
– A stick of unsalted butter (½ cup), melted
– A pinch of salt
– A bag of semi-sweet chocolate chips (1½ cups)
– A can of sweetened condensed milk (14 ounces)
– A splash of vanilla extract (1 teaspoon)
– A bag of mini marshmallows (2 cups)
Instructions
1. Preheat your oven to 350°F and line an 8×8-inch baking pan with parchment paper, leaving an overhang for easy removal later.
2. Crush the graham crackers into fine crumbs using a food processor or by placing them in a sealed bag and rolling with a rolling pin until you have 2 cups of crumbs.
3. In a medium bowl, combine the graham cracker crumbs, melted butter, and salt, mixing until the crumbs are evenly moistened and the mixture resembles wet sand.
4. Press the crumb mixture firmly into the bottom of the prepared pan in an even layer, using the bottom of a measuring cup to compact it for a sturdy crust.
5. In a small saucepan over low heat, warm the sweetened condensed milk, chocolate chips, and vanilla extract, stirring constantly until the chocolate is fully melted and the mixture is smooth, about 3-5 minutes.
6. Pour the chocolate mixture over the graham cracker crust, spreading it evenly with a spatula to cover the surface completely.
7. Sprinkle the mini marshmallows in a single layer over the chocolate, covering it entirely for a fluffy topping.
8. Bake in the preheated oven for 20-25 minutes, or until the marshmallows are puffed and golden brown, watching closely to prevent burning.
9. Remove the pan from the oven and let it cool completely at room temperature for at least 2 hours to allow the layers to set properly before slicing.
10. Once cooled, use the parchment paper overhang to lift the squares out of the pan, then cut into 16 even pieces with a sharp knife wiped clean between cuts for neat edges.
Creating these squares yields a delightful contrast of textures: the crisp graham base gives way to a fudgy chocolate center, topped with a lightly toasted marshmallow that melts in your mouth. For a creative twist, serve them slightly warmed with a drizzle of caramel or alongside a scoop of vanilla ice cream to enhance the indulgent experience.
Coconut Graham Wafer Crumb Macaroons
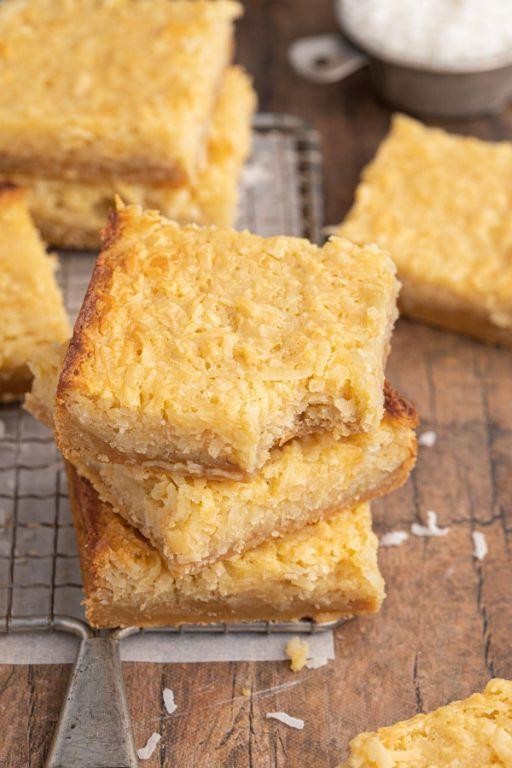
Elevating the humble macaroon to new heights, these Coconut Graham Wafer Crumb Macaroons blend tropical sweetness with a delightful crunch. Imagine tender coconut mounds with a buttery graham cracker base, creating a treat that’s both nostalgic and sophisticated—perfect for holiday gatherings or an elegant afternoon indulgence.
Serving: 24 | Pre Time: 15 minutes | Cooking Time: 20 minutes
24
servings15
minutes20
minutesIngredients
- 3 cups of sweetened shredded coconut
- 1 cup of graham cracker crumbs (just crush up a sleeve of graham crackers—it’s so easy!)
- ¾ cup of granulated sugar
- ½ cup of all-purpose flour
- ¼ teaspoon of salt
- 4 large egg whites
- 1 teaspoon of vanilla extract
- A splash of water, if needed
Instructions
- Preheat your oven to 325°F and line two baking sheets with parchment paper.
- In a large bowl, combine the sweetened shredded coconut, graham cracker crumbs, granulated sugar, all-purpose flour, and salt, stirring until evenly mixed.
- In a separate bowl, whisk the egg whites and vanilla extract until frothy, which should take about 1–2 minutes with a hand mixer.
- Pour the egg white mixture into the dry ingredients, folding gently until a sticky dough forms; if it feels too dry, add a splash of water, one tablespoon at a time.
- Using a cookie scoop or your hands, form the dough into 1½-inch mounds and place them 2 inches apart on the prepared baking sheets.
- Bake for 18–20 minutes, rotating the pans halfway through, until the macaroons are golden brown on the edges and set in the center.
- Let the macaroons cool on the baking sheets for 5 minutes, then transfer them to a wire rack to cool completely.
Vibrant with a crisp exterior and chewy interior, these macaroons offer a delightful contrast of textures. Serve them drizzled with dark chocolate or alongside a cup of espresso for a truly decadent experience.
Graham Wafer Crumb Toffee Bars

Savor the perfect harmony of buttery toffee and crisp graham crumbs in these elegant bars that transform simple pantry staples into a sophisticated treat. With a golden, caramelized base and a satisfying crunch, they’re ideal for holiday gatherings or an afternoon indulgence with coffee. Their rich, sweet flavor and sturdy texture make them as beautiful on a dessert platter as they are delicious straight from the pan.
Serving: 16 | Pre Time: 15 minutes | Cooking Time: 25 minutes
16
servings15
minutes25
minutesIngredients
– A couple of sleeves of graham crackers (about 2 cups of fine crumbs)
– A stick of unsalted butter (½ cup), plus an extra tablespoon for greasing
– A cup of packed light brown sugar
– A splash of vanilla extract (1 teaspoon)
– A pinch of salt (¼ teaspoon)
– A cup of semisweet chocolate chips
– A handful of chopped pecans (½ cup)
Instructions
1. Preheat your oven to 350°F and grease an 8×8-inch baking pan with that extra tablespoon of butter, lining it with parchment paper for easy removal later.
2. Crush the graham crackers into fine crumbs using a food processor or by sealing them in a bag and rolling with a pin—aim for a texture like sand without large chunks.
3. Melt the stick of butter in a medium saucepan over medium heat, then stir in the brown sugar, vanilla, and salt until fully combined and bubbling gently, about 3-4 minutes.
4. Tip: Keep the heat steady to avoid burning the sugar; the mixture should turn a deep amber color and smell richly caramelized.
5. Remove the saucepan from the heat and immediately fold in the graham cracker crumbs until evenly coated and no dry spots remain.
6. Press the mixture firmly into the prepared pan with the back of a spoon or your hands to create a compact, even layer—this ensures the bars hold together after baking.
7. Bake in the preheated oven for 20-25 minutes, until the edges are golden brown and the center appears set but not overly dark.
8. Tip: Check at the 20-minute mark; overbaking can make the toffee bitter, so rely on visual cues over strict timing.
9. As soon as the pan comes out of the oven, sprinkle the chocolate chips evenly over the hot surface and let them sit for 2 minutes to soften before spreading into a smooth layer with an offset spatula.
10. Scatter the chopped pecans over the melted chocolate, pressing them lightly to adhere, then allow the bars to cool completely at room temperature for at least 2 hours.
11. Tip: For clean cuts, chill the bars in the refrigerator for 30 minutes after cooling, then slice into squares with a sharp knife wiped clean between cuts.
Each bite offers a delightful contrast of textures, from the crisp, buttery base to the creamy chocolate and crunchy pecans. Elevate these bars by drizzling them with a touch of sea salt or serving alongside a scoop of vanilla ice cream for a decadent dessert that feels both homey and refined.
Raspberry Graham Wafer Crumb Cheesecake
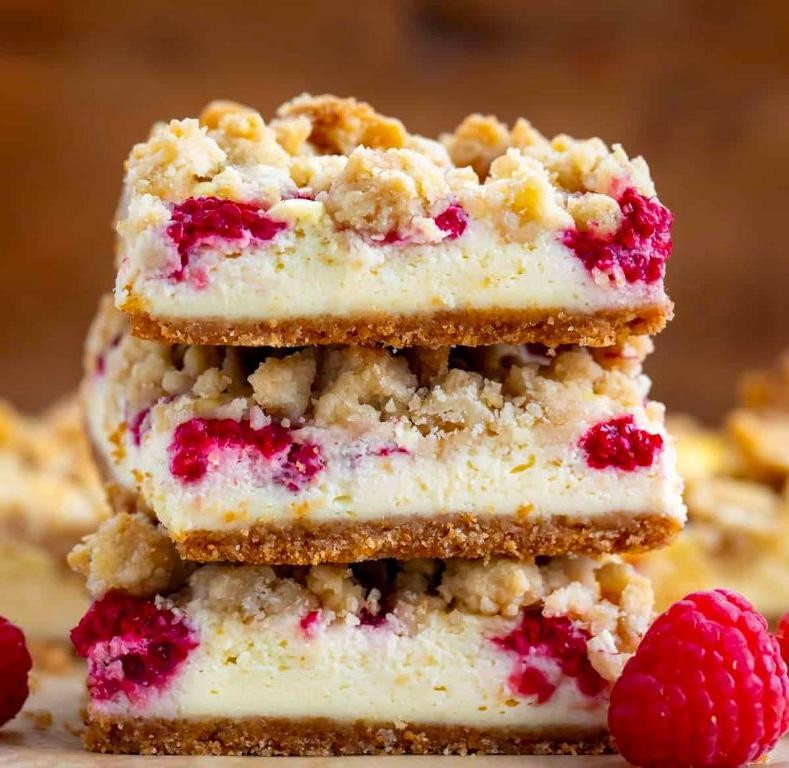
Delightfully decadent yet surprisingly simple to prepare, this Raspberry Graham Wafer Crumb Cheesecake combines the tart brightness of fresh raspberries with the rich, creamy indulgence of classic cheesecake, all nestled atop a buttery, crumbly graham cracker crust that provides the perfect textural contrast. It’s an elegant dessert that feels both celebratory and comforting, ideal for everything from holiday gatherings to a quiet weekend treat.
Serving: 12 | Pre Time: 25 minutes | Cooking Time: 55 minutes
12
servings25
minutes55
minutesIngredients
- For the crust: about 2 cups of graham cracker crumbs (from roughly 15 whole crackers), ½ cup of melted butter, and a couple of tablespoons of granulated sugar.
- For the filling: 3 blocks of cream cheese (8 oz each), softened to room temperature, 1 cup of granulated sugar, 3 large eggs, 1 cup of sour cream, a splash of vanilla extract, and 1 tablespoon of all-purpose flour.
- For the topping: 2 cups of fresh raspberries and a drizzle of raspberry jam (about ¼ cup) for a glossy finish.
Instructions
- Preheat your oven to 325°F and lightly grease a 9-inch springform pan.
- In a medium bowl, combine the graham cracker crumbs, melted butter, and 2 tablespoons of sugar until the mixture resembles wet sand.
- Press the crumb mixture firmly into the bottom of the prepared pan, using the back of a measuring cup to create an even layer.
- Bake the crust for 10 minutes at 325°F until it’s lightly golden and set, then remove it from the oven and let it cool slightly on a wire rack. Tip: Cooling the crust briefly helps prevent a soggy bottom when you add the filling.
- In a large mixing bowl, beat the softened cream cheese and 1 cup of sugar on medium speed for 3 minutes until completely smooth and creamy.
- Add the eggs one at a time, beating for 30 seconds after each addition until just incorporated.
- Mix in the sour cream, vanilla extract, and 1 tablespoon of flour until the filling is uniform and no streaks remain.
- Pour the filling over the cooled crust and smooth the top with a spatula.
- Place the springform pan on a baking sheet and bake at 325°F for 50-55 minutes; the edges should be set, but the center will still jiggle slightly when gently shaken. Tip: Avoid opening the oven door during baking to prevent cracks from forming.
- Turn off the oven, crack the door open, and let the cheesecake cool inside for 1 hour to set gradually.
- Transfer the cheesecake to a wire rack to cool completely to room temperature, about 2 hours.
- Refrigerate the cheesecake, uncovered, for at least 4 hours or overnight until fully chilled and firm.
- Before serving, arrange the fresh raspberries evenly over the top of the cheesecake.
- Warm the raspberry jam in a small saucepan over low heat for 2-3 minutes until runny, then drizzle it lightly over the raspberries for a shiny glaze. Tip: Brushing the jam gently helps preserve the berries’ shape and adds a professional touch.
Marvel at the creamy, velvety texture of the cheesecake filling, which contrasts beautifully with the crisp, buttery crust and the juicy burst of raspberries. The tangy fruit cuts through the richness, making each slice perfectly balanced—serve it chilled with a dollop of whipped cream or alongside a cup of espresso for an extra indulgent finish.
Mocha Graham Wafer Crumb Mousse
Luxuriously layered with the sophisticated bitterness of espresso and the velvety richness of dark chocolate, this mousse transforms humble graham crackers into an elegant, cloud-like dessert. It’s the perfect finale for a dinner party, offering a delightful contrast of textures and a deep, complex flavor that feels both indulgent and refreshingly light.
Serving: 6 | Pre Time: 25 minutes | Cooking Time: 0 minutes
6
servings25
minutesIngredients
– 1 cup of heavy cream, nice and cold
– 8 ounces of good-quality dark chocolate, chopped up
– 1/4 cup of strong brewed espresso, cooled to room temp
– 1/4 cup of granulated sugar
– A splash of pure vanilla extract
– A couple of pinches of fine sea salt
– 10 whole graham crackers, for that lovely crumb
– A little extra whipped cream for topping, if you like
Instructions
1. Place the chopped dark chocolate in a heatproof bowl.
2. Gently heat the heavy cream in a small saucepan over medium heat until it just begins to simmer around the edges, which should take about 3-4 minutes; do not let it boil.
3. Immediately pour the hot cream over the chopped chocolate and let it sit undisturbed for 1 full minute to allow the chocolate to melt.
4. After 1 minute, whisk the chocolate and cream mixture slowly and steadily until it becomes completely smooth and glossy, which is your ganache base.
5. Whisk in the cooled espresso, granulated sugar, vanilla extract, and fine sea salt until everything is fully combined and the sugar has dissolved.
6. Set the chocolate-espresso ganache aside to cool to room temperature, which should take about 15-20 minutes; you can speed this up by placing the bowl in an ice bath and stirring occasionally.
7. While the ganache cools, place the graham crackers in a sealed plastic bag and crush them with a rolling pin until you have fine, sandy crumbs with a few larger pieces for texture.
8. Once the ganache has cooled (it should feel just slightly warm to the touch), use a hand mixer or stand mixer fitted with the whisk attachment to whip it on medium-high speed for 3-4 minutes until it becomes light, fluffy, and holds soft peaks.
9. Spoon or pipe the whipped mousse into serving glasses, creating layers by alternating with spoonfuls of the graham cracker crumbs.
10. Chill the assembled desserts in the refrigerator for at least 2 hours to allow the mousse to set fully and the flavors to meld.
11. Just before serving, top each glass with a dollop of the extra whipped cream and a final sprinkle of the remaining graham cracker crumbs.
Fragrant with coffee and deeply chocolatey, this mousse boasts an airy, melt-in-your-mouth texture that’s beautifully grounded by the crunchy, buttery graham layers. For a stunning presentation, serve it in clear glasses to showcase the elegant strata, or garnish with chocolate shavings and a dusting of cocoa powder for an extra touch of sophistication.
Conclusion
Perfect for any occasion, these 26 graham wafer crumb desserts prove that simple ingredients can create extraordinary treats. We hope you’re inspired to whip up one (or several!) of these creations. Don’t forget to leave a comment telling us your favorite, and if you loved this roundup, please share it on Pinterest to spread the sweetness!


