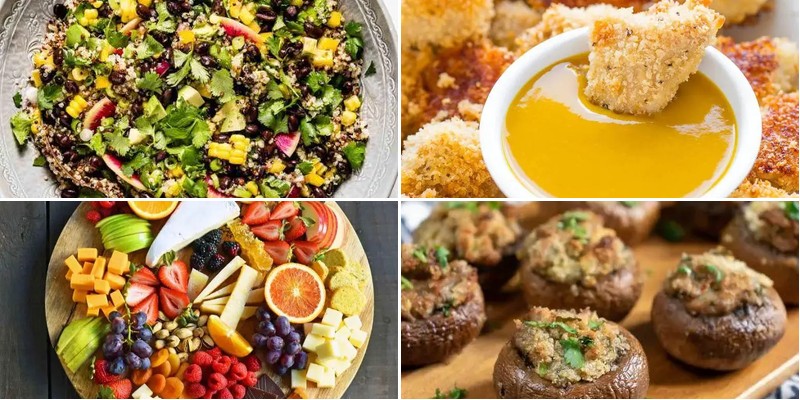
Oh, the joy of celebrating a graduate’s achievements! Planning the perfect party menu can feel overwhelming, but we’ve gathered 18 exquisite recipes that will make your celebration truly memorable. From elegant appetizers to show-stopping desserts, these crowd-pleasing dishes are sure to impress your guests. Let’s dive into these delicious options that will have everyone talking about your graduation party for years to come!
Herb-Crusted Chicken Bites with Honey Mustard Dip
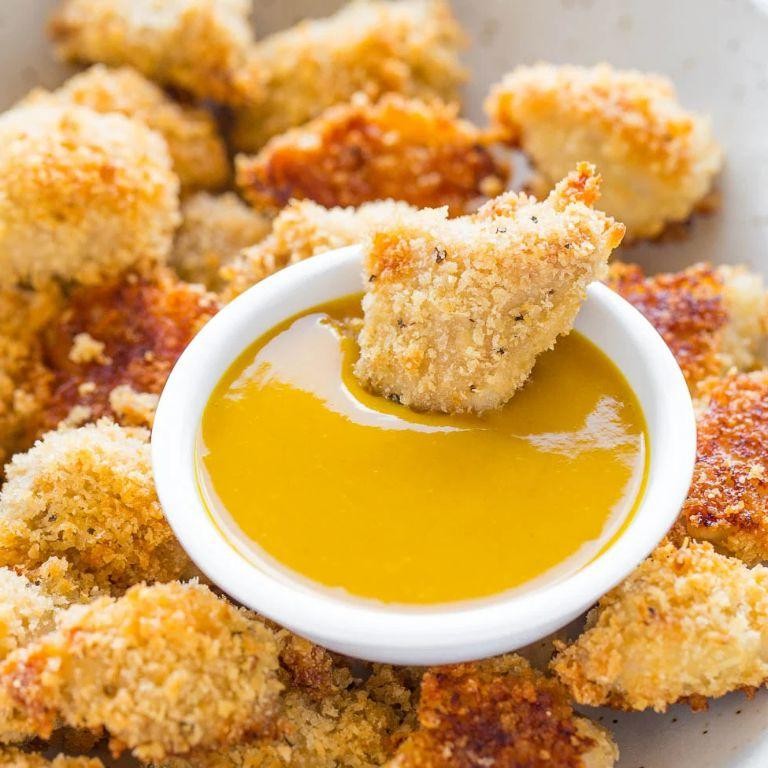
Ready to make the most irresistible party snack that’ll have everyone asking for the recipe? These herb-crusted chicken bites with honey mustard dip come together quickly and deliver restaurant-quality flavor right in your own kitchen. Let’s walk through each step methodically so you can create perfectly crispy, tender chicken every single time.
2
servings15
minutes18
minutesIngredients
For the chicken bites: about 1.5 pounds of boneless, skinless chicken breasts cut into 1-inch pieces, 1 cup of panko breadcrumbs, 1/2 cup of grated Parmesan cheese, 2 tablespoons of dried Italian seasoning, 1 teaspoon of garlic powder, 1/2 teaspoon of paprika, 2 large eggs, 1/4 cup of all-purpose flour, and a generous pinch of salt and black pepper. For the dip: 1/2 cup of mayonnaise, 2 tablespoons of Dijon mustard, 2 tablespoons of honey, and a splash of lemon juice.
Instructions
1. Preheat your oven to 400°F and line a baking sheet with parchment paper. 2. Cut the chicken breasts into uniform 1-inch pieces to ensure even cooking. 3. In one shallow bowl, whisk the eggs until fully blended. 4. In a second bowl, combine the flour with a pinch of salt and pepper. 5. In a third bowl, mix the panko breadcrumbs, Parmesan cheese, Italian seasoning, garlic powder, and paprika. 6. Working with one piece at a time, coat each chicken piece first in the flour mixture, shaking off any excess. 7. Next, dip the floured chicken into the egg wash, letting any drips fall back into the bowl. 8. Finally, press the chicken firmly into the breadcrumb mixture, ensuring all sides are well coated. 9. Arrange the coated chicken pieces in a single layer on your prepared baking sheet, leaving space between each piece for proper air circulation. 10. Bake for 15-18 minutes, flipping halfway through, until the coating is golden brown and the internal temperature reaches 165°F. 11. While the chicken bakes, prepare the dip by whisking together mayonnaise, Dijon mustard, honey, and lemon juice in a small bowl until smooth. 12. Let the chicken rest for 2-3 minutes after baking to allow the juices to redistribute. Don’t skip resting time—this keeps your chicken moist and tender. During the breading process, use one hand for dry ingredients and the other for wet to prevent clumpy fingers. For extra crispy results, lightly spray the breaded chicken with cooking oil before baking. Delightfully crispy on the outside and incredibly juicy inside, these chicken bites offer a satisfying crunch with every bite. The herb crust provides savory depth that pairs beautifully with the sweet-tangy honey mustard dip. Serve them as an appetizer with toothpicks for easy dipping, or turn them into a main course over a fresh green salad for a complete meal.
Mini Caprese Salad Skewers

H
Here’s a simple yet elegant appetizer that’s perfect for any gathering. Mini Caprese Salad Skewers bring together fresh flavors in a fun, handheld format that’s surprisingly easy to assemble. Let’s walk through each step together so you can create these beautiful bites with confidence.
20
skewers15
minutesIngredients
– About 20 cherry tomatoes
– A couple of 8-ounce balls of fresh mozzarella
– A big handful of fresh basil leaves
– A generous drizzle of extra virgin olive oil
– A good splash of balsamic glaze
– A couple of pinches of kosher salt
– A few grinds of black pepper
Instructions
1. Rinse 20 cherry tomatoes under cool running water and pat them completely dry with paper towels.
2. Drain the liquid from two 8-ounce fresh mozzarella balls and cut them into 20 equal-sized cubes using a sharp knife.
3. Select 20 medium-sized fresh basil leaves that are free of brown spots or tears.
4. Thread one cherry tomato onto a 6-inch wooden skewer, pushing it about halfway down the stick.
5. Add one basil leaf by folding it gently and sliding it onto the skewer next to the tomato.
6. Place one mozzarella cube on the skewer, ensuring it sits snugly against the basil leaf.
7. Repeat steps 4-6 until you have 20 completed skewers arranged on a serving platter.
8. Drizzle the skewers with 2 tablespoons of extra virgin olive oil, making sure each one gets coated.
9. Sprinkle evenly with 1 teaspoon of kosher salt and ½ teaspoon of freshly ground black pepper.
10. Finish by drizzling 1 tablespoon of balsamic glaze in a zigzag pattern across all skewers.
Drizzle these skewers right before serving to keep the basil vibrant and crisp. The creamy mozzarella provides a lovely contrast to the juicy tomato pop, while the basil adds that fresh herbal note that makes caprese so distinctive. For a fun twist, try alternating the assembly order on some skewers or serving them alongside crusty bread to soak up the delicious olive oil and balsamic pooling at the bottom of the platter.
Smoked Salmon and Cream Cheese Roll-Ups
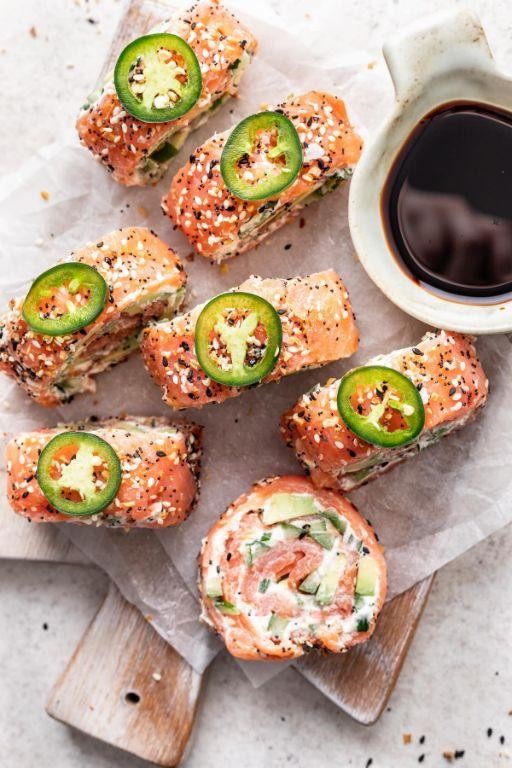
Fancy an elegant appetizer that looks impressive but comes together in minutes? These smoked salmon and cream cheese roll-ups are your new go-to for effortless entertaining, combining silky fish with creamy tang in perfect bite-sized packages.
8
roll-ups35
minutesIngredients
– 8 ounces of thinly sliced smoked salmon
– 4 ounces of softened cream cheese
– 1 tablespoon of fresh lemon juice
– 1 teaspoon of chopped fresh dill
– A pinch of black pepper
– A couple of capers for garnish (optional)
Instructions
1. Place the cream cheese in a small bowl and let it sit at room temperature for 30 minutes until soft and spreadable.
2. Add the lemon juice, chopped dill, and black pepper to the softened cream cheese.
3. Stir the mixture vigorously with a fork for about 1 minute until completely smooth and well combined.
4. Lay one slice of smoked salmon flat on a clean cutting board, with the longer side facing you.
5. Spread approximately 1 tablespoon of the cream cheese mixture evenly over the salmon slice, leaving a 1/2-inch border at the top edge.
6. Starting from the bottom edge, tightly roll the salmon away from you, applying gentle pressure to create a compact cylinder.
7. Repeat steps 4-6 with the remaining salmon slices and cream cheese mixture.
8. Arrange the roll-ups seam-side down on a serving plate.
9. Cover the plate with plastic wrap and refrigerate for at least 1 hour to firm up.
10. Remove from refrigerator and slice each roll-up crosswise into 1-inch pieces using a sharp knife.
11. Arrange the pieces cut-side up on your serving platter.
12. Garnish with capers if desired, pressing them gently into the cream cheese filling.
Zesty lemon brightens the rich salmon, while the creamy filling provides a cool contrast to the smoky fish. Serve these elegant spirals on cucumber rounds for extra crunch, or pack them in lunch boxes for a sophisticated midday treat.
Spicy Buffalo Cauliflower Wings
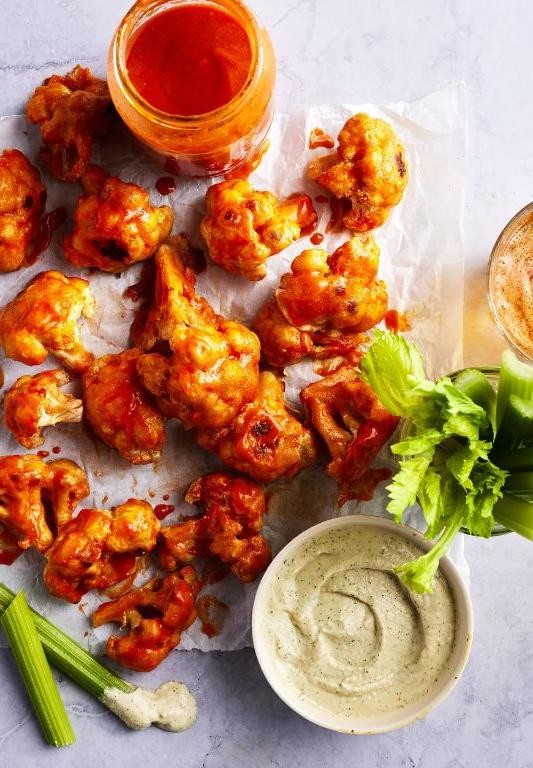
Perfect for game day or a casual gathering, these spicy buffalo cauliflower wings deliver that classic wing experience with a satisfying plant-based twist. Preparing them involves a simple breading process and a quick bake until crispy.
3
servings15
minutes40
minutesIngredients
- 1 large head of cauliflower, cut into bite-sized florets
- 1 cup of all-purpose flour
- 1 cup of milk (any kind you like)
- 1 teaspoon of garlic powder
- 1/2 teaspoon of salt
- A couple of tablespoons of hot sauce (like Frank’s RedHot)
- A good glug of melted butter or olive oil (about 2 tablespoons)
Instructions
- Preheat your oven to 450°F and line a baking sheet with parchment paper.
- In a large bowl, whisk together the flour, milk, garlic powder, and salt until you have a smooth, thick batter. Tip: The batter should coat the back of a spoon nicely—if it’s too thin, add a bit more flour.
- Toss the cauliflower florets in the batter, making sure each piece is fully coated.
- Arrange the coated cauliflower in a single layer on the prepared baking sheet, leaving a little space between each piece.
- Bake for 20 minutes, then flip each piece over using tongs. Tip: Flipping ensures even browning and crispiness on all sides.
- Bake for another 10-15 minutes, until the cauliflower is golden brown and crispy at the edges.
- While the cauliflower bakes, whisk together the hot sauce and melted butter in a large bowl.
- As soon as the cauliflower comes out of the oven, immediately toss the hot florets in the buffalo sauce mixture until evenly coated. Tip: Tossing while hot helps the sauce cling better for maximum flavor in every bite.
- Return the sauced cauliflower to the baking sheet and bake for another 5 minutes to set the glaze.
Here, you’ll find the exterior delightfully crispy while the inside stays tender, all wrapped in that tangy, spicy buffalo kick. Serve them piled high with celery sticks and a generous drizzle of cool ranch dressing for the perfect balance.
Grilled Vegetable Antipasto Platter
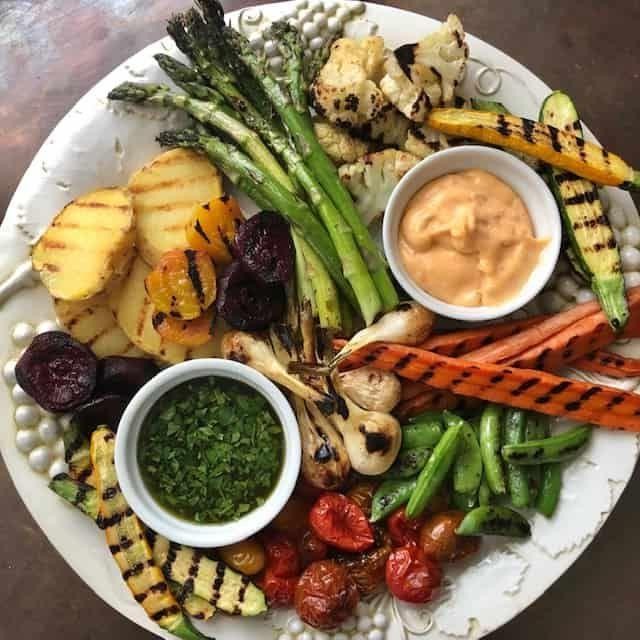
Grilling up vegetables for an antipasto platter transforms simple produce into a stunning centerpiece that’s perfect for sharing. Gather your favorite summer vegetables and let’s walk through each step together, ensuring every piece is perfectly charred and bursting with flavor. This methodical approach will help even beginners create an impressive, restaurant-worthy spread with confidence.
2
servings15
minutes20
minutesIngredients
– 2 medium zucchinis, sliced into ½-inch thick rounds
– 1 large red bell pepper, cored and cut into 1-inch wide strips
– 1 small eggplant, sliced into ¾-inch thick rounds
– 1 red onion, peeled and cut into ½-inch thick wedges
– 8 ounces cremini mushrooms, stems trimmed
– ¼ cup extra virgin olive oil
– 2 tablespoons balsamic vinegar
– 3 cloves garlic, minced
– 1 teaspoon dried oregano
– ½ teaspoon kosher salt
– ¼ teaspoon black pepper
– A handful of fresh basil leaves, for garnish
Instructions
1. Preheat your grill to medium-high heat, aiming for 400°F.
2. In a large mixing bowl, whisk together ¼ cup olive oil, 2 tablespoons balsamic vinegar, 3 minced garlic cloves, 1 teaspoon oregano, ½ teaspoon salt, and ¼ teaspoon black pepper until fully combined.
3. Add all sliced vegetables—zucchini, bell pepper, eggplant, onion, and mushrooms—to the bowl and toss thoroughly to coat each piece evenly with the marinade.
4. Place vegetables directly on the preheated grill grate in a single layer, working in batches if needed to avoid overcrowding.
5. Grill zucchini and eggplant rounds for 4–5 minutes per side, until you see clear grill marks and the flesh becomes tender.
6. Grill bell pepper strips and onion wedges for 6–7 minutes total, turning occasionally until edges are lightly charred and onions are translucent.
7. Grill mushrooms for 5–6 minutes, gill-side down first for 3 minutes, then flipping until they release their moisture and brown slightly.
8. Transfer all grilled vegetables to a serving platter as they finish cooking.
9. Scatter fresh basil leaves over the warm vegetables just before serving. Remember, grilled vegetables continue to soften as they cool, so serve them warm for the best texture. Really, the magic happens when those caramelized edges meet the bright basil—each bite offers a smoky sweetness balanced by fresh herbs. Try stacking different vegetables on crusty bread or layering them over creamy burrata for an extra indulgent twist.
Classic Shrimp Cocktail with Zesty Lemon Sauce
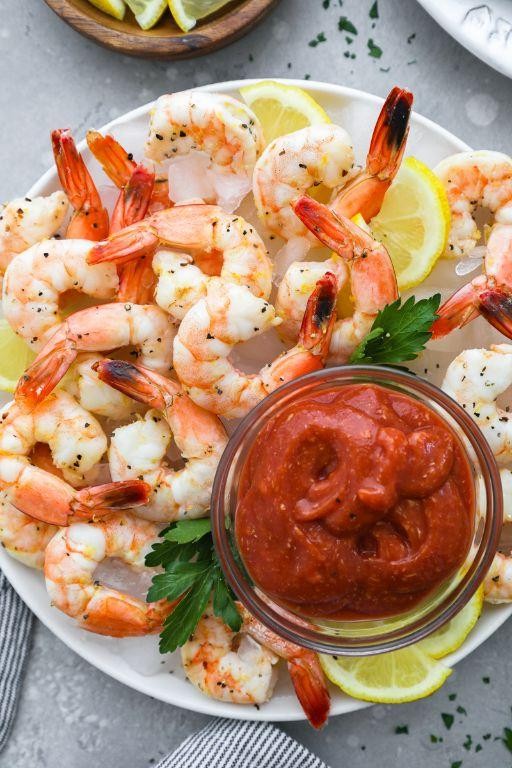
Let’s create the perfect shrimp cocktail that will impress your guests with minimal effort. Looking for a refreshing appetizer that feels fancy but is surprisingly simple to master? This classic dish combines plump, tender shrimp with a bright, zesty sauce that wakes up your taste buds.
3
servings10
minutes3
minutesIngredients
– 1 pound of large raw shrimp, peeled and deveined but tails left on
– 2 tablespoons of fresh lemon juice
– 1 tablespoon of prepared horseradish
– 1/2 cup of ketchup
– A couple of dashes of Worcestershire sauce
– A splash of hot sauce
– A pinch of salt
– Ice for chilling
Instructions
- Fill a large pot with water and bring it to a rolling boil over high heat.
- Add the peeled and deveined shrimp to the boiling water and cook for exactly 2-3 minutes until they turn pink and opaque.
- Immediately transfer the cooked shrimp to a bowl of ice water using a slotted spoon to stop the cooking process.
- Let the shrimp chill in the ice bath for 5 minutes until completely cool to prevent them from becoming rubbery.
- While the shrimp chill, combine 1/2 cup of ketchup, 2 tablespoons of fresh lemon juice, and 1 tablespoon of prepared horseradish in a small bowl.
- Add a couple of dashes of Worcestershire sauce and a splash of hot sauce to the ketchup mixture.
- Stir all the sauce ingredients together until well combined and smooth.
- Season the sauce with a pinch of salt, adjusting if needed after tasting.
- Drain the chilled shrimp thoroughly and pat them dry with paper towels to ensure the sauce clings properly.
- Arrange the shrimp on a serving platter with the sauce in a small bowl in the center for dipping.
Mouthwatering shrimp cocktail is ready to serve! The plump shrimp should have a firm yet tender bite, while the zesty sauce delivers a perfect balance of tangy, spicy, and sweet flavors. For a creative presentation, serve individual portions in martini glasses lined with shredded lettuce, or add extra lemon wedges for squeezing over the shrimp right before eating.
Pulled Pork Sliders with Tangy BBQ Sauce
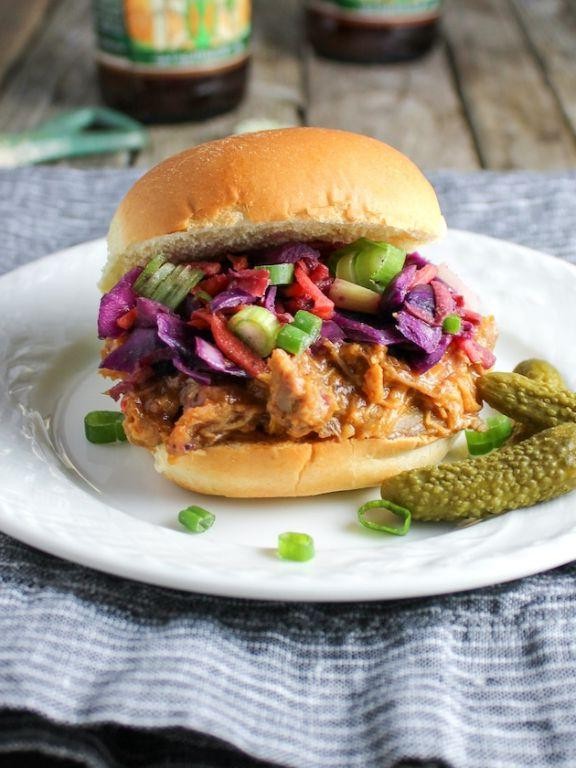
Getting perfectly tender pulled pork sliders starts with choosing the right cut and cooking it low and slow. Gradually building layers of flavor through seasoning, slow roasting, and a tangy homemade BBQ sauce makes these sliders irresistible. Follow these steps carefully for fall-apart pork that will have everyone asking for seconds.
12
sliders20
minutes255
minutesIngredients
- a 3-4 pound pork shoulder roast
- a generous sprinkle of brown sugar
- a couple of tablespoons of paprika
- a good pinch of salt and black pepper
- a cup of ketchup
- a quarter cup of apple cider vinegar
- a couple of tablespoons of Worcestershire sauce
- a splash of liquid smoke
- a pack of 12 slider buns
- a cup of coleslaw mix
Instructions
- Preheat your oven to 300°F.
- Pat the pork shoulder dry completely with paper towels.
- Rub the brown sugar, paprika, salt, and black pepper evenly over all sides of the pork.
- Place the seasoned pork in a roasting pan, fat side up.
- Roast the pork, uncovered, for 4 hours until the internal temperature reaches 195°F.
- While the pork roasts, combine ketchup, apple cider vinegar, Worcestershire sauce, and liquid smoke in a saucepan.
- Simmer the sauce over medium-low heat for 15 minutes, stirring occasionally.
- Remove the pork from the oven and let it rest for 30 minutes.
- Use two forks to shred the pork completely, discarding any large fat pieces.
- Mix the shredded pork with three-quarters of the BBQ sauce until well coated.
- Toast the slider buns lightly in a 350°F oven for 5 minutes.
- Place a generous scoop of pulled pork on each bun bottom.
- Top the pork with a small handful of coleslaw mix.
- Drizzle the remaining BBQ sauce over the coleslaw.
- Cover with the bun tops and serve immediately.
The tender, shredded pork practically melts in your mouth, contrasting beautifully with the crisp coleslaw and soft bun. That tangy BBQ sauce cuts through the richness, creating a perfectly balanced bite. Try serving these sliders with pickle spears on the side for an extra crunch that complements the soft texture.
Refreshing Watermelon Feta Bites
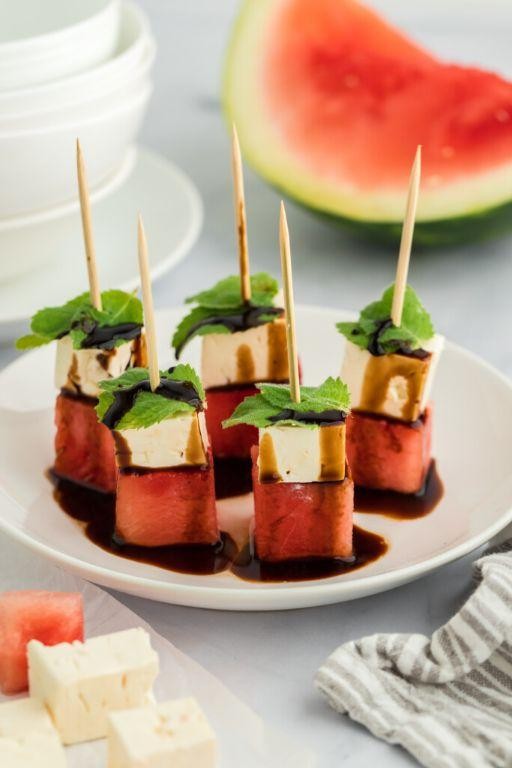
Very few summer appetizers combine sweet, salty, and refreshing quite like these watermelon feta bites. Visualize assembling these vibrant bites in just minutes for a stunning presentation that’s as easy as it is impressive. Let’s walk through each step together to ensure perfect results every time.
4
portions15
minutesIngredients
– About 2 cups of fresh watermelon, cut into 1-inch cubes
– A generous 1/2 cup of crumbled feta cheese
– A small handful of fresh mint leaves, roughly chopped
– A couple of tablespoons of extra virgin olive oil
– A splash of fresh lime juice (from about 1 lime)
– A pinch of flaky sea salt
– A few grinds of black pepper
Instructions
1. Arrange your 2 cups of watermelon cubes in a single layer on a serving platter.
2. Evenly sprinkle the 1/2 cup of crumbled feta cheese over the watermelon cubes.
3. Scatter the handful of chopped mint leaves across the platter for a fresh, aromatic touch. (Tip: Roll the mint leaves into a tight bundle before chopping to create fine ribbons.)
4. Drizzle the 2 tablespoons of olive oil evenly over the assembled bites.
5. Squeeze the juice from one fresh lime directly over the platter, ensuring each bite gets a hint of citrus. (Tip: Roll the lime firmly on the counter before juicing to maximize the amount of juice you get.)
6. Finish by sprinkling a pinch of flaky sea salt and a few grinds of black pepper over everything. (Tip: The salt will draw out the watermelon’s natural juices, creating a light dressing, so serve immediately for the best texture.)
Last, these bites offer a delightful contrast between the crisp, juicy watermelon and the creamy, salty feta. The mint and lime brighten each bite, making it irresistibly refreshing. For a creative twist, try serving them on small skewers for easy mingling at your next barbecue.
Cheese-Stuffed Mushrooms with Garlic Herb Topping

Mushrooms make the perfect edible vessel for rich, savory fillings, and these cheese-stuffed beauties with a garlic herb topping are no exception. Mastering this appetizer is simpler than you might think, especially when we break it down step by step. Let’s gather our ingredients and get cooking.
16
portions15
minutes26
minutesIngredients
– 16 large white mushrooms
– 2 tablespoons of olive oil
– 4 cloves of garlic, minced
– 1/2 cup of cream cheese, softened
– 1/4 cup of grated Parmesan cheese
– A couple of tablespoons of fresh parsley, chopped
– A pinch of salt
– A pinch of black pepper
Instructions
1. Preheat your oven to 375°F (190°C).
2. Wipe the 16 large white mushrooms clean with a damp paper towel to remove any dirt.
3. Carefully twist and pull the stems out of each mushroom cap.
4. Finely chop the removed mushroom stems.
5. Heat the 2 tablespoons of olive oil in a skillet over medium heat for 1 minute.
6. Add the chopped mushroom stems and minced garlic cloves to the skillet.
7. Sauté for 5-7 minutes, until the stems are soft and the garlic is fragrant.
8. Transfer the cooked mushroom stem and garlic mixture to a medium mixing bowl.
9. Add the 1/2 cup of softened cream cheese, 1/4 cup of grated Parmesan cheese, chopped fresh parsley, a pinch of salt, and a pinch of black pepper to the bowl.
10. Stir all the ingredients together until they are fully combined into a uniform filling.
11. Spoon the cheese filling generously into each mushroom cap, mounding it slightly.
12. Arrange the filled mushrooms on a baking sheet in a single layer.
13. Bake in the preheated oven for 18-20 minutes, until the mushrooms are tender and the tops are golden brown.
14. Remove the baking sheet from the oven using oven mitts.
15. Let the mushrooms cool on the baking sheet for 5 minutes before serving.
Here, the baked mushrooms offer a tender, juicy bite that contrasts wonderfully with the creamy, savory filling. The garlic and Parmesan create a deeply umami flavor that’s brightened by the fresh parsley. For a fun twist, try serving them atop a simple arugula salad for a light lunch.
Spinach and Artichoke Dip with Crispy Pita Chips

On chilly autumn evenings, nothing beats gathering around a warm, cheesy dip with friends. Our spinach and artichoke version comes together with minimal fuss but delivers maximum comfort, perfect for game day or cozy nights in.
5
servings15
minutes33
minutesIngredients
– A 10-ounce package of frozen chopped spinach, thawed
– A 14-ounce can of artichoke hearts, drained and chopped
– 1 cup of shredded mozzarella cheese
– 1/2 cup of grated Parmesan cheese
– 1/2 cup of mayonnaise
– 1/2 cup of sour cream
– 2 cloves of garlic, minced
– A splash of lemon juice
– 1/4 teaspoon of black pepper
– 4 pita bread rounds
– A couple of tablespoons of olive oil
Instructions
1. Preheat your oven to 375°F.
2. Squeeze all excess water from the thawed spinach using your hands or a clean kitchen towel—this prevents a watery dip.
3. In a large mixing bowl, combine the spinach, chopped artichokes, mozzarella, Parmesan, mayonnaise, sour cream, minced garlic, lemon juice, and black pepper.
4. Stir the mixture until all ingredients are evenly distributed.
5. Transfer the dip to an oven-safe baking dish, spreading it into an even layer.
6. Bake the dip for 20–25 minutes, or until the top is golden and bubbly.
7. While the dip bakes, brush both sides of each pita round lightly with olive oil.
8. Cut each pita into 8 wedges using a sharp knife or kitchen scissors.
9. Arrange the pita wedges in a single layer on a baking sheet.
10. Bake the pita chips for 8–10 minutes at 375°F, flipping halfway through, until crisp and lightly browned—watch closely to avoid burning.
11. Remove both the dip and chips from the oven and let the dip cool for 5 minutes before serving. Resulting in a creamy, tangy dip with tender spinach and artichokes, paired perfectly with homemade crispy pita chips. For a fun twist, try serving it in a hollowed-out bread bowl or alongside fresh veggie sticks for extra crunch.
Savory Quinoa and Black Bean Salad Cups
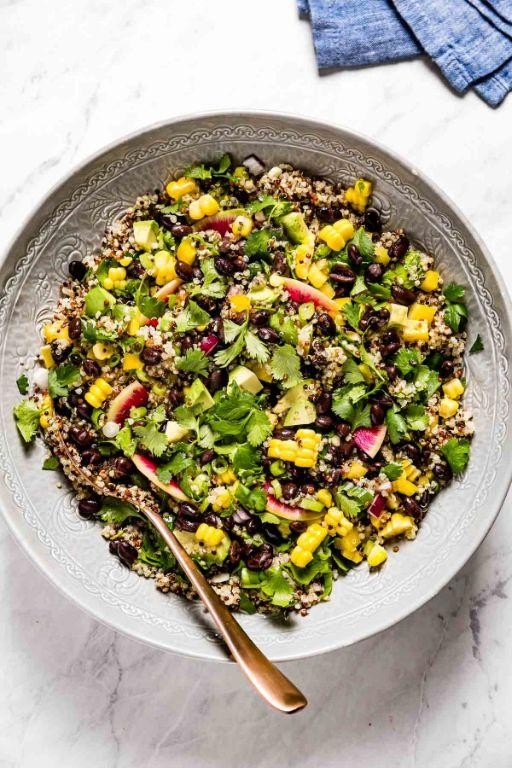
Gathering wholesome ingredients for a quick, satisfying meal doesn’t have to be complicated. Let’s walk through creating these Savory Quinoa and Black Bean Salad Cups together, perfect for a nutritious lunch or easy dinner. You’ll find the process straightforward and the results deliciously rewarding.
12
cups20
minutes20
minutesIngredients
– 1 cup of quinoa
– A couple of cups of water
– A 15-ounce can of black beans, rinsed
– A generous handful of cherry tomatoes, chopped
– Half a red onion, finely diced
– A big bunch of fresh cilantro, chopped
– A couple of limes, juiced
– A good glug of olive oil
– A pinch of salt and black pepper
– A dozen crisp lettuce cups (like butter or romaine)
Instructions
1. Rinse 1 cup of quinoa thoroughly under cold water in a fine-mesh strainer to remove its natural bitter coating.
2. Combine the rinsed quinoa with 2 cups of water in a medium saucepan and bring to a boil over high heat.
3. Once boiling, reduce the heat to low, cover the saucepan, and let the quinoa simmer for exactly 15 minutes until all the water is absorbed.
4. Remove the saucepan from the heat, keep it covered, and let the quinoa steam for 5 minutes—this helps it become fluffy.
5. Fluff the cooked quinoa with a fork and spread it on a baking sheet to cool completely to room temperature, which prevents the salad from becoming soggy.
6. While the quinoa cools, rinse and drain the can of black beans thoroughly in a colander.
7. Chop the cherry tomatoes into small pieces and finely dice half a red onion.
8. Chop a big bunch of fresh cilantro, including the stems for extra flavor.
9. In a large mixing bowl, combine the cooled quinoa, black beans, chopped tomatoes, diced red onion, and cilantro.
10. Squeeze the juice from two limes directly over the mixture to add brightness and prevent browning.
11. Drizzle a generous glug of olive oil over the salad and season with a pinch of salt and black pepper.
12. Toss everything together gently until well combined and evenly coated.
13. Spoon the quinoa and black bean mixture into individual crisp lettuce cups, filling them just to the top without overpacking. You’ll love the crisp, fresh texture of the lettuce against the hearty quinoa and beans, with the zesty lime tying it all together. Try serving these cups as a light main dish or as a colorful appetizer for your next gathering.
Bacon-Wrapped Jalapeño Poppers

Many home cooks find appetizers intimidating, but these bacon-wrapped jalapeño poppers break down the process into manageable steps that even beginners can master. Making them involves simple assembly and straightforward baking for guaranteed crowd-pleasing results.
24
poppers15
minutes25
minutesIngredients
– 12 fresh jalapeño peppers
– 8 ounces cream cheese, softened
– 1 cup shredded cheddar cheese
– 1/2 teaspoon garlic powder
– 1/2 teaspoon smoked paprika
– 12 slices thin-cut bacon
Instructions
1. Preheat your oven to 400°F and line a baking sheet with aluminum foil.
2. Cut each jalapeño in half lengthwise and use a small spoon to scrape out all seeds and membranes. (Tip: Wear disposable gloves while handling jalapeños to prevent skin irritation from the oils.)
3. In a medium bowl, combine the softened cream cheese, shredded cheddar, garlic powder, and smoked paprika until fully blended.
4. Spoon approximately 1 tablespoon of the cheese mixture into each jalapeño half, filling them evenly.
5. Wrap one slice of bacon around each stuffed jalapeño half, stretching it slightly to ensure full coverage. (Tip: Use thin-cut bacon as it crisps better and cooks through without burning the peppers.)
6. Place each bacon-wrapped popper seam-side down on the prepared baking sheet, spacing them about 1 inch apart.
7. Bake at 400°F for 20-25 minutes until the bacon is crispy and golden brown. (Tip: For extra crispiness, switch your oven to broil for the final 2-3 minutes, watching carefully to prevent burning.)
8. Remove from oven and let rest on the baking sheet for 5 minutes before serving.
Fresh from the oven, these poppers offer a fantastic contrast between the crispy bacon exterior and the creamy, melted cheese center. The jalapeños soften just enough to provide gentle heat without overwhelming spice, making them perfect for dipping in cool ranch or pairing with an ice-cold beer during game day gatherings.
Gourmet Macaroni and Cheese Bites
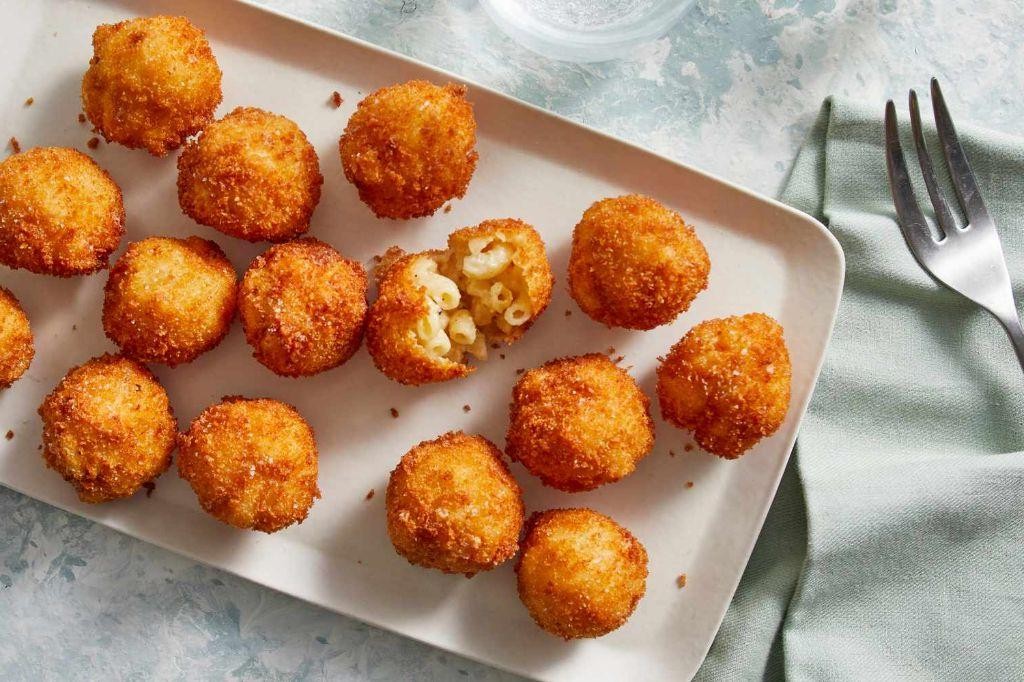
Crafting these gourmet macaroni and cheese bites is simpler than you might think, and they’re perfect for parties, snacks, or even a fun dinner twist. Let’s walk through each step together so you can create crispy, cheesy delights that will impress everyone. You’ll be amazed at how straightforward the process is when we break it down methodically.
24
bites25
minutes20
minutesIngredients
– 2 cups of elbow macaroni
– 2 cups of shredded sharp cheddar cheese
– 1 cup of whole milk
– 3 tablespoons of all-purpose flour
– 3 tablespoons of unsalted butter
– A couple of large eggs
– A splash of hot sauce
– 1 cup of panko breadcrumbs
– A pinch of salt and black pepper
– Enough vegetable oil for frying
Instructions
1. Bring a large pot of salted water to a rolling boil over high heat.
2. Add the 2 cups of elbow macaroni to the boiling water and cook for exactly 8 minutes, stirring occasionally to prevent sticking.
3. Drain the cooked macaroni in a colander and rinse it briefly under cold water to stop the cooking process; this helps keep the pasta firm.
4. In a medium saucepan, melt the 3 tablespoons of unsalted butter over medium heat until it bubbles lightly.
5. Whisk in the 3 tablespoons of all-purpose flour and cook for 1 minute to form a smooth roux, which will thicken your sauce without lumps.
6. Gradually pour in the 1 cup of whole milk while whisking constantly to avoid clumps, and cook for 3-4 minutes until the mixture thickens enough to coat the back of a spoon.
7. Remove the saucepan from the heat and stir in the 2 cups of shredded sharp cheddar cheese until fully melted and smooth.
8. Add a splash of hot sauce and a pinch of salt and black pepper to the cheese sauce, then mix thoroughly.
9. Combine the cheese sauce with the drained macaroni in a large bowl, folding gently to coat every piece evenly.
10. Spread the macaroni mixture into a greased baking dish and refrigerate it for at least 2 hours, or until firm; chilling makes it easier to shape the bites.
11. In a shallow bowl, beat the 2 large eggs until frothy to help the breading adhere better.
12. Place the 1 cup of panko breadcrumbs in another shallow bowl.
13. Scoop about 1 tablespoon of the chilled macaroni mixture and roll it into a ball between your palms.
14. Dip each ball first into the beaten eggs, then roll it in the panko breadcrumbs until fully coated for a crispy exterior.
15. Heat about 2 inches of vegetable oil in a deep skillet to 350°F, using a thermometer to ensure accuracy for even frying.
16. Carefully place the coated bites in the hot oil in batches, frying for 2-3 minutes until golden brown and crispy, turning once for even color.
17. Remove the bites with a slotted spoon and drain them on a paper towel-lined plate to absorb excess oil.
18. Serve the bites immediately while hot and crispy. These bites boast a crunchy panko shell that gives way to a creamy, cheesy center, with the sharp cheddar and hint of hot sauce adding depth. Try pairing them with a cool ranch dip or stacking them on a platter with toothpicks for easy grabbing at gatherings.
Thai Chicken Satay with Peanut Sauce

Just imagine the aroma of grilled chicken skewers with that signature peanut sauce—it’s easier to make than you think and perfect for weeknight dinners or casual gatherings. Grilling these satay skewers brings out incredible flavor while keeping the chicken tender and juicy.
12
skewers95
minutes8
minutesIngredients
– 1.5 pounds of chicken breast cut into 1-inch strips
– A quarter cup of coconut milk
– 2 tablespoons of soy sauce
– 1 tablespoon of brown sugar
– 2 minced garlic cloves
– 1 teaspoon of turmeric
– A half teaspoon of cumin
– 12 wooden skewers soaked in water for 30 minutes
– For the peanut sauce: a third cup of creamy peanut butter, 2 tablespoons of soy sauce, 1 tablespoon of lime juice, 1 teaspoon of brown sugar, a quarter cup of coconut milk, and a splash of water if needed
Instructions
1. Soak 12 wooden skewers in water for 30 minutes to prevent burning.
2. Cut 1.5 pounds of chicken breast into 1-inch thick strips.
3. In a medium bowl, whisk together a quarter cup of coconut milk, 2 tablespoons of soy sauce, 1 tablespoon of brown sugar, 2 minced garlic cloves, 1 teaspoon of turmeric, and a half teaspoon of cumin.
4. Add the chicken strips to the marinade, ensuring each piece is fully coated.
5. Cover the bowl and refrigerate for at least 1 hour or up to 4 hours for deeper flavor.
6. Thread 2-3 marinated chicken strips onto each soaked skewer.
7. Preheat your grill to medium-high heat, about 400°F.
8. Place the skewers on the hot grill and cook for 3-4 minutes per side until the chicken reaches 165°F internally and has visible grill marks.
9. While the chicken grills, make the peanut sauce by combining a third cup of creamy peanut butter, 2 tablespoons of soy sauce, 1 tablespoon of lime juice, 1 teaspoon of brown sugar, and a quarter cup of coconut milk in a small saucepan.
10. Heat the sauce over low heat, stirring constantly until smooth and warm, about 2-3 minutes.
11. If the sauce is too thick, add a splash of water and stir until it reaches your desired consistency.
12. Remove the grilled chicken skewers from the heat and let them rest for 2 minutes before serving.
Grilled to perfection, these satay skewers have a slightly charred exterior that gives way to tender, flavorful chicken inside. The creamy peanut sauce adds a rich, nutty contrast that makes each bite irresistible—try serving them over jasmine rice with quick-pickled vegetables for a complete meal that transports you straight to a Thai street food stall.
Prosciutto-Wrapped Asparagus Spears
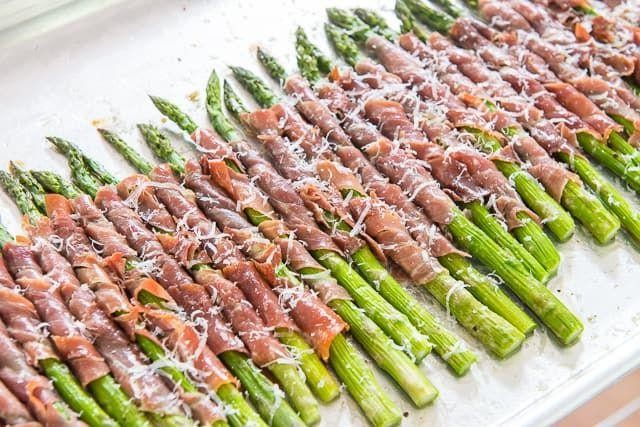
This elegant appetizer transforms simple asparagus into a restaurant-worthy treat with minimal effort. The salty prosciutto beautifully complements the crisp-tender asparagus, creating a perfect balance of flavors and textures that will impress any guest.
8
spears15
minutes15
minutesIngredients
– 1 pound of fresh asparagus spears, about 20-24 medium thickness
– 8 thin slices of prosciutto
– 2 tablespoons of olive oil
– A couple of cloves of garlic, minced
– A generous pinch of black pepper
– A squeeze of fresh lemon juice
Instructions
1. Preheat your oven to 400°F and line a baking sheet with parchment paper.
2. Wash the asparagus spears and pat them completely dry with paper towels.
3. Trim off the tough, woody ends by bending each spear until it snaps naturally.
4. Cut each prosciutto slice in half lengthwise to create 16 long strips.
5. Wrap one prosciutto strip around each asparagus spear, starting about 1 inch from the top and spiraling down to the base.
6. Arrange the wrapped spears in a single layer on your prepared baking sheet.
7. Drizzle the olive oil evenly over all the asparagus spears.
8. Sprinkle the minced garlic and black pepper across the arranged spears.
9. Bake for 12-15 minutes until the prosciutto is crispy and the asparagus is tender when pierced with a fork.
10. Remove from oven and immediately squeeze fresh lemon juice over the hot spears.
My favorite thing about these is how the prosciutto becomes wonderfully crisp while the asparagus stays juicy inside. The lemon brightens everything up beautifully, making these perfect for serving alongside grilled meats or as part of an antipasto platter.
Refreshing Fruit and Cheese Platter
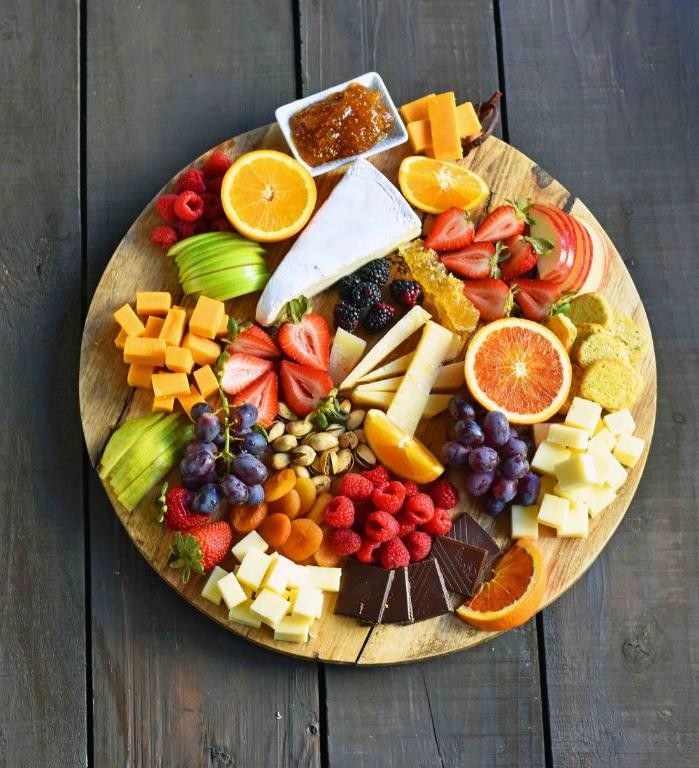
Building a beautiful fruit and cheese platter is simpler than you might think, and today I’ll walk you through creating this refreshing arrangement that’s perfect for any gathering. By following these straightforward steps, you’ll assemble a stunning centerpiece that balances sweet and savory flavors beautifully. Let’s start with gathering our simple ingredients and then move through the assembly process methodically.
1
platter15
minutesIngredients
– 1 block of creamy brie cheese
– 2 cups of fresh red grapes
– 1 large apple
– 1 cup of mixed berries (strawberries, blueberries, raspberries)
– A handful of walnuts
– A couple of crackers
– A splash of honey
– A sprinkle of fresh mint leaves
Instructions
1. Remove the brie cheese from refrigeration and let it sit at room temperature for exactly 30 minutes to soften slightly.
2. Wash all fruits thoroughly under cool running water for about 1 minute each.
3. Pat the grapes completely dry with paper towels to prevent moisture from affecting the crackers.
4. Core the apple and slice it into ¼-inch thick wedges using a sharp knife.
5. Hull the strawberries and cut them in half lengthwise.
6. Arrange the brie cheese in the center of a large wooden board or platter.
7. Place the grapes in small clusters around two opposite sides of the cheese.
8. Fan the apple slices in a circular pattern next to the grape clusters.
9. Scatter the mixed berries in the remaining empty spaces on the board.
10. Sprinkle the walnuts evenly throughout the arrangement.
11. Artfully place the crackers along the edges of the platter.
12. Drizzle honey in a zigzag pattern over the brie cheese and some of the fruits.
13. Garnish with fresh mint leaves scattered across the entire platter.
14. Serve immediately or cover lightly with plastic wrap and refrigerate for up to 2 hours before serving.
Varying textures from creamy brie to crisp apples and crunchy walnuts create an exciting eating experience. The combination of sweet honey with tart berries and savory cheese makes each bite uniquely satisfying. For a creative twist, try serving individual portions in small mason jars for a portable picnic option.
Hearty Meatball Marinara Subs
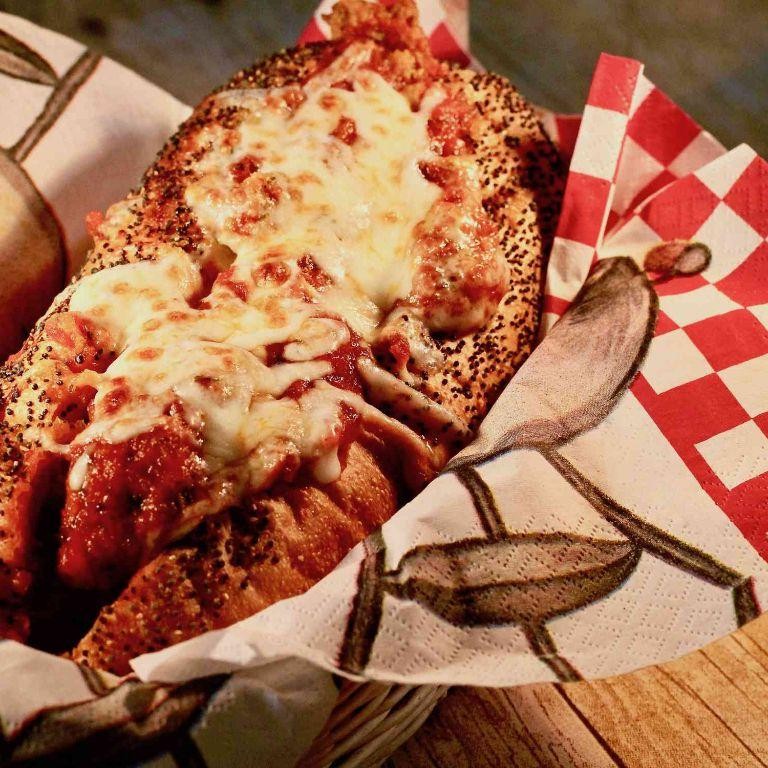
There’s nothing quite like sinking your teeth into a warm, saucy meatball sub on a crisp fall day. This recipe walks you through creating tender homemade meatballs simmered in rich marinara, all nestled in a toasted sub roll with melted cheese. Perfect for game day or a cozy family dinner, these subs come together with simple techniques anyone can master.
2
sandwiches15
minutes40
minutesIngredients
– 1 pound of ground beef (80/20 works best for juicy meatballs)
– 1/2 cup of breadcrumbs (I like panko for extra crispiness)
– 1/4 cup of grated Parmesan cheese (the good stuff from the refrigerated section)
– 1 large egg (room temperature binds everything better)
– 2 cloves of garlic, minced (fresh makes all the difference)
– A couple of tablespoons of chopped fresh parsley
– A generous pinch of salt and a few cracks of black pepper
– 2 cups of your favorite marinara sauce (jarred is fine, but homemade is divine)
– 4 sub rolls (split lengthwise but still connected)
– 2 cups of shredded mozzarella cheese (for that perfect melt)
– A splash of olive oil for cooking
Instructions
1. Preheat your oven to 375°F and line a baking sheet with parchment paper.
2. In a large mixing bowl, combine the ground beef, breadcrumbs, Parmesan, egg, minced garlic, parsley, salt, and pepper.
3. Use your hands to gently mix everything until just combined—overmixing makes tough meatballs.
4. Roll the mixture into 12 equal-sized meatballs, about 1.5 inches each, placing them on the prepared baking sheet.
5. Bake the meatballs for 20 minutes at 375°F until they’re browned and register 160°F internally.
6. While meatballs bake, pour marinara sauce into a large saucepan and heat over medium-low until simmering.
7. Transfer the baked meatballs directly into the simmering marinara sauce using a slotted spoon.
8. Let the meatballs simmer in the sauce for 10 minutes to absorb flavor—this step makes them incredibly tender.
9. Place split sub rolls on a clean baking sheet and toast them in the oven for 5 minutes at 375°F until lightly crisp.
10. Arrange 3 meatballs in each toasted roll, spooning extra sauce over them.
11. Top each sub generously with shredded mozzarella cheese.
12. Return subs to the oven and bake for 5 more minutes at 375°F until cheese is completely melted and bubbly.
Perfectly gooey cheese stretches with every bite while the tender meatballs soak the toasted bread with savory marinara. Try serving these open-faced with extra sauce for dipping, or add a sprinkle of red pepper flakes for a spicy kick that cuts through the richness.
Decadent Chocolate-Dipped Strawberries

Making decadent chocolate-dipped strawberries is simpler than you might think, and the results are always impressive. Mastering this classic treat requires just a few quality ingredients and careful attention to temperature. Follow these steps precisely for glossy, perfectly coated berries every time.
1
pound15
minutes2
minutesIngredients
– 1 pound of fresh strawberries with stems intact
– 8 ounces of high-quality dark chocolate chips
– A couple of tablespoons of coconut oil
– A splash of vanilla extract
– A pinch of flaky sea salt for finishing
Instructions
1. Line a baking sheet with parchment paper and set it aside.
2. Gently wash the strawberries and pat them completely dry with paper towels, making sure no moisture remains on the surface.
3. Combine the dark chocolate chips and coconut oil in a microwave-safe bowl.
4. Microwave the chocolate mixture on high for 30 seconds, then stir thoroughly with a spatula.
5. Continue microwaving in 15-second intervals, stirring after each, until the chocolate is completely smooth and melted, being careful not to overheat it.
6. Stir in the vanilla extract until fully incorporated into the melted chocolate.
7. Hold a strawberry by its stem and dip it into the chocolate, swirling to coat about three-quarters of the berry.
8. Allow excess chocolate to drip back into the bowl for about 5 seconds before placing the strawberry on the prepared baking sheet.
9. Repeat the dipping process with all remaining strawberries, working quickly before the chocolate begins to set.
10. While the chocolate is still wet, sprinkle a tiny pinch of flaky sea salt over each dipped strawberry.
11. Transfer the baking sheet to the refrigerator and chill the strawberries for exactly 20 minutes, or until the chocolate coating is completely firm.
12. Carefully remove the chilled strawberries from the baking sheet using your fingers or a small offset spatula.
Creating these chocolate-dipped strawberries yields a delightful contrast between the crisp chocolate shell and juicy berry interior. The subtle salt enhances the dark chocolate’s richness without overpowering the natural fruit sweetness. Consider arranging them on a decorative platter for entertaining or packaging individually as edible gifts for special occasions.
Conclusion
Deliciously designed to make your graduate’s celebration unforgettable, these 18 recipes offer something for every taste and skill level. We hope you’ll try them out and create wonderful memories together! Don’t forget to share your favorite dishes in the comments below and pin this article to your Pinterest boards for future party planning.


