Searching for gluten-free meat recipes that actually satisfy? You’ve come to the right place! Whether you’re craving quick weeknight dinners, cozy comfort food, or impressive dishes for guests, this collection has you covered. From juicy burgers to savory stews, these 28 delicious ideas prove gluten-free eating is anything but boring. Let’s dive in and discover your next favorite meal!
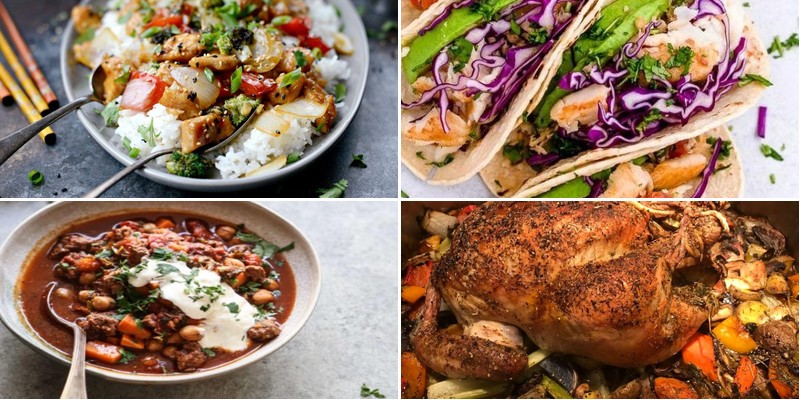
Savory Herb-Roasted Chicken
Nothing evokes the comforting embrace of home cooking quite like the aromatic promise of herb-roasted chicken, its golden skin crackling with savory perfection while tender meat falls effortlessly from the bone. This timeless dish marries simplicity with elegance, transforming humble ingredients into a centerpiece worthy of both weeknight dinners and celebratory gatherings. Each bite delivers a symphony of earthy herbs and rich, juicy flavors that speak to the soul.
2
portions15
minutes90
minutesIngredients
For the Chicken and Seasoning:
- 1 whole chicken (4-5 pounds)
- 2 tablespoons olive oil
- 1 tablespoon kosher salt
- 1 teaspoon black pepper
- 2 teaspoons dried thyme
- 1 teaspoon dried rosemary
For the Aromatics:
- 1 lemon, quartered
- 4 garlic cloves, smashed
- 1 small onion, quartered
Instructions
- Preheat your oven to 425°F and position a rack in the middle.
- Pat the chicken completely dry inside and out with paper towels to ensure crisp skin.
- Rub the entire surface of the chicken with 2 tablespoons of olive oil.
- Sprinkle 1 tablespoon of kosher salt, 1 teaspoon of black pepper, 2 teaspoons of dried thyme, and 1 teaspoon of dried rosemary evenly over the skin and inside the cavity.
- Stuff the cavity with 1 quartered lemon, 4 smashed garlic cloves, and 1 quartered onion to infuse the meat with flavor from within.
- Truss the chicken legs together with kitchen twine to promote even cooking.
- Place the chicken breast-side up in a roasting pan fitted with a rack.
- Roast for 15 minutes at 425°F to jumpstart browning.
- Reduce the oven temperature to 375°F and continue roasting for 60-75 minutes, until the internal temperature at the thickest part of the thigh reads 165°F on an instant-read thermometer.
- Transfer the chicken to a cutting board and let it rest for 15 minutes before carving to allow juices to redistribute.
This resting period yields exceptionally moist, fork-tender meat beneath a shatteringly crisp, herb-flecked crust. The garlic and lemon steam gently from within, imparting a bright, aromatic depth that balances the savory richness. Try serving it over a bed of creamy polenta to soak up the pan juices, or shred the leftovers into a vibrant grain bowl with roasted vegetables for a refreshing next-day meal.
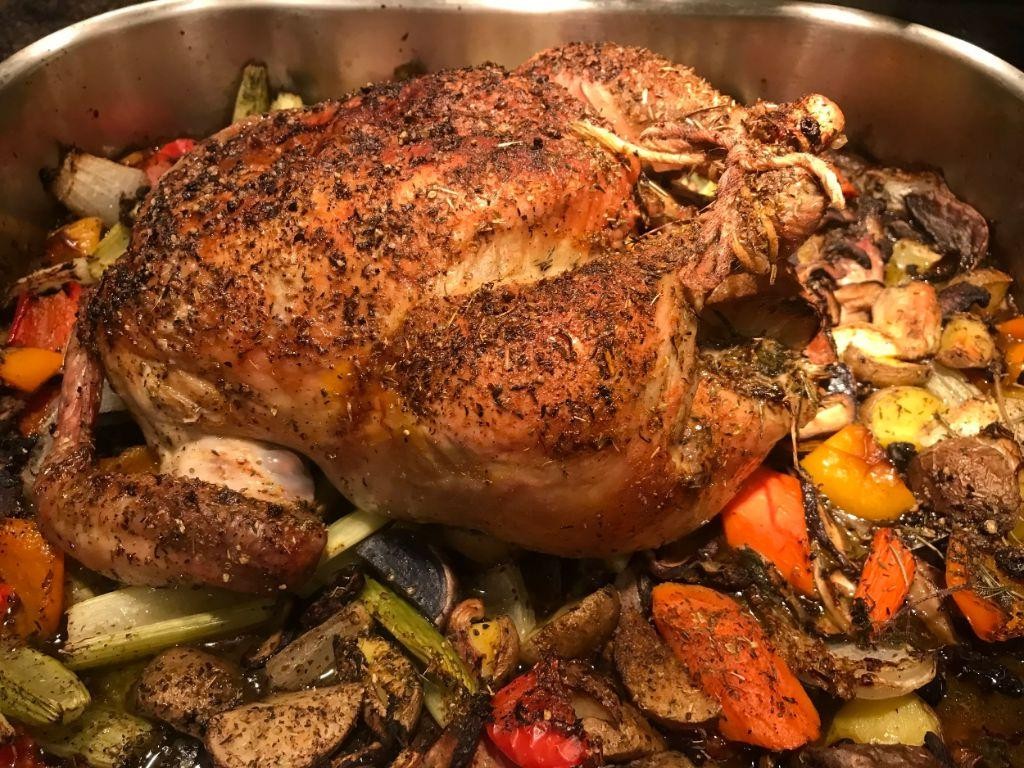
Juicy Lemon-Pepper Grilled Steak
Nothing elevates a summer evening quite like the sizzle of premium beef meeting a hot grill, releasing aromatic notes of citrus and cracked pepper into the twilight air. This lemon-pepper grilled steak recipe transforms simple ingredients into an extraordinary centerpiece, where bright acidity and earthy spice create perfect harmony. Prepare to impress with minimal effort and maximum flavor.
2
servings15
minutes18
minutesIngredients
For the Steak and Marinade:
– 2 (1.5-inch thick) ribeye steaks (about 1.5 lbs total)
– 1/4 cup extra virgin olive oil
– 3 tbsp freshly squeezed lemon juice
– 2 tbsp coarsely ground black pepper
– 4 cloves garlic, minced
– 1 tsp fine sea salt
For Finishing:
– 2 tbsp unsalted butter
– 1 tbsp chopped fresh parsley
– 1 tsp lemon zest
Instructions
1. Pat the ribeye steaks completely dry with paper towels on all surfaces.
2. Whisk together 1/4 cup olive oil, 3 tbsp lemon juice, 2 tbsp black pepper, 4 minced garlic cloves, and 1 tsp sea salt in a shallow dish.
3. Place the dried steaks in the marinade, turning to coat all sides evenly.
4. Cover the dish and refrigerate the steaks for exactly 45 minutes to allow flavors to penetrate without breaking down the texture.
5. Preheat your grill to high heat, reaching 450°F with the lid closed for 15 minutes.
6. Remove steaks from marinade, letting excess drip off while reserving the marinade.
7. Place steaks on the hot grill grates and close the lid immediately.
8. Grill for 5 minutes without moving to develop a dark, caramelized crust.
9. Flip steaks using tongs (never a fork to prevent juice loss) and grill for another 5 minutes with the lid closed.
10. Check internal temperature with an instant-read thermometer inserted horizontally into the thickest part, removing at 130°F for medium-rare.
11. Transfer steaks to a cutting board and tent loosely with foil.
12. Let rest undisturbed for 8 minutes to allow juices to redistribute throughout the meat.
13. Meanwhile, combine 2 tbsp butter, 1 tbsp parsley, and 1 tsp lemon zest in a small bowl.
14. Slice steaks against the grain into 1/2-inch thick strips.
15. Top sliced steak with the lemon-parsley butter mixture, letting it melt over the warm surface.
Juicy doesn’t begin to describe the tender, pink-centered perfection that yields effortlessly to the knife. The bold pepper crust gives way to bright lemon notes that cut through the rich beefiness, while the melted butter adds a final luxurious sheen. Consider serving over creamy polenta or alongside grilled asparagus spears to catch every last drop of the vibrant pan juices.
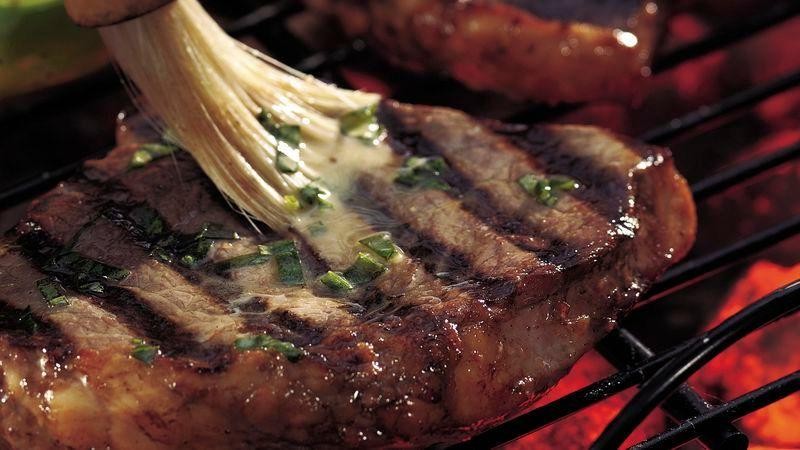
Spicy Garlic Shrimp Skewers
Perfectly charred and bursting with vibrant flavor, these Spicy Garlic Shrimp Skewers elevate simple seafood into an impressive centerpiece. Marinated in a bold blend of garlic, chili, and citrus, each plump shrimp develops a beautiful caramelized crust while remaining tender and juicy. This dish transforms ordinary gatherings into memorable occasions with its sophisticated balance of heat and brightness.
2
servings35
minutes6
minutesIngredients
For the Marinade
- 1/4 cup olive oil
- 3 tbsp fresh lemon juice
- 4 cloves garlic, minced
- 1 tsp red pepper flakes
- 1/2 tsp smoked paprika
- 1/4 tsp black pepper
- 1/2 tsp salt
For the Skewers
- 1 lb large shrimp, peeled and deveined
- 1 lemon, cut into 8 wedges
- 2 tbsp chopped fresh parsley
Instructions
- In a medium bowl, whisk together 1/4 cup olive oil, 3 tbsp fresh lemon juice, 4 minced garlic cloves, 1 tsp red pepper flakes, 1/2 tsp smoked paprika, 1/4 tsp black pepper, and 1/2 tsp salt until fully combined.
- Add 1 lb peeled and deveined shrimp to the marinade, tossing gently to coat each piece thoroughly.
- Cover the bowl with plastic wrap and refrigerate for exactly 30 minutes to allow flavors to penetrate while keeping shrimp tender.
- While shrimp marinates, soak 8 wooden skewers in water for 20 minutes to prevent burning during grilling.
- Thread 4-5 marinated shrimp onto each soaked skewer, alternating with lemon wedges between every 2 shrimp.
- Preheat grill to medium-high heat (400°F) and lightly oil the grates to prevent sticking.
- Place skewers on the hot grill and cook for 2-3 minutes until shrimp edges turn pink and develop light grill marks.
- Flip skewers using tongs and cook another 2-3 minutes until shrimp are opaque throughout with firm, springy texture.
- Transfer cooked skewers to a serving platter and immediately sprinkle with 2 tbsp chopped fresh parsley.
You’ll delight in the contrast between the crispy, slightly charred exterior and the succulent, perfectly cooked interior. The garlic-infused heat builds gradually while the bright lemon cuts through the richness, creating a dynamic flavor experience. Consider serving these skewers over cilantro-lime rice or alongside grilled vegetables for a complete meal that showcases summer’s best qualities.
Rosemary and Thyme Lamb Chops

Yielded from the gentle hills where Mediterranean herbs flourish, these rosemary and thyme lamb chops elevate simple ingredients into an extraordinary culinary experience, where aromatic woodsy notes meet tender, succulent meat in perfect harmony.
8
chops35
minutes8
minutesIngredients
For the Lamb and Marinade
- 8 lamb loin chops, 1-inch thick
- 2 tablespoons olive oil
- 1 tablespoon fresh rosemary, finely chopped
- 1 tablespoon fresh thyme leaves
- 2 cloves garlic, minced
- 1 teaspoon kosher salt
- ½ teaspoon black pepper
For Finishing
- 1 tablespoon unsalted butter
Instructions
- Pat the lamb chops completely dry with paper towels to ensure proper searing.
- Rub the olive oil evenly over all surfaces of each lamb chop.
- Sprinkle the kosher salt and black pepper evenly on both sides of the chops.
- Press the minced garlic, chopped rosemary, and thyme leaves firmly onto the meat to create an herb crust.
- Let the lamb chops rest at room temperature for 30 minutes to allow the flavors to penetrate and ensure even cooking.
- Preheat a cast-iron skillet over medium-high heat until a drop of water sizzles and evaporates immediately.
- Place the lamb chops in the hot skillet without crowding, cooking them in batches if necessary.
- Sear the chops for 3-4 minutes until a deep golden-brown crust forms and they release easily from the pan.
- Flip the chops using tongs and cook for another 3-4 minutes for medium-rare, or until the internal temperature reaches 135°F on an instant-read thermometer.
- Add the butter to the skillet during the last minute of cooking, tilting the pan to baste the chops with the melted butter.
- Transfer the lamb chops to a clean plate and let them rest for 5 minutes to allow the juices to redistribute throughout the meat.
An exquisite balance emerges between the crisp, herb-flecked exterior and the juicy, pink-centered meat within. Allow these chops to shine as the centerpiece of an elegant dinner party or pair them with roasted root vegetables for a complete meal that celebrates the depth of Mediterranean flavors.
Teriyaki Glazed Salmon Fillets
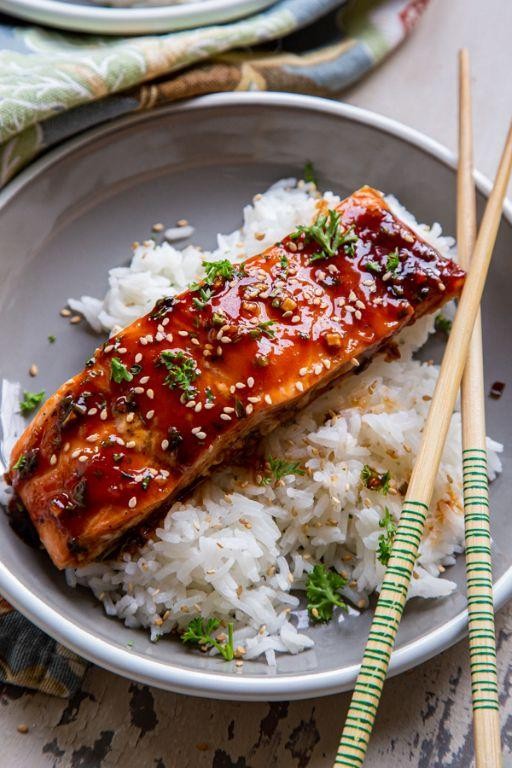
Exquisitely glazed with a glossy, sweet-savory teriyaki coating, these salmon fillets transform an ordinary weeknight into an extraordinary dining experience. The caramelized exterior gives way to perfectly flaky, moist flesh that practically melts on the tongue. This elegant yet approachable dish brings restaurant-quality sophistication to your home kitchen with minimal effort.
5
servings15
minutes10
minutesIngredients
For the Teriyaki Glaze
- 1/2 cup low-sodium soy sauce
- 1/4 cup mirin
- 2 tablespoons brown sugar
- 1 tablespoon rice vinegar
- 2 teaspoons freshly grated ginger
- 2 garlic cloves, minced
- 1 tablespoon cornstarch
- 2 tablespoons cold water
For the Salmon
- 4 (6-ounce) salmon fillets, skin-on
- 1 tablespoon vegetable oil
- 2 teaspoons sesame seeds
- 2 green onions, thinly sliced
Instructions
- Combine soy sauce, mirin, brown sugar, rice vinegar, grated ginger, and minced garlic in a small saucepan over medium heat.
- Whisk the mixture continuously until the brown sugar completely dissolves, about 2 minutes.
- Create a slurry by whisking cornstarch with cold water in a separate small bowl until smooth.
- Gradually pour the cornstarch slurry into the simmering sauce while whisking constantly to prevent lumps.
- Continue cooking the sauce, stirring frequently, until it thickens to a glaze consistency that coats the back of a spoon, about 3-4 minutes.
- Remove the teriyaki glaze from heat and set aside to cool slightly while preparing the salmon.
- Pat salmon fillets completely dry with paper towels to ensure proper searing.
- Heat vegetable oil in a large non-stick skillet over medium-high heat until shimmering but not smoking.
- Place salmon fillets skin-side up in the hot skillet and cook undisturbed for 4 minutes to develop a golden-brown crust.
- Carefully flip each fillet using a thin spatula and cook skin-side down for 3 minutes.
- Brush the top of each fillet generously with the prepared teriyaki glaze using a pastry brush.
- Continue cooking for 1-2 minutes until the glaze becomes sticky and caramelized on the surface.
- Transfer the glazed salmon to serving plates using a spatula, being careful to keep the crust intact.
- Sprinkle sesame seeds and sliced green onions evenly over the finished fillets for garnish.
Luxuriously tender beneath its sticky-sweet exterior, this salmon achieves the perfect textural contrast between the crisp-glazed surface and the moist, flaky interior. The complex teriyaki notes of umami, sweetness, and subtle acidity create a symphony of flavors that pairs beautifully with steamed jasmine rice or crisp roasted vegetables. Consider serving the fillets over a bed of sesame-spinach salad for an elegant presentation that highlights the dish’s sophisticated simplicity.
Balsamic Vinegar Pork Tenderloin
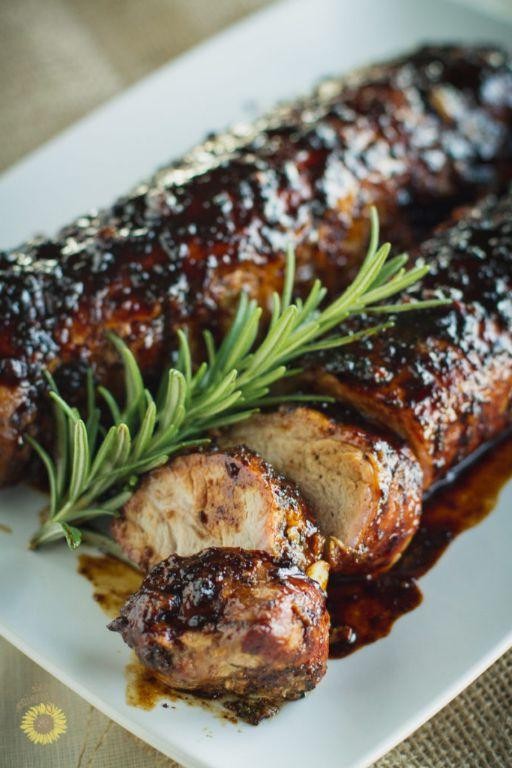
Delicately glazed with a glossy reduction, this balsamic vinegar pork tenderloin transforms the humble cut into an elegant centerpiece worthy of any dinner party. The sweet-tart complexity of aged balsamic vinegar caramelizes into a sophisticated crust that perfectly complements the tender, juicy interior. With minimal ingredients yielding maximum flavor, this dish proves that culinary excellence often lies in simplicity executed with precision.
2
servings10
minutes30
minutesIngredients
For the Pork:
– 1.5 lbs pork tenderloin, trimmed of silver skin
– 2 tbsp olive oil
– 1 tsp kosher salt
– ½ tsp freshly ground black pepper
For the Balsamic Glaze:
– ½ cup balsamic vinegar
– 2 tbsp honey
– 2 cloves garlic, minced
– 1 tsp fresh rosemary, finely chopped
– ¼ tsp red pepper flakes
Instructions
1. Preheat your oven to 400°F and position a rack in the center of the oven.
2. Pat the pork tenderloin completely dry with paper towels to ensure proper browning.
3. Rub the pork tenderloin evenly with olive oil, then season all sides with kosher salt and black pepper.
4. Heat a large oven-safe skillet over medium-high heat for 2 minutes until hot.
5. Place the pork tenderloin in the hot skillet and sear for 2 minutes without moving to develop a golden-brown crust.
6. Flip the pork and sear the opposite side for 2 minutes until deeply browned.
7. Sear the remaining sides for 1 minute each until the entire surface is caramelized.
8. Transfer the seared pork to a plate and reduce the skillet heat to medium.
9. Pour the balsamic vinegar into the skillet, using a wooden spoon to scrape up any browned bits from the bottom.
10. Add the honey, minced garlic, chopped rosemary, and red pepper flakes to the skillet.
11. Simmer the sauce for 3-4 minutes, stirring frequently, until it thickens enough to coat the back of a spoon.
12. Return the pork tenderloin to the skillet, spooning the balsamic glaze over the top and sides.
13. Transfer the skillet to the preheated oven and roast for 15-18 minutes until the internal temperature reaches 145°F on an instant-read thermometer.
14. Remove the skillet from the oven and transfer the pork to a cutting board to rest for 5 minutes, which allows the juices to redistribute evenly.
15. Slice the pork tenderloin into ½-inch thick medallions and arrange on a serving platter.
16. Drizzle the remaining balsamic glaze from the skillet over the sliced pork before serving.
Glazed to perfection, the pork emerges with a caramelized crust that gives way to remarkably tender, pink-centered meat. The balsamic reduction provides a beautiful balance of sweet acidity that cuts through the richness, while the rosemary and garlic infuse each bite with aromatic depth. Serve sliced over creamy polenta or alongside roasted root vegetables to create a complete meal that celebrates autumn’s bounty.
Mediterranean Chicken Gyros
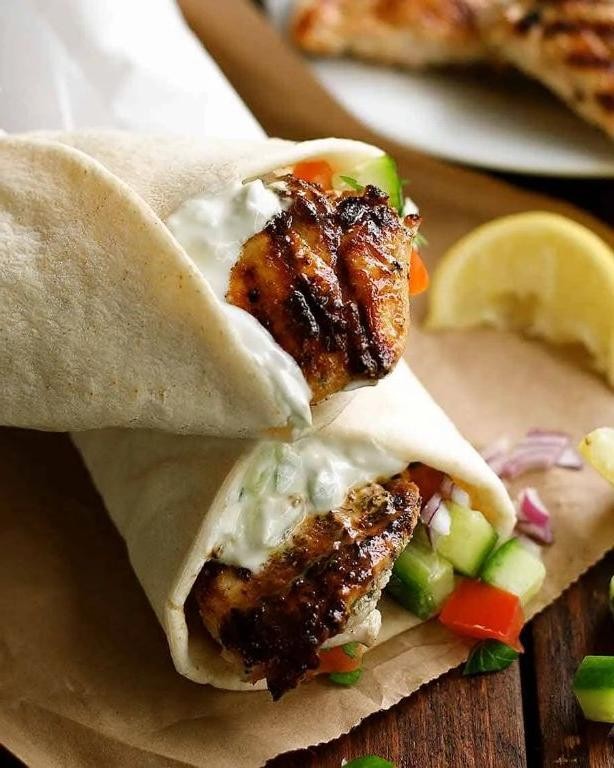
Nestled between the vibrant flavors of the Mediterranean and the comforting familiarity of street food, these chicken gyros offer a culinary journey that’s both sophisticated and deeply satisfying. Marinated chicken, crisp vegetables, and a tangy yogurt sauce come together in warm pita for a meal that feels both elegant and effortless. This recipe transforms simple ingredients into a dish that’s perfect for weeknight dinners or entertaining guests.
2
sandwiches40
minutes15
minutesIngredients
- For the Chicken Marinade
- 1.5 lbs boneless, skinless chicken thighs, cut into 1-inch strips
- 1/4 cup extra virgin olive oil
- 3 tbsp fresh lemon juice
- 4 garlic cloves, minced
- 1 tbsp dried oregano
- 1 tsp ground cumin
- 1 tsp smoked paprika
- For the Tzatziki Sauce
- 1 cup plain Greek yogurt
- 1/2 cup grated cucumber, squeezed dry
- 1 tbsp fresh dill, chopped
- 1 garlic clove, minced
- 1 tbsp lemon juice
- For Assembly
- 4 large pita bread rounds
- 1 cup shredded romaine lettuce
- 1/2 cup cherry tomatoes, halved
- 1/4 cup red onion, thinly sliced
Instructions
- Combine 1/4 cup olive oil, 3 tbsp lemon juice, 4 minced garlic cloves, 1 tbsp oregano, 1 tsp cumin, and 1 tsp smoked paprika in a medium bowl.
- Add 1.5 lbs chicken thigh strips to the marinade, ensuring each piece is fully coated.
- Cover the bowl and refrigerate for at least 30 minutes, or up to 4 hours for deeper flavor penetration.
- While chicken marinates, prepare the tzatziki by mixing 1 cup Greek yogurt, 1/2 cup grated cucumber, 1 tbsp dill, 1 minced garlic clove, and 1 tbsp lemon juice in a separate bowl.
- Refrigerate the sauce until ready to serve to allow flavors to meld.
- Heat a large skillet over medium-high heat until a drop of water sizzles immediately.
- Cook marinated chicken strips in a single layer for 5-7 minutes per side, until internal temperature reaches 165°F and exterior develops golden-brown sear marks.
- Transfer cooked chicken to a clean plate and let rest for 3 minutes to redistribute juices.
- Warm 4 pita rounds in the same skillet for 30 seconds per side until pliable and lightly toasted.
- Assemble gyros by placing 1/4 of the chicken strips down the center of each warmed pita.
- Top each with 1/4 cup romaine lettuce, 2 tbsp cherry tomatoes, and 1 tbsp red onion slices.
- Drizzle 2-3 tbsp tzatziki sauce over each gyro before folding.
Generously filled pitas offer a delightful contrast of textures, from the tender, herb-infused chicken to the cool crunch of fresh vegetables. The creamy tzatziki provides a bright, tangy counterpoint that elevates each bite, while the warm, pliable pita holds everything together beautifully. For an elegant presentation, slice each assembled gyro in half diagonally and serve alongside a simple Greek salad or roasted lemon potatoes.
Blackened Cajun Catfish
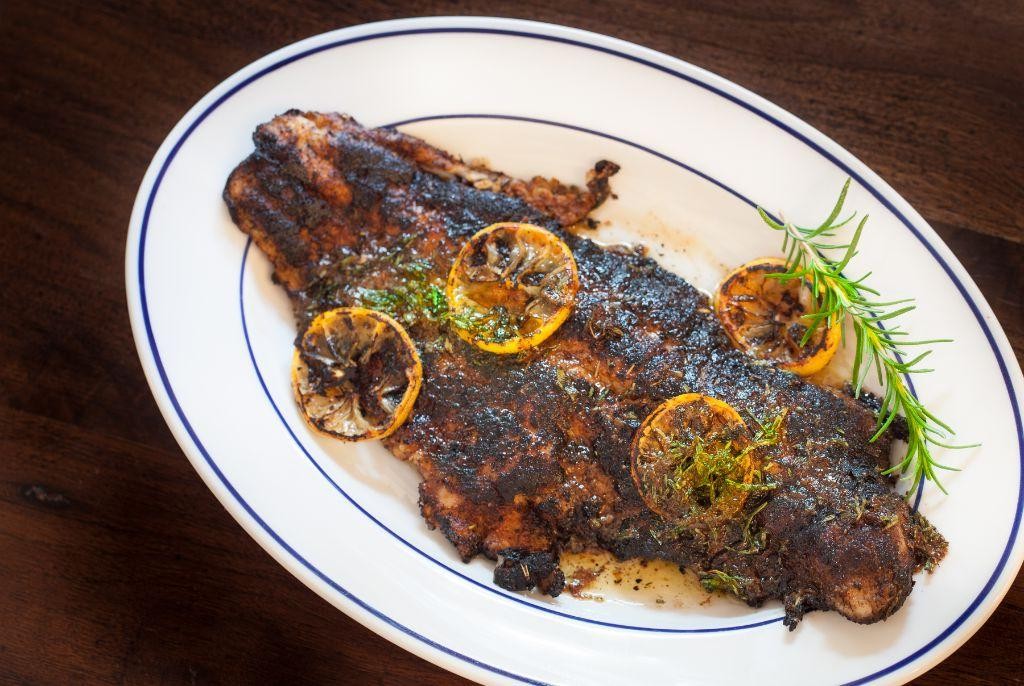
Elevating humble catfish to extraordinary heights, this Blackened Cajun Catfish recipe transforms simple ingredients into a symphony of bold flavors and textures. The technique of blackening creates a beautifully charred crust that locks in the fish’s natural moisture while delivering intense spice and smoke.
4
portions10
minutes11
minutesIngredients
For the Cajun Spice Blend:
– 2 tbsp paprika
– 1 tbsp garlic powder
– 1 tbsp onion powder
– 2 tsp dried thyme
– 2 tsp dried oregano
– 1 tsp cayenne pepper
– 1 tsp black pepper
– 1 tsp salt
For the Catfish:
– 4 catfish fillets (6 oz each)
– 3 tbsp vegetable oil
– 2 tbsp unsalted butter
Instructions
1. Combine paprika, garlic powder, onion powder, thyme, oregano, cayenne pepper, black pepper, and salt in a small bowl to create the Cajun spice blend.
2. Pat catfish fillets completely dry with paper towels to ensure proper spice adhesion and crust formation.
3. Generously coat both sides of each fillet with the prepared spice blend, pressing gently to help it adhere.
4. Heat a cast-iron skillet over medium-high heat for 3 minutes until smoking hot—this high heat is essential for proper blackening.
5. Add vegetable oil to the hot skillet and swirl to coat the surface evenly.
6. Carefully place seasoned catfish fillets in the skillet, leaving space between them to prevent steaming.
7. Cook for 3-4 minutes without moving until a dark, crusty layer forms on the bottom.
8. Flip fillets using a thin metal spatula and cook for another 3 minutes on the second side.
9. Add unsalted butter to the skillet and baste the fillets continuously for 1 minute to enrich the flavor and create a glossy finish.
10. Remove catfish from skillet and let rest for 2 minutes before serving to allow juices to redistribute.
Zesty and complex, the blackened crust gives way to tender, flaky fish that practically melts in your mouth. Serve this fiery beauty over creamy grits to balance the heat, or slice it into tacos with crisp cabbage slaw for a textural contrast that highlights the dish’s smoky depth.
Smoky Chipotle Beef Tacos

Rich, complex flavors meld beautifully in these Smoky Chipotle Beef Tacos, where tender shredded beef meets the gentle heat of chipotle peppers. This elevated take on taco night transforms simple ingredients into a sophisticated culinary experience worthy of any gathering. Each component works in harmony to create depth and balance that will impress even the most discerning palates.
8
tacos20
minutes165
minutesIngredients
For the Beef and Marinade
- 2 lbs beef chuck roast, cut into 2-inch cubes
- 2 tbsp olive oil
- 1 tsp kosher salt
- ½ tsp black pepper
- 2 tsp ground cumin
- 1 tsp smoked paprika
- 3 chipotle peppers in adobo sauce, minced
- 2 tbsp adobo sauce from the can
- 4 garlic cloves, minced
- 1 cup beef broth
- 1 medium yellow onion, thinly sliced
For Assembly
- 8 small corn tortillas
- ½ cup crumbled cotija cheese
- ¼ cup chopped fresh cilantro
- 1 lime, cut into wedges
- ½ cup diced red onion
Instructions
- Pat the beef chuck roast cubes completely dry with paper towels to ensure proper browning.
- Season all sides of the beef evenly with kosher salt, black pepper, ground cumin, and smoked paprika.
- Heat olive oil in a large Dutch oven over medium-high heat until it shimmers, about 2 minutes.
- Sear beef cubes in a single layer, turning every 3-4 minutes until all sides develop a deep brown crust.
- Reduce heat to medium and add minced garlic, cooking for exactly 1 minute until fragrant but not burned.
- Add minced chipotle peppers, adobo sauce, and thinly sliced yellow onion, stirring to coat the beef.
- Pour in beef broth, scraping any browned bits from the bottom of the pot to incorporate flavor.
- Bring the liquid to a gentle simmer, then immediately reduce heat to low and cover the pot.
- Cook for 2 hours and 30 minutes at a maintained low simmer, checking occasionally that liquid doesn’t evaporate completely.
- Remove the lid and test doneness by inserting a fork into the beef – it should shred easily with no resistance.
- Transfer beef to a cutting board and use two forks to shred it into bite-sized pieces, discarding any large fat pieces.
- Return shredded beef to the pot and stir to coat with the reduced cooking liquid.
- Warm corn tortillas directly over a gas flame for 15-20 seconds per side until lightly charred and pliable.
- Divide the shredded chipotle beef evenly among the warmed tortillas.
- Top each taco with crumbled cotija cheese, diced red onion, and chopped fresh cilantro.
- Serve immediately with lime wedges for squeezing over the finished tacos.
Notably, the beef achieves a melt-in-your-mouth tenderness that contrasts beautifully with the crisp-edged tortillas. The smoky heat from the chipotle builds gradually while the cool cotija cheese provides a salty counterpoint. For an elegant presentation, arrange the tacos on a wooden board with extra lime wedges and fresh cilantro sprigs scattered artfully around the edges.
Garlic Butter Roasted Turkey Breast
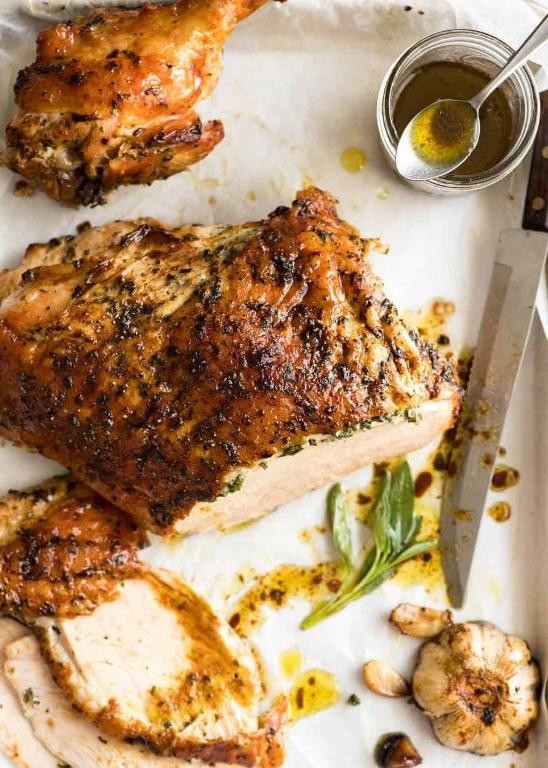
Yield to the comforting aroma of garlic and herbs that will soon fill your kitchen with this elegant roasted turkey breast. Perfectly golden and infused with rich butter, this centerpiece dish transforms simple ingredients into a memorable meal worthy of any gathering. The method ensures tender, juicy meat with a beautifully crisp skin that will have everyone asking for seconds.
6
servings25
minutes105
minutesIngredients
For the turkey and brine:
– 1 (4-5 lb) bone-in turkey breast
– 1/4 cup kosher salt
– 2 quarts cold water
For the garlic butter:
– 1/2 cup unsalted butter, softened
– 6 garlic cloves, minced
– 1 tbsp fresh thyme leaves
– 1 tsp fresh rosemary, finely chopped
– 1/2 tsp black pepper
For roasting:
– 1 tbsp olive oil
– 1/2 cup chicken broth
Instructions
1. Combine 1/4 cup kosher salt with 2 quarts cold water in a large container, stirring until salt dissolves completely.
2. Submerge the 4-5 lb bone-in turkey breast in the brine, cover, and refrigerate for exactly 4 hours to enhance juiciness and flavor penetration.
3. Remove turkey from brine, pat completely dry with paper towels, and place on a wire rack set inside a roasting pan.
4. Preheat your oven to 425°F to ensure proper initial browning and heat distribution.
5. Mix 1/2 cup softened butter with 6 minced garlic cloves, 1 tbsp thyme leaves, 1 tsp chopped rosemary, and 1/2 tsp black pepper in a small bowl until fully combined.
6. Carefully loosen the skin from the turkey breast by sliding your fingers between the skin and meat, creating pockets for the butter mixture.
7. Spread half of the garlic butter mixture evenly underneath the skin, covering as much surface area as possible for maximum flavor infusion.
8. Rub the remaining garlic butter mixture over the entire exterior of the turkey breast, including all sides and crevices.
9. Drizzle 1 tbsp olive oil over the skin and rub to create an even coating for optimal crisping.
10. Pour 1/2 cup chicken broth into the bottom of the roasting pan to create steam and prevent drippings from burning.
11. Roast at 425°F for 30 minutes until the skin begins to turn golden brown and crisp.
12. Reduce oven temperature to 350°F and continue roasting for 45-60 minutes, until the internal temperature reaches 165°F when measured with an instant-read thermometer inserted into the thickest part of the breast.
13. Transfer the turkey to a cutting board and let rest for 15 minutes before carving to allow juices to redistribute throughout the meat.
Unbelievably tender and aromatic, this turkey breast features a crackling-crisp skin that gives way to succulent, herb-infused meat. The garlic butter permeates every bite, creating layers of flavor that meld beautifully with the natural turkey essence. Consider serving thin slices over creamy polenta or alongside roasted root vegetables to complement the rich, savory notes.
Honey Mustard Glazed Chicken Thighs
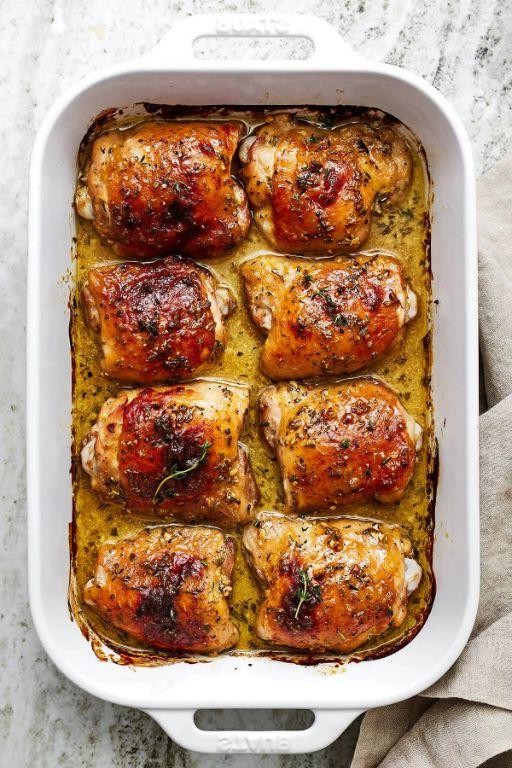
Golden-hued and glistening, these honey mustard glazed chicken thighs transform humble ingredients into an elegant weeknight masterpiece. The sweet-savory glaze caramelizes beautifully over juicy, bone-in thighs, creating a dish that feels both comforting and sophisticated. Perfectly balanced flavors make this recipe worthy of both casual family dinners and impromptu gatherings.
8
thighs10
minutes50
minutesIngredients
- For the Chicken:
- 8 bone-in, skin-on chicken thighs (about 3 pounds)
- 2 tablespoons olive oil
- 1 teaspoon kosher salt
- ½ teaspoon freshly ground black pepper
- For the Glaze:
- ⅓ cup Dijon mustard
- ¼ cup honey
- 2 tablespoons apple cider vinegar
- 2 cloves garlic, minced
- 1 teaspoon smoked paprika
Instructions
- Preheat your oven to 400°F and position a rack in the center.
- Pat the chicken thighs completely dry with paper towels to ensure crispy skin.
- Rub the chicken thighs evenly with olive oil, then season both sides with kosher salt and black pepper.
- Arrange the chicken thighs skin-side up in a single layer in a large oven-safe skillet or baking dish.
- Roast the chicken for 25 minutes at 400°F until the skin begins to turn golden brown.
- While the chicken roasts, whisk together Dijon mustard, honey, apple cider vinegar, minced garlic, and smoked paprika in a small bowl until smooth.
- Remove the chicken from the oven and carefully brush half of the honey mustard glaze evenly over each thigh.
- Return the chicken to the oven and continue roasting for 15-20 minutes until the internal temperature reaches 165°F when measured with an instant-read thermometer.
- Brush the remaining glaze over the chicken during the final 5 minutes of cooking for maximum flavor impact.
- Let the chicken rest for 5 minutes before serving to allow juices to redistribute throughout the meat.
Lusciously tender meat yields to the slightest pressure, while the sticky-sweet glaze forms a beautifully lacquered crust that crackles with each bite. Serve these glazed thighs over creamy polenta to soak up the pan juices, or pair with roasted root vegetables for a complete autumnal meal that celebrates the harmony of sweet and savory elements.
Herb-Crusted Pork Loin with Apple Compote
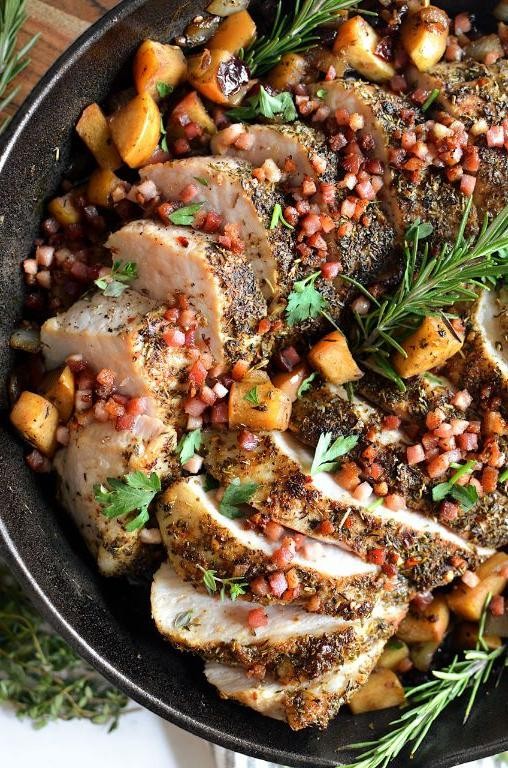
Vibrant with autumnal elegance, this herb-crusted pork loin celebrates the perfect harmony of savory and sweet. A golden, aromatic crust encases the juicy, tender pork, while the gently spiced apple compote provides a delightful counterpoint of fruity brightness. This centerpiece-worthy dish transforms simple ingredients into an unforgettable dining experience that feels both rustic and refined.
6
servings20
minutes80
minutesIngredients
For the Pork Loin
- 1 (3-pound) boneless pork loin
- 2 tablespoons olive oil
- 1 teaspoon kosher salt
- 1/2 teaspoon black pepper
For the Herb Crust
- 1/2 cup panko breadcrumbs
- 1/4 cup fresh parsley, finely chopped
- 2 tablespoons fresh rosemary, finely chopped
- 1 tablespoon fresh thyme leaves
- 2 cloves garlic, minced
- 2 tablespoons Dijon mustard
For the Apple Compote
- 3 medium Granny Smith apples, peeled and diced
- 1/4 cup brown sugar
- 2 tablespoons unsalted butter
- 1/4 teaspoon ground cinnamon
- 1/8 teaspoon ground nutmeg
- 2 tablespoons apple cider vinegar
Instructions
- Preheat your oven to 375°F and position a rack in the center.
- Pat the pork loin completely dry with paper towels to ensure proper browning.
- Rub the pork loin evenly with olive oil, then season all sides with kosher salt and black pepper.
- Heat a large oven-safe skillet over medium-high heat for 2 minutes until hot.
- Sear the pork loin for 3-4 minutes per side until a deep golden-brown crust forms.
- Transfer the seared pork to a plate and brush all sides evenly with Dijon mustard.
- In a small bowl, combine panko breadcrumbs, parsley, rosemary, thyme, and minced garlic.
- Press the herb mixture firmly onto the mustard-coated pork to create an even crust.
- Return the crusted pork to the skillet and roast in the preheated oven for 45-55 minutes.
- Check for doneness by inserting an instant-read thermometer into the thickest part—it should read 145°F.
- While the pork roasts, melt butter in a medium saucepan over medium heat.
- Add diced apples and cook for 5 minutes, stirring occasionally, until slightly softened.
- Sprinkle brown sugar, cinnamon, and nutmeg over the apples, stirring to coat evenly.
- Pour in apple cider vinegar and reduce heat to low, simmering for 12-15 minutes until apples are tender but still hold their shape.
- Remove the pork from the oven and let it rest on a cutting board for exactly 10 minutes before slicing.
What emerges is a masterpiece of contrasting textures—the crisp herb crust giving way to succulent, pink-centered pork that slices beautifully. The apple compote’s gentle sweetness and subtle spice notes elevate each bite, creating a symphony of fall flavors. Consider serving thick slices over creamy polenta or alongside roasted root vegetables to make this elegant dish the star of any autumn gathering.
Zesty Lime and Cilantro Fish Tacos

Delicate white fish fillets, kissed with vibrant lime and fresh cilantro, transform into the most sublime taco filling—a celebration of coastal flavors that dances between bright acidity and herbal freshness. This elegant preparation elevates the humble fish taco into a sophisticated yet approachable meal, perfect for both casual gatherings and refined dinners. Each component harmonizes to create a dish that feels simultaneously light and deeply satisfying.
8
tacos20
minutes8
minutesIngredients
For the Fish Marinade:
- 1 lb white fish fillets (such as cod or tilapia)
- 3 tbsp fresh lime juice
- 2 tbsp chopped fresh cilantro
- 1 tbsp olive oil
- 1 tsp chili powder
- 1/2 tsp ground cumin
- 1/4 tsp salt
For Assembly:
- 8 small corn tortillas
- 1 cup shredded purple cabbage
- 1/4 cup crumbled cotija cheese
- 1/4 cup sour cream
- 1 lime, cut into wedges
Instructions
- Pat the white fish fillets completely dry with paper towels to ensure proper searing.
- Whisk together 3 tablespoons fresh lime juice, 2 tablespoons chopped cilantro, 1 tablespoon olive oil, 1 teaspoon chili powder, 1/2 teaspoon cumin, and 1/4 teaspoon salt in a shallow dish.
- Place the fish fillets in the marinade, turning to coat all sides evenly.
- Let the fish marinate at room temperature for exactly 15 minutes—this brief marinating time prevents the lime juice from cooking the fish while still infusing flavor.
- Heat a large skillet over medium-high heat until a drop of water sizzles immediately upon contact.
- Cook the marinated fish fillets for 3-4 minutes per side, until the flesh becomes opaque and flakes easily with a fork.
- Transfer the cooked fish to a cutting board and use two forks to gently shred it into bite-sized pieces.
- Warm the corn tortillas directly over a gas flame for 15-20 seconds per side, or in a dry skillet until pliable and lightly toasted.
- Divide the shredded fish evenly among the warmed tortillas.
- Top each taco with shredded purple cabbage, creating a colorful base layer.
- Sprinkle crumbled cotija cheese over the cabbage for a salty, creamy contrast.
- Dollop sour cream generously over each taco, using the back of a spoon to spread it lightly.
- Garnish with additional fresh cilantro leaves and serve immediately with lime wedges on the side.
Offering a delightful textural contrast between the flaky fish and crisp cabbage, these tacos present a symphony of bright, zesty flavors that awaken the palate. The creamy cotija and sour cream provide a cooling balance to the citrus-forward marinade, while the warm corn tortillas add earthy sweetness. For an elegant presentation, arrange the tacos on a large platter with lime wedges artfully scattered around the edges, creating a vibrant centerpiece that invites communal dining and celebration.
Stuffed Bell Peppers with Ground Beef
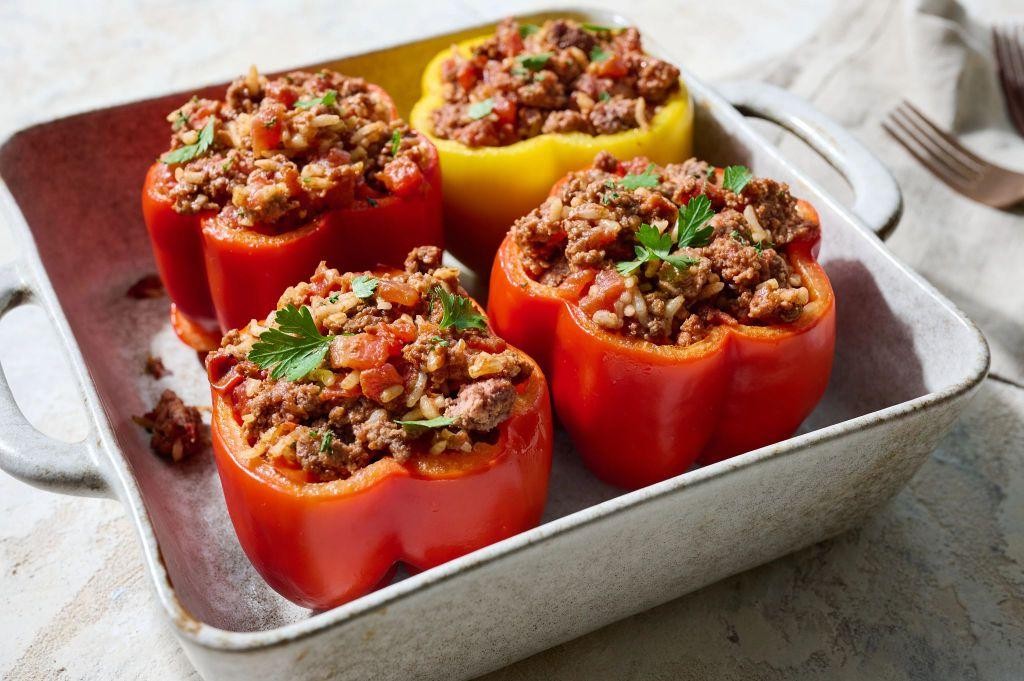
Masterfully transforming humble bell peppers into elegant edible vessels, this classic comfort dish combines vibrant colors with rich, savory flavors. Each pepper becomes a self-contained meal, brimming with seasoned ground beef and aromatic rice, creating a visually stunning presentation that belies its straightforward preparation. The harmonious blend of textures and tastes makes this recipe both satisfying for weeknight dinners and impressive enough for casual entertaining.
2
portions20
minutes50
minutesIngredients
- For the peppers:
- 4 large bell peppers (any color)
- 1 tablespoon olive oil
- 1/2 teaspoon salt
- For the filling:
- 1 pound ground beef (80/20 blend)
- 1 medium yellow onion, finely diced
- 2 cloves garlic, minced
- 1 cup cooked white rice
- 1 (15-ounce) can tomato sauce
- 1 teaspoon dried oregano
- 1/2 teaspoon black pepper
- 1 cup shredded mozzarella cheese
Instructions
- Preheat your oven to 375°F and lightly grease a 9×13-inch baking dish with olive oil.
- Slice the tops off all 4 bell peppers and remove the seeds and membranes, creating hollow vessels.
- Brush the outside of each pepper with the remaining olive oil and sprinkle with 1/2 teaspoon salt total.
- Place the peppers cut-side up in the prepared baking dish and bake for 15 minutes to slightly soften.
- While peppers bake, heat a large skillet over medium-high heat and brown the ground beef for 6-8 minutes, breaking it into small crumbles.
- Add the diced onion to the skillet and cook for 4-5 minutes until translucent and fragrant.
- Stir in the minced garlic and cook for 1 minute until aromatic but not browned.
- Drain any excess grease from the skillet, then add the cooked rice, tomato sauce, oregano, and black pepper.
- Simmer the mixture for 3-4 minutes until thoroughly combined and heated through.
- Remove the partially baked peppers from the oven and carefully fill each with the beef mixture, packing it gently.
- Sprinkle 1/4 cup of mozzarella cheese over the top of each stuffed pepper.
- Return the baking dish to the oven and bake for 25-30 minutes until the cheese is golden and bubbly.
- Let the stuffed peppers rest for 5 minutes before serving to allow the filling to set.
Exquisitely balanced between tender pepper walls and the hearty, savory filling, each bite delivers contrasting textures that complement one another beautifully. The melted mozzarella forms a delicate crust over the richly seasoned beef, while the rice absorbs the tomato sauce’s subtle acidity. For an elegant presentation, serve alongside a crisp arugula salad dressed with lemon vinaigrette to cut through the dish’s richness.
Tangy Barbecue Ribs
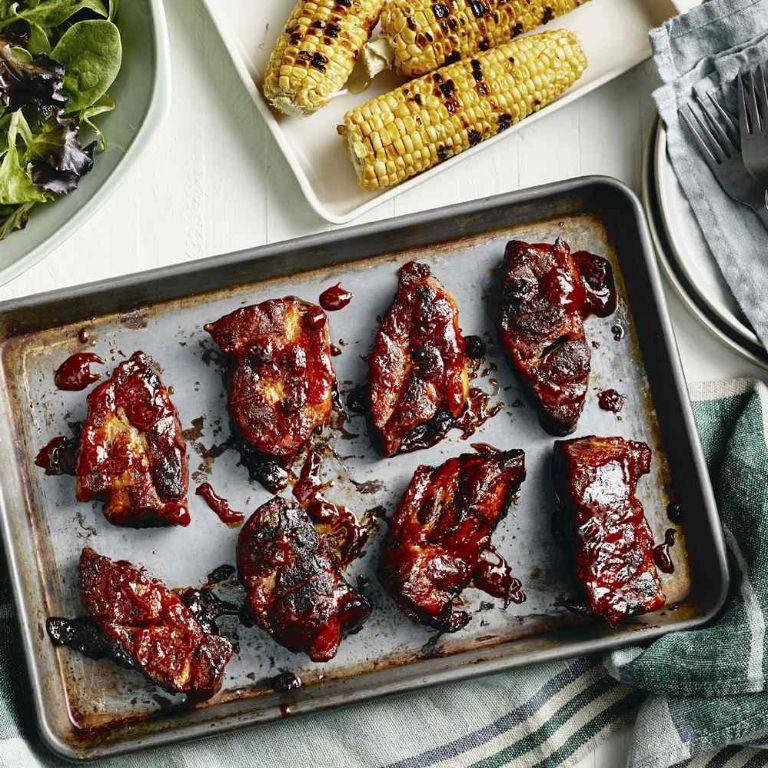
Glistening with a caramelized glaze and boasting tender, fall-off-the-bone texture, these tangy barbecue ribs elevate backyard dining to gourmet status. Perfectly balanced between sweet and acidic notes, they showcase the art of slow-cooking with sophisticated flavor layering. This recipe transforms humble pork ribs into an elegant centerpiece worthy of any gathering.
2
pounds20
minutes175
minutesIngredients
For the Dry Rub:
– 2 tbsp brown sugar
– 1 tbsp smoked paprika
– 1 tsp garlic powder
– 1 tsp onion powder
– 1/2 tsp cayenne pepper
– 1 tbsp kosher salt
For the Braising Liquid:
– 1/2 cup apple cider vinegar
– 1/2 cup chicken broth
– 2 tbsp Worcestershire sauce
For the Barbecue Sauce:
– 1 cup ketchup
– 1/4 cup honey
– 2 tbsp Dijon mustard
– 1 tbsp soy sauce
– 2 tbsp apple cider vinegar
Instructions
1. Preheat your oven to 275°F and line a baking sheet with heavy-duty aluminum foil.
2. Remove the membrane from the bone-side of 2 pounds pork ribs using a paper towel for better grip.
3. Combine 2 tbsp brown sugar, 1 tbsp smoked paprika, 1 tsp garlic powder, 1 tsp onion powder, 1/2 tsp cayenne pepper, and 1 tbsp kosher salt in a small bowl.
4. Rub the spice mixture evenly over both sides of the ribs, pressing gently to adhere.
5. Place the seasoned ribs bone-side down on the prepared baking sheet.
6. Whisk together 1/2 cup apple cider vinegar, 1/2 cup chicken broth, and 2 tbsp Worcestershire sauce in a measuring cup.
7. Carefully pour the braising liquid around the ribs, avoiding washing off the rub.
8. Cover the baking sheet tightly with another layer of foil, creating a sealed packet.
9. Bake at 275°F for 2.5 hours until the meat has pulled back from the bones by about 1/2 inch.
10. Meanwhile, combine 1 cup ketchup, 1/4 cup honey, 2 tbsp Dijon mustard, 1 tbsp soy sauce, and 2 tbsp apple cider vinegar in a saucepan.
11. Simmer the sauce over medium heat for 8 minutes until slightly thickened, stirring frequently.
12. Remove the ribs from the oven and carefully uncover, reserving the braising liquid.
13. Brush both sides of the ribs generously with the prepared barbecue sauce.
14. Increase oven temperature to 375°F and return the uncovered ribs to the oven.
15. Bake for 15 minutes until the sauce is sticky and caramelized.
16. Let the ribs rest for 10 minutes before slicing between the bones.
Nothing compares to the succulent texture that yields effortlessly to gentle pressure, revealing perfectly cooked meat infused with complex flavors. The tangy-sweet glaze creates a beautiful lacquered finish that crackles slightly with each bite. Consider serving these elegant ribs alongside creamy coleslaw and grilled corn for a sophisticated summer feast that celebrates American barbecue traditions with refined flair.
Sesame Ginger Chicken Stir-Fry
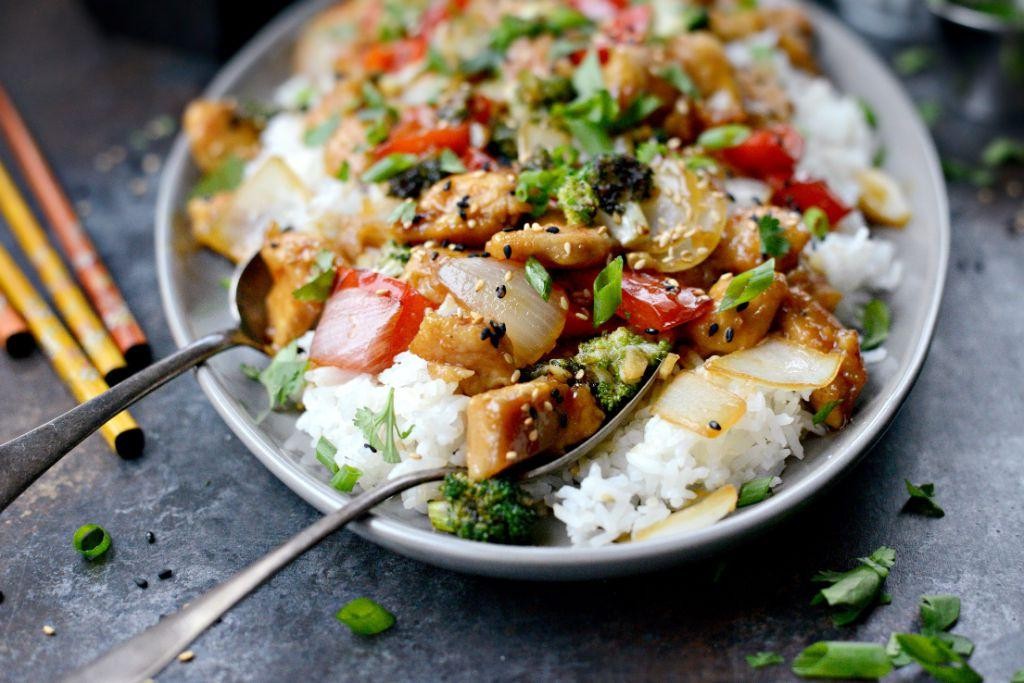
Luminous with the golden glow of toasted sesame and vibrant with the zesty warmth of fresh ginger, this stir-fry transforms humble chicken into an elegant weeknight masterpiece that dances between sweet, savory, and subtly spicy notes. Perfectly seared chicken mingles with crisp vegetables in a glossy, aromatic sauce that clings beautifully to every component. It’s the kind of dish that feels both comforting and sophisticated, proving that extraordinary flavors can emerge from your kitchen in mere minutes.
2
servings15
minutes15
minutesIngredients
For the Chicken:
- 1 lb boneless, skinless chicken breasts, cut into 1-inch pieces
- 2 tbsp cornstarch
- 1/4 tsp black pepper
- 2 tbsp vegetable oil
For the Sauce:
- 1/4 cup low-sodium soy sauce
- 2 tbsp honey
- 1 tbsp rice vinegar
- 2 tsp toasted sesame oil
- 1 tbsp fresh ginger, minced
- 2 garlic cloves, minced
- 1 tsp sesame seeds
For the Vegetables:
- 1 red bell pepper, sliced into 1/4-inch strips
- 1 cup broccoli florets
- 1/2 cup snap peas
Instructions
- Pat the chicken pieces completely dry with paper towels to ensure a crisp sear.
- Toss the chicken with cornstarch and black pepper until evenly coated.
- Heat vegetable oil in a large skillet or wok over medium-high heat until it shimmers, about 2 minutes.
- Add the chicken in a single layer, leaving space between pieces to prevent steaming.
- Sear the chicken for 3-4 minutes per side until golden brown and cooked through to 165°F internally.
- Transfer the chicken to a clean plate using a slotted spoon.
- Reduce the heat to medium and add the bell pepper, broccoli, and snap peas to the same skillet.
- Sauté the vegetables for 4-5 minutes until crisp-tender and bright in color.
- Whisk together soy sauce, honey, rice vinegar, sesame oil, ginger, and garlic in a small bowl.
- Pour the sauce mixture into the skillet with the vegetables, scraping up any browned bits from the bottom.
- Simmer the sauce for 2 minutes until it thickens slightly and becomes glossy.
- Return the cooked chicken to the skillet and toss to coat evenly with the sauce.
- Sprinkle sesame seeds over the stir-fry and remove from heat. Radiant with glossy sauce and speckled with toasted sesame, this dish offers tender chicken alongside vegetables that retain a satisfying crunch. The harmony of sweet honey, salty soy, and pungent ginger creates layers of flavor that deepen with each bite. Serve it over jasmine rice to soak up every drop of the aromatic sauce, or wrap it in butter lettuce cups for a refreshing, low-carb alternative.
Classic Italian Meatballs

Zesty, aromatic, and deeply comforting, these Classic Italian Meatballs embody the soulful essence of traditional home cooking, where each tender sphere is infused with garlic, herbs, and rich tomato sauce. Crafted from a harmonious blend of ground meats and fresh breadcrumbs, they simmer gently to achieve a melt-in-your-mouth texture that pairs beautifully with pasta or crusty bread. This timeless recipe delivers both rustic charm and elegant flavor, perfect for weeknight dinners or festive gatherings.
20
meatballs20
minutes40
minutesIngredients
For the Meatballs
– 1 lb ground beef (80% lean)
– 1/2 lb ground pork
– 1 cup fresh breadcrumbs
– 1/2 cup whole milk
– 1/4 cup grated Parmesan cheese
– 1 large egg
– 2 tbsp finely chopped fresh parsley
– 2 cloves garlic, minced
– 1 tsp salt
– 1/2 tsp black pepper
– 2 tbsp olive oil
For the Sauce
– 2 tbsp olive oil
– 1/2 cup finely chopped yellow onion
– 2 cloves garlic, minced
– 28 oz can crushed tomatoes
– 1/4 cup chopped fresh basil
– 1 tsp salt
– 1/2 tsp black pepper
Instructions
1. Combine 1 cup fresh breadcrumbs and 1/2 cup whole milk in a large bowl, letting them soak for 5 minutes until the milk is fully absorbed.
2. Add 1 lb ground beef, 1/2 lb ground pork, 1/4 cup grated Parmesan cheese, 1 large egg, 2 tbsp finely chopped fresh parsley, 2 cloves minced garlic, 1 tsp salt, and 1/2 tsp black pepper to the breadcrumb mixture.
3. Gently mix the ingredients with your hands until just combined, being careful not to overwork the meat to maintain tender meatballs.
4. Shape the mixture into 1.5-inch meatballs, placing them on a parchment-lined baking sheet; you should have approximately 20 meatballs.
5. Heat 2 tbsp olive oil in a large Dutch oven or heavy-bottomed pot over medium-high heat until shimmering, about 2 minutes.
6. Working in batches to avoid crowding, brown the meatballs for 2-3 minutes per side until golden brown, then transfer them to a clean plate.
7. Reduce heat to medium and add 2 tbsp olive oil to the same pot, then sauté 1/2 cup finely chopped yellow onion for 4-5 minutes until translucent.
8. Add 2 cloves minced garlic and cook for 1 minute until fragrant, stirring constantly to prevent burning.
9. Pour in 28 oz crushed tomatoes, 1/4 cup chopped fresh basil, 1 tsp salt, and 1/2 tsp black pepper, stirring to combine.
10. Return the browned meatballs to the pot, submerging them in the sauce.
11. Bring the sauce to a gentle simmer, then reduce heat to low, cover, and cook for 25-30 minutes until the meatballs reach an internal temperature of 165°F.
12. Let the meatballs rest in the sauce for 5 minutes before serving to allow the flavors to meld. Lusciously tender with a savory depth from the beef-pork blend, these meatballs boast a delicate crumb and herb-infused aroma that permeates the vibrant tomato sauce. Serve them over al dente spaghetti for a classic presentation, or stuff them into crusty rolls with provolone for a hearty sandwich; their rich, garlicky notes and velvety texture make them equally suited for elegant platters or casual family suppers.
Moroccan Spiced Lamb Stew
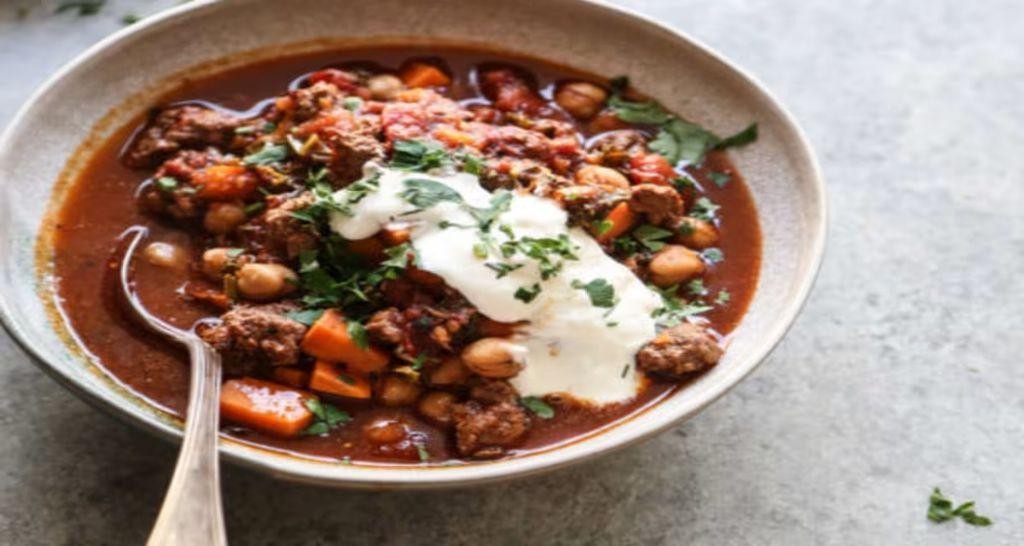
Capturing the essence of North African hospitality, this Moroccan spiced lamb stew transforms humble ingredients into an aromatic masterpiece that fills the kitchen with warming scents of cinnamon and cumin. Carefully braised lamb shoulder becomes meltingly tender while absorbing the complex layers of preserved lemon and sweet apricots. Each spoonful offers a journey through Marrakech’s bustling spice markets, where tradition and flavor dance in perfect harmony.
2
servings20
minutes150
minutesIngredients
For the Lamb and Base:
– 2 lbs lamb shoulder, cut into 1-inch cubes
– 2 tbsp olive oil
– 1 large yellow onion, diced
– 4 garlic cloves, minced
For the Spice Blend:
– 1 tsp ground cumin
– 1 tsp ground coriander
– 1/2 tsp ground cinnamon
– 1/4 tsp cayenne pepper
For the Stew Liquid:
– 4 cups beef broth
– 1/2 cup dried apricots, chopped
– 2 tbsp preserved lemon, finely chopped
– 1 tbsp tomato paste
Instructions
1. Pat the lamb cubes completely dry with paper towels to ensure proper browning.
2. Heat 2 tbsp olive oil in a heavy Dutch oven over medium-high heat until shimmering.
3. Sear lamb cubes in a single layer for 3-4 minutes per side until deeply browned, working in batches to avoid crowding.
4. Transfer browned lamb to a clean plate, leaving rendered fat in the pot.
5. Add diced onion to the hot fat and cook for 6-8 minutes until softened and translucent.
6. Stir in minced garlic and cook for 1 minute until fragrant.
7. Sprinkle cumin, coriander, cinnamon, and cayenne over the onions, toasting for 30 seconds to release their oils.
8. Add 1 tbsp tomato paste and cook for 1 minute until it darkens slightly.
9. Return all lamb and accumulated juices to the pot.
10. Pour in 4 cups beef broth, scraping any browned bits from the bottom with a wooden spoon.
11. Stir in chopped dried apricots and preserved lemon until evenly distributed.
12. Bring the stew to a gentle simmer, then reduce heat to low and cover tightly.
13. Simmer covered for 2 hours, checking occasionally to maintain a bare bubble.
14. Remove the lid and continue simmering for 30 minutes to slightly thicken the sauce.
15. Test lamb tenderness by pressing a cube with a fork—it should easily separate.
16. Season with salt only at the end to prevent over-reduction during cooking.
Offering a luxurious texture where the lamb shreds at the slightest pressure, this stew balances earthy spices with the bright acidity of preserved lemon. The apricots melt into the sauce, creating subtle sweetness that complements the rich lamb without overwhelming the palate. Serve over fluffy couscous to catch every drop of the fragrant sauce, or with crusty bread for dipping into the deeply developed flavors.
Conclusion
Whether you’re gluten-free by necessity or choice, these 28 delicious meat recipes prove you don’t have to sacrifice flavor. From comforting classics to exciting new dishes, there’s something here for every craving and occasion. We hope you find new family favorites! Don’t forget to share which recipes you loved in the comments below and pin this article to your Pinterest boards for easy meal planning.


