
Many people think going gluten-free means giving up flavorful Indian cuisine, but we’re here to show you how wrong that assumption is! Whether you’re craving comforting curries, vibrant vegetable dishes, or satisfying snacks, this collection proves gluten-free Indian cooking is both accessible and incredibly delicious. Get ready to discover 29 mouthwatering recipes that will transform your kitchen into a spice-filled haven of gluten-free goodness.
Gluten-Free Paneer Tikka

Last week, I was craving Indian food but needed something gluten-free for my friend’s dinner party—enter this incredible paneer tikka recipe that had everyone asking for seconds! It’s become my go-to for quick, flavorful meals that feel indulgent yet are surprisingly simple to whip up.
4
servings30
minutes25
minutesIngredients
– 1 pound paneer
– 1 cup plain Greek yogurt
– 2 tbsp lemon juice
– 2 tbsp olive oil
– 4 cloves garlic
– 1 inch ginger
– 1 tbsp garam masala
– 1 tsp turmeric
– 1 tsp paprika
– 1/2 tsp salt
– 1/2 tsp black pepper
– 1 medium red onion
– 1 medium bell pepper
Instructions
1. Cut 1 pound paneer into 1-inch cubes and set aside in a large bowl.
2. Mince 4 cloves garlic and 1 inch ginger into a fine paste using a microplane or grater.
3. Combine 1 cup Greek yogurt, minced garlic-ginger paste, 2 tbsp lemon juice, 2 tbsp olive oil, 1 tbsp garam masala, 1 tsp turmeric, 1 tsp paprika, 1/2 tsp salt, and 1/2 tsp black pepper in a separate bowl, whisking until smooth.
4. Pour the marinade over the paneer cubes, ensuring each piece is fully coated, then cover and refrigerate for at least 2 hours (tip: marinating overnight deepens the flavors).
5. Preheat your oven to 400°F and line a baking sheet with parchment paper.
6. Cut 1 medium red onion and 1 medium bell pepper into 1-inch chunks while the oven heats.
7. Thread marinated paneer, onion, and bell pepper alternately onto skewers, leaving small gaps between pieces for even cooking.
8. Arrange skewers on the prepared baking sheet and bake for 20–25 minutes, flipping halfway through, until edges are lightly charred (tip: broil for 2–3 minutes at the end for extra crispiness).
9. Check doneness by inserting a knife into a paneer cube—it should be firm but tender, not rubbery (tip: avoid overcrowding skewers to prevent steaming instead of roasting).
What I love most is how the paneer stays creamy inside while the edges get slightly crispy from the yogurt marinade. Serve these skewers over cauliflower rice with a drizzle of mint chutney, or tuck them into gluten-free wraps with fresh cilantro for a vibrant lunch—the smoky, tangy flavors are absolutely addictive!
Chickpea Flour Dosas

Gosh, I remember the first time I tried making traditional dosas—the fermentation process had me checking my pantry like a worried parent. That’s why I fell in love with this chickpea flour version that comes together in minutes, perfect for those busy weeknights when you’re craving something wholesome but short on time.
3
dosas15
minutes20
minutesIngredients
– 1 cup chickpea flour
– 1/4 cup rice flour
– 1 1/4 cups water
– 1/2 tsp salt
– 1/4 tsp turmeric
– 2 tbsp vegetable oil
Instructions
1. Combine 1 cup chickpea flour, 1/4 cup rice flour, 1/2 teaspoon salt, and 1/4 teaspoon turmeric in a medium bowl.
2. Gradually whisk in 1 1/4 cups water until the batter is completely smooth with no lumps.
3. Let the batter rest for 10 minutes to allow the flours to fully hydrate.
4. Heat a non-stick skillet over medium heat until a drop of water sizzles immediately upon contact.
5. Lightly brush the skillet with 1 teaspoon of vegetable oil using a pastry brush.
6. Pour 1/4 cup of batter into the center of the skillet and immediately swirl to form a thin 6-inch circle.
7. Cook for 2-3 minutes until the edges lift easily and the surface appears dry with small bubbles.
8. Drizzle 1/2 teaspoon of vegetable oil around the edges of the dosa.
9. Flip the dosa using a thin spatula and cook for 1-2 minutes until golden brown spots appear.
10. Transfer the cooked dosa to a plate and repeat with remaining batter, brushing the skillet with oil between each dosa. Absolutely magical how these crisp-edged crepes develop that nutty chickpea flavor with just a hint of turmeric warmth. I love serving them folded around spiced potatoes for a complete meal, or simply with chutney for a quick snack—the delicate lacy texture makes every bite feel special.
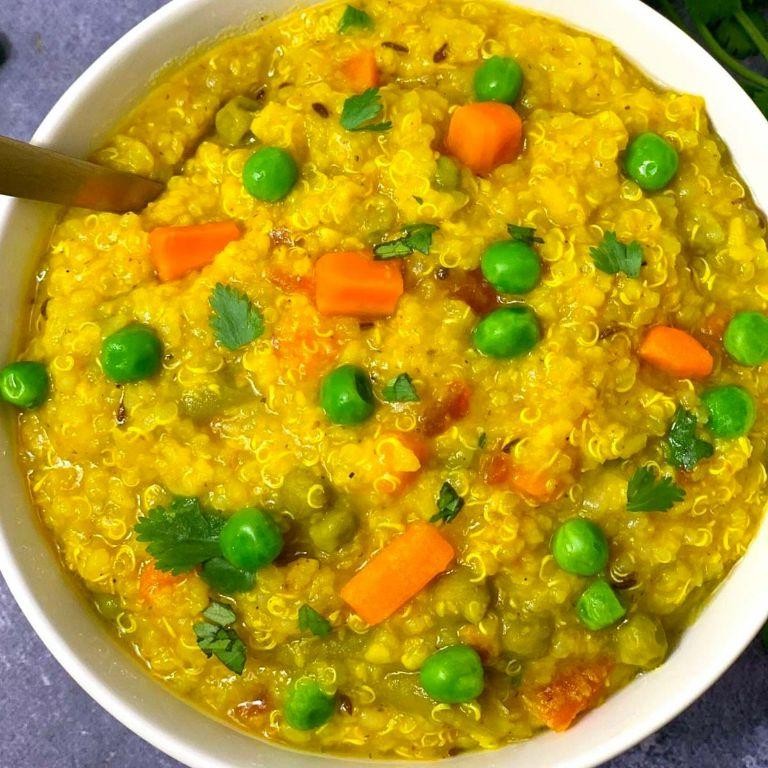
Quinoa Biryani
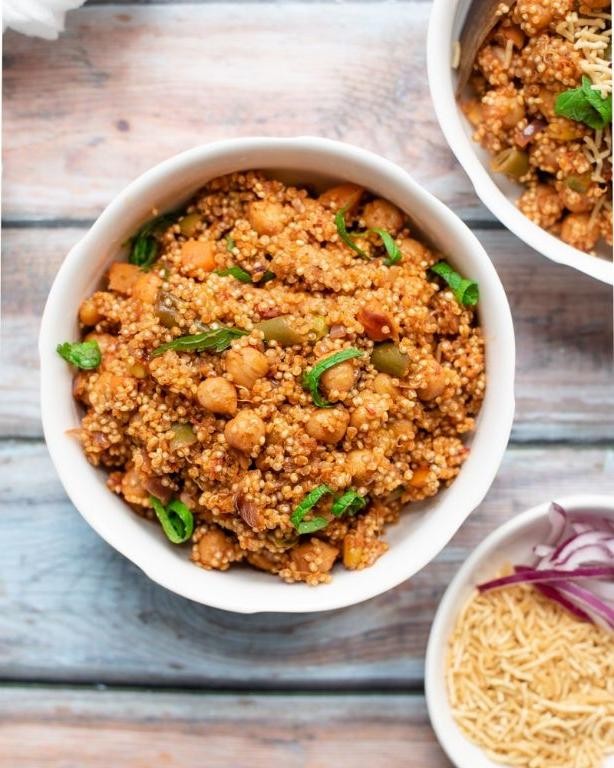
Diving into my spice cabinet always sparks kitchen adventures, and this quinoa biryani was born from one of those “what if” moments when I wanted something healthier than traditional rice biryani but just as comforting. I’ve been making this weekly since discovering how well quinoa absorbs those aromatic spices without getting mushy—perfect for busy weeknights when I crave something satisfying but don’t want to spend hours cooking.
4
servings15
minutes27
minutesIngredients
– 1 cup quinoa
– 2 cups vegetable broth
– 1 tbsp olive oil
– 1 medium onion, thinly sliced
– 2 cloves garlic, minced
– 1 tsp grated ginger
– 1 tsp cumin seeds
– 1 cinnamon stick
– 3 cardamom pods
– 1/2 tsp turmeric powder
– 1/2 tsp red chili powder
– 1 cup mixed vegetables (carrots, peas, bell peppers)
– 1/4 cup plain yogurt
– 2 tbsp chopped cilantro
– 1 tbsp lemon juice
– Salt to taste
Instructions
1. Rinse 1 cup quinoa under cold water in a fine-mesh strainer for 1 minute to remove bitterness.
2. Heat 1 tbsp olive oil in a large pot over medium heat until shimmering.
3. Add 1 tsp cumin seeds, 1 cinnamon stick, and 3 cardamom pods, toast for 30 seconds until fragrant.
4. Add 1 thinly sliced onion, sauté for 5 minutes until golden brown.
5. Stir in 2 minced garlic cloves and 1 tsp grated ginger, cook for 1 minute until raw smell disappears.
6. Add 1/2 tsp turmeric powder and 1/2 tsp red chili powder, stir for 30 seconds to bloom spices.
7. Mix in 1 cup mixed vegetables, cook for 3 minutes until slightly tender.
8. Add rinsed quinoa, toast for 2 minutes while stirring constantly.
9. Pour in 2 cups vegetable broth and 1/4 cup plain yogurt, bring to a boil.
10. Reduce heat to low, cover pot, and simmer for 15 minutes until liquid is absorbed.
11. Remove from heat, let stand covered for 5 minutes to steam.
12. Fluff with fork, stir in 2 tbsp chopped cilantro and 1 tbsp lemon juice.
13. Season with salt to taste, mix gently to combine. Buttery quinoa grains separate beautifully while holding all those warm spices, and I love how the yogurt adds a subtle tang that balances the heat. Serve it topped with extra cilantro and a side of cucumber raita for a complete meal that feels both nourishing and celebratory.
Lentil Dal Tadka
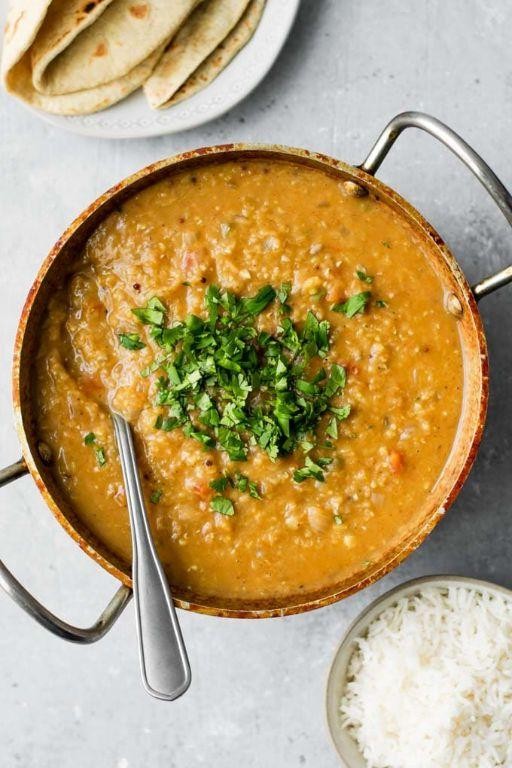
A warm, comforting bowl of lentil dal tadka has become my go-to weeknight dinner, especially after discovering how this humble Indian dish can transform simple pantry staples into something magical. I first fell for its aromatic spices during a rainy evening when my neighbor shared her family recipe, and now I make it whenever I need a cozy, satisfying meal that comes together in under an hour.
5
servings15
minutes40
minutesIngredients
– 1 cup red lentils
– 4 cups water
– 1 tbsp vegetable oil
– 1 tsp cumin seeds
– 1 medium yellow onion, diced
– 3 cloves garlic, minced
– 1 tbsp grated fresh ginger
– 1 tsp turmeric powder
– 1 tsp garam masala
– 1/2 tsp cayenne pepper
– 1 tsp salt
– 1 tbsp lemon juice
– 2 tbsp chopped fresh cilantro
Instructions
1. Rinse 1 cup red lentils under cold running water until the water runs clear.
2. Combine rinsed lentils and 4 cups water in a large pot over high heat.
3. Bring the lentil mixture to a boil, then reduce heat to maintain a gentle simmer.
4. Simmer lentils uncovered for 25 minutes, skimming off any foam that rises to the surface.
5. Heat 1 tbsp vegetable oil in a separate skillet over medium heat until shimmering.
6. Add 1 tsp cumin seeds to the hot oil and cook for 30 seconds until they sizzle and become fragrant.
7. Add 1 diced yellow onion and cook for 6-8 minutes until softened and golden brown.
8. Stir in 3 minced garlic cloves and 1 tbsp grated ginger, cooking for 1 minute until aromatic.
9. Add 1 tsp turmeric powder, 1 tsp garam masala, 1/2 tsp cayenne pepper, and 1 tsp salt to the onion mixture.
10. Cook the spice mixture for 1 minute, stirring constantly to prevent burning.
11. Pour the tempered spice mixture into the cooked lentils and stir to combine thoroughly.
12. Simmer the combined dal for 5 minutes to allow flavors to meld.
13. Remove the pot from heat and stir in 1 tbsp lemon juice.
14. Garnish the finished dal with 2 tbsp chopped fresh cilantro.
Nothing beats the creamy texture of perfectly cooked lentils against the crispy, aromatic tadka topping. The bright lemon finish cuts through the richness beautifully, making this dal equally delicious served over basmati rice or with warm naan for dipping.
Gluten-Free Aloo Gobi
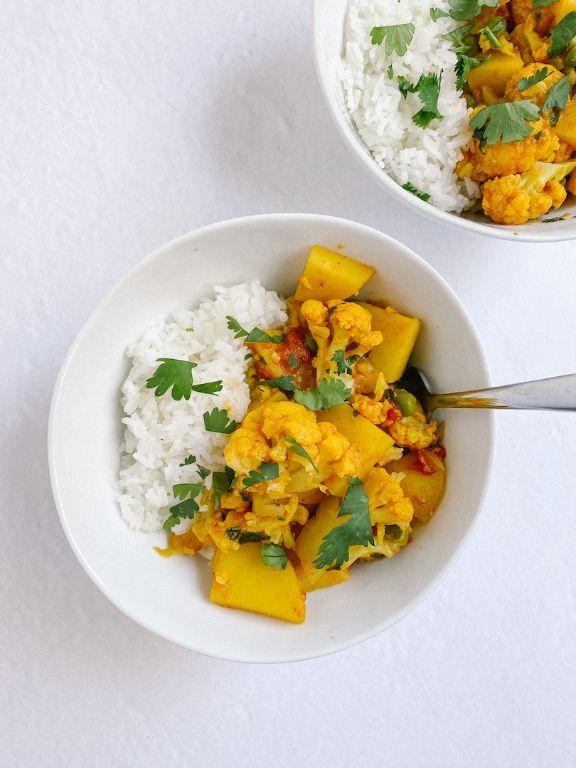
Wandering through my local farmers market last weekend, I spotted the most beautiful cauliflower and knew immediately what I had to make. This gluten-free aloo gobi has become my go-to comfort food ever since my friend Priya shared her family recipe with me. There’s something magical about how these simple ingredients transform into such a vibrant, satisfying dish.
Ingredients
– 2 tbsp olive oil
– 1 medium yellow onion, diced
– 3 cloves garlic, minced
– 1 tbsp fresh ginger, grated
– 1 tsp cumin seeds
– 1 tsp turmeric powder
– 1 tsp coriander powder
– 1/2 tsp red chili powder
– 2 medium potatoes, peeled and cubed
– 1 medium cauliflower, cut into florets
– 1 tsp salt
– 1/4 cup water
– 2 tbsp fresh cilantro, chopped
Instructions
1. Heat 2 tablespoons of olive oil in a large skillet over medium heat for 2 minutes until shimmering.
2. Add 1 teaspoon of cumin seeds and toast for 30 seconds until fragrant, being careful not to burn them.
3. Add diced yellow onion and sauté for 5 minutes until translucent and lightly golden.
4. Stir in minced garlic and grated ginger, cooking for 1 minute until aromatic.
5. Add turmeric powder, coriander powder, and red chili powder, toasting the spices for 30 seconds to release their flavors.
6. Mix in cubed potatoes and coat thoroughly with the spice mixture.
7. Add cauliflower florets and 1 teaspoon of salt, gently tossing to combine all ingredients evenly.
8. Pour in 1/4 cup of water and immediately cover the skillet with a tight-fitting lid.
9. Reduce heat to medium-low and cook for 15 minutes without stirring to allow steam to soften the vegetables.
10. Remove the lid and check if potatoes are tender by piercing with a fork – they should yield easily.
11. Increase heat to medium and cook uncovered for 5 minutes to evaporate excess moisture and lightly brown the vegetables.
12. Turn off heat and fold in chopped fresh cilantro until evenly distributed.
Perfectly cooked aloo gobi features tender potatoes that hold their shape alongside cauliflower with just the right amount of bite. The turmeric gives it that gorgeous golden hue while the cumin seeds add little bursts of earthy flavor. I love serving this over basmati rice or stuffing it into warm gluten-free tortillas for a quick lunch wrap.
Buckwheat Roti
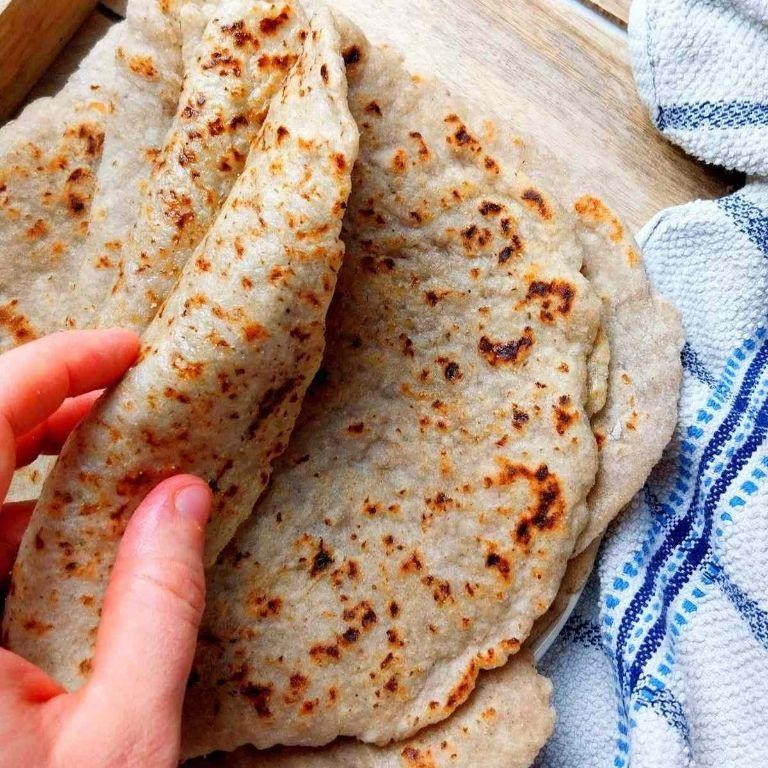
Cooking with alternative flours has completely transformed my kitchen adventures, and buckwheat roti has become my latest obsession. I first discovered this gluten-free flatbread during a friend’s dinner party where it stole the show with its nutty flavor and incredible flexibility. Now I make these weekly because they’re surprisingly simple and pair beautifully with everything from curries to breakfast scrambles.
Ingredients
– 2 cups buckwheat flour
– 3/4 cup warm water (110°F)
– 1/2 tsp salt
– 2 tbsp avocado oil
Instructions
1. Combine 2 cups buckwheat flour and 1/2 teaspoon salt in a large mixing bowl.
2. Gradually add 3/4 cup warm water (110°F) while mixing with your other hand until a shaggy dough forms.
3. Knead the dough on a lightly floured surface for 5 minutes until smooth and pliable.
4. Divide the dough into 8 equal-sized balls, covering them with a damp cloth to prevent drying.
5. Heat a cast iron skillet over medium-high heat (375°F) for 3 minutes until properly heated.
6. Roll one dough ball into a 6-inch circle using a rolling pin, dusting with extra flour to prevent sticking.
7. Carefully transfer the rolled roti to the hot skillet and cook for 90 seconds until bubbles form on the surface.
8. Flip the roti using tongs and cook for another 60 seconds until brown spots appear.
9. Brush the cooked roti with 1/4 teaspoon avocado oil using a pastry brush.
10. Repeat steps 6-9 with remaining dough balls, stacking cooked rotis in a cloth-lined basket to keep warm.
Hearty and wholesome, these rotis have a wonderfully earthy flavor with just enough chewiness to hold up to saucy dishes. I love tearing them into pieces to scoop up lentil stew or using them as wraps for spiced vegetable fillings—they never tear or become soggy like some gluten-free alternatives.
Millet Upma
Craving something wholesome yet comforting for breakfast? I discovered millet upma during my quest for healthier morning options, and it’s become my go-to when I want something satisfying that won’t leave me sluggish by 10 AM. This savory porridge-like dish transforms humble millet into something truly special with just a handful of pantry staples.
3
servings10
minutes25
minutesIngredients
– 1 cup millet
– 2 tbsp vegetable oil
– 1 tsp mustard seeds
– 1 medium yellow onion, diced
– 2 green chilies, slit lengthwise
– 1 inch fresh ginger, minced
– 2 cups water
– 1 tsp salt
– 2 tbsp fresh cilantro, chopped
– 1 tbsp lemon juice
Instructions
1. Rinse 1 cup millet under cold running water until water runs clear, then drain completely using a fine-mesh strainer.
2. Heat 2 tbsp vegetable oil in a heavy-bottomed saucepan over medium heat for 90 seconds until shimmering.
3. Add 1 tsp mustard seeds and cook for 45 seconds until they begin to pop and crackle.
4. Stir in diced yellow onion and cook for 4-5 minutes until translucent and edges turn golden brown.
5. Add slit green chilies and minced ginger, stirring constantly for 1 minute until fragrant.
6. Mix in drained millet and toast for 2 minutes, stirring frequently until grains smell nutty.
7. Pour in 2 cups water and 1 tsp salt, then bring to a rolling boil over high heat.
8. Reduce heat to low, cover saucepan tightly with lid, and simmer for 15 minutes without stirring.
9. Remove saucepan from heat and let stand covered for 5 minutes to allow steam to finish cooking grains.
10. Fluff millet gently with fork, then stir in chopped cilantro and lemon juice until evenly distributed.
Grainy yet tender, this upma delivers a delightful nuttiness that pairs beautifully with the sharpness of ginger and chilies. I love serving it topped with a fried egg for extra protein, or alongside cool yogurt to balance the spices—it makes for such a vibrant breakfast that feels both nourishing and exciting.
Coconut Chickpea Curry
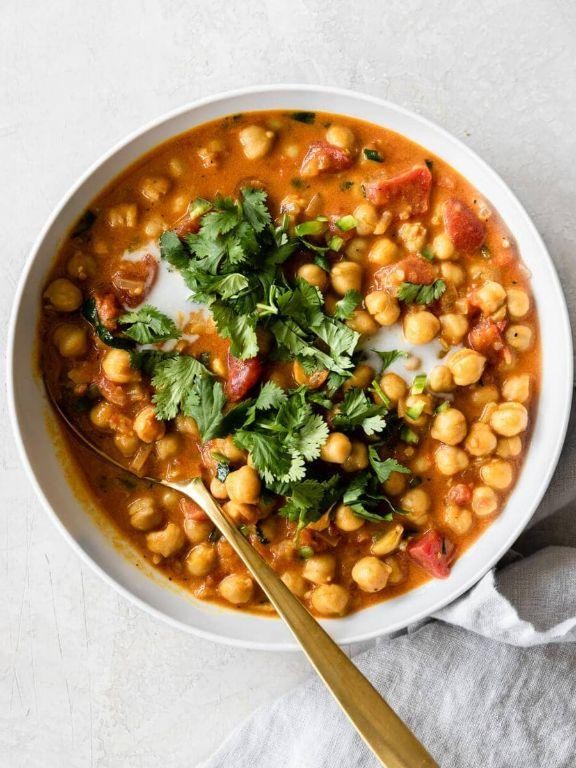
Perfect for those busy weeknights when you want something comforting yet healthy, this coconut chickpea curry has become my go-to dinner solution. I first discovered this recipe during a rainy evening when my pantry was looking sparse, and now it’s the dish my family requests most often.
5
servings15
minutes26
minutesIngredients
- 2 tbsp coconut oil
- 1 medium yellow onion, diced
- 3 cloves garlic, minced
- 1 tbsp fresh ginger, grated
- 1 tbsp curry powder
- 1 tsp ground turmeric
- 1/4 tsp cayenne pepper
- 2 (15 oz) cans chickpeas, drained and rinsed
- 1 (14 oz) can diced tomatoes
- 1 (14 oz) can coconut milk
- 1 cup vegetable broth
- 1 tsp salt
- 1/4 cup fresh cilantro, chopped
- 2 cups cooked basmati rice
Instructions
- Heat 2 tbsp coconut oil in a large pot over medium heat until shimmering.
- Add 1 diced yellow onion and cook for 5 minutes, stirring occasionally, until translucent.
- Stir in 3 minced garlic cloves and 1 tbsp grated ginger, cooking for 1 minute until fragrant.
- Sprinkle in 1 tbsp curry powder, 1 tsp turmeric, and 1/4 tsp cayenne pepper, toasting the spices for 30 seconds to deepen their flavor.
- Add 2 cans of drained chickpeas, stirring to coat with the spice mixture.
- Pour in 1 can diced tomatoes, 1 can coconut milk, and 1 cup vegetable broth, stirring to combine.
- Bring the curry to a simmer, then reduce heat to low and cover the pot.
- Cook for 20 minutes, stirring occasionally, until the sauce has thickened slightly.
- Stir in 1 tsp salt and taste, adjusting seasoning if needed.
- Remove from heat and stir in 1/4 cup chopped cilantro.
- Serve immediately over 2 cups cooked basmati rice.
So creamy and satisfying, this curry has the perfect balance of rich coconut milk and warm spices that meld together beautifully. The chickpeas maintain their texture while soaking up all the flavorful sauce, making each bite more delicious than the last. Try serving it with naan bread for dipping or topping with extra fresh cilantro for a bright, fresh finish.
Spicy Masala Grilled Chicken
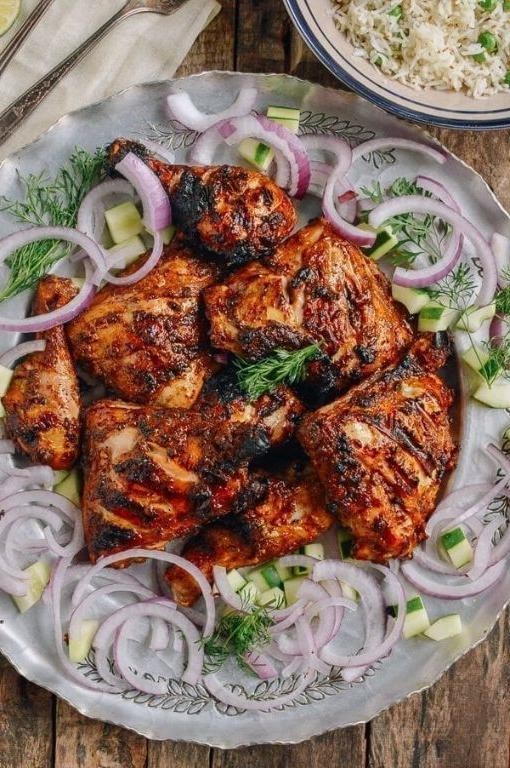
Oof, I can still remember the first time I tried making this spicy masala grilled chicken—my kitchen filled with such incredible aromas that my neighbors actually knocked to ask what I was cooking! Over the years, this recipe has become my go-to for summer gatherings, and I love how the bold spices create this beautiful crust while keeping the chicken incredibly juicy inside. It’s the kind of dish that feels fancy but is surprisingly simple to pull off, especially if you’re like me and tend to multitask while prepping the grill.
5
portions15
minutes16
minutesIngredients
– 2 lbs chicken thighs
– 1/4 cup plain yogurt
– 2 tbsp olive oil
– 1 tbsp lemon juice
– 2 tsp garam masala
– 1 tsp paprika
– 1/2 tsp cayenne pepper
– 1 tsp garlic powder
– 1 tsp salt
– 1/2 tsp black pepper
Instructions
1. In a medium bowl, combine 1/4 cup plain yogurt, 2 tbsp olive oil, 1 tbsp lemon juice, 2 tsp garam masala, 1 tsp paprika, 1/2 tsp cayenne pepper, 1 tsp garlic powder, 1 tsp salt, and 1/2 tsp black pepper.
2. Add 2 lbs chicken thighs to the bowl, coating each piece evenly with the marinade.
3. Cover the bowl with plastic wrap and refrigerate for at least 2 hours or up to overnight for deeper flavor penetration.
4. Preheat your grill to medium-high heat, approximately 400°F, and lightly oil the grates to prevent sticking.
5. Place the marinated chicken thighs on the grill, smooth side down, and close the lid.
6. Grill for 6-8 minutes until the bottoms develop visible grill marks and release easily when lifted.
7. Flip the chicken thighs using tongs and grill for another 6-8 minutes with the lid closed.
8. Check for doneness by inserting a meat thermometer into the thickest part of a thigh; it should read 165°F.
9. Transfer the grilled chicken to a clean plate and let it rest for 5 minutes before serving to allow juices to redistribute.
Very tender and packed with smoky heat, this chicken boasts a slightly crisp exterior that gives way to incredibly moist meat. I love serving it over a cool cucumber salad to balance the spice, or shredding it into tacos with a dollop of mint chutney for a fun twist.
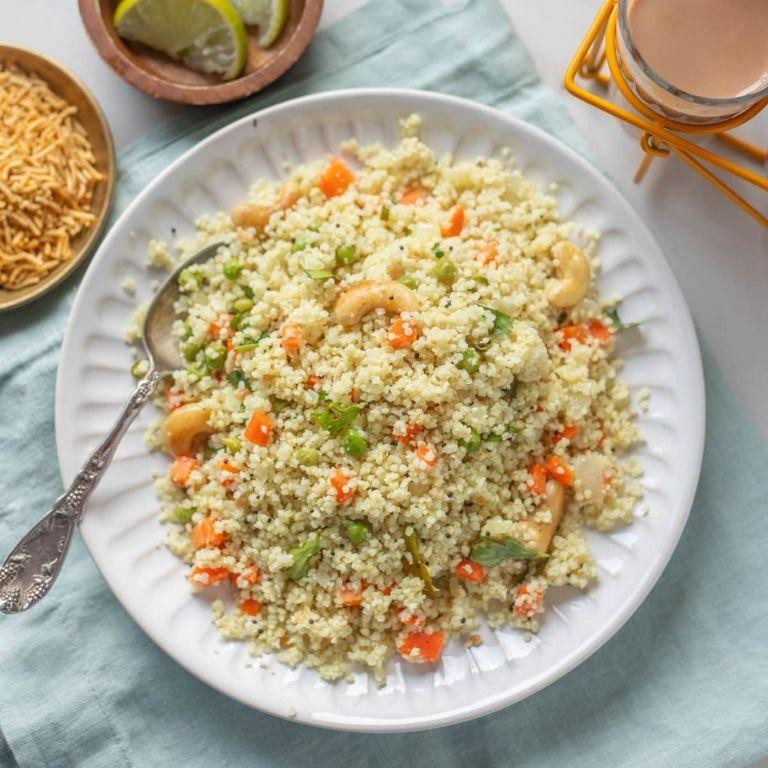
Quinoa Vegetable Khichdi
Zesty and wholesome, this quinoa vegetable khichdi has become my go-to comfort meal on busy weeknights. I first discovered this dish when trying to use up leftover vegetables in my fridge, and now it’s a regular in my rotation—perfect for those evenings when you want something nourishing without spending hours in the kitchen.
4
servings15
minutes29
minutesIngredients
– 1 cup quinoa
– 2 tbsp ghee
– 1 tsp cumin seeds
– 1 medium yellow onion, diced
– 2 cloves garlic, minced
– 1 inch fresh ginger, grated
– 1 cup mixed vegetables (carrots, peas, green beans), chopped
– 1/2 tsp turmeric powder
– 1/2 tsp red chili powder
– 4 cups water
– 1 tsp salt
– 1 tbsp fresh cilantro, chopped
Instructions
1. Rinse 1 cup quinoa under cold water in a fine-mesh strainer for 1 minute to remove bitterness.
2. Heat 2 tbsp ghee in a large pot over medium heat until shimmering.
3. Add 1 tsp cumin seeds and toast for 30 seconds until fragrant.
4. Sauté 1 medium diced yellow onion for 4 minutes until translucent.
5. Stir in 2 cloves minced garlic and 1 inch grated ginger, cooking for 1 minute until aromatic.
6. Add 1 cup chopped mixed vegetables and cook for 3 minutes until slightly softened.
7. Mix in 1/2 tsp turmeric powder and 1/2 tsp red chili powder, stirring for 30 seconds to bloom spices.
8. Add rinsed quinoa and toast for 2 minutes, stirring constantly.
9. Pour in 4 cups water and 1 tsp salt, bringing to a boil.
10. Reduce heat to low, cover pot, and simmer for 18 minutes until quinoa is tender and water is absorbed.
11. Turn off heat and let sit covered for 5 minutes to steam.
12. Fluff with fork and garnish with 1 tbsp chopped fresh cilantro.
Just perfect, this khichdi has a comforting porridge-like texture with fluffy quinoa grains and tender vegetables. The turmeric gives it a warm golden hue while the cumin adds earthy depth—I love serving it topped with a dollop of yogurt or alongside crispy papadums for contrasting textures.
Rice Flour Idli
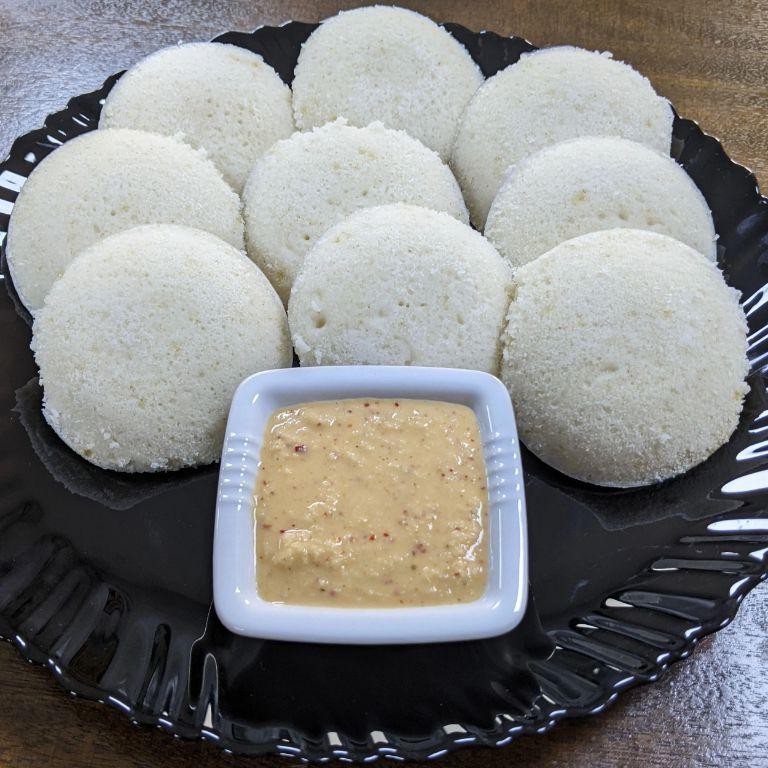
Sometimes the simplest foods bring the most comfort, and that’s exactly what happened when I discovered rice flour idli during my quest for quick, healthy breakfasts. I was tired of my usual oatmeal routine and wanted something light yet satisfying that wouldn’t keep me in the kitchen all morning. These steamed cakes have become my go-to when I need something nourishing but don’t want to spend hours cooking.
12
idlis25
minutes12
minutesIngredients
– 1 cup rice flour
– ¼ cup urad dal flour
– ½ cup plain yogurt
– ¾ cup water
– 1 tsp salt
– ½ tsp baking soda
– 1 tbsp vegetable oil
Instructions
1. Combine 1 cup rice flour, ¼ cup urad dal flour, and 1 tsp salt in a large mixing bowl.
2. Add ½ cup plain yogurt to the dry ingredients and mix gently with a whisk.
3. Gradually pour in ¾ cup water while stirring continuously to prevent lumps from forming.
4. Whisk the batter for 2 minutes until smooth and slightly frothy – this aeration helps create soft idlis.
5. Cover the bowl with a clean kitchen towel and let the batter rest at room temperature for 20 minutes to allow the flours to hydrate properly.
6. After resting, sprinkle ½ tsp baking soda over the batter and fold gently – do not overmix at this stage.
7. Grease idli molds or small ramekins with 1 tbsp vegetable oil, making sure to coat all surfaces thoroughly.
8. Fill each mold ¾ full with batter, leaving space for expansion during steaming.
9. Place the filled molds in a steamer over medium-high heat with water already boiling.
10. Steam the idlis for 12 minutes at a consistent medium-high heat, resisting the temptation to open the steamer lid.
11. Check doneness by inserting a toothpick into the center of an idli – it should come out clean with no batter sticking.
12. Remove the molds from the steamer and let them cool for 3 minutes before carefully unmolding.
The resulting idlis are incredibly soft and spongy with a delicate tang from the yogurt. I love how the subtle fermentation creates tiny air pockets that make them perfect for soaking up chutneys or sambar. For a fun twist, try serving them open-faced with a sunny-side-up egg on top – the runny yolk pairs beautifully with the mild flavor.
Stuffed Bell Peppers with Spiced Quinoa
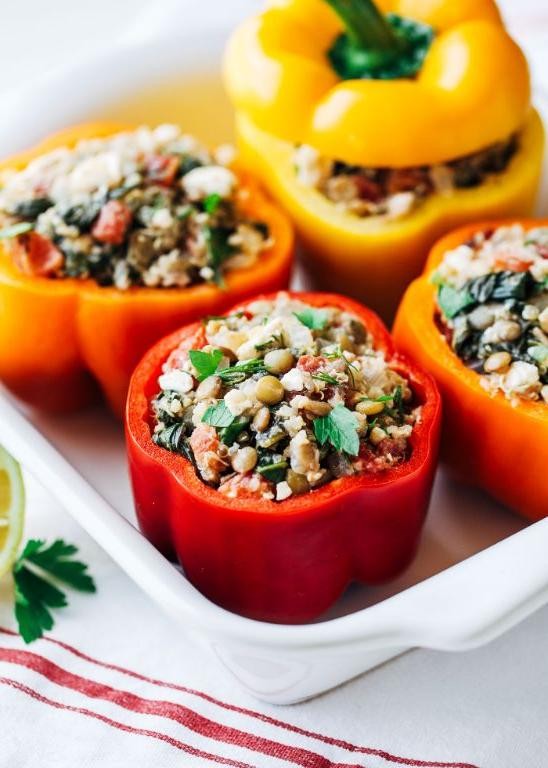
Every time I make these stuffed bell peppers, I’m reminded of my grandmother’s kitchen – the vibrant colors, the comforting aromas, and that satisfying moment when you cut into a perfectly cooked pepper. I’ve adapted her classic recipe using quinoa instead of rice, which gives it a wonderful nutty texture and makes it naturally gluten-free. These peppers have become my go-to weeknight dinner because they’re surprisingly simple to make yet feel special enough for company.
5
portions20
minutes55
minutesIngredients
– 4 large bell peppers
– 1 cup quinoa
– 2 cups vegetable broth
– 1 tablespoon olive oil
– 1 medium onion, diced
– 2 cloves garlic, minced
– 1 teaspoon ground cumin
– 1/2 teaspoon smoked paprika
– 1/4 teaspoon cayenne pepper
– 1 can (15 oz) black beans, rinsed and drained
– 1 cup corn kernels
– 1/2 cup shredded Monterey Jack cheese
– Salt to taste
Instructions
1. Preheat your oven to 375°F and lightly grease a baking dish that fits all four peppers snugly.
2. Cut the tops off the bell peppers and remove all seeds and membranes, keeping the pepper bodies intact.
3. Rinse the quinoa thoroughly in a fine-mesh strainer until the water runs clear to remove the natural bitterness.
4. In a medium saucepan, combine the rinsed quinoa and vegetable broth, then bring to a boil over high heat.
5. Reduce heat to low, cover the saucepan, and simmer for 15 minutes until the quinoa has absorbed all the liquid.
6. While the quinoa cooks, heat olive oil in a large skillet over medium heat until shimmering.
7. Add the diced onion and cook for 5-7 minutes, stirring occasionally, until translucent and fragrant.
8. Stir in the minced garlic and cook for 1 minute until aromatic but not browned.
9. Add the ground cumin, smoked paprika, and cayenne pepper to the skillet, toasting the spices for 30 seconds to release their oils.
10. Mix in the cooked quinoa, black beans, and corn kernels, stirring until well combined and heated through.
11. Season the filling mixture with salt, then stir in half of the shredded Monterey Jack cheese.
12. Spoon the quinoa mixture evenly into the prepared bell peppers, packing it down gently.
13. Arrange the stuffed peppers in the greased baking dish and sprinkle the remaining cheese over the tops.
14. Cover the baking dish with aluminum foil and bake at 375°F for 25 minutes.
15. Remove the foil and continue baking for another 10-15 minutes until the peppers are tender and the cheese is golden brown.
16. Let the stuffed peppers rest for 5 minutes before serving to allow the filling to set properly.
Perfectly tender peppers give way to a fluffy, spiced quinoa filling that’s both hearty and satisfying. The smoked paprika adds a subtle smokiness that complements the sweet corn and earthy black beans beautifully. I love serving these with a dollop of cool Greek yogurt or avocado slices for contrast, and they make fantastic leftovers for lunch the next day.
Gluten-Free Malai Kofta

Yesterday, I was craving something rich and comforting but needed to keep it gluten-free for my sister’s visit. That’s when I remembered this incredible Malai Kofta recipe I perfected last winter—it’s become my go-to for impressing guests without stressing about dietary restrictions. The creamy sauce and tender koftas always feel like a warm hug in a bowl.
12
koftas15
minutes15
minutesIngredients
– 2 cups grated paneer
– 1/2 cup grated potato
– 1/4 cup cornstarch
– 1/2 tsp salt
– 2 tbsp vegetable oil
– 1 medium onion, chopped
– 2 cloves garlic, minced
– 1 inch ginger, grated
– 1 tsp garam masala
– 1/2 tsp turmeric
– 1/4 tsp cayenne pepper
– 1 cup tomato puree
– 1/2 cup heavy cream
– 1/4 cup water
– 2 tbsp chopped cilantro
Instructions
1. Combine 2 cups grated paneer, 1/2 cup grated potato, 1/4 cup cornstarch, and 1/2 tsp salt in a large bowl.
2. Mix thoroughly until the ingredients form a cohesive dough that holds together when pressed.
3. Shape the mixture into 12 equal-sized balls, rolling them firmly between your palms. (Tip: Lightly wet your hands to prevent sticking.)
4. Heat 2 tbsp vegetable oil in a deep skillet over medium heat until it shimmers.
5. Carefully place the kofta balls in the hot oil and fry for 3-4 minutes, turning occasionally until golden brown on all sides.
6. Remove the fried koftas with a slotted spoon and drain on paper towels.
7. In the same skillet, sauté 1 chopped onion over medium heat for 5 minutes until translucent.
8. Add 2 cloves minced garlic and 1 inch grated ginger, cooking for 1 minute until fragrant.
9. Stir in 1 tsp garam masala, 1/2 tsp turmeric, and 1/4 tsp cayenne pepper, toasting the spices for 30 seconds.
10. Pour in 1 cup tomato puree and cook for 4 minutes, stirring frequently until the oil separates from the mixture.
11. Add 1/2 cup heavy cream and 1/4 cup water, bringing the sauce to a gentle simmer over low heat. (Tip: Don’t boil vigorously or the cream may curdle.)
12. Carefully place the fried koftas into the simmering sauce and cook for 2 minutes to heat through.
13. Stir in 2 tbsp chopped cilantro just before serving. (Tip: Reserve some cilantro for garnish to keep it fresh-looking.)
This Malai Kofta delivers the most luxurious contrast—the koftas stay wonderfully soft inside their crisp coating while soaking up the spiced cream sauce. That creamy, mildly spiced gravy pairs beautifully with fluffy basmati rice or warm gluten-free naan for dipping. Try serving it in shallow bowls to showcase the golden koftas floating in that vibrant orange sauce—it always makes dinner feel extra special.
Vegetable Pulao with Brown Rice
Every time I want a comforting meal that feels both nourishing and satisfying, I turn to this vegetable pulao with brown rice. It’s become my go-to weeknight dinner because it’s packed with flavor, easy to customize with whatever veggies I have on hand, and always fills my kitchen with the most amazing aroma.
5
servings15
minutes46
minutesIngredients
- 1 cup brown basmati rice
- 2 tablespoons olive oil
- 1 medium onion, chopped
- 2 cloves garlic, minced
- 1 teaspoon cumin seeds
- 1 teaspoon ground coriander
- 1/2 teaspoon turmeric powder
- 1/4 teaspoon cayenne pepper
- 1 large carrot, diced
- 1 cup green beans, chopped
- 1/2 cup frozen peas
- 2 cups vegetable broth
- 1/2 teaspoon salt
Instructions
- Rinse 1 cup brown basmati rice under cold water until the water runs clear, which helps remove excess starch for fluffier rice.
- Heat 2 tablespoons olive oil in a large pot over medium heat for 1 minute.
- Add 1 chopped medium onion and cook for 4-5 minutes until translucent, stirring occasionally.
- Add 2 minced garlic cloves and cook for 1 minute until fragrant.
- Add 1 teaspoon cumin seeds and toast for 30 seconds until they sizzle and release their aroma.
- Stir in 1 teaspoon ground coriander, 1/2 teaspoon turmeric powder, and 1/4 teaspoon cayenne pepper, toasting the spices for 30 seconds to deepen their flavor.
- Add 1 diced large carrot and 1 cup chopped green beans, cooking for 3 minutes until slightly softened.
- Add the rinsed brown rice and stir to coat with the spice mixture for 1 minute.
- Pour in 2 cups vegetable broth and add 1/2 teaspoon salt, stirring to combine.
- Bring the mixture to a boil over high heat, then immediately reduce to low heat and cover the pot tightly.
- Simmer for 35 minutes without lifting the lid, which allows the rice to steam properly and absorb all the liquid.
- Remove from heat and stir in 1/2 cup frozen peas, letting the residual heat thaw them for 5 minutes.
- Fluff the pulao with a fork before serving to separate the grains evenly.
Perfectly fluffy with each grain of brown rice distinct and tender, this pulao delivers warm spices that mingle beautifully with the sweet carrots and crisp-tender green beans. I love serving it with a dollop of Greek yogurt and a sprinkle of fresh cilantro, or packing it cold for a satisfying next-day lunch that tastes even better as the flavors meld together.
Butternut Squash Soup with Garam Masala

Wandering through the farmer’s market last weekend, I spotted those gorgeous butternut squashes and knew exactly what I wanted to make – this warming soup that’s become my go-to comfort food when the weather turns crisp. There’s something magical about how the garam masala transforms this classic fall soup into something truly special.
3
servings25
minutes75
minutesIngredients
- 1 large butternut squash
- 2 tablespoons olive oil
- 1 medium yellow onion
- 3 cloves garlic
- 4 cups vegetable broth
- 1 cup heavy cream
- 2 teaspoons garam masala
- 1 teaspoon salt
- 1/2 teaspoon black pepper
- 2 tablespoons butter
Instructions
- Preheat your oven to 400°F and line a baking sheet with parchment paper.
- Cut the butternut squash in half lengthwise and scoop out the seeds with a spoon.
- Brush the cut sides of the squash with 1 tablespoon of olive oil and place them cut-side down on the baking sheet.
- Roast the squash for 45-50 minutes until the flesh is completely tender when pierced with a fork.
- While the squash roasts, dice the yellow onion and mince the garlic cloves.
- Heat the remaining 1 tablespoon of olive oil in a large pot over medium heat.
- Sauté the diced onion for 5-7 minutes until translucent and slightly golden around the edges.
- Add the minced garlic and cook for 1 more minute until fragrant.
- Once the squash is cool enough to handle, scoop the flesh from the skins into the pot.
- Pour in the vegetable broth and bring the mixture to a gentle boil.
- Reduce heat to low and simmer for 15 minutes to allow flavors to meld.
- Carefully transfer the soup to a blender in batches and blend until completely smooth.
- Return the blended soup to the pot and stir in the heavy cream, garam masala, salt, and black pepper.
- Add the butter and stir until fully melted and incorporated.
- Heat the soup over low heat for 5 more minutes, stirring occasionally, until heated through.
My favorite thing about this soup is how the velvety texture contrasts with the warm, aromatic spices. The garam masala adds this incredible depth that makes each spoonful more interesting than the last. Sometimes I’ll swirl in a dollop of Greek yogurt and top with toasted pumpkin seeds for extra crunch – it’s absolutely divine served with crusty bread for dipping.
Gluten-Free Sweet Potato Chaat
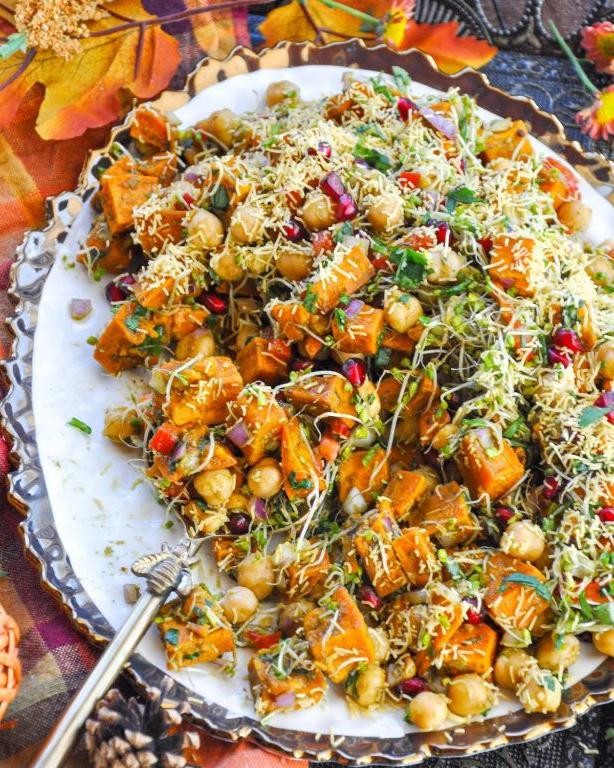
Gluten-free sweet potato chaat has become my go-to weeknight dinner hack when I’m craving something vibrant but don’t want to spend hours in the kitchen. Growing up, my mom always added a secret pinch of chaat masala to everything, and now I understand why—it transforms simple ingredients into magic. This version came about when I had leftover roasted sweet potatoes and decided to get creative instead of making the usual mash.
2
servings15
minutes30
minutesIngredients
– 2 large sweet potatoes
– 2 tbsp olive oil
– 1 tsp cumin seeds
– 1 medium red onion
– 1 medium tomato
– 1/4 cup fresh cilantro
– 2 tbsp lemon juice
– 1 tsp chaat masala
– 1/2 tsp red chili powder
– 1/4 tsp black salt
– 1/4 cup plain yogurt
Instructions
1. Preheat your oven to 400°F and line a baking sheet with parchment paper.
2. Peel 2 large sweet potatoes and cut them into 1-inch cubes.
3. Toss the sweet potato cubes with 2 tablespoons of olive oil until evenly coated.
4. Spread the sweet potatoes in a single layer on the prepared baking sheet.
5. Roast for 25-30 minutes until the edges are caramelized and a fork pierces easily through the center.
6. While the sweet potatoes roast, finely dice 1 medium red onion and 1 medium tomato.
7. Chop 1/4 cup of fresh cilantro leaves, setting aside a few sprigs for garnish.
8. Heat a small skillet over medium heat and toast 1 teaspoon of cumin seeds for 30 seconds until fragrant.
9. Transfer the roasted sweet potatoes to a large mixing bowl.
10. Add the diced onion, tomato, and toasted cumin seeds to the bowl.
11. Drizzle 2 tablespoons of lemon juice over the mixture.
12. Sprinkle 1 teaspoon of chaat masala, 1/2 teaspoon of red chili powder, and 1/4 teaspoon of black salt evenly.
13. Gently toss all ingredients until well combined.
14. Whisk 1/4 cup of plain yogurt until smooth in a small bowl.
15. Drizzle the whisked yogurt over the chaat just before serving.
16. Garnish with reserved cilantro sprigs.
Every bite delivers that perfect contrast between the creamy sweet potatoes and the zesty chaat masala. I love how the black salt adds that distinctive tang that makes this dish so addictive. Sometimes I’ll serve it in individual bowls topped with extra yogurt and a sprinkle of sev for added crunch.
Conclusion
Just imagine the vibrant flavors waiting in these 29 gluten-free Indian dishes! From comforting curries to crispy snacks, there’s something for every craving. I’d love to hear which recipes become your new favorites—leave a comment below and share this roundup on Pinterest so others can discover these delicious gluten-free options too. Happy cooking!


