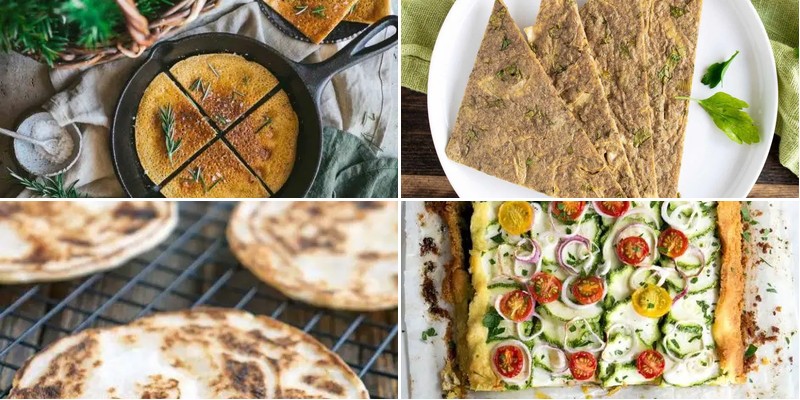
Baking delicious gluten-free flatbreads doesn’t have to be complicated! Whether you’re looking for quick weeknight dinners, comforting weekend treats, or creative ways to enjoy your favorite toppings, we’ve gathered 23 amazing recipes that will satisfy every craving. Get ready to discover new favorites that are surprisingly easy to make and packed with flavor—let’s dive into these tasty flatbread ideas!
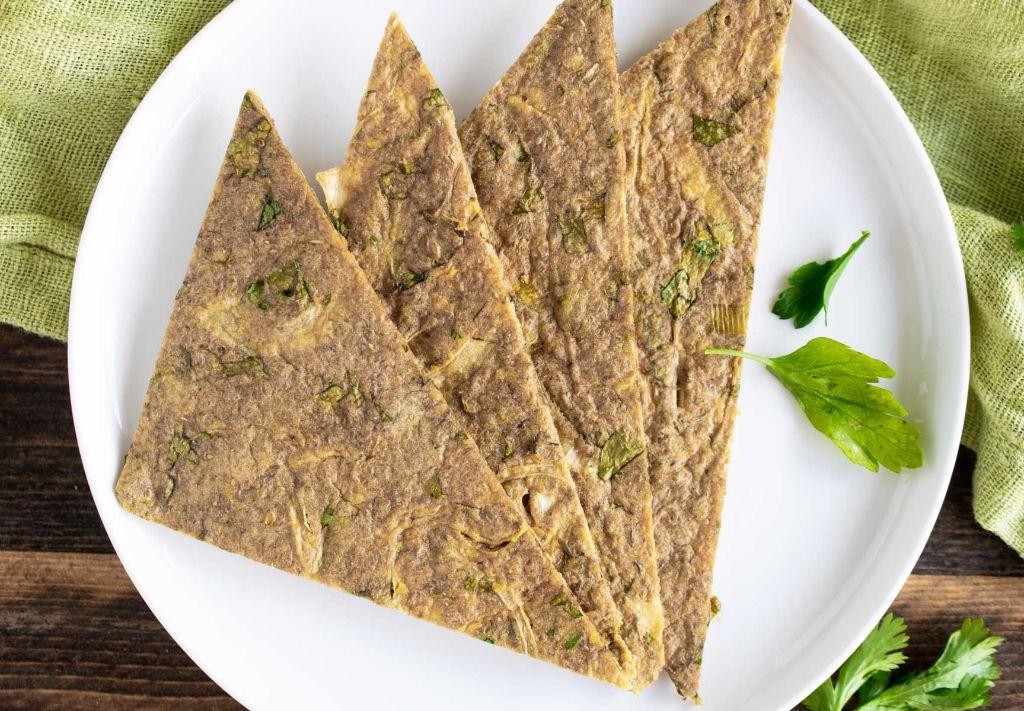
Herbed Chickpea Flatbread
Offering a sophisticated twist on traditional flatbreads, this herbed chickpea version combines delicate textures with aromatic flavors that elevate any meal. The nutty undertones of chickpea flour create a beautifully tender canvas for fresh herbs to shine through. Perfect as an appetizer or accompaniment, this flatbread brings Mediterranean elegance to your table with minimal effort.
1
flatbread10
minutes20
minutesIngredients
Chickpea flour – 1 cup
Water – ¾ cup
Olive oil – 2 tbsp
Fresh rosemary – 1 tbsp, chopped
Salt – ½ tsp
Baking powder – 1 tsp
Instructions
1. Preheat your oven to 375°F and line a baking sheet with parchment paper.
2. Whisk together 1 cup chickpea flour, ½ tsp salt, and 1 tsp baking powder in a medium bowl until fully combined.
3. Gradually pour ¾ cup water into the dry ingredients while stirring continuously to prevent lumps from forming.
4. Add 2 tbsp olive oil and 1 tbsp chopped fresh rosemary to the batter, then mix until the consistency becomes smooth and pourable.
5. Pour the batter onto the prepared baking sheet and use a spatula to spread it into an even ¼-inch thick rectangle.
6. Bake for 18-20 minutes at 375°F until the edges turn golden brown and the center feels firm to the touch.
7. Transfer the flatbread to a wire rack and let it cool for 5 minutes before slicing to maintain structural integrity.
8. Cut into wedges or squares using a sharp knife for clean edges. The flatbread emerges with a crisp exterior that gives way to a surprisingly moist, cake-like interior, while the rosemary infuses each bite with earthy fragrance. Serve warm alongside roasted vegetables or topped with creamy labneh for a stunning contrast of textures.
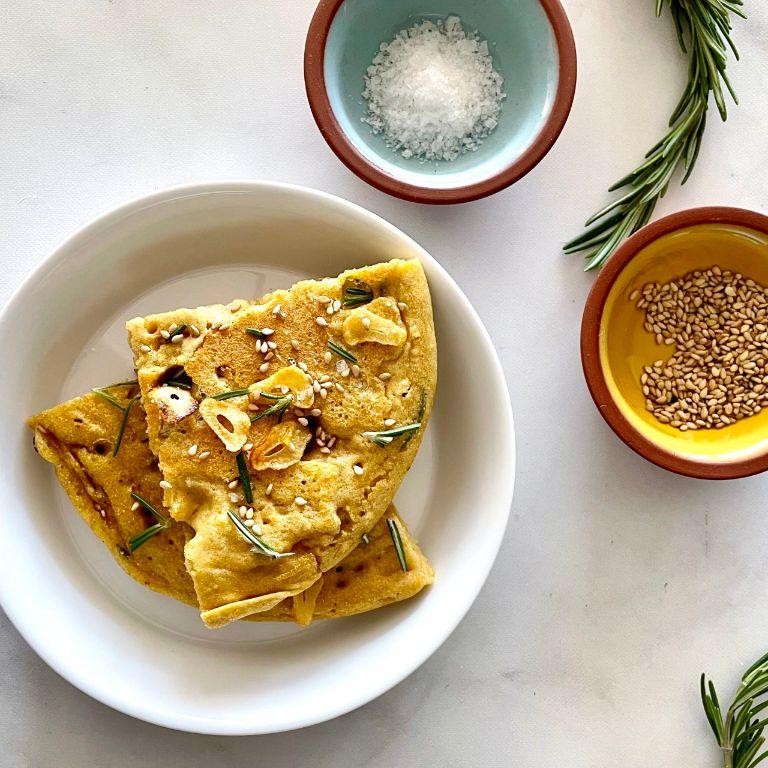
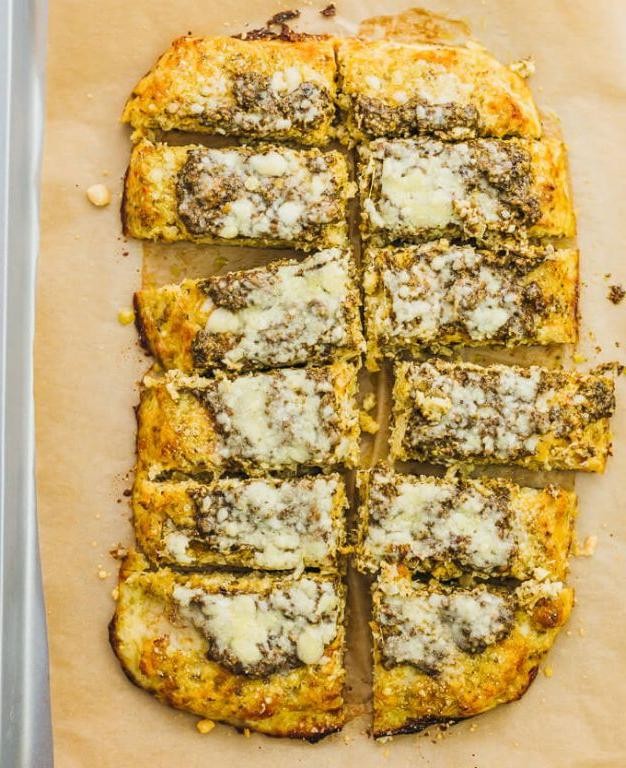
Garlic and Rosemary Socca

Beneath its rustic simplicity lies a canvas of golden perfection, this garlic and rosemary socca emerges from the oven with a crisp exterior that gives way to a tender, custardy interior. Infused with the earthy fragrance of rosemary and the gentle warmth of roasted garlic, this Provençal-inspired flatbread transforms humble chickpea flour into something truly extraordinary. Each bite delivers a harmonious balance of nutty flavors and aromatic herbs that will transport your senses straight to the French countryside.
3
portions10
minutes18
minutesIngredients
Chickpea flour – 1 cup
Water – 1 cup
Olive oil – 3 tbsp
Garlic – 2 cloves, minced
Fresh rosemary – 1 tbsp, finely chopped
Salt – ½ tsp
Black pepper – ¼ tsp
Instructions
1. Preheat your oven to 450°F and place a 10-inch cast iron skillet inside to heat for 15 minutes.
2. Whisk together 1 cup chickpea flour, ½ tsp salt, and ¼ tsp black pepper in a medium bowl.
3. Gradually pour in 1 cup water while continuously whisking to prevent lumps from forming.
4. Stir in 2 tbsp olive oil until the batter becomes smooth and slightly thickened.
5. Fold in 2 minced garlic cloves and 1 tbsp chopped fresh rosemary until evenly distributed.
6. Carefully remove the hot skillet from the oven and immediately pour in the remaining 1 tbsp olive oil, swirling to coat the bottom.
7. Pour the batter into the hot skillet, tilting to create an even layer about ¼-inch thick.
8. Bake at 450°F for 12-15 minutes until the edges are deeply golden and the center is set.
9. Turn on the broiler and cook for 1-2 minutes until the surface develops attractive blistered spots.
10. Remove from oven and let rest for 5 minutes before slicing into wedges. For optimal crispness, serve the socca immediately while still warm from the oven. The hot skillet creates that essential crispy crust that defines authentic socca, while the brief broiling at the end adds beautiful color and texture variation. Fresh socca develops its characteristic custardy center when the batter rests briefly before baking, allowing the chickpea flour to fully hydrate. Fragrant with roasted garlic and woodsy rosemary, this socca boasts a delightfully crisp edge that contrasts beautifully with its soft, almost creamy interior. Serve it torn into rustic pieces alongside a vibrant salad, or top with roasted vegetables and a drizzle of olive oil for an elegant appetizer that celebrates simple, honest ingredients.
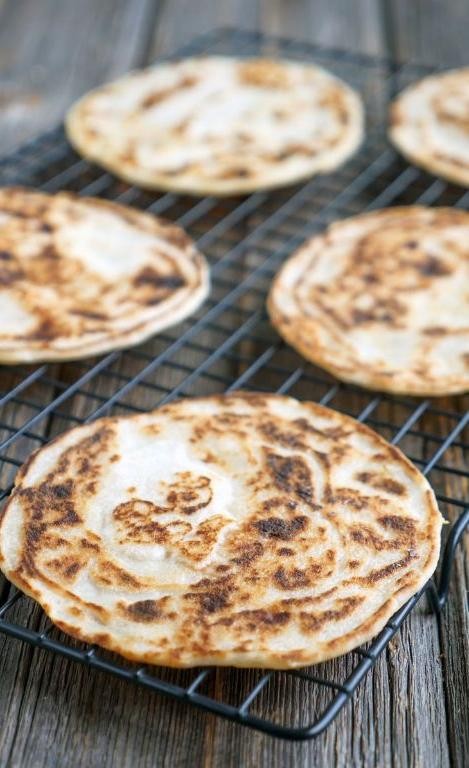
Almond Flour Naan
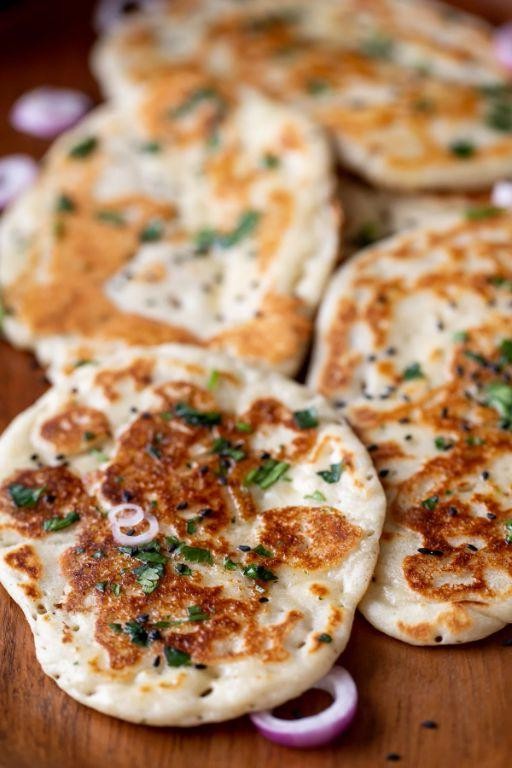
Glistening with golden-brown blisters and boasting a tender, pliable texture, almond flour naan offers a gluten-free alternative to traditional flatbread that doesn’t compromise on flavor or satisfaction. Crafted from just a handful of simple ingredients, this versatile bread pairs beautifully with curries, dips, or stands alone as a wholesome snack. Its subtle nutty undertones and soft, chewy interior make it an elegant addition to any meal.
4
portions10
minutes10
minutesIngredients
Almond flour – 2 cups
Egg – 1 large
Plain Greek yogurt – ½ cup
Baking powder – 1 tsp
Salt – ½ tsp
Ghee – 2 tbsp
Instructions
1. Combine 2 cups almond flour, 1 tsp baking powder, and ½ tsp salt in a medium bowl, whisking thoroughly to eliminate any lumps.
2. Add 1 large egg and ½ cup plain Greek yogurt to the dry ingredients, mixing with a spatula until a cohesive dough forms.
3. Divide the dough into 4 equal portions and roll each into a smooth ball between your palms.
4. Place one dough ball between two sheets of parchment paper and press into a ¼-inch thick oval using your hands or a rolling pin.
5. Heat a cast-iron skillet over medium-high heat until a drop of water sizzles immediately upon contact.
6. Carefully peel the parchment from one side of the naan and place it dough-side down in the hot skillet.
7. Cook for 90 seconds until the bottom develops deep golden spots and the edges appear set.
8. Flip the naan using a spatula and cook for another 60 seconds until the second side is lightly browned.
9. Remove the naan from the skillet and immediately brush the top with ½ tbsp ghee using a pastry brush.
10. Repeat steps 4-9 with the remaining dough balls, stacking the finished naan under a clean kitchen towel to keep them warm and pliable.
Hearty yet delicate, these almond flour naan emerge with a satisfying chew and subtle nuttiness that complements both robust stews and delicate dips. Their slightly crisp exterior gives way to a tender crumb perfect for scooping up saucy dishes or enjoying alongside a simple salad. For an elegant twist, sprinkle with za’atar before serving or use as a base for open-faced sandwiches with roasted vegetables and herbed yogurt.
Buckwheat Flatbread Wraps
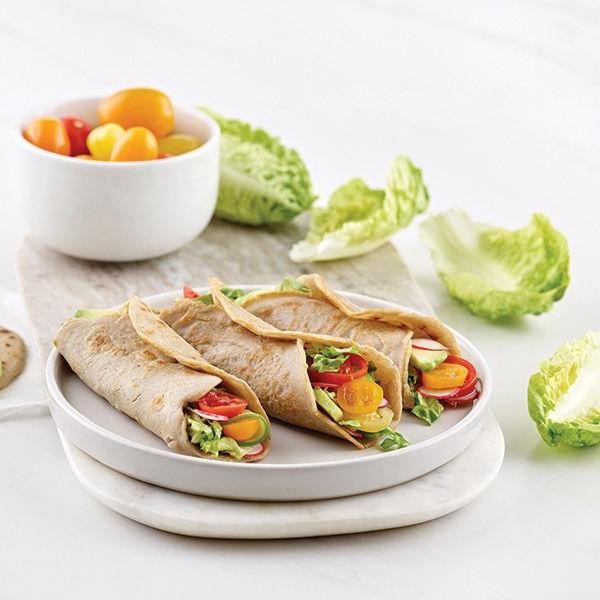
Kneading tradition with modern simplicity, these buckwheat flatbread wraps offer earthy sophistication in every fold. Their nutty flavor profile and delicate texture elevate even the most humble fillings into elegant meals. Perfect for both casual lunches and refined gatherings, these wraps bring artisanal charm to your table with minimal effort.
3
portions10
minutes10
minutesIngredients
Buckwheat flour – 1 cup
Water – ¾ cup
Salt – ½ tsp
Olive oil – 2 tbsp
Instructions
1. Combine 1 cup buckwheat flour and ½ tsp salt in a medium mixing bowl.
2. Gradually pour in ¾ cup warm water while stirring continuously with a fork.
3. Knead the mixture for 3 minutes until a smooth, pliable dough forms.
4. Divide the dough into 4 equal portions and roll each into a ball.
5. Lightly dust a clean surface with buckwheat flour to prevent sticking.
6. Roll one dough ball into an 8-inch circle using a rolling pin.
7. Heat a non-stick skillet over medium-high heat until water droplets sizzle immediately.
8. Brush the skillet with ½ tbsp olive oil using a pastry brush.
9. Cook the first flatbread for 90 seconds until bubbles form on the surface.
10. Flip the flatbread using a spatula and cook for another 60 seconds until golden spots appear.
11. Transfer the cooked flatbread to a plate and cover with a clean kitchen towel to keep warm.
12. Repeat steps 6-11 with remaining dough balls, brushing the skillet with additional olive oil between each.
Zesty and slightly nutty, these wraps boast a tender yet sturdy texture that holds fillings beautifully without tearing. Their subtle earthiness pairs wonderfully with roasted vegetables, grilled chicken, or fresh herb salads. For an elegant presentation, roll them tightly and slice diagonally to reveal colorful layered cross-sections.
Cauliflower Crusted Flatbread
Unveiling a sophisticated twist on traditional flatbread, this cauliflower-crusted version offers a delicate, gluten-free alternative that marries elegance with wholesome ingredients. Its golden, crisp exterior gives way to a surprisingly tender interior, making it an ideal canvas for both simple and elaborate toppings. Perfect for entertaining or a refined weeknight meal, this recipe transforms humble cauliflower into something truly extraordinary.
1
flatbread15
minutes30
minutesIngredients
Cauliflower – 1 medium head
Egg – 1 large
Parmesan cheese – ½ cup grated
Salt – ½ tsp
Black pepper – ¼ tsp
Olive oil – 1 tbsp
Instructions
1. Preheat your oven to 400°F and line a baking sheet with parchment paper.
2. Cut the cauliflower into florets and pulse in a food processor until it resembles fine rice-like crumbs.
3. Transfer the cauliflower rice to a microwave-safe bowl and microwave on high for 5 minutes to steam and soften it.
4. Place the steamed cauliflower in a clean kitchen towel and squeeze firmly to remove all excess moisture—this crucial step ensures a crisp crust.
5. In a mixing bowl, combine the dried cauliflower, egg, Parmesan cheese, salt, and black pepper until a cohesive dough forms.
6. Shape the dough into a ball and place it on the prepared baking sheet.
7. Press the dough into an even ¼-inch thick circle using your hands or a rolling pin.
8. Brush the surface lightly with olive oil to promote even browning during baking.
9. Bake for 20–25 minutes until the edges are golden brown and the center feels firm to the touch.
10. For extra crispness, broil the flatbread on high for 2–3 minutes, watching carefully to prevent burning.
11. Remove from the oven and let it rest for 5 minutes before slicing to allow the structure to set.
This cauliflower crusted flatbread delivers a satisfying crunch with subtle nutty notes from the Parmesan. The texture remains remarkably pliable, making it perfect for folding around fillings or topping with roasted vegetables and fresh herbs. Try serving it warm with a drizzle of truffle oil and arugula for an effortlessly elegant appetizer.
Sweet Potato Flatbread

Elegant in its simplicity yet profound in flavor, sweet potato flatbread transforms humble ingredients into a sophisticated canvas for culinary creativity. This versatile bread boasts a subtle sweetness and tender crumb that pairs beautifully with both savory and sweet accompaniments, making it an exceptional addition to any table. With its warm golden hue and delicate texture, it elevates everyday meals into memorable dining experiences.
4
portions15
minutes65
minutesIngredients
Sweet potato – 1 large (about 1 cup mashed)
All-purpose flour – 1½ cups
Olive oil – 2 tbsp
Salt – ½ tsp
Water – ¼ cup
Instructions
1. Preheat your oven to 400°F and line a baking sheet with parchment paper.
2. Pierce the sweet potato several times with a fork and bake for 45-50 minutes until completely tender when pierced with a knife.
3. Allow the sweet potato to cool for 15 minutes, then scoop out 1 cup of flesh into a mixing bowl, discarding the skin.
4. Mash the sweet potato thoroughly with a fork until no lumps remain.
5. Add the flour, olive oil, and salt to the mashed sweet potato.
6. Gradually add water while mixing with your hands until a soft dough forms.
7. Knead the dough on a lightly floured surface for 3-4 minutes until smooth and elastic.
8. Divide the dough into 4 equal portions and roll each into a ball.
9. Roll each ball into a ¼-inch thick circle using a rolling pin.
10. Heat a dry skillet over medium-high heat for 2 minutes until hot.
11. Cook each flatbread for 2-3 minutes per side until golden brown spots appear and the bread puffs slightly.
12. Transfer cooked flatbreads to a wire rack to prevent sogginess.
Unbelievably soft with a delicate chew, this flatbread carries the subtle earthiness of sweet potato through every bite. Its slightly sweet undertones make it perfect for wrapping around grilled vegetables or spreading with creamy goat cheese and fresh herbs. For a delightful twist, try it toasted with honey and toasted pecans for an elegant breakfast treat.
Quinoa and Chia Seed Flatbread
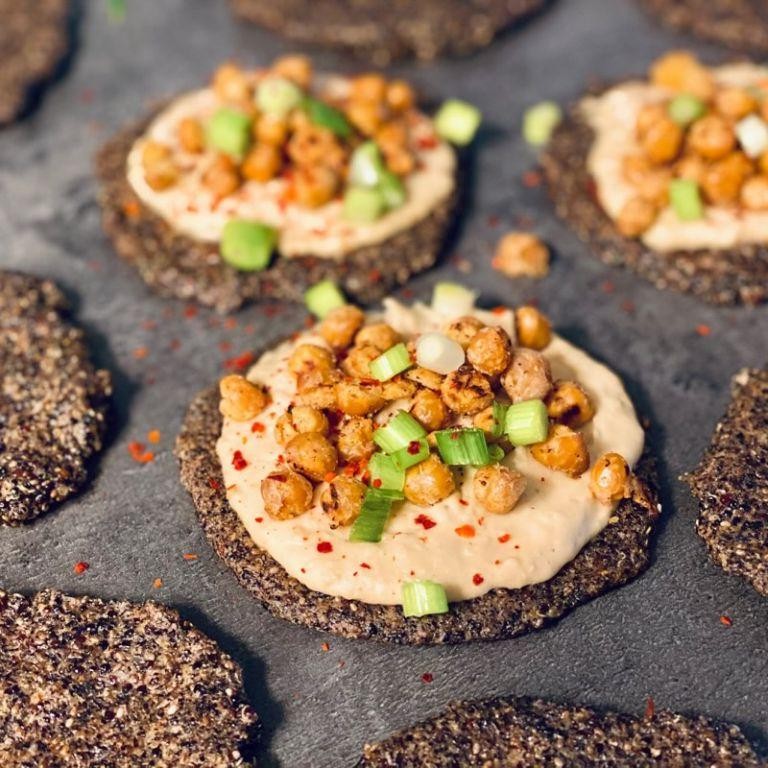
Nourishing and versatile, this quinoa and chia seed flatbread offers a delightful gluten-free alternative to traditional breads. Its delicate texture and nutty flavor profile make it an elegant base for both sweet and savory toppings. Crafted with simple, wholesome ingredients, it transforms everyday meals into something special.
5
portions15
minutes15
minutesIngredients
Quinoa flour – 1 cup
Chia seeds – 2 tbsp
Water – ¾ cup
Olive oil – 1 tbsp
Salt – ½ tsp
Instructions
1. Combine 1 cup quinoa flour, 2 tbsp chia seeds, and ½ tsp salt in a medium mixing bowl.
2. Gradually add ¾ cup water while stirring continuously to prevent lumps from forming.
3. Whisk the mixture for 2 minutes until the chia seeds begin to gel and the batter thickens slightly.
4. Let the batter rest for 10 minutes to allow the chia seeds to fully hydrate and create a cohesive dough.
5. Heat a non-stick skillet over medium-low heat (325°F) and lightly grease it with 1 tbsp olive oil.
6. Pour the batter into the skillet and use a spatula to spread it into an even ¼-inch thick circle.
7. Cook for 6-8 minutes until the edges appear dry and the bottom develops golden-brown spots.
8. Carefully flip the flatbread using a wide spatula when the surface looks matte rather than glossy.
9. Cook the second side for 5-7 minutes until firm to the touch and evenly golden.
10. Transfer to a wire rack to cool completely, which helps maintain its crisp exterior.
Remarkably light yet satisfyingly sturdy, this flatbread boasts a subtly crunchy crust with a tender, slightly chewy interior. Its nutty essence pairs beautifully with creamy avocado, smoked salmon, or a drizzle of honey for contrasting flavors. For an elegant presentation, cut into triangles and serve alongside Mediterranean dips or top with microgreens for added visual appeal.
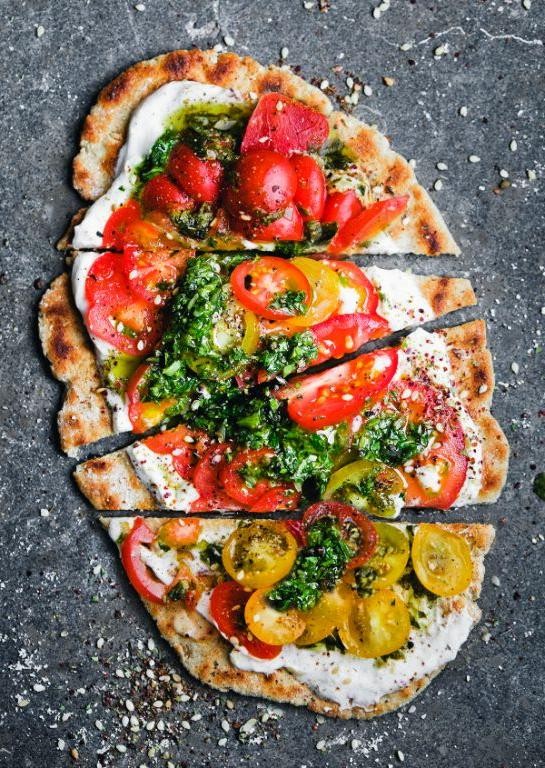
Avocado and Spinach Flatbread
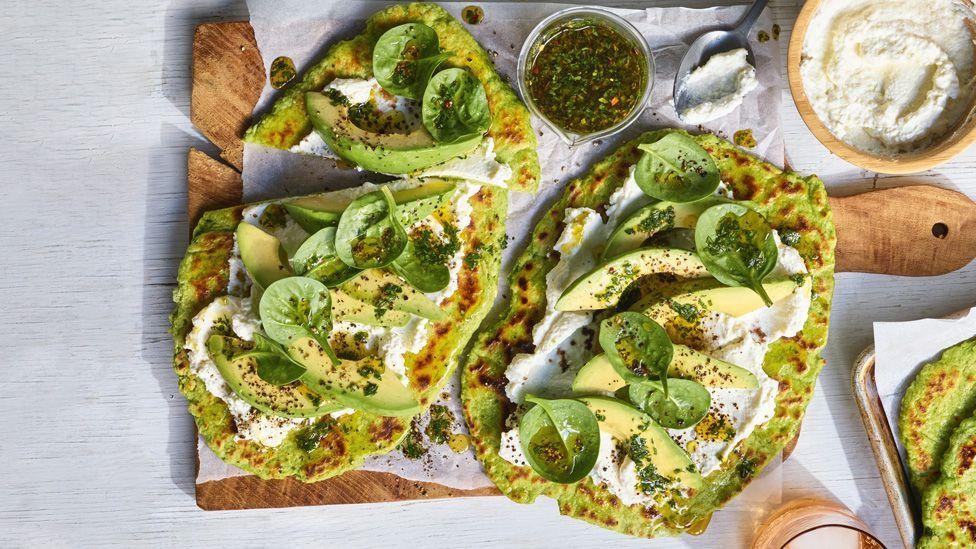
Gracefully bridging rustic tradition with contemporary wellness, this avocado and spinach flatbread transforms humble ingredients into an artful canvas. Golden-edged crust provides the perfect foundation for vibrant green toppings that celebrate freshness in every bite. Each element harmonizes to create a dish that feels both nourishing and indulgent.
1
servings10
minutes15
minutesIngredients
Flatbread – 1 piece
Avocado – 1 large
Spinach – 2 cups
Lemon juice – 1 tbsp
Garlic – 1 clove
Olive oil – 2 tbsp
Red pepper flakes – ½ tsp
Salt – ¼ tsp
Instructions
1. Preheat your oven to 400°F and place a baking sheet inside to heat.
2. Brush the flatbread evenly with 1 tablespoon of olive oil, ensuring coverage to the edges.
3. Place the oiled flatbread directly onto the preheated baking sheet and bake for 8-10 minutes until the edges turn golden brown and crisp.
4. While the flatbread bakes, mash the avocado in a medium bowl until smooth but slightly chunky.
5. Stir 1 tablespoon of lemon juice into the mashed avocado to prevent browning.
6. Mince 1 clove of garlic and mix it thoroughly into the avocado mixture.
7. Heat the remaining 1 tablespoon of olive oil in a skillet over medium heat.
8. Add 2 cups of spinach to the skillet and cook for 2-3 minutes until just wilted but still bright green.
9. Spread the avocado mixture evenly over the baked flatbread, leaving a ½-inch border around the edges.
10. Arrange the wilted spinach in an even layer over the avocado spread.
11. Sprinkle ¼ teaspoon of salt and ½ teaspoon of red pepper flakes evenly across the surface.
12. Return the assembled flatbread to the oven and bake for 3-4 minutes until warmed through.
Meticulously layered textures create a symphony of contrasts—the crisp crust yields to creamy avocado, while wilted spinach adds delicate structure. Bright lemon cuts through the richness, making each slice feel simultaneously light and satisfying. For an elegant presentation, garnish with microgreens or serve alongside a citrus-dressed arugula salad to complement the earthy notes.
Cassava Flour Tortillas
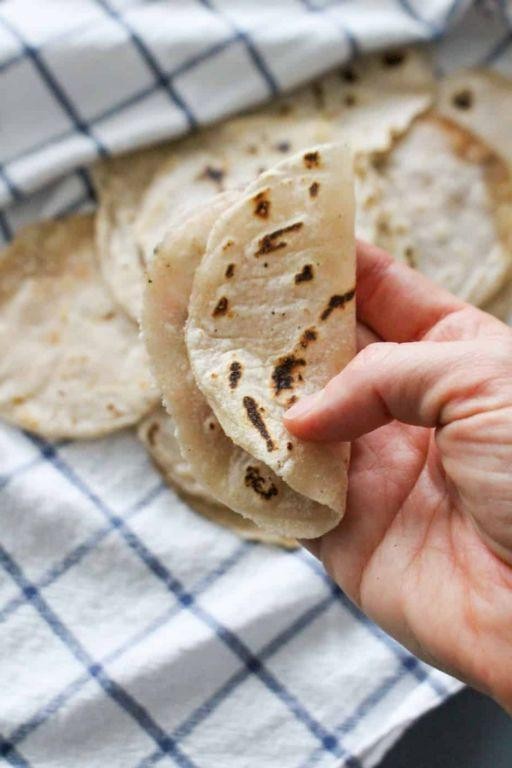
Glowing with rustic charm, cassava flour tortillas offer a naturally gluten-free alternative to traditional flatbreads that doesn’t compromise on texture or flavor. These pliable rounds possess a subtle nuttiness that beautifully complements both savory fillings and sweet accompaniments. Mastering their delicate balance requires precision, but the reward is a versatile staple worthy of any discerning kitchen.
2
portions10
minutes5
minutesIngredients
Cassava flour – 1 cup
Water – ½ cup
Salt – ¼ tsp
Olive oil – 2 tbsp
Instructions
1. Whisk together 1 cup cassava flour and ¼ tsp salt in a medium bowl until fully combined.
2. Create a well in the center of the dry ingredients and pour in 2 tbsp olive oil and ½ cup warm water (110°F).
3. Use a fork to gradually incorporate the wet ingredients into the dry mixture until a shaggy dough forms.
4. Knead the dough by hand for exactly 2 minutes on a clean surface until it becomes smooth and pliable.
5. Divide the dough into 4 equal portions and roll each into a tight ball between your palms.
6. Place one dough ball between two sheets of parchment paper and press with a flat plate to slightly flatten.
7. Roll the dough into a 7-inch circle using even pressure, rotating frequently to maintain uniform thickness.
8. Heat a dry cast-iron skillet over medium-high heat until water droplets sizzle immediately upon contact.
9. Carefully peel the top parchment from one tortilla and invert it into the hot skillet.
10. Cook for 45 seconds until the edges begin to lift and brown spots appear on the bottom surface.
11. Flip the tortilla using a thin spatula and cook for another 30 seconds until puffed slightly.
12. Transfer the cooked tortilla to a clean kitchen towel and cover to keep warm while repeating with remaining dough.
Outstandingly flexible with a tender chew, these tortillas boast a delicate earthy flavor that enhances rather than overpowers fillings. Their slightly speckled surface provides visual texture that makes even simple bean and cheese preparations feel elevated. Consider using them as edible wrappers for breakfast tacos or as a base for sophisticated flatbread appetizers topped with roasted vegetables and crumbled goat cheese.
Coconut Flour Flatbread
Kindly consider this refined coconut flour flatbread, a delicate canvas that transforms simple ingredients into an elegant, grain-free delight perfect for sophisticated gatherings or quiet evenings. Its subtle tropical aroma and tender crumb structure make it exceptionally versatile for both sweet and savory applications. With just four essential components, this recipe achieves remarkable complexity through careful technique and precise execution.
5
flatbreads10
minutes20
minutesIngredients
Coconut flour – ½ cup
Eggs – 4 large
Coconut oil – 2 tbsp
Salt – ¼ tsp
Instructions
1. Preheat a non-stick skillet over medium-low heat (300°F surface temperature) for 8 minutes to ensure even cooking.
2. Crack 4 large eggs into a medium mixing bowl and whisk vigorously for 90 seconds until fully homogenized and slightly frothy.
3. Add ½ cup coconut flour to the egg mixture and immediately begin folding with a spatula to prevent clumping.
4. Incorporate 2 tbsp melted coconut oil into the batter using gentle folding motions until the oil is fully absorbed.
5. Sprinkle ¼ tsp salt evenly across the batter surface and mix for exactly 30 seconds until just combined.
6. Allow the batter to rest undisturbed for 5 minutes to let the coconut flour fully hydrate and thicken properly.
7. Test batter consistency: it should hold its shape when scooped but still spread slowly when poured.
8. Pour ¼ cup batter onto the preheated skillet and immediately use the back of a spoon to spread it into a 6-inch circle.
9. Cook the first side for 3-4 minutes until the edges appear dry and small bubbles form across the surface.
10. Carefully flip the flatbread using a thin spatula when the bottom shows golden-brown spots.
11. Cook the second side for 2-3 minutes until both sides display consistent golden coloration.
12. Transfer the finished flatbread to a wire rack to prevent steaming and maintain crisp edges.
This flatbread emerges with a remarkably tender, cake-like interior that contrasts beautifully with its delicate, slightly crisp exterior. The subtle coconut essence pairs exquisitely with smoked salmon and dill cream, or for a sweet variation, try it with mango chutney and toasted coconut flakes. Its flexible structure makes it ideal for elegant wraps or as a sophisticated base for canapés.
Zucchini and Carrot Flatbread
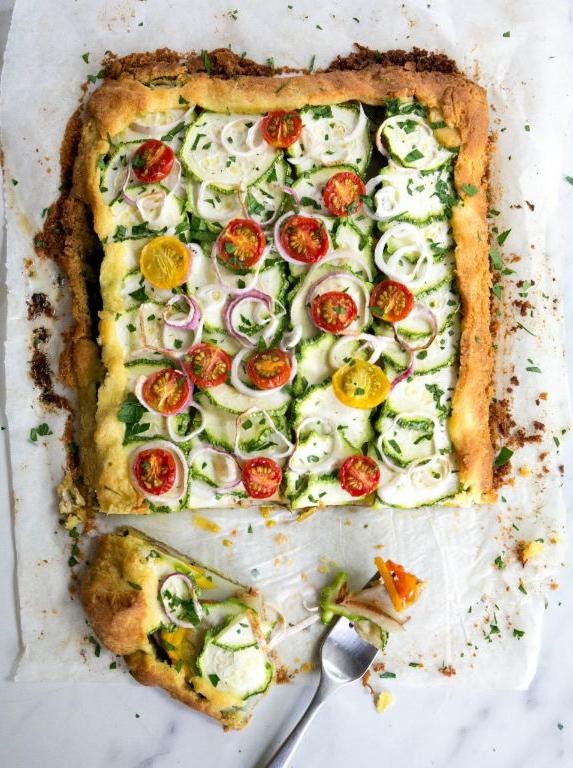
Mastering the art of seasonal cooking often means transforming humble vegetables into something extraordinary. This zucchini and carrot flatbread celebrates late summer’s bounty with elegant simplicity, where thinly sliced vegetables create a mosaic of color and flavor atop a crisp, golden crust. Each bite offers a delightful contrast between the tender, sweet vegetables and the sturdy, herb-kissed base.
4
servings15
minutes22
minutesIngredients
- Pizza dough – 1 lb
- Zucchini – 1 medium
- Carrot – 1 large
- Olive oil – 2 tbsp
- Garlic – 2 cloves
- Mozzarella cheese – 1 cup shredded
- Salt – ½ tsp
- Black pepper – ¼ tsp
- Fresh thyme – 1 tbsp
Instructions
- Preheat your oven to 425°F and position a rack in the center for even heating.
- Roll the pizza dough into a 12-inch circle on a floured surface, creating an even thickness throughout.
- Transfer the dough to a parchment-lined baking sheet, preventing sticking without additional oil.
- Using a mandoline or sharp knife, slice the zucchini and carrot into ⅛-inch thick rounds for uniform cooking.
- Mince the garlic finely to distribute its flavor evenly across the flatbread.
- Brush the dough surface with 1 tablespoon of olive oil, leaving a ½-inch border around the edges.
- Sprinkle the shredded mozzarella cheese evenly over the oiled dough, creating a moisture barrier between crust and vegetables.
- Arrange the zucchini and carrot slices in overlapping concentric circles, covering the cheese layer completely.
- Drizzle the remaining tablespoon of olive oil over the vegetable arrangement.
- Sprinkle the minced garlic, salt, black pepper, and fresh thyme leaves evenly across the surface.
- Bake for 18-22 minutes until the crust edges are golden brown and the vegetable edges begin to crisp.
- Remove from oven and let rest for 5 minutes before slicing to allow the cheese to set properly.
Heavenly in its simplicity, this flatbread achieves a perfect textural balance: the crisp-edged vegetables yield to a tender interior while the crust remains sturdy enough to hold each generous slice. The sweet earthiness of roasted carrots complements the mild zucchini, both enhanced by the aromatic thyme and savory garlic notes. Consider serving it alongside a bitter greens salad for contrast or cutting it into elegant squares for appetizer portions at your next gathering.
Flaxseed and Onion Flatbread
There’s something quietly sophisticated about transforming humble ingredients into something extraordinary. This flaxseed and onion flatbread achieves that perfect balance—crisp-edged yet tender-crumbed, with the earthy depth of toasted seeds meeting the sweet caramelization of slow-cooked onions. Today, we’re crafting this elegant flatbread that feels simultaneously rustic and refined.
2
portions25
minutes25
minutesIngredients
Flour – 1 cup
Flaxseed – ¼ cup
Onion – 1 medium
Water – ½ cup
Salt – ½ tsp
Olive oil – 2 tbsp
Instructions
1. Finely dice one medium onion into uniform ¼-inch pieces to ensure even cooking.
2. Heat 1 tablespoon olive oil in a skillet over medium-low heat for 2 minutes until shimmering.
3. Add diced onions and cook for 15-18 minutes, stirring occasionally, until they turn deep golden brown and release sweet aromas.
4. Combine 1 cup flour, ¼ cup flaxseed, and ½ teaspoon salt in a mixing bowl, whisking thoroughly to distribute ingredients evenly.
5. Add caramelized onions to the dry ingredients, using a fork to separate any clumps for consistent distribution.
6. Gradually pour in ½ cup warm water while stirring with a wooden spoon until a shaggy dough forms.
7. Knead the dough on a lightly floured surface for 5 minutes until smooth and elastic, adding flour sparingly if sticky.
8. Divide the dough into 4 equal portions and roll each into a ball, covering with a damp cloth to prevent drying.
9. Heat a cast-iron skillet over medium-high heat for 3 minutes until a drop of water sizzles immediately.
10. Roll one dough ball into an 8-inch circle, dusting with flour to prevent sticking while maintaining even thickness.
11. Brush the skillet with remaining olive oil and cook the flatbread for 2-3 minutes until bubbles form and the bottom develops golden-brown spots.
12. Flip the flatbread and cook for another 1-2 minutes until both sides are evenly browned and the bread puffs slightly.
13. Repeat the cooking process with remaining dough balls, stacking cooked flatbreads under a clean kitchen towel to keep them soft.
Serving this warm flatbread reveals its delightful texture—crisp exterior giving way to a surprisingly tender crumb flecked with nutty flaxseed and sweet onion. The caramelized onions create pockets of deep flavor that pair beautifully with creamy spreads or robust stews. For an elegant presentation, brush with garlic-infused olive oil and sprinkle with fresh herbs before slicing into wedges.
Rice Flour Roti
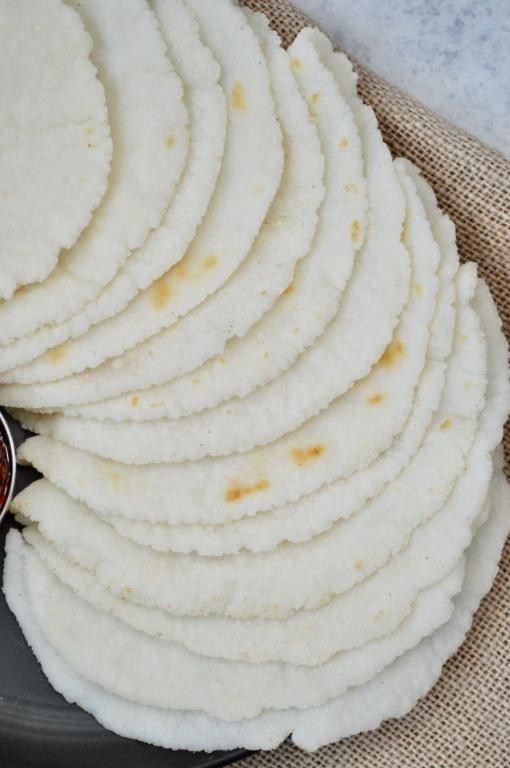
Perfectly delicate and naturally gluten-free, rice flour roti offers a wonderfully light alternative to traditional wheat flatbreads with its subtly sweet flavor and tender, pliable texture that pairs beautifully with both savory curries and sweet accompaniments. This elegant flatbread requires just three simple ingredients yet yields impressive results when handled with care, creating paper-thin rounds that cook to a beautiful speckled golden brown. Mastering this artful bread opens up endless culinary possibilities for those seeking gluten-free options without compromising on texture or flavor.
6
portions20
minutes12
minutesIngredients
Rice flour – 1 cup
Water – ¾ cup
Salt – ½ tsp
Instructions
1. Combine 1 cup rice flour and ½ teaspoon salt in a medium mixing bowl.
2. Gradually add ¾ cup warm water (approximately 110°F) while mixing with your other hand.
3. Knead the mixture for 3-4 minutes until it forms a smooth, pliable dough that doesn’t stick to your fingers.
4. Cover the dough with a damp kitchen towel and let it rest for 15 minutes to allow the rice flour to fully hydrate.
5. Divide the dough into 6 equal portions and roll each into smooth balls between your palms.
6. Place one dough ball between two sheets of parchment paper to prevent sticking.
7. Roll the dough into a thin, 6-inch circle using even pressure, rotating frequently to maintain round shape.
8. Heat a non-stick skillet or griddle over medium-high heat (375°F) for 2 minutes until properly heated.
9. Carefully peel the top parchment paper away from the rolled roti.
10. Flip the roti onto your palm and gently remove the bottom parchment paper.
11. Place the roti directly onto the hot skillet and cook for 45-60 seconds until small bubbles appear on the surface.
12. Flip the roti using a spatula and cook the other side for another 45-60 seconds until both sides show golden brown spots.
13. Transfer the cooked roti to a plate and lightly brush with ghee or oil if desired.
14. Repeat the rolling and cooking process with the remaining dough balls, stacking the cooked rotis to keep them soft and warm.
What makes these rotis particularly special is their delicate, slightly chewy texture that contrasts beautifully with their crisp, speckled surface. The subtle nutty flavor of the rice flour shines through, making them versatile enough to wrap around spiced vegetables or dip into creamy lentil dishes. For an elegant twist, try serving them warm with honey and toasted coconut for a simple yet sophisticated dessert.
Oatmeal and Yogurt Flatbread
Just when you thought humble oats had revealed all their culinary secrets, they surprise us once more in this sophisticated flatbread that marries the earthy comfort of oatmeal with the delicate tang of yogurt. This elegant creation transforms simple pantry staples into a remarkably versatile bread with a tender crumb and subtle complexity that belies its minimal ingredient list.
3
portions15
minutes20
minutesIngredients
Rolled oats – 1 cup
Plain Greek yogurt – ¾ cup
Baking powder – 1 tsp
Salt – ½ tsp
Instructions
1. Preheat your oven to 375°F and line a baking sheet with parchment paper.
2. Place 1 cup of rolled oats in a food processor and pulse for 30 seconds until they reach a coarse flour consistency.
3. Transfer the oat flour to a medium mixing bowl and add 1 teaspoon of baking powder and ½ teaspoon of salt.
4. Whisk the dry ingredients together thoroughly to ensure even distribution of the leavening agent.
5. Add ¾ cup of plain Greek yogurt to the dry mixture and stir with a wooden spoon until a shaggy dough forms.
6. Turn the dough out onto a lightly floured surface and knead gently for exactly 1 minute until it becomes smooth and cohesive.
7. Divide the dough into 4 equal portions using a bench scraper for precise cutting.
8. Roll each portion into a ball, then flatten into a ¼-inch thick circle using a rolling pin.
9. Arrange the flatbread rounds on the prepared baking sheet, leaving 2 inches between each for proper air circulation.
10. Bake for 18-20 minutes until the edges turn golden brown and the surface develops light cracks.
11. Transfer the flatbreads to a wire rack and let them cool for 5 minutes before serving.
Remarkably tender with a satisfying chew, these flatbreads offer subtle nutty notes from the oats balanced by the yogurt’s gentle tang. Their versatile nature makes them perfect for tearing and dipping into hummus or serving alongside Mediterranean-inspired dishes, where their delicate texture complements both bold flavors and simple accompaniments equally well.
Tapioca and Cheese Flatbread
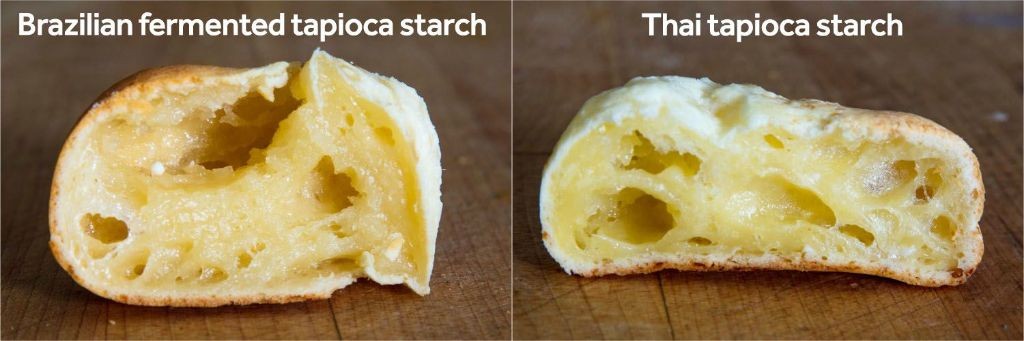
Venturing beyond traditional flatbreads, this tapioca and cheese creation offers a uniquely satisfying texture that bridges the gap between crisp and chewy. Velvety tapioca starch combines with sharp cheese to form a delicate canvas that crisps beautifully while maintaining a wonderfully pliable interior. This elegant flatbread proves that simple ingredients can yield extraordinary results when paired thoughtfully.
5
portions15
minutes24
minutesIngredients
Tapioca starch – 2 cups
Shredded mozzarella cheese – 1 cup
Water – ¾ cup
Salt – ½ tsp
Olive oil – 2 tbsp
Instructions
1. Combine 2 cups tapioca starch, 1 cup shredded mozzarella cheese, and ½ tsp salt in a large mixing bowl.
2. Heat ¾ cup water in a saucepan until it reaches 180°F, using a kitchen thermometer for precision.
3. Pour the hot water over the starch mixture and stir vigorously with a wooden spoon until a cohesive dough forms.
4. Knead the dough on a clean surface dusted with tapioca starch for exactly 2 minutes until smooth and elastic.
5. Divide the dough into 4 equal portions and roll each into a ball, covering with a damp cloth to prevent drying.
6. Heat a cast-iron skillet over medium-high heat until a drop of water sizzles immediately upon contact.
7. Roll one dough ball between two sheets of parchment paper to create a ¼-inch thick circle.
8. Brush the skillet with ½ tbsp olive oil and carefully transfer the flatbread to the hot surface.
9. Cook for 3-4 minutes until the bottom develops golden brown spots and the edges begin to curl slightly.
10. Flip the flatbread using a spatula and cook for another 2-3 minutes until both sides are evenly golden.
11. Repeat the cooking process with remaining dough balls, brushing the skillet with additional olive oil between batches.
12. Transfer cooked flatbreads to a wire rack to maintain crispness rather than stacking them. Only now does this humble combination reveal its true character—the flatbread emerges with a delightfully crisp exterior that gives way to a uniquely chewy, stretchy interior reminiscent of fresh mozzarella. Its subtle saltiness and delicate chew make it perfect for tearing and dipping into herbed olive oil or serving alongside charcuterie boards as an elegant alternative to crackers.
Conclusion
From quick weeknight dinners to impressive party appetizers, these 23 gluten-free flatbread recipes offer something delicious for every occasion. We hope you find new favorites to add to your cooking rotation! Don’t forget to leave a comment sharing which recipes you loved most and pin this article to your Pinterest boards to save these ideas for later.


