
Just imagine your little ones happily eating nutritious meals without a single complaint about gluten-free food! We’ve gathered 26 wholesome, kid-approved recipes that are perfect for busy families. From quick dinners to comforting favorites, these dishes will keep those little tummies full and smiling. Ready to discover some new family favorites? Let’s dive into these delicious gluten-free creations!
Delightful Gluten-Free Banana Pancakes
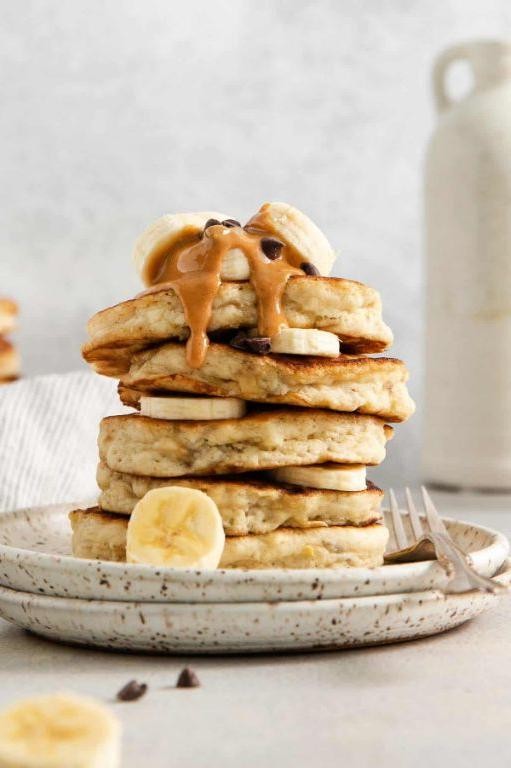
Perfect for lazy weekend mornings, these gluten-free banana pancakes are so fluffy and satisfying you won’t believe they’re missing traditional flour. You’ll love how simple they come together with ingredients you probably already have in your pantry. They’re the ultimate cozy breakfast that feels indulgent but keeps things wholesome.
2
portions10
minutes15
minutesIngredients
- For the batter:
- 2 ripe medium bananas
- 2 large eggs
- 1/2 cup almond flour
- 1/4 cup oat flour
- 1 tsp baking powder
- 1/2 tsp cinnamon
- 1/4 tsp salt
- 1 tbsp maple syrup
- 1 tsp vanilla extract
- 2 tbsp melted coconut oil
- For cooking:
- 1 tbsp coconut oil
Instructions
- Peel 2 ripe medium bananas and place them in a medium mixing bowl.
- Mash the bananas thoroughly with a fork until no large chunks remain.
- Crack 2 large eggs into the bowl with the mashed bananas.
- Whisk the eggs and bananas together until fully combined.
- Add 1/2 cup almond flour, 1/4 cup oat flour, 1 tsp baking powder, 1/2 tsp cinnamon, and 1/4 tsp salt to the wet ingredients.
- Gently stir the dry ingredients into the wet mixture until just combined—don’t overmix.
- Pour in 1 tbsp maple syrup, 1 tsp vanilla extract, and 2 tbsp melted coconut oil.
- Stir everything together until you have a smooth, slightly thick batter.
- Heat a non-stick skillet or griddle over medium heat (about 350°F).
- Add 1 tbsp coconut oil to the hot skillet and swirl to coat the surface.
- Drop 1/4 cup portions of batter onto the skillet, spacing them about 2 inches apart.
- Cook the pancakes for 2-3 minutes until bubbles form on the surface and the edges look set.
- Carefully flip each pancake with a spatula.
- Cook for another 1-2 minutes until golden brown on both sides.
- Transfer the cooked pancakes to a plate and repeat with remaining batter.
Golden and tender, these pancakes have a lovely moist texture from the bananas with just the right amount of sweetness. The cinnamon adds warmth that pairs beautifully with extra maple syrup or fresh berries. Try stacking them high with sliced bananas between layers for an extra special presentation that’s sure to impress.
Hearty Quinoa and Veggie Fingers
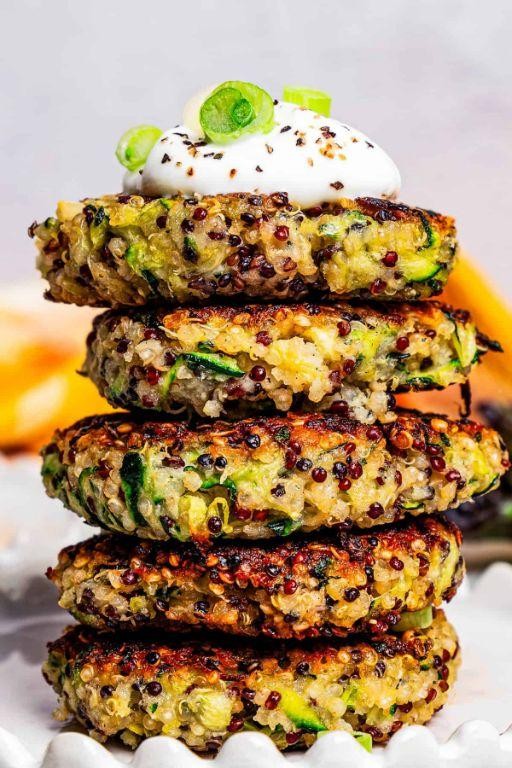
Oh, you know those days when you want something satisfying but don’t want to spend hours in the kitchen? These quinoa and veggie fingers are your answer—they’re packed with flavor, surprisingly easy to make, and perfect for a quick lunch or snack. Once you try them, you’ll see why they’ve become my go-to recipe.
8
portions15
minutes8
minutesIngredients
For the quinoa mixture:
- 1 cup cooked quinoa, cooled
- 1/2 cup finely grated carrot
- 1/4 cup finely chopped red bell pepper
- 2 tbsp finely chopped onion
- 1 large egg, beaten
- 1/4 cup breadcrumbs
- 1/2 tsp garlic powder
- 1/4 tsp salt
For coating and cooking:
- 1/4 cup all-purpose flour
- 1 large egg, beaten
- 1/2 cup breadcrumbs
- 3 tbsp olive oil
Instructions
- Combine 1 cup cooked quinoa, 1/2 cup grated carrot, 1/4 cup chopped red bell pepper, 2 tbsp chopped onion, 1 beaten egg, 1/4 cup breadcrumbs, 1/2 tsp garlic powder, and 1/4 tsp salt in a medium bowl.
- Mix all ingredients thoroughly until well combined and the mixture holds together when pressed.
- Divide the mixture into 8 equal portions and shape each into a finger-like log about 3 inches long.
- Place 1/4 cup all-purpose flour in a shallow dish.
- Place 1 beaten egg in a second shallow dish.
- Place 1/2 cup breadcrumbs in a third shallow dish.
- Dredge each quinoa finger first in flour, shaking off excess.
- Dip each floured finger into the beaten egg, allowing excess to drip off.
- Coat each egg-dipped finger in breadcrumbs, pressing gently to adhere.
- Heat 3 tbsp olive oil in a large skillet over medium heat until shimmering (about 350°F).
- Arrange breaded quinoa fingers in the hot skillet without crowding.
- Cook for 3-4 minutes until golden brown on the bottom.
- Flip each finger carefully using tongs.
- Cook for another 3-4 minutes until golden brown on all sides and heated through.
- Transfer cooked fingers to a paper towel-lined plate to drain excess oil.
So, what makes these special? The crispy breadcrumb coating gives way to a tender, slightly chewy interior with sweet notes from the carrots and peppers. Serve them with a quick yogurt dip or tuck them into pita pockets with fresh greens for a complete meal.
Sweet Potato and Carrot Mini Muffins
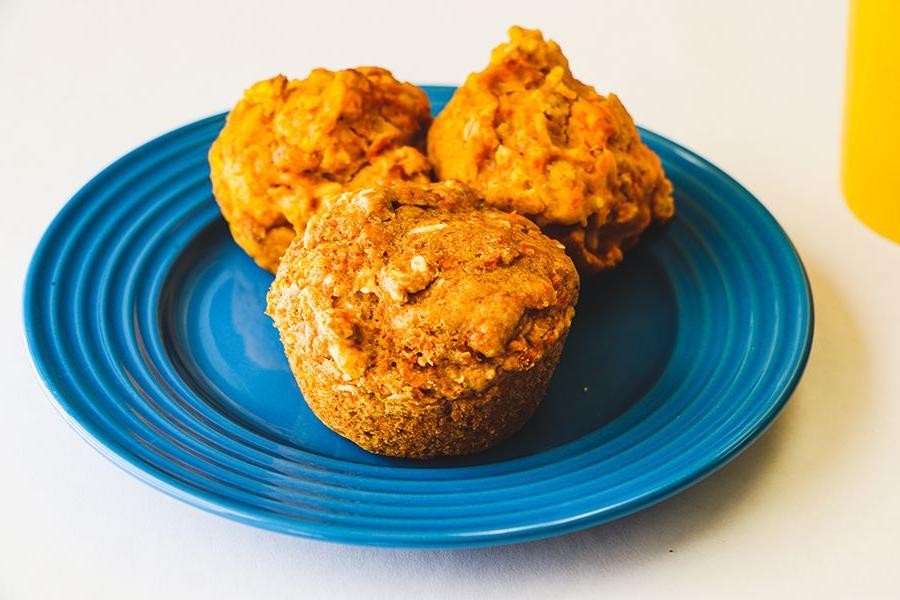
Zesty sweet potato and carrot team up in these moist little muffins that are perfect for breakfast on the go or an afternoon snack. You’ll love how the natural sweetness shines through without being overly sugary. They come together quickly and fill your kitchen with the coziest autumn aroma while they bake.
24
muffins15
minutes18
minutesIngredients
For the wet ingredients:
- 1 cup mashed sweet potato
- 1/2 cup grated carrot
- 1/3 cup maple syrup
- 1/4 cup melted coconut oil
- 2 large eggs
- 1 tsp vanilla extract
For the dry ingredients:
- 1 1/2 cups all-purpose flour
- 1 tsp baking powder
- 1/2 tsp baking soda
- 1 tsp cinnamon
- 1/2 tsp nutmeg
- 1/4 tsp salt
Instructions
- Preheat your oven to 350°F.
- Grease a 24-cup mini muffin tin with cooking spray or line with paper liners.
- In a large bowl, whisk together the mashed sweet potato, grated carrot, maple syrup, melted coconut oil, eggs, and vanilla extract until well combined.
- In a separate medium bowl, whisk together the all-purpose flour, baking powder, baking soda, cinnamon, nutmeg, and salt.
- Gradually add the dry ingredients to the wet ingredients, stirring gently until just combined. Tip: Don’t overmix—a few lumps are fine and will keep your muffins tender.
- Spoon the batter into the prepared muffin cups, filling each about 3/4 full.
- Bake for 15-18 minutes, or until a toothpick inserted into the center of a muffin comes out clean. Tip: Rotate the pan halfway through baking for even browning.
- Remove the muffins from the oven and let them cool in the pan for 5 minutes.
- Transfer the muffins to a wire rack to cool completely. Tip: Letting them cool fully helps the texture set and makes them easier to handle.
Hearty and satisfying, these mini muffins have a wonderfully moist crumb with subtle spice notes from the cinnamon and nutmeg. The grated carrot adds pleasant texture while the sweet potato keeps them incredibly tender. Try serving them warm with a smear of cream cheese or packing them in lunchboxes for a wholesome treat that both kids and adults will adore.
Kid-Friendly Gluten-Free Chicken Nuggets

Remember those chicken nuggets you loved as a kid? These gluten-free versions are just as crispy and delicious, but way better for your family. You can whip them up in under 30 minutes, and they’re perfect for picky eaters or anyone avoiding gluten. They’re so good, even the adults will be sneaking them off the plate!
2
servings20
minutes8
minutesIngredients
For the chicken:
– 1 lb boneless, skinless chicken breasts
– 1/2 cup buttermilk
– 1 tsp garlic powder
– 1 tsp paprika
For the coating:
– 1 cup gluten-free all-purpose flour
– 1/2 cup gluten-free breadcrumbs
– 1 tsp salt
– 1/2 tsp black pepper
For frying:
– 1 cup avocado oil
Instructions
1. Cut the chicken breasts into 1-inch pieces using a sharp knife.
2. Combine buttermilk, garlic powder, and paprika in a medium bowl.
3. Add chicken pieces to the buttermilk mixture and stir to coat completely.
4. Let the chicken marinate for 15 minutes at room temperature.
5. Mix gluten-free flour, breadcrumbs, salt, and pepper in a separate bowl.
6. Remove each chicken piece from the buttermilk, letting excess drip off.
7. Dredge each chicken piece in the flour mixture, pressing gently to adhere.
8. Heat avocado oil in a large skillet over medium-high heat until it reaches 350°F.
9. Carefully place coated chicken pieces in the hot oil using tongs.
10. Fry for 3-4 minutes until the bottom is golden brown.
11. Flip each nugget and fry for another 3-4 minutes.
12. Transfer cooked nuggets to a paper towel-lined plate to drain.
13. Check that the internal temperature reaches 165°F using a meat thermometer.
Just out of the fryer, these nuggets have the most satisfying crunch that gives way to juicy, tender chicken inside. The combination of garlic and paprika adds just enough flavor without being overwhelming. Try serving them with honey mustard for dipping or chop them up to top a gluten-free salad for lunch tomorrow!
Almond Flour Chocolate Chip Cookies
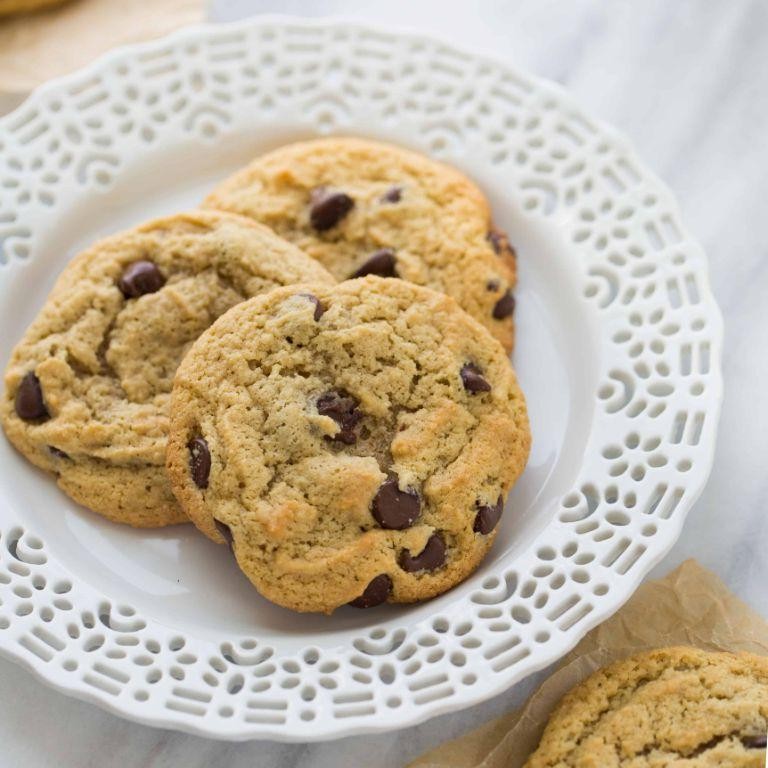
Wondering if gluten-free cookies can actually taste amazing? These almond flour chocolate chip cookies will make you a believer with their chewy texture and rich flavor. You’ll love how simple they are to whip up for a quick treat.
24
cookies15
minutes12
minutesIngredients
For the cookie dough:
- 2 cups almond flour
- 1/2 cup coconut sugar
- 1/2 cup unsalted butter, softened
- 1 large egg
- 1 tsp vanilla extract
- 1/2 tsp baking soda
- 1/4 tsp salt
- 3/4 cup dark chocolate chips
Instructions
- Preheat your oven to 350°F.
- Line a baking sheet with parchment paper.
- Combine the softened butter and coconut sugar in a large mixing bowl.
- Beat the mixture with an electric mixer for 2 minutes until creamy. Tip: Make sure your butter is properly softened for easier mixing.
- Add the egg and vanilla extract to the bowl.
- Beat for another minute until fully incorporated.
- In a separate bowl, whisk together the almond flour, baking soda, and salt.
- Gradually add the dry ingredients to the wet ingredients.
- Mix until just combined. Tip: Don’t overmix the dough to keep the cookies tender.
- Fold in the dark chocolate chips.
- Scoop tablespoon-sized portions of dough onto the prepared baking sheet.
- Space the cookies 2 inches apart.
- Bake for 10-12 minutes until the edges are golden brown. Tip: The cookies will look slightly underdone in the center but will firm up as they cool.
- Remove the baking sheet from the oven.
- Let the cookies cool on the baking sheet for 5 minutes.
- Transfer the cookies to a wire rack to cool completely.
Chewy centers with crispy edges make these cookies absolutely irresistible. The almond flour gives them a nutty depth that pairs perfectly with the rich dark chocolate. Try serving them warm with a scoop of vanilla ice cream for an extra special treat.
Gluten-Free Mac and Cheese Bites
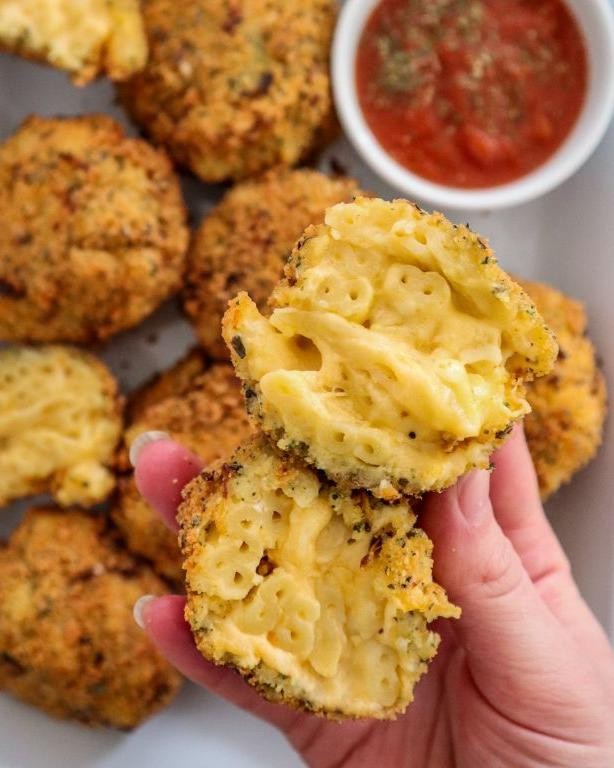
Nothing beats that classic mac and cheese flavor, but these gluten-free bites make it even more fun to enjoy. You get all that cheesy goodness in perfect little portions that are great for parties or snacking. They’re crispy on the outside, creamy inside, and totally gluten-free so everyone can dig in.
24
bites45
minutes25
minutesIngredients
- For the pasta and sauce:
- 8 oz gluten-free elbow macaroni
- 2 tbsp unsalted butter
- 2 tbsp gluten-free all-purpose flour
- 1 cup whole milk
- 1 cup shredded sharp cheddar cheese
- 1/2 cup grated Parmesan cheese
- 1/4 tsp garlic powder
- 1/4 tsp paprika
- 1/4 tsp salt
- 1/8 tsp black pepper
- For coating and baking:
- 1 cup gluten-free breadcrumbs
- 1/4 cup grated Parmesan cheese
- 2 large eggs
- 1 tbsp water
- Olive oil cooking spray
Instructions
- Preheat your oven to 400°F and lightly spray a mini muffin tin with olive oil cooking spray.
- Cook the gluten-free elbow macaroni according to package directions until al dente, then drain it completely. Tip: Rinse the pasta briefly with cool water to stop the cooking and prevent sticking.
- Melt 2 tbsp unsalted butter in a medium saucepan over medium heat.
- Whisk in 2 tbsp gluten-free all-purpose flour and cook for 1 minute, stirring constantly, until the mixture is bubbly and lightly golden.
- Gradually pour in 1 cup whole milk while whisking continuously to avoid lumps.
- Cook the sauce for 3–4 minutes, whisking often, until it thickens enough to coat the back of a spoon.
- Remove the saucepan from the heat and stir in 1 cup shredded sharp cheddar cheese, 1/2 cup grated Parmesan cheese, 1/4 tsp garlic powder, 1/4 tsp paprika, 1/4 tsp salt, and 1/8 tsp black pepper until the cheese is fully melted and the sauce is smooth.
- Combine the cheese sauce with the drained macaroni in a large bowl, mixing until every piece is coated.
- Spread the mac and cheese mixture into a parchment-lined baking sheet and refrigerate for 30 minutes until firm. Tip: Chilling helps the bites hold their shape when handling.
- In a shallow bowl, whisk 2 large eggs with 1 tbsp water until frothy.
- In a separate shallow bowl, mix 1 cup gluten-free breadcrumbs with 1/4 cup grated Parmesan cheese.
- Scoop about 1 tbsp of the chilled mac and cheese and roll it into a compact ball between your palms.
- Dip each ball into the egg mixture, letting excess drip off, then roll it in the breadcrumb-Parmesan mixture until evenly coated.
- Place each coated ball into a cup of the prepared mini muffin tin. Tip: Press gently to flatten the bottom slightly—this gives a stable base for baking.
- Bake at 400°F for 15–18 minutes, or until the bites are golden brown and crisp on the outside.
Keep these warm for serving—they’re fantastic with a side of marinara for dipping or crumbled over a salad for extra crunch. The contrast between the crispy coating and the tender, cheesy center makes them irresistible straight from the oven.
Fun Zucchini Noodle Spaghetti
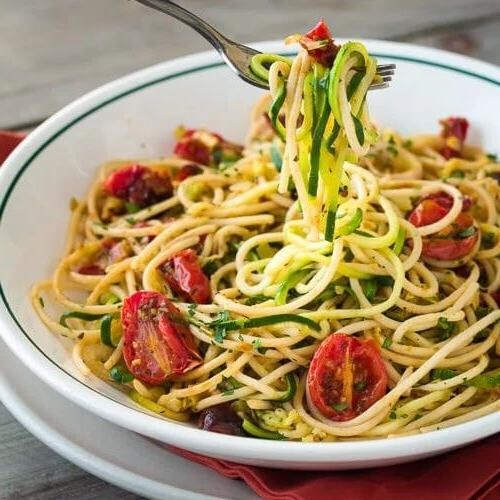
Mmm, you know those days when you want something comforting but don’t want to feel weighed down afterward? This zucchini noodle spaghetti gives you all the cozy pasta vibes while keeping things fresh and light. It’s the perfect weeknight dinner that comes together in under 30 minutes.
2
portions20
minutes16
minutesIngredients
For the zucchini noodles:
– 4 medium zucchini (about 2 pounds)
– 1 tbsp olive oil
– 1/2 tsp salt
For the sauce:
– 1 tbsp olive oil
– 3 cloves garlic, minced
– 1/2 cup chopped yellow onion
– 1 lb ground turkey
– 1 (24 oz) jar marinara sauce
– 1/4 cup chopped fresh basil
– 1/4 tsp black pepper
Instructions
1. Spiralize all 4 zucchini using a spiralizer set to the thin noodle setting.
2. Place the zucchini noodles in a colander and toss with 1/2 tsp salt.
3. Let the zucchini noodles sit for 15 minutes to release excess moisture.
4. Pat the zucchini noodles completely dry with paper towels.
5. Heat 1 tbsp olive oil in a large skillet over medium-high heat.
6. Add 3 cloves minced garlic and 1/2 cup chopped onion to the skillet.
7. Sauté for 3 minutes until the onion becomes translucent.
8. Add 1 lb ground turkey to the skillet, breaking it up with a wooden spoon.
9. Cook the turkey for 6-8 minutes until no pink remains.
10. Pour in the entire 24 oz jar of marinara sauce.
11. Stir in 1/4 tsp black pepper and simmer for 5 minutes.
12. Remove the sauce from heat and stir in 1/4 cup fresh basil.
13. Heat a separate large skillet over medium heat with 1 tbsp olive oil.
14. Add the dried zucchini noodles to the hot skillet.
15. Sauté the noodles for exactly 2 minutes, tossing constantly.
16. Divide the zucchini noodles evenly among 4 plates.
17. Top each portion with the turkey marinara sauce.
And just like that, you’ve got a meal that feels indulgent but won’t leave you stuffed. The zucchini noodles have a satisfying al dente bite while the rich turkey sauce brings classic Italian flavors. Try topping it with a sprinkle of Parmesan or serving alongside garlic bread for that complete pasta night experience.
Blueberry Bliss Oatmeal Bars
Wondering how to make your mornings a little sweeter? You’re going to love these blueberry bliss oatmeal bars. They’re the perfect grab-and-go breakfast that feels like a treat but keeps you full until lunch.
9
squares15
minutes40
minutesIngredients
- For the crust and topping:
- 2 cups old-fashioned rolled oats
- 1 cup all-purpose flour
- 1/2 cup brown sugar
- 1/2 teaspoon baking soda
- 1/4 teaspoon salt
- 3/4 cup unsalted butter, melted
- For the blueberry filling:
- 2 cups fresh blueberries
- 1/4 cup granulated sugar
- 2 tablespoons lemon juice
- 1 tablespoon cornstarch
Instructions
- Preheat your oven to 350°F and line an 8×8-inch baking pan with parchment paper.
- Combine 2 cups rolled oats, 1 cup flour, 1/2 cup brown sugar, 1/2 teaspoon baking soda, and 1/4 teaspoon salt in a large bowl.
- Pour 3/4 cup melted butter over the dry ingredients and mix until everything is evenly coated and crumbly.
- Press about two-thirds of the oat mixture firmly into the bottom of your prepared pan to form the crust.
- In a separate bowl, gently toss 2 cups blueberries with 1/4 cup granulated sugar, 2 tablespoons lemon juice, and 1 tablespoon cornstarch until the berries are coated.
- Spread the blueberry mixture evenly over the crust layer.
- Sprinkle the remaining oat mixture evenly over the blueberry filling.
- Bake for 35-40 minutes at 350°F until the topping is golden brown and the blueberry filling is bubbling around the edges.
- Let the bars cool completely in the pan on a wire rack for at least 2 hours before cutting. Tip: Don’t skip the cooling time—this helps the bars set properly so they hold their shape when sliced.
- Use the parchment paper to lift the entire slab out of the pan before cutting into 9 squares. Tip: For clean cuts, wipe your knife between slices.
- Store any leftovers in an airtight container at room temperature for up to 3 days. Tip: These freeze beautifully for up to 2 months—just wrap individual bars tightly in plastic wrap.
These bars have a wonderful contrast between the crisp oat topping and the soft, jammy blueberry center. The lemon juice adds just enough brightness to keep the sweetness in check. Try warming one up and serving it with a scoop of vanilla ice cream for an easy dessert that’ll impress everyone.
Cheese and Spinach Stuffed Peppers
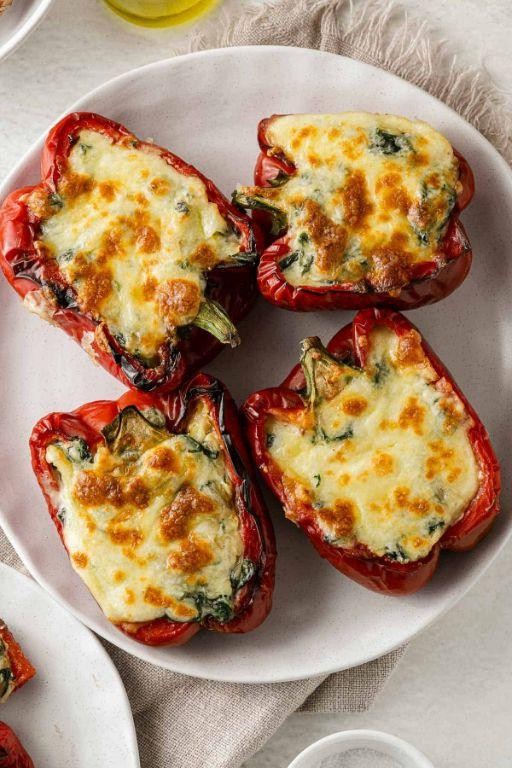
Aren’t you craving something cozy and cheesy that’s actually good for you too? These stuffed peppers are the perfect solution for busy weeknights when you want something satisfying without the fuss. They’re packed with flavor and come together in just a few simple steps.
8
portions20
minutes45
minutesIngredients
For the peppers:
– 4 large bell peppers (any color)
– 1 tablespoon olive oil
– 1/2 teaspoon salt
For the filling:
– 1 pound ground beef
– 1 small onion, finely chopped
– 2 cloves garlic, minced
– 10 ounces frozen spinach, thawed and squeezed dry
– 1 cup cooked rice
– 1 cup shredded mozzarella cheese
– 1/2 cup grated Parmesan cheese
– 1 teaspoon Italian seasoning
– 1/2 teaspoon black pepper
– 1/4 teaspoon red pepper flakes (optional)
For topping:
– 1/2 cup marinara sauce
– 1/2 cup shredded mozzarella cheese
Instructions
1. Preheat your oven to 375°F.
2. Cut the bell peppers in half lengthwise through the stems.
3. Remove the seeds and white membranes from each pepper half.
4. Brush the inside of each pepper half with olive oil.
5. Sprinkle the salt evenly inside the peppers.
6. Place the pepper halves cut-side up in a 9×13 inch baking dish.
7. Bake the peppers for 15 minutes at 375°F to soften them slightly.
8. While peppers bake, heat a large skillet over medium-high heat.
9. Add the ground beef to the hot skillet.
10. Cook the beef for 5 minutes, breaking it up with a spoon.
11. Add the chopped onion to the skillet with the beef.
12. Cook the beef and onion mixture for 4 minutes until onions soften.
13. Add the minced garlic to the skillet.
14. Cook for 1 minute until fragrant.
15. Drain any excess grease from the skillet.
16. Add the squeezed-dry spinach to the beef mixture.
17. Stir in the cooked rice, 1 cup mozzarella, Parmesan, Italian seasoning, black pepper, and red pepper flakes.
18. Mix everything together until well combined.
19. Remove the peppers from the oven after 15 minutes.
20. Divide the filling mixture evenly among the pepper halves.
21. Top each stuffed pepper with 1 tablespoon of marinara sauce.
22. Sprinkle the remaining 1/2 cup mozzarella cheese over the tops.
23. Return the baking dish to the oven.
24. Bake for 25 minutes at 375°F until cheese is golden and bubbly.
25. Let the peppers rest for 5 minutes before serving. Really, these peppers deliver the perfect balance of creamy, cheesy filling and tender-crisp pepper shells that hold their shape beautifully. The spinach adds earthy depth while keeping things light, and that golden cheese topping provides the ultimate comfort food satisfaction. Try serving them with a simple green salad or crusty bread to soak up any extra sauce.
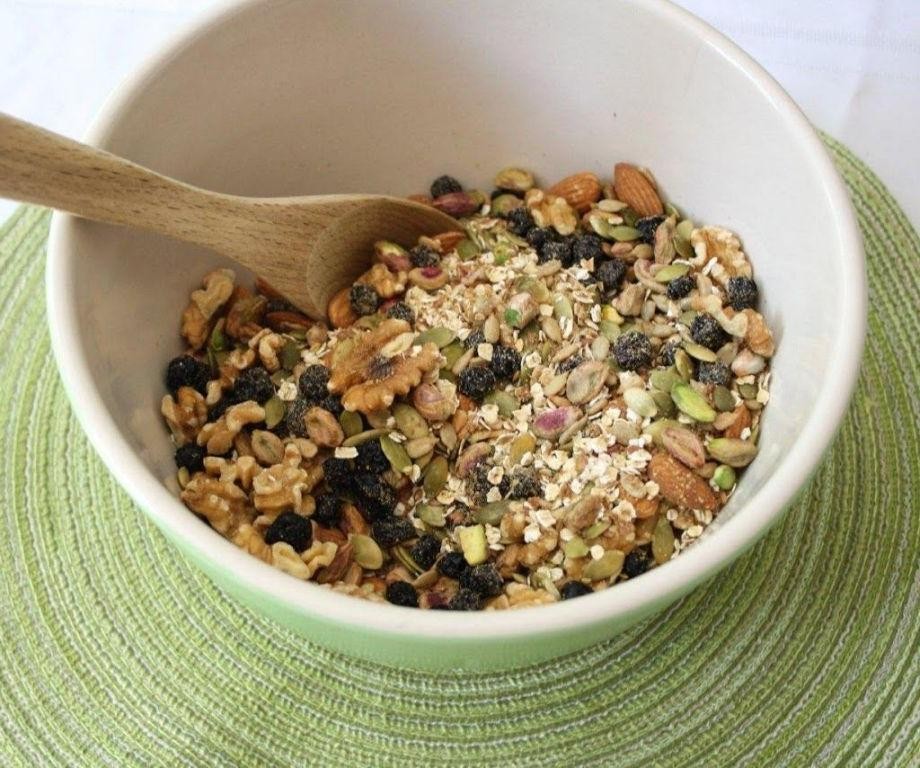
Crunchy Chickpea Snack Mix
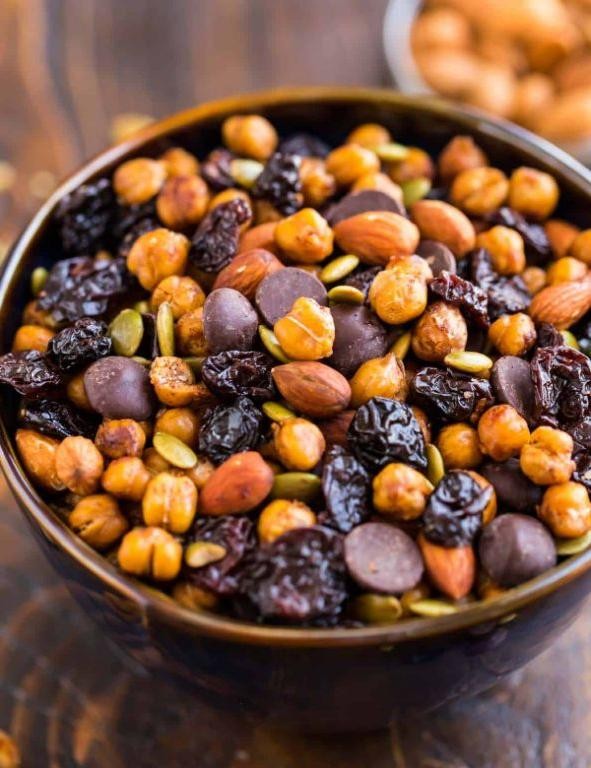
You know those days when you need something crunchy, salty, and satisfying but don’t want to reach for the same old chips? Yeah, this crunchy chickpea snack mix is about to become your new go-to. It’s packed with flavor and texture, and it’s surprisingly easy to make at home.
4
servings10
minutes35
minutesIngredients
For the chickpeas and nuts:
– 1 (15-ounce) can chickpeas, rinsed, drained, and patted very dry
– 1 cup raw almonds
– 1 cup raw pepitas (pumpkin seeds)
For the seasoning:
– 2 tablespoons olive oil
– 1 teaspoon smoked paprika
– 1/2 teaspoon garlic powder
– 1/2 teaspoon onion powder
– 1/2 teaspoon salt
Instructions
1. Preheat your oven to 400°F (200°C) and line a large, rimmed baking sheet with parchment paper.
2. In a large bowl, combine the dried chickpeas, raw almonds, and raw pepitas.
3. Drizzle the 2 tablespoons of olive oil over the chickpea and nut mixture.
4. Sprinkle the 1 teaspoon smoked paprika, 1/2 teaspoon garlic powder, 1/2 teaspoon onion powder, and 1/2 teaspoon salt over everything.
5. Toss the mixture thoroughly with a large spoon until every piece is evenly coated with oil and spices.
6. Spread the mixture in a single, even layer on your prepared baking sheet.
7. Place the baking sheet in the preheated oven and bake for 20 minutes.
8. After 20 minutes, remove the baking sheet from the oven. (Tip: Shaking the pan halfway through helps everything cook evenly and prevents burning.)
9. Use a spatula to stir and flip the snack mix to expose the other sides of the ingredients.
10. Return the baking sheet to the oven and bake for another 10 to 15 minutes. (Tip: Watch closely for the last 5 minutes—the chickpeas should be deep golden and crispy, and the pepitas will start to puff and pop slightly.)
11. Remove the baking sheet from the oven and let the snack mix cool completely on the pan for at least 30 minutes. (Tip: This cooling step is crucial for the chickpeas to achieve their maximum crunch.)
Just imagine that first bite: the nutty crunch of almonds, the light pop of toasted pepitas, and those incredibly crispy, savory chickpeas. Jar this mix up for a perfect road trip snack or sprinkle it over a salad for an instant crunch upgrade.
Gluten-Free Mini Pizza Poppers

Now, who doesn’t love bite-sized pizza? These gluten-free mini pizza poppers are the perfect party snack or quick weeknight dinner that everyone can enjoy, no matter their dietary needs. They’re crispy, cheesy, and totally irresistible.
12
poppers15
minutes20
minutesIngredients
For the crust:
- 1 cup gluten-free all-purpose flour
- 1 tsp baking powder
- 1/2 tsp salt
- 1/2 cup plain Greek yogurt
- 2 tbsp olive oil
For the filling:
- 1/2 cup pizza sauce
- 1 cup shredded mozzarella cheese
- 1/4 cup mini pepperoni slices
- 1 tbsp grated Parmesan cheese
For baking:
- 1 tbsp melted butter
- 1/2 tsp garlic powder
Instructions
- Preheat your oven to 375°F and line a baking sheet with parchment paper.
- In a medium bowl, whisk together 1 cup gluten-free all-purpose flour, 1 tsp baking powder, and 1/2 tsp salt.
- Add 1/2 cup plain Greek yogurt and 2 tbsp olive oil to the dry ingredients.
- Mix with a fork until a dough forms, then knead with your hands for 1 minute until smooth.
- Divide the dough into 12 equal pieces and roll each into a ball.
- Flatten each ball into a 3-inch circle using your palms.
- Place 1 tsp pizza sauce in the center of each dough circle.
- Sprinkle 1 tbsp shredded mozzarella cheese over the sauce on each circle.
- Add 4-5 mini pepperoni slices on top of the cheese.
- Pinch the edges of the dough together to seal each popper completely.
- Place the sealed poppers seam-side down on the prepared baking sheet, spacing them 1 inch apart.
- Brush the tops with 1 tbsp melted butter mixed with 1/2 tsp garlic powder.
- Sprinkle 1 tbsp grated Parmesan cheese evenly over all the poppers.
- Bake for 18-20 minutes until golden brown and crispy.
- Let cool for 5 minutes before serving.
These little poppers come out with a wonderfully crispy exterior that gives way to a gooey, cheesy center. The garlic butter topping adds that extra savory kick that makes them truly addictive. Try serving them with extra pizza sauce for dipping, or pack them in lunchboxes for a fun surprise the next day.
Vibrant Rainbow Fruit Skewers
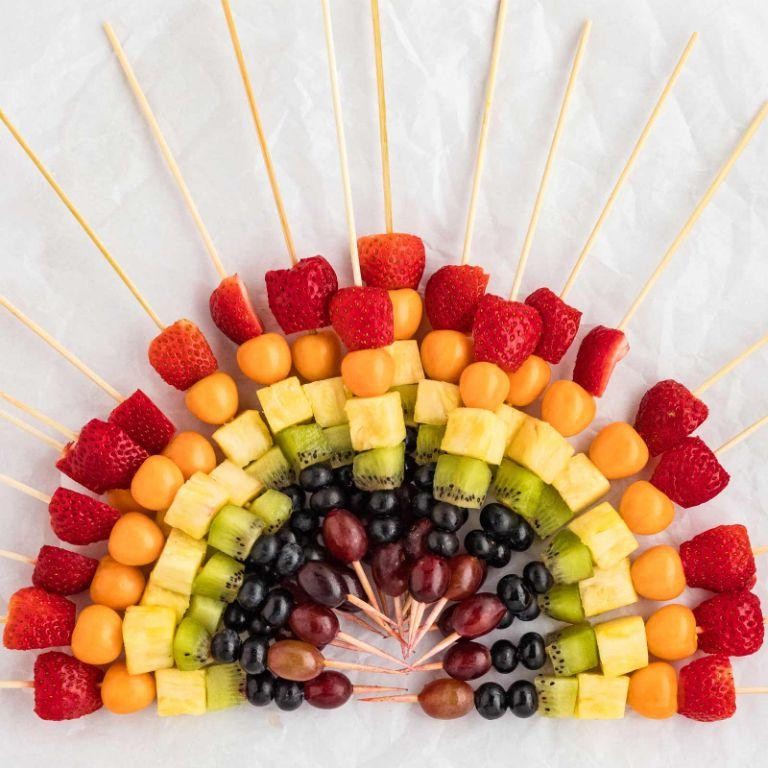
Craving something colorful and refreshing? These vibrant rainbow fruit skewers are exactly what you need when you want a healthy snack that looks as good as it tastes. You’ll love how easy they are to assemble and how impressive they look at any gathering.
8
skewers25
minutesIngredients
- For the fruit skewers:
- 1 cup strawberries, hulled and halved
- 1 cup pineapple chunks (1-inch pieces)
- 1 cup cantaloupe chunks (1-inch pieces)
- 1 cup green grapes
- 1 cup blueberries
- 1 cup blackberries
- 8 wooden skewers (soaked in water for 30 minutes)
- For the honey-lime drizzle:
- 2 tablespoons honey
- 1 tablespoon fresh lime juice
Instructions
- Soak 8 wooden skewers in water for 30 minutes to prevent burning.
- Wash and prepare all fruits: hull and halve 1 cup strawberries, cut 1 cup pineapple and 1 cup cantaloupe into 1-inch chunks, and measure 1 cup each of green grapes, blueberries, and blackberries.
- Thread fruits onto skewers in rainbow order: start with 2 strawberry halves, followed by 2 pineapple chunks, 2 cantaloupe chunks, 4-5 grapes, 4-5 blueberries, and finish with 2-3 blackberries.
- Tip: Leave about 2 inches at the bottom of each skewer for easy handling.
- Repeat threading pattern for all 8 skewers, arranging fruits consistently.
- In a small bowl, whisk together 2 tablespoons honey and 1 tablespoon fresh lime juice until fully combined.
- Brush the honey-lime mixture evenly over all fruit skewers using a pastry brush.
- Tip: For best flavor, let skewers sit for 10 minutes after brushing to allow the drizzle to soak in slightly.
- Arrange finished skewers on a serving platter.
- Tip: Serve immediately or refrigerate for up to 2 hours—the fruits stay fresh but may release some juice if stored longer.
What makes these skewers so special is the juicy crunch of fresh fruit combined with the sweet-tangy glaze. The contrasting textures from soft berries to firm melons create a delightful eating experience. Try serving them alongside yogurt dip or as edible centerpieces at your next barbecue—they disappear almost as fast as you can make them!
Creamy Avocado and Corn Salad
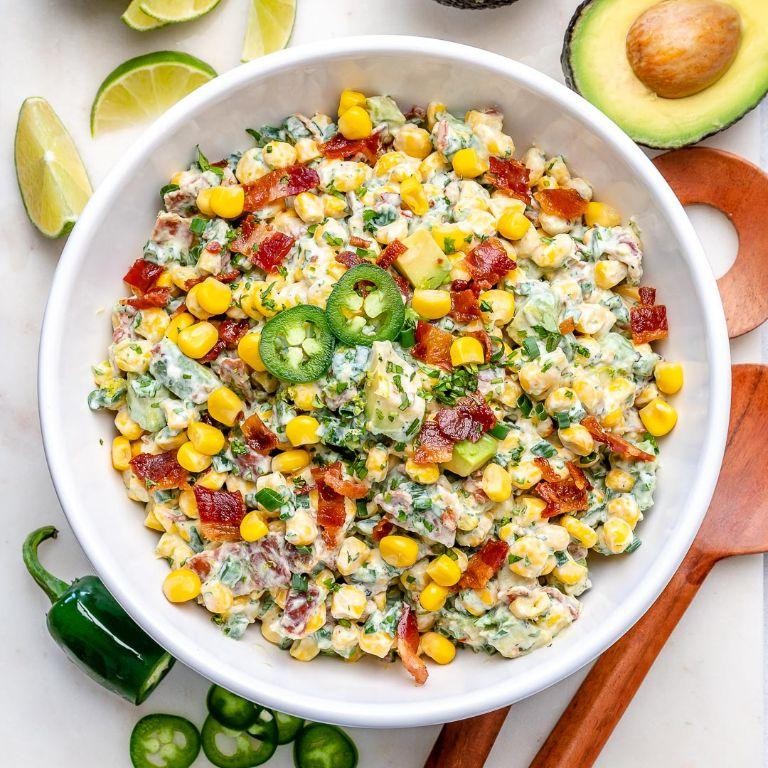
Ultimately, you know those days when you want something fresh but satisfying? This creamy avocado and corn salad hits that perfect spot—it’s bright, a little tangy, and comes together in minutes. You’ll love how the creamy dressing clings to every bite.
4
servings15
minutesIngredients
For the dressing:
– 1/4 cup plain Greek yogurt
– 2 tbsp fresh lime juice
– 1 tbsp olive oil
– 1/2 tsp salt
– 1/4 tsp black pepper
For the salad:
– 2 ripe avocados
– 2 cups corn kernels (fresh or thawed frozen)
– 1/4 cup finely chopped red onion
– 1/4 cup chopped fresh cilantro
Instructions
1. In a medium bowl, whisk together the Greek yogurt, lime juice, olive oil, salt, and black pepper until smooth.
2. Cut the avocados in half, remove the pits, and scoop the flesh into the bowl with the dressing.
3. Gently mash the avocados with a fork until creamy but still slightly chunky.
4. Add the corn kernels, red onion, and cilantro to the bowl.
5. Fold all ingredients together until evenly combined.
6. Taste and adjust seasoning if needed, adding more salt or lime juice for balance.
7. Serve immediately or cover and refrigerate for up to 1 hour.
This salad has a wonderful creamy texture with pops of sweet corn and a bright lime kick. Try it as a dip with tortilla chips or spooned over grilled chicken for a quick dinner. The cool, tangy flavors make it perfect for warm days or potlucks.
Conclusion
Offering delicious, nutritious meals that keep everyone smiling! These 26 gluten-free recipes make family mealtime stress-free and fun. We hope you find new favorites to add to your rotation—give them a try and let us know which ones your kids loved most in the comments below. Don’t forget to share this roundup on Pinterest to spread the wholesome goodness!


