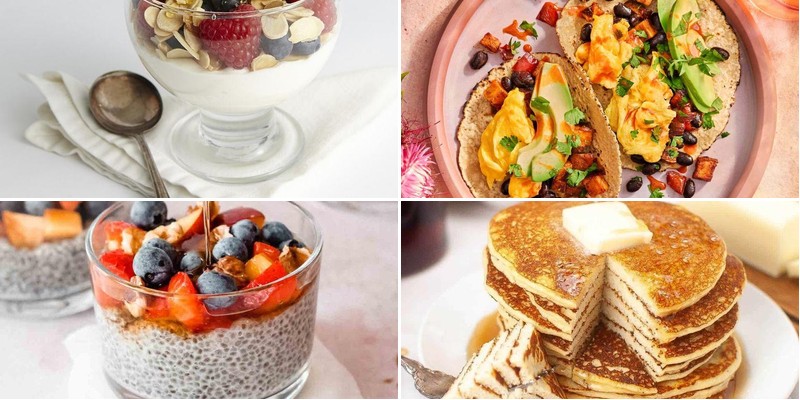
Zipping out the door with an empty stomach? We’ve all been there! That’s why we’ve gathered 18 delicious gluten-free breakfast recipes perfect for busy mornings. From grab-and-go muffins to make-ahead smoothies, these tasty options will fuel your day without the gluten. Ready to transform your morning routine? Let’s dive into these mouthwatering creations that prove gluten-free can be quick, easy, and absolutely delicious!
Berry Quinoa Breakfast Bowls
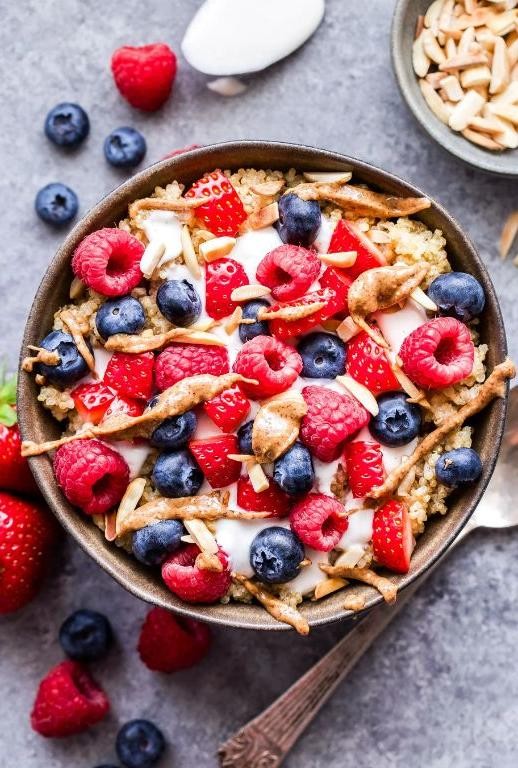
Very few things get me out of bed faster than the promise of a vibrant, nourishing breakfast, and these Berry Quinoa Breakfast Bowls have become my absolute weekday obsession. I started making them last summer when my garden was overflowing with berries, and now they’re my go-to for busy mornings when I need something that feels special but comes together in minutes.
2
bowls5
minutes20
minutesIngredients
– 1 cup of quinoa (I like the tri-color kind for extra visual appeal)
– 2 cups of water
– A big handful of fresh mixed berries (about 1 cup)
– A generous drizzle of maple syrup (around 2 tablespoons)
– A splash of vanilla extract (about 1 teaspoon)
– A couple of tablespoons of sliced almonds
– A pinch of salt
Instructions
1. Rinse 1 cup of quinoa thoroughly in a fine-mesh strainer under cold running water for about 1 minute to remove the natural bitter coating.
2. Combine the rinsed quinoa, 2 cups of water, and a pinch of salt in a medium saucepan over high heat.
3. Bring the mixture to a rolling boil, then immediately reduce the heat to low and cover the saucepan tightly with a lid.
4. Simmer the quinoa for exactly 15 minutes—set a timer so you don’t peek and let the steam escape!
5. Remove the saucepan from the heat and let the quinoa sit covered for 5 minutes to steam and fluff up perfectly.
6. Fluff the cooked quinoa gently with a fork to separate the grains and prevent clumping.
7. Stir in a splash of vanilla extract and a generous drizzle of maple syrup while the quinoa is still warm so it absorbs the flavors evenly.
8. Divide the quinoa mixture evenly between two bowls.
9. Top each bowl with a big handful of fresh mixed berries and a couple of tablespoons of sliced almonds for crunch.
Absolutely magical how the warm, fluffy quinoa mingles with the juicy burst of berries and the toasty crunch of almonds. The vanilla and maple create this cozy sweetness that makes it feel like dessert for breakfast—sometimes I’ll even add a dollop of Greek yogurt for extra creaminess!
Chia Seed Pudding with Almond Milk
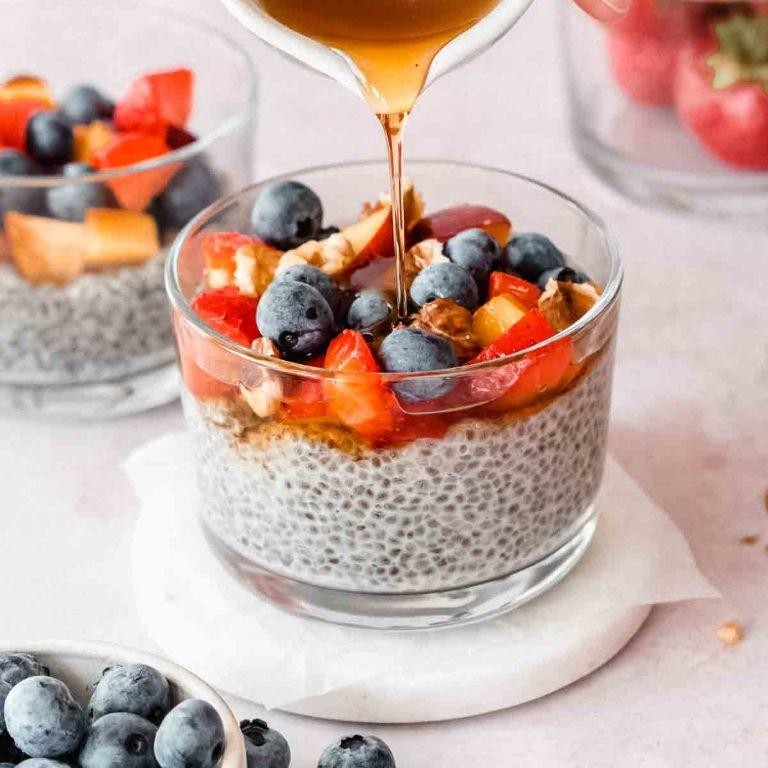
Every morning, I used to struggle with finding a quick yet nutritious breakfast until I discovered this magical chia seed pudding. It’s become my go-to for busy mornings, and I love how effortlessly it comes together while I’m still half-asleep. Honestly, it’s saved me from many rushed, unsatisfying breakfasts!
5
servings10
minutesIngredients
- 1/2 cup of chia seeds
- 2 cups of unsweetened almond milk
- A couple of tablespoons of maple syrup
- A splash of vanilla extract
- A pinch of salt
Instructions
- Pour the 2 cups of unsweetened almond milk into a medium-sized mixing bowl.
- Add the 1/2 cup of chia seeds to the almond milk in the bowl.
- Drizzle in the couple of tablespoons of maple syrup for natural sweetness.
- Splash in the vanilla extract to enhance the flavor.
- Sprinkle in the pinch of salt to balance the sweetness.
- Whisk everything together vigorously for about 1 minute to prevent clumping.
- Let the mixture sit undisturbed for 5 minutes, then whisk again to break up any seeds stuck together.
- Cover the bowl tightly with plastic wrap or a lid.
- Refrigerate the pudding for at least 4 hours, or ideally overnight, until it thickens to a spoonable consistency.
- Check the pudding after refrigeration; if it’s too thick, stir in an extra splash of almond milk to loosen it up.
- Serve chilled directly from the bowl or portion into jars.
Perfectly creamy and subtly sweet, this pudding has a delightful gel-like texture that’s both satisfying and easy to customize. I love topping mine with fresh berries or a sprinkle of cinnamon for extra flair, making it feel like a treat any time of day.
Gluten-Free Banana Oatmeal Muffins
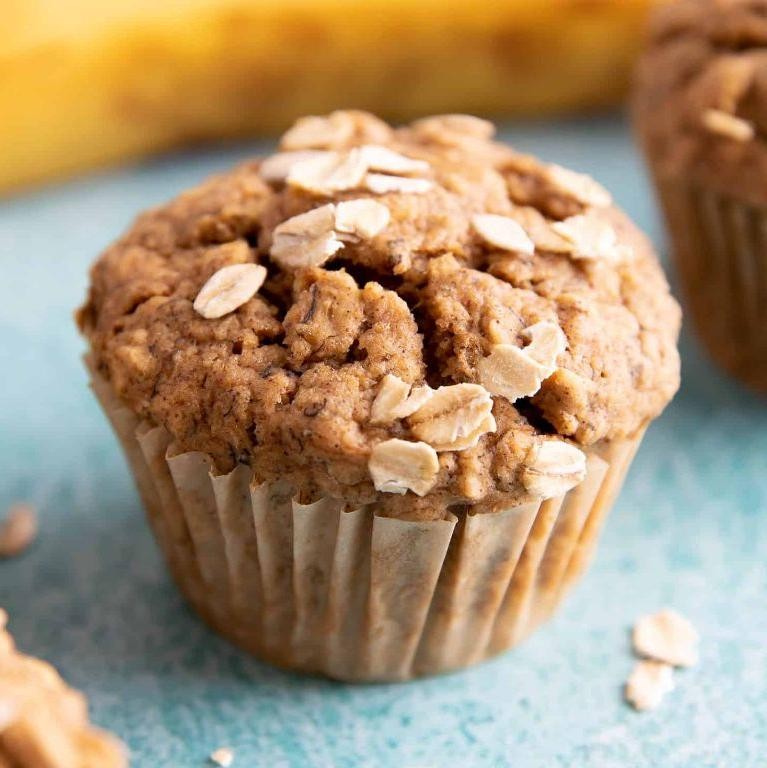
Sometimes I find myself with a bunch of overripe bananas on my counter and that familiar craving for something warm and comforting. That’s exactly how these gluten-free banana oatmeal muffins came to be last Sunday morning when I wanted something wholesome but didn’t feel like making a big production out of breakfast. They’re the perfect solution for using up those spotty bananas while creating something everyone in my household will actually eat.
12
muffins15
minutes20
minutesIngredients
– 2 cups of gluten-free rolled oats (I always use the old-fashioned kind)
– 3 medium overripe bananas (you know, the ones with all the brown spots)
– 2 large eggs from the fridge
– 1/3 cup of maple syrup (the real stuff, not pancake syrup)
– 1/4 cup of melted coconut oil
– A good splash of vanilla extract (about 1 teaspoon)
– 1 teaspoon of baking powder
– 1/2 teaspoon of baking soda
– A generous pinch of salt
– A couple of dashes of cinnamon
– 1/2 cup of chocolate chips (because everything’s better with chocolate)
Instructions
1. Preheat your oven to 350°F and line a 12-cup muffin tin with paper liners or grease them well.
2. Add the rolled oats to your blender or food processor and pulse until they reach a flour-like consistency, which usually takes about 30-45 seconds.
3. Tip: Don’t over-blend the oats or they can become gummy – you want them fine but not powdery.
4. In a large mixing bowl, mash the bananas with a fork until mostly smooth with just a few small chunks remaining.
5. Crack in the eggs and whisk them together with the bananas until well combined.
6. Pour in the maple syrup, melted coconut oil, and vanilla extract, then stir everything together.
7. Add the oat flour, baking powder, baking soda, salt, and cinnamon to the wet ingredients.
8. Gently fold the dry ingredients into the wet mixture until just combined – don’t overmix!
9. Tip: When making gluten-free baked goods, overmixing can lead to dense results, so stop as soon as you no longer see dry spots.
10. Fold in the chocolate chips until they’re evenly distributed throughout the batter.
11. Divide the batter evenly among the 12 muffin cups, filling each about 3/4 full.
12. Tip: For bakery-style muffin tops, fill the cups almost to the top – these don’t rise dramatically.
13. Bake for 18-22 minutes until the tops are golden brown and a toothpick inserted into the center comes out clean (except for maybe melted chocolate).
14. Let the muffins cool in the pan for 5 minutes before transferring them to a wire rack.
After they’ve cooled slightly, these muffins have the most wonderful moist texture from the bananas and oats, with little bursts of melted chocolate in every bite. I love how the cinnamon adds just enough warmth without overpowering the banana flavor. Sometimes I’ll split one open while it’s still warm and add a pat of butter, or crumble one over Greek yogurt for a more substantial breakfast.
Avocado and Egg Breakfast Burritos
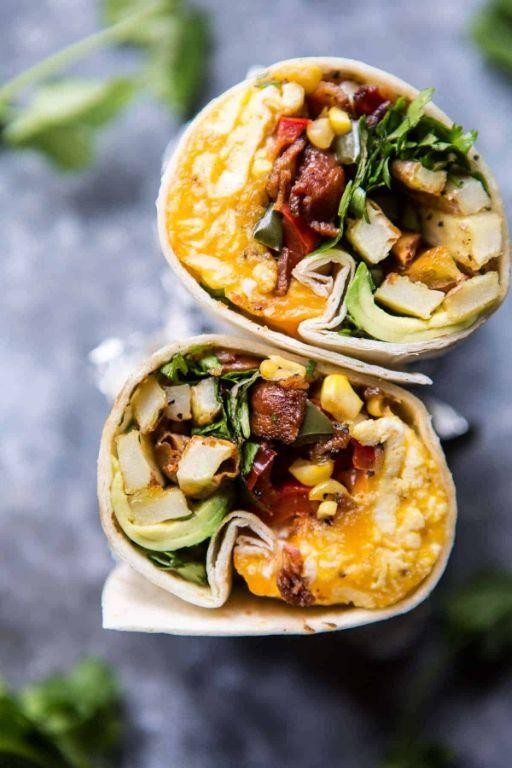
Keeping my family fed in the morning rush used to be a struggle until I discovered these avocado and egg breakfast burritos—they’re the perfect grab-and-go solution that actually tastes amazing. I love how I can prep the components ahead of time and just assemble everything while my coffee brews. These have become our weekday superhero, saving us from both hunger and fast-food temptation.
2
burritos10
minutes5
minutesIngredients
– 4 large flour tortillas (the burrito-sized ones)
– 6 large eggs
– 1 ripe avocado
– 1 cup of shredded cheddar cheese
– 2 tablespoons of milk
– A couple of tablespoons of butter
– A generous pinch of salt
– A few cracks of black pepper
– A splash of hot sauce (my secret weapon!)
Instructions
1. Crack 6 large eggs into a medium bowl.
2. Add 2 tablespoons of milk and a generous pinch of salt to the eggs.
3. Whisk the egg mixture vigorously for about 30 seconds until fully combined and slightly frothy.
4. Heat a non-stick skillet over medium heat and melt 2 tablespoons of butter until it stops bubbling.
5. Pour the egg mixture into the hot skillet and let it set for 15 seconds without stirring.
6. Gently push the cooked edges toward the center with a spatula, tilting the pan to let uncooked egg flow to the edges.
7. Continue this push-and-tilt motion every 20 seconds until eggs are softly set but still moist, about 3-4 minutes total.
8. Remove scrambled eggs from heat immediately—they’ll continue cooking from residual heat.
9. Warm 4 large flour tortillas in a dry skillet over medium heat for 20 seconds per side until pliable.
10. Cut 1 ripe avocado in half, remove the pit, and scoop the flesh into a small bowl.
11. Mash the avocado with a fork until slightly chunky, then season with a few cracks of black pepper.
12. Divide the scrambled eggs evenly among the 4 warmed tortillas, placing them in the center.
13. Top each with mashed avocado and 1/4 cup of shredded cheddar cheese.
14. Add a splash of hot sauce to each burrito if desired.
15. Fold the bottom edge of each tortilla up over the filling, then fold in the sides and roll tightly away from you.
Getting these burritos right means you’ll have the perfect balance of creamy avocado, fluffy eggs, and melty cheese in every bite. I love wrapping them in foil and tossing them in my bag for a proper breakfast on busy mornings—they stay warm for ages and the tortilla never gets soggy.
Peanut Butter and Banana Smoothie
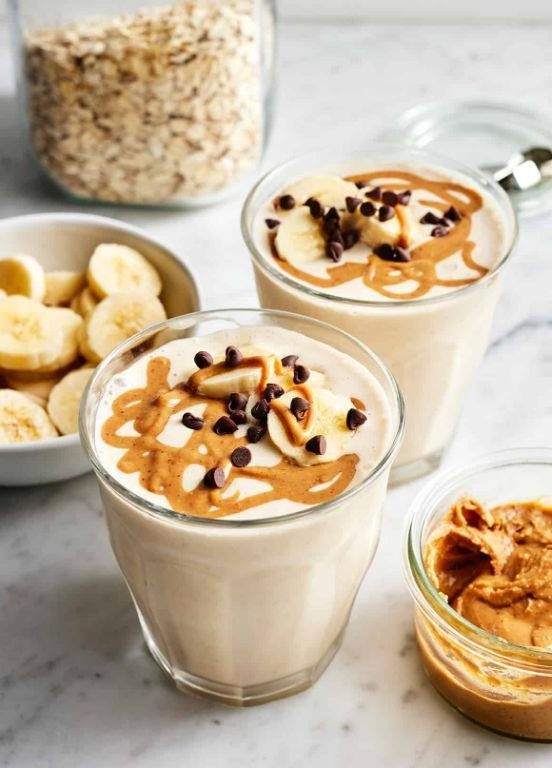
After a particularly hectic morning of chasing my toddler around the house, I found myself craving something quick, nutritious, and that didn’t require turning on the stove. A peanut butter and banana smoothie was the perfect solution, blending my favorite comforting flavors into one frosty glass. It’s become my go-to for a fast breakfast or a satisfying afternoon pick-me-up that feels like a treat but fuels me right.
1
servings5
minutesIngredients
- A couple of very ripe, spotty bananas (they make it sweeter!)
- A big scoop of creamy peanut butter, about 2 tablespoons
- A cup of cold milk (any kind you like)
- A generous handful of ice cubes
- A drizzle of honey, about 1 tablespoon, if your bananas aren’t super sweet
Instructions
- Peel your bananas and break them into 3-4 chunks each to help your blender out.
- Add the banana chunks, that big scoop of peanut butter, the cup of cold milk, the handful of ice, and the drizzle of honey (if using) into your blender pitcher.
- Securely fasten the lid on your blender—trust me, you don’t want a smoothie explosion all over your kitchen counter.
- Start blending on a low speed for about 10 seconds to break up the big ice chunks, which prevents the motor from straining.
- Increase the speed to high and blend for a full 45-60 seconds, or until the mixture is completely smooth with no visible ice pieces. Tip: For a thicker, almost milkshake-like texture, try using frozen banana slices instead of fresh.
- Stop the blender and check the consistency by tilting the pitcher; if it seems too thick, add another splash of milk and blend for another 15 seconds.
- Pour the finished smoothie immediately into a tall glass. Tip: If you’re not drinking it right away, give it a quick stir before serving, as it can sometimes separate.
Deliciously creamy and satisfying, this smoothie has the perfect thick-but-drinkable texture that clings to your straw. The classic flavor combo of peanut butter and banana is a true winner, feeling both nostalgic and energizing. I love pouring it into a chilled mason jar for a portable breakfast or even freezing it into popsicle molds for a healthy frozen treat the kids adore.
Zucchini and Egg Mini Frittatas
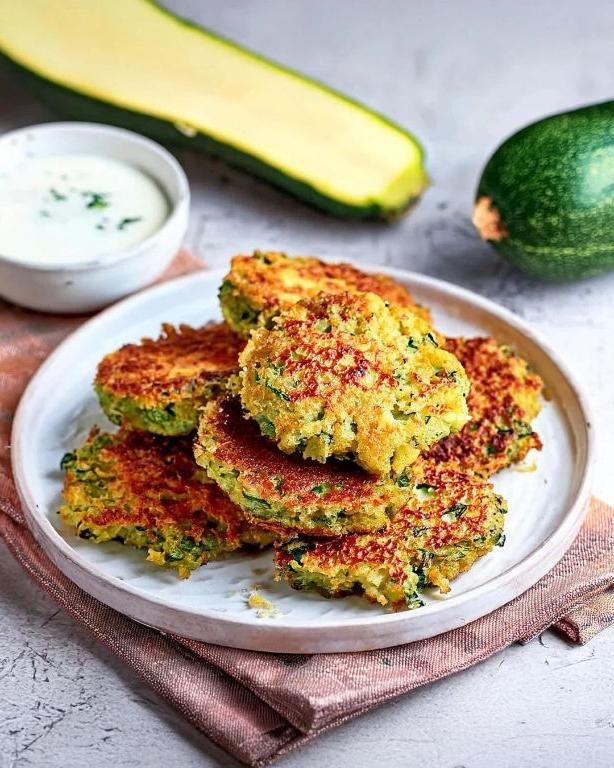
Perfect for those busy mornings when you need something nutritious but don’t have time to stand over the stove, these zucchini and egg mini frittatas have become my go-to breakfast prep. I actually started making these after my garden went wild with zucchini last summer—talk about a delicious way to use up that bounty!
12
portions15
minutes20
minutesIngredients
- 4 large eggs
- 1 cup of shredded zucchini (squeeze out that extra moisture!)
- A generous half-cup of shredded cheddar cheese
- A couple of tablespoons of finely chopped onion
- A splash of whole milk (about 2 tablespoons)
- 1 tablespoon of olive oil for greasing
- A pinch of salt and a few cracks of black pepper
Instructions
- Preheat your oven to 375°F and grab a standard 12-cup muffin tin.
- Brush each muffin cup with olive oil, making sure to coat the bottom and sides thoroughly to prevent sticking.
- In a medium bowl, whisk together the 4 eggs and 2 tablespoons of milk until fully combined and slightly frothy.
- Stir in the 1 cup of shredded zucchini, half-cup of cheddar cheese, 2 tablespoons of chopped onion, pinch of salt, and black pepper until evenly distributed.
- Divide the egg mixture evenly among the 12 prepared muffin cups, filling each about three-quarters full.
- Bake for 18-20 minutes at 375°F until the tops are golden and the centers feel firm when lightly pressed.
- Let the frittatas cool in the pan for 5 minutes before carefully removing them with a butter knife.
Velvety and light with little bursts of cheesy goodness, these mini frittatas have the perfect tender-crisp texture from the zucchini. I love serving them with a dollop of spicy salsa or stacking them between English muffins for a breakfast sandwich twist—they’re just as delicious cold straight from the fridge!
Sweet Potato and Black Bean Breakfast Tacos
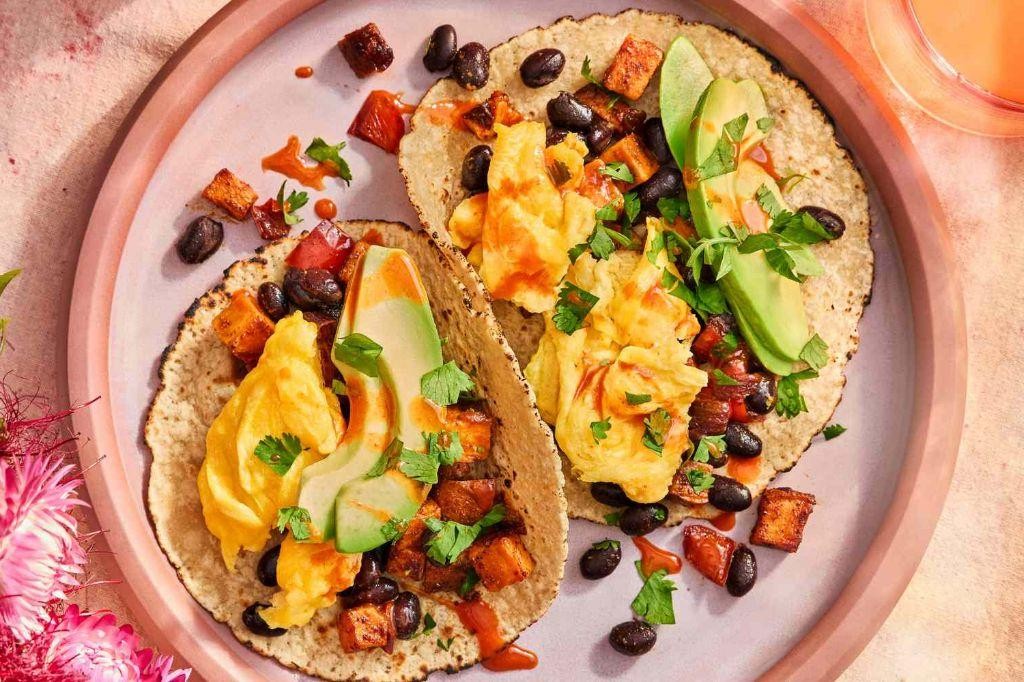
Yesterday morning, I found myself staring into the fridge with that familiar “what’s for breakfast” dilemma when inspiration struck—I had leftover roasted sweet potatoes and a can of black beans just begging to become something delicious. These breakfast tacos came together so quickly that I was eating before my coffee even finished brewing!
2
tacos15
minutes35
minutesIngredients
- 2 medium sweet potatoes, peeled and diced into ½-inch cubes
- 1 tablespoon olive oil
- ½ teaspoon chili powder
- ¼ teaspoon cumin
- A good pinch of salt
- 1 can (15 oz) black beans, rinsed and drained
- 4 small flour tortillas
- 2 large eggs
- A splash of milk
- A couple of tablespoons of shredded cheddar cheese
- Your favorite salsa for serving
- A handful of fresh cilantro leaves
Instructions
- Preheat your oven to 400°F and line a baking sheet with parchment paper.
- Toss the diced sweet potatoes with olive oil, chili powder, cumin, and salt until evenly coated.
- Spread the sweet potatoes in a single layer on the prepared baking sheet.
- Roast for 20-25 minutes until tender and slightly caramelized at the edges, flipping halfway through.
- While potatoes roast, warm the black beans in a small saucepan over medium heat for 5-7 minutes.
- Heat a non-stick skillet over medium heat and warm each tortilla for about 30 seconds per side until pliable.
- Whisk together eggs and milk in a small bowl until well combined.
- Pour the egg mixture into the same skillet and scramble over medium-low heat for 2-3 minutes until softly set.
- Assemble tacos by dividing roasted sweet potatoes, warm black beans, scrambled eggs, and cheese among the tortillas.
- Top each taco with salsa and fresh cilantro leaves before serving immediately.
Out of the oven, these tacos deliver the most satisfying contrast—the creamy sweet potatoes against the hearty beans, all wrapped in warm tortillas. I love how the slight spice from the chili powder plays with the fresh pop of cilantro, making these feel both comforting and vibrant. Sometimes I’ll add sliced avocado or a dollop of Greek yogurt for extra creaminess when I’m feeling fancy!
Yogurt and Nut Parfait
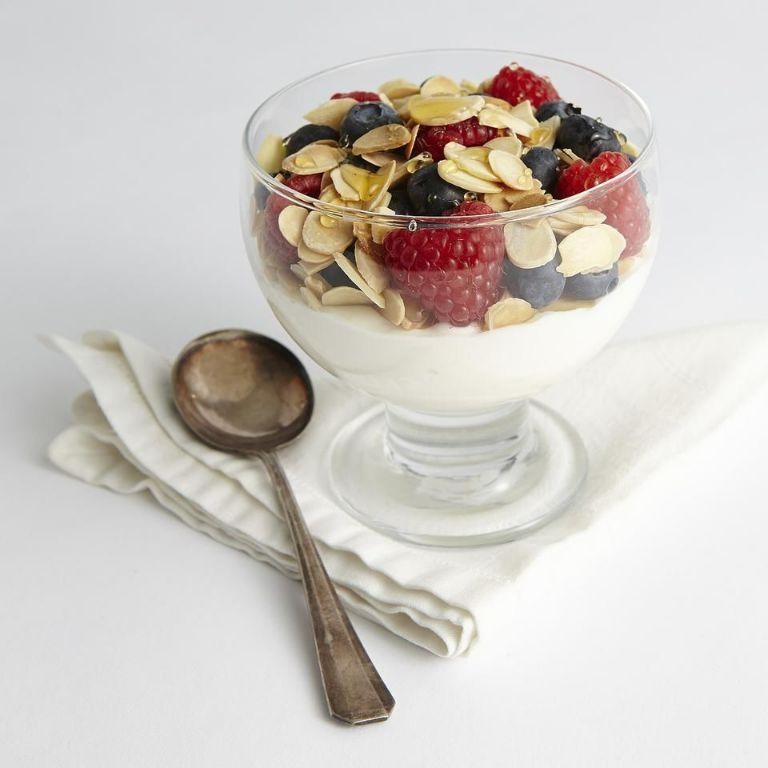
My mornings used to be such a rushed blur until I discovered this little jar of joy that actually makes me look forward to getting out of bed. This yogurt and nut parfait has become my go-to breakfast that feels indulgent but takes barely any effort to throw together.
1
servings5
minutesIngredients
– A couple cups of plain Greek yogurt
– A generous drizzle of honey
– A handful of your favorite granola
– A sprinkle of chopped walnuts
– A splash of vanilla extract
– A pinch of cinnamon
Instructions
1. Grab your favorite glass or jar—I find tall, clear ones make the layers look extra pretty.
2. Spoon about half a cup of Greek yogurt into the bottom of your glass, spreading it evenly.
3. Drizzle about one tablespoon of honey over the yogurt layer in a circular motion.
4. Sprinkle a quarter cup of granola evenly over the honey layer—this creates that satisfying crunch.
5. Add another half cup of Greek yogurt on top of the granola layer.
6. Mix a quarter teaspoon of vanilla extract directly into the remaining yogurt before adding it—this distributes the flavor beautifully throughout.
7. Top with another quarter cup of granola and a tablespoon of chopped walnuts.
8. Finish with a light dusting of cinnamon—about an eighth teaspoon—across the top.
9. Let the parfait sit for 2-3 minutes before serving to allow the granola to soften slightly.
That first spoonful delivers the most wonderful contrast between the cool, creamy yogurt and the crunchy, nutty layers. The honey caramelizes slightly against the walnuts, creating little pockets of sweet, toasty flavor that make this feel way more special than your average breakfast.
Pumpkin Spice Overnight Oats
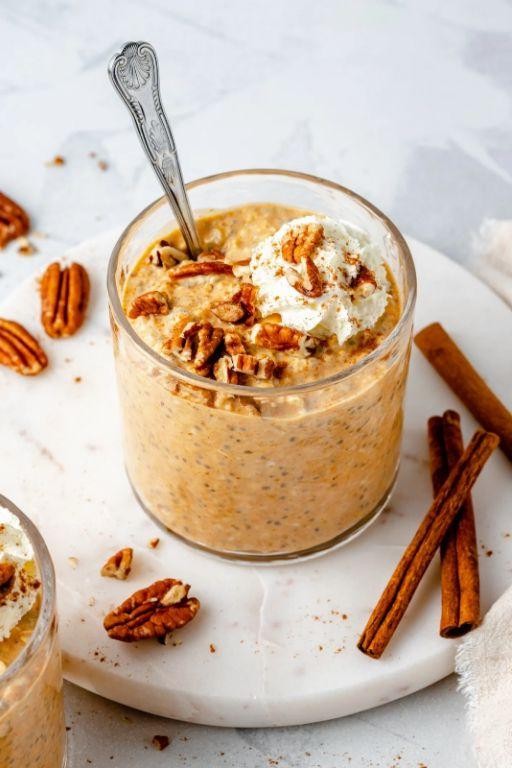
Dreading those rushed mornings but craving something cozy and seasonal? I was too, until I discovered this make-ahead breakfast that feels like a warm hug in a jar. As someone who’s perpetually running late but still wants a nutritious start, overnight oats have become my secret weapon, especially when pumpkin spice season rolls around.
1
servings5
minutesIngredients
– A half cup of old-fashioned rolled oats
– A third cup of pumpkin puree (not pie filling!)
– A generous splash of milk, about a half cup
– A couple of tablespoons of maple syrup
– A teaspoon of pumpkin pie spice
– A pinch of salt
– A handful of chopped pecans for topping
Instructions
1. Grab a 12-ounce mason jar or any container with a tight-fitting lid.
2. Measure exactly 1/2 cup of old-fashioned rolled oats and pour them into your jar.
3. Add 1/3 cup of pumpkin puree directly on top of the oats.
4. Pour in 1/2 cup of milk—I find whole milk makes it creamier, but any type works.
5. Drizzle 2 tablespoons of maple syrup over the mixture.
6. Sprinkle 1 teaspoon of pumpkin pie spice evenly across the surface.
7. Add just a pinch of salt to balance the sweetness.
8. Secure the lid tightly and shake vigorously for 30 seconds until everything is fully combined.
9. Refrigerate the jar for at least 8 hours, or overnight—this allows the oats to fully soften and absorb the flavors.
10. When ready to eat, remove from refrigerator and top with a handful of chopped pecans.
11. Stir thoroughly to incorporate the pecans throughout the mixture.
12. Serve chilled directly from the jar.
Zesty with warm spices and creamy from the overnight soak, these oats develop an almost pudding-like texture that’s incredibly satisfying. The pecans add a delightful crunch against the smooth base, making each spoonful a perfect balance. I love drizzling extra maple syrup over top or even adding a dollop of Greek yogurt for extra protein—it transforms this simple jar into a complete breakfast that keeps me full until lunch.
Ham and Cheese Breakfast Crepes

Gosh, there’s something magical about starting the day with these ham and cheese breakfast crepes—they always transport me back to lazy Sunday mornings at my grandma’s house, where the scent of sizzling ham would drift through her cozy kitchen. I’ve perfected this recipe over countless weekend brunches, and now it’s become my go-to when I want to impress overnight guests without spending hours cooking.
5
crepes15
minutes35
minutesIngredients
– 1 cup of all-purpose flour
– 2 large eggs
– 1 ¼ cups of whole milk
– A couple tablespoons of melted butter
– A generous pinch of salt
– 8 thin slices of deli ham
– 1 cup of shredded cheddar cheese
– A splash of vegetable oil for the pan
Instructions
1. Whisk together 1 cup of all-purpose flour, 2 large eggs, 1 ¼ cups of whole milk, 2 tablespoons of melted butter, and a generous pinch of salt in a medium bowl until the batter is completely smooth with no lumps.
2. Heat a 10-inch non-stick skillet over medium heat and lightly brush the surface with vegetable oil using a pastry brush.
3. Pour ¼ cup of batter into the center of the hot skillet and immediately swirl the pan to spread the batter into a thin, even circle.
4. Cook the crepe for 60-90 seconds until the edges begin to lift and the bottom develops light golden spots.
5. Flip the crepe using a thin spatula and cook for another 45-60 seconds until the second side is lightly browned.
6. Transfer the cooked crepe to a plate and repeat the process with remaining batter, stacking crepes with parchment paper between each one to prevent sticking.
7. Place one crepe flat on your work surface and arrange 2 slices of deli ham in the center, leaving a 1-inch border around the edges.
8. Sprinkle 2 tablespoons of shredded cheddar cheese evenly over the ham.
9. Fold the crepe by bringing two opposite sides toward the center, then rolling it up tightly like a burrito.
10. Return the filled crepe to the skillet over medium-low heat and cook for 2-3 minutes per side until the cheese is completely melted and the exterior is crisp.
The melted cheddar becomes wonderfully stringy when you cut into these crepes, while the ham adds a savory saltiness that balances the delicate eggy wrapper. I love serving these with a dollop of spicy salsa or folding in some sautéed mushrooms for an extra flavor boost—they’re equally delicious whether you eat them with your hands or with a fork and knife.
Coconut Flour Pancakes
Finally, after years of gluten-free breakfast experiments, I’ve perfected coconut flour pancakes that actually hold together! My kids used to call my early attempts “pancake confetti” until I discovered the magic ratio that creates fluffy, satisfying stacks everyone craves on lazy weekend mornings.
4
pancakes10
minutes20
minutesIngredients
– ½ cup coconut flour
– ¼ cup tapioca flour
– 1 teaspoon baking powder
– A pinch of salt
– 4 large eggs
– ¾ cup canned coconut milk
– 2 tablespoons maple syrup
– 1 teaspoon vanilla extract
– A generous splash of avocado oil for cooking
Instructions
1. Whisk together ½ cup coconut flour, ¼ cup tapioca flour, 1 teaspoon baking powder, and a pinch of salt in a medium bowl until no lumps remain.
2. Crack 4 large eggs into a separate bowl and whisk until fully combined and slightly frothy.
3. Pour ¾ cup canned coconut milk, 2 tablespoons maple syrup, and 1 teaspoon vanilla extract into the eggs, whisking continuously.
4. Gradually add the wet ingredients to the dry ingredients, stirring until a thick batter forms with no dry spots.
5. Let the batter rest for exactly 5 minutes to allow the coconut flour to fully absorb the liquid.
6. Heat a non-stick skillet over medium-low heat (325°F if using an electric griddle) and add a teaspoon of avocado oil.
7. Scoop ¼ cup portions of batter onto the heated surface, spreading gently into 4-inch circles with the back of your spoon.
8. Cook for 3-4 minutes until the edges appear dry and small bubbles form across the surface.
9. Carefully flip each pancake using a thin spatula and cook for another 2-3 minutes until golden brown on both sides.
10. Transfer cooked pancakes to a wire rack instead of stacking them to prevent steaming and sogginess.
11. Repeat with remaining batter, adding more avocado oil between batches as needed.
12. Serve immediately while warm and crispy-edged. My family adores how these pancakes develop a delicate crisp exterior while staying remarkably moist inside, with the subtle coconut flavor pairing perfectly with fresh berries or an extra drizzle of maple syrup for those extra-indulgent mornings.
Spinach and Cheese Egg Muffins

Perfect for those hectic mornings when you’re scrambling to get out the door, these spinach and cheese egg muffins have become my absolute breakfast lifesaver. I first started making them when my toddler refused to eat anything green, and now they’re a weekly staple that even my picky eater devours.
6
muffins10
minutes20
minutesIngredients
- 6 large eggs
- A generous handful of fresh spinach, roughly chopped
- About half a cup of shredded cheddar cheese
- A couple tablespoons of milk
- A pinch of salt and black pepper
- A quick spray of cooking oil for the muffin tin
Instructions
- Preheat your oven to 350°F and grab your standard 6-cup muffin tin.
- Give each muffin cup a light spray with cooking oil to prevent sticking – this makes cleanup so much easier!
- Crack all 6 eggs into a medium mixing bowl and whisk them until fully combined and slightly frothy.
- Pour in your couple tablespoons of milk and whisk again until everything is well incorporated.
- Add your generous handful of chopped spinach to the egg mixture – don’t worry if it seems like a lot, it wilts down beautifully.
- Sprinkle in about half a cup of shredded cheddar cheese and mix gently with a fork.
- Season with a pinch of salt and black pepper, then give everything one final stir to distribute the ingredients evenly.
- Carefully pour the egg mixture into the prepared muffin cups, filling each about three-quarters full to allow for rising.
- Bake at 350°F for exactly 18-20 minutes, until the tops are golden and the centers feel firm when lightly pressed.
- Let the muffins cool in the tin for 5 minutes before removing them with a butter knife – this resting time helps them set properly.
Zesty and satisfying, these muffins emerge from the oven with fluffy interiors and slightly crisp edges that contrast beautifully. The melted cheddar creates little pockets of gooey goodness throughout, while the spinach adds just the right earthy note without being overwhelming. I love serving them alongside fresh fruit for a balanced breakfast, or sometimes I’ll crumble one over a salad for an easy protein boost at lunch.
Apple Cinnamon Breakfast Bars
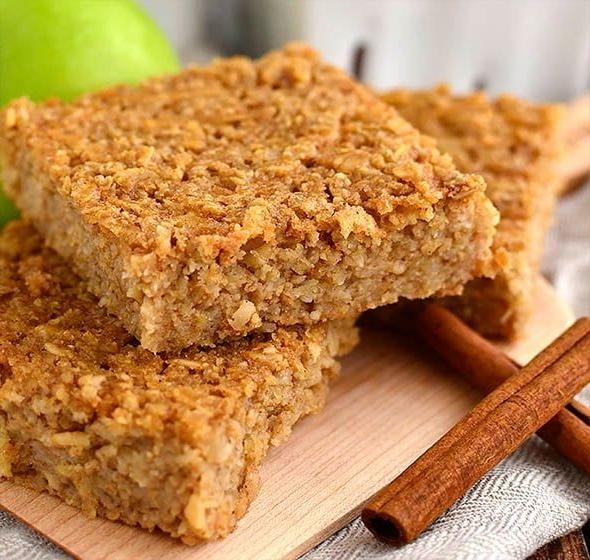
Finally, after years of soggy granola bars and rushed breakfasts, I’ve perfected these apple cinnamon bars that actually hold together! My kids used to complain about store-bought bars, but now they beg me to make these on Sunday evenings. There’s something magical about the smell of cinnamon and baked apples filling the kitchen that makes Monday mornings feel less daunting.
9
bars15
minutes30
minutesIngredients
– 2 cups of old-fashioned rolled oats (not the quick-cook kind)
– 1 ½ cups of chopped apples, skin on for extra fiber
– ½ cup of creamy almond butter
– ⅓ cup of pure maple syrup (the real stuff, not pancake syrup)
– 2 large eggs
– 1 tablespoon of ground cinnamon (don’t be shy with it)
– 1 teaspoon of vanilla extract
– A pinch of sea salt
– A splash of milk if your batter seems too thick
Instructions
1. Preheat your oven to 350°F and line an 8×8 inch baking pan with parchment paper, leaving some overhang on two sides for easy removal.
2. In a large mixing bowl, combine the rolled oats, chopped apples, cinnamon, and sea salt until everything is evenly distributed.
3. In a separate medium bowl, whisk together the almond butter, maple syrup, eggs, and vanilla extract until the mixture is smooth and well-combined.
4. Pour the wet ingredients into the dry ingredients and mix thoroughly until every oat is coated and the apples are evenly distributed throughout the batter.
5. If the batter seems too thick to spread easily, add a splash of milk and stir until it reaches a spreadable consistency.
6. Transfer the batter to your prepared baking pan and use a spatula to press it firmly into an even layer, making sure to get into all the corners.
7. Bake for 25-30 minutes until the edges are golden brown and the center feels firm when you gently press it with your finger.
8. Remove from the oven and let the bars cool completely in the pan on a wire rack for at least 1 hour before cutting – this is crucial for clean slices!
9. Once completely cooled, use the parchment paper overhang to lift the entire slab out of the pan onto a cutting board.
10. Cut into 9 even bars using a sharp knife, wiping the blade clean between cuts for neater edges. Last night I discovered these bars are absolutely divine when warmed for 15 seconds in the microwave and served with a dollop of Greek yogurt. The soft baked apples create little pockets of sweetness against the hearty oat base, while the cinnamon makes your whole kitchen smell like autumn comfort.
Conclusion
Looking for quick, gluten-free breakfasts that actually taste amazing? This collection proves you don’t need gluten to start your day right. We’d love to hear which recipes become your new favorites—drop us a comment below! If you found these ideas helpful, please share this roundup on Pinterest to help other busy food lovers discover delicious morning options.


