Mmm, get ready to ditch dinner dilemmas! Whether you’re gluten-free, dairy-free, or just craving something deliciously different, this roundup is your new best friend. We’ve gathered 32 mouthwatering recipes that promise flavor-packed, satisfying meals everyone at your table will love. From quick weeknight wonders to cozy comfort classics, your perfect dinner is just a scroll away. Let’s dive in and make tonight’s meal unforgettable!
Lemon Herb Grilled Chicken with Quinoa Salad
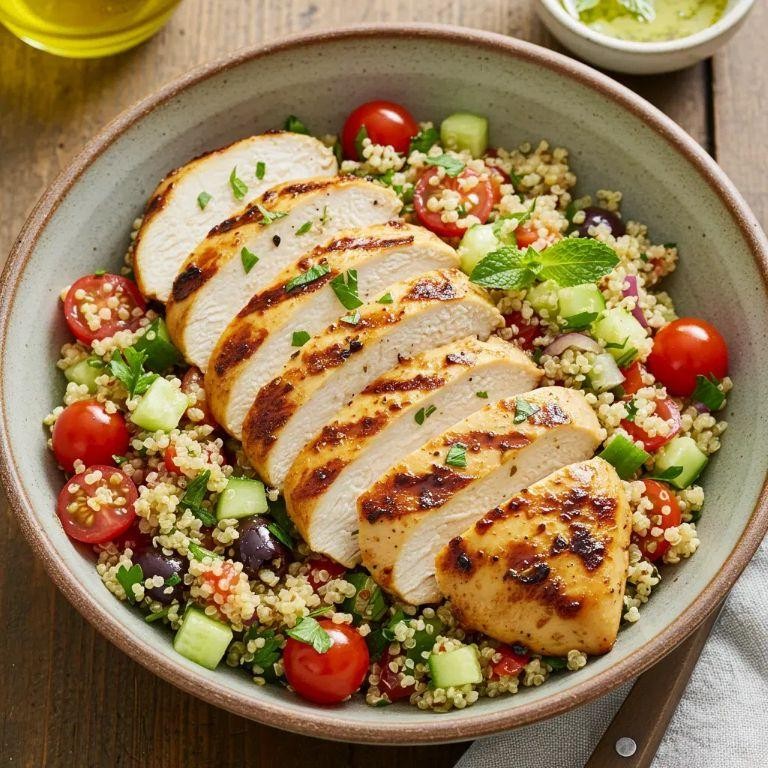
Yielded by the warmth of summer, this Lemon Herb Grilled Chicken with Quinoa Salad is a vibrant, wholesome dish that marries smoky, charred poultry with a bright, herbaceous grain salad. It’s a celebration of fresh flavors and textures, perfect for al fresco dining or a light yet satisfying weeknight meal.
Serving: 4 | Pre Time: 20 minutes | Cooking Time: 25 minutes
Ingredients
– 4 boneless, skinless chicken breasts (about 6 ounces each)
– 1/4 cup olive oil
– 2 lemons
– 2 cloves garlic
– 1 tablespoon fresh rosemary
– 1 tablespoon fresh thyme
– 1 teaspoon kosher salt
– 1/2 teaspoon black pepper
– 1 cup quinoa
– 2 cups water
– 1/2 cup chopped fresh parsley
– 1/4 cup chopped fresh mint
– 1/2 cup crumbled feta cheese
– 1/2 cup halved cherry tomatoes
– 1/4 cup sliced red onion
Instructions
1. Zest and juice 1 lemon into a medium bowl.
2. Mince 2 cloves garlic and add to the bowl.
3. Finely chop 1 tablespoon fresh rosemary and 1 tablespoon fresh thyme, then stir into the bowl with 1/4 cup olive oil, 1 teaspoon kosher salt, and 1/2 teaspoon black pepper to create a marinade.
4. Place 4 chicken breasts in a shallow dish and pour the marinade over them, turning to coat evenly. Cover and refrigerate for at least 15 minutes.
5. Rinse 1 cup quinoa under cold water in a fine-mesh strainer for 1 minute to remove bitterness.
6. Combine the rinsed quinoa and 2 cups water in a saucepan, bring to a boil over high heat, then reduce heat to low, cover, and simmer for 15 minutes until the water is absorbed and grains are tender.
7. Preheat a grill or grill pan to medium-high heat (about 400°F).
8. Remove chicken from marinade, shaking off excess, and grill for 6-7 minutes per side until internal temperature reaches 165°F and juices run clear.
9. Transfer chicken to a cutting board, tent with foil, and let rest for 5 minutes to retain moisture.
10. Fluff the cooked quinoa with a fork and transfer to a large bowl to cool slightly.
11. Slice the remaining lemon into wedges for serving.
12. To the quinoa, add 1/2 cup chopped parsley, 1/4 cup chopped mint, 1/2 cup crumbled feta, 1/2 cup halved cherry tomatoes, and 1/4 cup sliced red onion, tossing gently to combine.
13. Slice the rested chicken against the grain into 1/2-inch thick pieces.
14. Divide the quinoa salad among plates, top with sliced chicken, and garnish with lemon wedges.
As you plate this dish, the tender, juicy chicken offers a smoky contrast to the fluffy, herb-kissed quinoa, while bursts of feta and tomato add creamy and tangy notes. For a creative twist, serve it in lettuce cups or alongside grilled vegetables for a complete, colorful feast.
Zucchini Noodles with Pesto and Grilled Shrimp

Crafted for those seeking a light yet satisfying meal, zucchini noodles with pesto and grilled shrimp offer a vibrant, garden-fresh alternative to traditional pasta. This elegant dish combines the delicate sweetness of shrimp with the herbaceous brightness of homemade pesto, all twirled around tender zucchini ribbons for a meal that feels both indulgent and nourishing. It’s a perfect showcase for summer’s bounty, ready to impress at any dinner table.
Serving: 4 | Pre Time: 20 minutes | Cooking Time: 10 minutes
Ingredients
– 4 medium zucchini
– 1 pound large shrimp, peeled and deveined
– 2 cups fresh basil leaves, packed
– 1/2 cup grated Parmesan cheese
– 1/3 cup pine nuts
– 2 cloves garlic
– 1/2 cup extra-virgin olive oil, divided
– 1 tablespoon lemon juice
– 1/2 teaspoon salt
– 1/4 teaspoon black pepper
Instructions
1. Using a spiralizer, create noodles from all 4 zucchini and set them aside in a large bowl.
2. In a food processor, combine the basil, Parmesan cheese, pine nuts, and garlic cloves, pulsing until finely chopped.
3. With the processor running, slowly drizzle in 1/4 cup of the olive oil until the pesto forms a smooth, cohesive sauce.
4. Stir the lemon juice, salt, and black pepper into the pesto, then transfer it to a small bowl.
5. Pat the shrimp dry with paper towels to ensure a good sear, then toss them with the remaining 1/4 cup of olive oil.
6. Preheat a grill or grill pan to medium-high heat, about 400°F.
7. Grill the shrimp for 2-3 minutes per side, until they turn pink and opaque with light char marks.
8. In a large skillet over medium heat, warm the zucchini noodles for 2-3 minutes, just until they soften slightly but remain al dente.
9. Remove the skillet from heat and gently fold in the prepared pesto until the noodles are evenly coated.
10. Divide the pesto-coated zucchini noodles among 4 plates and top each serving with the grilled shrimp.
For a delightful finish, this dish presents a harmonious blend of textures: the zucchini noodles offer a crisp-tender bite, while the shrimp provide a succulent, smoky contrast. The pesto lends a creamy, aromatic depth that ties everything together beautifully. Consider garnishing with extra pine nuts or a sprinkle of Parmesan for added crunch, or serve it alongside a crisp white wine to elevate the dining experience.
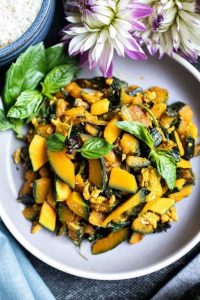
Spaghetti Squash with Roasted Vegetables
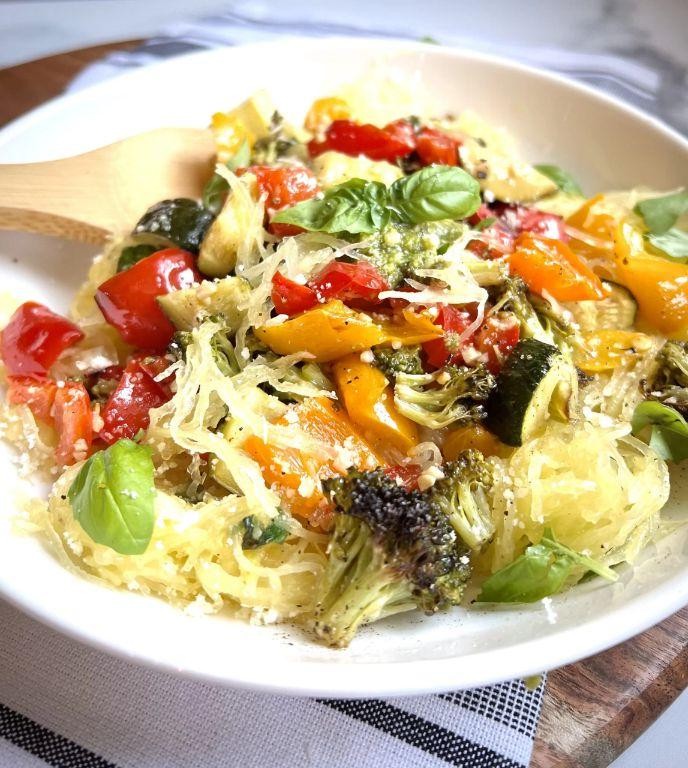
Kaleidoscopic in its autumnal hues, this Spaghetti Squash with Roasted Vegetables transforms humble produce into an elegant, nutrient-dense centerpiece. Its delicate, noodle-like strands provide a naturally gluten-free base, while a medley of caramelized vegetables adds depth and vibrant color. Perfect for a cozy dinner or impressive holiday side, this dish celebrates simplicity with sophisticated flair.
Serving: 4 | Pre Time: 15 minutes | Cooking Time: 50 minutes
Ingredients
– 1 large spaghetti squash (about 3 lbs)
– 2 tbsp olive oil, divided
– 1 tsp kosher salt, divided
– 1/2 tsp black pepper, divided
– 1 red bell pepper, seeded and cut into 1-inch pieces
– 1 yellow bell pepper, seeded and cut into 1-inch pieces
– 1 medium zucchini, cut into 1/2-inch rounds
– 1 small red onion, cut into 1-inch wedges
– 3 cloves garlic, minced
– 1 tbsp fresh thyme leaves
– 1/4 cup grated Parmesan cheese
Instructions
1. Preheat your oven to 400°F and line a large baking sheet with parchment paper.
2. Carefully slice the spaghetti squash in half lengthwise using a sharp chef’s knife, then scoop out and discard the seeds and stringy pulp with a spoon.
3. Drizzle the cut sides of the squash with 1 tablespoon of olive oil and season evenly with 1/2 teaspoon of kosher salt and 1/4 teaspoon of black pepper.
4. Place the squash halves cut-side down on the prepared baking sheet and roast for 35-40 minutes, or until the flesh is easily pierced with a fork and pulls apart into strands.
5. While the squash roasts, toss the red bell pepper, yellow bell pepper, zucchini, and red onion with the remaining 1 tablespoon of olive oil, 1/2 teaspoon of kosher salt, and 1/4 teaspoon of black pepper on a separate baking sheet.
6. Spread the vegetables in a single layer and roast at 400°F for 20-25 minutes, stirring halfway through, until they are tender and lightly charred at the edges.
7. Remove both the squash and vegetables from the oven and let the squash cool for 5 minutes until safe to handle.
8. Use a fork to scrape the flesh of the squash into long, spaghetti-like strands, transferring them to a large serving bowl.
9. Gently fold in the roasted vegetables, minced garlic, and fresh thyme leaves until evenly combined.
10. Sprinkle the grated Parmesan cheese over the top and serve immediately.
Naturally sweet and savory, the roasted vegetables melt into the tender squash strands, creating a satisfying texture that is both hearty and light. For a creative twist, top with toasted pine nuts or a drizzle of browned butter, or serve alongside grilled chicken for a complete meal.
Coconut Curry Lentil Soup

Under the gray winter sky, a bowl of Coconut Curry Lentil Soup offers a vibrant, aromatic escape, blending creamy coconut milk with earthy lentils and warm spices for a comforting, nourishing meal that feels both indulgent and wholesome. This one-pot wonder comes together with minimal effort, delivering layers of flavor that deepen beautifully overnight, making it an ideal make-ahead dish for busy weeknights or cozy gatherings. Each spoonful promises a harmonious balance of richness and brightness, a testament to how simple ingredients can transform into something truly extraordinary.
Serving: 6 | Pre Time: 15 minutes | Cooking Time: 35 minutes
Ingredients
– 2 tbsp olive oil
– 1 medium yellow onion, diced
– 3 cloves garlic, minced
– 1 tbsp fresh ginger, grated
– 2 tbsp red curry paste
– 1 tsp ground turmeric
– 1 tsp ground cumin
– 1 cup red lentils, rinsed
– 4 cups vegetable broth
– 1 (13.5 oz) can full-fat coconut milk
– 1 tbsp fresh lime juice
– 1/2 tsp salt
– 1/4 cup fresh cilantro, chopped
Instructions
1. Heat 2 tbsp olive oil in a large pot over medium heat until shimmering, about 2 minutes.
2. Add 1 medium diced yellow onion and cook, stirring occasionally, until softened and translucent, 5–7 minutes.
3. Stir in 3 cloves minced garlic and 1 tbsp grated fresh ginger, cooking until fragrant, 1 minute.
4. Add 2 tbsp red curry paste, 1 tsp ground turmeric, and 1 tsp ground cumin, toasting the spices while stirring constantly for 30 seconds to release their oils.
5. Tip: Toasting the spices briefly enhances their depth without burning them.
6. Pour in 1 cup rinsed red lentils and 4 cups vegetable broth, stirring to combine.
7. Bring the mixture to a boil, then reduce heat to low, cover, and simmer for 20 minutes until lentils are tender.
8. Tip: Simmer covered to prevent evaporation and ensure the lentils cook evenly.
9. Stir in 1 (13.5 oz) can full-fat coconut milk, 1 tbsp fresh lime juice, and 1/2 tsp salt, heating gently for 5 minutes without boiling to meld flavors.
10. Remove from heat and let sit for 5 minutes to allow the soup to thicken slightly.
11. Tip: For a creamier texture, blend half the soup with an immersion blender before serving.
12. Garnish with 1/4 cup chopped fresh cilantro just before serving.
But the true magic of this soup lies in its velvety texture, where the lentils break down into a luscious base that cradles the aromatic curry and coconut notes. Serve it topped with a drizzle of coconut milk and a sprinkle of crispy fried shallots for added crunch, or pair it with crusty bread to soak up every last drop. Its flavors intensify after resting, making leftovers a coveted treat the next day.
Almond-Crusted Baked Salmon
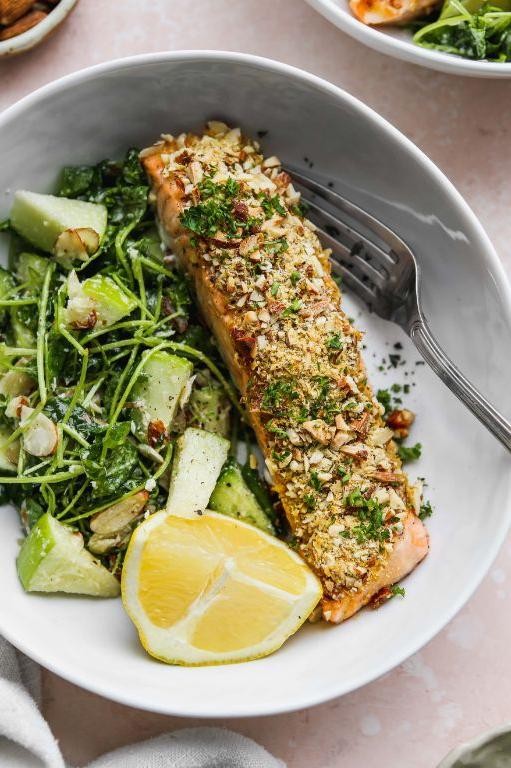
Meticulously crafted yet surprisingly simple, this almond-crusted baked salmon transforms an elegant protein into a weeknight-friendly masterpiece. The nutty, golden crust yields to tender, flaky fish beneath, creating a delightful contrast that feels both special and approachable. With minimal hands-on time, it’s a dish that promises to impress without demanding hours in the kitchen.
Serving: 4 | Pre Time: 15 minutes | Cooking Time: 15 minutes
Ingredients
– 4 (6-ounce) salmon fillets, skin-on or skinless
– 1/2 cup sliced almonds, finely chopped
– 1/4 cup panko breadcrumbs
– 2 tablespoons grated Parmesan cheese
– 1 tablespoon chopped fresh parsley
– 1/2 teaspoon garlic powder
– 1/4 teaspoon smoked paprika
– 1/4 teaspoon kosher salt
– 1/8 teaspoon black pepper
– 2 tablespoons Dijon mustard
– 1 tablespoon honey
– 1 tablespoon olive oil
– Lemon wedges, for serving
Instructions
1. Preheat your oven to 400°F (200°C) and line a rimmed baking sheet with parchment paper for easy cleanup.
2. Pat the 4 salmon fillets completely dry with paper towels to ensure the crust adheres properly.
3. In a medium bowl, combine the 1/2 cup finely chopped almonds, 1/4 cup panko, 2 tablespoons Parmesan, 1 tablespoon parsley, 1/2 teaspoon garlic powder, 1/4 teaspoon smoked paprika, 1/4 teaspoon kosher salt, and 1/8 teaspoon black pepper.
4. In a small bowl, whisk together the 2 tablespoons Dijon mustard and 1 tablespoon honey until smooth.
5. Brush the top of each salmon fillet evenly with the mustard-honey mixture, using all of it.
6. Press the almond mixture firmly onto the mustard-coated tops of the fillets, creating an even layer.
7. Drizzle the 1 tablespoon olive oil over the crusted fillets to promote browning.
8. Bake the salmon on the prepared sheet for 12-15 minutes, until the crust is deeply golden and the fish flakes easily with a fork, checking at the 12-minute mark to prevent overcooking.
9. Remove the baking sheet from the oven and let the salmon rest for 3 minutes before serving to allow the juices to redistribute.
10. Serve the salmon immediately with fresh lemon wedges on the side.
Succulent and perfectly cooked, the salmon flakes into moist, tender pieces beneath its crisp, fragrant crust. The almonds toast to a nutty richness that complements the subtle sweetness from the honey glaze, while a squeeze of lemon brightens each bite. For a complete meal, plate it alongside roasted asparagus or a simple arugula salad dressed with lemon vinaigrette.
Stuffed Bell Peppers with Cauliflower Rice
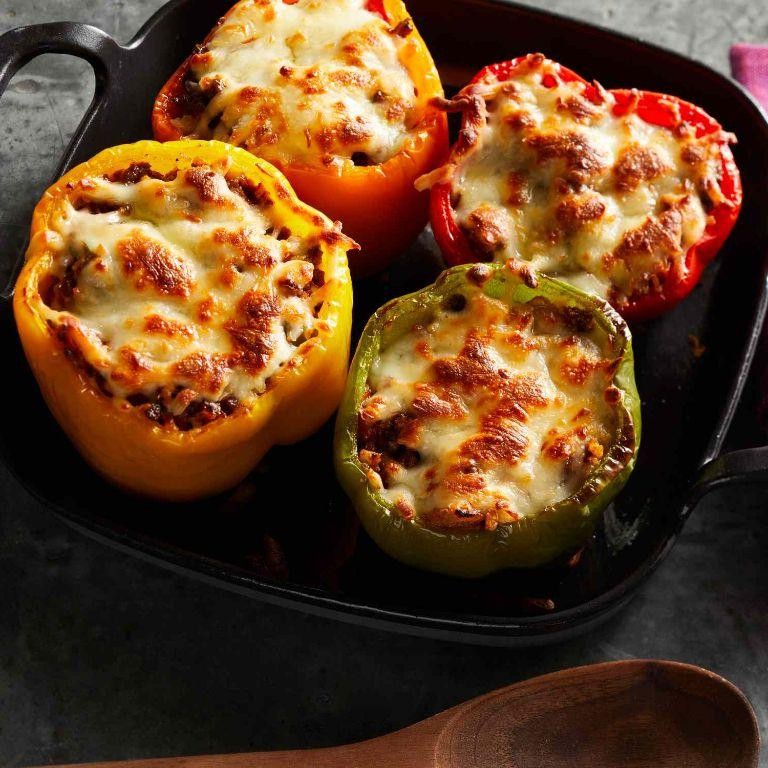
Radiantly colorful and brimming with wholesome ingredients, these stuffed bell peppers offer a satisfying and elegant meal that feels both comforting and nourishing. Featuring a savory filling of seasoned cauliflower rice, lean ground turkey, and melted cheese, they are a delightful twist on a classic that is as beautiful on the plate as it is delicious. Perfect for a weeknight dinner or a special gathering, this dish promises to become a new favorite in your culinary repertoire.
Serving: 4 | Pre Time: 20 minutes | Cooking Time: 35 minutes
Ingredients
– 4 large bell peppers (any color)
– 1 tablespoon olive oil
– 1 pound lean ground turkey
– 1 small yellow onion, finely diced
– 2 cloves garlic, minced
– 4 cups riced cauliflower
– 1 (15-ounce) can diced tomatoes, drained
– 1 teaspoon dried oregano
– 1 teaspoon paprika
– 1/2 teaspoon salt
– 1/4 teaspoon black pepper
– 1 cup shredded mozzarella cheese
– 2 tablespoons chopped fresh parsley
Instructions
1. Preheat your oven to 375°F (190°C) and lightly grease a 9×13-inch baking dish.
2. Slice the tops off the bell peppers, remove the seeds and membranes, and place them upright in the prepared dish.
3. Heat the olive oil in a large skillet over medium-high heat until shimmering, about 1 minute.
4. Add the ground turkey and cook, breaking it up with a spoon, until no pink remains, approximately 5-7 minutes.
5. Stir in the diced onion and minced garlic, cooking until the onion is translucent and fragrant, about 3-4 minutes.
6. Add the riced cauliflower to the skillet and cook, stirring occasionally, until it begins to soften, about 5 minutes.
7. Mix in the drained diced tomatoes, dried oregano, paprika, salt, and black pepper, and cook for 2 more minutes to blend the flavors.
8. Remove the skillet from the heat and fold in 1/2 cup of the shredded mozzarella cheese and the chopped parsley.
9. Evenly divide the filling among the bell peppers, packing it gently into each cavity.
10. Sprinkle the remaining 1/2 cup of mozzarella cheese over the tops of the stuffed peppers.
11. Cover the baking dish tightly with aluminum foil and bake for 25 minutes.
12. Remove the foil and continue baking until the peppers are tender and the cheese is golden and bubbly, about 10 more minutes.
13. Let the stuffed peppers rest for 5 minutes before serving to allow the filling to set.
Yielded from the oven, these peppers boast a tender-crisp texture that gives way to a richly savory and well-seasoned filling. The melted mozzarella forms a delightful golden crust, while the fresh parsley adds a bright, herbal finish. For a creative presentation, serve them alongside a simple arugula salad dressed with lemon vinaigrette to complement the hearty flavors.
Moroccan Chickpea and Sweet Potato Stew

Fragrant with warming spices and brimming with nourishing vegetables, this Moroccan-inspired stew transforms humble ingredients into a deeply satisfying, one-pot meal. Perfect for a cozy weeknight, it simmers into a rich, aromatic broth that clings to tender sweet potatoes and creamy chickpeas. Serving: 4 | Pre Time: 15 minutes | Cooking Time: 35 minutes
Ingredients
– 2 tablespoons olive oil
– 1 large yellow onion, diced
– 3 cloves garlic, minced
– 1 tablespoon grated fresh ginger
– 1 tablespoon ground cumin
– 2 teaspoons ground coriander
– 1 teaspoon smoked paprika
– 1/2 teaspoon ground cinnamon
– 1/4 teaspoon cayenne pepper
– 2 large sweet potatoes, peeled and cut into 1-inch cubes
– 1 (15-ounce) can chickpeas, drained and rinsed
– 1 (28-ounce) can diced tomatoes
– 4 cups vegetable broth
– 1 teaspoon salt
– 1/2 teaspoon freshly ground black pepper
– 1/4 cup chopped fresh cilantro
Instructions
1. Heat 2 tablespoons olive oil in a large Dutch oven or heavy-bottomed pot over medium heat until shimmering.
2. Add 1 large diced yellow onion and cook, stirring occasionally, for 5-7 minutes until softened and translucent.
3. Stir in 3 minced garlic cloves and 1 tablespoon grated ginger, cooking for 1 minute until fragrant.
4. Add 1 tablespoon cumin, 2 teaspoons coriander, 1 teaspoon smoked paprika, 1/2 teaspoon cinnamon, and 1/4 teaspoon cayenne pepper to the pot, toasting the spices with the aromatics for 30 seconds to bloom their flavors.
5. Add 2 large cubed sweet potatoes and 1 can of drained chickpeas, stirring to coat them evenly in the spice mixture.
6. Pour in 1 can of diced tomatoes with their juices and 4 cups of vegetable broth, scraping up any browned bits from the bottom of the pot.
7. Season the stew with 1 teaspoon salt and 1/2 teaspoon black pepper, then bring to a boil over high heat.
8. Reduce the heat to maintain a gentle simmer, cover the pot, and cook for 25-30 minutes until the sweet potatoes are fork-tender.
9. Stir in 1/4 cup chopped fresh cilantro just before serving. Ladle the stew into bowls.
Lusciously thick and warmly spiced, this stew boasts a velvety texture where the sweet potatoes nearly melt into the broth. For a delightful contrast, serve it over a bed of fluffy couscous or with a dollop of cool, tangy yogurt to balance the heat.
Tuscan White Bean Salad with Sundried Tomatoes
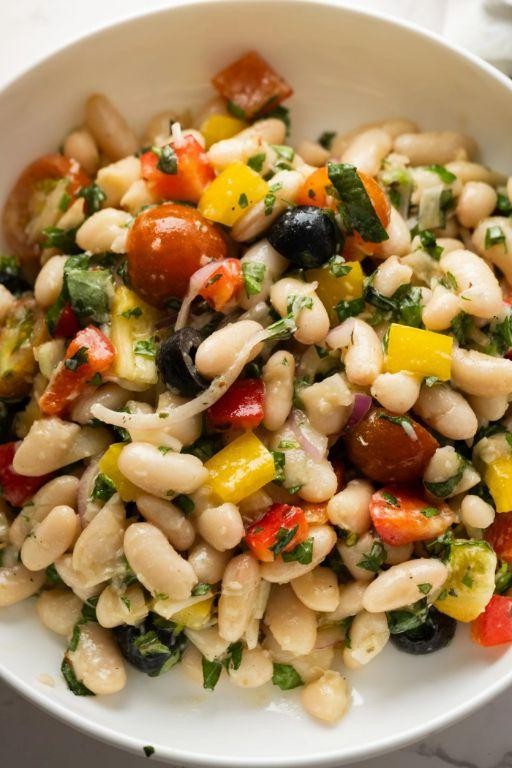
Crafted with the rustic charm of the Italian countryside, this Tuscan White Bean Salad with Sundried Tomatoes is a celebration of simple, vibrant ingredients that come together in a dish both elegant and satisfying. Combining creamy cannellini beans, intensely flavored sundried tomatoes, and fresh herbs, it offers a delightful balance of textures and tastes that feels both wholesome and sophisticated, perfect for a light lunch or as a standout side at any gathering.
Serving: 4 | Pre Time: 15 minutes | Cooking Time: 0 minutes
Ingredients
– 2 (15-ounce) cans cannellini beans, rinsed and drained
– 1/2 cup sundried tomatoes in oil, drained and chopped
– 1/4 cup extra-virgin olive oil
– 2 tablespoons red wine vinegar
– 1 small red onion, finely diced
– 1/4 cup fresh parsley, chopped
– 2 tablespoons fresh basil, chopped
– 1 teaspoon dried oregano
– 1/2 teaspoon salt
– 1/4 teaspoon black pepper
Instructions
1. In a large mixing bowl, combine the rinsed and drained cannellini beans and chopped sundried tomatoes.
2. Add the finely diced red onion, chopped fresh parsley, and chopped fresh basil to the bowl.
3. In a small bowl, whisk together the extra-virgin olive oil, red wine vinegar, dried oregano, salt, and black pepper until fully emulsified.
4. Pour the dressing over the bean mixture in the large bowl.
5. Gently toss all ingredients together with a spoon or spatula until evenly coated, being careful not to crush the beans.
6. Let the salad sit at room temperature for 10 minutes to allow the flavors to meld.
7. Taste and adjust seasoning if needed, but avoid over-salting as the flavors will develop further.
8. Transfer the salad to a serving dish or individual plates.
Buttery soft beans contrast beautifully with the chewy sundried tomatoes, while the herbs and tangy dressing create a bright, aromatic profile. Serve it over a bed of crisp greens for added freshness, or alongside grilled chicken or fish to make it a complete meal, letting its Mediterranean flair shine through effortlessly.
Turkey and Spinach Stuffed Portobello Mushrooms
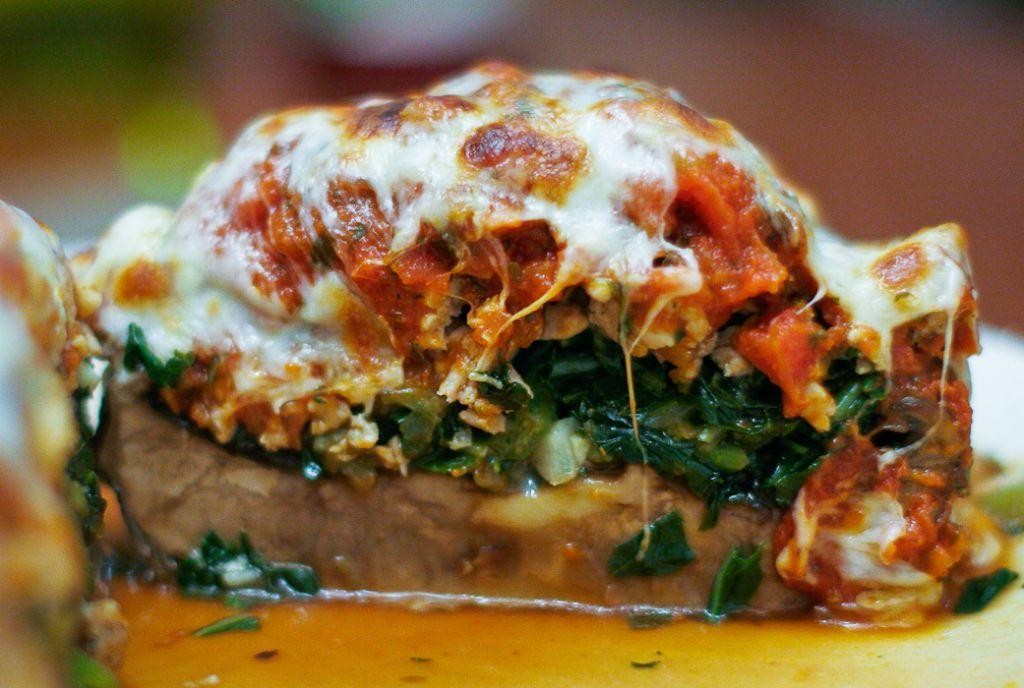
Meticulously crafted for elegant entertaining or a sophisticated weeknight dinner, these Turkey and Spinach Stuffed Portobello Mushrooms transform simple ingredients into a show-stopping centerpiece. The earthy, meaty caps cradle a savory, herb-infused filling that bakes to golden perfection. This dish masterfully balances rich flavors with a wholesome profile, making it as suitable for a holiday gathering as it is for an impressive family meal.
Serving: 4 | Pre Time: 15 minutes | Cooking Time: 25 minutes
Ingredients
– 4 large portobello mushroom caps
– 1 tablespoon olive oil
– 1/2 teaspoon kosher salt, divided
– 1/4 teaspoon black pepper
– 1/2 pound ground turkey
– 2 cups fresh spinach, roughly chopped
– 1/2 cup yellow onion, finely diced
– 2 cloves garlic, minced
– 1/4 cup grated Parmesan cheese
– 1/4 cup Italian-style breadcrumbs
– 1 large egg, lightly beaten
– 1 teaspoon dried oregano
Instructions
1. Preheat your oven to 400°F (200°C) and line a baking sheet with parchment paper.
2. Using a spoon, carefully scrape out the gills from the undersides of the 4 portobello mushroom caps to create a deep well for the stuffing.
3. Place the cleaned mushroom caps, stem-side up, on the prepared baking sheet. Brush the caps evenly with 1 tablespoon of olive oil and season with 1/4 teaspoon of the kosher salt and all of the black pepper.
4. Bake the mushroom caps in the preheated oven for 10 minutes to soften them and release excess moisture.
5. While the mushrooms bake, heat a large skillet over medium-high heat. Add the ground turkey and cook for 5-7 minutes, using a wooden spoon to break it into small crumbles, until it is no longer pink.
6. Add the finely diced yellow onion to the skillet with the turkey and cook for 3-4 minutes, until the onion becomes translucent and soft.
7. Stir the minced garlic and roughly chopped fresh spinach into the skillet and cook for 1-2 minutes, just until the spinach wilts. Tip: Adding the garlic after the onion prevents it from burning and becoming bitter.
8. Remove the skillet from the heat and transfer the turkey mixture to a medium mixing bowl to cool slightly, for about 5 minutes.
9. To the slightly cooled turkey mixture, add the grated Parmesan cheese, Italian-style breadcrumbs, lightly beaten egg, dried oregano, and the remaining 1/4 teaspoon of kosher salt. Mix thoroughly until all ingredients are well combined.
10. Remove the par-baked mushroom caps from the oven. Carefully divide and pack the turkey stuffing mixture evenly into the wells of each mushroom cap, mounding it slightly on top. Tip: Packing the filling firmly helps it hold its shape during baking.
11. Return the stuffed mushrooms to the oven and bake for 15-18 minutes, or until the filling is hot throughout and the top is golden brown. Tip: For an extra crispy, cheesy top, broil the mushrooms for the final 1-2 minutes of cooking, watching closely to prevent burning.
12. Let the stuffed mushrooms rest on the baking sheet for 5 minutes before serving to allow the flavors to settle and make them easier to handle.
Luxuriously textured, each bite offers the tender, juicy bite of the mushroom against the savory, well-seasoned filling. The Parmesan cheese melts into the breadcrumbs, creating a delightful crust that contrasts with the moist interior. For a stunning presentation, serve atop a swirl of creamy polenta or alongside a crisp arugula salad dressed with a lemon vinaigrette.
Herb Roasted Chicken with Root Vegetables
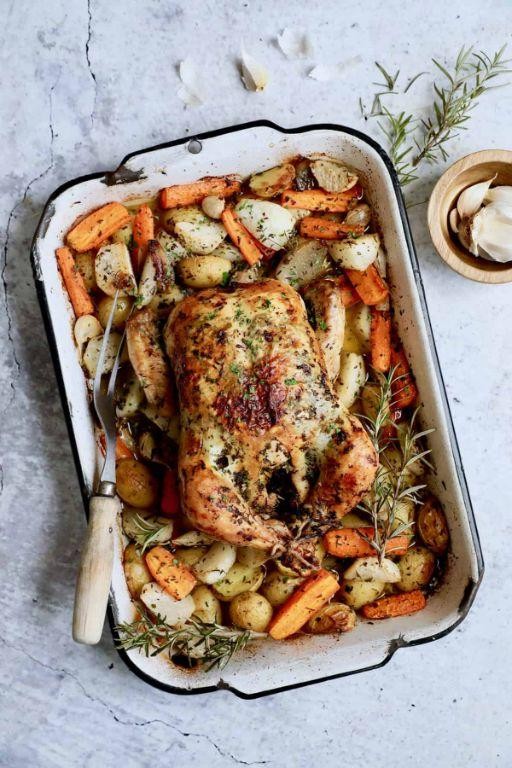
Fragrant and comforting, this herb roasted chicken with root vegetables is a quintessential one-pan wonder that transforms humble ingredients into a showstopping centerpiece. The golden, crispy-skinned chicken rests atop a bed of caramelized vegetables, perfuming your kitchen with the earthy aromas of rosemary and thyme. It’s a timeless dish that promises both elegance and ease for any gathering.
Serving: 4 | Pre Time: 20 minutes | Cooking Time: 75 minutes
Ingredients
– 1 whole chicken (3.5 to 4 pounds)
– 2 tbsp olive oil
– 1 tbsp kosher salt
– 1 tsp black pepper
– 2 tbsp fresh rosemary, chopped
– 1 tbsp fresh thyme leaves
– 4 cloves garlic, minced
– 1 lemon, quartered
– 4 medium carrots, peeled and cut into 2-inch pieces
– 3 medium parsnips, peeled and cut into 2-inch pieces
– 1 large yellow onion, cut into 1-inch wedges
– 1 lb baby potatoes, halved
Instructions
1. Preheat your oven to 425°F.
2. Pat the whole chicken completely dry with paper towels to ensure crisp skin.
3. In a small bowl, combine 1 tbsp olive oil, kosher salt, black pepper, chopped rosemary, thyme leaves, and minced garlic to make a herb paste.
4. Rub the herb paste evenly over the entire surface of the chicken and inside the cavity.
5. Place the quartered lemon inside the chicken cavity.
6. In a large roasting pan, toss the carrots, parsnips, onion wedges, and baby potatoes with the remaining 1 tbsp olive oil.
7. Arrange the vegetables in an even layer in the pan.
8. Place the seasoned chicken on top of the vegetables, breast-side up.
9. Roast in the preheated oven at 425°F for 15 minutes to start browning.
10. Reduce the oven temperature to 375°F and continue roasting for 60 minutes, or until the chicken’s internal temperature reaches 165°F when measured at the thickest part of the thigh.
11. For extra browning, baste the chicken with pan juices halfway through cooking.
12. Remove the pan from the oven and let the chicken rest on the vegetables for 15 minutes before carving to allow juices to redistribute.
13. Carve the chicken and serve immediately with the roasted vegetables.
Buttery and tender, the chicken yields juicy meat beneath its crackling skin, while the vegetables become sweet and caramelized at the edges. Serve this rustic masterpiece directly from the pan for a family-style presentation, perhaps with a drizzle of the savory pan juices over each plate. The harmonious blend of herbs and roasted flavors makes it equally suited for a cozy Sunday supper or an impressive holiday feast.
Butternut Squash Risotto

Under the crisp autumn sky, a bowl of butternut squash risotto offers a sublime embrace of seasonal comfort. This creamy, golden-hued dish masterfully balances the squash’s natural sweetness with the savory depth of Parmesan and aromatic herbs, creating a luxurious yet approachable centerpiece for any fall gathering. Each spoonful delivers a velvety texture and rich flavor that celebrates the harvest in the most elegant way.
Serving: 4 | Pre Time: 15 minutes | Cooking Time: 30 minutes
Ingredients
– 1 medium butternut squash (about 2 lbs), peeled, seeded, and diced into 1/2-inch cubes
– 1 1/2 cups Arborio rice
– 4 cups low-sodium vegetable broth, kept warm on the stove
– 1 small yellow onion, finely diced
– 2 cloves garlic, minced
– 1/2 cup dry white wine
– 4 tbsp unsalted butter, divided
– 2 tbsp olive oil
– 1/2 cup grated Parmesan cheese
– 1 tsp fresh thyme leaves
– Salt to taste
– Freshly ground black pepper to taste
Instructions
1. Preheat your oven to 400°F and line a baking sheet with parchment paper.
2. Toss the diced butternut squash with 1 tablespoon of olive oil, 1/4 teaspoon of salt, and 1/4 teaspoon of black pepper on the baking sheet.
3. Roast the squash for 20-25 minutes until tender and lightly caramelized at the edges, stirring once halfway through.
4. While the squash roasts, heat the vegetable broth in a medium saucepan over low heat to maintain a simmer.
5. In a large, heavy-bottomed pot or Dutch oven, heat 1 tablespoon of olive oil and 2 tablespoons of butter over medium heat until the butter melts.
6. Add the diced onion and cook for 5-7 minutes, stirring occasionally, until translucent and softened.
7. Stir in the minced garlic and cook for 1 minute until fragrant.
8. Add the Arborio rice to the pot and toast for 2 minutes, stirring constantly, until the grains are lightly golden and coated in the fat.
9. Pour in the white wine and cook, stirring continuously, until the liquid is fully absorbed, about 2 minutes.
10. Begin adding the warm broth one ladleful at a time, stirring frequently and allowing each addition to be nearly absorbed before adding the next, which should take about 20-25 minutes total.
11. When the rice is al dente and creamy, fold in the roasted butternut squash, remaining 2 tablespoons of butter, Parmesan cheese, and fresh thyme leaves.
12. Season with additional salt and pepper to taste, then remove from heat and let rest for 2 minutes before serving.
Yet this risotto’s allure lies in its velvety texture, where each grain of rice remains distinct yet luxuriously coated in a savory-sweet sauce. The roasted squash adds pockets of caramelized depth, while the Parmesan provides a salty, umami finish that lingers pleasantly. For a creative twist, top with crispy sage leaves fried in butter or a drizzle of truffle oil to elevate it into a show-stopping dinner party dish.
Black Bean and Corn Tacos with Avocado Cream

Dazzling in their simplicity yet bursting with vibrant flavors, these Black Bean and Corn Tacos with Avocado Cream offer a delightful fusion of textures and tastes. Perfect for a quick weeknight dinner or a casual gathering, they bring together wholesome ingredients in a beautifully balanced dish. The creamy avocado topping adds a luxurious finish that elevates every bite.
Serving: 4 | Pre Time: 15 minutes | Cooking Time: 10 minutes
Ingredients
– 1 tablespoon olive oil
– 1 small yellow onion, finely diced
– 2 cloves garlic, minced
– 1 (15-ounce) can black beans, rinsed and drained
– 1 cup frozen corn kernels
– 1 teaspoon ground cumin
– 1/2 teaspoon chili powder
– 1/4 teaspoon salt
– 8 small corn tortillas
– 1 ripe avocado
– 1/4 cup sour cream
– 1 tablespoon lime juice
– 1/4 cup chopped fresh cilantro
– 1/2 cup crumbled queso fresco
Instructions
1. Heat 1 tablespoon olive oil in a large skillet over medium heat until shimmering, about 2 minutes.
2. Add 1 small yellow onion, finely diced, and cook until translucent and soft, stirring occasionally for 5–6 minutes.
3. Stir in 2 cloves garlic, minced, and cook until fragrant, about 30 seconds.
4. Add 1 (15-ounce) can black beans, rinsed and drained, 1 cup frozen corn kernels, 1 teaspoon ground cumin, 1/2 teaspoon chili powder, and 1/4 teaspoon salt to the skillet.
5. Cook the mixture, stirring occasionally, until heated through and the corn is tender, about 4–5 minutes; for best flavor, let it simmer gently to allow the spices to meld.
6. While the filling cooks, warm 8 small corn tortillas in a dry skillet over medium heat for 30 seconds per side until pliable and lightly toasted.
7. In a small bowl, mash 1 ripe avocado with a fork until smooth.
8. Stir in 1/4 cup sour cream, 1 tablespoon lime juice, and 1/4 cup chopped fresh cilantro until fully combined; adding the lime juice immediately helps prevent the avocado from browning.
9. Spoon the black bean and corn filling evenly into the warmed tortillas.
10. Top each taco with a dollop of the avocado cream and sprinkle with 1/2 cup crumbled queso fresco.
You’ll love the contrast between the hearty, spiced filling and the cool, creamy avocado topping, with the queso fresco adding a subtle salty tang. For a creative twist, serve these tacos alongside a crisp salad or with extra lime wedges for a bright, zesty finish.
Eggplant Rollatini with Cashew Ricotta
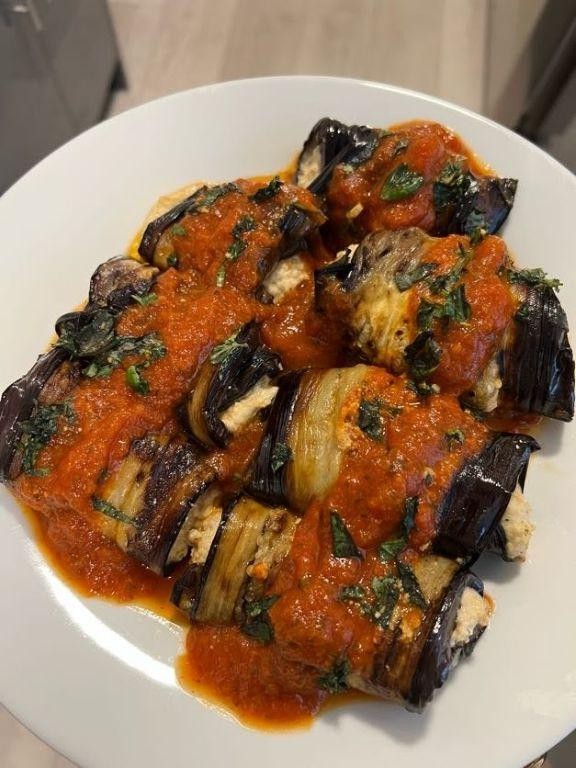
Unveiling a plant-based masterpiece, this Eggplant Rollatini with Cashew Ricotta transforms humble ingredients into an elegant centerpiece. Thinly sliced eggplant envelops a creamy, dairy-free filling, baked until golden in a vibrant marinara sauce for a comforting yet sophisticated meal.
Serving: 4 | Pre Time: 25 minutes | Cooking Time: 35 minutes
Ingredients
– 2 large eggplants
– 1 cup raw cashews, soaked in hot water for 1 hour
– 1/4 cup nutritional yeast
– 2 tbsp lemon juice
– 1 tsp garlic powder
– 1/2 tsp salt
– 1/4 tsp black pepper
– 2 cups marinara sauce
– 2 tbsp olive oil
– 1/4 cup fresh basil, chopped
Instructions
1. Preheat the oven to 400°F and line two baking sheets with parchment paper.
2. Slice the eggplants lengthwise into 1/4-inch thick strips using a mandoline or sharp knife for even cooking.
3. Brush both sides of each eggplant slice with olive oil and arrange in a single layer on the baking sheets.
4. Roast the eggplant slices for 15 minutes until pliable and lightly browned, flipping halfway through to ensure even texture.
5. Drain the soaked cashews and blend them in a food processor with nutritional yeast, lemon juice, garlic powder, salt, and pepper until smooth and creamy, scraping down the sides as needed.
6. Spread 1 cup of marinara sauce evenly in the bottom of a 9×13-inch baking dish.
7. Place 1 tablespoon of the cashew mixture at one end of each roasted eggplant slice and roll tightly from the short end.
8. Arrange the rolled eggplant seam-side down in the baking dish, nestling them closely together.
9. Pour the remaining 1 cup of marinara sauce over the rolls, covering them completely.
10. Bake uncovered at 400°F for 20 minutes until the sauce is bubbling and the edges are golden brown.
11. Remove from the oven and let rest for 5 minutes to allow the filling to set before serving.
12. Garnish with chopped fresh basil just before serving.
The baked eggplant becomes tender yet holds its shape, while the cashew ricotta offers a luxuriously creamy contrast to the tangy marinara. For an elegant presentation, serve individual rolls over a swirl of extra sauce, or pair with a crisp green salad to balance the rich flavors.
Thai Basil Chicken Lettuce Wraps
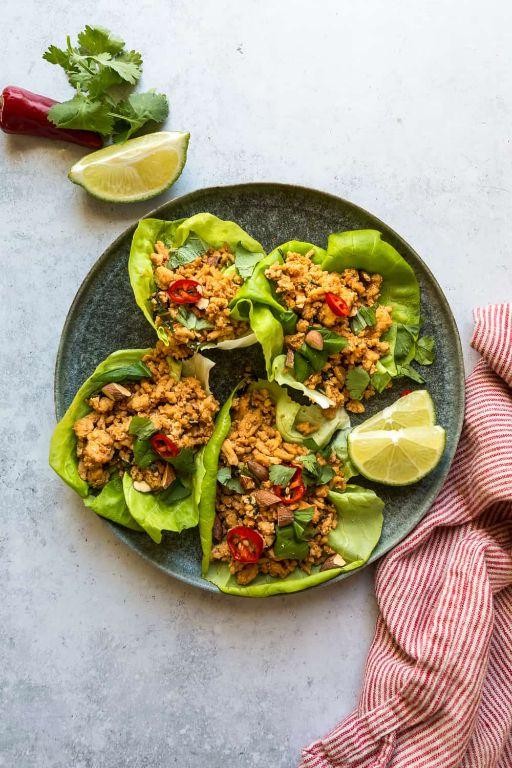
Heralding a vibrant fusion of Thai-inspired flavors, this dish transforms simple ingredients into an elegant, hands-on meal perfect for gatherings or a refreshing weeknight dinner. Imagine tender chicken infused with aromatic basil and savory sauces, all cradled in crisp lettuce cups for a delightful interplay of textures and tastes. It’s a culinary adventure that balances bold spices with fresh, light elements, inviting you to savor each bite with gusto.
Serving: 4 | Pre Time: 15 minutes | Cooking Time: 15 minutes
Ingredients
– 1 lb ground chicken
– 2 tbsp vegetable oil
– 4 cloves garlic, minced
– 2 Thai chilies, thinly sliced
– 1 cup fresh Thai basil leaves
– 1 tbsp fish sauce
– 1 tbsp soy sauce
– 1 tsp sugar
– 1 tbsp oyster sauce
– 1 head butter lettuce, leaves separated
– 1 lime, cut into wedges
Instructions
1. Heat the vegetable oil in a large skillet over medium-high heat until it shimmers, about 1 minute.
2. Add the minced garlic and sliced Thai chilies to the skillet, stirring constantly for 30 seconds until fragrant to prevent burning.
3. Add the ground chicken to the skillet, breaking it apart with a spatula into small pieces.
4. Cook the chicken for 5-7 minutes, stirring occasionally, until it is fully browned and no pink remains.
5. Stir in the fish sauce, soy sauce, sugar, and oyster sauce, mixing thoroughly to coat the chicken evenly.
6. Continue cooking the mixture for 2 minutes, allowing the sauces to reduce slightly and cling to the meat.
7. Remove the skillet from heat and immediately fold in the fresh Thai basil leaves until just wilted, about 30 seconds, to preserve their vibrant color and aroma.
8. Spoon the chicken mixture into the separated butter lettuce leaves, arranging them on a serving platter.
9. Garnish with lime wedges on the side for squeezing over the wraps just before eating to enhance the flavors.
What makes these wraps truly special is the contrast between the warm, savory chicken and the cool, crisp lettuce, creating a symphony of textures in every bite. The aromatic basil and tangy lime elevate the dish, offering a burst of freshness that’s both satisfying and light. For a creative twist, serve alongside jasmine rice or top with crushed peanuts for added crunch, making it a versatile centerpiece for any table.
Crispy Baked Tofu with Peanut Sauce

Marrying the satisfying crunch of perfectly baked tofu with the rich, creamy allure of peanut sauce creates a dish that is both deeply comforting and elegantly simple. This recipe transforms humble ingredients into a vibrant, protein-packed meal, where golden, crispy cubes are generously coated in a savory-sweet sauce that clings to every bite. It’s a versatile centerpiece, equally at home atop a bed of fluffy rice or nestled in a crisp salad for a light yet fulfilling dinner.
Serving: 4 | Pre Time: 15 minutes | Cooking Time: 25 minutes
Ingredients
– 1 (14-ounce) block extra-firm tofu
– 1 tablespoon cornstarch
– 1 tablespoon olive oil
– 1/4 teaspoon salt
– 1/4 teaspoon black pepper
– 1/4 cup creamy peanut butter
– 2 tablespoons soy sauce
– 1 tablespoon rice vinegar
– 1 tablespoon maple syrup
– 1 teaspoon sesame oil
– 1/4 cup water
– 1 garlic clove, minced
– 1 teaspoon grated fresh ginger
Instructions
1. Preheat your oven to 400°F (200°C) and line a large baking sheet with parchment paper.
2. Drain the 14-ounce block of extra-firm tofu and press it firmly between paper towels or a clean kitchen towel for 10 minutes to remove excess moisture.
3. Cut the pressed tofu into 1-inch cubes and place them in a large mixing bowl.
4. Sprinkle the 1 tablespoon of cornstarch, 1/4 teaspoon salt, and 1/4 teaspoon black pepper over the tofu cubes.
5. Drizzle the 1 tablespoon of olive oil over the seasoned tofu and toss gently until all cubes are evenly coated.
6. Arrange the coated tofu cubes in a single layer on the prepared baking sheet, ensuring they are not touching.
7. Bake the tofu at 400°F for 25 minutes, flipping each cube halfway through the cooking time, until golden brown and crispy on all edges.
8. While the tofu bakes, prepare the peanut sauce by combining 1/4 cup creamy peanut butter, 2 tablespoons soy sauce, 1 tablespoon rice vinegar, 1 tablespoon maple syrup, 1 teaspoon sesame oil, 1/4 cup water, 1 minced garlic clove, and 1 teaspoon grated fresh ginger in a small saucepan.
9. Whisk the sauce ingredients constantly over medium-low heat for 3-4 minutes until the mixture is smooth, warm, and slightly thickened.
10. Transfer the baked tofu to a serving bowl and pour the warm peanut sauce over the top, tossing gently to coat each piece evenly.
Now, savor the delightful contrast of the tofu’s crisp, golden exterior giving way to a tender interior, all enveloped in a glossy, umami-rich sauce with a subtle hint of ginger. For a creative twist, serve it over chilled soba noodles or stuff it into warm lettuce cups with shredded carrots and fresh cilantro, adding layers of texture and freshness to every forkful.
Quinoa-Stuffed Acorn Squash
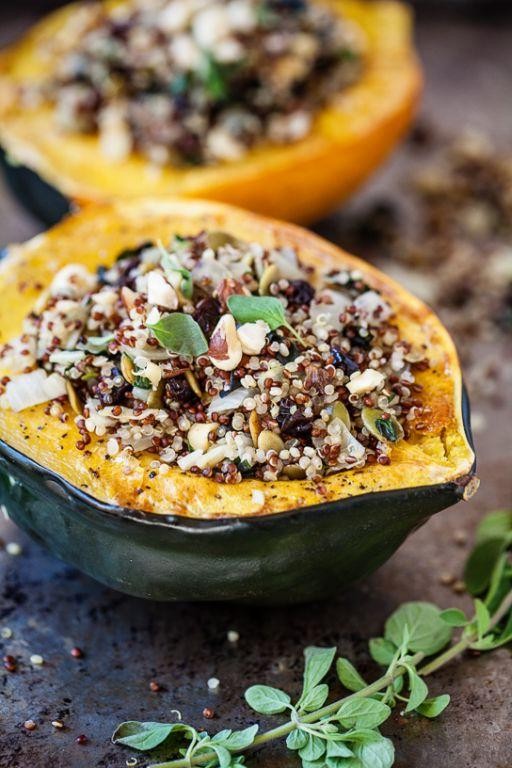
Crafted for crisp autumn evenings, this quinoa-stuffed acorn squash transforms humble ingredients into a stunning centerpiece. Its vibrant filling of nutty quinoa, sweet cranberries, and savory herbs nestles within tender roasted squash halves, offering a wholesome dish that delights both the palate and the eye. Perfect for gatherings or a cozy weeknight dinner, it brings warmth and elegance to any table.
Serving: 4 | Pre Time: 15 minutes | Cooking Time: 55 minutes
Ingredients
– 2 medium acorn squashes
– 1 cup quinoa
– 2 cups vegetable broth
– 1 tbsp olive oil
– 1 small yellow onion, diced
– 2 cloves garlic, minced
– 1/2 cup dried cranberries
– 1/4 cup chopped pecans
– 1 tsp dried thyme
– 1/2 tsp salt
– 1/4 tsp black pepper
– 2 tbsp maple syrup
Instructions
1. Preheat the oven to 400°F and line a baking sheet with parchment paper.
2. Cut each acorn squash in half lengthwise and scoop out the seeds with a spoon.
3. Brush the cut sides of the squash halves with 1 tablespoon of olive oil and place them cut-side down on the prepared baking sheet.
4. Roast the squash in the preheated oven for 30 minutes, or until the flesh is tender when pierced with a fork.
5. While the squash roasts, rinse the quinoa under cold water in a fine-mesh strainer to remove any bitterness.
6. In a medium saucepan, bring the vegetable broth to a boil over high heat, then stir in the rinsed quinoa.
7. Reduce the heat to low, cover the saucepan, and simmer the quinoa for 15 minutes, or until all the liquid is absorbed.
8. Heat the remaining 1 tablespoon of olive oil in a large skillet over medium heat.
9. Add the diced onion to the skillet and sauté for 5 minutes, until softened and translucent.
10. Stir in the minced garlic and cook for 1 minute more, until fragrant.
11. Remove the skillet from the heat and fold in the cooked quinoa, dried cranberries, chopped pecans, dried thyme, salt, and black pepper until well combined.
12. Once the squash halves are roasted, flip them over so the cut sides face up on the baking sheet.
13. Divide the quinoa mixture evenly among the four squash halves, packing it gently into the cavities.
14. Drizzle each stuffed squash half with 1/2 tablespoon of maple syrup for a touch of sweetness.
15. Return the baking sheet to the oven and bake for an additional 10 minutes, until the filling is heated through and the edges are lightly golden.
16. Remove from the oven and let the stuffed squash rest for 5 minutes before serving to allow the flavors to meld.
Kaleidoscopic in texture, each bite contrasts the creamy squash with the chewy quinoa and crunchy pecans, while the maple syrup caramelizes into a glossy finish. For a creative twist, garnish with fresh parsley or crumbled goat cheese just before serving, enhancing its rustic charm and making it a versatile dish that pairs beautifully with a simple green salad or roasted vegetables.
Grilled Lime Cilantro Skirt Steak
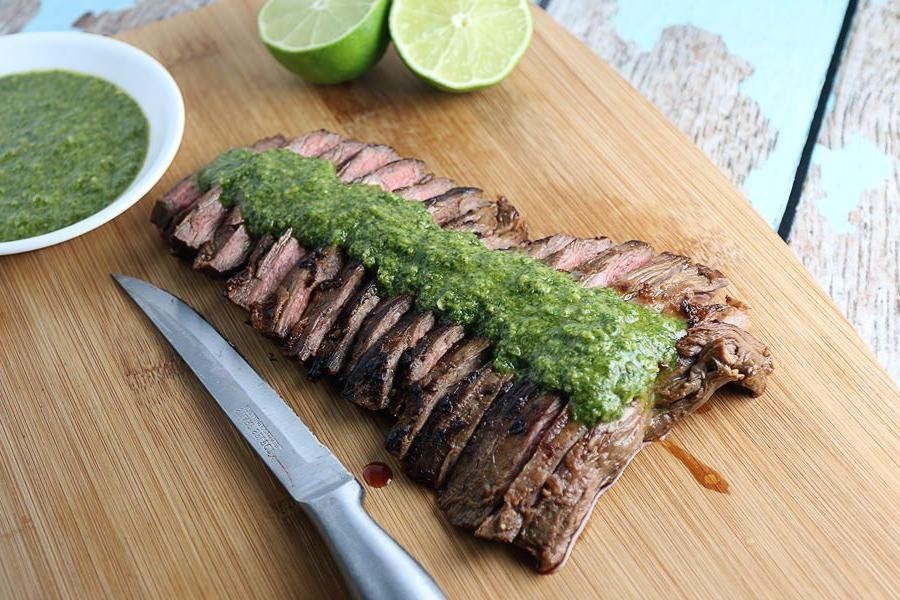
Dazzlingly simple yet profoundly flavorful, this Grilled Lime Cilantro Skirt Steak transforms a humble cut into a show-stopping centerpiece. The vibrant marinade, a zesty symphony of citrus and herbs, tenderizes the meat while imbuing it with a bright, aromatic character that sings of summer gatherings. It’s a recipe that promises maximum impact with minimal fuss, perfect for elevating a weeknight dinner or impressing guests at your next backyard barbecue.
Serving: 4 | Pre Time: 25 minutes | Cooking Time: 10 minutes
Ingredients
– 1.5 lbs skirt steak
– 1/4 cup fresh lime juice
– 1/4 cup olive oil
– 1/2 cup fresh cilantro, finely chopped
– 4 cloves garlic, minced
– 1 tbsp honey
– 1 tsp ground cumin
– 1 tsp kosher salt
– 1/2 tsp black pepper
Instructions
1. In a medium bowl, whisk together 1/4 cup fresh lime juice, 1/4 cup olive oil, 1/2 cup finely chopped fresh cilantro, 4 minced garlic cloves, 1 tbsp honey, 1 tsp ground cumin, 1 tsp kosher salt, and 1/2 tsp black pepper until fully combined.
2. Place 1.5 lbs of skirt steak in a large resealable plastic bag or shallow dish, and pour the marinade over it, ensuring the meat is fully coated.
3. Seal the bag or cover the dish, and refrigerate for at least 20 minutes or up to 2 hours to marinate; for best flavor penetration, do not exceed 2 hours as the acidity can begin to break down the meat’s texture.
4. Preheat a grill or grill pan to high heat, approximately 450°F, and lightly oil the grates to prevent sticking.
5. Remove the steak from the marinade, letting any excess drip off, and discard the used marinade.
6. Place the steak on the hot grill and cook for 3-4 minutes without moving it to achieve a well-seared, caramelized crust.
7. Flip the steak using tongs and cook for an additional 3-4 minutes for medium-rare, or until the internal temperature reaches 130°F on an instant-read thermometer; skirt steak is best served medium-rare to medium to maintain tenderness.
8. Transfer the grilled steak to a cutting board and let it rest for 5-7 minutes to allow the juices to redistribute evenly throughout the meat.
9. Slice the steak thinly against the grain, which is essential for ensuring each bite is tender and not chewy.
Just off the grill, the steak boasts a beautifully charred exterior giving way to a juicy, pink interior, with the lime and cilantro lending a refreshing, tangy brightness that cuts through the rich beefiness. For a creative twist, serve the sliced steak over a bed of crisp greens or tucked into warm tortillas with a dollop of creamy avocado, transforming it into vibrant steak tacos that celebrate its zesty marinade.
Roasted Vegetable Paella
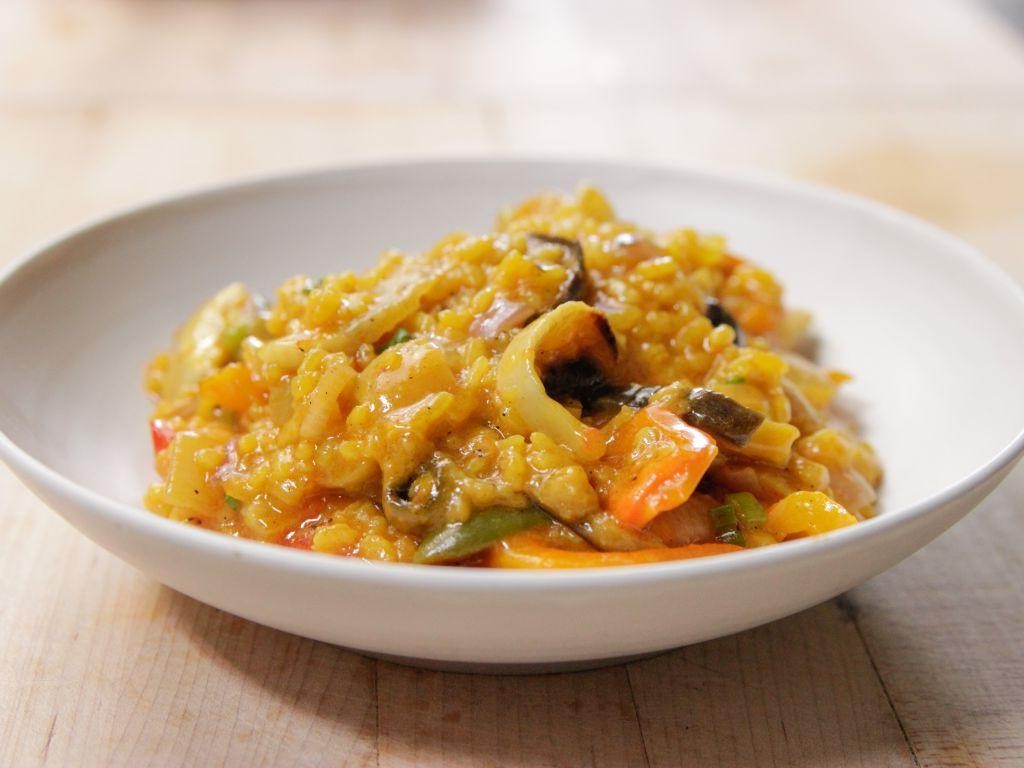
Glistening with vibrant hues and aromatic spices, this Roasted Vegetable Paella transforms humble ingredients into a stunning centerpiece. A symphony of roasted vegetables and saffron-infused rice, it’s a celebration of texture and flavor that’s both nourishing and deeply satisfying. Perfect for gatherings or a cozy night in, this dish promises to delight the senses with every forkful.
Serving: 6 | Pre Time: 20 minutes | Cooking Time: 45 minutes
Ingredients
– 2 tbsp olive oil
– 1 large yellow onion, diced
– 3 cloves garlic, minced
– 1 red bell pepper, sliced
– 1 yellow bell pepper, sliced
– 1 zucchini, sliced into half-moons
– 1 cup cherry tomatoes, halved
– 1 ½ cups Arborio rice
– ½ tsp saffron threads
– 4 cups vegetable broth
– 1 tsp smoked paprika
– ½ tsp salt
– ¼ tsp black pepper
– ¼ cup fresh parsley, chopped
– 1 lemon, cut into wedges
Instructions
1. Preheat the oven to 425°F and line a baking sheet with parchment paper.
2. Toss the sliced red bell pepper, yellow bell pepper, zucchini, and cherry tomatoes with 1 tbsp olive oil, then spread them evenly on the baking sheet.
3. Roast the vegetables for 20–25 minutes until they are tender and lightly charred at the edges, stirring halfway through for even cooking.
4. Heat the remaining 1 tbsp olive oil in a large, oven-safe paella pan or skillet over medium heat.
5. Add the diced onion and cook for 5–7 minutes until translucent and softened.
6. Stir in the minced garlic and cook for 1 minute until fragrant, being careful not to let it burn.
7. Add the Arborio rice to the pan and toast for 2–3 minutes, stirring constantly, until the grains are lightly golden.
8. Crumble the saffron threads into the vegetable broth to infuse it, then pour the broth into the pan along with the smoked paprika, salt, and black pepper.
9. Bring the mixture to a simmer, then reduce the heat to low and cook uncovered for 15 minutes without stirring to develop a socarrat (crispy bottom layer).
10. Gently fold in the roasted vegetables, then transfer the pan to the preheated oven and bake for 10 minutes until the rice is fully cooked and the liquid is absorbed.
11. Remove the paella from the oven and let it rest for 5 minutes to allow the flavors to meld.
12. Garnish with chopped parsley and serve with lemon wedges on the side.
Elevating this paella to new heights, the socarrat adds a delightful crunch that contrasts beautifully with the tender, saffron-kissed rice. Each bite bursts with the smoky sweetness of roasted peppers and the bright acidity of tomatoes, making it a versatile dish that pairs wonderfully with a crisp white wine or a simple green salad for a complete meal.
Conclusion
You’ve just discovered 32 amazing gluten-free and dairy-free dinners that prove eating for your needs can be delicious and easy. We hope this list inspires your next cozy meal. Give a recipe a try, then come back and tell us your favorite in the comments! If you found this helpful, please share it on Pinterest to help other home cooks.