Feeling that familiar heartburn after dinner? You’re not alone! GERD doesn’t mean giving up delicious, comforting meals. We’ve gathered 24 amazing dinner recipes that are both gentle on your stomach and packed with flavor. From cozy classics to fresh favorites, these dishes will have you looking forward to mealtime again. Get ready to discover your new go-to comfort foods that love you back!
Grilled Herb Chicken with Steamed Vegetables
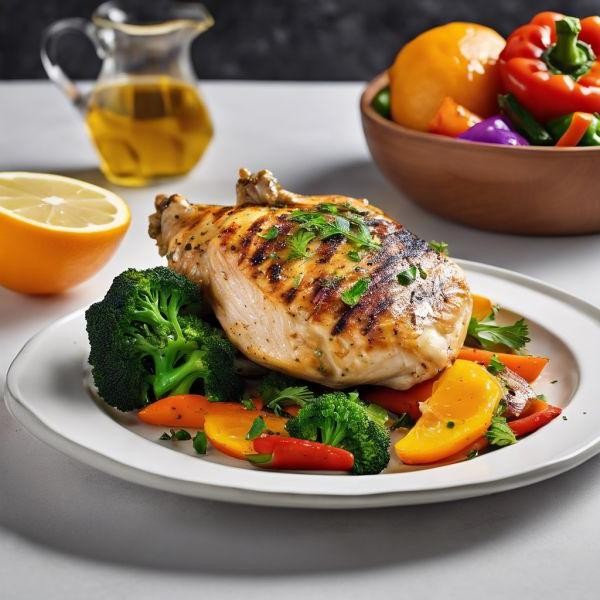
Looking for a protein-packed meal that comes together with minimal fuss? Let’s fire up the grill for this herb-rubbed chicken paired with crisp-tender vegetables. Loaded with fresh flavor and simple enough for a weeknight, it’s a go-to when you want healthy and satisfying.
Ingredients
- 4 boneless, skinless chicken breasts (about 6 oz each)
- 2 tbsp extra-virgin olive oil
- 1 tbsp fresh rosemary, finely chopped
- 1 tbsp fresh thyme leaves
- 2 cloves garlic, minced
- 1 tsp kosher salt
- ½ tsp freshly cracked black pepper
- 1 lb asparagus, woody ends trimmed
- 2 cups broccoli florets
- 1 tbsp fresh lemon juice
Instructions
- Preheat a gas or charcoal grill to medium-high heat (400°F).
- Pat the chicken breasts dry with paper towels to ensure even browning.
- In a small bowl, whisk together the olive oil, rosemary, thyme, minced garlic, kosher salt, and black pepper to create a herb marinade.
- Coat the chicken breasts evenly with the herb mixture, massaging it into all surfaces.
- Place the chicken on the preheated grill and cook for 6–7 minutes, until grill marks form and the edges begin to turn opaque.
- Flip the chicken using tongs and grill for another 6–7 minutes, until the internal temperature reaches 165°F when checked with an instant-read thermometer.
- While the chicken grills, prepare a steamer basket over a pot of boiling water.
- Add the asparagus and broccoli florets to the steamer basket in a single layer to promote even cooking.
- Cover and steam the vegetables for 4–5 minutes, until bright green and crisp-tender.
- Transfer the steamed vegetables to a serving platter and drizzle with fresh lemon juice.
- Remove the grilled chicken from the grill and let it rest for 3 minutes to redistribute juices.
- Slice the chicken against the grain and arrange alongside the steamed vegetables.
Off the grill, the chicken is juicy with a fragrant, herbaceous crust, while the vegetables offer a crisp bite and bright acidity. For a vibrant twist, scatter with microgreens or serve over a bed of quinoa to soak up the lemony juices.
Baked Salmon with Lemon and Dill
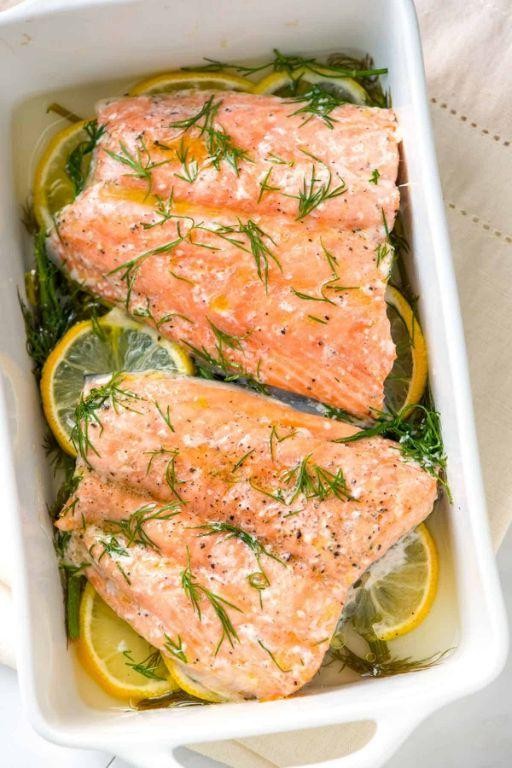
Mouthwatering and effortlessly elegant, this baked salmon delivers bright, herbaceous flavors with minimal effort. Perfect for busy weeknights yet impressive enough for guests. Let’s get straight to the recipe.
Ingredients
- 1 ½ lb wild-caught salmon fillet, skin-on
- 2 tbsp extra-virgin olive oil
- 1 lemon, thinly sliced into rounds
- 2 tbsp fresh dill fronds, chopped
- 1 tsp Diamond Crystal kosher salt
- ½ tsp freshly cracked black pepper
- 2 tbsp unsalted butter, cut into pats
Instructions
- Preheat your oven to 400°F and position a rack in the center.
- Pat the salmon fillet completely dry with paper towels to ensure a crisp skin.
- Drizzle the olive oil evenly over the salmon, coating all surfaces.
- Season the fillet uniformly with kosher salt and freshly cracked black pepper.
- Arrange the thin lemon slices in a single layer across the top of the salmon.
- Sprinkle the chopped fresh dill fronds evenly over the lemon slices.
- Distribute the pats of unsalted butter across the salmon surface.
- Transfer the prepared salmon to a parchment-lined baking sheet.
- Bake at 400°F for 12-15 minutes, until the internal temperature reaches 125°F for medium-rare.
- Remove from oven and let rest for 5 minutes before serving to allow juices to redistribute.
Outstandingly moist and flaky, the salmon yields to gentle pressure with buttery texture. Bright lemon cuts through the richness while dill provides an herbal freshness that lingers. Serve over creamy polenta or alongside roasted asparagus for a complete meal that feels both nourishing and indulgent.
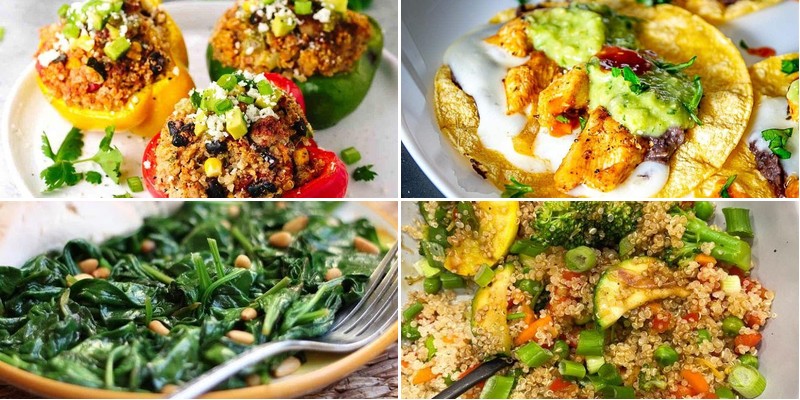
Quinoa and Vegetable Stir-Fry
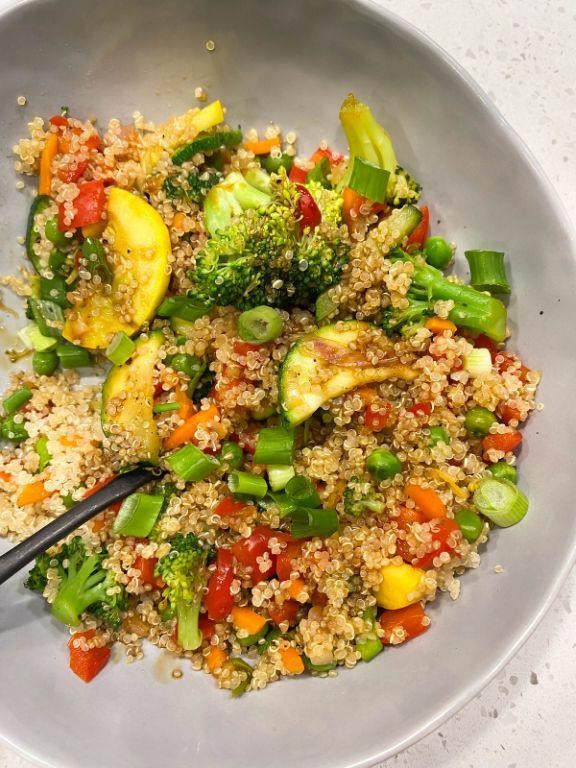
Nourishing and quick to prepare, this quinoa and vegetable stir-fry delivers vibrant flavors and satisfying textures in under 30 minutes. Perfect for busy weeknights when you want something wholesome without the fuss. Customize with your favorite seasonal vegetables for endless variations.
Ingredients
- 1 cup quinoa, rinsed thoroughly
- 2 cups vegetable broth
- 2 tablespoons extra virgin olive oil
- 3 cloves garlic, minced
- 1 tablespoon fresh ginger, finely grated
- 1 medium red onion, thinly sliced
- 1 red bell pepper, julienned
- 1 yellow bell pepper, julienned
- 2 cups broccoli florets
- 1 large carrot, cut into matchsticks
- 3 tablespoons tamari sauce
- 1 tablespoon toasted sesame oil
- 2 teaspoons rice vinegar
- 1/4 cup fresh cilantro, chopped
- 1 tablespoon toasted sesame seeds
Instructions
- Combine quinoa and vegetable broth in a medium saucepan over high heat.
- Bring to a boil, then reduce heat to low and cover tightly.
- Simmer for 15 minutes until liquid is absorbed and quinoa shows tiny spirals.
- Remove from heat and let stand covered for 5 minutes to steam.
- Fluff quinoa with a fork and set aside uncovered to prevent clumping.
- Heat olive oil in a large wok or skillet over medium-high heat until shimmering.
- Add minced garlic and grated ginger, stirring constantly for 30 seconds until fragrant.
- Add sliced red onion and cook for 2 minutes until slightly softened.
- Add julienned bell peppers and cook for 3 minutes until vibrant but still crisp.
- Add broccoli florets and carrot matchsticks, stirring frequently for 4 minutes.
- Pour tamari sauce around the edges of the wok to caramelize slightly.
- Add cooked quinoa to the vegetable mixture, tossing to combine evenly.
- Drizzle with toasted sesame oil and rice vinegar, stirring to incorporate.
- Remove from heat and fold in chopped cilantro.
- Sprinkle with toasted sesame seeds just before serving. Delightfully textured with fluffy quinoa contrasting crisp-tender vegetables, this stir-fry offers savory depth from the tamari and bright freshness from cilantro. Serve alongside grilled chicken or top with a fried egg for added protein, making it a versatile base for countless meal variations.
Oven-Roasted Turkey Breast with Sweet Potatoes
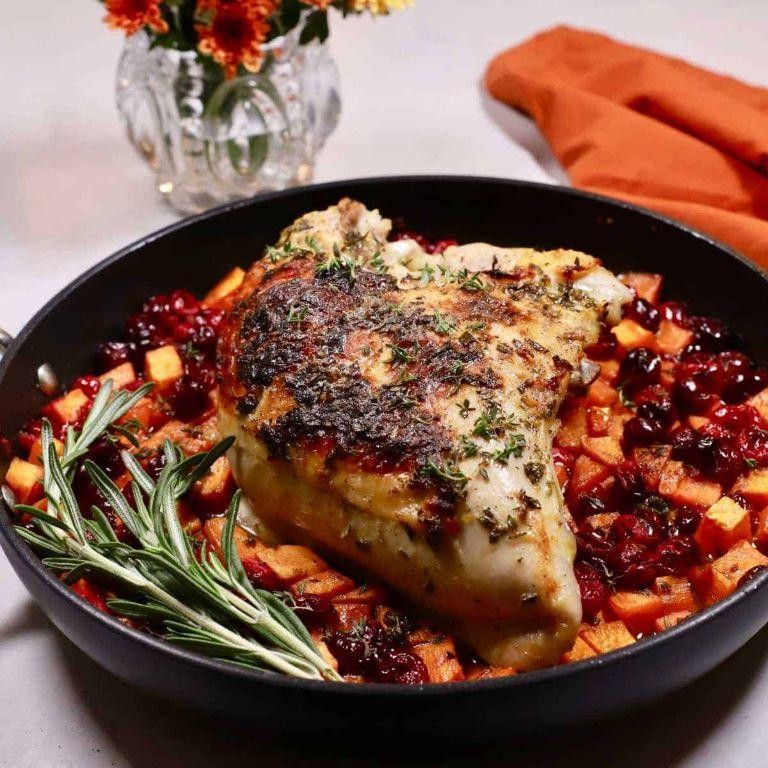
Just in time for autumn gatherings, this oven-roasted turkey breast delivers succulent results with minimal effort. Juicy, herb-rubbed turkey cooks alongside caramelized sweet potatoes for a complete meal. Perfect for smaller celebrations or weeknight dinners when a whole bird feels excessive.
Ingredients
– 1 (3-pound) bone-in turkey breast, skin on
– 2 large sweet potatoes, peeled and cut into 1-inch cubes
– 3 tablespoons clarified butter, melted
– 2 tablespoons fresh rosemary, finely chopped
– 4 cloves garlic, minced
– 1 teaspoon kosher salt
– ½ teaspoon freshly cracked black pepper
– ¼ teaspoon smoked paprika
Instructions
1. Preheat oven to 375°F and position rack in center position.
2. Pat turkey breast completely dry with paper towels to ensure crisp skin.
3. Combine melted clarified butter, chopped rosemary, minced garlic, kosher salt, black pepper, and smoked paprika in small bowl.
4. Rub herb mixture evenly over entire surface of turkey breast, including beneath the skin.
5. Arrange sweet potato cubes in single layer in roasting pan.
6. Place turkey breast directly on sweet potatoes, skin-side up.
7. Insert digital meat thermometer into thickest part of turkey breast, avoiding bone.
8. Roast at 375°F for 60-75 minutes until thermometer reads 165°F.
9. For extra crispy skin, increase temperature to 425°F during final 10 minutes of cooking.
10. Remove from oven and transfer turkey to cutting board.
11. Let turkey rest undisturbed for 15 minutes to redistribute juices.
12. Toss sweet potatoes in pan juices while turkey rests.
13. Carve turkey against the grain into ½-inch slices.
Golden-brown skin gives way to exceptionally moist meat infused with aromatic herbs. The sweet potatoes develop caramelized edges while absorbing savory turkey drippings. Serve sliced over a bed of the roasted sweet potatoes, drizzled with any remaining pan juices for added richness.
Mild Seasoned Chicken Tacos with Avocado Salsa
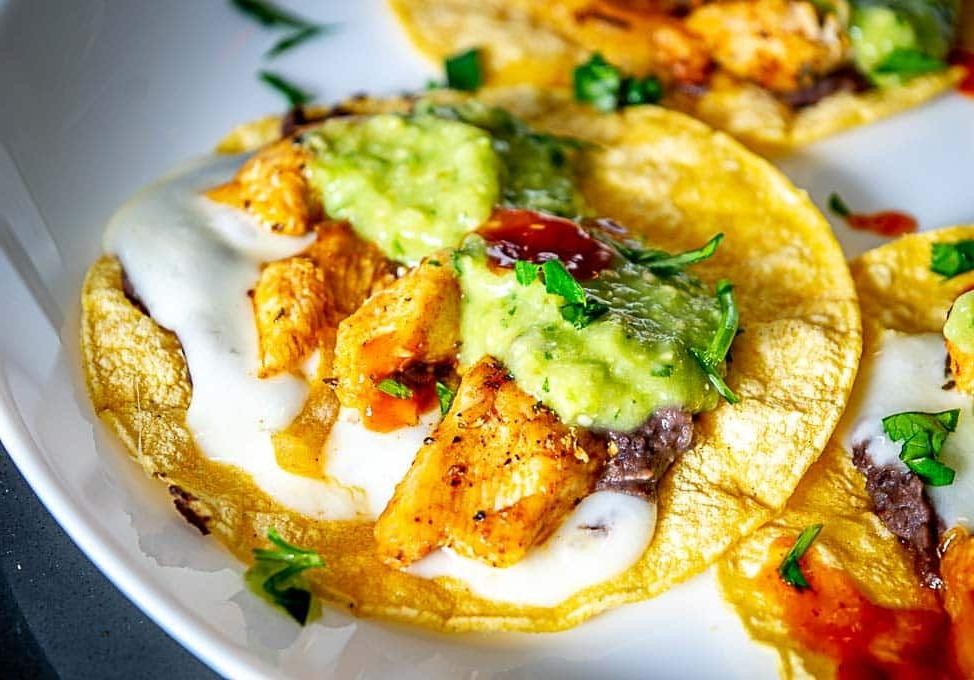
Ready for taco night without the heat? These mild seasoned chicken tacos deliver big flavor with a cooling avocado salsa that balances every bite perfectly. They come together quickly for a weeknight dinner that feels special but requires minimal effort.
Ingredients
– 1 lb boneless, skinless chicken thighs, trimmed of excess fat
– 2 tbsp avocado oil
– 1 tsp ground cumin
– 1 tsp smoked paprika
– 1/2 tsp garlic powder
– 1/2 tsp onion powder
– 1/4 tsp fine sea salt
– 8 small corn tortillas
– 2 ripe Hass avocados, pitted and diced
– 1/4 cup finely diced red onion
– 2 tbsp freshly squeezed lime juice
– 2 tbsp chopped fresh cilantro
– 1/4 tsp kosher salt
Instructions
1. Pat chicken thighs completely dry with paper towels to ensure proper browning.
2. Combine cumin, smoked paprika, garlic powder, onion powder, and fine sea salt in a small bowl.
3. Rub spice mixture evenly over all surfaces of the chicken thighs.
4. Heat avocado oil in a large cast-iron skillet over medium-high heat until shimmering, about 2 minutes.
5. Place chicken thighs in the hot skillet, presentation side down, and cook undisturbed for 6 minutes to develop a deep golden crust.
6. Flip chicken and cook for another 5-6 minutes until internal temperature reaches 165°F on an instant-read thermometer.
7. Transfer chicken to a cutting board and let rest for 5 minutes to redistribute juices.
8. While chicken rests, warm corn tortillas directly over a gas flame for 15-20 seconds per side until lightly charred and pliable.
9. Combine diced avocados, red onion, lime juice, cilantro, and kosher salt in a medium bowl, gently folding to coat without mashing the avocado.
10. Slice rested chicken against the grain into 1/4-inch thick strips.
11. Divide chicken evenly among warmed tortillas.
12. Top each taco generously with avocado salsa. Every bite offers tender, juicy chicken with a subtle smoky warmth, contrasted by the cool creaminess of the avocado salsa. The charred corn tortillas provide just enough texture to hold everything together without overpowering the delicate flavors. For a beautiful presentation, serve them open-faced on a large platter with extra lime wedges for squeezing over the top.
Lentil and Sweet Potato Stew
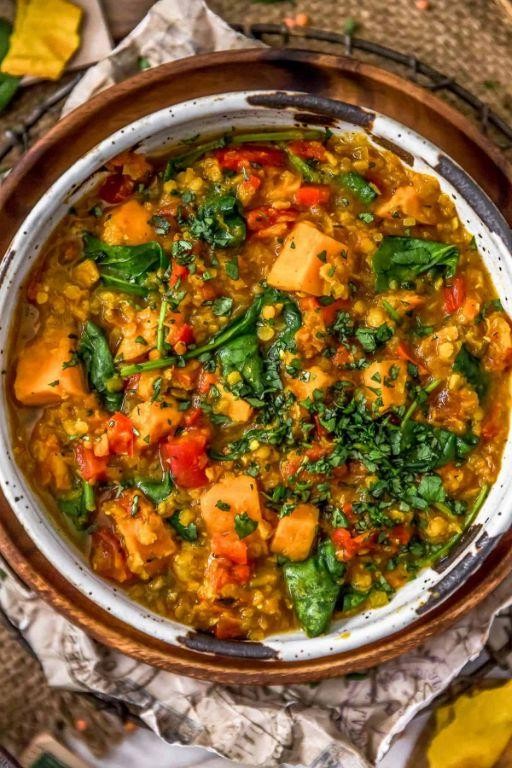
Unbelievably satisfying and packed with plant-based protein, this hearty stew combines earthy lentils with sweet potatoes in a rich, aromatic broth. Using just one pot makes cleanup effortless while developing deep, complex flavors through simple techniques.
Ingredients
- 2 tablespoons extra virgin olive oil
- 1 large yellow onion, finely diced
- 3 garlic cloves, minced
- 1 tablespoon tomato paste
- 1 teaspoon smoked paprika
- 1/2 teaspoon ground cumin
- 1 cup brown lentils, rinsed
- 2 medium sweet potatoes, peeled and cubed into 1-inch pieces
- 4 cups vegetable broth
- 1 bay leaf
- 1/2 teaspoon fine sea salt
- 1/4 teaspoon freshly ground black pepper
- 2 tablespoons fresh parsley, chopped
Instructions
- Heat 2 tablespoons extra virgin olive oil in a large Dutch oven over medium heat until shimmering.
- Add 1 large finely diced yellow onion and sauté for 5 minutes until translucent, stirring occasionally to prevent burning.
- Stir in 3 minced garlic cloves and cook for 1 minute until fragrant.
- Add 1 tablespoon tomato paste and cook for 2 minutes, stirring constantly to deepen its flavor and remove raw taste.
- Sprinkle in 1 teaspoon smoked paprika and 1/2 teaspoon ground cumin, toasting for 30 seconds to release their oils.
- Pour in 1 cup rinsed brown lentils, stirring to coat with the spice mixture.
- Add 2 cubed sweet potatoes, 4 cups vegetable broth, and 1 bay leaf, bringing to a boil.
- Reduce heat to low, cover, and simmer for 30 minutes until lentils are tender but not mushy.
- Remove bay leaf and stir in 1/2 teaspoon fine sea salt and 1/4 teaspoon freshly ground black pepper.
- Garnish with 2 tablespoons chopped fresh parsley before serving.
Notably creamy sweet potatoes contrast with firm lentils in this deeply spiced broth. The smoked paprika adds subtle smokiness while fresh parsley provides bright freshness. Serve over creamy polenta or with crusty bread for soaking up every last drop.
Basil Pesto Pasta with Grilled Zucchini
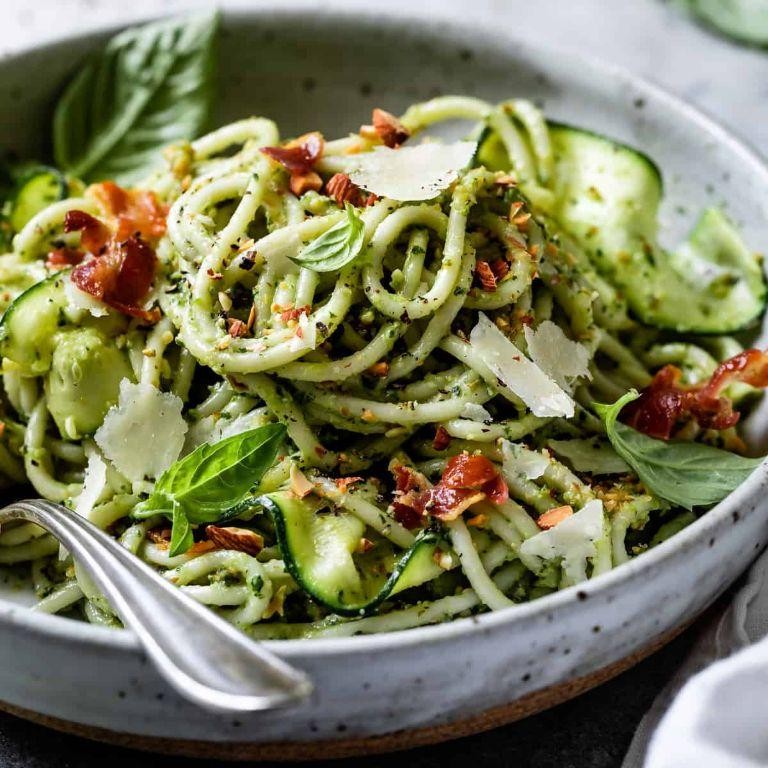
Oven-roasted or fresh from the garden, zucchini transforms this classic pasta dish into a complete meal. Grilling intensifies its natural sweetness while adding smoky depth to bright basil pesto. This combination creates a vibrant, satisfying dinner ready in under 30 minutes.
Ingredients
- 12 ounces dried linguine pasta
- 2 medium zucchini, sliced lengthwise into 1/4-inch planks
- 3 tablespoons extra-virgin olive oil, divided
- 1 cup fresh basil leaves, packed
- 1/4 cup toasted pine nuts
- 1/2 cup freshly grated Parmigiano-Reggiano cheese
- 2 garlic cloves, peeled
- 1/4 cup high-quality extra-virgin olive oil
- 1 tablespoon fresh lemon juice
- 1/4 teaspoon fine sea salt
- 1/8 teaspoon freshly cracked black pepper
Instructions
- Preheat grill or grill pan to medium-high heat (450°F).
- Brush zucchini planks with 1 tablespoon olive oil and season with salt.
- Grill zucchini for 3-4 minutes per side until distinct char marks appear and flesh softens.
- Transfer grilled zucchini to cutting board and slice crosswise into 1/2-inch strips.
- Bring large pot of heavily salted water to rolling boil.
- Cook linguine according to package directions until al dente, typically 9-11 minutes.
- While pasta cooks, combine basil, pine nuts, Parmigiano-Reggiano, and garlic in food processor.
- Pulse mixture 5-6 times until coarsely chopped, scraping down sides between pulses.
- With processor running, slowly drizzle in 1/4 cup olive oil until emulsified.
- Add lemon juice, salt, and pepper, then pulse twice to incorporate.
- Reserve 1/2 cup pasta water before draining linguine.
- Return drained pasta to warm pot off heat.
- Immediately add pesto and 1/4 cup reserved pasta water, tossing vigorously to coat.
- Fold in grilled zucchini strips until evenly distributed.
- Adjust consistency with additional pasta water if sauce appears too thick.
- Plate immediately and garnish with extra Parmigiano-Reggiano.
Perfectly al dente linguine provides satisfying chew against silky pesto clinging to each strand. Charred zucchini contributes smoky sweetness that balances the pesto’s garlicky brightness. For elevated presentation, top with additional toasted pine nuts and fresh basil chiffonade before serving.
Baked Tilapia with Herbed Rice
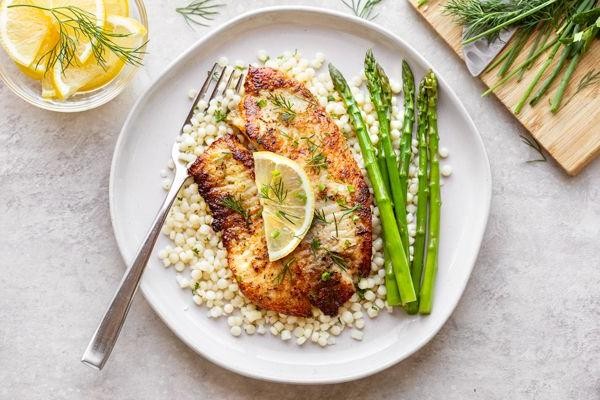
Dinner just got simpler with this elegant baked tilapia over herbed rice. Perfectly flaky fish pairs beautifully with aromatic grains for a complete meal. This recipe delivers restaurant-quality results with minimal effort.
Ingredients
- 4 tilapia fillets (6 oz each), patted dry
- 1 cup long-grain white rice, rinsed
- 2 cups chicken stock, warmed
- 3 tbsp clarified butter, divided
- 2 tbsp extra virgin olive oil
- 1 tbsp fresh lemon juice
- 2 tsp kosher salt, divided
- 1 tsp freshly cracked black pepper
- 1 tsp garlic powder
- 1 tsp smoked paprika
- 2 tbsp fresh parsley, finely chopped
- 1 tbsp fresh dill, minced
- 1 tsp fresh thyme leaves
- ½ medium yellow onion, finely diced
- 2 garlic cloves, minced
Instructions
- Preheat oven to 400°F and position rack in center.
- Heat 1 tablespoon clarified butter in oven-safe skillet over medium heat until shimmering.
- Sauté diced onion for 3-4 minutes until translucent and fragrant.
- Add minced garlic and cook for 30 seconds until aromatic but not browned.
- Stir in rinsed rice and toast for 1 minute, coating grains evenly with butter.
- Pour in warmed chicken stock and bring to rapid simmer.
- Cover skillet tightly and transfer to preheated oven for 18 minutes.
- While rice bakes, combine olive oil, remaining clarified butter, and lemon juice in small bowl.
- Pat tilapia fillets completely dry with paper towels to ensure proper searing.
- Season both sides of fillets with 1 teaspoon kosher salt, black pepper, garlic powder, and smoked paprika.
- Remove skillet from oven when rice has absorbed all liquid and appears fluffy.
- Fluff rice with fork and stir in fresh parsley, dill, and thyme until evenly distributed.
- Arrange seasoned tilapia fillets in single layer over herbed rice bed.
- Drizzle butter-lemon mixture evenly over fish fillets.
- Return skillet to oven and bake uncovered for 12-14 minutes until fish flakes easily with fork.
- Remove from oven and let rest for 2 minutes before serving.
Perfectly cooked tilapia yields to gentle pressure, revealing pearly white flakes that contrast beautifully with the fragrant rice. The herb-infused grains absorb the delicate fish juices during baking, creating a harmonious flavor exchange. Present directly from the skillet for rustic appeal, or plate individually with lemon wedges for elegant dining.
Garlic and Herb Shrimp Skewers
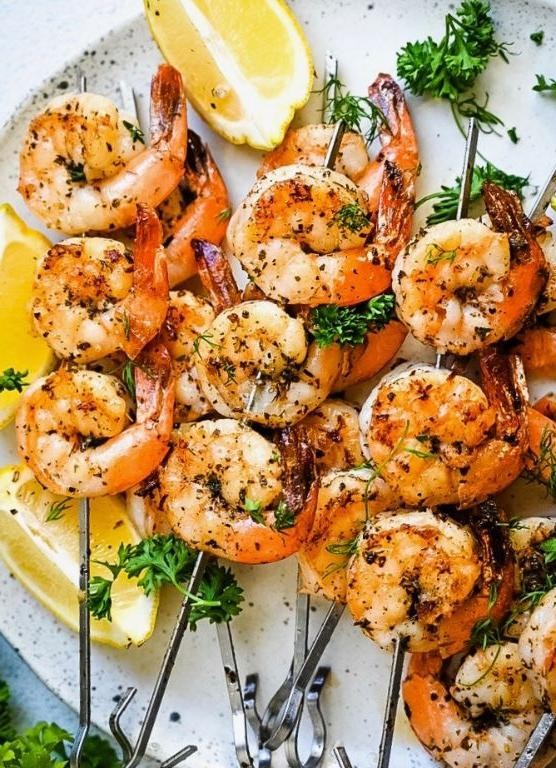
Nothing beats the sizzle of garlicky shrimp hitting a hot grill. Now you can master these restaurant-worthy skewers at home with minimal effort and maximum flavor payoff. Perfect for weeknights or entertaining, they come together in under 30 minutes.
Ingredients
– 1½ pounds extra-large wild-caught shrimp, peeled and deveined
– 3 tablespoons clarified butter, melted
– 4 garlic cloves, microplaned
– 2 tablespoons fresh lemon juice
– 1 tablespoon finely chopped fresh rosemary
– 2 teaspoons finely chopped fresh thyme
– ½ teaspoon crushed red pepper flakes
– ¾ teaspoon fine sea salt
– ¼ teaspoon freshly cracked black pepper
Instructions
1. Soak 8-inch bamboo skewers in cold water for 30 minutes to prevent burning.
2. Pat shrimp completely dry with paper towels to ensure proper searing.
3. Whisk together clarified butter, microplaned garlic, lemon juice, rosemary, thyme, red pepper flakes, sea salt, and black pepper in a medium bowl.
4. Add shrimp to marinade and toss until evenly coated.
5. Thread 4-5 shrimp onto each skewer, leaving ¼-inch space between pieces for even cooking.
6. Preheat grill to medium-high heat (400°F) and lightly oil grates.
7. Grill skewers for 2 minutes undisturbed to develop grill marks.
8. Flip skewers and cook for 1½-2 minutes until shrimp turn opaque and firm.
9. Remove from grill immediately to prevent overcooking.
10. Let rest for 1 minute before serving. Overcooking shrimp makes them rubbery, so watch carefully during the final minute. Organize your mise en place before starting for smoother execution. Use a timer for precision cooking.
Outstandingly tender shrimp boast a crisp exterior with robust garlic and herb infusion. The clarified butter creates a richer, nuttier flavor than regular butter while preventing burning. Serve over creamy polenta or alongside grilled asparagus for a complete meal that impresses with minimal effort.
Slow-Cooked Ginger Chicken with Brown Rice
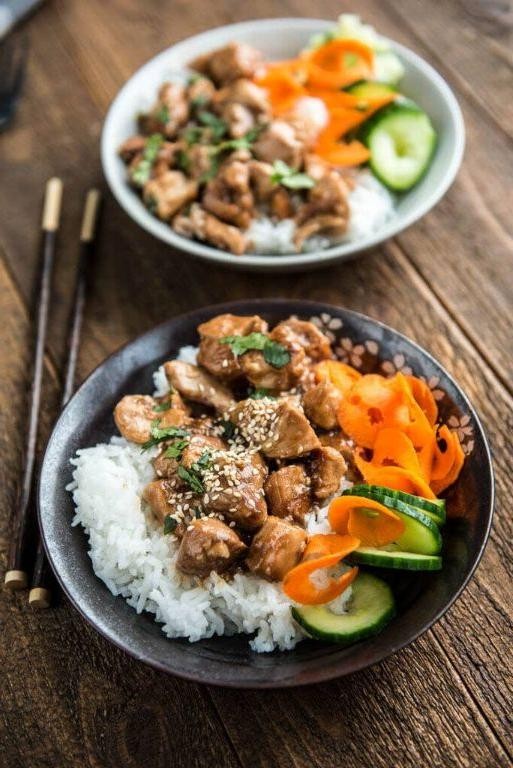
Fragrant ginger and tender chicken meld beautifully in this hands-off slow cooker meal. Forget complicated techniques—this dish practically cooks itself while filling your kitchen with incredible aromas. You’ll appreciate how the ginger infuses every bite without overwhelming the palate.
Ingredients
- 2 lbs bone-in, skin-on chicken thighs
- 1 cup long-grain brown rice, rinsed
- 3 tbsp freshly grated ginger root
- 4 cloves garlic, finely minced
- 1 cup low-sodium chicken stock
- 2 tbsp tamari sauce
- 1 tbsp toasted sesame oil
- 1 tsp crushed red pepper flakes
- 3 scallions, thinly sliced
- 1 tbsp rice vinegar
Instructions
- Pat chicken thighs completely dry with paper towels to ensure proper browning.
- Arrange chicken thighs skin-side down in a cold, large skillet to render fat gradually.
- Cook over medium heat for 8 minutes until skin develops a deep golden-brown crust.
- Flip chicken and sear for 3 minutes on the flesh side to lock in juices.
- Transfer chicken to slow cooker, arranging in a single layer for even cooking.
- Combine rinsed brown rice, grated ginger, minced garlic, chicken stock, tamari, sesame oil, and red pepper flakes in the slow cooker.
- Stir mixture gently to distribute ingredients without disturbing chicken placement.
- Cover and cook on LOW setting for 4 hours until rice has absorbed all liquid.
- Test chicken internal temperature with an instant-read thermometer; it should register 165°F.
- Remove chicken temporarily and fluff rice with a fork to separate grains.
- Return chicken to cooker and drizzle with rice vinegar for brightness.
- Garnish with sliced scallions just before serving to maintain their crisp texture.
Velvety chicken falls effortlessly from the bone while the rice develops a satisfying chew. The ginger provides subtle heat that builds gradually with each bite. For a complete meal, serve alongside quick-pickled vegetables to cut through the richness.
Stuffed Bell Peppers with Quinoa and Turkey
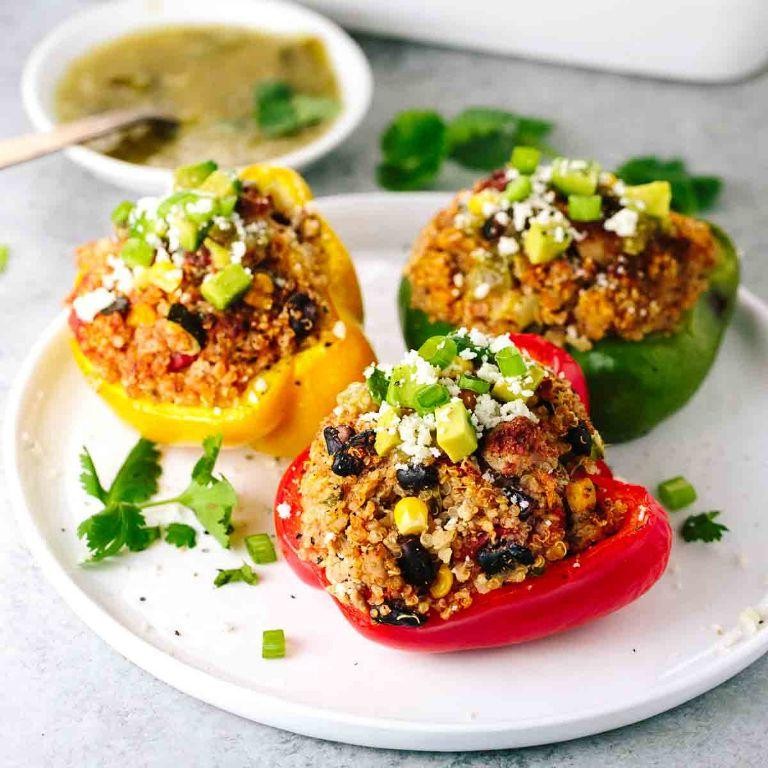
Crisp bell peppers become edible vessels in this protein-packed meal. Their hollowed interiors cradle a savory blend of lean turkey and nutty quinoa. This dish delivers complete nutrition while satisfying comfort food cravings.
Ingredients
– 4 large bell peppers, halved lengthwise and seeded
– 1 lb ground turkey (93% lean)
– 1 cup quinoa, rinsed thoroughly
– 2 cups unsalted chicken stock
– 1 medium yellow onion, finely diced
– 3 garlic cloves, minced
– 2 tbsp extra virgin olive oil
– 1 tsp smoked paprika
– ½ tsp crushed red pepper flakes
– ½ cup freshly grated Parmigiano-Reggiano
– ¼ cup flat-leaf parsley, finely chopped
Instructions
1. Preheat oven to 375°F and position rack in center position.
2. Brush pepper halves with 1 tablespoon olive oil and arrange cut-side up on baking sheet.
3. Roast peppers for 15 minutes until slightly softened but still firm.
4. Heat remaining olive oil in large skillet over medium-high heat until shimmering.
5. Sauté diced onion for 4 minutes until translucent, stirring frequently.
6. Add minced garlic and cook 60 seconds until fragrant but not browned.
7. Crumble ground turkey into skillet, breaking apart with wooden spoon.
8. Cook turkey 6-8 minutes until no pink remains, stirring occasionally.
9. Stir in smoked paprika and red pepper flakes, coating meat evenly.
10. Add rinsed quinoa to skillet, toasting for 2 minutes until lightly golden.
11. Pour in chicken stock, scraping browned bits from skillet bottom.
12. Bring mixture to boil, then reduce heat to low and cover tightly.
13. Simmer quinoa for 18 minutes until liquid is fully absorbed.
14. Remove skillet from heat and let stand covered for 5 minutes.
15. Fluff quinoa-turkey mixture with fork to separate grains.
16. Fold in Parmigiano-Reggiano and parsley until evenly distributed.
17. Divide filling among pre-roasted pepper halves, mounding slightly.
18. Return to oven and bake 20 minutes until peppers are tender-crisp.
19. Switch oven to broil and cook 2-3 minutes until filling is lightly browned.
20. Rest stuffed peppers for 5 minutes before serving.
Zesty Parmesan notes cut through the savory turkey, while quinoa provides satisfying toothsomeness. The peppers maintain structural integrity despite becoming knife-tender. For dramatic presentation, serve on pooled tomato coulis with microgreens garnish.
Sautéed Spinach with Lemon and Pine Nuts
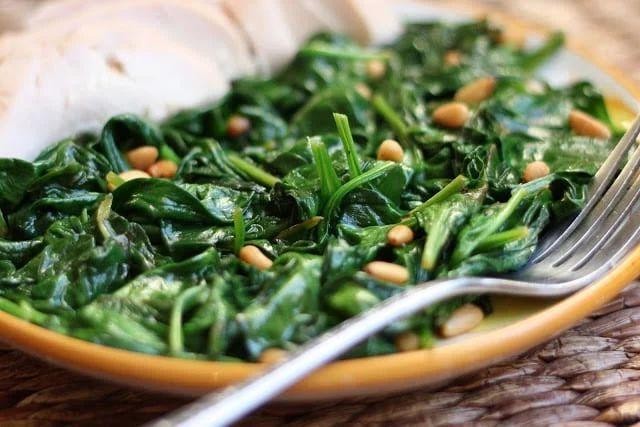
Often overlooked as a simple side, this vibrant sauté transforms fresh spinach into something extraordinary. Our version balances earthy greens with bright citrus and nutty crunch for a sophisticated accompaniment. You’ll appreciate how quickly it comes together while delivering restaurant-quality results.
Ingredients
– 1 pound fresh spinach leaves, thoroughly washed and dried
– 2 tablespoons extra virgin olive oil
– 3 garlic cloves, thinly sliced
– ¼ cup pine nuts
– 2 tablespoons freshly squeezed lemon juice
– ½ teaspoon fine sea salt
– ¼ teaspoon freshly cracked black pepper
Instructions
1. Heat a large skillet over medium-high heat for 2 minutes until the surface is evenly hot.
2. Add pine nuts to the dry skillet and toast for 90 seconds, shaking the pan constantly until golden brown and fragrant.
3. Immediately transfer toasted pine nuts to a small bowl to prevent burning from residual heat.
4. Return the skillet to medium heat and add extra virgin olive oil, swirling to coat the surface.
5. Add thinly sliced garlic and cook for 45 seconds until pale golden and aromatic.
6. Working in two batches, add half the spinach leaves and cook for 1 minute until just wilted.
7. Add the remaining spinach and continue cooking for another 90 seconds, tossing constantly with tongs.
8. Sprinkle fine sea salt and freshly cracked black pepper evenly over the wilted spinach.
9. Drizzle freshly squeezed lemon juice across the surface and toss to incorporate.
10. Remove from heat and fold in the reserved toasted pine nuts.
11. Transfer immediately to a serving dish to preserve the vibrant green color.
Crisp-tender spinach leaves provide the perfect textural base for this bright side dish. The toasted pine nuts add welcome crunch against the silky greens, while the lemon juice cuts through any bitterness with its clean acidity. Consider serving alongside seared salmon or folding into warm pasta with grated Parmesan for a quick vegetarian main.
Herbed Couscous with Roasted Chickpeas
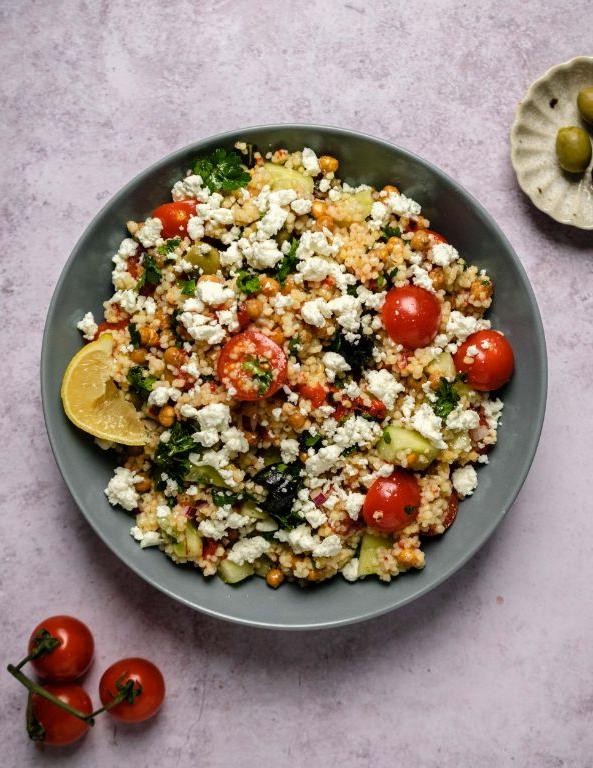
Vibrant and satisfying, this herbed couscous with roasted chickpeas delivers bold Mediterranean flavors in under 30 minutes. Perfect for busy weeknights yet elegant enough for entertaining, it balances fluffy grains with crispy legumes. Fresh herbs and lemon brighten each bite while toasted pine nuts add welcome crunch.
Ingredients
– 1 cup Israeli couscous
– 1 ½ cups vegetable stock
– 1 (15-ounce) can chickpeas, drained and patted dry
– 3 tablespoons extra-virgin olive oil, divided
– ½ teaspoon smoked paprika
– ¼ teaspoon cayenne pepper
– 2 tablespoons freshly squeezed lemon juice
– ¼ cup finely chopped fresh parsley
– 2 tablespoons chopped fresh mint
– 1 tablespoon chopped fresh dill
– 2 tablespoons toasted pine nuts
– Flaky sea salt for finishing
Instructions
1. Preheat oven to 425°F and line a baking sheet with parchment paper.
2. Toss dried chickpeas with 1 tablespoon olive oil, smoked paprika, and cayenne pepper until evenly coated.
3. Spread chickpeas in a single layer on prepared baking sheet and roast for 18-20 minutes until crisp and golden brown.
4. Meanwhile, bring vegetable stock to a rolling boil in a medium saucepan.
5. Add Israeli couscous to boiling stock, reduce heat to low, cover, and simmer for 8-10 minutes until liquid is absorbed.
6. Fluff cooked couscous with a fork to separate grains and prevent clumping.
7. Transfer couscous to a large mixing bowl and drizzle with remaining 2 tablespoons olive oil and lemon juice.
8. Gently fold in roasted chickpeas, parsley, mint, dill, and toasted pine nuts until evenly distributed.
9. Season with flaky sea salt to finish.
Keep leftovers refrigerated in an airtight container for up to 3 days. The contrast between fluffy couscous and crispy chickpeas creates wonderful texture variation, while the herb medley provides fresh, aromatic notes. For a complete meal, top with grilled halloumi or serve alongside roasted vegetables.
Mango Chicken Salad with Lime Vinaigrette
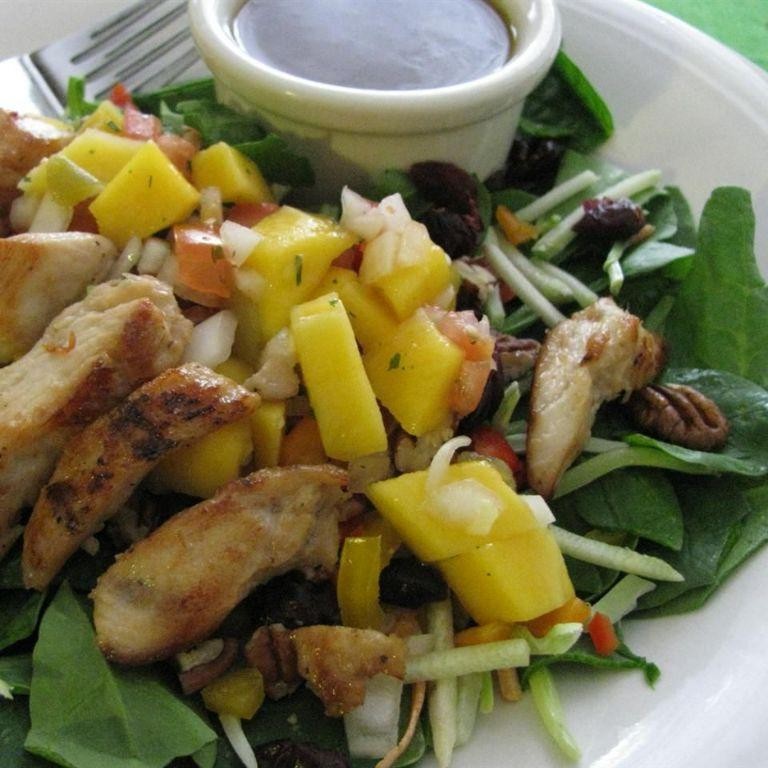
Vibrant mango and tender chicken unite in this refreshing salad, balanced by a zesty lime vinaigrette. Perfect for warm days when you crave something light yet satisfying. This dish comes together quickly with minimal cooking required.
Ingredients
– 1 lb boneless, skinless chicken breasts
– 2 ripe mangoes, peeled and diced
– 6 cups mixed baby greens
– 1/4 cup extra virgin olive oil
– 3 tbsp fresh lime juice
– 1 tbsp honey
– 1 tsp Dijon mustard
– 1/4 cup toasted pepitas
– 1/4 cup fresh cilantro leaves
– 1/2 tsp kosher salt
– 1/4 tsp freshly ground black pepper
Instructions
1. Preheat a grill pan or skillet to medium-high heat (400°F).
2. Season chicken breasts evenly with kosher salt and black pepper on both sides.
3. Place chicken on heated surface and cook for 6-7 minutes per side until internal temperature reaches 165°F.
4. Transfer chicken to a cutting board and let rest for 5 minutes to retain juices.
5. While chicken rests, whisk together olive oil, lime juice, honey, and Dijon mustard in a small bowl until emulsified.
6. Thinly slice the rested chicken against the grain for maximum tenderness.
7. Combine mixed baby greens, diced mangoes, and sliced chicken in a large salad bowl.
8. Drizzle the lime vinaigrette over the salad mixture and toss gently to coat all ingredients.
9. Garnish with toasted pepitas and fresh cilantro leaves.
10. Serve immediately to maintain crisp texture.
Hearty yet refreshing, this salad offers contrasting textures from the creamy mango and firm chicken. The bright acidity of the lime vinaigrette cuts through the richness beautifully. For a stunning presentation, serve in individual bowls with extra pepitas sprinkled around the edges.
Conclusion
Living with GERD doesn’t mean sacrificing flavor! These 24 dinner recipes offer delicious comfort while keeping symptoms at bay. I hope you find some new favorites to add to your weekly rotation. Which recipe are you most excited to try? Share your thoughts in the comments below, and don’t forget to pin this article to your Pinterest boards for easy meal planning!