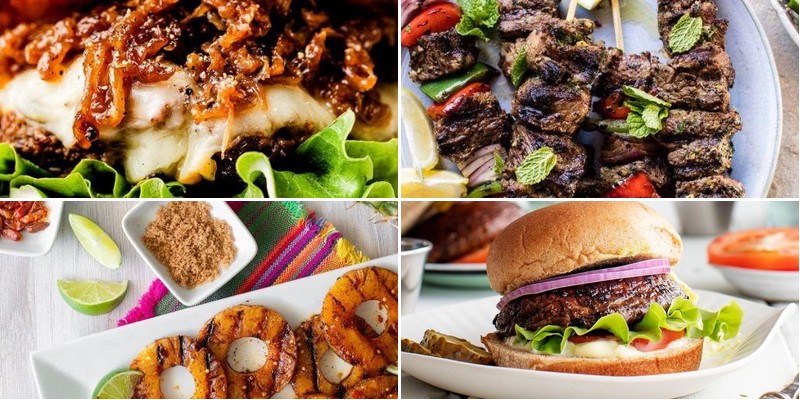
Vibrant weeknight dinners don’t have to be complicated! When time is tight but you’re craving something delicious, your gas grill is the ultimate shortcut to mouthwatering meals. From juicy burgers and sizzling skewers to perfectly grilled veggies, these 22 recipes deliver maximum flavor with minimal effort. Get ready to fire up the grill and transform your busy evenings into tasty celebrations—let’s dive in!
Grilled Honey Garlic Chicken Skewers
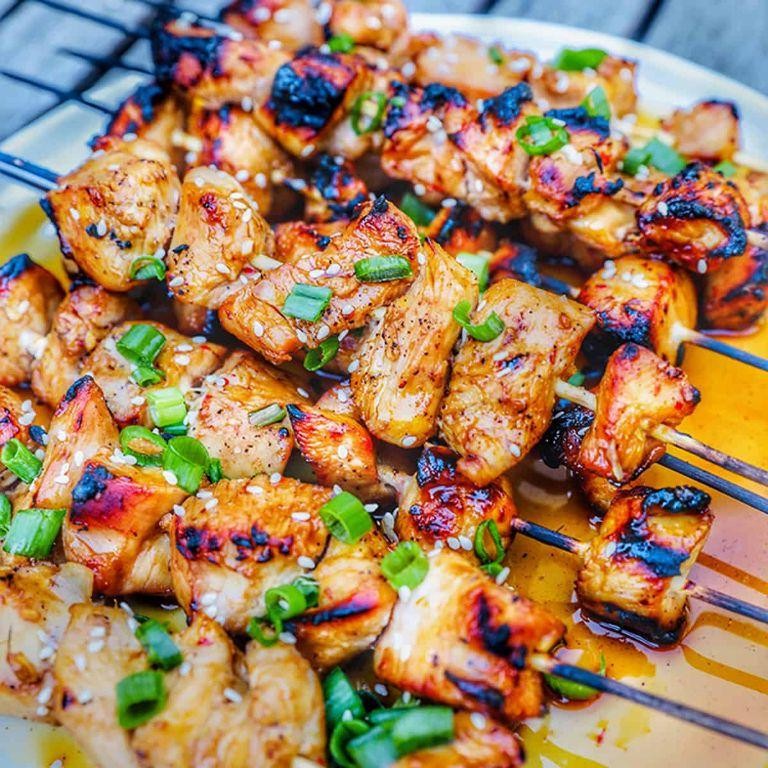
Zesty and finger-licking good—these grilled honey garlic chicken skewers are about to become your summer obsession. Fire up the grill and get ready for sticky-sweet perfection in every bite. Seriously, your backyard BBQ game just leveled up.
8
skewers95
minutes10
minutesIngredients
– 1.5 lbs boneless, skinless chicken thighs (I always go for thighs—they stay juicier on the grill)
– 1/3 cup honey (local raw honey gives the best flavor)
– 4 cloves garlic, minced (fresh is non-negotiable here)
– 2 tbsp soy sauce (low-sodium lets the honey shine)
– 1 tbsp olive oil (extra virgin is my go-to for marinades)
– 1 tsp smoked paprika (adds that subtle smoky depth)
– 1/2 tsp black pepper (freshly cracked, please)
– 8 wooden skewers (soaked in water for 30 minutes to prevent burning)
Instructions
1. Soak 8 wooden skewers in water for 30 minutes to prevent burning on the grill.
2. Cut 1.5 lbs boneless, skinless chicken thighs into 1-inch cubes.
3. In a medium bowl, whisk together 1/3 cup honey, 4 minced garlic cloves, 2 tbsp soy sauce, 1 tbsp olive oil, 1 tsp smoked paprika, and 1/2 tsp black pepper.
4. Add chicken cubes to the marinade, tossing to coat every piece thoroughly.
5. Cover the bowl and refrigerate for at least 1 hour (overnight marinating makes it even more flavorful).
6. Thread marinated chicken cubes onto the soaked skewers, leaving small gaps between pieces.
7. Preheat your grill to medium-high heat (400°F) and lightly oil the grates.
8. Place skewers on the grill and cook for 5 minutes without moving them to get nice grill marks.
9. Flip skewers and cook for another 5 minutes until internal temperature reaches 165°F.
10. Brush skewers with remaining marinade during the last 2 minutes of cooking for extra glaze.
11. Remove from grill and let rest for 3 minutes before serving.
Resting lets the juices redistribute, giving you tender, pull-apart chicken with that perfect sticky-sweet crust. Serve these skewers over cilantro lime rice or chop them into a vibrant summer salad—either way, that caramelized honey garlic glaze will have everyone asking for the recipe.
Spicy Cajun Grilled Shrimp Tacos

Ready to transform taco night? These fiery Cajun shrimp tacos deliver maximum flavor with minimal effort. Grab your skillet and let’s get sizzling.
8
tacos15
minutes5
minutesIngredients
- 1 lb large raw shrimp, peeled and deveined—I always buy wild-caught for that sweet, briny flavor
- 2 tbsp olive oil, extra virgin is my kitchen staple
- 2 tbsp Cajun seasoning—homemade blend beats store-bought every time
- 1 lime, juiced (save those halves for garnish!)
- 8 small corn tortillas—char them slightly for extra texture
- 1 cup shredded purple cabbage for crunch
- 1/4 cup chopped cilantro, stems and all for bold herbiness
- 1/4 cup sour cream mixed with 1 tbsp lime juice—my creamy cooling sauce hack
- 1 diced avocado, perfectly ripe when it yields to gentle pressure
Instructions
- Pat shrimp completely dry with paper towels—this ensures a proper sear instead of steaming.
- Toss shrimp with olive oil and Cajun seasoning in a medium bowl until evenly coated.
- Heat a large skillet over medium-high heat until a drop of water sizzles immediately.
- Arrange shrimp in a single layer in the hot skillet, cooking for 2 minutes undisturbed to develop a crust.
- Flip each shrimp and cook for exactly 1 more minute until opaque and lightly charred.
- Remove skillet from heat and immediately squeeze fresh lime juice over the shrimp.
- Warm tortillas in a dry skillet for 30 seconds per side until pliable with light brown spots.
- Spread 1 tablespoon of the lime sour cream mixture evenly across each warm tortilla.
- Divide shrimp evenly among tortillas, about 4-5 shrimp per taco.
- Top each taco with shredded cabbage, diced avocado, and fresh cilantro.
That smoky Cajun crust gives way to tender shrimp, while the cool lime cream balances the heat perfectly. Try stacking them upright in a taco holder for that Instagram-worthy presentation, or wrap tightly in foil for a mess-free backyard feast.
BBQ Pork Ribs with Tangy Sauce

Ready to transform basic ribs into a sticky, finger-licking masterpiece? These BBQ pork ribs with tangy sauce deliver fall-off-the-bone perfection every single time. Trust me, your grill game is about to level up.
2
racks20
minutes195
minutesIngredients
– 2 racks pork baby back ribs (I always remove the membrane for maximum flavor absorption)
– 1/4 cup brown sugar (pack it tight for that caramelized crust)
– 2 tbsp smoked paprika (this is non-negotiable for authentic smokiness)
– 1 tbsp garlic powder (fresh works too, but powder distributes evenly)
– 1 tbsp onion powder
– 2 tsp black pepper (freshly cracked gives the best bite)
– 1 tsp cayenne pepper (adjust based on your heat tolerance)
– 1 cup ketchup (I use the classic Heinz for consistent sweetness)
– 1/2 cup apple cider vinegar (the tangy secret weapon)
– 1/4 cup Worcestershire sauce
– 2 tbsp Dijon mustard (adds subtle complexity)
– 1/4 cup honey (local wildflower honey is my favorite here)
Instructions
1. Preheat your oven to 275°F.
2. Pat the pork ribs completely dry with paper towels.
3. Flip the ribs bone-side up and slide a knife under the membrane.
4. Grab the membrane with a paper towel and pull it off in one piece.
5. Combine brown sugar, smoked paprika, garlic powder, onion powder, black pepper, and cayenne in a small bowl.
6. Rub the spice mixture evenly over both sides of the ribs.
7. Wrap each rack tightly in aluminum foil.
8. Place the foil-wrapped ribs on a baking sheet.
9. Bake at 275°F for 3 hours.
10. While ribs bake, combine ketchup, apple cider vinegar, Worcestershire sauce, Dijon mustard, and honey in a saucepan.
11. Bring the sauce to a simmer over medium heat.
12. Reduce heat to low and cook for 15 minutes, stirring occasionally.
13. Remove ribs from oven and carefully unwrap the foil.
14. Brush a generous layer of sauce over both sides of the ribs.
15. Increase oven temperature to 400°F.
16. Return the sauced ribs to the oven, uncovered.
17. Bake for 15 minutes until the sauce is caramelized and sticky.
18. Let the ribs rest for 10 minutes before slicing.
Every bite delivers that perfect pull-apart texture where the meat just surrenders from the bone. Expect a beautiful balance of sweet honey, tangy vinegar, and smoky paprika that’ll have everyone reaching for seconds. Serve these bad boys with extra sauce for dipping and plenty of napkins—things are about to get deliciously messy.
Grilled Portobello Mushroom Burgers
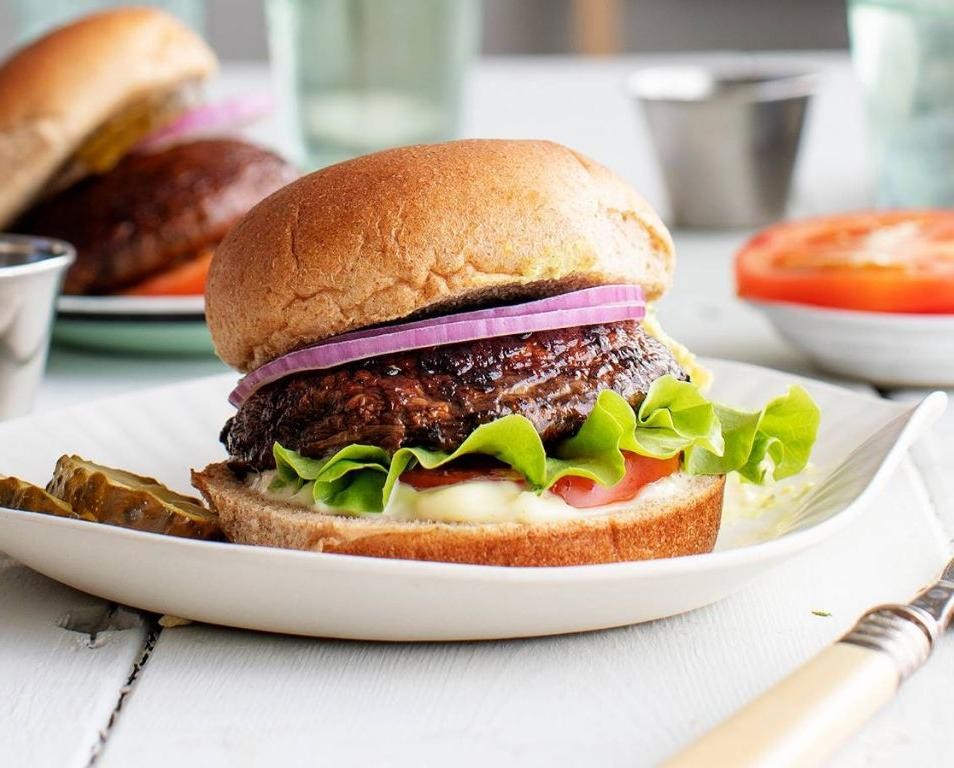
Perfect for meatless Monday or any day you crave something hearty. These grilled portobello burgers deliver serious umami flavor with minimal effort—your grill will thank you.
3
sandwiches15
minutes10
minutesIngredients
– 4 large portobello mushroom caps (look for ones with deep gills)
– 1/4 cup extra virgin olive oil (my go-to for rich flavor)
– 2 tbsp balsamic vinegar (the good stuff makes a difference)
– 2 garlic cloves, minced (fresh only—no jarred nonsense)
– 1 tsp smoked paprika (adds that smoky depth)
– 4 burger buns (brioche for luxury, whole wheat for health)
– 4 slices provolone cheese (melts like a dream)
– 1 avocado, sliced (perfectly ripe but firm)
– 1 cup arugula (the peppery kick balances everything)
Instructions
1. Preheat your grill to medium-high heat (400°F).
2. Carefully scrape out the dark gills from the portobello caps using a spoon.
3. Whisk together olive oil, balsamic vinegar, minced garlic, and smoked paprika in a small bowl.
4. Brush both sides of each mushroom cap generously with the marinade.
5. Place mushrooms gill-side down on the hot grill.
6. Grill for 5 minutes until you see prominent grill marks.
7. Flip the mushrooms and grill for another 4 minutes.
8. Place one slice of provolone cheese on each mushroom during the last minute of grilling.
9. Toast the burger buns on the grill for 1-2 minutes until lightly golden.
10. Remove mushrooms and buns from the grill.
11. Spread the bottom bun with sliced avocado.
12. Top with a grilled portobello cap.
13. Add a handful of arugula over the mushroom.
14. Cap with the top bun and press gently.
That first bite delivers juicy mushroom texture against the creamy avocado and melty cheese. Try serving these with sweet potato fries or stacking two mushrooms for an extra-hearty burger experience.
Lemon Herb Grilled Salmon
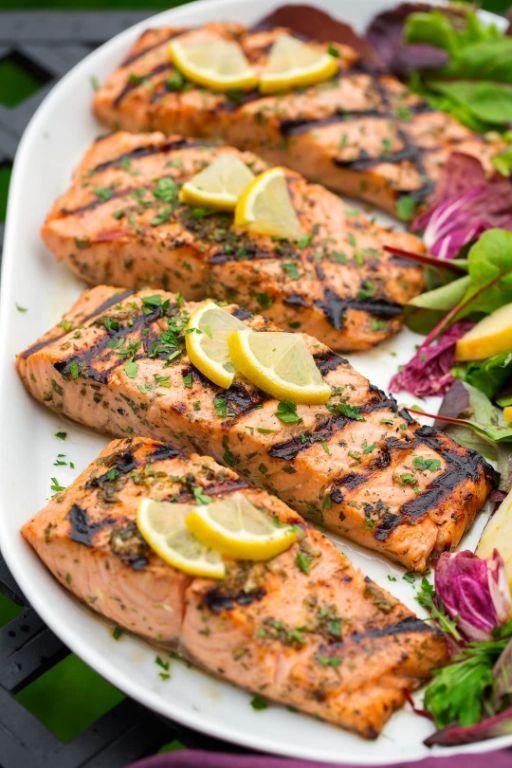
Whip up the most vibrant, flavor-packed salmon that’ll have everyone asking for seconds. This lemon herb grilled version comes together in minutes but tastes like you spent hours—perfect for busy weeknights or impressive enough for weekend guests.
2
servings20
minutes10
minutesIngredients
– 4 (6 oz) salmon fillets, skin-on for that crispy texture I love
– 3 tbsp extra virgin olive oil, my go-to for high-heat grilling
– 2 tbsp fresh lemon juice, squeezed right before using for maximum brightness
– 2 cloves garlic, minced fine—fresh only, no jarred stuff here
– 1 tbsp chopped fresh dill, trust me it beats dried by miles
– 1 tsp lemon zest, get that yellow part only for no bitterness
– 1/2 tsp kosher salt, I prefer the larger crystals for better distribution
– 1/4 tsp black pepper, freshly ground always
Instructions
1. Pat salmon fillets completely dry with paper towels—this ensures perfect searing without steaming.
2. Whisk together olive oil, lemon juice, garlic, dill, lemon zest, salt, and pepper in a small bowl until fully combined.
3. Brush the marinade generously over both sides of each salmon fillet, coating evenly.
4. Let salmon sit at room temperature for 15 minutes—no longer or the acid will start cooking the fish.
5. Preheat your grill to medium-high heat, about 400°F, and oil the grates well to prevent sticking.
6. Place salmon skin-side up on the hot grill and close the lid immediately.
7. Grill for 4-5 minutes until you see grill marks and the fish releases easily from the grates.
8. Flip salmon carefully using a thin spatula and grill skin-side down for another 4-5 minutes.
9. Check for doneness by inserting a fork—the flesh should flake easily but remain moist in the center.
10. Remove salmon from grill and let rest for 2 minutes before serving to redistribute juices.
Expect flaky, tender salmon with a crispy skin contrast that’s downright addictive. The lemon herb marinade creates this bright, aromatic crust that pairs beautifully with simple roasted veggies or over a grain bowl. Seriously, this might become your new go-to salmon recipe—it’s that good and surprisingly simple to master.
Classic Beef Burgers with Caramelized Onions

Sizzle up your weeknight dinner game with these juicy beef burgers crowned with sweet caramelized onions. Smash that craving for something hearty and homemade—no fancy restaurant required. Your kitchen, your rules, let’s get cooking.
3
sandwiches10
minutes26
minutesIngredients
– 1 lb ground beef (80/20 blend for maximum juiciness)
– 1 large yellow onion, thinly sliced (I always grab an extra—they shrink down so much!)
– 2 tbsp olive oil (extra virgin is my pantry staple)
– 1 tsp salt (coarse kosher salt makes all the difference)
– 1/2 tsp black pepper (freshly cracked, please)
– 4 burger buns (toasted brioche buns are my weakness)
– 4 slices cheddar cheese (sharp cheddar melts like a dream)
Instructions
1. Heat 1 tbsp olive oil in a large skillet over medium-low heat.
2. Add sliced onions and cook for 20 minutes, stirring every 5 minutes until golden brown and sweet.
3. While onions cook, divide ground beef into 4 equal portions and gently form into 1-inch thick patties.
4. Create a shallow thumbprint in the center of each patty to prevent bulging during cooking.
5. Season both sides of patties generously with salt and pepper.
6. Heat remaining 1 tbsp olive oil in a separate skillet over medium-high heat until shimmering.
7. Place patties in the hot skillet and cook for 4 minutes without moving them.
8. Flip burgers and immediately top each with a slice of cheddar cheese.
9. Cook for another 4 minutes until cheese melts and internal temperature reaches 160°F.
10. While burgers cook, toast burger buns in a toaster or skillet until golden brown.
11. Remove burgers from skillet and let rest for 2 minutes to redistribute juices.
12. Assemble burgers on toasted buns and top generously with caramelized onions.
Unbelievably juicy patties meet that sweet-savory onion magic in every single bite. The melted cheddar creates this gorgeous cheese pull situation that’s basically burger heaven. Serve these bad boys with extra napkins and maybe some crispy sweet potato fries for the ultimate comfort food moment.
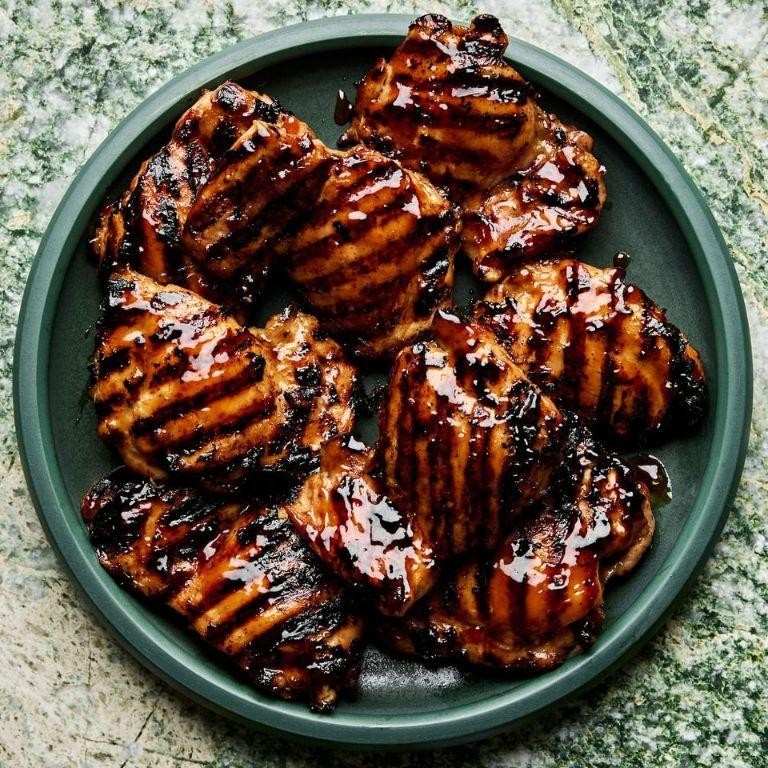
Asian Glazed Grilled Chicken Thighs
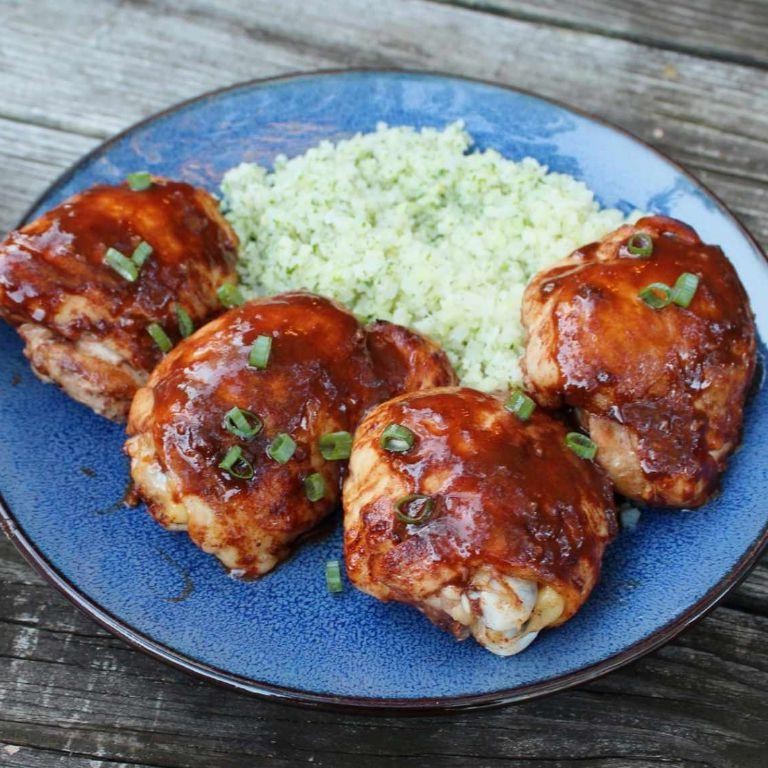
Viral food trends come and go, but these Asian glazed grilled chicken thighs are here to stay. They pack serious flavor with minimal effort—perfect for busy weeknights when you want something restaurant-worthy without the fuss. Get ready to level up your grilling game with this sticky, sweet, and savory masterpiece.
5
portions15
minutes12
minutesIngredients
– 2 lbs boneless, skinless chicken thighs (I always buy organic—better flavor and texture)
– 1/2 cup soy sauce (use low-sodium if you’re watching salt intake)
– 1/4 cup honey (local raw honey gives the best floral notes)
– 2 tbsp rice vinegar
– 3 cloves garlic, minced (fresh is essential here, no jarred stuff)
– 1 tbsp grated fresh ginger (keep your ginger in the freezer for easy grating)
– 1 tsp sesame oil (toasted sesame oil adds that authentic nutty flavor)
– 1/2 tsp red pepper flakes (adjust based on your heat preference)
– 2 green onions, thinly sliced
– 1 tbsp sesame seeds
Instructions
1. Combine soy sauce, honey, rice vinegar, minced garlic, grated ginger, sesame oil, and red pepper flakes in a medium bowl.
2. Whisk the marinade ingredients vigorously for 30 seconds until fully combined and slightly frothy.
3. Place chicken thighs in a large resealable plastic bag or shallow dish.
4. Pour 3/4 of the marinade over the chicken, reserving the remaining 1/4 in a separate bowl.
5. Seal the bag and massage the marinade into the chicken thighs for 1 minute to ensure even coating.
6. Refrigerate the marinating chicken for exactly 30 minutes—any longer and the acid will start breaking down the meat.
7. Preheat your grill to medium-high heat (400°F) while the chicken marinates.
8. Remove chicken from marinade and discard the used marinade completely.
9. Place chicken thighs directly on the preheated grill grates.
10. Grill for 6 minutes without moving to develop perfect grill marks.
11. Flip chicken thighs using tongs—never a fork to avoid piercing and losing juices.
12. Brush the reserved clean marinade over the cooked side of each thigh.
13. Continue grilling for another 5-6 minutes until internal temperature reaches 165°F on an instant-read thermometer.
14. Transfer grilled chicken to a clean cutting board and let rest for 5 minutes—this keeps the juices locked in.
15. Sprinkle with sliced green onions and sesame seeds before serving.
Beyond just another chicken recipe, these thighs deliver that perfect sticky-sweet glaze with a subtle heat kick. The caramelized edges contrast beautifully with the juicy, tender interior—serve them over jasmine rice to soak up every drop of that incredible sauce, or slice them for next-level rice bowls that’ll have everyone asking for seconds.
Juicy Grilled Pork Chops with Apple Slaw
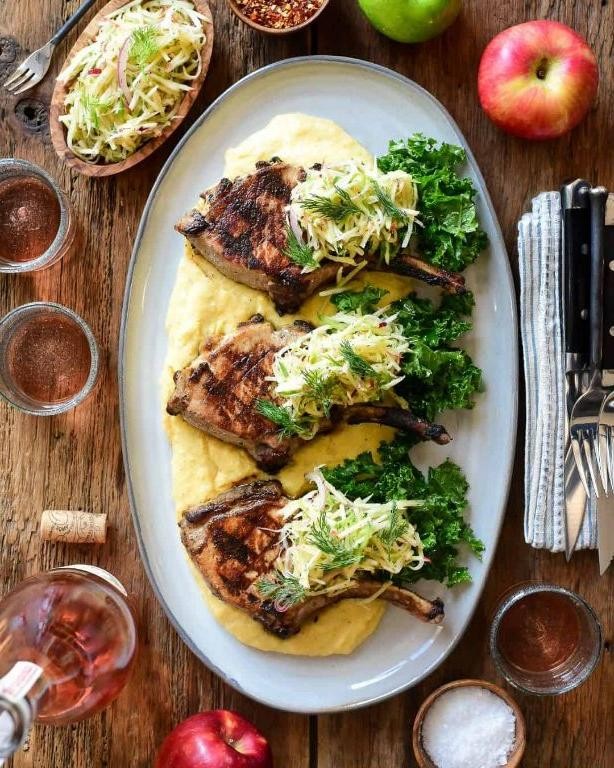
Sizzling summer vibes call for these perfectly grilled pork chops with crisp apple slaw. Get ready to level up your backyard BBQ game with minimal effort and maximum flavor. This combo brings sweet, savory, and smoky together in every bite.
4
servings15
minutes15
minutesIngredients
– 4 bone-in pork chops, 1-inch thick (my butcher always hooks me up with these)
– 2 tbsp olive oil (extra virgin is my go-to for that fruity kick)
– 1 tsp kosher salt (I prefer the coarse texture for better seasoning)
– ½ tsp black pepper, freshly ground
– ½ tsp garlic powder
– 2 crisp apples, thinly sliced (Honeycrisp are my favorite for their sweet-tart balance)
– 2 cups shredded cabbage (the pre-shredded bag saves so much time)
– ¼ cup mayonnaise
– 1 tbsp apple cider vinegar
– 1 tsp honey
– ¼ tsp celery seed (this little secret ingredient makes all the difference)
Instructions
1. Preheat your grill to medium-high heat, around 400°F.
2. Pat pork chops completely dry with paper towels—this ensures a perfect sear.
3. Rub olive oil evenly over both sides of all pork chops.
4. Mix kosher salt, black pepper, and garlic powder in a small bowl.
5. Season both sides of pork chops generously with the spice mixture.
6. Place pork chops on the hot grill and close the lid.
7. Grill for 5 minutes without moving them to develop grill marks.
8. Flip pork chops using tongs and grill for another 5 minutes.
9. Check internal temperature with a meat thermometer—aim for 145°F for juicy results.
10. Remove pork chops from grill and let rest for 5 minutes on a clean plate.
11. While pork rests, combine shredded cabbage and sliced apples in a large bowl.
12. Whisk together mayonnaise, apple cider vinegar, honey, and celery seed in a small bowl.
13. Pour dressing over cabbage and apple mixture.
14. Toss slaw thoroughly until everything is evenly coated.
15. Serve pork chops immediately with generous portions of apple slaw.
Velvety pork chops meet the crunchiest apple slaw for a texture party in your mouth. The smoky char plays perfectly against the sweet-tangy dressing. Try serving these on wooden boards for that rustic picnic vibe everyone loves.
Grilled Vegetable Platter with Balsamic Drizzle

Bold flavors meet backyard vibes in this stunning grilled vegetable platter. Charred edges and sweet caramelization transform simple veggies into a showstopper. That balsamic drizzle? Pure magic—it ties everything together with tangy sweetness.
5
servings15
minutes16
minutesIngredients
– 2 large zucchinis, sliced lengthwise into ½-inch planks—these hold their shape beautifully on the grill
– 1 red bell pepper, cored and quartered—I always choose the shiniest one for maximum sweetness
– 1 yellow bell pepper, cored and quartered—the color contrast makes the platter pop
– 1 large eggplant, sliced into ½-inch rounds—salted briefly to remove bitterness
– 1 red onion, cut into ½-inch thick rings—they caramelize into sweet perfection
– ¼ cup extra virgin olive oil—my go-to for that fruity backbone
– 2 tbsp balsamic glaze—the thick, syrupy kind that clings to every surface
– 3 garlic cloves, minced—fresh only, the powdered stuff just won’t do
– 1 tsp kosher salt—it adheres better than table salt
– ½ tsp black pepper, freshly ground—the aroma is worth the extra effort
Instructions
1. Preheat your grill to medium-high heat (400°F) and brush the grates with oil to prevent sticking.
2. Arrange zucchini, bell peppers, eggplant, and red onion in a single layer on a large baking sheet.
3. Drizzle olive oil evenly over all vegetables, using your hands to coat every surface thoroughly.
4. Sprinkle minced garlic, kosher salt, and black pepper directly onto the oiled vegetables.
5. Place vegetables on the hot grill, starting with eggplant and peppers since they take longest to cook.
6. Grill eggplant for 4 minutes per side until you see defined grill marks and the flesh softens.
7. Flip bell peppers after 3 minutes when the skins begin to blister and blacken in spots.
8. Add zucchini and red onion to the grill, cooking for 2-3 minutes per side until tender-crisp.
9. Remove all vegetables from the grill once they’re charred at the edges but still hold their shape.
10. Arrange grilled vegetables artistically on a large platter while still warm.
11. Drizzle balsamic glaze in zigzag patterns across the entire vegetable arrangement.
12. Let the platter rest for 5 minutes before serving to allow flavors to meld.
Glorious char marks give way to tender-crisp textures that practically melt in your mouth. The balsamic drizzle caramelizes slightly on the warm vegetables, creating sticky-sweet pockets that contrast beautifully with the smoky grill flavor. Serve this platter family-style with crusty bread to soak up the juices, or chop everything up tomorrow for an incredible veggie sandwich filling.
Flame-Kissed Grilled Lobster Tails
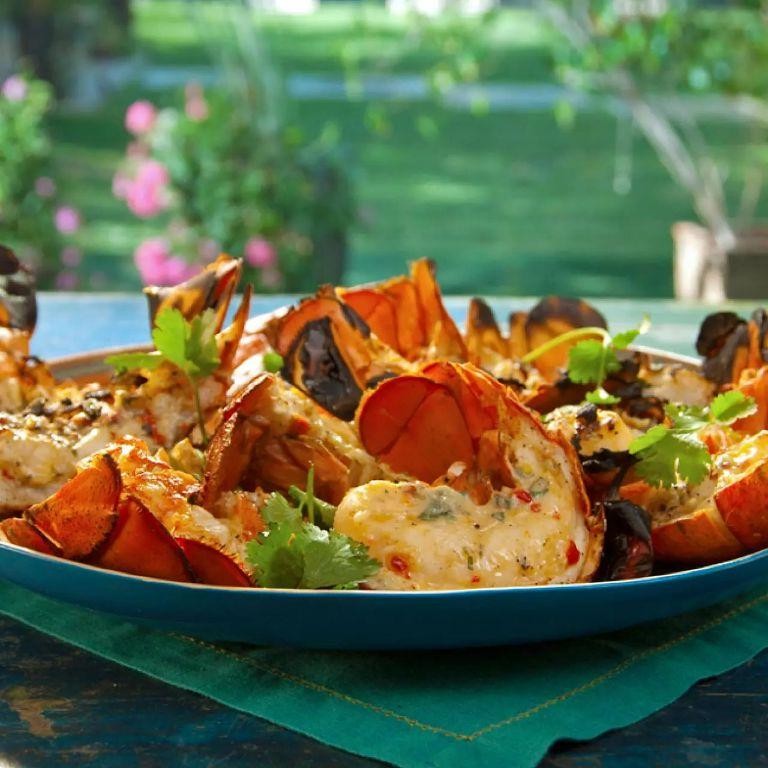
Unlock restaurant-quality seafood right in your backyard with these flame-kissed lobster tails. Seriously impressive yet surprisingly simple—this method delivers that perfect smoky char and tender, buttery meat every single time. Your summer cookout game is about to level up dramatically.
5
servings15
minutes13
minutesIngredients
– 4 lobster tails (8-10 oz each)—thawed if frozen, because fresh always gives the best texture
– ½ cup unsalted butter—I always use European-style for its richer flavor
– 3 garlic cloves, minced—freshly crushed releases the most aromatic oils
– 2 tbsp fresh lemon juice—squeezed right before using to keep it bright
– 1 tsp smoked paprika—this adds that deep, smoky backbone
– ½ tsp cayenne pepper—just enough for a subtle kick without overwhelming
– ¼ cup chopped fresh parsley—I grab it from my little herb garden for the freshest punch
– Salt to season—I prefer fine sea salt for even distribution
Instructions
1. Preheat your grill to medium-high heat, aiming for 400°F—this ensures a good sear without burning.
2. Use kitchen shears to cut through the top shell of each lobster tail, stopping at the tail fin.
3. Gently pry the shell open and lift the meat, keeping it attached at the base.
4. Press the meat upward so it rests on top of the split shell—this exposes more surface area to the grill.
5. In a small saucepan, melt the unsalted butter over low heat.
6. Add the minced garlic and cook for 1 minute until fragrant but not browned.
7. Stir in the fresh lemon juice, smoked paprika, and cayenne pepper until fully combined.
8. Brush half of the garlic butter mixture evenly over the exposed lobster meat.
9. Place the lobster tails shell-side down on the preheated grill.
10. Close the grill lid and cook for 5-7 minutes.
11. Baste the lobster with the remaining garlic butter mixture.
12. Continue grilling for another 4-6 minutes until the meat is opaque and firm to touch.
13. Remove the lobster tails from the grill and sprinkle with chopped fresh parsley and salt.
14. Let rest for 2 minutes before serving to allow juices to redistribute. Outrageously succulent with a smoky, buttery finish that melts in your mouth. Serve these beauties over lemony orzo or with grilled corn for the ultimate coastal feast—the charred edges and tender interior create a texture dream you’ll crave all season.
Mediterranean Grilled Lamb Kebabs
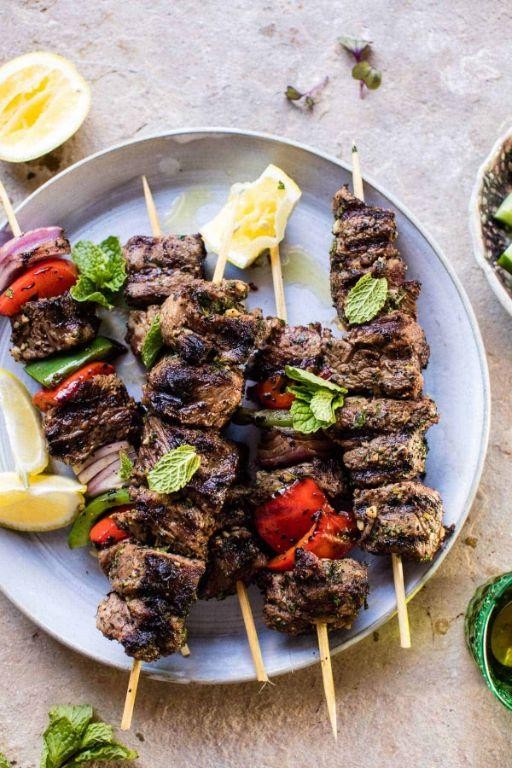
Aromatic Mediterranean flavors meet fire-kissed perfection in these lamb kebabs. Charred edges, juicy centers, and zesty marinade make these impossible to resist. Skip the boring dinner—these skewers bring vacation vibes to your backyard.
4
servings20
minutes10
minutesIngredients
– 2 lbs lamb shoulder, cut into 1.5-inch cubes (I trim excess fat but keep some for flavor)
– 1/4 cup extra virgin olive oil (my go-to for rich flavor)
– 3 tbsp lemon juice (freshly squeezed—bottled just doesn’t hit the same)
– 4 garlic cloves, minced (don’t be shy—more garlic means more flavor)
– 1 tbsp dried oregano (rub it between your palms to wake up the oils)
– 1 tsp smoked paprika (adds that subtle smokiness without a smoker)
– 1/2 tsp black pepper (freshly cracked for the best bite)
– 1 tsp kosher salt (I prefer Diamond Crystal—it dissolves evenly)
– 1 large red onion, cut into 1-inch chunks (they caramelize beautifully)
– 1 red bell pepper, cut into 1-inch pieces (adds sweet, charred notes)
– Metal or soaked wooden skewers (soak wooden ones for 30 minutes to prevent burning)
Instructions
1. Whisk together 1/4 cup olive oil, 3 tbsp lemon juice, 4 minced garlic cloves, 1 tbsp oregano, 1 tsp smoked paprika, 1/2 tsp black pepper, and 1 tsp kosher salt in a large bowl.
2. Add 2 lbs lamb cubes to the bowl and toss until evenly coated.
3. Cover the bowl with plastic wrap and refrigerate for at least 2 hours or up to overnight.
4. Preheat your grill to 450°F—this high heat ensures a good sear.
5. Thread marinated lamb, 1-inch red onion chunks, and 1-inch red bell pepper pieces alternately onto skewers, leaving small gaps for even cooking.
6. Place skewers on the hot grill and cook for 4-5 minutes.
7. Flip skewers using tongs and grill for another 4-5 minutes.
8. Check for doneness by inserting a meat thermometer into the thickest lamb piece—it should read 145°F for medium.
9. Remove skewers from the grill and let them rest for 3 minutes before serving.
Resting lets the juices redistribute, so each bite is tender, not dry. The smoky paprika and garlic meld with the charred veggies for a vibrant, savory-sweet combo. Serve these over fluffy couscous or stuff into warm pita with tzatziki for a handheld feast.
Sweet and Spicy Grilled Pineapple

Ditch the boring fruit salad—this grilled pineapple will literally stop your backyard BBQ in its tracks. Caramelized edges meet spicy chili kick in under 15 minutes flat.
1
pineapple10
minutes8
minutesIngredients
- 1 large pineapple, peeled and cored (I look for golden-yellow skin with zero squish)
- 2 tbsp honey (local raw honey adds floral notes)
- 1 tbsp lime juice (freshly squeezed—bottled just doesn’t hit the same)
- 1 tsp chili powder (I use ancho for smoky depth)
- 1/4 tsp cayenne pepper (adjust if you’re spice-shy)
- 1 tbsp melted unsalted butter (salted works too, but then skip extra salt)
- Pinch of sea salt (flaky Maldon salt at the end is *chef’s kiss*)
Instructions
- Preheat your grill to medium-high heat (400°F)—hold your hand 5 inches above the grates; you should only manage 2-3 seconds before pulling away.
- Slice the peeled pineapple into 1-inch thick rings. Pro tip: Keep the core intact—it helps rings hold shape on the grill.
- Whisk honey, lime juice, chili powder, cayenne, melted butter, and salt in a shallow bowl until fully combined.
- Brush both sides of each pineapple ring generously with the spicy glaze using a silicone brush.
- Place glazed pineapple rings directly on the hot grill grates. Close the lid immediately.
- Grill for 4 minutes until you see deep grill marks and the edges start caramelizing.
- Flip each ring carefully with tongs. Grill for another 3-4 minutes until the second side is charred and sticky.
- Remove pineapple from grill and let rest 1 minute—this allows the sugars to set so it doesn’t burn your mouth.
Outrageously juicy with a crackly caramelized crust that gives way to tender, heat-kissed flesh. Slide a ring over vanilla ice cream for sweet-heat sundae vibes, or chop it into a jalapeño-cheddar burger for total flavor chaos.
Teriyaki Grilled Chicken Breast
Ready to level up your weeknight dinner game? This teriyaki grilled chicken breast delivers restaurant-quality flavor in under 30 minutes—perfect for busy schedules and picky eaters alike.
2
servings15
minutes15
minutesIngredients
– 2 large boneless, skinless chicken breasts (I butterfly thick ones for even cooking)
– 1/2 cup low-sodium soy sauce (trust me, regular makes it too salty)
– 1/4 cup honey (local raw honey adds the best floral notes)
– 2 tbsp rice vinegar
– 3 cloves garlic, minced (fresh only—jarred just doesn’t hit the same)
– 1 tbsp freshly grated ginger (I keep peeled ginger frozen for easy grating)
– 1 tbsp sesame oil
– 1 tsp cornstarch
– 2 tbsp water
– 1 tbsp neutral oil (avocado oil is my high-heat go-to)
– 2 green onions, thinly sliced
– 1 tbsp toasted sesame seeds
Instructions
1. Place chicken breasts between two sheets of plastic wrap and pound to ½-inch uniform thickness using a meat mallet or heavy pan.
2. Whisk together soy sauce, honey, rice vinegar, garlic, ginger, and sesame oil in a medium bowl until fully combined.
3. Reserve ¼ cup of the teriyaki marinade in a separate small bowl for later use.
4. Add chicken breasts to the remaining marinade, ensuring they’re fully coated, and refrigerate for exactly 15 minutes—any longer and the texture gets mushy.
5. Preheat your grill or grill pan to medium-high heat (400°F surface temperature).
6. Remove chicken from marinade, letting excess drip off, and discard the used marinade.
7. Brush grill grates with neutral oil to prevent sticking.
8. Place chicken on the hot grill and cook for 5-6 minutes without moving to develop grill marks.
9. Flip chicken and cook for another 5-6 minutes until internal temperature reaches 165°F on an instant-read thermometer.
10. While chicken cooks, mix cornstarch and water in the reserved ¼ cup teriyaki sauce.
11. Transfer the cornstarch mixture to a small saucepan and simmer over medium heat for 2-3 minutes until thickened into a glossy glaze.
12. Brush the thickened teriyaki glaze over the cooked chicken during the last minute of grilling.
13. Remove chicken from grill and let rest for 3 minutes before slicing against the grain.
14. Garnish with sliced green onions and toasted sesame seeds.
Glazed to perfection, this chicken boasts caramelized edges and juicy, tender meat that practically melts. The sweet-savory teriyaki clings to every bite, while the sesame seeds add satisfying crunch. Serve it sliced over steaming rice with quick-pickled cucumbers for the ultimate weeknight win.
Grilled Asparagus with Parmesan
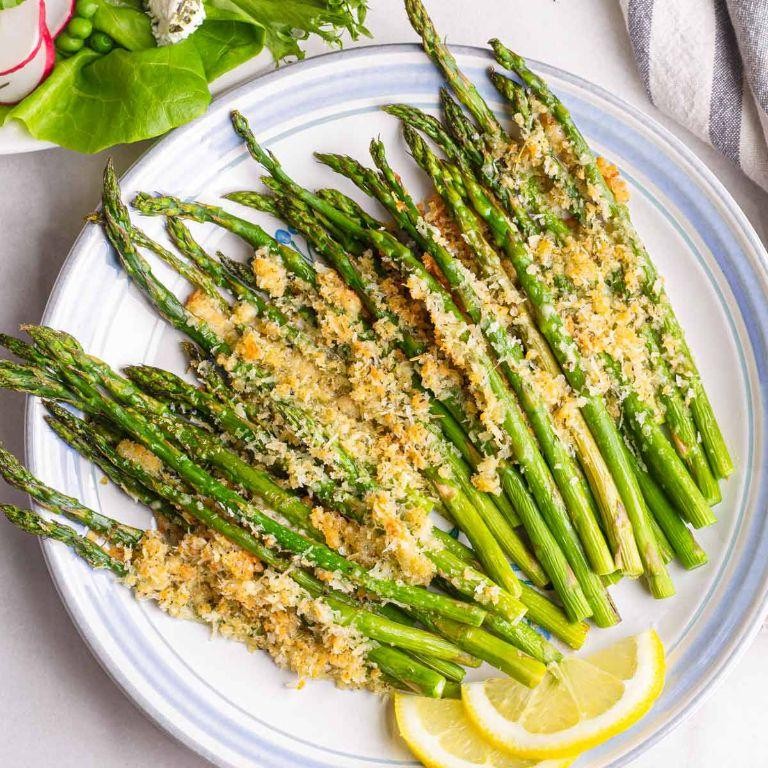
Finally, grilled asparagus that actually makes you want to eat your greens. This crispy, cheesy version converts veggie skeptics every time—perfect for weeknights or impressing guests.
4
servings10
minutes8
minutesIngredients
– 1 lb fresh asparagus spears (look for firm stalks with tight tips)
– 2 tbsp extra virgin olive oil (my go-to for that fruity kick)
– 1/2 tsp kosher salt (the coarse grains cling better than table salt)
– 1/4 tsp black pepper (freshly cracked for maximum flavor)
– 1/4 cup grated Parmesan cheese (the real stuff, not the shaky can)
– 1 lemon (room temp for easier juicing)
Instructions
1. Preheat your grill to medium-high heat (400°F).
2. Rinse asparagus spears under cold water and pat completely dry with paper towels.
3. Snap off the tough woody ends of each asparagus spear where they naturally break.
4. Place asparagus on a baking sheet in a single layer.
5. Drizzle olive oil evenly over the asparagus spears.
6. Use your hands to toss the asparagus until each spear is lightly coated with oil.
7. Sprinkle kosher salt and black pepper evenly over the oiled asparagus.
8. Arrange asparagus perpendicular to the grill grates to prevent falling through.
9. Grill asparagus for 6-8 minutes, turning halfway through with tongs.
10. Watch for bright green color and slight char marks as visual doneness cues.
11. Transfer grilled asparagus to a serving platter using tongs.
12. Sprinkle grated Parmesan cheese immediately over the hot asparagus.
13. Cut lemon in half and squeeze fresh juice evenly over the finished dish.
That crispy-tender texture with salty Parmesan and bright lemon creates magic. Serve it alongside grilled chicken or chop it over pasta—either way, those charred tips disappear first.
Zesty Grilled Lime Cilantro Corn
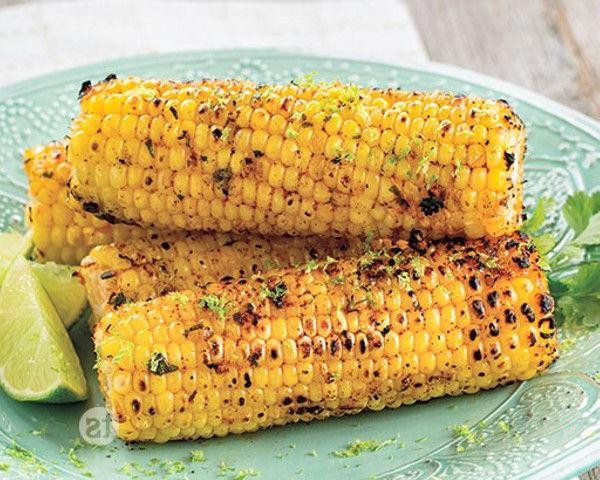
Get ready to transform basic corn into your new summer obsession. Grilled corn gets a zesty makeover with bright lime and fresh cilantro that’ll have everyone begging for your secret. This flavor bomb comes together in minutes but tastes like you spent hours perfecting it.
3
servings10
minutes15
minutesIngredients
– 4 ears fresh corn, husks removed (look for bright green husks and plump kernels)
– 2 tablespoons extra virgin olive oil, my go-to for that perfect char
– 1/4 cup fresh cilantro, finely chopped (I always use the stems too for extra flavor)
– 2 tablespoons fresh lime juice, about 1 large lime squeezed right before using
– 1 teaspoon kosher salt, the coarse grains cling beautifully to the corn
– 1/2 teaspoon chili powder, I prefer the smoky Mexican variety here
– 1/4 teaspoon black pepper, freshly cracked for maximum aroma
Instructions
1. Preheat your grill to medium-high heat (400°F) for at least 10 minutes.
2. Brush all 4 ears of corn evenly with the 2 tablespoons of olive oil using a pastry brush.
3. Place corn directly on grill grates and close the lid.
4. Grill corn for 12-15 minutes, turning every 3-4 minutes with tongs until kernels are lightly charred on all sides.
5. Transfer grilled corn to a serving platter using heat-safe tongs.
6. Combine 1/4 cup chopped cilantro, 2 tablespoons lime juice, 1 teaspoon salt, 1/2 teaspoon chili powder, and 1/4 teaspoon black pepper in a small bowl.
7. Brush the cilantro-lime mixture evenly over all sides of the hot corn using a clean pastry brush.
8. Serve immediately while the corn is still warm and the flavors are most vibrant. Zesty grilled lime cilantro corn delivers that perfect crunch-tender texture with kernels that pop in your mouth. The bright acidity from fresh lime cuts through the smoky char, while cilantro adds an herby freshness that makes this impossible to eat just one ear. Try serving it alongside grilled shrimp tacos or crumbling cotija cheese over the top for an extra layer of creamy saltiness.
Charred Grilled Steak with Chimichurri

Y’all, get ready for the most vibrant steak situation that’ll make your taste buds dance. Charred to perfection with that signature crust, then drenched in fresh, herby chimichurri that cuts through the richness. This is your new go-to for impressing guests or treating yourself right.
4
servings15
minutes10
minutesIngredients
– 2 lbs ribeye steak (1.5 inches thick for that perfect crust-to-juice ratio)
– 3 tbsp extra virgin olive oil (my go-to for both steak and sauce)
– 4 garlic cloves, minced (fresh only—jarred garlic just doesn’t hit the same)
– 1 tsp kosher salt (I prefer the larger flakes for better texture)
– ½ tsp black pepper, freshly ground (pre-ground loses its magic)
– 1 cup fresh parsley leaves (packed tight for maximum herb power)
– ¼ cup fresh oregano leaves (trust me, fresh makes all the difference)
– 2 tbsp red wine vinegar (adds that perfect tangy kick)
– ¼ tsp red pepper flakes (adjust if you’re sensitive to heat)
Instructions
1. Pat the ribeye steaks completely dry with paper towels on all surfaces.
2. Rub 1 tablespoon of olive oil evenly over both sides of each steak.
3. Season both sides generously with kosher salt and freshly ground black pepper, pressing gently to adhere.
4. Preheat your grill to high heat, aiming for 450-500°F surface temperature.
5. Place steaks on the hot grill and cook undisturbed for 4-5 minutes to develop deep grill marks.
6. Flip steaks using tongs (never pierce with a fork) and cook another 4-5 minutes for medium-rare.
7. Check internal temperature with a meat thermometer—remove at 130°F for perfect medium-rare.
8. Transfer steaks to a cutting board and let rest for exactly 8 minutes to redistribute juices.
9. While steaks rest, combine parsley, oregano, and minced garlic in a food processor.
10. Pulse 5-6 times until herbs are finely chopped but not pureed.
11. Add remaining 2 tablespoons olive oil, red wine vinegar, and red pepper flakes to the processor.
12. Pulse 2-3 times just until combined—you want texture, not a smooth paste.
13. Slice rested steaks against the grain into ½-inch thick pieces.
14. Arrange sliced steak on a platter and spoon chimichurri generously over the top.
Absolutely incredible how the charred, crusty exterior gives way to juicy, pink perfection inside. The bright, garlicky chimichurri cuts through the richness in the most addictive way—try serving it over crispy roasted potatoes or stuffing it into warm tortillas for next-level steak tacos.
Herbed Grilled Chicken Wings
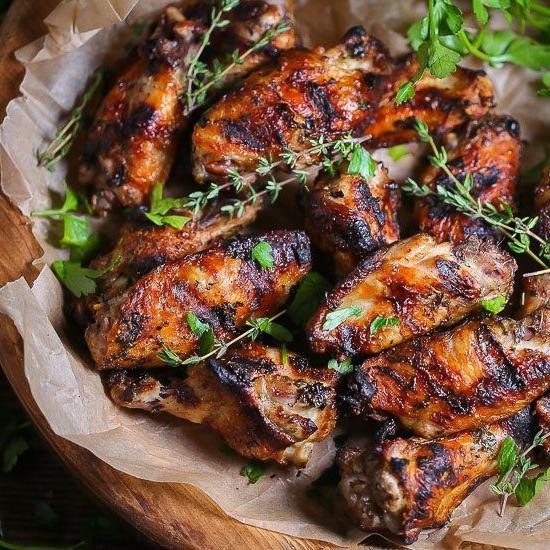
Need a game-changing appetizer that’ll have everyone begging for the recipe? Nothing beats these herby, char-kissed wings—they’re ridiculously simple but taste like you spent hours.
5
servings25
minutes24
minutesIngredients
- 2 lbs chicken wings, pat dry for maximum crispiness
- 3 tbsp extra virgin olive oil, my go-to for rich flavor
- 2 tbsp fresh lemon juice, squeeze it fresh—bottled just doesn’t hit the same
- 2 cloves garlic, minced finely so no one bites into a chunk
- 1 tbsp fresh rosemary, chopped (trust me, fresh over dried here)
- 1 tbsp fresh thyme leaves, stripped from stems for that earthy punch
- 1 tsp kosher salt, it clings better than table salt
- ½ tsp black pepper, freshly ground for peak aroma
Instructions
- Pat the chicken wings completely dry with paper towels—this is key for crispy skin, not steam.
- Whisk together olive oil, lemon juice, minced garlic, rosemary, thyme, salt, and pepper in a large bowl.
- Toss the dried wings in the marinade until every piece is evenly coated.
- Let the wings marinate at room temperature for 20 minutes (this helps the herbs infuse faster than refrigerating).
- Preheat your grill to medium-high heat, about 400°F, and lightly oil the grates to prevent sticking.
- Place wings on the grill in a single layer, not touching, to ensure even cooking.
- Grill for 10–12 minutes per side, flipping only once, until internal temperature hits 165°F and skin is charred in spots.
- Use a meat thermometer to check doneness—guessing leads to overcooked or undercooked wings.
- Transfer wings to a platter and let rest for 3 minutes so juices redistribute.
Outcome? These wings boast a crackly exterior with tender, herb-infused meat inside. Serve them piled high with extra lemon wedges for squeezing, or chop the leftovers into a zesty salad tomorrow—they’re that versatile.
Summer Grilled Peaches with Honey
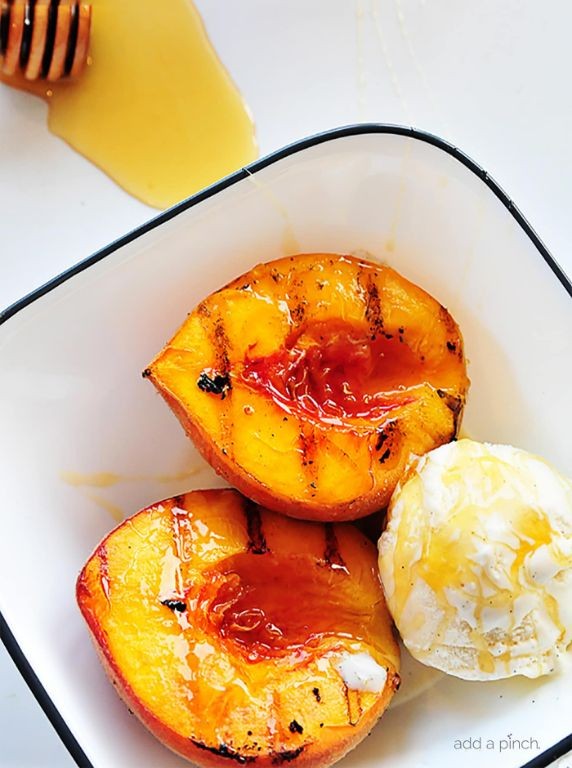
Elevate your summer dessert game with these grilled peaches that transform basic fruit into caramelized perfection. Everyone thinks grilling is just for meat, but wait until you taste these juicy, honey-kissed beauties. They’re so simple, you’ll make them all season long.
2
servings5
minutes7
minutesIngredients
- 4 ripe peaches—firm but slightly soft to the touch, halved and pitted
- 2 tbsp honey—I always use raw honey for that floral kick
- 1 tbsp unsalted butter, melted—it adds a rich gloss
- 1/2 tsp cinnamon—just a pinch for warmth
- Pinch of sea salt—trust me, it balances the sweetness
- Vanilla ice cream for serving—go for the good stuff, it’s worth it
Instructions
- Preheat your grill to medium-high heat, around 400°F, and lightly oil the grates to prevent sticking.
- Brush the cut sides of the peach halves evenly with melted butter using a pastry brush.
- Place the peaches cut-side down on the grill and cook for 3–4 minutes until you see clear grill marks and the edges start to caramelize.
- Flip the peaches carefully with tongs and grill for another 2–3 minutes until the skins are slightly blistered and the flesh is tender.
- Drizzle honey over the grilled peaches while they’re still warm so it soaks in beautifully.
- Sprinkle cinnamon and a pinch of sea salt evenly over the top for a flavor boost.
- Serve immediately with a scoop of vanilla ice cream nestled into each peach half.
Perfectly charred edges give way to silky, warm peach flesh that melts into cool ice cream. Play with textures by adding a crunchy granola sprinkle or fresh mint for a pop of color. This dessert feels fancy but takes minutes—summer magic on a plate.
Conclusion
Outstanding meals don’t have to be complicated! These 22 gas grill recipes prove you can create delicious dinners even on your busiest nights. Fire up your grill and try one tonight—we’d love to hear which recipes become your favorites in the comments below. Don’t forget to share this collection with fellow grill lovers by pinning it to your Pinterest boards!


