Craving some kitchen magic that’ll turn mealtime into an adventure your kids will love? We’ve gathered 23 exciting, fun recipes perfect for little hands and big imaginations. From playful breakfast creations to whimsical dinners that make healthy eating an absolute blast, these dishes are guaranteed to bring smiles to the table and make cooking together a delightful family experience. Get ready to transform ordinary meals into extraordinary memories!
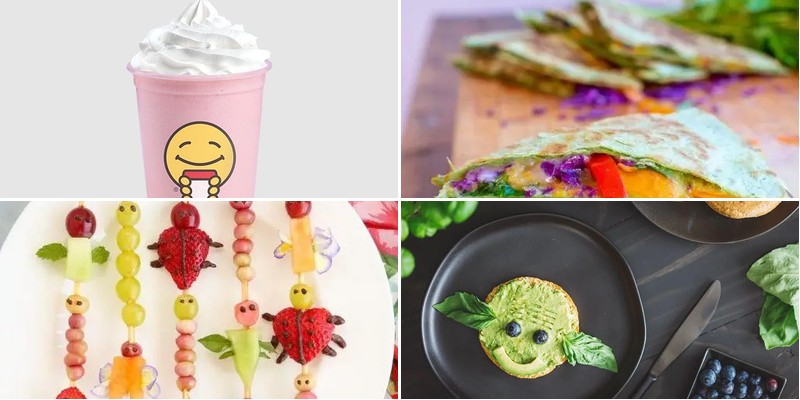
Cheesy Rainbow Quesadillas

Remember those days when you need something quick, colorful, and guaranteed to make everyone at the table smile? That’s exactly why I created these cheesy rainbow quesadillas—they’re my go-to for busy weeknights when my kids need a little extra veggie encouragement, and honestly, the vibrant colors just make me happy too.
2
quesadillas15
minutes16
minutesIngredients
- 4 large flour tortillas (10-inch size, soft and pliable)
- 2 cups shredded Monterey Jack cheese (freshly shredded for optimal melt)
- 1/2 cup finely diced red bell pepper (vibrant and crisp)
- 1/2 cup finely diced yellow bell pepper (sunny and sweet)
- 1/2 cup finely diced orange bell pepper (juicy and mild)
- 1/4 cup finely chopped fresh cilantro (bright and aromatic)
- 2 tablespoons unsalted butter (rich and creamy)
- 1/2 teaspoon garlic powder (savory and fragrant)
- 1/4 teaspoon smoked paprika (warm and subtly smoky)
Instructions
- Place one flour tortilla flat on your clean work surface.
- Sprinkle 1/2 cup of shredded Monterey Jack cheese evenly over one half of the tortilla, leaving a 1-inch border around the edge.
- Scatter 2 tablespoons each of diced red, yellow, and orange bell peppers over the cheese layer.
- Sprinkle 1 tablespoon of finely chopped fresh cilantro evenly over the peppers.
- Dust the filling with 1/8 teaspoon of garlic powder and a pinch of smoked paprika.
- Fold the empty half of the tortilla over the filling, pressing gently to secure.
- Repeat steps 1–6 with the remaining tortillas and ingredients.
- Heat a large non-stick skillet or griddle over medium heat for 2 minutes until evenly warm.
- Melt 1/2 tablespoon of unsalted butter in the skillet, swirling to coat the surface.
- Carefully place one assembled quesadilla in the skillet.
- Cook for 2–3 minutes until the bottom is golden brown with crisp spots.
- Flip the quesadilla using a wide spatula.
- Cook for another 2–3 minutes until the second side is equally golden and the cheese is fully melted (check by gently pressing the center—it should feel soft and give slightly).
- Transfer the cooked quesadilla to a cutting board.
- Repeat steps 8–14 with the remaining quesadillas, adding more butter as needed.
- Let each quesadilla rest for 1 minute before slicing to allow the cheese to set slightly.
- Cut each quesadilla into 3 wedges using a sharp knife or pizza cutter.
Keep these colorful wedges warm in a 200°F oven if serving a crowd, or pair them with a cool avocado crema for a delightful temperature contrast. The crisp exterior gives way to that gloriously stretchy, molten cheese, while the confetti of sweet peppers adds just the right crunch—honestly, it’s impossible to eat just one wedge.
Mini Monster Pizzas

Growing up, Halloween was always my favorite holiday, and these Mini Monster Pizzas bring back those magical memories of creative cooking with my mom—they’re the perfect spooky snack that’s surprisingly simple to make with little ones.
12
portions15
minutes12
minutesIngredients
– 1 package of pre-made pizza dough, thawed to room temperature
– 1 cup of rich tomato pizza sauce
– 2 cups of shredded mozzarella cheese, freshly grated
– 1/4 cup of sliced black olives for monster “eyes”
– 1/4 cup of vibrant green bell pepper strips for “claws”
– 2 tablespoons of extra virgin olive oil for brushing
– 1 teaspoon of dried oregano for a fragrant herb kick
Instructions
1. Preheat your oven to 425°F and line a baking sheet with parchment paper.
2. Roll out the pizza dough on a lightly floured surface to about 1/4-inch thickness.
3. Use a round cookie cutter or glass to cut the dough into 3-inch circles, re-rolling scraps as needed.
4. Place the dough circles on the prepared baking sheet, spacing them 1 inch apart.
5. Brush each dough circle lightly with extra virgin olive oil using a pastry brush.
6. Spoon 1 tablespoon of tomato pizza sauce onto the center of each dough circle.
7. Spread the sauce evenly with the back of the spoon, leaving a 1/4-inch border around the edges.
8. Sprinkle 1-2 tablespoons of shredded mozzarella cheese over each sauced circle.
9. Arrange two sliced black olive pieces on each pizza to create monster “eyes.”
10. Place 2-3 green bell pepper strips around the edges to resemble monster “claws.”
11. Sprinkle a pinch of dried oregano over the top of each mini pizza for added flavor.
12. Bake in the preheated oven for 10-12 minutes, until the crust is golden brown and cheese is bubbly.
13. Remove from oven and let cool on the baking sheet for 2-3 minutes before serving. A final bite reveals a crispy, golden crust that gives way to gooey melted cheese and tangy sauce, with the olives and peppers adding playful texture. Arrange them on a platter with spooky napkins for a Halloween party, or let kids customize their own monster faces for extra fun.
Fruity Animal Skewers
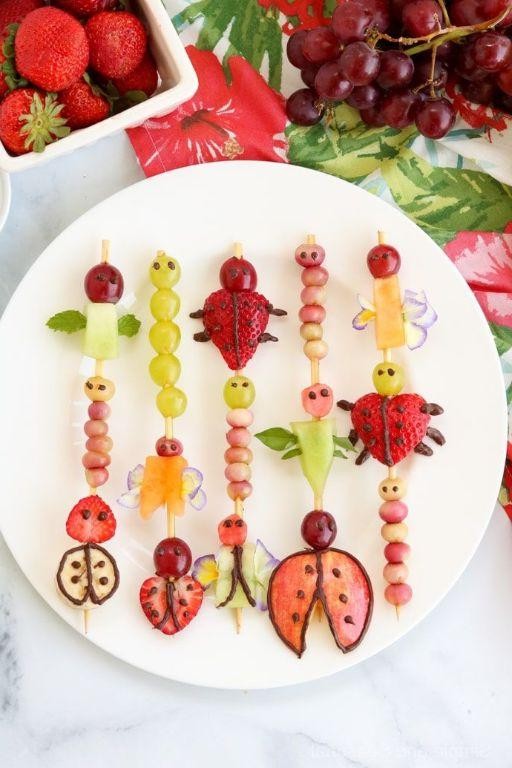
Last weekend, my kids were having one of those “I’m bored” afternoons, and I remembered how my grandmother used to turn simple fruits into magical creations that made us forget all our complaints. These fruity animal skewers became our kitchen adventure—they’re so fun to assemble that even my picky eater was begging for more watermelon!
8
skewers30
minutesIngredients
– 2 cups fresh, sweet watermelon cubes (about 1-inch pieces)
– 1 cup plump, juicy strawberries (hulled and halved)
– 1 cup crisp green grapes
– 1 cup vibrant pineapple chunks
– 8 small wooden skewers (soaked in water for 30 minutes)
– ½ cup creamy vanilla Greek yogurt
– 2 tablespoons rich wildflower honey
– 1 tablespoon freshly squeezed lemon juice
Instructions
1. Soak 8 small wooden skewers in cool water for exactly 30 minutes to prevent burning during assembly.
2. Wash all fruits thoroughly under cold running water and pat completely dry with paper towels.
3. Cut a small watermelon into 1-inch cubes, removing all seeds as you work.
4. Hull 1 cup of fresh strawberries and slice each berry in half vertically.
5. Arrange your prepared fruits in separate bowls for easy access during skewering.
6. Thread fruits onto soaked skewers in alternating patterns, starting with a watermelon cube as your animal “body.”
7. Create animal faces by strategically placing grape “eyes” and strawberry “ears”—press fruits firmly but gently to secure.
8. Repeat the assembly process until all 8 skewers are complete with colorful animal designs.
9. Whisk together ½ cup vanilla Greek yogurt, 2 tablespoons honey, and 1 tablespoon lemon juice in a small bowl until smooth.
10. Drizzle the honey-yogurt sauce over arranged skewers just before serving to maintain fruit crispness.
11. Serve immediately on a chilled platter to keep fruits fresh and vibrant.
Ultimate party starters, these skewers offer a delightful crunch from the grapes against the juicy burst of watermelon. The honey-yogurt drizzle adds a creamy tang that perfectly balances the natural sweetness—try serving them standing up in a pineapple “forest” for an instant centerpiece that disappears faster than you can say “animal party!”
Pasta Rocket Ships
Last week, my kids were begging for something “out of this world” for dinner, and that’s when I dreamed up these playful pasta rocket ships. Little did they know, I was sneaking in some extra veggies while creating the most fun meal we’ve had in ages!
4
servings15
minutes20
minutesIngredients
– 8 ounces of dried fusilli pasta
– 2 tablespoons of rich extra-virgin olive oil
– 3 plump garlic cloves, minced
– 1 pound of sweet Italian sausage, casings removed
– 1 cup of vibrant cherry tomatoes, halved
– 1/2 cup of freshly grated Parmesan cheese
– 1/4 cup of chopped fresh basil leaves
– 1/2 teaspoon of coarse sea salt
– 1/4 teaspoon of freshly cracked black pepper
Instructions
1. Bring a large pot of salted water to a rolling boil over high heat.
2. Add 8 ounces of dried fusilli pasta to the boiling water and cook for exactly 10 minutes, stirring occasionally to prevent sticking.
3. While pasta cooks, heat 2 tablespoons of rich extra-virgin olive oil in a large skillet over medium heat until shimmering.
4. Add 3 minced plump garlic cloves and cook for 1 minute until fragrant but not browned.
5. Crumble 1 pound of sweet Italian sausage into the skillet and cook for 6-8 minutes, breaking it up with a spatula, until no pink remains.
6. Add 1 cup of halved vibrant cherry tomatoes and cook for 3-4 minutes until they begin to soften and release their juices.
7. Drain the cooked pasta, reserving 1/4 cup of starchy pasta water.
8. Tip: The starchy pasta water helps create a silky sauce that clings perfectly to the noodles.
9. Add the drained pasta directly to the skillet with the sausage mixture.
10. Pour in the reserved pasta water and toss everything together for 1-2 minutes until well combined.
11. Tip: Tossing the pasta in the skillet for that extra minute allows the flavors to meld beautifully.
12. Remove the skillet from heat and stir in 1/2 cup of freshly grated Parmesan cheese until melted and creamy.
13. Fold in 1/4 cup of chopped fresh basil leaves, 1/2 teaspoon of coarse sea salt, and 1/4 teaspoon of freshly cracked black pepper.
14. Tip: Adding the basil at the end preserves its bright, fresh flavor and vibrant green color.
15. Serve immediately while hot.
But the real magic happens when you twirl those fusilli noodles – each one looks like a tiny rocket ship ready for launch! The savory sausage and sweet tomatoes create this incredible flavor orbit, while the Parmesan adds a creamy richness that makes every bite feel like a celebration. We love serving these in individual bowls with extra basil sprinkled on top, and watching the kids’ imaginations take flight with each delicious mouthful.
Dinosaur Shaped Sandwiches
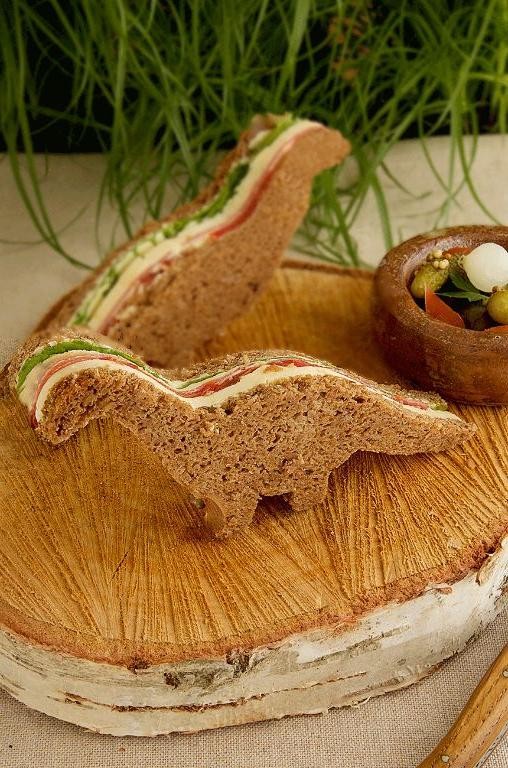
Remember those childhood lunchboxes that made you the envy of the cafeteria? I sure do, which is why I’m bringing back the magic with these adorable dinosaur shaped sandwiches that my kids absolutely beg for every week. There’s something about turning ordinary ingredients into prehistoric creatures that makes even picky eaters devour every last bite.
3
sandwiches10
minutes24
minutesIngredients
– 8 slices of soft white bread
– 1/2 cup creamy peanut butter
– 1/4 cup sweet strawberry jam
– 1 large dinosaur-shaped cookie cutter
– 2 tablespoons softened salted butter
Instructions
1. Lay out 8 slices of soft white bread on a clean cutting board.
2. Spread 1 tablespoon of creamy peanut butter evenly across 4 bread slices, going all the way to the edges.
3. Dollop 1 tablespoon of sweet strawberry jam in the center of each peanut butter-covered slice.
4. Place the remaining 4 bread slices on top to create sandwiches.
5. Press down gently with your palms to seal the edges without squeezing out the filling.
6. Position your large dinosaur-shaped cookie cutter in the center of one sandwich.
7. Press down firmly through both bread layers until the cutter touches the cutting board.
8. Lift the cookie cutter straight up to reveal your dinosaur shape.
9. Repeat steps 6-8 with remaining sandwiches.
10. Gather the bread scraps and save them for breadcrumbs or feeding birds.
11. Spread softened salted butter lightly on the outside of each dinosaur sandwich using a pastry brush.
12. Heat a non-stick skillet over medium-low heat (about 300°F) for 2 minutes until warm.
13. Cook each sandwich for 3-4 minutes until the bottom turns golden brown with visible grill marks.
14. Flip carefully using a spatula and cook for another 3-4 minutes until the second side matches the first.
15. Transfer to a wire rack to cool for 5 minutes before serving.
Buttery crisp exteriors give way to that nostalgic peanut butter and jelly combination that never gets old. The slight warmth makes the jam ooze just enough when you bite into the dinosaur’s head, and I love serving these with carrot stick “fossils” and cucumber slice “ponds” for a complete prehistoric plate that disappears faster than the dinosaurs did.
Colorful Veggie Sushi Rolls
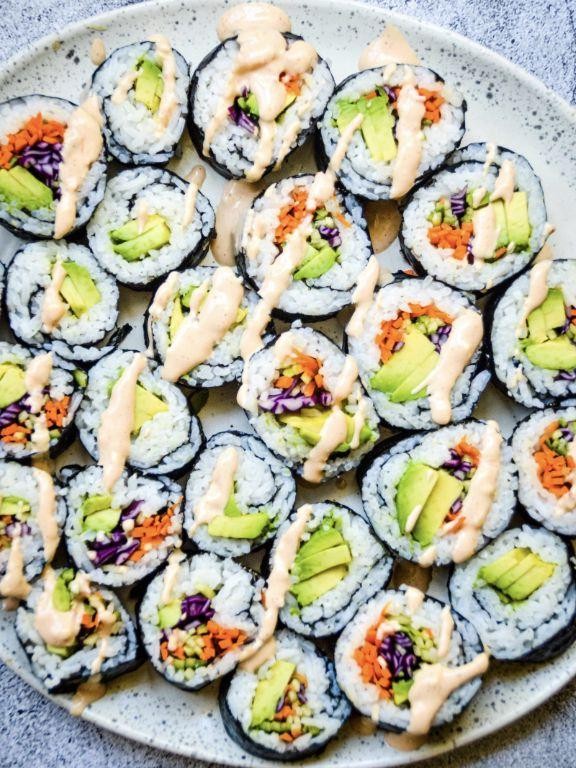
Now, I’ll confess something: I used to think sushi required years of training and mysterious ingredients. That is, until I discovered how incredibly simple and satisfying it is to make colorful veggie sushi rolls at home—perfect for lunch prep or impressing friends with minimal fuss.
4
rolls25
minutesIngredients
– 2 cups freshly cooked sushi rice, still warm and slightly sticky
– 4 sheets of toasted nori seaweed, crisp and briny
– 1 ripe avocado, creamy and sliced into thin strips
– 1 medium carrot, julienned into vibrant orange matchsticks
– 1 small cucumber, seeds removed and cut into crisp, fresh strips
– 2 tablespoons seasoned rice vinegar, with its sweet-tangy kick
– 1 tablespoon toasted sesame seeds, for nutty crunch
– ½ teaspoon fine sea salt, to enhance the rice flavor
Instructions
1. Place one nori sheet shiny-side down on a bamboo sushi mat lined with plastic wrap.
2. Spread ½ cup warm sushi rice evenly over the nori, leaving a 1-inch border at the top edge.
3. Sprinkle ¼ teaspoon fine sea salt and ½ tablespoon seasoned rice vinegar over the rice layer.
4. Arrange avocado, carrot, and cucumber strips horizontally across the lower third of the rice.
5. Lift the mat edge and tightly roll the nori over the fillings, pressing firmly as you go.
6. Continue rolling until the seam meets the nori, then squeeze the mat gently to seal the roll.
7. Repeat steps 1–6 with remaining ingredients to make 4 rolls total.
8. Use a sharp, wet knife to slice each roll into 8 even pieces, wiping the blade between cuts.
9. Sprinkle toasted sesame seeds over the arranged sushi pieces for visual appeal and texture.
10. Serve immediately or cover with damp paper towels and refrigerate for up to 2 hours. Delightfully fresh and satisfying, these rolls offer a crisp crunch from the vegetables against the tender rice, with the nori adding a subtle salty note. For a fun twist, arrange them on a platter with small bowls of soy sauce, pickled ginger, and wasabi for dipping—perfect for a light lunch or colorful party appetizer that always disappears quickly.
DIY Rainbow Pancakes

Creating rainbow pancakes has become my absolute favorite weekend tradition—there’s something magical about watching those colorful batter circles sizzle on the griddle that turns ordinary mornings into celebrations. I first started making these when my niece declared all food should be as colorful as her crayon collection, and now we have pancake art sessions every Sunday.
5
portions15
minutes25
minutesIngredients
– 2 cups all-purpose flour
– 3 tablespoons granulated sugar
– 2 teaspoons baking powder
– 1/2 teaspoon fine sea salt
– 2 large farm-fresh eggs
– 1 3/4 cups whole milk
– 4 tablespoons melted unsalted butter
– 1 teaspoon pure vanilla extract
– 5 different gel food colors
– Cooking spray or additional butter for greasing
Instructions
1. Whisk together 2 cups all-purpose flour, 3 tablespoons granulated sugar, 2 teaspoons baking powder, and 1/2 teaspoon fine sea salt in a large mixing bowl until thoroughly combined.
2. Crack 2 large farm-fresh eggs into a separate medium bowl and beat them with a fork until yolks and whites are fully incorporated.
3. Pour 1 3/4 cups whole milk, 4 tablespoons melted unsalted butter, and 1 teaspoon pure vanilla extract into the beaten eggs, whisking continuously until the mixture appears smooth and uniform.
4. Combine the wet ingredients with the dry ingredients, stirring gently with a spatula until just mixed—the batter should remain slightly lumpy to prevent tough pancakes.
5. Divide the batter equally among 5 small bowls, approximately 3/4 cup in each container.
6. Add 5 different gel food colors to each bowl, using a toothpick to incorporate the color completely until you achieve vibrant, uniform hues.
7. Preheat a non-stick griddle or large skillet over medium heat (350°F) until a drop of water sizzles and evaporates immediately upon contact.
8. Lightly grease the cooking surface with cooking spray or additional butter using a pastry brush for even coverage.
9. Pour 1/4 cup of colored batter onto the griddle, spacing pancakes 2 inches apart to allow for spreading without merging.
10. Cook for 2-3 minutes until bubbles form across the entire surface and edges appear set and slightly dry.
11. Flip each pancake carefully with a thin spatula when the bottom develops golden-brown spots about the size of dimes.
12. Cook for another 1-2 minutes on the second side until both surfaces achieve matching golden-brown coloration.
13. Transfer cooked pancakes to a wire rack in a single layer rather than stacking them, which prevents steaming and maintains crisp edges.
14. Repeat the cooking process with remaining colored batters, regreasing the surface between batches to prevent sticking. What makes these pancakes truly special is how the colors stay vibrant while cooking, creating soft, fluffy layers that practically melt in your mouth. We love stacking them in rainbow order and watching the colors peek through when cut—perfect for dipping in warm maple syrup or topping with whipped cream clouds.
Smiley Face Strawberry Smoothies

Craving something that’ll brighten your morning and your mood? I recently whipped up these adorable smiley face strawberry smoothies for my niece’s breakfast, and let me tell you—they disappeared faster than my coffee! There’s something magical about starting the day with a drink that literally smiles back at you, especially when it’s packed with fresh fruit goodness.
Ingredients
– 2 cups frozen sweet strawberries
– 1 ripe banana
– 1 cup creamy vanilla Greek yogurt
– 1/2 cup chilled whole milk
– 2 tablespoons golden wildflower honey
– 1 teaspoon pure vanilla extract
– 6 plump fresh blueberries
– 3 juicy fresh strawberry slices
Instructions
1. Add 2 cups frozen sweet strawberries to your blender pitcher.
2. Peel and break 1 ripe banana into chunks directly into the blender.
3. Measure 1 cup creamy vanilla Greek yogurt and spoon it into the blender.
4. Pour 1/2 cup chilled whole milk over the other ingredients.
5. Drizzle 2 tablespoons golden wildflower honey into the mixture.
6. Add 1 teaspoon pure vanilla extract to enhance the flavor.
7. Secure the blender lid tightly and blend on high speed for 45-60 seconds until completely smooth and creamy.
8. Tip: For an extra frosty texture, chill your glasses in the freezer for 10 minutes before blending.
9. Pour the smooth pink mixture evenly into two tall glasses, filling them 3/4 full.
10. Arrange 3 plump fresh blueberries in a curved line near the top of each smoothie surface to create eye shapes.
11. Place 1 juicy fresh strawberry slice below the eyes to form a smiling mouth on each smoothie.
12. Tip: Use a toothpick to gently adjust the fruit pieces into perfect smiley face positions.
13. Serve immediately with colorful paper straws for the full cheerful effect.
14. Tip: If making ahead, blend everything except the face decorations and store covered in the refrigerator for up to 2 hours. That velvety texture with the sweet berry flavor just melts in your mouth. They’re so fun to serve at weekend brunches or as after-school treats that always earn extra smiles from both kids and adults!
Confetti Popcorn Balls
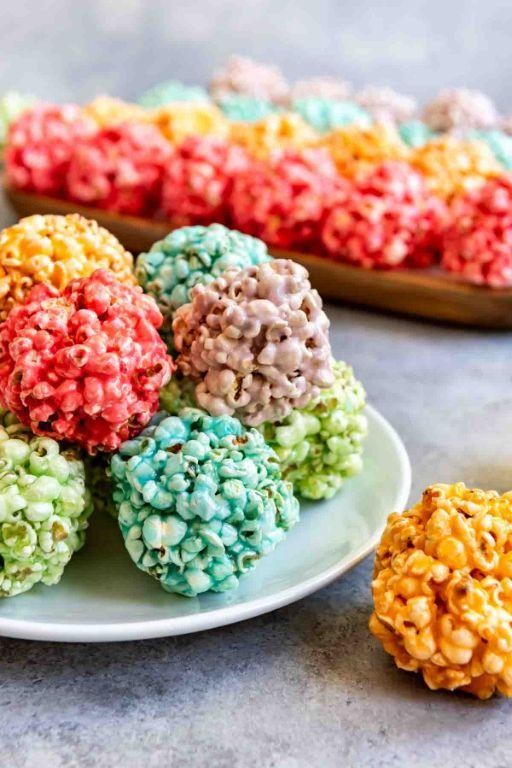
Years ago at a county fair, I discovered these magical popcorn balls that tasted like childhood celebrations. I’ve been perfecting my own version ever since, and today I’m sharing my go-to recipe that always brings smiles to family movie nights. There’s something about that sweet crunch mixed with colorful sprinkles that just makes ordinary moments feel special.
12
popcorn balls15
minutes6
minutesIngredients
– 10 cups freshly popped popcorn
– 1 cup light corn syrup
– ½ cup granulated sugar
– ¼ cup unsalted butter
– 1 teaspoon pure vanilla extract
– ½ cup rainbow sprinkles
– ¼ teaspoon fine sea salt
Instructions
1. Place 10 cups of freshly popped popcorn in an extra-large mixing bowl, picking out any unpopped kernels.
2. Combine 1 cup light corn syrup, ½ cup granulated sugar, and ¼ cup unsalted butter in a medium saucepan over medium heat.
3. Stir constantly with a wooden spoon until the butter completely melts and the mixture becomes smooth, about 3-4 minutes.
4. Bring the syrup mixture to a rolling boil and cook without stirring for exactly 2 minutes (tip: use a timer for precision).
5. Remove the saucepan from heat and immediately stir in 1 teaspoon pure vanilla extract and ¼ teaspoon fine sea salt.
6. Carefully pour the hot syrup mixture over the popcorn in the large bowl.
7. Sprinkle ½ cup rainbow sprinkles over the coated popcorn.
8. Use a heat-resistant spatula to gently fold everything together until the popcorn is evenly coated (tip: work quickly before the syrup cools).
9. Lightly grease your hands with butter or cooking spray to prevent sticking.
10. Scoop about ½ cup of the popcorn mixture and firmly press it into a ball shape with your hands.
11. Repeat with the remaining mixture, forming approximately 12 popcorn balls (tip: pack them tightly so they hold their shape).
12. Place the formed popcorn balls on a parchment-lined baking sheet to set completely, about 30 minutes.
Zesty and cheerful, these confetti popcorn balls deliver the perfect balance of sweet and salty with an irresistible crunchy texture. I love wrapping them individually in colorful cellophane for party favors or stacking them in a tall glass jar as a festive centerpiece that disappears faster than you can say “movie night!”
Under the Sea Rice Cakes
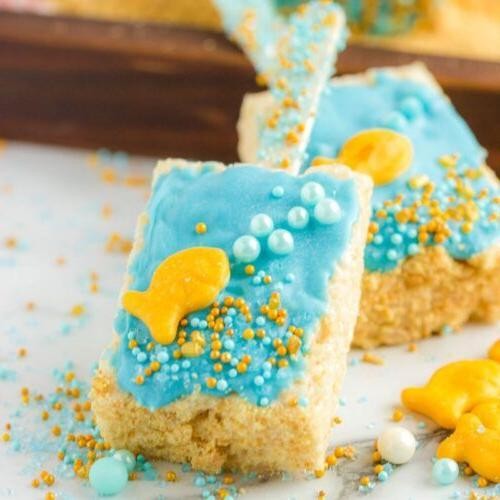
Wandering through the Asian market last weekend, I spotted the most vibrant blue pea flowers and immediately knew I had to create something magical. These Under the Sea Rice Cakes have become my new favorite weekend project—they’re surprisingly simple to make but look absolutely stunning on the plate. I love how they transport me back to childhood beach vacations with their ocean-like appearance.
12
portions45
minutes28
minutesIngredients
- 2 cups sushi rice
- 1 ¾ cups cold water
- 3 tablespoons blue pea flower powder
- 2 tablespoons seasoned rice vinegar
- 1 teaspoon fine sea salt
- ½ cup finely diced English cucumber
- ¼ cup thinly sliced nori sheets
- 1 tablespoon toasted sesame seeds
- 2 teaspoons toasted sesame oil
Instructions
- Rinse 2 cups of sushi rice under cold running water until the water runs clear, gently swirling the grains with your fingers to remove excess starch.
- Combine the rinsed rice with 1 ¾ cups of cold water in a medium saucepan and let it soak for exactly 30 minutes to ensure even cooking and perfect texture.
- Stir 3 tablespoons of blue pea flower powder into the rice and water mixture until the water turns a deep ocean blue color.
- Bring the rice to a boil over high heat, then immediately reduce the heat to low and cover the saucepan tightly with a lid.
- Simmer the rice for exactly 18 minutes without peeking—this maintains the steam needed for perfect cooking.
- Remove the saucepan from heat and let it stand, covered, for 10 minutes to allow the rice to finish steaming and become fluffy.
- Transfer the hot rice to a large wooden or glass bowl and gently fold in 2 tablespoons of seasoned rice vinegar using a cutting motion with a rice paddle to avoid crushing the grains.
- Sprinkle 1 teaspoon of fine sea salt evenly over the rice while it’s still warm, folding gently to distribute.
- Add ½ cup of finely diced English cucumber and ¼ cup of thinly sliced nori sheets to the rice mixture, folding carefully to create colorful specks throughout.
- Drizzle 2 teaspoons of toasted sesame oil over the rice and gently mix to incorporate, being careful not to overwork the rice.
- Lightly wet your hands with cold water to prevent sticking, then portion the rice into ¼-cup mounds and shape into compact cakes about ½-inch thick.
- Sprinkle 1 tablespoon of toasted sesame seeds evenly over the top of each rice cake, gently pressing to adhere.
Out of this world, these rice cakes have the most delightful contrast between the slightly chewy rice and the crisp cucumber bits. The nori adds that essential briny ocean flavor that makes these truly taste like the sea. I love serving them arranged on a platter with extra nori strips draped over like seaweed for a dramatic underwater scene that always wows my dinner guests.
Alien Avocado Toasts
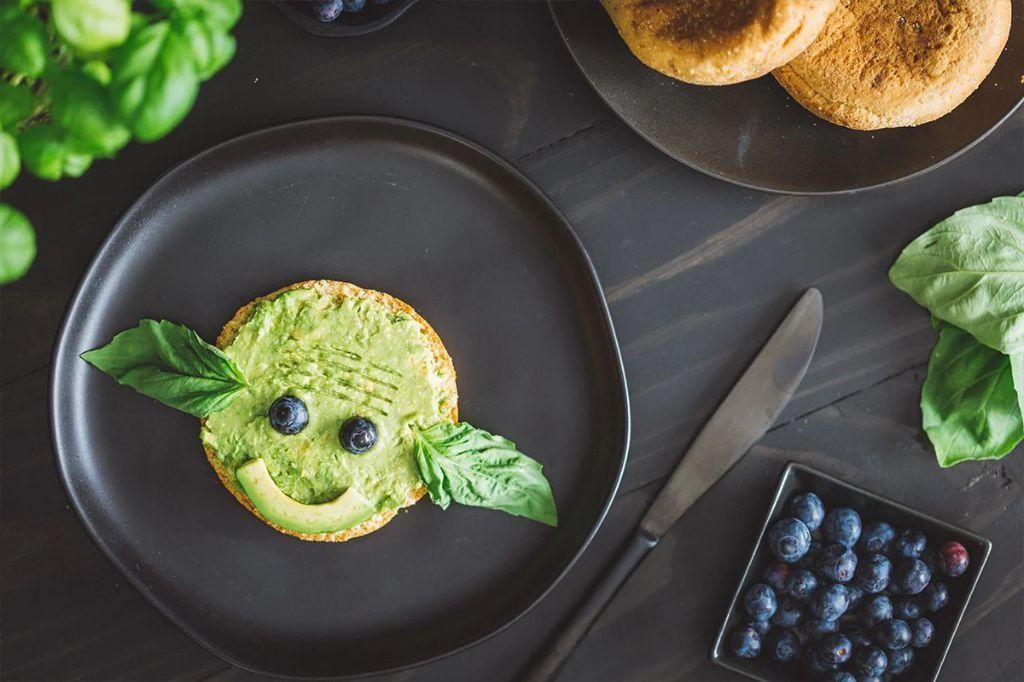
Never have I been more excited to share a recipe that looks like it came straight from a sci-fi movie but tastes like breakfast heaven. I stumbled upon this colorful creation during a late-night Pinterest rabbit hole, and after tweaking it through several Saturday morning experiments, it’s become my go-to showstopper brunch dish that always gets “oohs” and “aahs” from friends.
2
servings15
minutes10
minutesIngredients
– 4 slices of crusty artisan sourdough bread
– 2 perfectly ripe Hass avocados
– 1/4 cup of vibrant green pistachio pesto
– 1 tablespoon of zesty fresh lime juice
– 1/2 teaspoon of flaky sea salt
– 1/4 teaspoon of freshly cracked black pepper
– 2 tablespoons of extra virgin olive oil
– 1/4 cup of crumbled feta cheese
– 2 tablespoons of black sesame seeds
– 1/4 cup of edible flower petals (nasturtiums or pansies work beautifully)
Instructions
1. Preheat your oven to 375°F and place the sourdough slices on a baking sheet.
2. Brush both sides of each bread slice generously with extra virgin olive oil using a pastry brush.
3. Toast the bread in the oven for 8-10 minutes until golden brown and crisp around the edges.
4. While bread toasts, halve the avocados and remove pits using a knife twist technique.
5. Scoop avocado flesh into a medium bowl and mash with a fork until slightly chunky.
6. Fold in the pistachio pesto, fresh lime juice, flaky sea salt, and black pepper until fully incorporated.
7. Spread the avocado mixture evenly onto each warm toast slice using an offset spatula.
8. Sprinkle crumbled feta cheese generously over each toast.
9. Create “alien eyes” by arranging black sesame seeds in circular patterns on the avocado surface.
10. Garnish with edible flower petals scattered artistically across the toasts.
The creamy avocado base gets an unexpected nutty depth from the pistachio pesto, while the feta adds salty bursts that contrast beautifully with the floral notes. I love serving these on a dark slate board to really make the vibrant colors pop – they’re almost too pretty to eat, but trust me, you’ll devour every last crumb.
Chocolate Dipped Banana Pops

Vivid memories of summer fairs and sticky fingers came flooding back when I first tried making these at home – there’s something magical about the combination of creamy frozen banana and rich chocolate that feels both nostalgic and perfectly refreshing. As someone who always has bananas turning spotty on my counter, this recipe became my go-to solution for transforming them into something special without much effort. These chocolate-dipped banana pops are the perfect treat to beat the heat or satisfy that sweet tooth craving.
8
pops15
minutesIngredients
– 4 ripe but firm medium bananas
– 8 wooden popsicle sticks
– 2 cups high-quality semi-sweet chocolate chips
– 2 tablespoons creamy coconut oil
– ½ cup finely chopped roasted peanuts
– ¼ cup colorful rainbow sprinkles
Instructions
1. Peel 4 ripe but firm medium bananas and cut each in half crosswise.
2. Insert one wooden popsicle stick into the cut end of each banana half, pushing about halfway through the fruit.
3. Place the prepared banana pops on a parchment-lined baking sheet in a single layer.
4. Freeze the banana pops for exactly 2 hours until completely firm and frozen solid.
5. Combine 2 cups high-quality semi-sweet chocolate chips and 2 tablespoons creamy coconut oil in a microwave-safe bowl.
6. Microwave the chocolate mixture in 30-second intervals, stirring thoroughly between each interval, until completely smooth and glossy.
7. Remove the frozen banana pops from the freezer and working quickly with one pop at a time, dip each banana completely into the melted chocolate, rotating to coat evenly.
8. Allow excess chocolate to drip back into the bowl for about 5 seconds before proceeding.
9. Immediately roll the chocolate-coated banana in either ½ cup finely chopped roasted peanuts or ¼ cup colorful rainbow sprinkles, pressing gently to adhere.
10. Return each finished pop to the parchment-lined baking sheet.
11. Freeze the completed banana pops for another 30 minutes until the chocolate coating is fully set and firm to the touch.
Really, the contrast between the icy-cold banana interior and the crisp chocolate shell makes these irresistible. I love how the creamy coconut oil gives the chocolate that perfect snap when you bite into it, while the toppings add wonderful texture variations. For an extra special presentation, arrange these on a platter with different toppings in sections – they make such a fun interactive dessert for gatherings or just a treat-yourself moment.
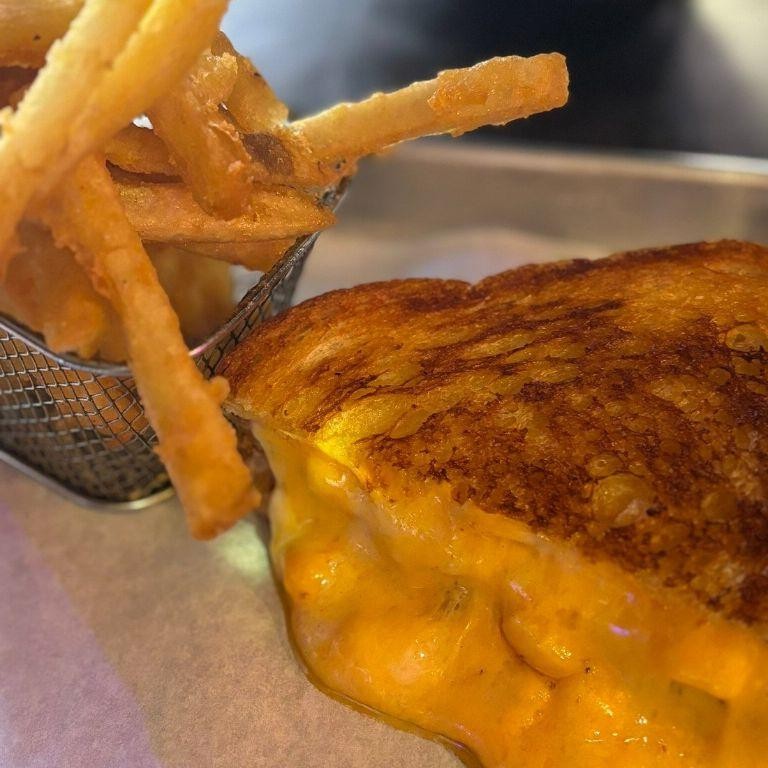
Treasure Map Grilled Cheese
Remember those childhood treasure hunts where you’d follow clues to find something magical? That’s exactly the feeling I get when I make this grilled cheese—each bite reveals another delicious surprise hidden between the golden bread. I first created this during a rainy afternoon when my kids were begging for “something special,” and now it’s become our go-to comfort food adventure.
2
sandwiches10
minutes10
minutesIngredients
– 4 slices of thick-cut sourdough bread
– 2 tablespoons of creamy European-style butter
– 1 cup of sharp white cheddar cheese, freshly shredded
– ½ cup of smoked Gouda cheese, crumbled
– ¼ cup of crispy cooked bacon pieces
– 2 tablespoons of sweet caramelized onions
– 1 tablespoon of grainy Dijon mustard
Instructions
1. Spread ½ tablespoon of creamy European-style butter evenly on one side of each slice of thick-cut sourdough bread.
2. Flip all bread slices over so the unbuttered sides face up.
3. Spread ½ tablespoon of grainy Dijon mustard on two of the unbuttered bread slices.
4. Sprinkle ¼ cup of sharp white cheddar cheese evenly over the mustard-covered bread slices.
5. Distribute 2 tablespoons of sweet caramelized onions over the cheese layer.
6. Scatter ⅛ cup of crispy cooked bacon pieces over the onions.
7. Crumble ¼ cup of smoked Gouda cheese over the bacon layer.
8. Top each prepared slice with the remaining bread slices, buttered sides facing outward.
9. Preheat a non-stick skillet over medium-low heat for 3 minutes until evenly heated.
10. Place both sandwiches in the skillet and cook for 4-5 minutes until the bottom bread develops deep golden-brown crust.
11. Carefully flip sandwiches using a spatula and cook for another 4-5 minutes until the second side achieves the same golden-brown color.
12. Remove sandwiches from heat and let rest for 2 minutes before slicing.
Every golden-crusted bite delivers that satisfying crunch followed by the oozy cheese pull we all love. The smoky Gouda and sharp cheddar create this incredible flavor harmony while the caramelized onions add just enough sweetness to balance the salty bacon. Sometimes I serve it with a side of tomato soup for dipping, but honestly, it stands perfectly on its own as the ultimate comfort food treasure.
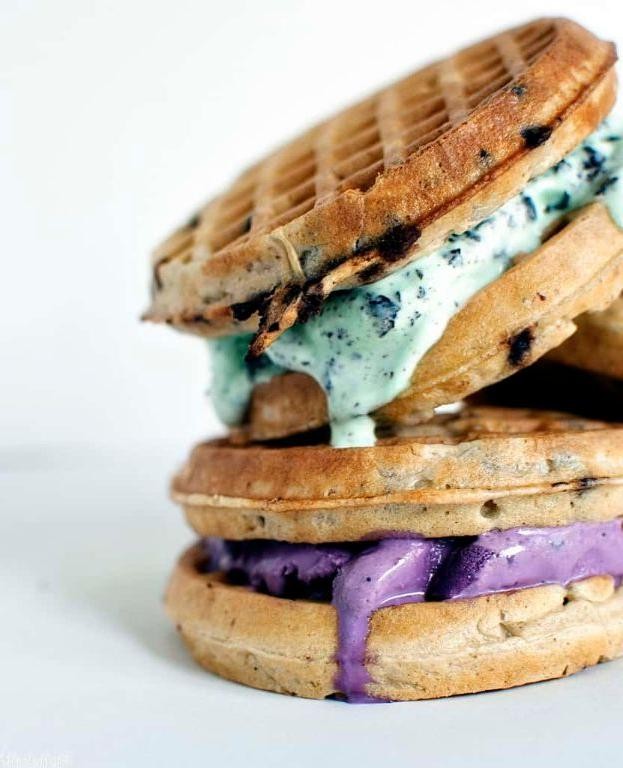
Wacky Waffle Ice Cream Sandwiches
Unbelievably fun and surprisingly simple, these wacky waffle ice cream sandwiches have become my go-to summer treat after discovering them at a quirky food truck in Austin last year. I love how the warm, crispy waffles contrast with the cold, creamy ice cream—it’s the kind of happy accident that makes cooking feel like play.
2
sandwiches20
minutes25
minutesIngredients
- 1 cup all-purpose flour
- 2 tablespoons granulated sugar
- 1 teaspoon baking powder
- ½ teaspoon fine sea salt
- 1 cup whole milk
- 1 large farm-fresh egg
- ¼ cup melted unsalted butter
- 1 teaspoon pure vanilla extract
- 2 pints premium vanilla bean ice cream
- ½ cup rainbow sprinkles
Instructions
- Preheat your waffle iron to 375°F, spraying both plates with nonstick cooking spray.
- Whisk together 1 cup all-purpose flour, 2 tablespoons granulated sugar, 1 teaspoon baking powder, and ½ teaspoon fine sea salt in a large mixing bowl.
- In a separate bowl, vigorously beat 1 large farm-fresh egg until frothy, about 30 seconds.
- Pour in 1 cup whole milk, ¼ cup melted unsalted butter, and 1 teaspoon pure vanilla extract, whisking until fully combined.
- Gently fold the wet ingredients into the dry mixture until just incorporated—lumps are okay to avoid tough waffles.
- Scoop ⅓ cup batter onto the center of the hot waffle iron, closing the lid firmly.
- Cook for 4–5 minutes until golden brown and crisp, checking that steam has nearly stopped escaping.
- Transfer waffles to a wire rack to cool completely, about 15 minutes—this prevents sogginess.
- Scoop ½ cup slightly softened premium vanilla bean ice cream onto the flat side of one cooled waffle.
- Press a second waffle gently on top, aligning edges to form a sandwich.
- Roll the exposed ice cream edges in ½ cup rainbow sprinkles, rotating to coat evenly.
- Wrap each sandwich tightly in parchment paper and freeze for at least 2 hours until firm.
Seriously, the magic here is in the textures: crackly waffles give way to velvety ice cream, while sprinkles add a playful crunch. I love serving these sliced into quarters for parties or drizzling with chocolate sauce for an extra-indulgent twist—they’re guaranteed to disappear fast!
Conclusion
So many delightful recipes await in this collection, perfect for turning mealtime into joyful family adventures! We hope these 23 fun, kid-friendly dishes inspire creativity in your kitchen. Try them out, then share which recipes your little ones loved most in the comments below. Don’t forget to pin your favorites on Pinterest to spread the culinary fun!


