Unleash your inner fry master with these 18 irresistible Fry Daddy recipes! Whether you’re craving crispy comfort food classics, quick weeknight dinners, or fun party snacks, this roundup has something to make everyone’s mouth water. Get ready to transform simple ingredients into golden, delicious creations—your deep fryer is about to become your new favorite kitchen companion. Let’s dive into these tasty ideas!
Perfectly Crispy Homemade Onion Rings

Crisp, golden onion rings are the ultimate comfort food indulgence, transforming humble onions into a restaurant-worthy treat with a satisfying crunch. This foolproof recipe delivers that perfect balance of a shatteringly crisp exterior and a tender, sweet interior. Mastering the technique ensures your homemade version rivals any diner classic.
Serving: 4 | Pre Time: 20 minutes | Cooking Time: 15 minutes
Ingredients
– 2 large sweet onions (like Vidalia), sliced into ½-inch thick rings
– 1 cup of all-purpose flour
– 2 large eggs, beaten
– 1 cup of panko breadcrumbs
– 1 teaspoon of smoked paprika
– ½ teaspoon of garlic powder
– A good pinch of salt and freshly ground black pepper
– Enough vegetable oil to fill a heavy pot about 3 inches deep
– A splash of buttermilk (about ¼ cup)
Instructions
1. Peel the 2 large sweet onions and slice them into ½-inch thick rings, separating the rings and discarding the small inner pieces.
2. In a shallow bowl, whisk together 1 cup of all-purpose flour, 1 teaspoon of smoked paprika, ½ teaspoon of garlic powder, and a good pinch of salt and pepper.
3. In a second shallow bowl, whisk the 2 large eggs with a splash of buttermilk until fully combined.
4. Place 1 cup of panko breadcrumbs in a third shallow bowl.
5. Dredge each onion ring first in the flour mixture, shaking off any excess.
6. Dip the floured ring into the egg mixture, letting the excess drip off.
7. Finally, coat the ring thoroughly in the panko breadcrumbs, pressing gently to adhere.
8. Place the coated rings on a wire rack set over a baking sheet and let them rest for 10 minutes to help the coating set, which prevents it from falling off during frying.
9. While the rings rest, pour enough vegetable oil into a heavy pot to reach a depth of 3 inches and heat it to 375°F over medium-high heat, using a deep-fry thermometer for accuracy.
10. Working in batches to avoid crowding, carefully lower 4-5 onion rings into the hot oil using tongs.
11. Fry the rings for 2-3 minutes, flipping once halfway, until they are deeply golden brown and crispy.
12. Transfer the fried rings to a paper towel-lined plate or a clean wire rack to drain immediately.
13. Repeat the frying process with the remaining batches, allowing the oil to return to 375°F between each batch for consistent results.
14. Serve the onion rings hot, seasoned with an extra pinch of salt if desired.
Delightfully crunchy and irresistibly savory, these onion rings offer a symphony of textures with their airy panko crust and soft, sweet onion center. For a gourmet twist, serve them alongside a zesty chipotle aioli or stack them high on a juicy burger. Their golden perfection makes them ideal for sharing, though you might find yourself wanting the whole batch.
Golden Southern Fried Chicken
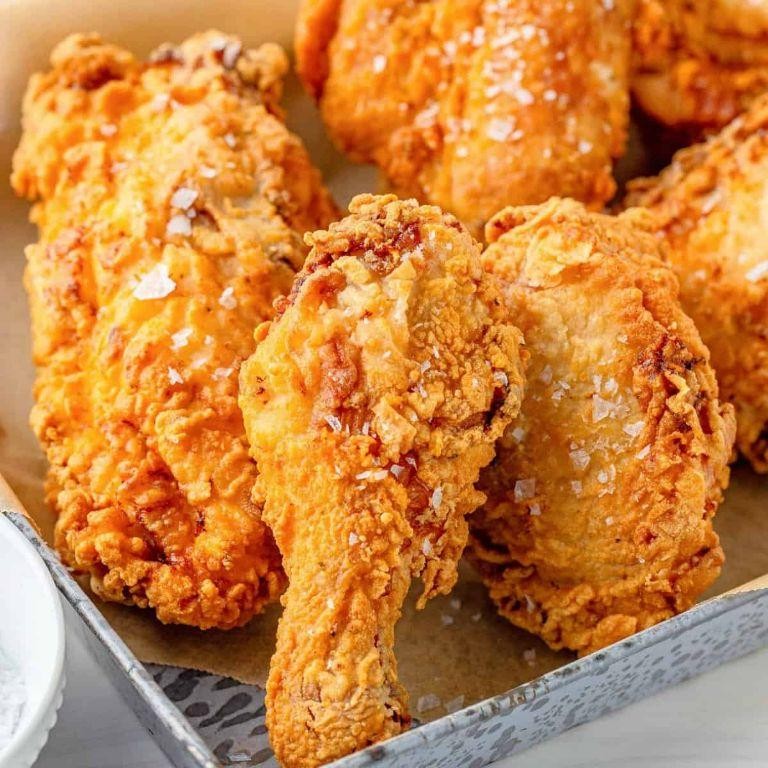
Wrapped in a crisp, golden crust that shatters with each bite, this Southern fried chicken delivers a symphony of textures and flavors that will transport you straight to a sun-drenched porch. Its juicy interior, seasoned with a harmonious blend of spices, offers a comforting warmth that makes it an irresistible centerpiece for any gathering.
Serving: 4 | Pre Time: 30 minutes | Cooking Time: 20 minutes
Ingredients
– A couple of pounds of chicken pieces (like thighs and drumsticks)
– A cup of buttermilk
– A splash of hot sauce
– A cup and a half of all-purpose flour
– A tablespoon of paprika
– A teaspoon of garlic powder
– A teaspoon of onion powder
– A teaspoon of salt
– Half a teaspoon of black pepper
– Enough vegetable oil to fill a large pot about 2 inches deep
Instructions
1. In a large bowl, combine the chicken pieces, buttermilk, and hot sauce, ensuring each piece is fully coated. Let it marinate in the refrigerator for at least 30 minutes to tenderize the meat.
2. In a separate shallow dish, whisk together the all-purpose flour, paprika, garlic powder, onion powder, salt, and black pepper until evenly mixed.
3. Remove one chicken piece from the buttermilk mixture, allowing excess liquid to drip off, then dredge it thoroughly in the flour mixture, pressing gently to adhere the coating. Tip: For an extra-crispy crust, double-dip by returning the coated chicken to the buttermilk and flour once more.
4. Heat the vegetable oil in a large, heavy-bottomed pot over medium-high heat until it reaches 350°F on a deep-fry thermometer. Tip: Maintain this temperature throughout frying to prevent greasy chicken.
5. Carefully place 3-4 chicken pieces into the hot oil without overcrowding, frying for 12-15 minutes, turning occasionally with tongs, until the exterior is deep golden brown and an internal thermometer reads 165°F. Tip: Let fried chicken rest on a wire rack for 5 minutes to keep the crust crisp.
6. Repeat with remaining chicken pieces, adjusting heat as needed to keep oil at 350°F.
7. Serve immediately while hot and crispy.
Zesty and satisfying, this fried chicken boasts a crackling exterior that gives way to succulent, flavorful meat. Pair it with creamy coleslaw and fluffy biscuits for a classic Southern feast, or slice it over a fresh garden salad for a delightful twist.
Savory Garlic Parmesan French Fries
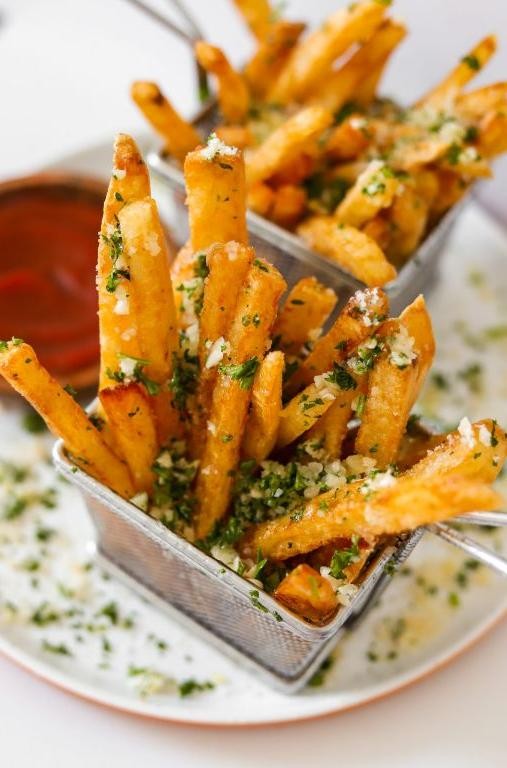
Savor the irresistible allure of crispy, golden fries elevated with a sophisticated blend of roasted garlic and nutty Parmesan, transforming a humble snack into a gourmet indulgence perfect for any gathering. These Savory Garlic Parmesan French Fries achieve a delightful balance of crunch and flavor, making them an elegant yet approachable centerpiece for casual dinners or upscale appetizer spreads. With just a few simple ingredients and techniques, you can create a dish that feels both comforting and refined, sure to impress even the most discerning palates.
Serving: 4 | Pre Time: 15 minutes | Cooking Time: 25 minutes
Ingredients
- 4 large russet potatoes, scrubbed clean
- 1/4 cup of olive oil
- 6 cloves of garlic, minced
- 1/2 cup of freshly grated Parmesan cheese
- 2 tablespoons of chopped fresh parsley
- 1 teaspoon of kosher salt
- 1/2 teaspoon of freshly ground black pepper
- A splash of vegetable oil for frying
Instructions
- Preheat your oven to 425°F and line a baking sheet with parchment paper.
- Cut the scrubbed russet potatoes into 1/4-inch thick fries, keeping them uniform for even cooking—this ensures they all crisp up nicely without some burning.
- Toss the potato fries with 1/4 cup of olive oil, 1 teaspoon of kosher salt, and 1/2 teaspoon of freshly ground black pepper in a large bowl until evenly coated.
- Spread the fries in a single layer on the prepared baking sheet, avoiding overcrowding to allow proper air circulation and browning.
- Bake the fries for 20-25 minutes, flipping them halfway through, until they are golden brown and crispy on the outside.
- While the fries bake, heat a splash of vegetable oil in a small skillet over medium heat and sauté the minced garlic for 1-2 minutes until fragrant but not browned, which prevents bitterness.
- Remove the baked fries from the oven and immediately transfer them to a large bowl.
- Pour the sautéed garlic over the hot fries, then sprinkle with 1/2 cup of freshly grated Parmesan cheese and 2 tablespoons of chopped fresh parsley, tossing gently to coat evenly while the fries are still warm so the cheese adheres well.
- Serve the fries immediately on a platter for the best texture and flavor.
Perfectly crisp on the outside with a tender interior, these fries boast a rich, savory depth from the roasted garlic and a salty, umami kick from the Parmesan. For a creative twist, pair them with a creamy aioli or serve alongside grilled meats to elevate a simple meal into something truly special.
Deep-Fried Tempura Vegetables
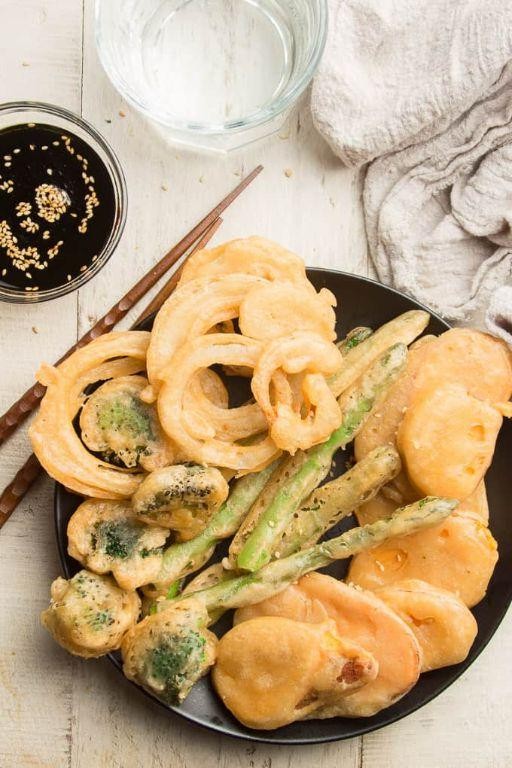
Kaleidoscopic in their golden-brown splendor, deep-fried tempura vegetables offer a delightful contrast of crisp exteriors and tender interiors, transforming humble produce into an elegant appetizer or side dish. This Japanese-inspired technique yields a light, airy batter that clings delicately to each piece, creating a satisfying crunch with every bite. Perfect for entertaining or a special weeknight treat, it brings restaurant-quality flair to your home kitchen with minimal effort.
Serving: 4 | Pre Time: 20 minutes | Cooking Time: 15 minutes
Ingredients
– A couple of cups of ice-cold water
– About 1 cup of all-purpose flour, plus a little extra for dusting
– A large egg, straight from the fridge
– A splash of vegetable oil for frying, plus more as needed
– A pinch of salt
– A mix of veggies: maybe a sweet potato, a zucchini, some broccoli florets, and a handful of green beans—whatever you’ve got on hand!
Instructions
1. Prep your veggies: wash and dry them thoroughly, then cut the sweet potato and zucchini into ¼-inch thick slices, separate the broccoli into small florets, and trim the green beans.
2. Heat about 2 inches of vegetable oil in a deep pot or Dutch oven to 350°F, using a candy thermometer to monitor the temperature—this ensures even frying without burning.
3. In a medium bowl, lightly beat the large egg, then whisk in the ice-cold water until just combined; the cold liquid helps create a lighter batter by minimizing gluten development.
4. Gently stir in the all-purpose flour with a fork until the batter is lumpy and barely mixed, avoiding overmixing to keep it airy and crisp.
5. Lightly dust the cut vegetables with a bit of extra flour to help the batter adhere better during frying.
6. Dip a few pieces of vegetables into the batter, letting excess drip off, then carefully lower them into the hot oil using tongs, frying in batches to prevent overcrowding and maintain oil temperature.
7. Fry for 2–3 minutes, turning occasionally, until the vegetables are golden brown and float to the surface, indicating they’re cooked through.
8. Remove the fried vegetables with a slotted spoon and drain on a wire rack set over a baking sheet, which keeps them crispier than paper towels by allowing steam to escape.
9. Sprinkle immediately with a pinch of salt while hot, then repeat with remaining vegetables, reheating oil to 350°F between batches.
10. Serve the tempura vegetables right away for the best texture. Naturally, the result is a symphony of textures: shatteringly crisp batter giving way to sweet, tender vegetables within. Pair them with a simple soy-based dipping sauce or enjoy as is, perhaps alongside a bowl of steamed rice for a complete meal—their delicate crunch makes them irresistible straight from the fryer.
Spicy Buffalo Chicken Wings
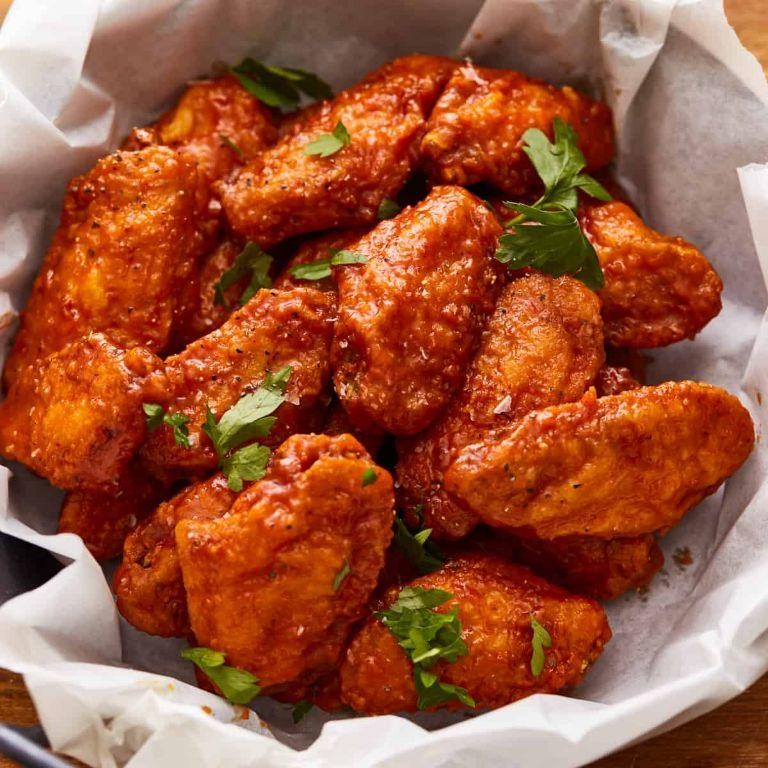
Nothing captures the spirit of American game-day gatherings quite like a platter of perfectly crisp, fiery chicken wings, their glossy orange glaze promising both heat and tang in every bite. These spicy Buffalo wings achieve that elusive balance where the crunch of the skin gives way to tender, juicy meat, all coated in a sauce that’s bold without overwhelming the palate.
Serving: 4 | Pre Time: 15 minutes | Cooking Time: 45 minutes
Ingredients
– About 2 pounds of chicken wings, split at the joints (or grab a bag of party wings to save time)
– A generous ½ cup of all-purpose flour
– A teaspoon of garlic powder
– A teaspoon of smoked paprika
– A couple of teaspoons of kosher salt
– A good grind of black pepper
– Enough vegetable oil to fill your deep fryer or a heavy pot about 3 inches deep (you’ll need roughly 6 cups)
– A stick (½ cup) of unsalted butter
– ¾ cup of your favorite hot sauce (Frank’s RedHot is the classic choice)
– A tablespoon of white vinegar
– A splash of Worcestershire sauce
– A couple of stalks of celery, cut into sticks
– A small bowl of creamy blue cheese dressing for dipping
Instructions
1. Pat the chicken wings completely dry with paper towels—this is crucial for maximum crispiness.
2. In a large bowl, whisk together the flour, garlic powder, smoked paprika, salt, and black pepper.
3. Toss the dried wings in the flour mixture until they’re evenly coated, then shake off any excess flour.
4. Heat the vegetable oil in a deep fryer or large, heavy pot to 375°F, using a deep-fry thermometer to check the temperature accurately.
5. Carefully add the wings in batches to avoid overcrowding, which would lower the oil temperature and make them soggy.
6. Fry each batch for 10–12 minutes, until the wings are golden brown and the internal temperature reaches 165°F when checked with an instant-read thermometer.
7. Transfer the fried wings to a wire rack set over a baking sheet to drain; this keeps them crisp better than paper towels.
8. While the wings fry, melt the butter in a small saucepan over medium heat.
9. Whisk in the hot sauce, white vinegar, and Worcestershire sauce until the mixture is smooth and simmering, then remove it from the heat.
10. Place the drained wings in a large, clean bowl and pour the warm sauce over them.
11. Toss the wings gently but thoroughly until every piece is evenly coated in the glossy Buffalo sauce.
12. Arrange the saucy wings on a platter with the celery sticks and blue cheese dressing on the side.
Yes, the result is a textural masterpiece: a shatteringly crisp exterior cloaks impossibly juicy meat, all enveloped in that iconic, vinegary heat that tingles without burning. Serve them piled high with extra sauce for dipping, or for a fun twist, skewer them with the celery sticks for easy, mess-free sharing.
Classic Fish and Chips
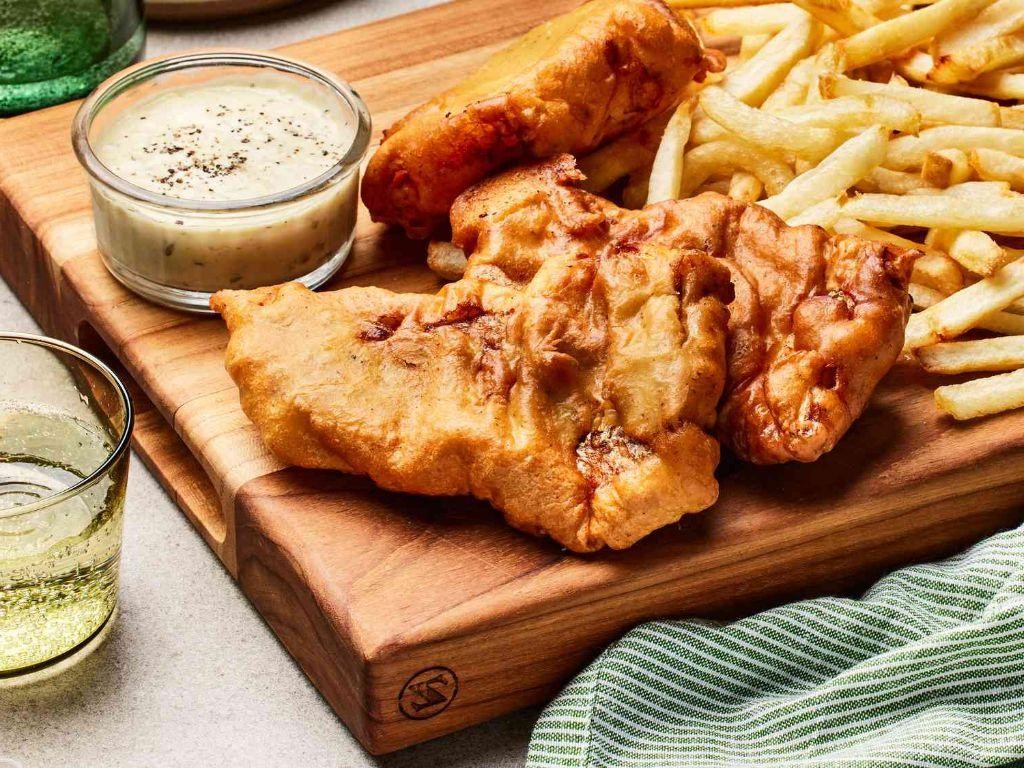
Crisp, golden, and utterly satisfying, classic fish and chips is a beloved staple that brings the seaside to your kitchen. This iconic dish features flaky white fish encased in a light, airy batter, fried to perfection alongside thick-cut potatoes. It’s a comforting meal that’s surprisingly straightforward to master at home, delivering that irresistible crunch with every bite.
Serving: 4 | Pre Time: 30 minutes | Cooking Time: 20 minutes
Ingredients
– 4 thick white fish fillets, like cod or haddock
– 4 large russet potatoes
– A couple of cups of all-purpose flour
– A splash of cold sparkling water or beer
– A pinch of baking powder
– A couple of large eggs
– A generous amount of vegetable oil for frying
– A sprinkle of salt and pepper
Instructions
1. Peel the 4 large russet potatoes and cut them into thick, even fries about 1/2-inch wide.
2. Soak the cut potatoes in cold water for 20 minutes to remove excess starch, which helps them crisp up better when fried.
3. Pat the 4 thick white fish fillets dry with paper towels and season both sides with a sprinkle of salt and pepper.
4. In a large bowl, whisk together a couple of cups of all-purpose flour, a pinch of baking powder, and a sprinkle of salt.
5. In a separate bowl, lightly beat a couple of large eggs, then gradually whisk in a splash of cold sparkling water or beer until you have a smooth, pancake-like batter.
6. Heat a generous amount of vegetable oil in a deep pot or fryer to 350°F, using a thermometer to ensure accuracy for even cooking.
7. Drain and thoroughly dry the soaked potatoes with a clean kitchen towel to prevent oil splatter.
8. Carefully add the potatoes to the hot oil and fry for 5-7 minutes until lightly golden but not fully cooked, then remove and drain on a paper towel-lined tray.
9. Dip each seasoned fish fillet into the dry flour mixture, then coat evenly in the batter, letting any excess drip off.
10. Gently lower the battered fish into the hot oil and fry for 4-5 minutes per side until deeply golden and crispy, working in batches to avoid overcrowding.
11. Return the partially cooked fries to the oil and fry for another 3-4 minutes until golden brown and crisp, then drain alongside the fish.
12. Serve immediately with malt vinegar or tartar sauce for an authentic touch.
The result is a delightful contrast: the fish stays moist and flaky inside its shatteringly crisp shell, while the fries offer a fluffy interior with a satisfying crunch. For a creative twist, try serving it wrapped in newspaper with a side of mushy peas, or elevate it with a zesty lemon aioli to brighten the rich flavors.
Battered Fried Shrimp with Cocktail Sauce
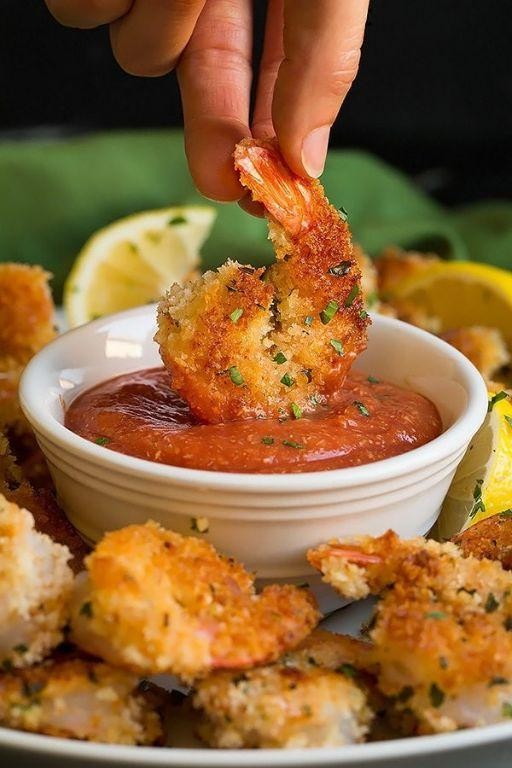
Nestled among the most beloved coastal indulgences, battered fried shrimp with cocktail sauce offers a perfect balance of crisp, golden exterior and tender, sweet interior. This classic preparation elevates simple shrimp into a show-stopping appetizer or light meal, with the zesty sauce providing a bright, tangy counterpoint to the rich, fried crust. It’s a dish that feels both timeless and effortlessly elegant, ideal for entertaining or a special weeknight treat.
Serving: 4 | Pre Time: 20 minutes | Cooking Time: 10 minutes
Ingredients
– 1 pound of large shrimp, peeled and deveined but with tails on
– A cup of all-purpose flour
– A couple of teaspoons of baking powder
– A teaspoon of paprika
– A half teaspoon of garlic powder
– A pinch of salt
– A cup of cold club soda
– A splash of vegetable oil for frying, plus more as needed
– For the cocktail sauce: a half cup of ketchup, a couple of tablespoons of prepared horseradish, a tablespoon of lemon juice, and a dash of Worcestershire sauce
Instructions
1. Pat the shrimp completely dry with paper towels to ensure the batter adheres well.
2. In a medium bowl, whisk together the flour, baking powder, paprika, garlic powder, and salt until fully combined.
3. Gradually pour in the cold club soda, whisking gently until just combined to form a smooth, lump-free batter; avoid overmixing to keep it light.
4. Heat about 2 inches of vegetable oil in a deep pot or Dutch oven to 375°F, using a thermometer for accuracy.
5. While the oil heats, make the cocktail sauce by stirring the ketchup, horseradish, lemon juice, and Worcestershire sauce in a small bowl until smooth; set aside.
6. Dip each shrimp into the batter, letting excess drip off, and carefully lower it into the hot oil.
7. Fry the shrimp in batches for 2–3 minutes, turning once, until they are golden brown and float to the surface.
8. Remove the shrimp with a slotted spoon and drain on a wire rack over paper towels to keep them crisp.
9. Serve immediately with the cocktail sauce on the side.
Oozing with juicy flavor, these shrimp boast a crackling, airy crust that gives way to succulent meat inside. The cocktail sauce adds a spicy, tangy kick that cuts through the richness beautifully. For a creative twist, serve them over a bed of crisp greens with extra lemon wedges, turning this classic into a vibrant salad centerpiece.
Loaded Jalapeño Poppers
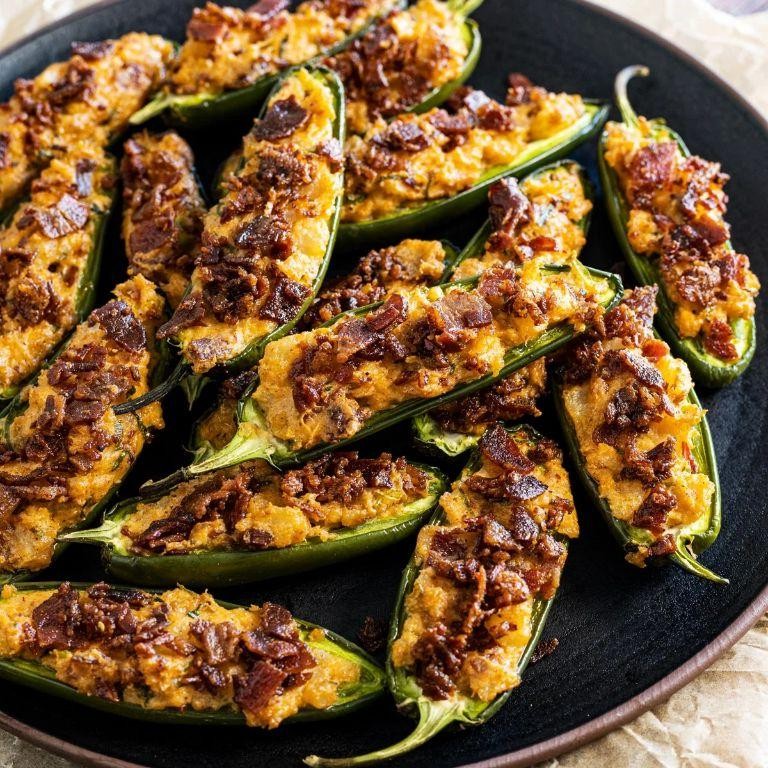
Lusciously creamy and delightfully spicy, these loaded jalapeño poppers transform a classic appetizer into an elegant centerpiece. Imagine plump peppers stuffed with a rich, savory filling and crowned with a golden, crispy topping—perfect for entertaining or a special treat. They strike a beautiful balance between heat and comfort, making them irresistible to both spice lovers and those seeking a more mellow bite.
Serving: 6 | Pre Time: 20 minutes | Cooking Time: 15 minutes
Ingredients
– 6 fresh jalapeño peppers
– 8 ounces of cream cheese, softened to room temperature
– 1 cup of shredded sharp cheddar cheese
– ¼ cup of cooked, crumbled bacon (about 4 slices)
– 2 tablespoons of finely chopped green onions
– A pinch of garlic powder
– A splash of milk to loosen the filling if needed
– ½ cup of panko breadcrumbs
– 2 tablespoons of melted butter
Instructions
1. Preheat your oven to 400°F and line a baking sheet with parchment paper.
2. Slice each jalapeño pepper in half lengthwise and use a small spoon to scrape out all the seeds and membranes for a milder heat.
3. In a medium bowl, combine the softened cream cheese, shredded sharp cheddar cheese, crumbled bacon, chopped green onions, and garlic powder until well mixed; add a splash of milk if the mixture seems too thick for easy scooping.
4. Spoon the cheese filling evenly into each jalapeño half, mounding it slightly above the edges.
5. In a small bowl, toss the panko breadcrumbs with the melted butter until coated.
6. Sprinkle the buttered panko evenly over the top of each filled jalapeño half to create a crispy crust.
7. Bake the poppers on the prepared sheet for 12-15 minutes, or until the filling is bubbly and the topping is golden brown.
8. Let the poppers cool for 5 minutes on the baking sheet before serving to allow the filling to set slightly.
Delightfully crisp on the outside with a molten, cheesy interior, these poppers offer a satisfying contrast in every bite. The smoky bacon and sharp cheddar meld seamlessly with the jalapeño’s gentle kick, while the buttery panko adds a delightful crunch. For a creative twist, serve them alongside a cool avocado crema or as a topping for grilled burgers to elevate any meal.
Sweet and Crispy Deep-Fried Oreos
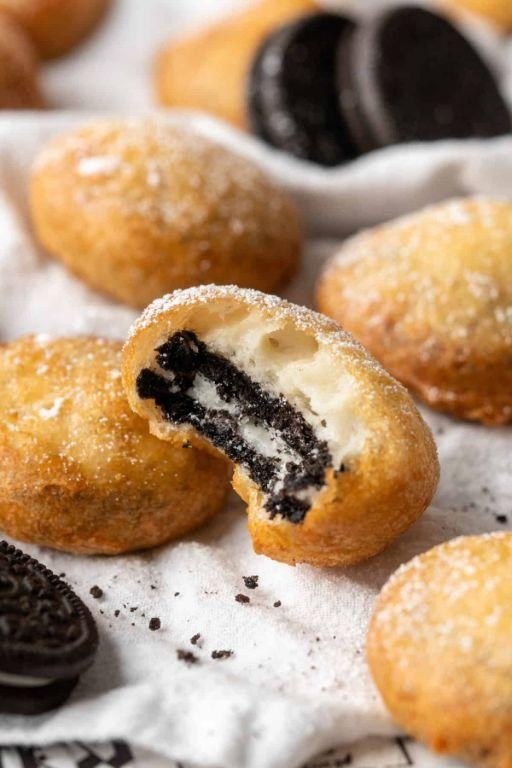
Here’s a nostalgic treat that transforms a classic cookie into a warm, indulgent dessert—perfect for sharing at gatherings or enjoying as a sweet weekend project. Imagine biting through a golden, crisp shell to find a molten, chocolatey center that’s both comforting and delightfully messy.
Serving: 4 | Pre Time: 10 minutes | Cooking Time: 15 minutes
Ingredients
- A cup of all-purpose flour
- A couple of tablespoons of granulated sugar
- A pinch of salt
- A teaspoon of baking powder
- A cup of milk
- A splash of vanilla extract
- One large egg
- A dozen Oreo cookies
- Enough vegetable oil for deep-frying (about 4 cups)
- A dusting of powdered sugar for serving
Instructions
- In a medium bowl, whisk together 1 cup of all-purpose flour, 2 tablespoons of granulated sugar, 1 pinch of salt, and 1 teaspoon of baking powder until fully combined.
- Add 1 cup of milk, 1 splash of vanilla extract, and 1 large egg to the dry ingredients, then whisk vigorously for about 2 minutes until the batter is smooth and free of lumps.
- Heat 4 cups of vegetable oil in a deep pot or Dutch oven over medium-high heat until it reaches 375°F on a candy thermometer, which typically takes 5–7 minutes.
- While the oil heats, dip 12 Oreo cookies one at a time into the batter, ensuring each is fully coated on all sides.
- Carefully place 3–4 battered Oreos into the hot oil using tongs, frying them for 2–3 minutes until they turn golden brown and crispy, flipping halfway through for even cooking.
- Remove the fried Oreos with a slotted spoon and transfer them to a paper towel-lined plate to drain excess oil for 1 minute.
- Repeat steps 4–6 with the remaining Oreos, working in batches to avoid overcrowding the pot, which helps maintain the oil temperature.
- Dust the warm fried Oreos generously with powdered sugar just before serving.
Resulting in a delightful contrast of textures, the crispy exterior gives way to a soft, gooey interior that melts in your mouth. For a creative twist, serve them alongside a scoop of vanilla ice cream or drizzle with chocolate sauce to enhance the rich, sweet flavors.
Crunchy Fried Zucchini Sticks

A quintessential appetizer that transforms humble zucchini into golden, crispy delights, these fried zucchini sticks offer a satisfying crunch with every bite. Perfect for gatherings or a savory snack, they pair beautifully with a variety of dipping sauces. Their simple preparation belies the elegant result—crisp on the outside, tender within, and utterly irresistible.
Serving: 4 | Pre Time: 15 minutes | Cooking Time: 10 minutes
Ingredients
– 2 medium zucchini, cut into sticks about 3 inches long and 1/2 inch thick
– 1 cup all-purpose flour
– 2 large eggs, lightly beaten
– 1 cup panko breadcrumbs
– 1/2 cup grated Parmesan cheese
– 1 teaspoon garlic powder
– 1 teaspoon paprika
– A generous pinch of salt and black pepper
– Vegetable oil for frying, enough to fill a deep skillet about 1 inch deep
– A squeeze of fresh lemon juice for serving
Instructions
1. Pat the zucchini sticks dry with paper towels to remove excess moisture, which helps the coating adhere better and prevents splattering during frying.
2. In a shallow bowl, combine the flour with a pinch of salt and black pepper.
3. In another shallow bowl, whisk the eggs until smooth.
4. In a third shallow bowl, mix the panko breadcrumbs, grated Parmesan cheese, garlic powder, and paprika thoroughly.
5. Dredge each zucchini stick first in the flour mixture, shaking off any excess.
6. Dip the floured stick into the beaten eggs, allowing any excess to drip off.
7. Coat the stick in the panko mixture, pressing gently to ensure an even, thick layer for maximum crunch.
8. Place the coated sticks on a baking sheet in a single layer; for best results, let them rest for 5 minutes to set the coating, which reduces falling off during frying.
9. In a large, deep skillet, heat the vegetable oil over medium-high heat until it reaches 375°F, using a candy thermometer for accuracy to avoid burning.
10. Carefully add the zucchini sticks in batches, avoiding overcrowding to maintain the oil temperature and ensure even cooking.
11. Fry for 2-3 minutes per side, or until golden brown and crispy, flipping once with tongs.
12. Transfer the fried sticks to a wire rack set over a baking sheet to drain excess oil, which keeps them crispier than paper towels.
13. Repeat with the remaining batches, reheating the oil to 375°F between each batch.
14. Squeeze fresh lemon juice over the hot zucchini sticks just before serving.
You’ll marvel at the contrast between the crunchy exterior and the soft, juicy interior of these zucchini sticks. Their savory flavor, enhanced by Parmesan and spices, shines when paired with a creamy ranch or a zesty marinara sauce for dipping, making them a versatile crowd-pleaser at any table.
Buttermilk Fried Catfish
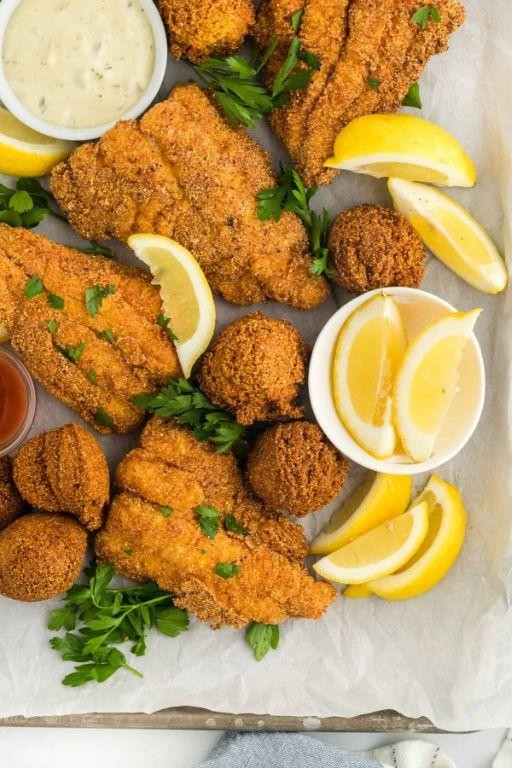
Just when you think you’ve tasted the ultimate Southern comfort, buttermilk fried catfish arrives to redefine crispy, flaky perfection. This classic dish transforms humble catfish fillets into golden, crunchy masterpieces with a tender interior that practically melts on the tongue. It’s the kind of soul-satisfying meal that turns an ordinary weeknight into a celebratory feast.
Serving: 4 | Pre Time: 30 minutes | Cooking Time: 15 minutes
Ingredients
– A couple of catfish fillets (about 1 1/2 pounds total)
– A generous splash of buttermilk (about 1 cup)
– A couple of cups of all-purpose flour
– A good shake of paprika (about 1 tablespoon)
– A pinch of garlic powder (about 1 teaspoon)
– A pinch of onion powder (about 1 teaspoon)
– A hearty pinch of salt (about 1 1/2 teaspoons)
– A few cracks of black pepper (about 1/2 teaspoon)
– A couple of cups of vegetable oil for frying
Instructions
1. Place the catfish fillets in a shallow dish and pour the buttermilk over them, ensuring they’re fully submerged. Let them soak at room temperature for 20 minutes—this tenderizes the fish and helps the coating stick beautifully.
2. In a separate wide bowl, whisk together the all-purpose flour, paprika, garlic powder, onion powder, salt, and black pepper until evenly combined.
3. Heat the vegetable oil in a large, heavy-bottomed skillet or Dutch oven over medium-high heat until it reaches 350°F on a deep-fry thermometer. Tip: Maintaining this temperature is key for a crisp, non-greasy crust.
4. Remove one catfish fillet from the buttermilk, letting the excess drip off, then dredge it thoroughly in the seasoned flour mixture, pressing gently to adhere.
5. Carefully place the coated fillet into the hot oil. Repeat with the remaining fillets, frying in batches to avoid overcrowding the pan.
6. Fry each fillet for 4-5 minutes per side, or until the coating is a deep golden brown and the fish flakes easily with a fork. Tip: Use a slotted spoon or tongs to gently flip the fish halfway through for even cooking.
7. Transfer the fried catfish to a wire rack set over a baking sheet to drain, which keeps the bottom crust crisp. Tip: Sprinkle with a little extra salt while hot for an extra flavor boost.
Out of the fryer, this catfish boasts a shatteringly crisp exterior that gives way to moist, delicate flakes within. The subtle tang from the buttermilk marinade complements the warm spices in the coating, creating a harmonious balance of flavors. Serve it piled high on a platter with creamy coleslaw and a wedge of lemon for squeezing, or tuck it into a soft bun with pickles and remoulade for a truly indulgent sandwich.
Tangy Honey Mustard Chicken Tenders
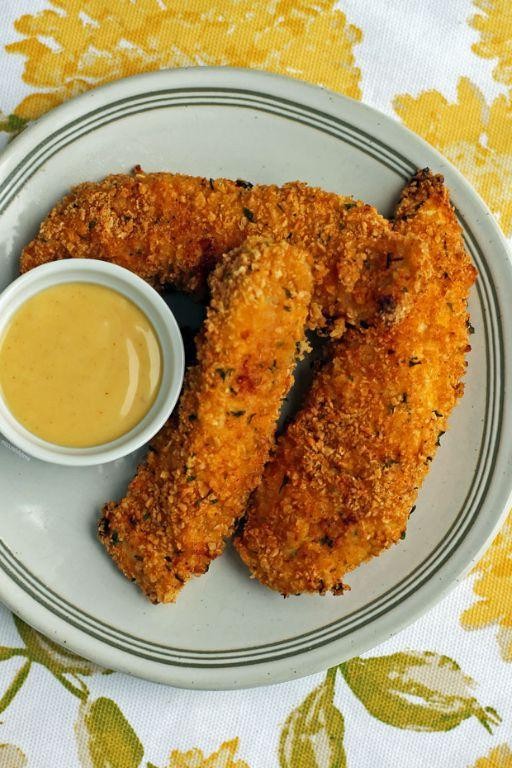
Zesty yet sophisticated, these Tangy Honey Mustard Chicken Tenders transform a beloved classic into an elegant weeknight dinner. They feature a perfectly crisp, golden-brown crust that gives way to juicy, tender chicken, all coated in a glossy, sweet-and-savory glaze. This recipe delivers restaurant-quality flavor with the comforting ease of a home-cooked meal.
Serving: 4 | Pre Time: 15 minutes | Cooking Time: 20 minutes
Ingredients
– About 1.5 pounds of boneless, skinless chicken tenders
– A cup of all-purpose flour
– A couple of large eggs
– A splash of milk
– A cup and a half of panko breadcrumbs
– A generous pinch of salt and black pepper
– A third of a cup of Dijon mustard
– A quarter cup of honey
– A tablespoon of apple cider vinegar
– A couple of cloves of garlic, minced
– A quarter cup of olive oil for frying
Instructions
1. Pat the chicken tenders completely dry with paper towels to ensure the coating adheres properly.
2. Set up three shallow bowls: place the flour in the first, whisk the eggs with the milk in the second, and combine the panko with the salt and pepper in the third.
3. Dredge each chicken tender first in the flour, shaking off any excess, then dip it into the egg mixture, letting the excess drip off.
4. Press the chicken firmly into the panko mixture, coating all sides evenly for maximum crunch.
5. Heat the olive oil in a large skillet over medium heat until it shimmers, about 350°F.
6. Working in batches to avoid crowding, fry the chicken for 3-4 minutes per side until deeply golden brown and the internal temperature reaches 165°F.
7. Transfer the cooked tenders to a wire rack set over a baking sheet; this keeps them crisp instead of steaming on a plate.
8. In a small saucepan, whisk together the Dijon mustard, honey, apple cider vinegar, and minced garlic over low heat.
9. Simmer the sauce for 2-3 minutes, stirring constantly, until it thickens slightly and becomes glossy.
10. Brush the warm honey mustard sauce generously over the hot chicken tenders just before serving.
Unbelievably crisp and juicy, these tenders offer a delightful contrast between the crunchy panko crust and the succulent chicken inside. The glossy honey mustard sauce provides a perfect balance of tangy Dijon and sweet honey, with a subtle garlicky warmth. For a creative twist, serve them over a bed of peppery arugula with a lemon wedge, or slice them atop a grain bowl with roasted vegetables.
Deep-Fried Mozzarella Cheese Sticks
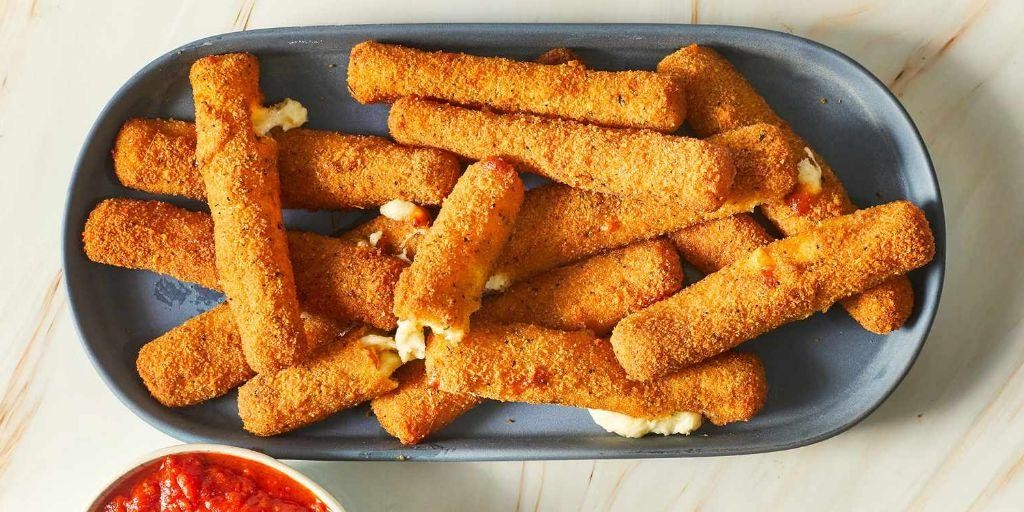
Savor the irresistible allure of golden-crisp exteriors giving way to molten, stretchy cheese centers—these deep-fried mozzarella sticks transform simple ingredients into a crowd-pleasing appetizer that feels both indulgent and nostalgic. With a perfectly seasoned coating and a foolproof frying technique, they emerge from the oil with a satisfying crunch that yields to a creamy, savory interior, making them an ideal centerpiece for game-day gatherings or elegant cocktail parties alike.
Serving: 4 | Pre Time: 20 minutes | Cooking Time: 10 minutes
Ingredients
– 8 mozzarella string cheese sticks
– 1 cup of all-purpose flour
– 2 large eggs, beaten with a splash of water
– 1 cup of Italian-seasoned breadcrumbs
– A couple of cups of vegetable oil for frying
– A pinch of salt for seasoning
Instructions
1. Cut each mozzarella string cheese stick in half crosswise to create 16 pieces total.
2. Place 1 cup of all-purpose flour in a shallow bowl.
3. In a separate shallow bowl, whisk 2 large eggs with 1 tablespoon of water until smooth.
4. Add 1 cup of Italian-seasoned breadcrumbs to a third shallow bowl.
5. Dredge each mozzarella piece in the flour, shaking off any excess.
6. Dip the floured piece into the beaten egg mixture, coating it evenly.
7. Roll the egg-coated piece in the breadcrumbs, pressing gently to adhere the crumbs fully.
8. Repeat the egg and breadcrumb steps for a double coating to ensure a crispier crust.
9. Place the coated mozzarella sticks on a baking sheet and freeze for 15 minutes to prevent cheese leakage during frying.
10. In a heavy-bottomed pot or deep fryer, heat 2 cups of vegetable oil to 375°F, using a thermometer for accuracy.
11. Fry the mozzarella sticks in batches of 4-5 for 2-3 minutes until golden brown, turning occasionally with tongs for even cooking.
12. Transfer the fried sticks to a paper towel-lined plate and sprinkle lightly with a pinch of salt while hot.
13. Serve immediately to enjoy the gooey cheese at its peak.
Oozing with rich, melted mozzarella, these sticks offer a delightful contrast between the crunchy, herb-infused crust and the soft, stretchy interior. For a creative twist, pair them with a spicy marinara dip or a cool ranch dressing to balance the warmth and richness, making each bite a harmonious blend of textures and flavors that will disappear from the plate in moments.
Crispy Fried Pickles with Ranch Dip

Unmistakably crunchy and irresistibly tangy, these crispy fried pickles elevate a classic bar snack into an elegant appetizer worthy of any gathering. Their golden-brown exterior gives way to a warm, briny center, perfectly complemented by a cool, herbaceous ranch dip that balances each bite with creamy sophistication.
Serving: 4 | Pre Time: 15 minutes | Cooking Time: 10 minutes
Ingredients
– A jar of dill pickle chips (about 16 ounces), patted super dry with paper towels
– A cup of all-purpose flour
– A couple of large eggs, beaten until smooth
– A cup and a half of panko breadcrumbs
– A teaspoon of garlic powder
– A half teaspoon of smoked paprika
– A quarter teaspoon of black pepper
– A good glug of vegetable oil for frying (enough to fill your pot about 2 inches deep)
– For the ranch dip: a half cup of sour cream, a quarter cup of mayonnaise, a tablespoon of fresh chopped dill, a splash of buttermilk, and a pinch each of garlic powder and onion powder
Instructions
1. Set up a breading station with three shallow bowls: place the flour in the first bowl, the beaten eggs in the second, and mix the panko breadcrumbs with garlic powder, smoked paprika, and black pepper in the third.
2. Take one pickle chip, coat it thoroughly in the flour, shaking off any excess—this helps the egg adhere better.
3. Dip the floured pickle into the beaten eggs, letting any extra drip back into the bowl to avoid a soggy coating.
4. Press the pickle firmly into the seasoned panko mixture, ensuring an even, generous coating on all sides; repeat with all pickle chips, placing them on a parchment-lined baking sheet.
5. In a heavy-bottomed pot or Dutch oven, heat the vegetable oil to 375°F over medium-high heat, using a deep-fry thermometer for accuracy.
6. Carefully add 4-5 pickle chips to the hot oil, frying for 2-3 minutes until they turn a deep golden brown and float to the surface, flipping once halfway through for even crispiness.
7. Remove the fried pickles with a slotted spoon and transfer them to a wire rack set over a baking sheet to drain excess oil, which keeps them crispy longer than paper towels.
8. While the pickles fry, whisk together the sour cream, mayonnaise, fresh dill, buttermilk, garlic powder, and onion powder in a small bowl until smooth for the ranch dip.
9. Serve the fried pickles immediately with the ranch dip on the side.
Just out of the fryer, these pickles offer a delightful contrast of textures—crispy and light on the outside, tender and juicy within. Their savory crunch pairs beautifully with the creamy, tangy dip, making them a standout starter for game days or elegant cocktail parties alike.
Deep-Fried Apple Fritters
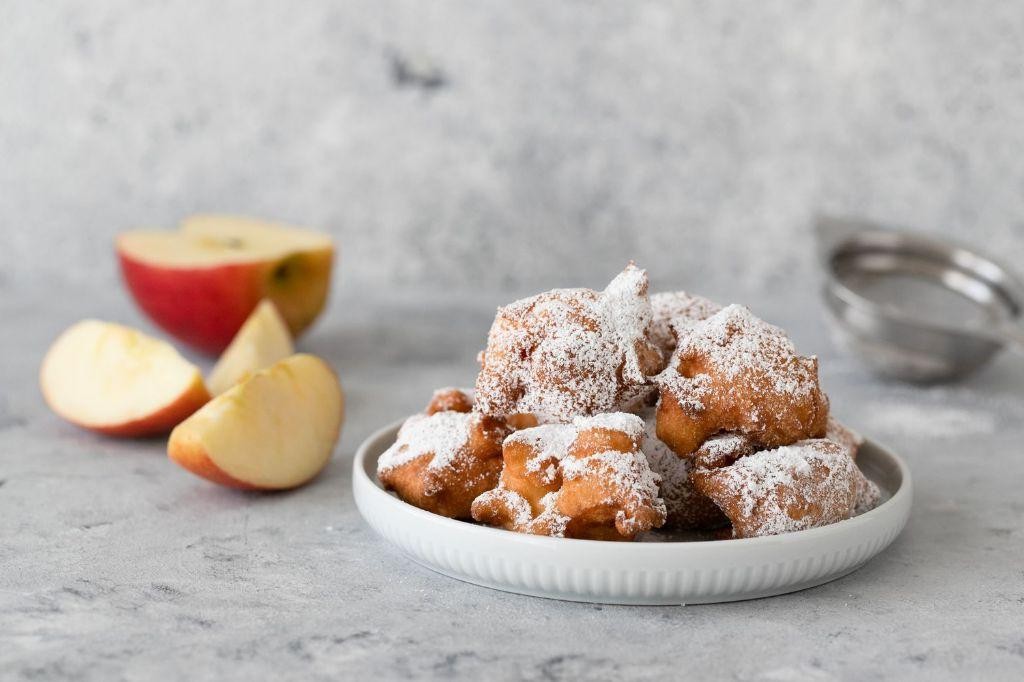
Meticulously crafted and impossibly light, these deep-fried apple fritters transform humble orchard fruit into golden, cloud-like confections. Each bite offers a crisp, sugar-dusted exterior that gives way to tender, spiced apple-studded batter, creating a dessert that feels both rustic and refined. Perfect for a weekend brunch or a cozy autumn evening, they capture the essence of comfort with an elegant touch.
Serving: 12 fritters | Pre Time: 20 minutes | Cooking Time: 15 minutes
Ingredients
– A couple of large Granny Smith apples, peeled and cored
– Just over 1 cup of all-purpose flour
– A generous ¼ cup of granulated sugar, plus extra for dusting
– 2 teaspoons of baking powder
– A big pinch of salt
– 1 teaspoon of ground cinnamon
– A splash of pure vanilla extract
– 1 large egg
– ¾ cup of whole milk
– About 4 cups of vegetable oil for frying
– A dollop of powdered sugar for the final touch
Instructions
1. Core and peel your apples, then dice them into small, ¼-inch cubes—this ensures they cook through evenly without making the batter soggy.
2. In a large mixing bowl, whisk together the all-purpose flour, granulated sugar, baking powder, salt, and ground cinnamon until fully combined.
3. In a separate bowl, lightly beat the large egg, then stir in the whole milk and pure vanilla extract until smooth.
4. Pour the wet ingredients into the dry mixture and gently fold with a spatula just until no dry streaks remain; overmixing can lead to tough fritters.
5. Gently fold the diced apples into the batter until evenly distributed, being careful not to crush them.
6. In a heavy-bottomed pot or Dutch oven, heat the vegetable oil to 350°F over medium-high heat, using a candy thermometer for accuracy—this temperature ensures a crisp exterior without absorbing too much oil.
7. Carefully drop heaping tablespoons of batter into the hot oil, frying 3-4 fritters at a time to avoid overcrowding and maintain the oil temperature.
8. Fry each fritter for 2-3 minutes per side, flipping once with a slotted spoon when golden brown and puffed.
9. Transfer the fried fritters to a wire rack set over a baking sheet to drain excess oil, which helps keep them crisp rather than soggy.
10. While still warm, roll the fritters in extra granulated sugar for a sparkling finish, then dust lightly with powdered sugar just before serving.
Each fritter emerges with a delicate, airy crumb that cradles soft, cinnamon-kissed apple pieces, offering a warm, comforting flavor. Enjoy them fresh from the fryer with a drizzle of caramel sauce or a side of vanilla ice cream for an indulgent twist that highlights their sweet, aromatic notes.
Seasoned Fried Potato Wedges
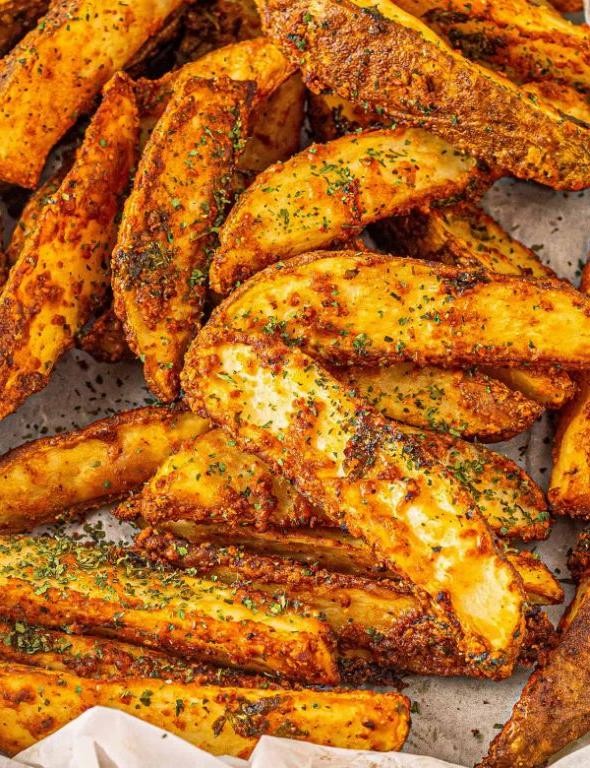
Meticulously crafted yet wonderfully approachable, seasoned fried potato wedges transform the humble spud into a golden, crisp-edged delight that’s perfect for casual gatherings or a comforting solo treat. With a savory, aromatic coating that clings to each tender interior, these wedges offer a satisfying crunch and depth of flavor that far surpasses any frozen alternative. They emerge from the fryer with a rustic, inviting appearance, ready to be paired with your favorite dipping sauces or enjoyed straight from the bowl.
Serving: 4 | Pre Time: 15 minutes | Cooking Time: 20 minutes
Ingredients
– 4 large russet potatoes, scrubbed clean
– A generous glug of vegetable oil (about 4 cups for frying)
– A couple of tablespoons of olive oil
– A good sprinkle of garlic powder (about 1 tbsp)
– A hearty pinch of smoked paprika (about 2 tsp)
– A dash of onion powder (about 1 tsp)
– A light dusting of salt (about 1 tsp, plus more for finishing)
– A crack of black pepper (about ½ tsp)
Instructions
1. Cut each scrubbed potato lengthwise into 8 even wedges, leaving the skin on for extra texture and nutrients.
2. In a large bowl, toss the potato wedges with the couple of tablespoons of olive oil until evenly coated.
3. In a small bowl, mix together the good sprinkle of garlic powder, hearty pinch of smoked paprika, dash of onion powder, light dusting of salt, and crack of black pepper.
4. Sprinkle the spice mixture over the oiled wedges and toss vigorously by hand to ensure every surface is covered—this helps the seasoning stick during frying.
5. In a heavy-bottomed pot or Dutch oven, heat the generous glug of vegetable oil to 375°F over medium-high heat, using a deep-fry thermometer for accuracy to prevent sogginess.
6. Working in batches to avoid overcrowding, carefully add a single layer of seasoned wedges to the hot oil using tongs.
7. Fry the wedges for 5–7 minutes, turning occasionally, until they are deeply golden brown and crisp on the outside, with the internal temperature reaching 210°F for perfect tenderness.
8. Remove the fried wedges with a slotted spoon and drain on a wire rack set over a baking sheet—this keeps them crispier than paper towels by allowing steam to escape.
9. Immediately season the hot wedges with an extra pinch of salt for a flavor boost right after frying.
10. Repeat steps 6–9 with the remaining batches, letting the oil return to 375°F between each for consistent results.
After the final step, arrange the wedges on a platter. Achieving a shatteringly crisp exterior that gives way to a fluffy, steaming center, these wedges boast a smoky, garlicky aroma with just a hint of warmth from the paprika. For a creative twist, serve them alongside a cool, herbed yogurt dip or crumble over some tangy feta cheese to balance the richness.
Conclusion
From crispy classics to creative delights, these 18 Fry Daddy recipes prove that deep frying can be both delicious and approachable. We hope this roundup inspires you to heat up your fryer and try something new! Don’t forget to leave a comment with your favorite recipe and share this article on Pinterest to spread the frying fun.


