Whether you’re heading to a holiday party, summer picnic, or casual get-together, bringing a standout fruit dish is always a crowd-pleaser. From vibrant salads and refreshing desserts to creative appetizers, these 34 delicious recipes are perfect for any festive gathering. Get ready to impress your friends and family with fresh, flavorful dishes that celebrate the best of fruit—let’s dive into these irresistible potluck ideas!
Tropical Fruit Salad with Mint and Lime
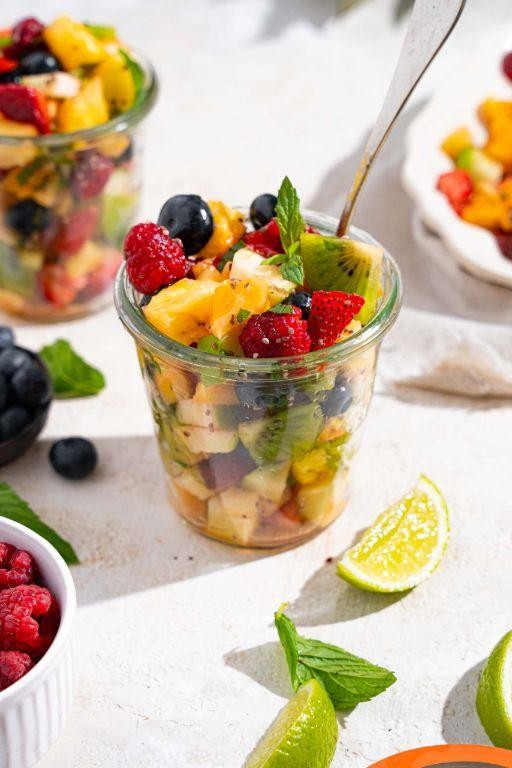
A vibrant celebration of sun-kissed flavors, this tropical fruit salad brings together nature’s sweetest offerings in a refreshing medley that dances on the palate. Perfect for brunch gatherings or as a light dessert, its bright citrus notes and herbal undertakes elevate simple fruit to something truly special. Each bite transports you to warmer climates, making it an ideal escape from everyday meals.
2
servings20
minutesIngredients
– 2 cups cubed fresh pineapple
– 2 cups cubed fresh mango
– 1 cup sliced fresh strawberries
– 1 cup fresh blueberries
– 1/4 cup fresh mint leaves
– 3 tablespoons fresh lime juice
– 1 tablespoon honey
Instructions
1. Wash all fruits thoroughly under cool running water and pat dry with paper towels.
2. Peel the pineapple using a sharp knife, removing all outer skin and eyes.
3. Cut the pineapple into 1-inch cubes, discarding the tough core.
4. Peel the mango and slice the flesh away from the flat pit in the center.
5. Cut mango flesh into 1-inch cubes for uniform pieces that will marinate evenly.
6. Hull the strawberries and slice them into quarters for optimal flavor release.
7. Gently rinse blueberries and remove any stems or damaged berries.
8. Stack mint leaves and roll them tightly before slicing into thin ribbons—this chiffonade technique prevents bruising.
9. Combine pineapple, mango, strawberries, and blueberries in a large glass bowl.
10. In a separate small bowl, whisk together lime juice and honey until fully incorporated.
11. Pour the lime-honey dressing over the mixed fruits and toss gently with a rubber spatula.
12. Let the salad rest at room temperature for 15 minutes to allow flavors to meld.
13. Fold in the sliced mint leaves just before serving to maintain their vibrant color and fresh aroma.
14. Transfer to a serving dish and present immediately for optimal texture and temperature.
Zesty lime brightens the natural sweetness of ripe tropical fruits, while mint adds a cooling contrast that makes each spoonful incredibly refreshing. The varied textures—from juicy pineapple to plump blueberries—create an exciting eating experience that feels both light and satisfying. For an elegant presentation, serve in hollowed-out pineapple halves or garnish with edible flowers to transform this simple salad into a centerpiece worthy of any special occasion.
Mixed Berry and Quinoa Salad
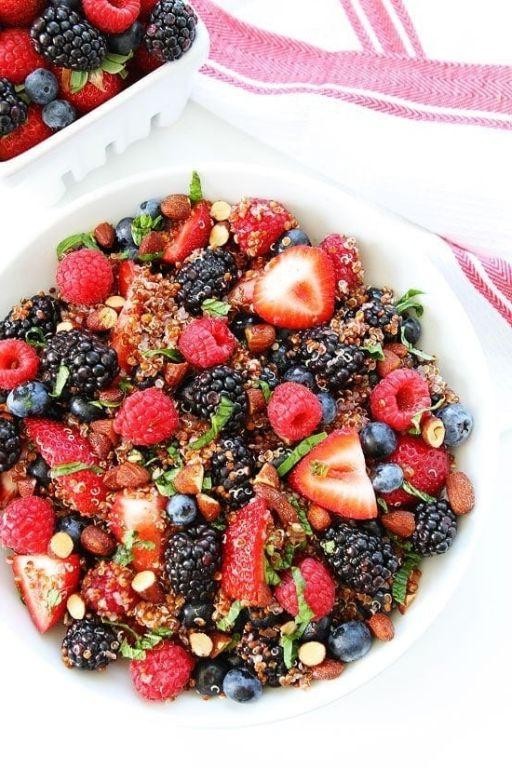
Vibrant and wholesome, this mixed berry and quinoa salad offers a delightful interplay of textures and flavors that elevates simple ingredients into an elegant meal. The nutty quinoa provides a hearty foundation, while the seasonal berries burst with juicy sweetness against the crisp freshness of greens and the subtle sharpness of red onion. Finished with a bright lemon-honey vinaigrette, it’s a dish that feels both nourishing and sophisticated, perfect for a light lunch or as a stunning side.
5
servings25
minutes15
minutesIngredients
– 1 cup quinoa
– 2 cups water
– 1/4 teaspoon salt
– 1 cup mixed fresh berries (blueberries, raspberries, sliced strawberries)
– 4 cups mixed greens
– 1/4 cup thinly sliced red onion
– 1/4 cup crumbled feta cheese
– 2 tablespoons extra virgin olive oil
– 1 tablespoon fresh lemon juice
– 1 teaspoon honey
– 1/8 teaspoon black pepper
Instructions
1. Rinse 1 cup quinoa under cold running water in a fine-mesh strainer for 1 minute to remove bitterness.
2. Combine rinsed quinoa, 2 cups water, and 1/4 teaspoon salt in a medium saucepan.
3. Bring to a boil over high heat, then reduce heat to low, cover, and simmer for 15 minutes until quinoa is tender and water is absorbed.
4. Remove saucepan from heat, fluff quinoa with a fork, and let it cool completely to room temperature for about 20 minutes to prevent wilting the greens.
5. In a small bowl, whisk together 2 tablespoons extra virgin olive oil, 1 tablespoon fresh lemon juice, 1 teaspoon honey, and 1/8 teaspoon black pepper until emulsified.
6. Place 4 cups mixed greens in a large salad bowl.
7. Add cooled quinoa, 1 cup mixed fresh berries, 1/4 cup thinly sliced red onion, and 1/4 cup crumbled feta cheese to the greens.
8. Drizzle the dressing over the salad and toss gently to coat all ingredients evenly without crushing the berries.
9. Serve immediately to maintain the crisp texture of the greens and berries.
Now, the salad presents a beautiful medley of fluffy quinoa, tender greens, and juicy berries, with the feta adding a creamy saltiness that balances the sweet-tart dressing. For a creative twist, serve it alongside grilled chicken or spoon it into lettuce cups for a handheld appetizer that highlights its refreshing, layered flavors.
Fresh Fruit Tart with Vanilla Custard
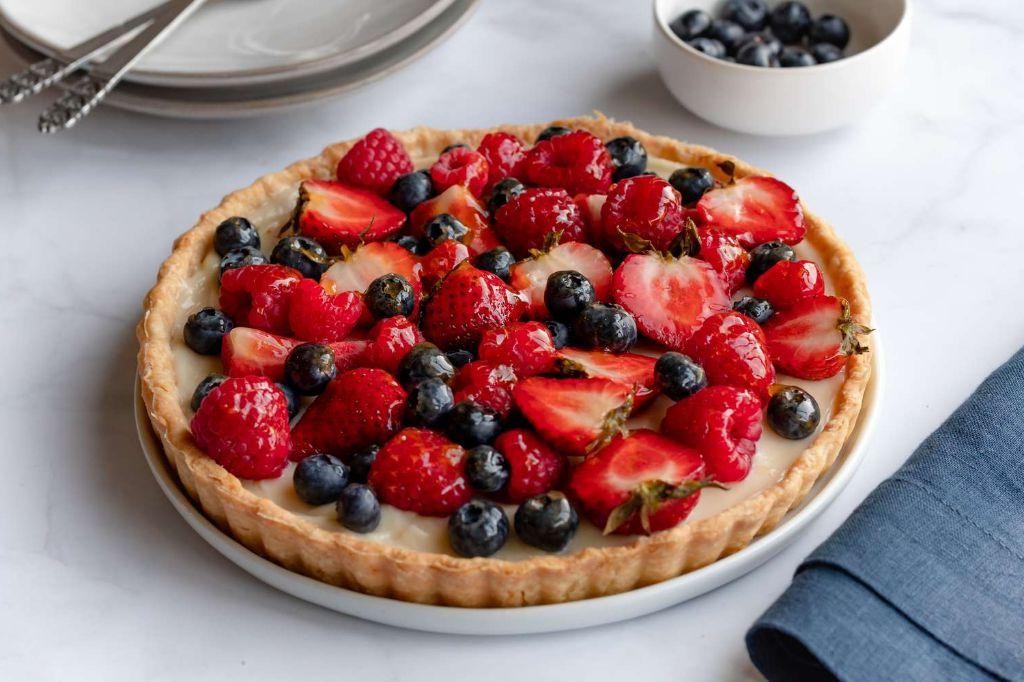
Elegant yet approachable, this fresh fruit tart combines a buttery shortbread crust with silky vanilla custard and a vibrant mosaic of seasonal fruits. The crisp texture of the shell provides the perfect foundation for the creamy filling and jewel-like fruit topping. Each component balances beautifully, creating a dessert that’s as stunning to behold as it is delightful to eat.
8
servings45
minutes35
minutesIngredients
- 1 1/2 cups all-purpose flour
- 1/2 cup powdered sugar
- 1/2 teaspoon salt
- 1/2 cup unsalted butter, cold and cubed
- 1 large egg yolk
- 2 cups whole milk
- 1/2 cup granulated sugar
- 1/4 cup cornstarch
- 4 large egg yolks
- 2 teaspoons vanilla extract
- 2 tablespoons unsalted butter
- 2 cups mixed fresh berries
- 1/4 cup apricot jam
- 1 tablespoon water
Instructions
- Preheat your oven to 350°F and lightly grease a 9-inch tart pan with removable bottom.
- Combine 1 1/2 cups all-purpose flour, 1/2 cup powdered sugar, and 1/2 teaspoon salt in a food processor.
- Add 1/2 cup cold cubed butter and pulse until the mixture resembles coarse crumbs.
- Add 1 large egg yolk and pulse just until the dough comes together.
- Press the dough evenly into the prepared tart pan, ensuring it reaches up the sides.
- Prick the bottom of the crust all over with a fork to prevent bubbling.
- Chill the crust in the refrigerator for 30 minutes to prevent shrinkage during baking.
- Bake the crust for 20-25 minutes until golden brown around the edges.
- Cool the crust completely on a wire rack before filling.
- Whisk together 1/2 cup granulated sugar and 1/4 cup cornstarch in a medium saucepan.
- Gradually whisk in 2 cups whole milk until smooth and lump-free.
- Cook the milk mixture over medium heat, stirring constantly with a wooden spoon, until it thickens and bubbles, about 8-10 minutes.
- Whisk 4 large egg yolks in a separate bowl, then slowly temper them by adding 1/2 cup of the hot milk mixture while whisking vigorously.
- Pour the tempered egg mixture back into the saucepan and cook for 2 more minutes, stirring constantly.
- Remove from heat and stir in 2 teaspoons vanilla extract and 2 tablespoons butter until fully incorporated.
- Press the custard through a fine-mesh sieve into a clean bowl to ensure perfect smoothness.
- Cover the custard directly with plastic wrap to prevent a skin from forming and refrigerate until completely chilled, about 2 hours.
- Spread the chilled custard evenly into the cooled tart shell using an offset spatula.
- Arrange 2 cups mixed fresh berries in concentric circles over the custard layer.
- Heat 1/4 cup apricot jam with 1 tablespoon water in a small saucepan until melted and smooth.
- Brush the warm glaze gently over the fruit to create a beautiful glossy finish.
- Refrigerate the assembled tart for at least 1 hour before serving to allow the flavors to meld.
Nothing compares to the satisfying contrast of the crisp, buttery crust against the velvety custard and juicy fruit. The vanilla-infused cream provides a sophisticated backdrop that lets the seasonal berries shine in every bite. For an elegant presentation, slice with a warm knife and serve alongside a glass of dessert wine or sparkling rosé.
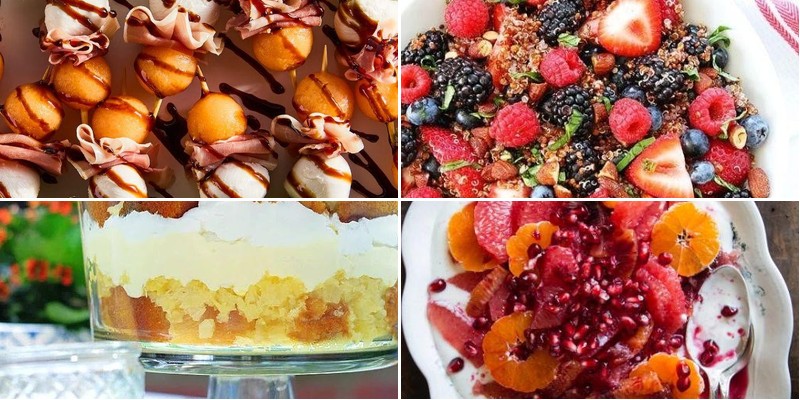
Watermelon and Feta Skewers
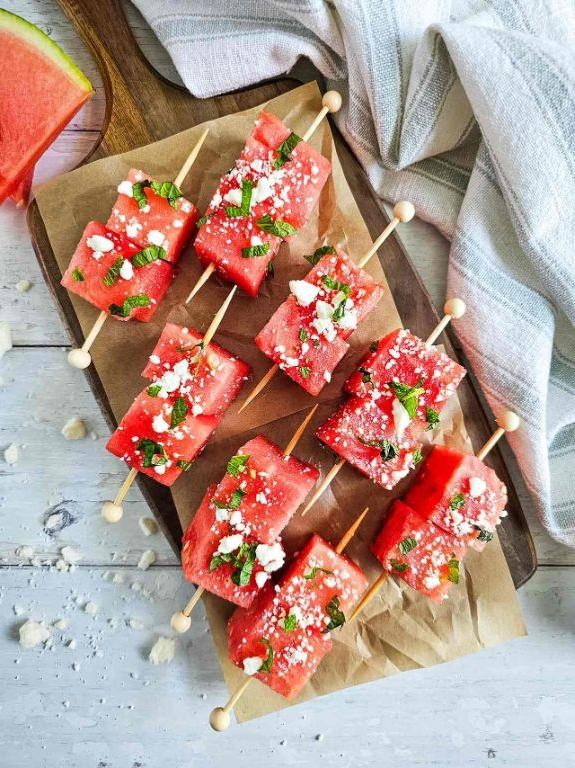
A symphony of sweet and savory unfolds in these elegant skewers, where juicy watermelon cubes meet creamy feta cheese in a delightful dance of contrasting flavors. Perfect for summer entertaining or a sophisticated appetizer, this no-cook dish comes together with effortless grace. Each bite offers a refreshing balance that will transport your palate to sun-drenched Mediterranean shores.
2
servings20
minutesIngredients
– 4 cups cubed seedless watermelon
– 8 ounces feta cheese
– 1/4 cup fresh mint leaves
– 2 tablespoons extra virgin olive oil
– 1 tablespoon fresh lime juice
– 1/4 teaspoon flaky sea salt
– 1/8 teaspoon freshly ground black pepper
Instructions
1. Cut the seedless watermelon into 1-inch cubes, ensuring uniform size for even presentation.
2. Cut the feta cheese into 3/4-inch cubes that will complement the watermelon pieces.
3. Thread one watermelon cube onto a skewer, followed by one feta cube, repeating this pattern three times per skewer.
4. Arrange the completed skewers on a serving platter in a single layer.
5. Chop the fresh mint leaves finely to release their aromatic oils.
6. Whisk together the extra virgin olive oil and fresh lime juice in a small bowl until emulsified.
7. Drizzle the olive oil and lime mixture evenly over the assembled skewers.
8. Sprinkle the flaky sea salt and freshly ground black pepper across the skewers.
9. Garnish with the chopped mint leaves, distributing them evenly.
10. Chill the skewers in the refrigerator for 15 minutes to allow the flavors to meld.
You’ll marvel at how the cool, crisp watermelon contrasts beautifully with the creamy, briny feta, while the mint provides a refreshing herbal note. The olive oil and lime dressing adds a subtle tang that ties all the elements together harmoniously. For an elegant presentation, consider serving these skewers alongside grilled meats or as part of a Mediterranean-inspired mezze platter.
Pineapple Coconut Trifle
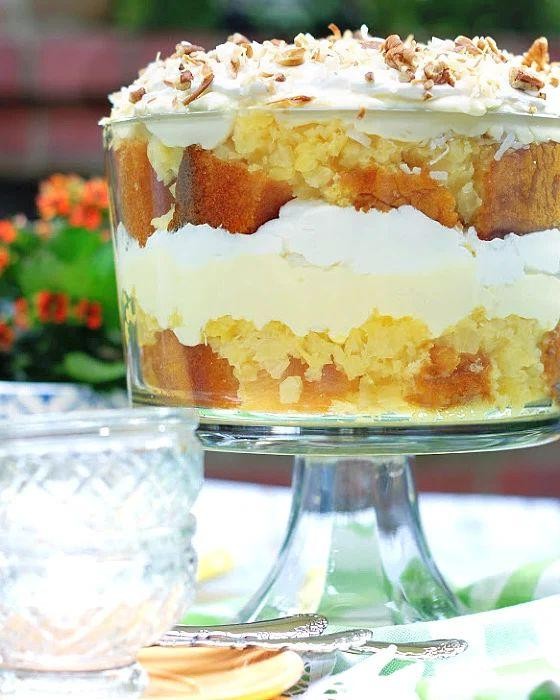
Vivid layers of tropical sunshine and creamy indulgence await in this sophisticated dessert that transforms simple ingredients into an elegant centerpiece. This pineapple coconut trifle combines the bright acidity of fresh fruit with the rich silkiness of coconut custard, creating a dessert that feels both luxurious and refreshingly light. Each spoonful offers a delightful contrast of textures and flavors that will transport your senses to a tropical paradise.
8
servings45
minutesIngredients
– 1 package (3.4 oz) instant vanilla pudding mix
– 2 cups cold whole milk
– 1 cup heavy cream
– 2 tablespoons granulated sugar
– 1 teaspoon vanilla extract
– 1 prepared pound cake (16 oz), cut into 1-inch cubes
– 2 cups fresh pineapple, cut into ½-inch pieces
– 1 cup sweetened shredded coconut
– ½ cup pineapple juice
– ¼ cup toasted coconut flakes
Instructions
1. Whisk the instant vanilla pudding mix with 2 cups cold whole milk in a medium bowl for exactly 2 minutes until thickened.
2. Cover the pudding with plastic wrap pressed directly against the surface and refrigerate for 30 minutes to prevent skin formation.
3. Combine 1 cup heavy cream, 2 tablespoons granulated sugar, and 1 teaspoon vanilla extract in a chilled mixing bowl.
4. Whip the cream mixture on medium-high speed for 3-4 minutes until stiff peaks form when you lift the beaters.
5. Gently fold the whipped cream into the chilled pudding until no white streaks remain, being careful not to deflate the mixture.
6. Arrange one-third of the pound cake cubes in an even layer across the bottom of a 3-quart trifle dish.
7. Brush the cake layer with 2 tablespoons of pineapple juice to moisten the cake evenly.
8. Spoon one-third of the pudding mixture over the cake layer and spread into an even layer using an offset spatula.
9. Scatter ⅔ cup of fresh pineapple pieces and ⅓ cup shredded coconut over the pudding layer.
10. Repeat the layering process two more times, ending with a final layer of pudding.
11. Sprinkle ¼ cup toasted coconut flakes evenly over the top layer as garnish.
12. Cover the trifle with plastic wrap and refrigerate for at least 4 hours, or preferably overnight, to allow flavors to meld.
Perfectly balanced between creamy and fruity, this trifle develops deeper flavor complexity as it chills, with the cake becoming wonderfully moist while maintaining structural integrity. The toasted coconut garnish provides a delightful crunch against the smooth pudding layers, making each bite a textural adventure that feels both elegant and comforting.
Citrus and Pomegranate Ambrosia
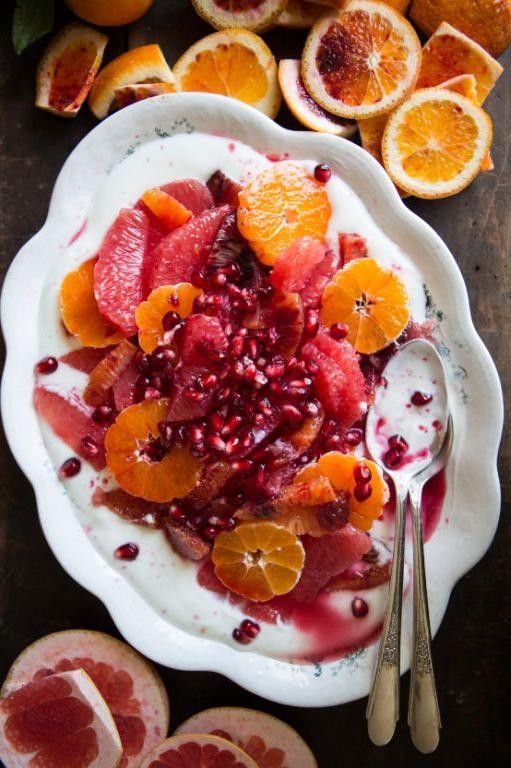
Delightfully refreshing and visually stunning, this citrus and pomegranate ambrosia reimagines the classic Southern dessert with contemporary elegance. Combining vibrant citrus segments with jewel-like pomegranate arils in a light honey-lime dressing, this dish offers a perfect balance of sweet and tart flavors. It’s an exquisite addition to holiday tables or a bright conclusion to any seasonal meal.
6
servings25
minutesIngredients
– 3 large navel oranges
– 2 large grapefruits
– 1 cup pomegranate arils
– 1/4 cup honey
– 2 tablespoons fresh lime juice
– 1/2 cup heavy cream
– 2 tablespoons powdered sugar
– 1/2 cup miniature marshmallows
– 1/4 cup sweetened shredded coconut
Instructions
1. Using a sharp knife, slice off the top and bottom of each orange and grapefruit to create stable cutting surfaces.
2. Carefully cut away all peel and white pith from the citrus fruits, following the fruit’s natural curve.
3. Hold each peeled fruit over a medium bowl and slice between membranes to release individual segments, catching all juice in the bowl.
4. In a small bowl, whisk together 1/4 cup honey and 2 tablespoons fresh lime juice until fully combined.
5. Pour the honey-lime dressing over the citrus segments and gently toss to coat evenly.
6. Add 1 cup pomegranate arils to the citrus mixture and fold gently to distribute throughout.
7. In a separate chilled bowl, whip 1/2 cup heavy cream with 2 tablespoons powdered sugar until soft peaks form.
8. Fold the whipped cream into the citrus-pomegranate mixture using a spatula, being careful not to deflate the cream.
9. Add 1/2 cup miniature marshmallows and 1/4 cup sweetened shredded coconut, folding just until evenly distributed.
10. Cover the bowl with plastic wrap and refrigerate for at least 2 hours to allow flavors to meld.
11. Serve chilled in individual dessert glasses or a decorative serving bowl.
Exquisitely textured with creamy peaks and juicy fruit bursts, this ambrosia offers a delightful contrast between the smooth whipped cream and the bright citrus segments. The honey-lime dressing beautifully enhances the natural sweetness while the pomegranate arils provide satisfying crunch. For an elegant presentation, layer it in champagne flutes with crushed ginger snaps or serve alongside shortbread cookies for added texture contrast.
Strawberry and Basil Bruschetta
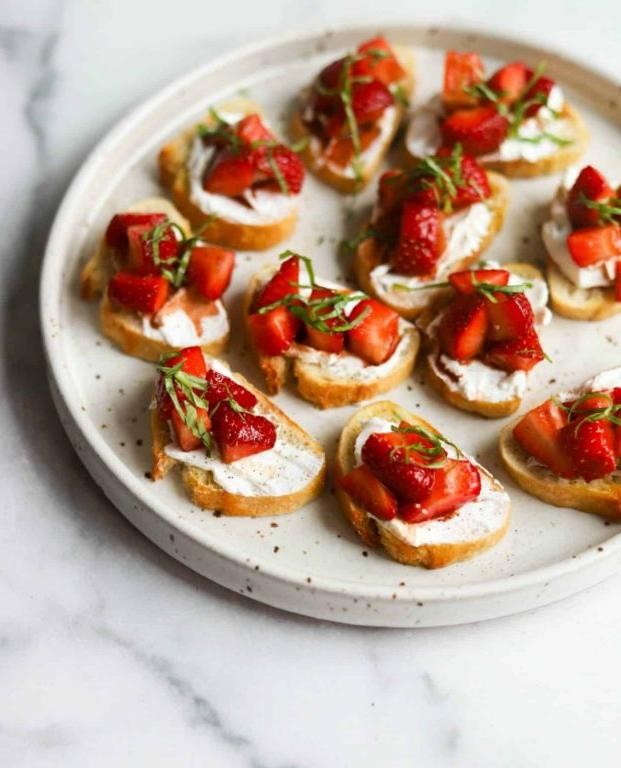
Captivating in its simplicity yet sophisticated in flavor, this strawberry and basil bruschetta transforms humble ingredients into an elegant appetizer. Combining the sweet juiciness of ripe strawberries with the aromatic freshness of basil creates a delightful contrast that dances on the palate. Perfect for summer entertaining or as a light starter, this dish brings a touch of culinary artistry to any table.
8
servings15
minutes10
minutesIngredients
– 1 baguette
– 2 tablespoons olive oil
– 1 cup fresh strawberries
– 1/4 cup fresh basil leaves
– 2 tablespoons balsamic glaze
– 4 ounces goat cheese
– 1/4 teaspoon sea salt
– 1/4 teaspoon black pepper
Instructions
1. Preheat your oven to 375°F and line a baking sheet with parchment paper.
2. Slice the baguette into 1/2-inch thick diagonal pieces using a serrated knife for clean cuts.
3. Arrange the bread slices in a single layer on the prepared baking sheet.
4. Brush both sides of each bread slice lightly with olive oil using a pastry brush.
5. Bake the bread slices for 8-10 minutes until golden brown and crisp around the edges.
6. While the bread toasts, hull and finely dice the strawberries into 1/4-inch pieces.
7. Stack the basil leaves, roll them tightly, and slice into thin ribbons (chiffonade).
8. In a medium bowl, gently combine the diced strawberries and basil ribbons.
9. Spread approximately 1 tablespoon of goat cheese evenly onto each toasted bread slice.
10. Spoon the strawberry-basil mixture over the goat cheese, dividing it evenly among the slices.
11. Drizzle each bruschetta with balsamic glaze in a zigzag pattern for visual appeal.
12. Season lightly with sea salt and freshly cracked black pepper just before serving.
Generously textured with crisp bread, creamy cheese, and juicy fruit, this bruschetta offers a symphony of contrasting elements. The tangy balsamic glaze cuts through the sweetness beautifully, while the basil provides an herbal freshness that lingers pleasantly. For an extra touch of elegance, serve these on a slate board garnished with extra basil sprigs and edible flowers.
Grapes and Goat Cheese in Puff Pastry
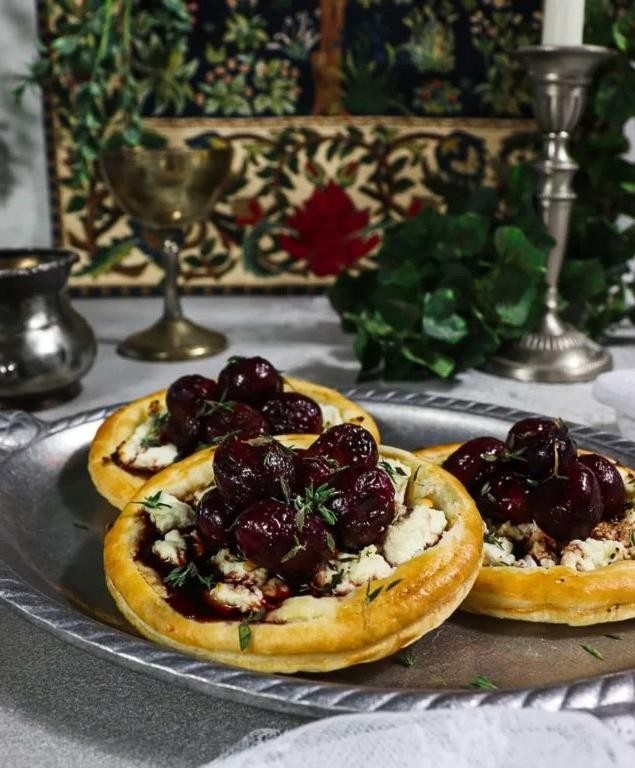
Yield to the elegant simplicity of seasonal entertaining with these golden puff pastry parcels, where sweet grapes caramelize into jammy perfection against the tangy creaminess of goat cheese, all wrapped in buttery, flaky layers that shatter delicately with each bite. This sophisticated yet approachable appetizer transforms humble ingredients into a stunning centerpiece worthy of any gathering, balancing rich and bright flavors with effortless grace. Perfect for autumn evenings or holiday celebrations, these parcels offer both visual appeal and complex taste in every elegant package.
6
portions20
minutes22
minutesIngredients
- 1 sheet frozen puff pastry
- 4 ounces goat cheese
- 1 cup red seedless grapes
- 1 tablespoon honey
- 1 tablespoon fresh thyme leaves
- 1 egg
- 1 tablespoon water
- 1 tablespoon all-purpose flour
Instructions
- Thaw the frozen puff pastry sheet at room temperature for 40 minutes until pliable but still cool to the touch.
- Preheat your oven to 400°F and line a baking sheet with parchment paper.
- Lightly dust your work surface with the all-purpose flour and unfold the puff pastry sheet.
- Roll the pastry into a 10×12-inch rectangle using even pressure to maintain consistent thickness.
- Cut the pastry into 6 equal rectangles using a sharp knife or pizza cutter for clean edges.
- Crumble the goat cheese evenly across the center of each pastry rectangle, leaving a ½-inch border.
- Arrange approximately 8-10 grapes in a single layer over the goat cheese on each rectangle.
- Drizzle ½ teaspoon of honey over the grapes on each pastry portion.
- Sprinkle fresh thyme leaves evenly over the filling components.
- Whisk together the egg and 1 tablespoon of water in a small bowl until fully combined.
- Brush the egg wash along the exposed borders of each pastry rectangle using a pastry brush.
- Fold each pastry rectangle in half over the filling to create a square parcel, pressing the edges firmly to seal.
- Crimp the sealed edges with a fork to create a decorative pattern and ensure no leakage during baking.
- Brush the tops of all parcels with the remaining egg wash for golden, glossy finish.
- Transfer the parcels to the prepared baking sheet, spacing them 2 inches apart for even air circulation.
- Bake at 400°F for 18-22 minutes until the pastry is puffed and deep golden brown.
- Cool the parcels on the baking sheet for 5 minutes before serving to allow the filling to set.
Remarkably, these parcels achieve a perfect textural contrast between the shatteringly crisp pastry exterior and the warm, creamy interior where grapes burst with intensified sweetness. The tangy goat cheese provides a sophisticated counterpoint to the caramelized fruit, while thyme adds an aromatic earthiness that complements both elements beautifully. For an elegant presentation, serve alongside a crisp white wine and garnish with additional fresh thyme sprigs to highlight the herbal notes.
Peach and Blueberry Galette
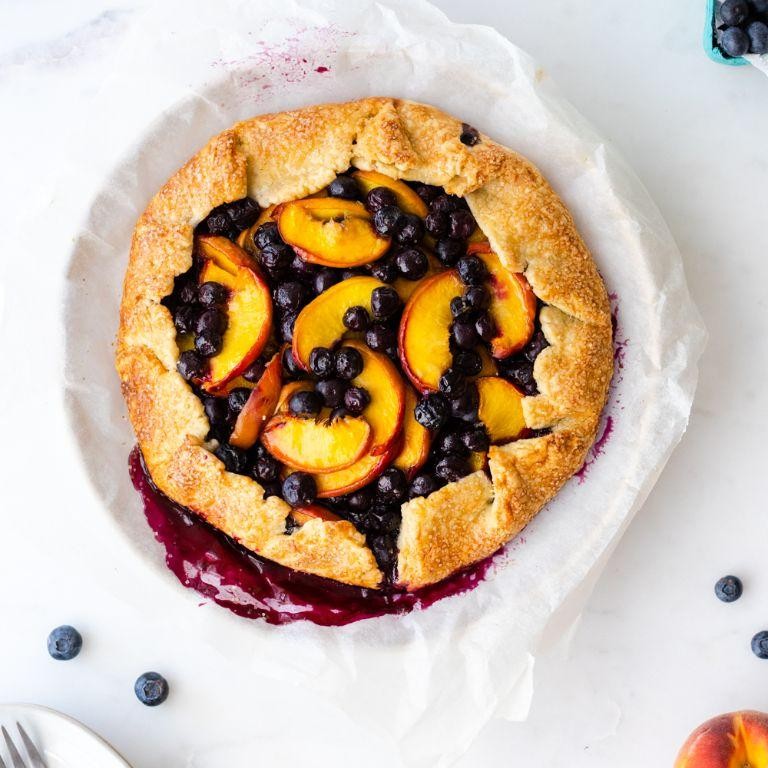
Elegant yet rustic, this peach and blueberry galette celebrates summer’s finest fruits in their purest form. Imagine sweet peaches and tart blueberries nestled in a buttery, flaky crust that requires no special pan or precise shaping. This free-form tart embraces imperfection while delivering sophisticated flavors that will impress at any gathering.
6
servings30
minutes40
minutesIngredients
– 1 1/4 cups all-purpose flour
– 1/2 teaspoon salt
– 1/2 cup unsalted butter, cold
– 3-4 tablespoons ice water
– 2 large peaches, sliced
– 1 cup fresh blueberries
– 1/4 cup granulated sugar
– 1 tablespoon cornstarch
– 1 teaspoon lemon juice
– 1 egg, beaten
– 1 tablespoon coarse sugar
Instructions
1. Combine 1 1/4 cups all-purpose flour and 1/2 teaspoon salt in a large bowl.
2. Cut 1/2 cup cold unsalted butter into 1/2-inch cubes and add to the flour mixture.
3. Use your fingers or a pastry cutter to work the butter into the flour until pea-sized crumbs form.
4. Gradually add 3-4 tablespoons ice water, one tablespoon at a time, mixing until the dough just comes together.
5. Shape the dough into a disk, wrap in plastic wrap, and refrigerate for 30 minutes.
6. While dough chills, combine 2 sliced peaches, 1 cup blueberries, 1/4 cup granulated sugar, 1 tablespoon cornstarch, and 1 teaspoon lemon juice in a medium bowl.
7. Roll the chilled dough into a 12-inch circle on a floured surface.
8. Transfer the dough circle to a parchment-lined baking sheet.
9. Arrange the fruit mixture in the center of the dough, leaving a 2-inch border.
10. Fold the edges of the dough over the fruit, pleating as you go.
11. Brush the dough edges with 1 beaten egg and sprinkle with 1 tablespoon coarse sugar.
12. Bake at 375°F for 35-40 minutes until the crust is golden brown and fruit is bubbling.
13. Cool on the baking sheet for 15 minutes before transferring to a wire rack.
Heavenly when served warm, this galette offers a delightful contrast between the crisp, buttery crust and the tender, jammy fruit filling. For an elegant presentation, dust with powdered sugar just before serving, or accompany with a scoop of vanilla bean ice cream that slowly melts into the warm fruit. The combination of sweet peaches and tart blueberries creates a balanced flavor profile that tastes like summer in every bite.
Mango and Avocado Salsa
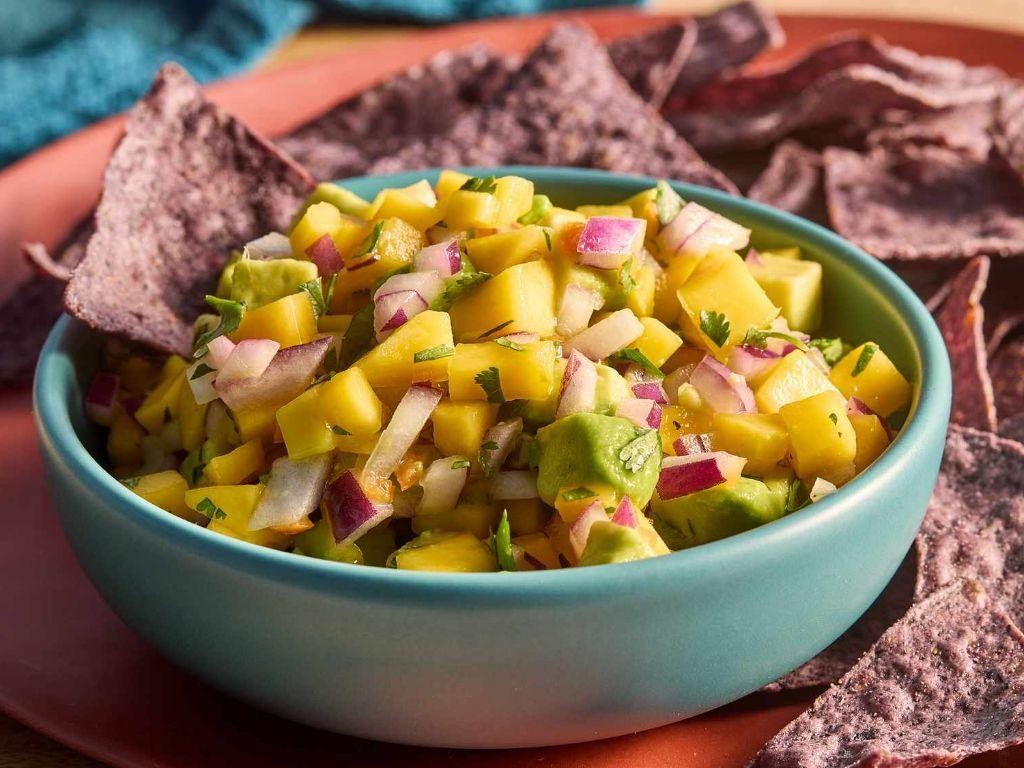
Captivating in its vibrant simplicity, this mango and avocado salsa brings together tropical sweetness and creamy richness in perfect harmony. Combining jewel-toned fruits with zesty lime and aromatic herbs creates a refreshing condiment that elevates everything from grilled fish to crispy tortilla chips. Each spoonful offers a delightful contrast of textures and flavors that will transport your taste buds to sun-drenched destinations.
25
minutesIngredients
– 2 cups diced ripe mango
– 1 cup diced ripe avocado
– 1/4 cup finely chopped red onion
– 2 tbsp freshly squeezed lime juice
– 1/4 cup chopped fresh cilantro
– 1 tbsp minced jalapeño
– 1/2 tsp kosher salt
Instructions
1. Peel and dice 2 cups of ripe mango into 1/4-inch cubes, ensuring the fruit yields slightly to gentle pressure when selecting for optimal sweetness.
2. Cut 1 cup of ripe avocado into 1/4-inch cubes, gently tossing them with 1 tablespoon of the lime juice immediately to prevent browning.
3. Finely chop 1/4 cup of red onion, then soak the pieces in ice water for 5 minutes to mellow their sharpness before draining thoroughly.
4. Mince 1 tablespoon of jalapeño, removing the seeds and membranes for milder heat if preferred.
5. Chop 1/4 cup of fresh cilantro leaves, avoiding the stems which can impart bitterness.
6. Combine the diced mango, avocado, drained red onion, minced jalapeño, and chopped cilantro in a medium mixing bowl.
7. Add the remaining 1 tablespoon of lime juice and 1/2 teaspoon of kosher salt to the bowl.
8. Gently fold all ingredients together using a rubber spatula until just combined, being careful not to mash the avocado.
9. Let the salsa rest at room temperature for 15 minutes to allow the flavors to meld before serving.
Vibrant and texturally complex, this salsa offers a delightful interplay between the juicy mango cubes and creamy avocado chunks. The bright acidity of lime beautifully balances the natural sweetness, while the jalapeño provides a subtle warmth that lingers pleasantly. Serve it alongside grilled shrimp skewers for an elegant appetizer, or spoon it over blackened fish tacos for a refreshing contrast to smoky flavors.
Cherry and Almond Clafoutis
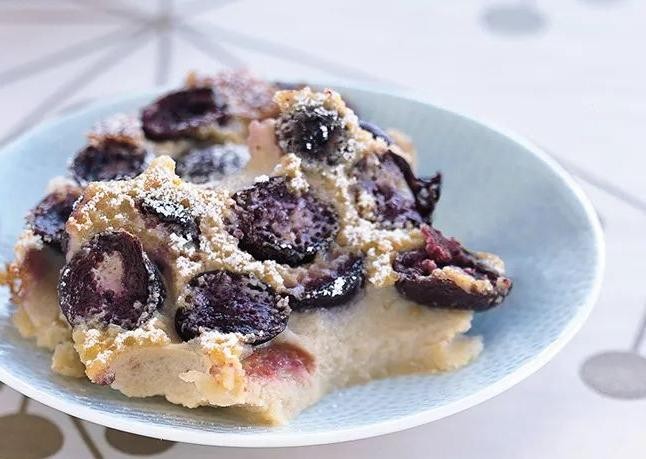
Meticulously balancing rustic charm with sophisticated elegance, this cherry and almond clafoutis transforms simple orchard fruits into a stunning dessert centerpiece. The tender batter cradles jewel-like cherries while toasted almonds provide delicate crunch and nutty depth. This classic French preparation achieves that perfect balance between custard-like softness and cake-like structure that makes it equally suited for afternoon tea or elegant dinner parties.
8
servings15
minutes40
minutesIngredients
– 1 cup whole milk
– 3 large eggs
– 1/2 cup granulated sugar
– 1/2 cup all-purpose flour
– 1/4 teaspoon salt
– 1 teaspoon vanilla extract
– 1/4 teaspoon almond extract
– 2 cups fresh cherries, pitted
– 1/4 cup sliced almonds
– 1 tablespoon unsalted butter
– 2 tablespoons powdered sugar
Instructions
1. Preheat your oven to 350°F and position a rack in the center of the oven.
2. Generously butter a 9-inch pie dish or ceramic baking dish using the 1 tablespoon of unsalted butter, ensuring complete coverage including the sides.
3. Arrange the 2 cups of pitted cherries in a single layer across the bottom of the buttered dish.
4. In a medium mixing bowl, whisk together 3 large eggs and 1/2 cup granulated sugar for exactly 2 minutes until the mixture becomes pale yellow and slightly thickened.
5. Gradually add 1/2 cup all-purpose flour while continuously whisking to prevent lumps from forming.
6. Pour in 1 cup whole milk, 1 teaspoon vanilla extract, and 1/4 teaspoon almond extract, whisking until the batter becomes completely smooth.
7. Add 1/4 teaspoon salt and whisk for 30 seconds more to ensure even distribution throughout the batter.
8. Carefully pour the batter over the cherries in the prepared dish, ensuring the cherries remain evenly distributed.
9. Sprinkle 1/4 cup sliced almonds evenly across the surface of the batter.
10. Bake at 350°F for 35-40 minutes until the edges are golden brown and the center appears set with a slight jiggle when gently shaken.
11. Remove from oven and let cool on a wire rack for 20 minutes to allow the custard to set properly.
12. Dust the surface evenly with 2 tablespoons of powdered sugar using a fine-mesh sieve for professional presentation.
Creating contrasting textures between the creamy custard base and burst cherries makes each bite dynamic. The almond extract subtly enhances the nutty topping while complementing the cherries’ natural tartness. Consider serving warm with a dollop of crème fraîche or alongside an espresso for a sophisticated finish.
Kiwi and Banana Smoothie Bowl
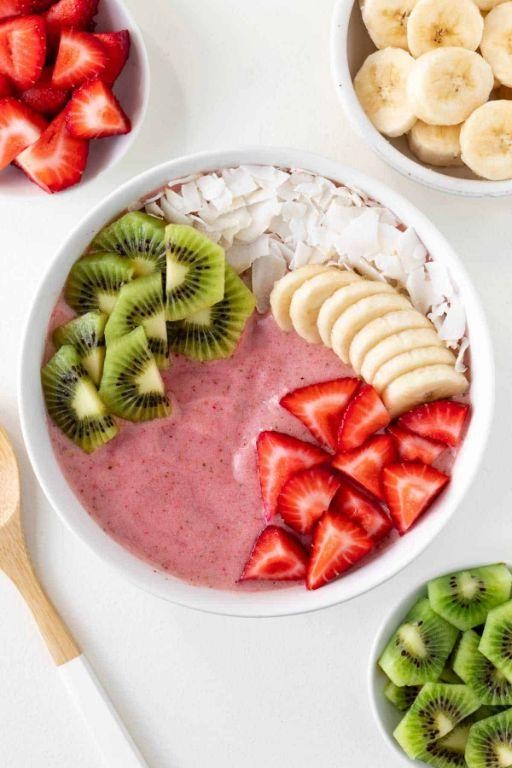
Zestful mornings call for vibrant beginnings, and this kiwi and banana smoothie bowl delivers both visual appeal and nutritional excellence. The brilliant green hue from fresh kiwis pairs beautifully with the creamy sweetness of ripe bananas, creating a breakfast masterpiece that energizes the senses while nourishing the body from within.
1
bowl10
minutesIngredients
– 2 medium ripe bananas
– 3 fresh kiwis
– 1/2 cup plain Greek yogurt
– 1/4 cup unsweetened almond milk
– 1 tablespoon honey
– 1/4 cup granola
– 2 tablespoons sliced almonds
– 1/4 cup fresh blueberries
Instructions
1. Peel 2 medium ripe bananas and slice them into 1-inch pieces. 2. Peel 3 fresh kiwis and cut them into quarters. 3. Combine the banana pieces, kiwi quarters, 1/2 cup plain Greek yogurt, 1/4 cup unsweetened almond milk, and 1 tablespoon honey in a high-speed blender. 4. Blend the mixture on high speed for 45-60 seconds until completely smooth and creamy. 5. Pour the smoothie base into a shallow bowl, using the back of a spoon to create an even layer. 6. Sprinkle 1/4 cup granola evenly over one section of the smoothie surface. 7. Arrange 2 tablespoons sliced almonds in a separate section for contrasting texture. 8. Scatter 1/4 cup fresh blueberries across the remaining area to create visual interest. The resulting texture combines velvety smoothness with satisfying crunch from the toppings, while the flavor profile balances tropical sweetness with subtle tartness. This vibrant bowl makes an impressive centerpiece for brunch gatherings or a luxurious start to any weekday morning when served in handmade ceramic bowls that highlight its beautiful colors.
Pomegranate and Apple Spinach Salad
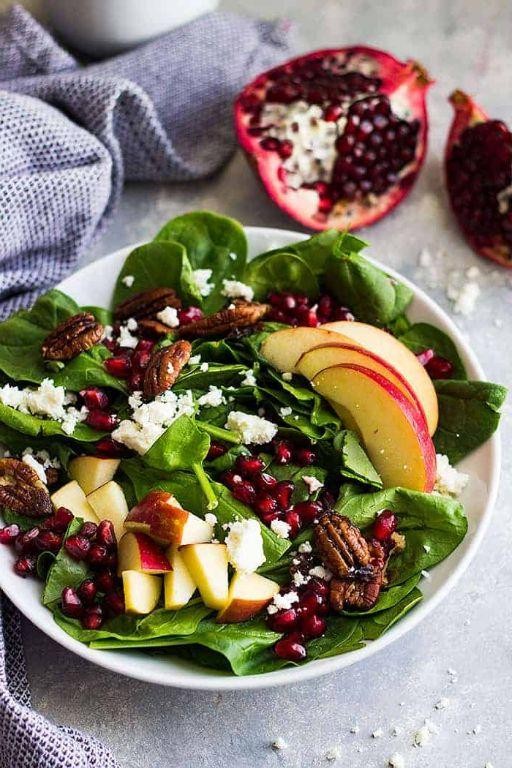
Savor the crisp transition of seasons with this vibrant salad, where jewel-toned pomegranate arils mingle with thinly sliced apples atop a bed of tender spinach. Each bite offers a delightful contrast of sweet and tart flavors, elevated by the subtle crunch of toasted walnuts and the creamy richness of crumbled feta. This elegant composition not only pleases the palate but creates a stunning visual centerpiece for any autumn table.
3
servings15
minutes4
minutesIngredients
– 6 cups fresh spinach
– 1 large apple
– 1/2 cup pomegranate arils
– 1/4 cup chopped walnuts
– 1/4 cup crumbled feta cheese
– 2 tablespoons olive oil
– 1 tablespoon honey
– 1 tablespoon lemon juice
– 1/4 teaspoon salt
– 1/8 teaspoon black pepper
Instructions
1. Wash 6 cups of fresh spinach thoroughly and spin dry in a salad spinner to ensure no excess water remains, which helps the dressing cling better.
2. Core 1 large apple and slice it into very thin half-moons approximately 1/8-inch thick to prevent browning and ensure even distribution throughout the salad.
3. Toast 1/4 cup of chopped walnuts in a dry skillet over medium heat for 3-4 minutes, stirring frequently until fragrant and lightly golden, then immediately transfer to a plate to cool.
4. In a small bowl, whisk together 2 tablespoons olive oil, 1 tablespoon honey, 1 tablespoon lemon juice, 1/4 teaspoon salt, and 1/8 teaspoon black pepper until fully emulsified.
5. Place the dried spinach in a large serving bowl and drizzle with half of the dressing, gently tossing to coat each leaf without bruising the delicate greens.
6. Arrange the apple slices over the dressed spinach, then scatter 1/2 cup pomegranate arils, toasted walnuts, and 1/4 cup crumbled feta cheese evenly across the top.
7. Drizzle the remaining dressing over the assembled salad just before serving to maintain optimal texture and prevent wilting.
Vibrant and texturally complex, this salad delivers crisp apples against velvety spinach with bursts of juicy pomegranate. The toasted walnuts provide earthy depth while the feta adds a salty counterpoint to the honey-lemon dressing. For an elegant presentation, serve individual portions on chilled plates garnished with extra pomegranate arils.
Raspberry and Nutella Puff Pastries

Beneath their golden, flaky exterior lies a delightful surprise of sweet-tart raspberries and rich chocolate hazelnut spread, these elegant pastries transform simple ingredients into an impressive treat perfect for brunch gatherings or afternoon indulgence. Their effortless preparation belies the sophisticated flavor profile that emerges from the harmonious marriage of fruity brightness and decadent creaminess. With just a few quality components and minimal hands-on time, you can create bakery-worthy confections that will captivate both casual snackers and discerning dessert enthusiasts alike.
6
portions15
minutes20
minutesIngredients
- 1 sheet frozen puff pastry
- 1/2 cup Nutella
- 1 cup fresh raspberries
- 1 large egg
- 1 tablespoon water
- 1 tablespoon powdered sugar
Instructions
- Thaw the frozen puff pastry sheet at room temperature for 40 minutes until pliable but still cool to the touch.
- Preheat your oven to 400°F and line a baking sheet with parchment paper.
- Unfold the puff pastry sheet on a lightly floured surface, smoothing any creases with a rolling pin.
- Cut the pastry into 6 equal rectangles using a sharp knife or pizza cutter for clean edges.
- Place 1 tablespoon of Nutella in the center of each rectangle, leaving a 1/2-inch border around all edges.
- Arrange 5-6 raspberries over the Nutella on each pastry, gently pressing them into the spread.
- Beat the egg with 1 tablespoon of water in a small bowl to create an egg wash.
- Brush the exposed pastry edges with the egg wash using a pastry brush, which will help create a golden-brown crust.
- Fold each pastry in half diagonally to form triangles, pressing the edges firmly together with your fingers.
- Crimp the sealed edges with a fork to ensure they don’t separate during baking.
- Brush the tops of all pastries with the remaining egg wash for maximum shine and color development.
- Transfer the pastries to the prepared baking sheet, spacing them 2 inches apart to allow for even heat circulation.
- Bake for 18-20 minutes until the pastries are puffed and deep golden brown with no pale, doughy spots visible.
- Cool the pastries on the baking sheet for 5 minutes before transferring to a wire rack.
- Sift powdered sugar over the warm pastries just before serving for a professional finishing touch.
Marvel at the contrast between the shatteringly crisp layers and the molten, jammy filling that bursts with bright berry acidity against the smooth chocolate backdrop. The delicate balance of textures—from the featherlight pastry to the juicy fruit pockets—creates an experience that feels both rustic and refined. For an extra touch of elegance, serve these warm with a dollop of vanilla bean ice cream or alongside an espresso martini for a sophisticated dessert pairing.
Cantaloupe and Prosciutto Skewers

Crafted with the perfect balance of sweet and savory, these elegant cantaloupe and prosciutto skewers transform simple ingredients into sophisticated bites ideal for entertaining. Combining juicy, ripe melon with delicate, salty prosciutto creates a harmonious flavor profile that delights the palate. This effortless appetizer requires minimal preparation yet delivers maximum impact, making it perfect for both casual gatherings and formal occasions.
12
skewers15
minutesIngredients
– 1 medium cantaloupe
– 8 thin slices prosciutto
– 2 tablespoons extra virgin olive oil
– 1 tablespoon fresh lime juice
– 1/4 teaspoon flaky sea salt
– 1/4 teaspoon freshly ground black pepper
– 12 small fresh mint leaves
– 12 (6-inch) wooden skewers
Instructions
1. Cut the cantaloupe in half lengthwise using a sharp chef’s knife and scoop out all seeds with a spoon.
2. Remove the rind completely by slicing it away from the flesh in downward motions.
3. Cut the cantaloupe flesh into 1-inch cubes, ensuring uniform size for even presentation.
4. Cut each prosciutto slice in half lengthwise to create 16 long, thin strips.
5. Wrap one prosciutto strip around each cantaloupe cube, leaving some melon exposed at the top and bottom.
6. Thread one prosciutto-wrapped cantaloupe cube onto each wooden skewer, pushing through the center.
7. Place one fresh mint leaf directly beneath each cantaloupe cube on the skewer.
8. Arrange all completed skewers in a single layer on a serving platter.
9. Whisk together the extra virgin olive oil and fresh lime juice in a small bowl until emulsified.
10. Drizzle the olive oil and lime mixture evenly over all skewers using a spoon.
11. Sprinkle the flaky sea salt and freshly ground black pepper evenly over the skewers.
12. Let the skewers rest at room temperature for 10 minutes before serving to allow flavors to meld.
Buttery prosciutto melts against the cool, crisp cantaloupe, while the mint adds a refreshing herbal note that cuts through the richness. The delicate crunch of flaky salt enhances both the sweet fruit and savory meat, creating a textural symphony in each bite. For an elegant presentation, arrange these skewers on a bed of arugula drizzled with the remaining dressing, or serve alongside chilled rosé for the perfect summer pairing.
Blackberry and Lemon Cheesecake Bars
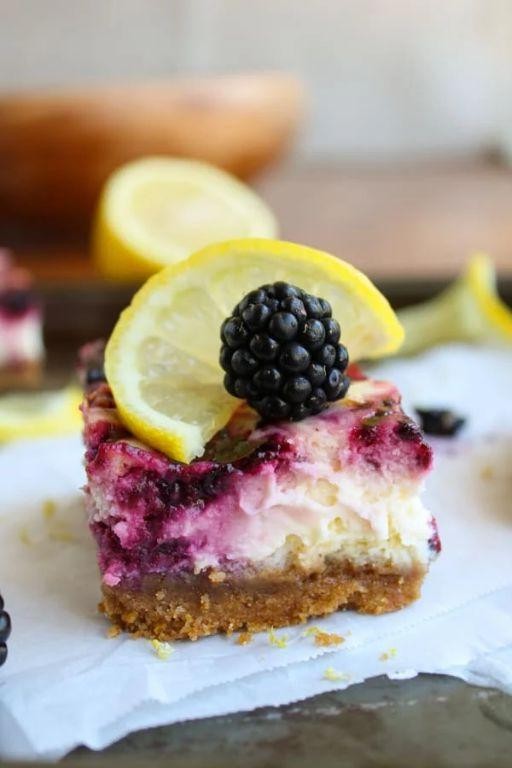
Wandering through late summer markets, one cannot help but be captivated by the deep purple allure of blackberries, their tart sweetness perfectly complemented by the bright zing of lemon in these sophisticated cheesecake bars. With a buttery shortbread crust and creamy filling punctuated by jewel-toned fruit, this dessert elevates simple ingredients into an elegant treat. These bars strike that ideal balance between rich indulgence and refreshing brightness, making them perfect for everything from casual gatherings to more formal occasions.
16
bars30
minutes50
minutesIngredients
– 2 cups graham cracker crumbs
– 1/2 cup unsalted butter, melted
– 1/4 cup granulated sugar
– 16 oz cream cheese, softened to room temperature
– 3/4 cup granulated sugar
– 2 large eggs, room temperature
– 1/4 cup fresh lemon juice
– 1 tbsp lemon zest
– 1 tsp pure vanilla extract
– 1 1/2 cups fresh blackberries
Instructions
1. Preheat your oven to 350°F and line an 8×8-inch baking pan with parchment paper, allowing excess to hang over two opposite sides for easy removal.
2. Combine graham cracker crumbs, melted butter, and 1/4 cup sugar in a medium bowl until the mixture resembles wet sand and holds together when pressed.
3. Firmly press the crust mixture into the bottom of the prepared pan using the flat bottom of a measuring cup to create an even, compact layer.
4. Bake the crust for 10 minutes until lightly golden and fragrant, then transfer to a wire rack to cool slightly while you prepare the filling.
5. Using an electric mixer on medium speed, beat the softened cream cheese and 3/4 cup sugar together for 2-3 minutes until completely smooth and no lumps remain.
6. Add eggs one at a time, beating for 30 seconds after each addition until fully incorporated and the mixture appears creamy.
7. Mix in lemon juice, lemon zest, and vanilla extract until just combined, being careful not to overmix which can incorporate too much air.
8. Gently fold in 1 cup of blackberries using a spatula, taking care not to break the berries to prevent the filling from turning purple.
9. Pour the filling over the pre-baked crust and spread evenly with an offset spatula.
10. Arrange the remaining 1/2 cup blackberries evenly across the top, pressing them lightly into the filling.
11. Bake for 35-40 minutes until the edges are set but the center still has a slight jiggle when gently shaken.
12. Turn off the oven and prop the door open with a wooden spoon, allowing the bars to cool gradually in the oven for 1 hour to prevent cracking.
13. Transfer the pan to a wire rack to cool completely to room temperature, about 2 hours.
14. Refrigerate for at least 4 hours, or preferably overnight, to allow the bars to fully set before slicing.
15. Using the parchment paper overhang, lift the entire block from the pan and place on a cutting board.
16. Use a sharp knife dipped in hot water and wiped clean between cuts to slice into 16 clean squares.
Zesty lemon cuts through the rich cream cheese filling, while the blackberries provide bursts of jammy sweetness against the crisp graham cracker base. The texture achieves perfect harmony between the firm crust, velvety filling, and tender fruit. For an elegant presentation, dust with powdered sugar and garnish with fresh mint sprigs alongside a glass of sparkling rosé.
Dragon Fruit and Pineapple Cups

Captivating in both presentation and flavor, these Dragon Fruit and Pineapple Cups offer a sophisticated tropical escape. Combining the subtle sweetness of dragon fruit with pineapple’s vibrant acidity creates a refreshing dessert that feels both indulgent and light. This elegant preparation transforms simple ingredients into a visually stunning dish perfect for entertaining or special occasions.
2
cups25
minutesIngredients
– 2 medium dragon fruits
– 1 fresh pineapple
– 2 tablespoons honey
– 1 tablespoon fresh lime juice
– 1/4 cup toasted coconut flakes
– 2 tablespoons chopped fresh mint
Instructions
1. Cut both dragon fruits in half lengthwise using a sharp chef’s knife.
2. Scoop out the dragon fruit flesh with a melon baller, leaving 1/4-inch thick shells intact.
3. Place the dragon fruit shells on a parchment-lined baking sheet and refrigerate for 15 minutes to chill.
4. Peel the pineapple completely, removing all eyes and tough outer skin.
5. Cut the pineapple into 1/2-inch cubes, discarding the tough core.
6. Combine the dragon fruit balls and pineapple cubes in a medium mixing bowl.
7. Drizzle the honey and lime juice over the fruit mixture.
8. Gently toss the fruit with a rubber spatula until evenly coated with the honey-lime mixture.
9. Remove the chilled dragon fruit shells from the refrigerator.
10. Spoon the fruit mixture evenly into the four dragon fruit shells using a slotted spoon to drain excess liquid.
11. Sprinkle the toasted coconut flakes evenly over each filled dragon fruit cup.
12. Garnish each cup with the chopped fresh mint just before serving.
13. Serve immediately or refrigerate for up to 30 minutes before serving.
The contrasting textures of creamy dragon fruit and juicy pineapple create a delightful mouthfeel, while the honey-lime dressing enhances the natural tropical sweetness. For an elegant presentation, serve these cups on individual chilled plates garnished with edible flowers, making them perfect for brunch or as a light dessert finale.
Apricot and Goat Cheese Crostini
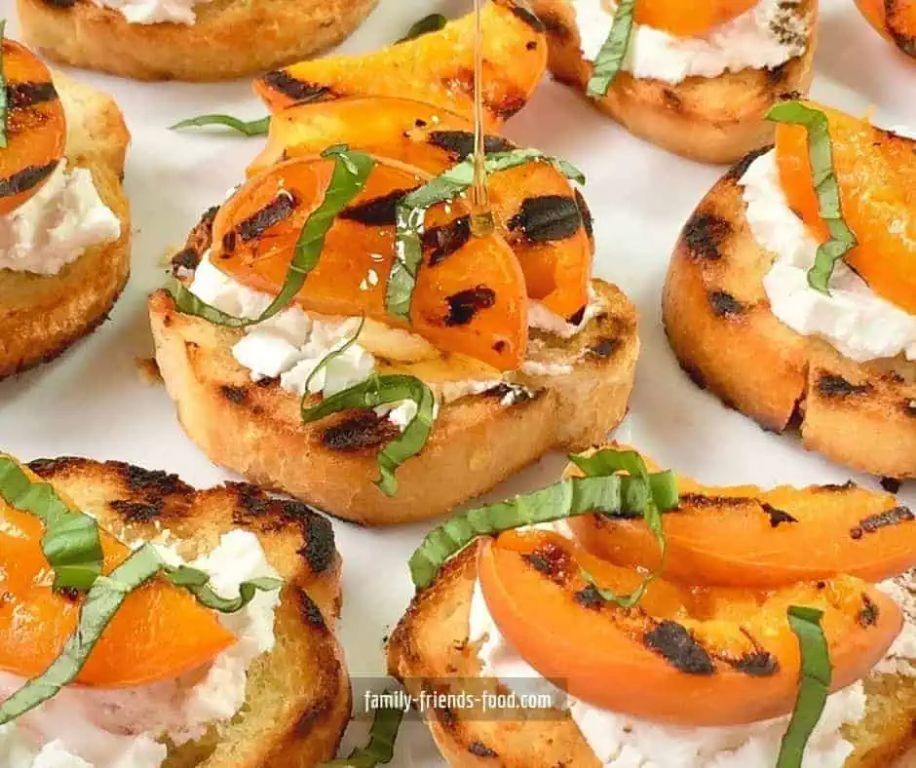
Elegant yet approachable, these apricot and goat cheese crostini transform simple ingredients into sophisticated bites perfect for entertaining. The sweet-tart apricot preserves create a beautiful contrast with the creamy, tangy goat cheese atop crisp, golden toast. With just minutes of preparation, you can create an impressive appetizer that delights both the palate and the eye.
12
crostini10
minutes10
minutesIngredients
– 1 baguette
– 2 tablespoons olive oil
– 4 ounces goat cheese
– 1/2 cup apricot preserves
– 1/4 cup fresh thyme leaves
– 1/4 teaspoon flaky sea salt
– 1/4 teaspoon black pepper
Instructions
1. Preheat your oven to 375°F and line a baking sheet with parchment paper.
2. Slice the baguette into 1/2-inch thick diagonal pieces using a serrated knife for clean cuts.
3. Arrange the bread slices in a single layer on the prepared baking sheet.
4. Brush both sides of each bread slice lightly with olive oil using a pastry brush.
5. Bake for 8-10 minutes until the edges are golden brown and the centers are crisp.
6. Remove the toasted crostini from the oven and let them cool completely on a wire rack to prevent sogginess.
7. Spread approximately 1 teaspoon of goat cheese evenly across each cooled crostini base.
8. Top the goat cheese layer with 1/2 teaspoon of apricot preserves, spreading gently to cover the cheese.
9. Sprinkle fresh thyme leaves evenly over each crostini for herbal fragrance.
10. Finish each crostini with a pinch of flaky sea salt and a crack of black pepper. Unforgettable in both texture and flavor, these crostini offer a delightful crunch that gives way to creamy cheese and sweet fruit preserves. The thyme adds an earthy note that balances the sweetness beautifully, while the flaky salt provides occasional bursts of salinity. Consider serving them alongside a crisp white wine or as part of a larger charcuterie board for an elegant presentation.
Conclusion
So many vibrant, shareable dishes to make your next gathering unforgettable! From refreshing fruit salads to decadent desserts, this collection has something for every taste. We hope these recipes inspire you to create delicious memories with friends and family. Try your favorites, leave a comment below telling us which one you loved most, and don’t forget to share this roundup on Pinterest!


