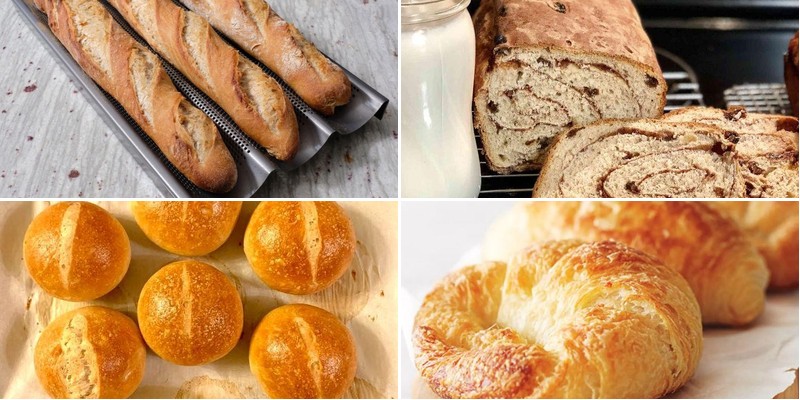
There’s something magical about the aroma of freshly baked goods filling your kitchen, isn’t there? Whether you’re craving warm bread, flaky pastries, or decadent desserts, these flour-based bakery recipes will transform your home into the coziest bakery in town. Get ready to roll up your sleeves and discover 22 irresistible treats that will have everyone asking for seconds!
Rustic Sourdough Bread
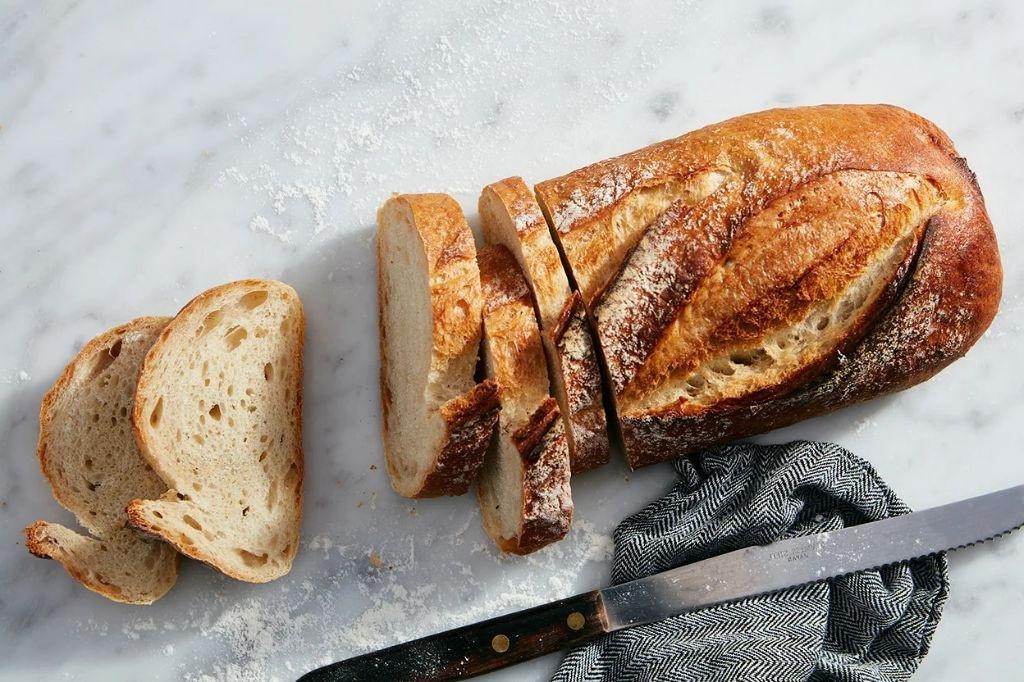
A warm, crusty loaf of sourdough is one of life’s simple pleasures. You get that satisfying crackle when you slice into it, and the tangy aroma fills your kitchen. It’s easier than you think to make your own rustic version at home.
Ingredients
– 1 cup of bubbly sourdough starter
– 3 ½ cups of bread flour
– 1 ½ cups of warm water
– 2 teaspoons of fine sea salt
– A splash of olive oil for greasing
– A couple of tablespoons of rice flour for dusting
Instructions
1. In a large bowl, combine 1 cup of bubbly sourdough starter with 1 ½ cups of warm water and whisk until milky.
2. Add 3 ½ cups of bread flour and mix with a spatula until no dry spots remain.
3. Cover the bowl with a damp kitchen towel and let it rest for 30 minutes at room temperature.
4. Sprinkle 2 teaspoons of fine sea salt over the dough and dimple it in with wet fingers.
5. Stretch and fold the dough in the bowl every 30 minutes for 2 hours, turning the bowl a quarter turn each time.
6. Tip the dough onto a lightly floured surface and shape it into a tight ball.
7. Place the dough seam-side up in a proofing basket dusted with a couple of tablespoons of rice flour.
8. Cover the basket with plastic and refrigerate for 12-16 hours to develop flavor.
9. Preheat your oven to 500°F with a Dutch oven inside for 45 minutes.
10. Turn the dough out onto parchment paper and score the top with a sharp blade.
11. Carefully lower the dough into the hot Dutch oven and spritz the inside with water.
12. Bake covered at 500°F for 20 minutes until the crust is lightly golden.
13. Remove the lid, reduce the oven temperature to 450°F, and bake for 25 more minutes until deeply browned.
14. Transfer the loaf to a wire rack and let it cool completely for 2 hours before slicing.
Really, that first slice reveals an airy crumb with those classic irregular holes. The crust shatters beautifully while the interior stays moist and tangy. Try toasting thick slices and topping them with smashed avocado and flaky sea salt for the ultimate breakfast treat.
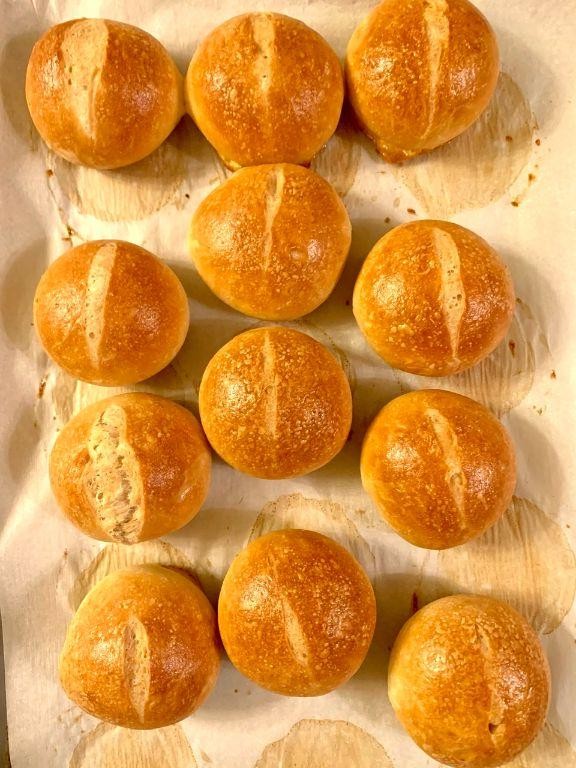
Fluffy Brioche Buns

Warm, buttery brioche buns are the ultimate homemade treat—soft, slightly sweet, and perfect for burgers, sandwiches, or just slathering with jam. You’ll be amazed how easy they are to make from scratch, and that heavenly smell filling your kitchen? Pure bliss. Let’s get baking!
Ingredients
– 3 ½ cups of all-purpose flour
– ½ cup of warm whole milk (around 110°F)
– ¼ cup of granulated sugar
– 2 large eggs, plus one more for that glossy egg wash
– ½ cup of unsalted butter, softened
– 1 packet of active dry yeast
– 1 tsp of fine sea salt
– A splash of warm water to wake up the yeast
Instructions
1. In a small bowl, combine the yeast with the splash of warm water and a pinch of sugar—let it sit for 5 minutes until it’s foamy and active.
2. In a large mixing bowl, whisk together the flour, sugar, and salt until well combined.
3. Make a well in the center of the dry ingredients and pour in the yeast mixture, warm milk, and 2 eggs.
4. Mix everything with a wooden spoon until a shaggy dough forms, then turn it out onto a lightly floured surface.
5. Knead the dough for 8–10 minutes, adding the softened butter a tablespoon at a time, until the dough is smooth, elastic, and slightly tacky. Tip: If the dough sticks to your hands, dust with a little more flour, but avoid adding too much—this keeps the buns tender.
6. Place the dough in a lightly oiled bowl, cover it with a damp kitchen towel, and let it rise in a warm spot for 1–1.5 hours, or until doubled in size.
7. Punch down the dough to release air, then divide it into 8 equal pieces and shape each into a smooth ball.
8. Arrange the dough balls on a parchment-lined baking sheet, spacing them about 2 inches apart.
9. Cover the buns loosely with the towel and let them rise again for 45–60 minutes, until puffy. Tip: For an extra-soft crust, place a pan of hot water on the oven rack below during the second rise to create steam.
10. Preheat your oven to 375°F.
11. Whisk the remaining egg with a tablespoon of water and gently brush it over the risen buns for a golden shine.
12. Bake for 18–20 minutes, rotating the pan halfway through, until the buns are deeply golden and sound hollow when tapped on the bottom. Tip: Use an instant-read thermometer—the buns are done when they reach an internal temperature of 190°F.
13. Transfer the buns to a wire rack to cool completely.
Zesty and rich, these brioche buns have a featherlight crumb and a subtle sweetness that pairs wonderfully with savory fillings. Try splitting one warm and loading it with pulled pork and tangy coleslaw, or simply enjoy it fresh from the oven with a smear of honey butter.
Classic Croissants

Let’s be real—there’s nothing quite like that first bite of a warm, buttery croissant fresh from the oven. You get that shatteringly crisp exterior giving way to all those soft, airy layers inside. Making them at home is a project, but so worth it for that incredible homemade flavor.
Ingredients
You’ll need about 4 cups of all-purpose flour, a couple of teaspoons of active dry yeast, a good pinch of salt, a quarter cup of granulated sugar, a cup of warm milk, a couple of tablespoons of unsalted butter for the dough, and a whole cup of cold unsalted butter for laminating. Don’t forget an egg for that golden finish!
Instructions
1. Combine the warm milk, yeast, and sugar in a large bowl and let it sit for 5 minutes until it becomes foamy. 2. Mix in the flour, salt, and the 2 tablespoons of softened butter until a shaggy dough forms. 3. Knead the dough on a floured surface for 8-10 minutes until it becomes smooth and elastic. 4. Place the dough in a lightly oiled bowl, cover it, and let it rise in a warm spot for 1-1.5 hours until it doubles in size. 5. While the dough rises, pound the cold cup of butter between two sheets of parchment paper into an 8×5-inch rectangle. 6. Roll the risen dough out on a floured surface into a 10×15-inch rectangle. 7. Place the butter rectangle in the center of the dough and fold the dough over it like a letter, sealing the edges completely. 8. Roll the dough out again into a long rectangle, then fold it into thirds again—this is your first turn. 9. Wrap the dough in plastic and chill it in the refrigerator for 30 minutes. 10. Repeat the rolling and folding process two more times, chilling for 30 minutes between each turn. 11. After the final chill, roll the dough out to about 1/4-inch thickness. 12. Cut the dough into long triangles, about 4 inches wide at the base. 13. Gently stretch each triangle slightly, then roll them up tightly starting from the wide end. 14. Curve the ends inward to create the classic crescent shape. 15. Place the shaped croissants on a parchment-lined baking sheet, leaving space between them. 16. Cover them lightly and let them proof at room temperature for 1.5-2 hours until they’re noticeably puffy. 17. Preheat your oven to 400°F. 18. Beat the egg with a splash of water and brush it gently over the croissants. 19. Bake for 15-18 minutes until they’re deeply golden brown and flaky. 20. Transfer them to a wire rack to cool slightly. Tip: Keep your butter cold throughout the process—warm butter will melt into the dough instead of creating those distinct layers. Tip: Don’t rush the proofing—properly proofed croissants will feel light and jiggle slightly when you shake the pan. Tip: Use a sharp knife or pizza cutter to cut your triangles cleanly for the best rise. They’re best enjoyed warm, when the exterior cracks with every bite and the interior stays wonderfully tender. Try splitting one and filling it with ham and cheese for a quick breakfast sandwich, or simply enjoy it with your morning coffee—pure bliss.
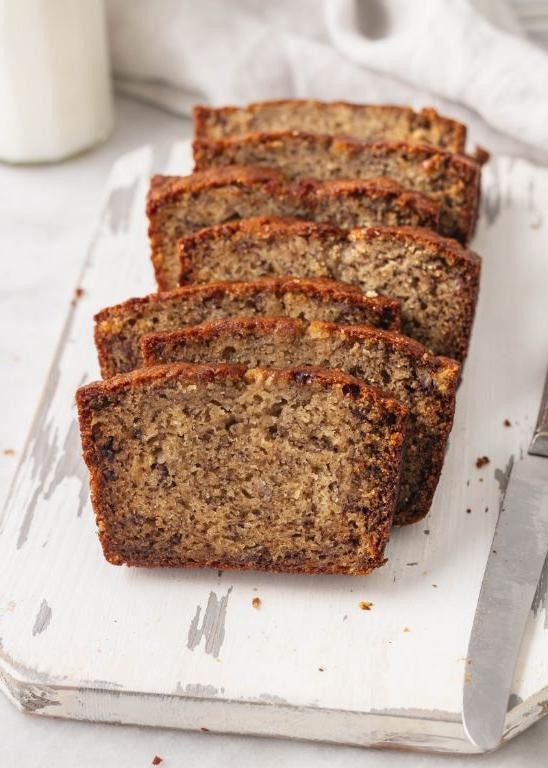
Moist Banana Bread
Remember that bunch of bananas turning brown on your counter? That’s actually the perfect start to the most moist banana bread you’ll ever bake. You’re about to turn those forgotten fruits into something truly special that fills your kitchen with the coziest aroma.
Ingredients
– 3 really ripe bananas (the spottier, the better!)
– 1/3 cup melted butter
– 1 teaspoon baking soda
– A good pinch of salt
– 3/4 cup granulated sugar
– 1 large egg, beaten
– 1 teaspoon vanilla extract
– 1 1/2 cups all-purpose flour
– A couple of tablespoons of milk if your batter seems too thick
Instructions
1. Preheat your oven to 350°F and grease a 9×5 inch loaf pan.
2. In a large mixing bowl, mash those ripe bananas with a fork until smooth with just a few small lumps.
3. Stir the melted butter into the mashed bananas until fully combined.
4. Mix in the baking soda and salt, making sure they’re evenly distributed.
5. Add the sugar, beaten egg, and vanilla extract, stirring until everything is well incorporated.
6. Gently fold in the flour until just combined—don’t overmix or your bread will be tough.
7. Check your batter’s consistency; if it seems too thick, stir in a couple tablespoons of milk.
8. Pour the batter into your prepared loaf pan and smooth the top with a spatula.
9. Bake for 55-65 minutes, or until a toothpick inserted into the center comes out clean.
10. Let the bread cool in the pan for 10 minutes before transferring to a wire rack.
Moist doesn’t even begin to describe this banana bread—it’s practically pudding-like in the best way possible. The deep banana flavor shines through with just the right amount of sweetness. Try toasting a slice and slathering it with peanut butter for the ultimate breakfast treat, or enjoy it warm with a cold glass of milk.
Homemade Naan Bread

Kneading your own naan bread is way easier than you’d think, and the results are so much better than store-bought. You get that perfect chewy texture and those beautiful charred bubbles that make restaurant naan so irresistible. Let’s get those dough balls rolling!
Ingredients
– 3 cups of all-purpose flour
– 1 cup of warm water (around 110°F)
– 1 packet of active dry yeast
– 1 tablespoon of sugar
– 1 teaspoon of salt
– ¼ cup of plain yogurt
– 2 tablespoons of olive oil
– A couple tablespoons of melted butter for brushing
– A sprinkle of garlic powder if you’re feeling fancy
Instructions
1. Combine the warm water, yeast, and sugar in a large bowl and let it sit for 5 minutes until it becomes foamy.
2. Mix in the yogurt, olive oil, and salt until everything is well combined.
3. Gradually add the flour, stirring with a wooden spoon until a shaggy dough forms.
4. Turn the dough out onto a floured surface and knead for 8 minutes until it becomes smooth and elastic.
5. Place the dough in a lightly oiled bowl, cover with a damp kitchen towel, and let it rise in a warm spot for 1 hour until doubled in size.
6. Punch down the dough and divide it into 8 equal pieces, rolling each into a ball.
7. Heat a cast iron skillet over medium-high heat until it’s very hot (about 400°F).
8. Roll one dough ball into an oval shape about ¼-inch thick.
9. Place the rolled dough directly onto the hot, dry skillet and cook for 2 minutes until bubbles form and the bottom has brown spots.
10. Flip the naan and cook for another 1-2 minutes until the other side is cooked through.
11. Remove from the skillet and immediately brush with melted butter and sprinkle with garlic powder if using.
12. Repeat with the remaining dough balls, keeping the cooked naan warm under a clean towel.
Crispy on the outside with that signature soft, chewy interior, this homemade naan has just the right amount of tang from the yogurt. Tear off warm pieces to scoop up your favorite curry, or get creative and use them as flatbread pizzas topped with your go-to ingredients.
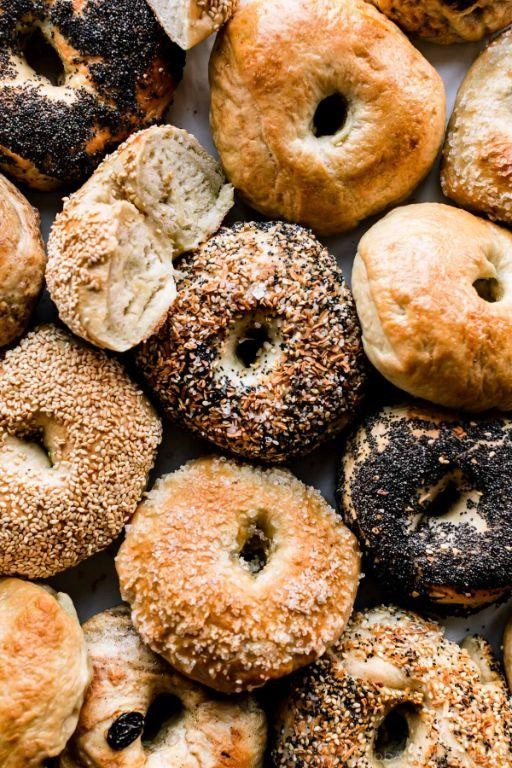
Traditional Bagels
Craving that perfect chewy, golden-brown bagel you get from your favorite bakery? You can totally make them at home, and honestly, they’re way more satisfying when you do. Let’s dive into making some seriously good traditional bagels from scratch.
Ingredients
– 4 cups of bread flour
– 1 ½ cups of warm water (around 110°F)
– 2 tablespoons of granulated sugar
– 2 teaspoons of active dry yeast
– 2 teaspoons of salt
– A big pot of water for boiling
– 2 tablespoons of honey for the water bath
– 1 egg white for that shiny top
– A sprinkle of your favorite toppings like sesame seeds or everything bagel seasoning
Instructions
1. In a large bowl, whisk together the warm water, sugar, and yeast, then let it sit for 5 minutes until it gets foamy.
2. Stir in the bread flour and salt until a shaggy dough forms.
3. Knead the dough on a floured surface for 8-10 minutes until it’s smooth and elastic. Tip: If it sticks, add a little more flour, but don’t overdo it—you want it just tacky, not dry.
4. Place the dough in a lightly oiled bowl, cover it with a damp towel, and let it rise in a warm spot for 1 hour or until doubled in size.
5. Punch down the dough and divide it into 8 equal pieces.
6. Roll each piece into a smooth ball, then poke a hole through the center with your thumb and stretch it to form a bagel shape about 3 inches wide.
7. Place the shaped bagels on a parchment-lined baking sheet, cover them, and let them rest for 20 minutes.
8. Preheat your oven to 425°F and bring a large pot of water to a boil, then stir in the honey.
9. Boil the bagels in batches for 1 minute per side—they should float and get slightly puffy. Tip: Don’t overcrowd the pot; this keeps them from sticking and ensures even cooking.
10. Transfer the boiled bagels back to the baking sheet.
11. Brush the tops with the egg white and sprinkle on your chosen toppings.
12. Bake for 20-25 minutes until they’re deep golden brown and sound hollow when tapped. Tip: Rotate the baking sheet halfway through for even browning.
Ultimate bagel bliss! You’ll love that crisp crust giving way to a soft, chewy interior with just a hint of sweetness from the boil. Slice one warm and slather it with cream cheese, or get fancy by toasting it for a breakfast sandwich—either way, it’s pure comfort in every bite.
Golden Dinner Rolls
Craving that perfect, buttery dinner roll that makes any meal feel special? You know the ones—soft, golden, and impossible to resist. Well, today’s your lucky day because I’m sharing my go-to recipe for Golden Dinner Rolls that’ll have everyone asking for seconds.
Ingredients
– 4 cups of all-purpose flour
– 1 packet of active dry yeast
– 1 cup of warm milk (around 110°F)
– ¼ cup of granulated sugar
– ½ cup of softened unsalted butter
– 2 large eggs
– 1 teaspoon of salt
– A splash of warm water
Instructions
1. Pour the warm milk into a large mixing bowl and sprinkle the yeast packet over it, letting it sit for 5 minutes until it gets foamy.
2. Add the sugar, softened butter, eggs, and salt to the bowl, then mix everything with a wooden spoon until well combined.
3. Gradually stir in the flour, one cup at a time, until a shaggy dough forms—tip: if it feels too dry, add a splash of warm water to bring it together.
4. Turn the dough onto a lightly floured surface and knead for 8-10 minutes until it’s smooth and elastic.
5. Place the dough in a greased bowl, cover it with a clean kitchen towel, and let it rise in a warm spot for 1 hour or until doubled in size.
6. Punch down the dough to release air bubbles, then divide it into 12 equal pieces and roll each into a smooth ball.
7. Arrange the dough balls in a greased 9×13-inch baking pan, cover them again, and let rise for 30 minutes until puffy.
8. Preheat your oven to 375°F while the rolls rise—tip: for extra golden tops, brush them lightly with melted butter before baking.
9. Bake the rolls for 18-20 minutes, or until they’re golden brown and sound hollow when tapped on the bottom.
10. Remove the rolls from the oven and let them cool in the pan for 5 minutes before transferring to a wire rack—tip: serve warm for the best texture.
What makes these rolls so irresistible is their fluffy, pillowy interior with a slightly sweet, buttery flavor that melts in your mouth. Try tearing them apart and dipping them in soup or slathering them with honey butter for a cozy twist—they’re perfect for holiday dinners or just because.
Buttery Puff Pastry

Zesty buttery puff pastry is that magical dough that turns simple ingredients into something spectacular. You know, the kind that puffs up golden and flaky in the oven, perfect for both sweet and savory treats. Let’s make some from scratch—it’s easier than you think and so worth the effort.
Ingredients
– 2 cups of all-purpose flour, plus a little extra for dusting
– 1 cup of cold unsalted butter, cut into small cubes
– A good pinch of fine salt
– About ½ cup of ice-cold water
– 1 large egg, for that golden finish
Instructions
1. In a large mixing bowl, combine the 2 cups of all-purpose flour and the pinch of fine salt.
2. Add the 1 cup of cold, cubed unsalted butter to the flour mixture.
3. Use your fingertips to quickly rub the butter into the flour until it resembles coarse crumbs with some pea-sized butter pieces still visible.
4. Gradually drizzle in about ½ cup of ice-cold water, mixing with a fork until the dough just comes together.
5. Tip: Work fast to keep the butter cold—this is key for flaky layers.
6. Turn the dough out onto a lightly floured surface and gently shape it into a rough rectangle.
7. Wrap the dough tightly in plastic wrap and chill it in the refrigerator for 30 minutes.
8. Roll the chilled dough on a floured surface into a ½-inch thick rectangle.
9. Fold the dough into thirds, like a letter, then give it a quarter turn.
10. Tip: This folding technique creates those signature flaky layers, so don’t skip it.
11. Repeat the rolling and folding process two more times, chilling the dough for 15 minutes between each fold if it feels soft.
12. After the final fold, wrap the dough and chill it for at least 1 hour or up to overnight.
13. Preheat your oven to 400°F and line a baking sheet with parchment paper.
14. Roll the chilled dough to ¼-inch thickness and cut it into your desired shapes.
15. Place the cut pastry on the prepared baking sheet.
16. Beat the 1 large egg with a splash of water and brush it lightly over the pastry tops.
17. Tip: The egg wash gives that beautiful golden color, so don’t skip this step.
18. Bake at 400°F for 15–20 minutes, until puffed and deep golden brown.
19. Let the pastry cool on a wire rack for a few minutes before serving.
Perfectly flaky and buttery, this puff pastry shatters with every bite, revealing tender, airy layers inside. Try it filled with jam for a quick dessert or topped with cheese and herbs for a savory snack—it’s endlessly versatile and always impressive.
Hearty Whole Wheat Bread
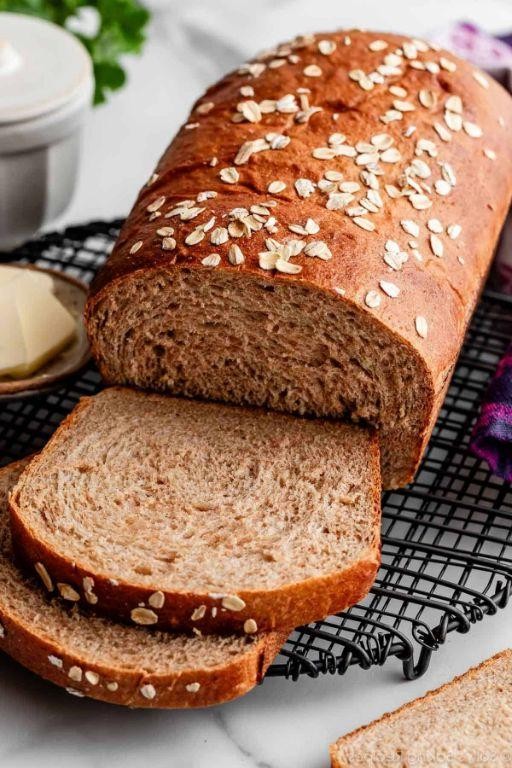
Remember that feeling when you walk into a house with fresh bread baking? That’s exactly what you’ll get with this whole wheat loaf. It’s the kind of comforting, homemade bread that makes your kitchen smell amazing and fills you up just right.
Ingredients
– 3 cups of whole wheat flour
– 1 cup of warm water (around 110°F)
– 2 tablespoons of honey
– 1 packet of active dry yeast
– 1 teaspoon of salt
– A couple tablespoons of olive oil
– A splash of milk for brushing
Instructions
1. Combine the warm water, honey, and yeast in a large bowl and let it sit for 5-7 minutes until it becomes foamy.
2. Stir in the whole wheat flour and salt until a shaggy dough forms.
3. Knead the dough on a floured surface for 8-10 minutes until it becomes smooth and elastic.
4. Place the dough in an oiled bowl, turning to coat, and cover with a damp cloth.
5. Let the dough rise in a warm spot for 1-1.5 hours until it doubles in size.
6. Punch down the dough to release air bubbles and shape it into a loaf.
7. Place the shaped dough in a greased 9×5 inch loaf pan.
8. Cover the pan and let the dough rise again for 45-60 minutes until it reaches just above the pan rim.
9. Preheat your oven to 375°F while the dough finishes rising.
10. Brush the top of the loaf lightly with milk for a golden crust.
11. Bake for 30-35 minutes until the bread sounds hollow when tapped on the bottom.
12. Transfer the bread to a wire rack and let it cool completely before slicing.
Slice into that warm, nutty loaf and you’ll find it’s surprisingly soft with just the right chew. The honey adds a subtle sweetness that pairs perfectly with salty butter, or try toasting thick slices for your next avocado toast situation.
Savory Cheese Scones

Just imagine biting into a warm, flaky scone with that perfect cheesy flavor. You’re going to love how easy these savory cheese scones are to whip up for breakfast or a quick snack. They come together in no time and fill your kitchen with the most amazing aroma.
Ingredients
– 2 cups of all-purpose flour
– 1 tablespoon of baking powder
– ½ teaspoon of salt
– A good pinch of black pepper
– ½ cup of cold butter, cut into small cubes
– 1 cup of shredded sharp cheddar cheese
– ¾ cup of cold whole milk
– 1 large egg for brushing
Instructions
1. Preheat your oven to 400°F and line a baking sheet with parchment paper.
2. In a large bowl, whisk together the flour, baking powder, salt, and black pepper until well combined.
3. Add the cold butter cubes and use your fingers or a pastry cutter to work them into the flour mixture until it resembles coarse crumbs with some pea-sized butter pieces remaining.
4. Stir in the shredded cheddar cheese until evenly distributed throughout the flour mixture.
5. Pour in the cold milk and mix gently with a fork until just combined and a shaggy dough forms—be careful not to overmix.
6. Tip: Keep everything cold for flakier scones—if the butter starts melting, pop the bowl in the fridge for 5 minutes.
7. Turn the dough out onto a lightly floured surface and gently pat it into a 1-inch thick circle.
8. Use a sharp knife or bench scraper to cut the circle into 8 equal wedges, like you’re cutting a pizza.
9. Tip: Don’t twist the cutter when cutting—press straight down for better rise.
10. Arrange the wedges on the prepared baking sheet, leaving about 1 inch between each scone.
11. Beat the egg with a fork and brush it lightly over the tops of each scone for golden brown color.
12. Bake for 15-18 minutes until the scones are golden brown and sound hollow when tapped on the bottom.
13. Tip: Check at 15 minutes—ovens vary, and you want them cooked through but not dry.
14. Transfer the scones to a wire rack and let them cool for at least 5 minutes before serving. Outstanding warm from the oven, these scones have a tender, slightly crumbly texture with pockets of melted cheddar throughout. The sharp cheese flavor really shines against the buttery pastry, making them perfect split open with a pat of butter or alongside a bowl of tomato soup for dipping.
Cinnamon Raisin Bread
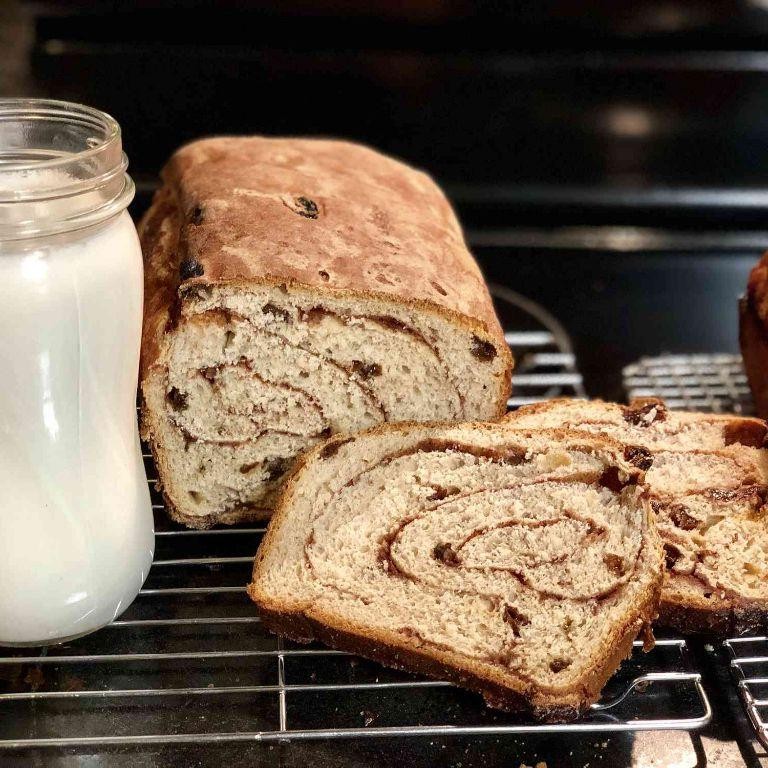
Gosh, there’s nothing quite like the smell of cinnamon raisin bread baking in your kitchen—it’s the kind of cozy, homemade treat that makes any morning feel special. You’ll love how simple it is to whip up this soft, sweet loaf, and the reward is totally worth it. Let’s get baking!
Ingredients
– 3 ½ cups of all-purpose flour
– 1 packet of active dry yeast
– 1 cup of warm milk (around 110°F)
– ¼ cup of granulated sugar
– ¼ cup of melted butter
– 1 large egg
– 1 teaspoon of salt
– 1 tablespoon of ground cinnamon
– ¾ cup of raisins
– A splash of vanilla extract
Instructions
1. In a small bowl, combine the warm milk, yeast, and a pinch of the sugar; let it sit for 5–10 minutes until foamy.
2. In a large mixing bowl, whisk together the remaining sugar, melted butter, egg, salt, and vanilla extract until smooth.
3. Pour the yeast mixture into the large bowl and stir to combine.
4. Gradually add the flour, one cup at a time, mixing with a wooden spoon until a shaggy dough forms.
5. Tip: If the dough feels too sticky, add an extra tablespoon of flour to make it easier to handle.
6. Turn the dough onto a lightly floured surface and knead for 8–10 minutes until smooth and elastic.
7. Place the dough in a greased bowl, cover with a damp towel, and let it rise in a warm spot for 1–1.5 hours until doubled in size.
8. Punch down the dough and roll it out into a 9×12-inch rectangle on a floured surface.
9. Sprinkle the cinnamon and raisins evenly over the dough, leaving a 1-inch border around the edges.
10. Tightly roll the dough from the short end into a log, pinching the seam to seal.
11. Place the loaf seam-side down in a greased 9×5-inch loaf pan, cover, and let it rise for another 45–60 minutes until puffy.
12. Tip: For a golden crust, brush the top with a little milk or melted butter before baking.
13. Preheat your oven to 350°F and bake the bread for 30–35 minutes until the top is deep golden brown and sounds hollow when tapped.
14. Tip: To prevent over-browning, tent the loaf with foil halfway through baking if needed.
15. Let the bread cool in the pan for 10 minutes, then transfer to a wire rack to cool completely.
This bread turns out incredibly soft with a sweet, cinnamony swirl in every slice. Try toasting a piece and slathering it with cream cheese for the ultimate breakfast treat—it’s so good, you might just eat the whole loaf in one sitting!
Crispy Baguette
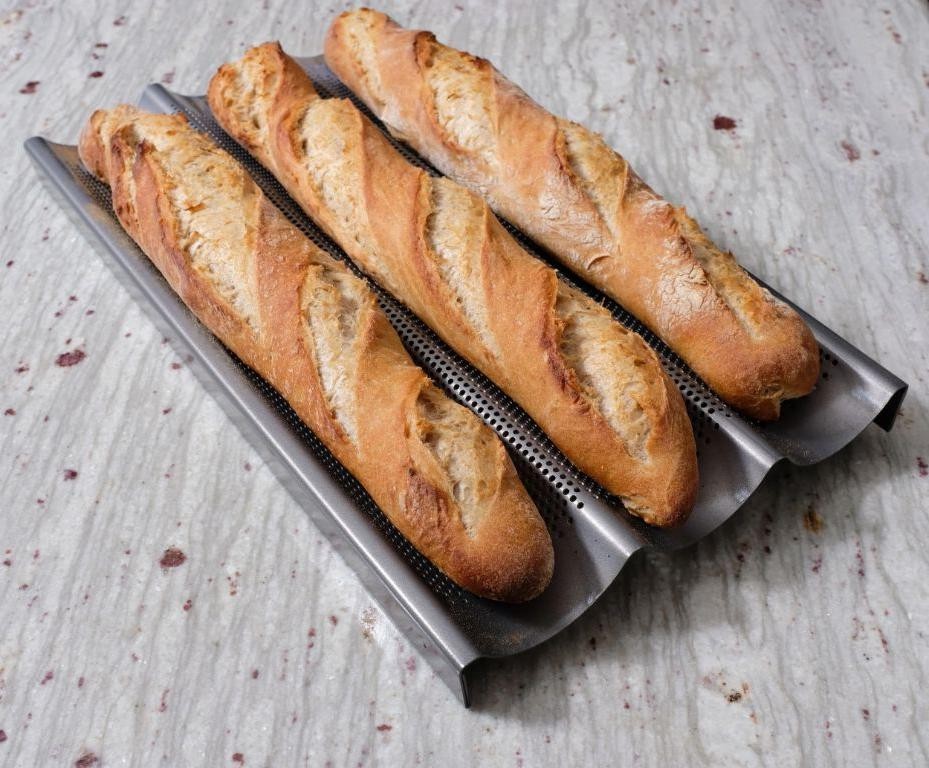
Remember those times you’ve craved that perfect bakery-style crunch? You’re about to make it happen right in your own kitchen with this ridiculously simple crispy baguette recipe. It’s easier than you think to get that golden, crackly crust and soft interior that makes any meal feel special.
Ingredients
– 3 cups of bread flour
– 1 teaspoon of active dry yeast
– 1 ½ cups of warm water (around 110°F)
– 1 tablespoon of olive oil
– 1 ½ teaspoons of salt
– A couple of ice cubes for steaming
Instructions
1. Combine the warm water, yeast, and 1 tablespoon of olive oil in a large mixing bowl, then let it sit for 5 minutes until it becomes foamy.
2. Mix in the bread flour and salt until a shaggy dough forms—don’t worry if it looks messy at this stage.
3. Knead the dough on a floured surface for 8-10 minutes until it becomes smooth and elastic, using the heel of your hand to push and fold.
4. Place the dough in a lightly oiled bowl, cover it with a damp kitchen towel, and let it rise in a warm spot for 1 hour until it doubles in size.
5. Punch down the risen dough to release air bubbles, then shape it into a 16-inch long baguette on a parchment-lined baking sheet.
6. Score the top of the baguette with a sharp knife at a 45-degree angle, making 4-5 diagonal cuts about ¼ inch deep to allow for expansion.
7. Preheat your oven to 450°F with a baking stone or inverted baking sheet inside—this helps create that professional bakery crust.
8. Place the shaped baguette in the preheated oven and immediately toss 2-3 ice cubes onto the bottom of the oven to create steam for extra crispiness.
9. Bake for 20-25 minutes until the crust is deep golden brown and sounds hollow when tapped on the bottom.
10. Transfer the baked baguette to a wire rack and let it cool completely for at least 30 minutes before slicing to preserve the texture.
A perfectly crispy baguette should have that satisfying crackle when you break it open, revealing a soft, airy interior with just the right chew. The deep golden crust gives way to subtle yeasty flavors that pair beautifully with everything from soups to cheese boards. Try tearing off chunks and dipping them in herbed olive oil or using day-old slices for the most incredible garlic bread you’ve ever made.
Soft Pretzels

Did you know homemade soft pretzels are way easier than you’d think? You get that perfect chewy texture and golden-brown crust right in your own kitchen. They’re perfect for game day, movie night, or just because you deserve a warm, salty treat.
Ingredients
– 1 ½ cups warm water (around 110°F)
– 1 packet of active dry yeast
– A good pinch of sugar
– 4 cups all-purpose flour
– A couple of teaspoons of salt
– 2 tablespoons melted butter
– About ½ cup baking soda for the water bath
– A sprinkle of coarse salt for topping
Instructions
1. Combine the warm water, yeast, and sugar in a large bowl and let it sit for 5 minutes until it gets foamy.
2. Stir in the flour, salt, and melted butter until a shaggy dough forms.
3. Knead the dough on a floured surface for 5-7 minutes until it becomes smooth and elastic.
4. Place the dough in a lightly oiled bowl, cover it with a damp towel, and let it rise in a warm spot for 1 hour until it doubles in size.
5. Preheat your oven to 450°F and line a baking sheet with parchment paper.
6. Punch down the dough and divide it into 12 equal pieces.
7. Roll each piece into an 18-inch rope and shape it into a classic pretzel twist.
8. Bring 10 cups of water and the baking soda to a boil in a large pot.
9. Boil each pretzel for 30 seconds, flipping once, to create that signature chewy crust.
10. Transfer the pretzels to the prepared baking sheet and sprinkle generously with coarse salt.
11. Bake for 12-14 minutes until they’re deeply golden brown.
12. Let them cool on a wire rack for a few minutes before serving. You’ll love that perfect balance of chewy interior and crisp, salty exterior. They’re fantastic torn apart warm with spicy mustard or dipped in melted cheese sauce for the ultimate comfort snack.
Lemon Poppy Seed Muffins
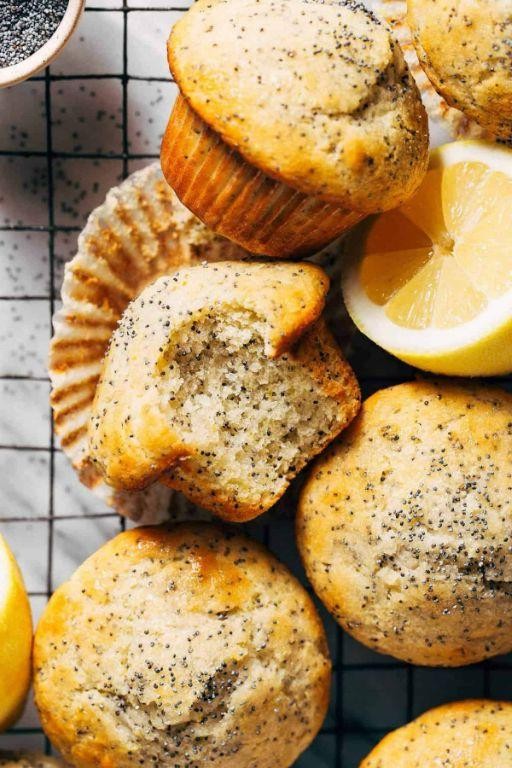
Perfect for those mornings when you need a little sunshine in your breakfast, these lemon poppy seed muffins are bright, tender, and so easy to whip up. You’ll love that zesty kick paired with the gentle crunch from the seeds. Honestly, they make your whole kitchen smell amazing while they bake.
Ingredients
– 2 cups of all-purpose flour
– 3/4 cup of granulated sugar
– 2 teaspoons of baking powder
– 1/2 teaspoon of salt
– 1 tablespoon of poppy seeds
– Zest from 2 lemons
– 1/2 cup of freshly squeezed lemon juice
– 1/2 cup of milk
– 1/2 cup of vegetable oil
– 2 large eggs
– 1 teaspoon of vanilla extract
Instructions
1. Preheat your oven to 375°F and line a 12-cup muffin tin with paper liners.
2. In a large bowl, whisk together the 2 cups of all-purpose flour, 3/4 cup of granulated sugar, 2 teaspoons of baking powder, and 1/2 teaspoon of salt until well combined.
3. Stir in 1 tablespoon of poppy seeds and the zest from 2 lemons into the dry ingredients.
4. In a separate medium bowl, whisk 1/2 cup of freshly squeezed lemon juice, 1/2 cup of milk, 1/2 cup of vegetable oil, 2 large eggs, and 1 teaspoon of vanilla extract until smooth.
5. Pour the wet ingredients into the dry ingredients and gently fold together with a spatula until just combined—don’t overmix to keep the muffins tender.
6. Divide the batter evenly among the 12 muffin cups, filling each about two-thirds full.
7. Bake at 375°F for 18–22 minutes, or until a toothpick inserted into the center of a muffin comes out clean.
8. Let the muffins cool in the pan for 5 minutes, then transfer them to a wire rack to cool completely.
Very moist and bursting with citrus flavor, these muffins have a soft crumb and that signature poppy seed crunch. Try them warm with a dab of honey or crumbled over Greek yogurt for a fun twist—they’re just as good the next day, if they last that long!
Rich Chocolate Cake
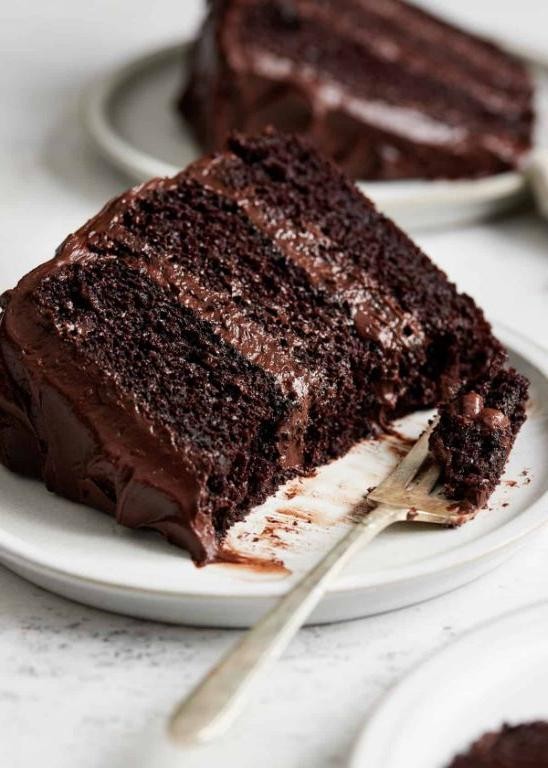
Zesty chocolate cravings hitting hard today? You know that feeling when only the richest, fudgiest cake will do? Well, you’re in luck—this recipe is your new best friend for those moments.
Ingredients
– 2 cups of all-purpose flour
– 1 and 3/4 cups of granulated sugar
– 3/4 cup of unsweetened cocoa powder
– 2 teaspoons of baking soda
– 1 teaspoon of baking powder
– A good pinch of salt
– 2 large eggs
– 1 cup of buttermilk
– 1/2 cup of vegetable oil
– 2 teaspoons of vanilla extract
– 1 cup of hot, strong-brewed coffee
– A couple of tablespoons of powdered sugar for dusting
Instructions
1. Preheat your oven to 350°F and grease two 9-inch round cake pans, then line them with parchment paper for easy removal.
2. In a large bowl, whisk together the flour, sugar, cocoa powder, baking soda, baking powder, and salt until no lumps remain.
3. Add the eggs, buttermilk, oil, and vanilla extract to the dry ingredients, and mix on medium speed until just combined—don’t overmix to keep the cake tender.
4. Slowly pour in the hot coffee while mixing on low; the batter will be thin, but that’s normal for a moist cake.
5. Divide the batter evenly between the prepared pans and tap them gently on the counter to release any air bubbles.
6. Bake for 30–35 minutes, or until a toothpick inserted into the center comes out clean with a few moist crumbs.
7. Let the cakes cool in the pans for 10 minutes, then turn them out onto a wire rack to cool completely to avoid sogginess.
8. Once cooled, dust the top with powdered sugar using a fine-mesh sieve for an even sprinkle.
Just imagine slicing into this beauty—it’s incredibly moist with a deep chocolate flavor that’s not too sweet. Serve it warm with a scoop of vanilla ice cream, or enjoy it plain for a cozy treat that feels like a hug in cake form.
Delightful Berry Tart

Sometimes you just need a dessert that feels fancy but is actually super simple to throw together. This delightful berry tart is exactly that—a buttery, flaky crust filled with sweet, juicy berries that’ll make you feel like a pastry pro without all the stress. Perfect for when you want something impressive but don’t have hours to spend in the kitchen.
Ingredients
– 1 ½ cups of all-purpose flour
– A stick of cold unsalted butter, cut into small cubes
– A couple of tablespoons of granulated sugar
– A pinch of salt
– A splash of ice water
– 2 cups of mixed fresh berries (like strawberries, blueberries, and raspberries)
– ¼ cup of powdered sugar for dusting
Instructions
1. Preheat your oven to 375°F (190°C).
2. In a large bowl, combine the all-purpose flour, granulated sugar, and a pinch of salt.
3. Add the cold, cubed butter to the flour mixture.
4. Use your fingers or a pastry cutter to work the butter into the flour until it looks like coarse crumbs.
5. Gradually add a splash of ice water, mixing just until the dough comes together.
6. Tip: Don’t overmix the dough to keep the crust flaky.
7. Press the dough evenly into a 9-inch tart pan, making sure to cover the bottom and sides.
8. Prick the bottom of the crust all over with a fork to prevent bubbling.
9. Bake the crust for 15 minutes at 375°F (190°C), or until it’s lightly golden.
10. Let the crust cool completely on a wire rack.
11. Arrange the mixed fresh berries in a single layer over the cooled crust.
12. Tip: Pat the berries dry with a paper towel to avoid a soggy crust.
13. Dust the top generously with powdered sugar using a fine-mesh sieve.
14. Tip: Serve within a few hours for the crispiest crust.
15. Slice and serve immediately.
Keep in mind that the buttery crust crumbles just right against the burst of juicy berries, making each bite a perfect mix of textures. It’s fantastic with a dollop of whipped cream or even a scoop of vanilla ice cream for an extra treat—ideal for summer gatherings or a cozy night in.
Conclusion
Zesty, versatile, and utterly delightful—these 22 flour bakery recipes are your ticket to homemade bliss. Whether you’re craving flaky pastries or cozy bread, there’s something here to spark joy in your kitchen. We’d love to hear which recipes become your favorites—drop a comment below and share this roundup on Pinterest to spread the baking love!