Struggling to get dinner on the table after a long day? You’re in the right place. We’ve gathered 33 of our favorite fast and easy recipes that are perfect for those busy weeknights. From comforting classics to fresh, flavorful dishes, these meals are designed to save you time without sacrificing taste. Let’s dive in and make your evenings a little simpler and a lot more delicious!
Quick Garlic Butter Shrimp Pasta
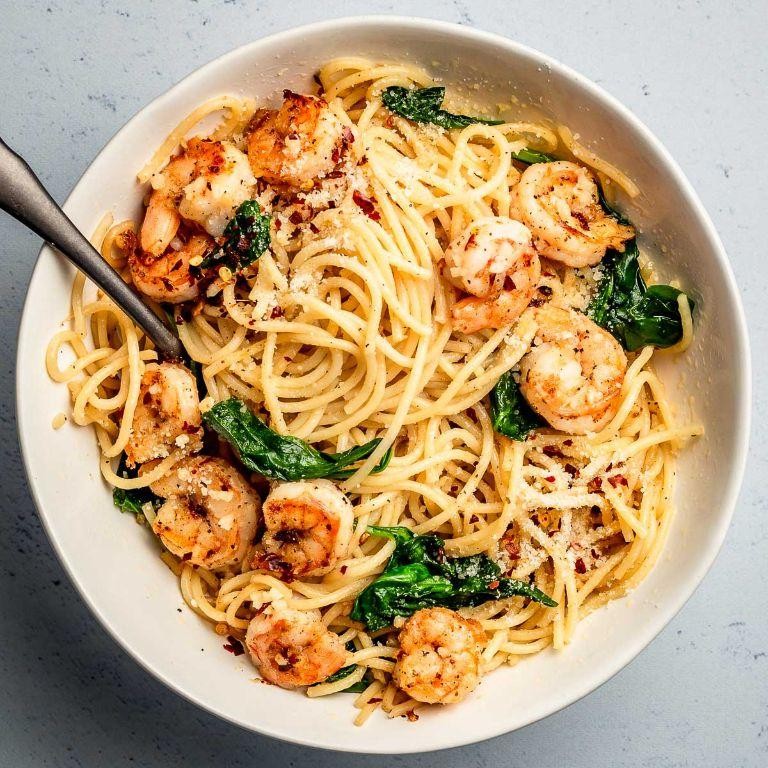
Last night, after a long day of work, I found myself craving something comforting yet quick—enter this garlic butter shrimp pasta that’s become my go-to weeknight savior. It’s rich, garlicky, and ready in about the time it takes to boil water, perfect for those evenings when you want a restaurant-quality meal without the fuss.
Serving: 4 | Pre Time: 10 minutes | Cooking Time: 15 minutes
Ingredients
– 12 oz linguine pasta (or any long pasta you prefer)
– 1 lb large shrimp, peeled and deveined (thawed if frozen)
– 4 tbsp unsalted butter, divided
– 4 cloves garlic, minced (use more if you love garlic!)
– 1/4 cup dry white wine (like Sauvignon Blanc, or substitute with chicken broth)
– 1/2 cup heavy cream
– 1/2 cup grated Parmesan cheese, plus extra for serving
– 2 tbsp fresh parsley, chopped (dried works in a pinch, but fresh is best)
– 1/2 tsp red pepper flakes (optional, for a little heat)
– Salt and black pepper to taste
– 1 tbsp olive oil (or any neutral oil for cooking)
Instructions
1. Bring a large pot of salted water to a rolling boil over high heat. Add the linguine and cook according to package directions until al dente, about 8-10 minutes, then drain and set aside, reserving 1/2 cup of pasta water.
2. While the pasta cooks, pat the shrimp dry with paper towels to ensure a good sear and season lightly with salt and pepper.
3. Heat the olive oil in a large skillet over medium-high heat until shimmering, about 1 minute. Add the shrimp in a single layer and cook for 1-2 minutes per side until pink and opaque, then transfer to a plate.
4. In the same skillet, reduce heat to medium and melt 2 tablespoons of butter. Add the minced garlic and red pepper flakes, cooking for 30-45 seconds until fragrant but not browned.
5. Pour in the white wine, scraping up any browned bits from the bottom of the pan, and let it simmer for 1-2 minutes until reduced by half.
6. Stir in the heavy cream and remaining 2 tablespoons of butter, bringing the mixture to a gentle simmer for 2-3 minutes until slightly thickened.
7. Add the cooked pasta, shrimp, and Parmesan cheese to the skillet, tossing everything together until well-coated. If the sauce is too thick, gradually add the reserved pasta water, 1 tablespoon at a time, until desired consistency is reached.
8. Remove from heat and stir in the chopped parsley. Taste and adjust seasoning with salt and pepper if needed.
Perfectly creamy with a hint of spice from the red pepper flakes, this dish boasts tender shrimp and a garlicky sauce that clings to every strand of pasta. I love serving it with a sprinkle of extra Parmesan and a side of crusty bread to soak up every last bit—it’s a simple meal that always feels like a treat.
Simple Chicken Stir-Fry with Vegetables
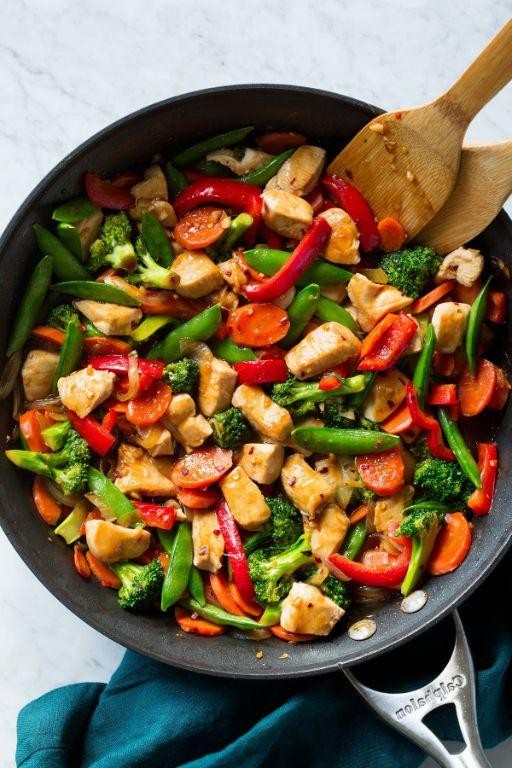
Mondays always seem to call for something quick and comforting, and this simple chicken stir-fry with vegetables has become my go-to weeknight lifesaver—it’s the kind of meal I can throw together after a long day, using whatever veggies I have on hand, and it never fails to satisfy my craving for something fresh yet hearty. I love how versatile it is; sometimes I’ll swap in broccoli or snap peas depending on what’s in my fridge, and it always turns out deliciously simple.
Serving: 4 | Pre Time: 15 minutes | Cooking Time: 15 minutes
Ingredients
– 1 lb boneless, skinless chicken breasts, cut into 1-inch pieces (thighs work too for more flavor)
– 2 tbsp vegetable oil, or any neutral oil like canola
– 1 red bell pepper, sliced into thin strips
– 1 cup sliced carrots, about 1/4-inch thick
– 1 cup broccoli florets, cut into bite-sized pieces
– 3 cloves garlic, minced
– 1 tbsp grated fresh ginger
– 1/4 cup low-sodium soy sauce
– 1 tbsp honey
– 1 tsp sesame oil
– 1/4 tsp red pepper flakes, adjust to taste for spice
– Cooked rice or noodles, for serving (optional)
Instructions
1. Pat the chicken pieces dry with paper towels to ensure they brown nicely in the pan.
2. Heat 1 tablespoon of vegetable oil in a large skillet or wok over medium-high heat until it shimmers, about 1-2 minutes.
3. Add the chicken to the skillet in a single layer, cooking without stirring for 3-4 minutes until the bottom is golden brown.
4. Flip the chicken pieces and cook for another 3-4 minutes until fully cooked through and no longer pink inside; transfer to a plate and set aside.
5. Tip: Let the skillet get hot before adding oil to prevent sticking and achieve a good sear.
6. Add the remaining 1 tablespoon of vegetable oil to the same skillet over medium-high heat.
7. Stir in the bell pepper, carrots, and broccoli, cooking for 4-5 minutes until the vegetables are tender-crisp and slightly charred at the edges.
8. Tip: Cut vegetables uniformly so they cook evenly and retain a nice crunch.
9. Add the minced garlic and grated ginger to the skillet, stirring constantly for 30 seconds until fragrant to avoid burning.
10. In a small bowl, whisk together the soy sauce, honey, sesame oil, and red pepper flakes until well combined.
11. Pour the sauce mixture into the skillet with the vegetables, stirring to coat everything evenly.
12. Return the cooked chicken to the skillet, tossing everything together for 1-2 minutes until heated through and well-coated with the sauce.
13. Tip: Taste the sauce before adding it and adjust the honey or red pepper flakes if desired for a perfect balance of sweet and spicy.
14. Remove the skillet from the heat and let it sit for 1 minute to allow the flavors to meld.
15. Serve immediately over cooked rice or noodles if using.
Ooh, the final dish is a vibrant mix of tender chicken and crisp-tender vegetables, all glazed in that savory-sweet sauce with a hint of spice from the red pepper flakes. I love how the sesame oil adds a nutty depth that makes it feel restaurant-quality, and it’s fantastic served over fluffy jasmine rice or even wrapped in lettuce leaves for a lighter twist.
Easy Beef Tacos with Fresh Salsa

Venturing into my kitchen on a busy weeknight, I always crave something satisfying yet simple—that’s where these easy beef tacos come in. I love how the savory seasoned beef pairs with a bright, fresh salsa, making it a go-to meal my whole family devours without fuss. It’s the kind of recipe that feels like a cozy hug after a long day, and I often whip it up while sharing stories with my kids about our favorite taco toppings.
Serving: 4 | Pre Time: 15 minutes | Cooking Time: 20 minutes
Ingredients
– 1 lb ground beef (80/20 blend works best for flavor)
– 8 small corn tortillas (warmed for flexibility)
– 1 tbsp olive oil (or any neutral oil)
– 1 medium onion, finely diced (white or yellow)
– 2 cloves garlic, minced
– 1 tbsp chili powder (adjust to spice preference)
– 1 tsp ground cumin
– 1/2 tsp salt (fine sea salt recommended)
– 1/4 tsp black pepper
– 1 cup diced tomatoes (fresh, about 2 medium)
– 1/4 cup finely chopped cilantro (stems removed for milder flavor)
– 1 tbsp lime juice (freshly squeezed for zest)
– 1 jalapeño, seeded and minced (omit for less heat)
Instructions
1. Heat 1 tbsp olive oil in a large skillet over medium-high heat until shimmering, about 1 minute.
2. Add 1 finely diced onion to the skillet and cook, stirring occasionally, until softened and translucent, about 5 minutes.
3. Stir in 2 minced garlic cloves and cook for 30 seconds until fragrant, being careful not to burn them.
4. Add 1 lb ground beef to the skillet, breaking it apart with a spatula into small crumbles.
5. Cook the beef, stirring frequently, until no pink remains, about 6–8 minutes, then drain any excess grease if desired.
6. Sprinkle 1 tbsp chili powder, 1 tsp ground cumin, 1/2 tsp salt, and 1/4 tsp black pepper over the beef, stirring to coat evenly and toast the spices for 1 minute.
7. While the beef cooks, combine 1 cup diced tomatoes, 1/4 cup chopped cilantro, 1 tbsp lime juice, and 1 minced jalapeño in a bowl to make the fresh salsa, mixing gently.
8. Warm 8 corn tortillas in a dry skillet over medium heat for 20–30 seconds per side until pliable, or wrap them in a damp towel and microwave for 30 seconds.
9. Spoon the seasoned beef into the warmed tortillas, topping each with a generous spoonful of the fresh salsa.
10. Serve immediately while the tortillas are warm and the beef is hot.
Hearty and vibrant, these tacos boast a juicy, well-spiced beef filling contrasted by the crisp, tangy salsa. For a fun twist, try serving them with extra lime wedges or a dollop of sour cream to balance the heat, making every bite a delightful mix of textures and flavors.
15-Minute Lemon Herb Salmon
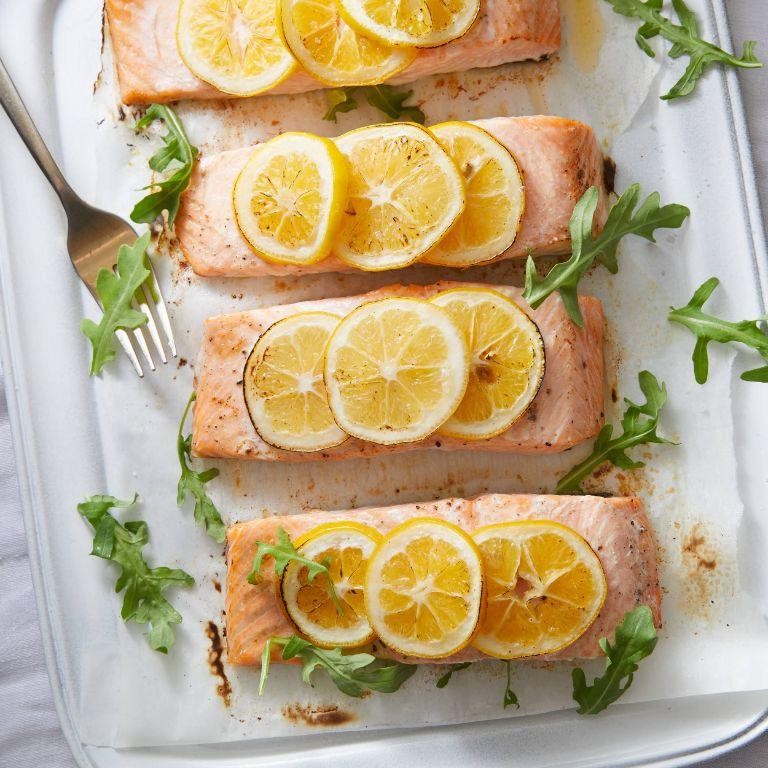
Unbelievably, even on my busiest weeknights, I crave something fresh and flavorful—that’s where this 15-Minute Lemon Herb Salmon comes in. It’s my go-to when I want a restaurant-quality meal without the fuss, and I love how the bright lemon and herbs make it feel special even on a Tuesday.
Serving: 2 | Pre Time: 5 minutes | Cooking Time: 10 minutes
Ingredients
– 2 salmon fillets (about 6 oz each), skin-on or skinless
– 2 tbsp olive oil (or any neutral oil)
– 1 lemon, juiced (about 3 tbsp)
– 1 tbsp fresh dill, chopped (or 1 tsp dried dill)
– 1 tbsp fresh parsley, chopped
– 2 garlic cloves, minced
– ½ tsp salt
– ¼ tsp black pepper
– Lemon slices for garnish (optional)
Instructions
1. Pat the salmon fillets dry with paper towels to ensure a crispy sear.
2. In a small bowl, whisk together the olive oil, lemon juice, dill, parsley, minced garlic, salt, and pepper to create the marinade.
3. Brush the marinade evenly over both sides of the salmon fillets, coating them thoroughly.
4. Heat a large skillet over medium-high heat until a drop of water sizzles upon contact, about 2 minutes.
5. Place the salmon fillets in the skillet, skin-side down if using skin-on, and cook undisturbed for 4–5 minutes until the edges turn opaque.
6. Flip the salmon carefully using a spatula and cook for another 3–4 minutes until the internal temperature reaches 145°F on an instant-read thermometer.
7. Remove the salmon from the skillet and let it rest for 2 minutes to allow the juices to redistribute.
8. Garnish with lemon slices if desired before serving.
Every bite of this salmon is tender and flaky, with a zesty lemon herb crust that’s perfectly balanced. I love pairing it with a simple quinoa salad or roasted asparagus for a complete meal that always impresses.
One-Pot Creamy Alfredo Pasta
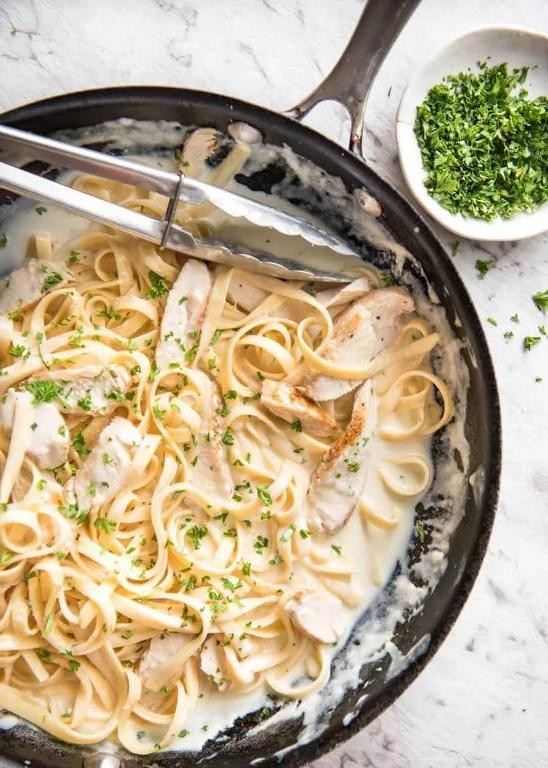
Last week, after a particularly hectic day, I found myself craving something comforting yet simple—no mountain of dishes, please! That’s when this One-Pot Creamy Alfredo Pasta became my go-to. It’s the kind of meal that feels indulgent but comes together with minimal fuss, perfect for those nights when you want to unwind with a cozy bowl of pasta without spending hours in the kitchen.
Serving: 4 | Pre Time: 5 minutes | Cooking Time: 20 minutes
Ingredients
– 1 lb fettuccine pasta (or any long pasta you have on hand)
– 4 tbsp unsalted butter (I prefer unsalted to control saltiness)
– 4 cloves garlic, minced (fresh is best for flavor)
– 2 cups heavy cream (for a rich, creamy sauce)
– 1 cup grated Parmesan cheese (freshly grated melts smoother)
– 1/2 tsp salt (adjust based on your cheese saltiness)
– 1/4 tsp black pepper (freshly ground adds a nice kick)
– 2 tbsp chopped fresh parsley (optional, for garnish)
Instructions
1. Place a large pot or Dutch oven over medium-high heat and add the fettuccine pasta, ensuring it lies flat.
2. Pour in enough water to cover the pasta by about 1 inch, then bring it to a boil, which should take about 5-7 minutes.
3. Once boiling, reduce the heat to medium and cook the pasta for 8-10 minutes, stirring occasionally, until it is al dente (tender but still firm to the bite).
4. Drain the pasta in a colander, reserving 1 cup of the pasta water, and set the pasta aside.
5. In the same pot, melt the unsalted butter over medium heat, which should take about 1-2 minutes until it’s bubbly.
6. Add the minced garlic to the melted butter and sauté for 1-2 minutes, stirring constantly, until it becomes fragrant and lightly golden.
7. Pour in the heavy cream and bring the mixture to a gentle simmer over medium heat, which should take about 3-4 minutes, stirring occasionally.
8. Reduce the heat to low and gradually stir in the grated Parmesan cheese until it is fully melted and the sauce is smooth, about 2-3 minutes.
9. Season the sauce with salt and black pepper, tasting and adjusting if needed, then return the drained pasta to the pot.
10. Toss the pasta in the sauce until it is evenly coated, adding a splash of the reserved pasta water if the sauce seems too thick, about 1-2 minutes.
11. Remove the pot from the heat and garnish with chopped fresh parsley if using.
12. Serve immediately while hot. A creamy, velvety sauce clings to every strand of pasta, offering a rich, garlicky flavor that’s both comforting and elegant. Try topping it with grilled chicken or steamed broccoli for a heartier meal, or enjoy it as is for a simple, satisfying dinner that’s sure to become a weeknight favorite.
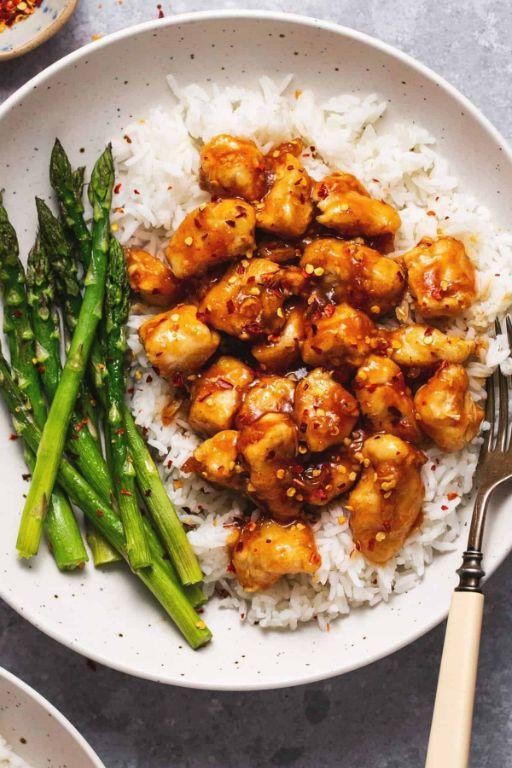
Spicy Sriracha Honey Chicken
My kitchen always smells amazing when I make this dish—it’s become my go‑over for busy weeknights when I crave something bold and satisfying. The sweet heat from the sriracha and honey combo is just irresistible, and it’s so easy to throw together, even after a long day.
Serving: 4 | Pre Time: 15 minutes | Cooking Time: 20 minutes
Ingredients
– 1.5 lbs boneless, skinless chicken thighs, cut into 1‑inch pieces (breasts work too, but thighs stay juicier)
– 2 tbsp cornstarch (for a crispier coating)
– 1/4 cup all‑purpose flour
– 1/2 tsp salt
– 1/4 tsp black pepper
– 2 tbsp vegetable oil, or any neutral oil
– 1/3 cup honey
– 1/4 cup sriracha sauce (adjust to your spice preference)
– 2 tbsp soy sauce
– 2 cloves garlic, minced
– 1 tbsp rice vinegar
– 1 tsp sesame oil (for a nutty finish)
– 2 green onions, thinly sliced (for garnish)
– Cooked white rice, for serving (about 4 cups)
Instructions
1. In a medium bowl, toss the chicken pieces with cornstarch, flour, salt, and pepper until evenly coated.
2. Heat vegetable oil in a large skillet over medium‑high heat until it shimmers, about 2 minutes.
3. Add the coated chicken to the skillet in a single layer, working in batches if needed to avoid crowding.
4. Cook the chicken for 5–6 minutes, turning occasionally, until golden brown and cooked through (internal temperature should reach 165°F).
5. Tip: Let the chicken sear undisturbed for the first 2 minutes to develop a nice crust.
6. While the chicken cooks, whisk together honey, sriracha, soy sauce, minced garlic, rice vinegar, and sesame oil in a small bowl.
7. Transfer the cooked chicken to a plate and reduce the skillet heat to medium.
8. Pour the sauce mixture into the skillet and simmer for 2–3 minutes, stirring constantly, until it thickens slightly and bubbles.
9. Tip: Simmer the sauce until it coats the back of a spoon—this ensures it’s sticky, not runny.
10. Return the chicken to the skillet and toss gently to coat every piece evenly with the sauce.
11. Cook for another 1–2 minutes, stirring, until the chicken is fully glazed and heated through.
12. Tip: For extra shine, add a splash of water if the sauce gets too thick while tossing.
13. Remove from heat and sprinkle with sliced green onions.
14. Serve immediately over cooked white rice.
Glazed and glossy, this chicken has a perfect sticky texture that clings to every grain of rice. The flavor is a beautiful balance—sweet upfront with a slow, warm sriracha kick that lingers. I love piling it into lettuce wraps for a crunchy twist or adding steamed broccoli right into the skillet for a one‑pan meal.
Quick Veggie Fried Rice
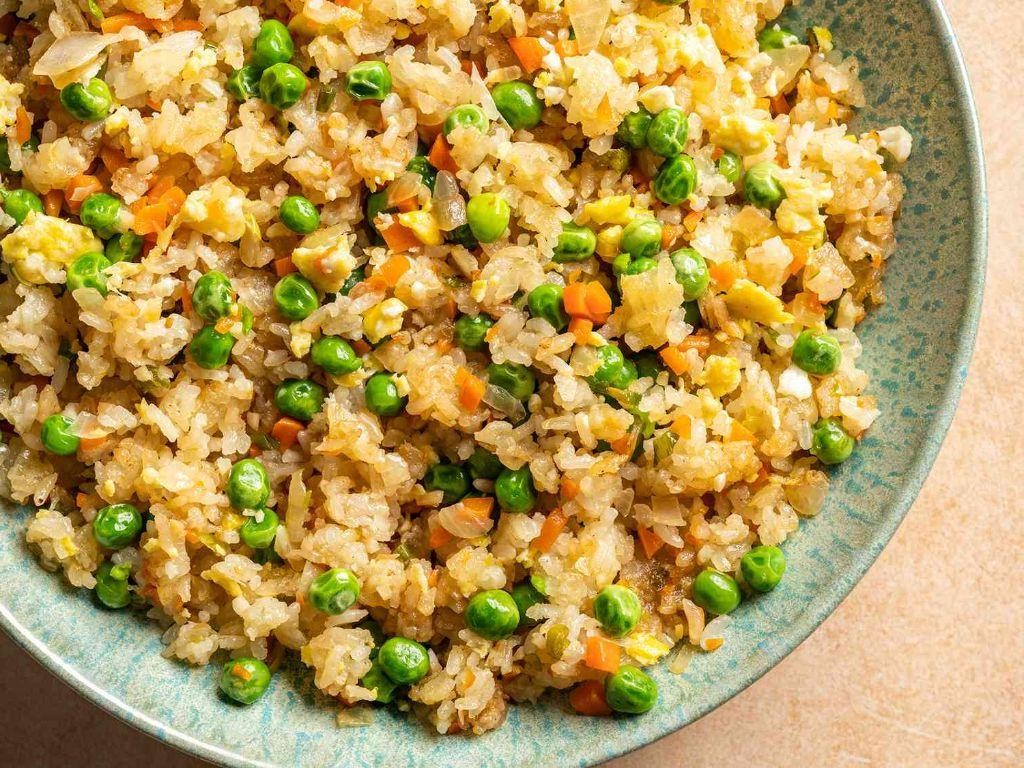
Busy weeknights call for simple solutions, and this quick veggie fried rice has been my go-to for years—it’s the dish I whip up when the fridge is looking sparse but I still want something satisfying. I love how versatile it is; you can toss in whatever veggies you have on hand, making it a true kitchen-saver. Serving: 4 | Pre Time: 10 minutes | Cooking Time: 15 minutes
Ingredients
– 2 cups cooked white rice, chilled (day-old rice works best to prevent mushiness)
– 2 tablespoons vegetable oil (or any neutral oil like canola)
– 2 large eggs, lightly beaten
– 1 cup frozen mixed vegetables (peas, carrots, corn—no need to thaw)
– 3 cloves garlic, minced (fresh is key for that aromatic punch)
– 3 tablespoons soy sauce (use low-sodium if preferred)
– 1 teaspoon sesame oil (for a nutty finish; don’t skip it!)
– 2 green onions, thinly sliced (reserve some for garnish)
Instructions
1. Heat 1 tablespoon of vegetable oil in a large skillet or wok over medium-high heat until shimmering, about 1 minute.
2. Add the beaten eggs to the skillet and scramble them for 30–45 seconds until just set, then transfer to a plate.
3. Tip: Use a spatula to break the eggs into small pieces as they cook for even distribution later.
4. Add the remaining 1 tablespoon of vegetable oil to the same skillet and heat for 30 seconds.
5. Stir in the minced garlic and cook for 30 seconds until fragrant, being careful not to burn it.
6. Add the frozen mixed vegetables to the skillet and stir-fry for 3–4 minutes until they’re tender and heated through.
7. Tip: Keep the heat high to quickly evaporate any moisture from the veggies, preventing a soggy rice.
8. Crumble the chilled rice into the skillet, breaking up any clumps with your spatula.
9. Pour the soy sauce evenly over the rice and stir-fry for 2–3 minutes until everything is well combined and the rice starts to crisp slightly.
10. Return the scrambled eggs to the skillet and add the sesame oil, tossing everything together for 1 minute to warm through.
11. Tip: Taste a small bite and adjust seasoning with a pinch of salt if needed, but the soy sauce usually provides enough flavor.
12. Remove the skillet from the heat and stir in most of the sliced green onions, saving a few for topping.
13. Ready to serve immediately while hot. The rice should have a slightly chewy texture with crispy bits from the high-heat cooking, and the sesame oil adds a rich, toasty aroma that ties it all together. I often top it with extra green onions or a drizzle of sriracha for a spicy kick—it’s perfect as a standalone meal or paired with a simple protein like grilled chicken.
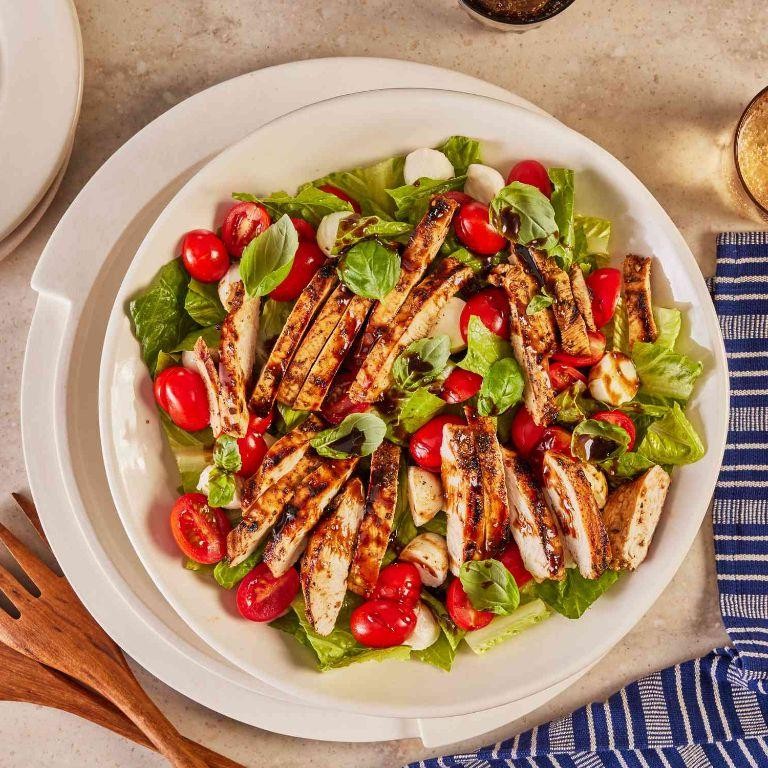
Fast Caprese Salad with Grilled Chicken
Just when I thought my weeknight dinner rotation couldn’t get any more predictable, I stumbled upon this lifesaver of a recipe. It’s become my go-to for those evenings when I crave something fresh and satisfying but have zero energy for a complicated meal—a true testament to the magic of simple, quality ingredients.
Serving: 4 | Pre Time: 15 minutes | Cooking Time: 12 minutes
Ingredients
– 1.5 lbs boneless, skinless chicken breasts, pounded to an even ¾-inch thickness (this ensures even cooking)
– 2 tbsp extra virgin olive oil, plus more for drizzling
– 1 tsp kosher salt, divided
– ½ tsp freshly ground black pepper
– 2 large ripe tomatoes, sliced into ¼-inch rounds (heirloom varieties add beautiful color)
– 8 oz fresh mozzarella cheese, sliced into ¼-inch rounds
– 1 cup fresh basil leaves, torn if large
– 2 tbsp balsamic glaze (store-bought is fine, or reduce balsamic vinegar by half until syrupy)
Instructions
1. Preheat your grill or grill pan to medium-high heat (about 400°F).
2. Pat the chicken breasts completely dry with paper towels to promote better browning.
3. Brush both sides of the chicken with the 2 tbsp of olive oil.
4. Season both sides of the chicken evenly with ¾ tsp of the kosher salt and all the black pepper.
5. Place the chicken on the preheated grill and cook undisturbed for 5-6 minutes, until grill marks form and the edges appear opaque.
6. Flip the chicken using tongs and cook for another 5-6 minutes, until the internal temperature reaches 165°F when checked with an instant-read thermometer.
7. Transfer the grilled chicken to a clean cutting board and let it rest for 5 minutes to allow the juices to redistribute.
8. While the chicken rests, arrange the tomato slices and mozzarella slices alternately on a large serving platter.
9. Scatter the torn basil leaves evenly over the tomato and mozzarella arrangement.
10. Slice the rested chicken against the grain into ½-inch thick strips.
11. Arrange the sliced chicken strips over the caprese salad base.
12. Drizzle the entire dish lightly with additional olive oil and the balsamic glaze.
13. Sprinkle the remaining ¼ tsp of kosher salt over the finished salad.
My favorite part is the contrast between the juicy, warm chicken and the cool, creamy mozzarella—it makes every bite interesting. For a fun twist, I sometimes serve it over a bed of peppery arugula or stuff the components into a crusty baguette for a hearty sandwich.
Zesty Lime Fish Tacos
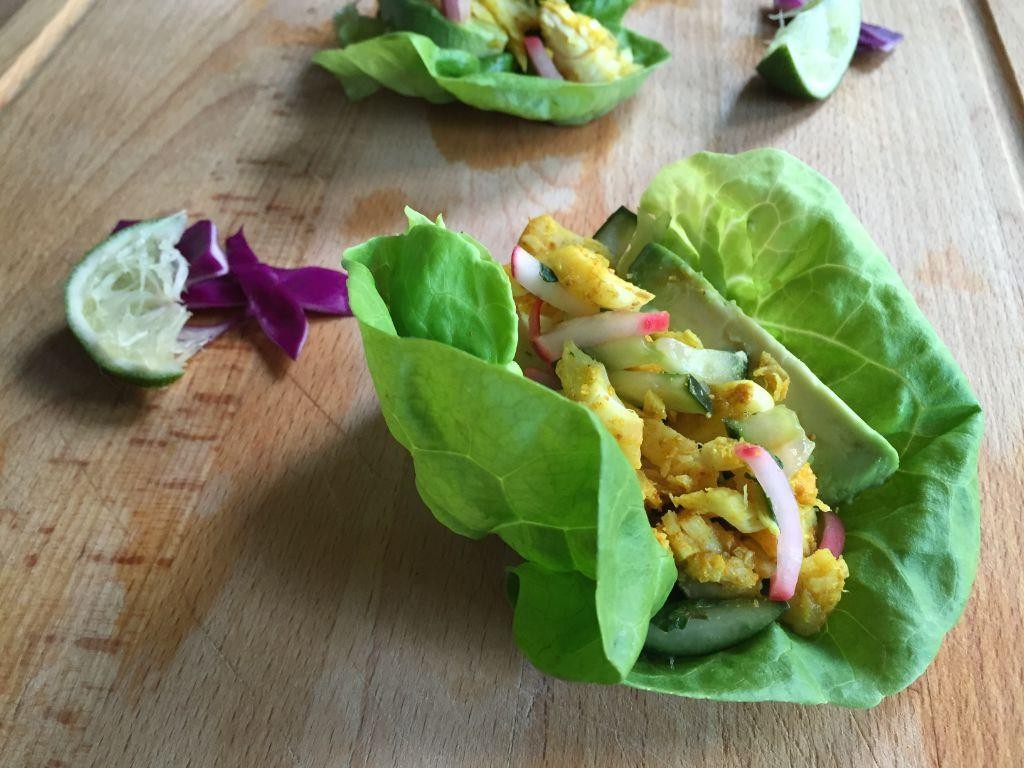
Whew, after a long day of testing recipes in my tiny kitchen, I’m thrilled to share these zesty lime fish tacos—they’re my go-to for a quick, flavorful weeknight dinner that always impresses. Inspired by a beach trip last summer, I love how the bright lime cuts through the richness of the fish, making it feel fresh and light even on a busy evening.
Serving: 4 | Pre Time: 15 minutes | Cooking Time: 10 minutes
Ingredients
– 1 lb white fish fillets (like cod or tilapia), cut into 1-inch pieces
– 2 tbsp olive oil (or any neutral oil)
– 1 tsp chili powder
– 1/2 tsp cumin
– 1/4 tsp salt
– 2 limes, juiced (about 1/4 cup)
– 8 small corn tortillas
– 1 cup shredded cabbage
– 1/2 cup sour cream
– 1/4 cup chopped cilantro
– 1 avocado, sliced
Instructions
1. In a medium bowl, combine the fish pieces, olive oil, chili powder, cumin, salt, and lime juice, tossing gently to coat evenly—let it marinate for 10 minutes at room temperature to enhance the flavors.
2. Heat a large skillet over medium-high heat until a drop of water sizzles, about 2 minutes.
3. Add the marinated fish to the skillet in a single layer, cooking for 3–4 minutes per side until the edges turn golden brown and the fish flakes easily with a fork.
4. While the fish cooks, warm the corn tortillas in a dry pan over medium heat for 30 seconds per side until pliable, or wrap them in a damp towel and microwave for 20 seconds to prevent cracking.
5. Assemble each taco by placing a warm tortilla on a plate, topping it with a portion of cooked fish, shredded cabbage, a dollop of sour cream, chopped cilantro, and avocado slices.
6. Serve immediately with extra lime wedges on the side for squeezing over the top.
These tacos offer a delightful crunch from the cabbage against the tender, flaky fish, with the lime adding a tangy punch that balances the creamy avocado and sour cream. Try serving them with a side of black beans or a simple corn salad for a complete meal that’s as vibrant as it is satisfying.
Quick Skillet Lasagna
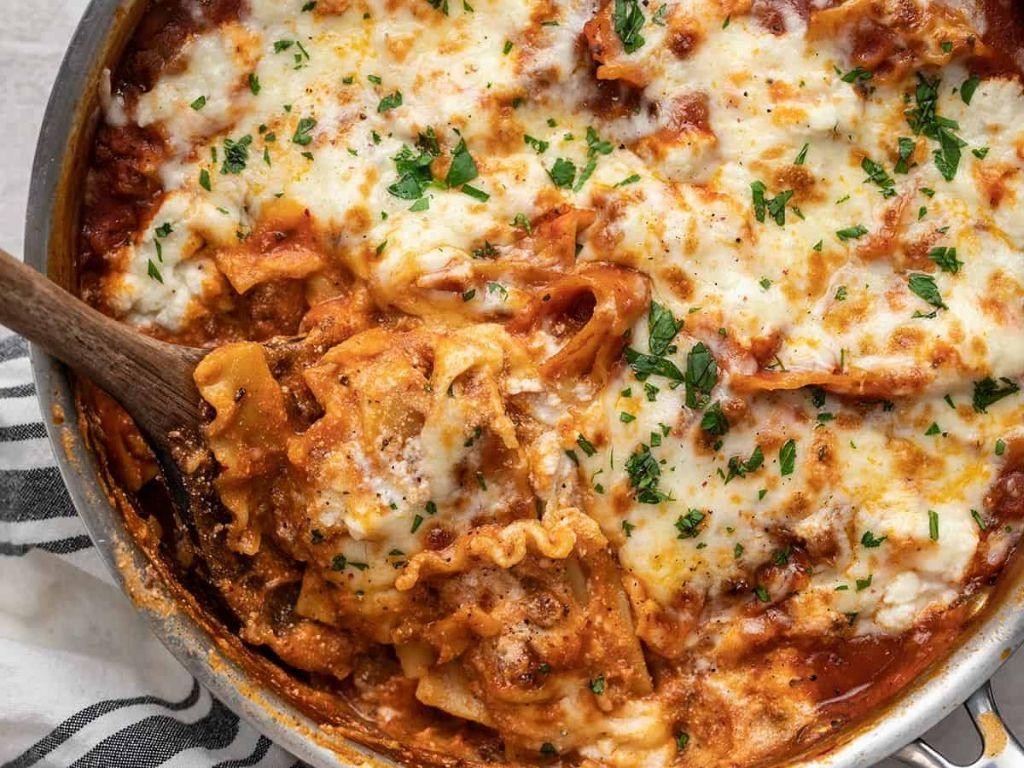
Remember those cozy Sunday dinners growing up? My mom’s lasagna was legendary, but let’s be real—who has hours to layer noodles on a busy weeknight? That’s why I’m obsessed with this Quick Skillet Lasagna. It delivers all the cheesy, saucy comfort in under 30 minutes, using just one pan for easy cleanup.
Serving: 4 | Pre Time: 5 minutes | Cooking Time: 20 minutes
Ingredients
– 1 tablespoon olive oil (or any neutral oil)
– 1 pound ground beef, 85% lean
– 1 small yellow onion, diced
– 2 cloves garlic, minced
– 1 (24-ounce) jar marinara sauce
– 1 cup water
– 8 ounces lasagna noodles, broken into 2-inch pieces
– 1 cup ricotta cheese
– 1 cup shredded mozzarella cheese
– ¼ cup grated Parmesan cheese
– 1 teaspoon dried oregano (adjust to taste)
– Salt and black pepper, to season
Instructions
1. Heat 1 tablespoon olive oil in a large, deep skillet over medium-high heat until shimmering, about 1 minute.
2. Add 1 pound ground beef and cook, breaking it up with a spoon, until browned and no pink remains, 5–7 minutes.
3. Stir in 1 diced onion and 2 minced garlic cloves; cook until onion is soft and fragrant, about 3 minutes.
4. Pour in 1 jar marinara sauce and 1 cup water, scraping the bottom of the skillet to incorporate any browned bits for extra flavor.
5. Add 8 ounces broken lasagna noodles and 1 teaspoon dried oregano, stirring to coat noodles evenly in the sauce.
6. Bring the mixture to a boil, then reduce heat to medium-low, cover, and simmer for 15 minutes, stirring halfway through to prevent sticking.
7. Uncover and dollop 1 cup ricotta cheese over the top in small spoonfuls.
8. Sprinkle 1 cup mozzarella and ¼ cup Parmesan evenly over the ricotta.
9. Cover again and cook for 3–5 minutes, until cheeses are melted and bubbly.
10. Remove from heat, season with salt and black pepper, and let rest for 2 minutes before serving.
Here’s the best part: the noodles soak up that rich sauce while staying perfectly al dente, and the triple-cheese layer gets gloriously gooey. I love scooping it straight from the skillet with garlic bread for a messy, satisfying meal that feels like a hug in a bowl.
Savory Thai Peanut Noodles
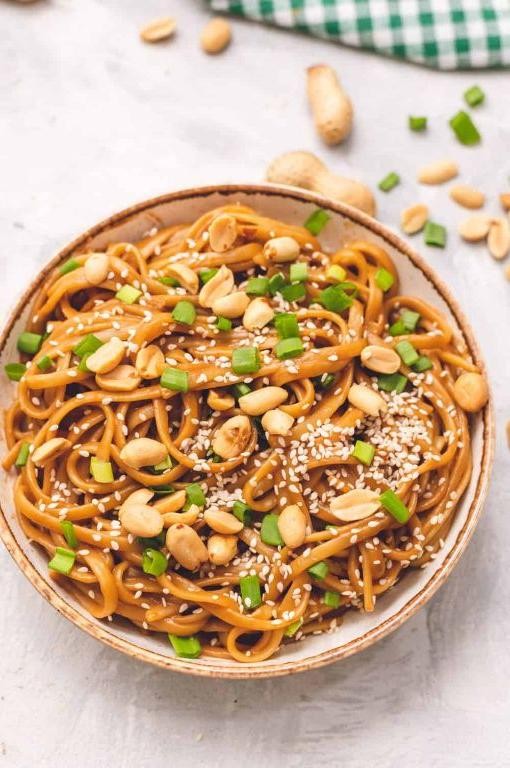
Just last week, after a long day of testing recipes, I found myself craving something quick, comforting, and packed with flavor—enter these Savory Thai Peanut Noodles. It’s become my go-to for turning pantry staples into a vibrant, satisfying meal in under 30 minutes, and I’m thrilled to share it with you.
Serving: 4 | Pre Time: 15 minutes | Cooking Time: 10 minutes
Ingredients
– 8 oz dried rice noodles (or any noodle you prefer, like linguine)
– 1 tbsp vegetable oil (or any neutral oil)
– 1 lb boneless, skinless chicken breast, thinly sliced (substitute with tofu for a vegetarian version)
– 1 red bell pepper, thinly sliced
– 3 green onions, chopped (reserve some for garnish)
– 1/2 cup creamy peanut butter (natural or regular both work)
– 1/4 cup low-sodium soy sauce
– 2 tbsp rice vinegar
– 1 tbsp honey (or maple syrup)
– 1 tsp grated fresh ginger
– 1 garlic clove, minced
– 1/4 tsp red pepper flakes (adjust for more or less heat)
– 1/4 cup water, as needed to thin sauce
– 1/4 cup chopped roasted peanuts, for garnish
– Lime wedges, for serving (optional)
Instructions
1. Place the rice noodles in a large bowl and cover with hot water from the tap, letting them soak for 8-10 minutes until softened but still slightly firm, then drain and set aside—this prevents them from overcooking later.
2. In a small bowl, whisk together the peanut butter, soy sauce, rice vinegar, honey, ginger, garlic, and red pepper flakes until smooth, adding water 1 tablespoon at a time if the sauce seems too thick for easy pouring.
3. Heat the vegetable oil in a large skillet or wok over medium-high heat until it shimmers, about 1 minute.
4. Add the sliced chicken to the skillet and cook for 5-6 minutes, stirring occasionally, until it’s no longer pink and reaches an internal temperature of 165°F.
5. Toss in the sliced red bell pepper and cook for 2-3 minutes more until it’s just tender-crisp, which adds a nice crunch to the dish.
6. Reduce the heat to low and pour the peanut sauce over the chicken and peppers, stirring to coat everything evenly and heat through for 1-2 minutes.
7. Add the drained noodles and chopped green onions to the skillet, gently tossing with tongs until everything is well combined and warmed, about 2 minutes.
8. Remove from heat and serve immediately, topped with the reserved green onions, chopped peanuts, and lime wedges if using.
Perfectly balanced with a creamy, nutty sauce that clings to every noodle, this dish offers a delightful mix of savory, sweet, and tangy notes. I love how the crisp peppers and crunchy peanuts add texture, making it a hit for weeknight dinners or even a casual gathering—try it with extra lime juice for a zesty kick!
Easy Teriyaki Pork Chops

Oftentimes, I find myself craving something savory and satisfying without wanting to spend hours in the kitchen—that’s where these easy teriyaki pork chops come in. Inspired by a busy weeknight last fall when I needed a quick dinner that still felt special, this recipe has become my go-to for impressing guests or just treating myself. I love how the sweet-salty glaze caramelizes beautifully, filling the kitchen with an irresistible aroma that always makes my mouth water.
Serving: 4 | Pre Time: 10 minutes | Cooking Time: 15 minutes
Ingredients
– 4 boneless pork chops, about 1-inch thick (pat them dry with paper towels for better browning)
– 1/4 cup soy sauce (I use low-sodium to control saltiness)
– 2 tbsp honey (or maple syrup for a different sweetness)
– 1 tbsp rice vinegar (adds a subtle tang)
– 2 cloves garlic, minced (fresh is best for flavor)
– 1 tsp grated fresh ginger (or 1/2 tsp ground ginger in a pinch)
– 1 tbsp vegetable oil (or any neutral oil like canola)
– 1 tbsp cornstarch (mixed with 1 tbsp water to thicken the sauce)
– 1 tsp sesame seeds, for garnish (optional but adds a nice crunch)
Instructions
1. In a small bowl, whisk together the soy sauce, honey, rice vinegar, minced garlic, and grated ginger until fully combined to make the teriyaki sauce.
2. Pat the pork chops dry with paper towels on both sides to remove excess moisture, which helps them sear properly without steaming.
3. Heat the vegetable oil in a large skillet over medium-high heat until it shimmers, about 1-2 minutes.
4. Place the pork chops in the skillet and cook for 4-5 minutes per side, or until they develop a golden-brown crust and reach an internal temperature of 145°F on a meat thermometer.
5. Remove the pork chops from the skillet and set them aside on a plate, loosely tented with foil to keep warm.
6. Reduce the heat to medium and pour the teriyaki sauce into the same skillet, scraping up any browned bits from the bottom with a wooden spoon for extra flavor.
7. In a separate small bowl, mix the cornstarch with 1 tablespoon of water until smooth to create a slurry, then stir it into the simmering sauce to thicken it, cooking for 1-2 minutes until it coats the back of a spoon.
8. Return the pork chops to the skillet, spooning the thickened sauce over them, and cook for an additional 1-2 minutes to glaze evenly.
9. Transfer the pork chops to a serving platter, sprinkle with sesame seeds if using, and let them rest for 3 minutes before slicing to allow the juices to redistribute.
10. Keep the leftover sauce in the skillet warm to drizzle over the chops just before serving for an extra glossy finish.
Kick back and enjoy these tender pork chops—their juicy interior pairs perfectly with the sticky, slightly sweet glaze that caramelizes into a beautiful sheen. I often serve them over a bed of fluffy jasmine rice to soak up every last drop of sauce, or slice them thin for a vibrant salad topped with crunchy veggies. The contrast between the savory meat and the glossy teriyaki makes this dish a weeknight winner that feels anything but ordinary.
Simple Mediterranean Quinoa Bowl
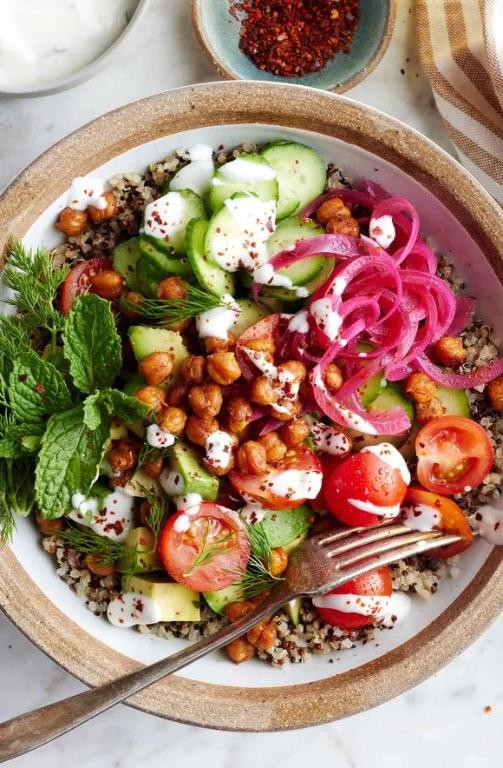
Picture this: after a long day, I crave something wholesome yet effortless, and that’s where this Simple Mediterranean Quinoa Bowl comes in—it’s my go-to for a quick, nutritious meal that feels like a mini vacation. I love how customizable it is, letting me toss in whatever veggies I have on hand, making it a staple in my weekly rotation.
Serving: 2 | Pre Time: 10 minutes | Cooking Time: 20 minutes
Ingredients
- 1 cup quinoa, rinsed well to remove bitterness
- 2 cups water
- 1 tbsp olive oil, or any neutral oil
- 1/2 cup cherry tomatoes, halved
- 1/2 cucumber, diced
- 1/4 cup red onion, finely chopped
- 1/4 cup feta cheese, crumbled
- 2 tbsp lemon juice, freshly squeezed for best flavor
- 1 tbsp fresh parsley, chopped, or dried as a substitute
- Salt and black pepper, to season throughout
Instructions
- In a medium saucepan, combine the rinsed quinoa and water, then bring to a boil over high heat.
- Reduce the heat to low, cover the saucepan, and simmer for 15 minutes until the quinoa is fluffy and the water is absorbed; check by fluffing with a fork—if grains are tender, it’s ready.
- While the quinoa cooks, heat the olive oil in a small skillet over medium heat for 1 minute to warm it slightly.
- In a large mixing bowl, combine the halved cherry tomatoes, diced cucumber, and finely chopped red onion.
- Once the quinoa is done, transfer it to the mixing bowl with the vegetables and toss gently to mix.
- Add the crumbled feta cheese, freshly squeezed lemon juice, and chopped fresh parsley to the bowl.
- Season the mixture with salt and black pepper, stirring until evenly distributed; taste and adjust seasoning if needed, but avoid over-salting.
- Divide the quinoa bowl mixture evenly between two serving bowls, pressing down lightly to pack it.
Now, this bowl delights with a fluffy quinoa base that soaks up the zesty lemon juice, while the crisp cucumbers and juicy tomatoes add a refreshing crunch. For a creative twist, I sometimes top it with grilled chicken or a drizzle of tahini for extra richness—it’s versatile enough to make each bite uniquely satisfying.
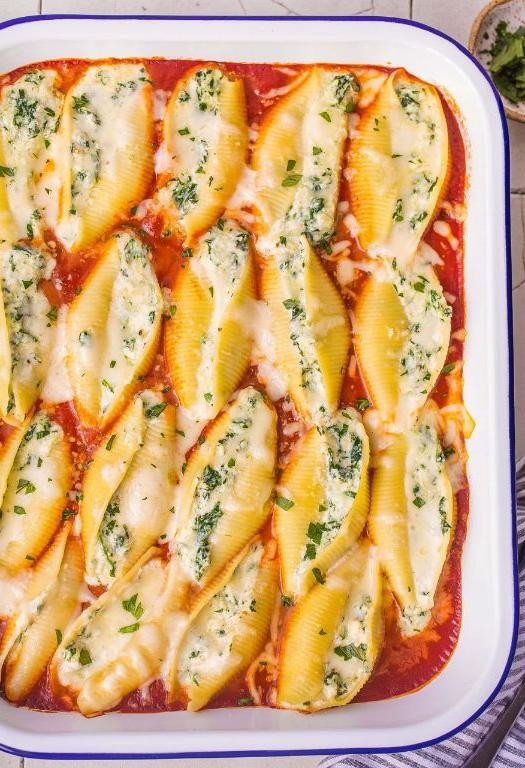
Fast Spinach and Ricotta Stuffed Shells
O
n busy weeknights when I’m craving something comforting but don’t have hours to spend in the kitchen, this fast spinach and ricotta stuffed shells is my go-to. It’s the kind of dish that feels indulgent yet comes together with minimal fuss—perfect for those evenings when you want a homemade meal without the marathon cooking session.
Serving: 4 | Pre Time: 15 minutes | Cooking Time: 25 minutes
Ingredients
– 12 jumbo pasta shells
– 1 (15-ounce) container whole-milk ricotta cheese
– 1 (10-ounce) package frozen chopped spinach, thawed and squeezed dry
– 1 cup shredded mozzarella cheese, divided
– 1/4 cup grated Parmesan cheese
– 1 large egg
– 1 teaspoon dried oregano
– 1/2 teaspoon garlic powder
– 1/4 teaspoon salt
– 1/4 teaspoon black pepper
– 2 cups marinara sauce (store-bought or homemade)
– 1 tablespoon olive oil, for greasing the dish
Instructions
1. Preheat your oven to 375°F (190°C).
2. Bring a large pot of salted water to a boil over high heat.
3. Add the jumbo pasta shells to the boiling water and cook for 9 minutes, stirring occasionally to prevent sticking.
4. Drain the shells in a colander and rinse briefly under cool water to stop the cooking process; set aside.
5. In a medium mixing bowl, combine the ricotta cheese, thawed spinach, 1/2 cup of the mozzarella cheese, Parmesan cheese, egg, oregano, garlic powder, salt, and black pepper. Mix until well blended.
6. Lightly grease a 9×13-inch baking dish with the olive oil, using a brush or your fingers to coat the bottom evenly.
7. Spread 1 cup of the marinara sauce in an even layer across the bottom of the prepared baking dish.
8. Using a spoon, fill each cooked pasta shell with the ricotta-spinach mixture, packing it gently but not overstuffing to avoid splitting.
9. Arrange the stuffed shells in a single layer over the sauce in the baking dish.
10. Pour the remaining 1 cup of marinara sauce over the top of the shells, covering them completely.
11. Sprinkle the remaining 1/2 cup of mozzarella cheese evenly over the sauce.
12. Cover the baking dish tightly with aluminum foil and bake in the preheated oven for 20 minutes.
13. Remove the foil and bake for an additional 5 minutes, or until the cheese is melted and bubbly and the edges are lightly golden.
14. Let the dish rest for 5 minutes before serving to allow the filling to set slightly.
H
ow these shells bake up with a creamy, herby filling and a tangy tomato sauce is pure comfort—the ricotta stays lush while the spinach adds a subtle earthiness. I love serving them straight from the oven with a crisp green salad or garlic bread for dipping into any extra sauce.
Crunchy Chicken Caesar Wraps

Perfect for those busy weeknights when you crave something satisfying but don’t want to spend hours in the kitchen, these Crunchy Chicken Caesar Wraps are my go-to lifesaver. I first started making them years ago when my kids had back-to-back soccer practices, and they’ve been a family favorite ever since—I love how the crispy chicken contrasts with the cool, creamy dressing.
Serving: 4 | Pre Time: 15 minutes | Cooking Time: 15 minutes
Ingredients
- 1 lb boneless, skinless chicken breasts, cut into 1-inch strips (or use thighs for more flavor)
- 1 cup all-purpose flour
- 2 large eggs, beaten
- 1 cup panko breadcrumbs
- 1/2 cup grated Parmesan cheese
- 1 tsp garlic powder
- 1 tsp paprika
- 1/2 tsp black pepper
- 1/2 tsp salt
- 1/4 cup olive oil (or any neutral oil like avocado oil)
- 4 large flour tortillas (10-inch size, warmed for flexibility)
- 2 cups romaine lettuce, chopped
- 1/2 cup Caesar dressing (store-bought or homemade, adjust to taste)
- 1/4 cup shaved Parmesan cheese (for garnish)
Instructions
- Preheat a large skillet over medium-high heat and add 1/4 cup olive oil, heating it until it shimmers, about 2 minutes.
- In a shallow bowl, combine 1 cup all-purpose flour, 1 tsp garlic powder, 1 tsp paprika, 1/2 tsp black pepper, and 1/2 tsp salt, mixing well with a fork.
- Place 2 large beaten eggs in a second shallow bowl.
- In a third shallow bowl, mix 1 cup panko breadcrumbs and 1/2 cup grated Parmesan cheese until evenly distributed.
- Dredge each 1 lb chicken strip first in the flour mixture, shaking off any excess.
- Dip the floured chicken strip into the beaten eggs, coating it completely.
- Press the egg-coated chicken strip into the panko-Parmesan mixture, ensuring an even, thick coating on all sides.
- Carefully place the coated chicken strips into the preheated skillet, cooking for 4-5 minutes per side until golden brown and crispy, and the internal temperature reaches 165°F when checked with a meat thermometer.
- Transfer the cooked chicken to a paper towel-lined plate to drain excess oil, letting it rest for 2 minutes to retain juiciness.
- Warm 4 large flour tortillas in a dry skillet over low heat for 30 seconds per side, or wrap them in a damp paper towel and microwave for 20 seconds to prevent cracking.
- Spread 2 tbsp Caesar dressing evenly over the center of each warmed tortilla.
- Top each tortilla with 1/2 cup chopped romaine lettuce.
- Divide the crispy chicken strips evenly among the tortillas, placing them over the lettuce.
- Sprinkle 1 tbsp shaved Parmesan cheese over the chicken on each wrap.
- Fold the bottom edge of each tortilla up over the filling, then fold in the sides and roll tightly to enclose the ingredients.
Out of the skillet, these wraps deliver a fantastic crunch from the panko-coated chicken that pairs beautifully with the cool, tangy Caesar dressing. For a fun twist, I sometimes slice them into pinwheels for parties or add a drizzle of hot sauce to spice things up—the creamy and crispy textures make every bite irresistible.
Quick and Tasty Mushroom Risotto

You know those nights when you want something comforting but don’t have hours to spend in the kitchen? This quick and tasty mushroom risotto is my go‑to for a satisfying, restaurant‑worthy meal that comes together in under an hour. I love how the earthy mushrooms meld with the creamy rice—it’s a dish that always feels special, even on a busy weeknight.
Serving: 4 | Pre Time: 10 minutes | Cooking Time: 30 minutes
Ingredients
– 1 tablespoon olive oil (or any neutral oil)
– 1 small yellow onion, finely diced
– 2 cloves garlic, minced
– 8 ounces cremini mushrooms, sliced (white mushrooms work too)
– 1½ cups Arborio rice
– ½ cup dry white wine (like Sauvignon Blanc, or substitute with broth)
– 4 cups low‑sodium vegetable broth, warmed
– ½ cup grated Parmesan cheese
– 2 tablespoons unsalted butter
– Salt and black pepper, to season
Instructions
1. Heat 1 tablespoon olive oil in a large, heavy‑bottomed pot or Dutch oven over medium heat.
2. Add 1 small diced yellow onion and cook, stirring occasionally, for 4–5 minutes until softened and translucent.
3. Stir in 2 cloves minced garlic and cook for 1 minute until fragrant.
4. Add 8 ounces sliced cremini mushrooms and cook for 6–8 minutes, stirring occasionally, until they release their liquid and turn golden brown.
5. Pour in 1½ cups Arborio rice and toast for 2 minutes, stirring constantly, until the grains are lightly coated and translucent at the edges.
6. Add ½ cup dry white wine and cook, stirring, until the liquid is fully absorbed, about 2–3 minutes.
7. Begin adding 4 cups warmed vegetable broth, ½ cup at a time, stirring frequently and waiting until each addition is nearly absorbed before adding the next—this should take about 20–25 minutes total.
8. Remove the pot from the heat and stir in ½ cup grated Parmesan cheese and 2 tablespoons unsalted butter until melted and creamy.
9. Season with salt and black pepper to your preference.
Perfectly creamy with a slight bite to the rice, this risotto boasts deep, earthy flavors from the mushrooms. I love topping it with extra Parmesan and a sprinkle of fresh parsley, or serving it alongside a simple green salad for a complete meal.
Conclusion
Nourishing your family doesn’t have to be a chore! This collection of 33 fast, easy dinners is your secret weapon for busy evenings. We hope you find some new favorites to add to your rotation. Give a recipe a try, then let us know which one you loved in the comments below! If this list helped you out, please share it on Pinterest to help other busy cooks.


