
Got a sweet tooth but short on time? Good news! We’ve gathered 32 mouthwatering dessert recipes that are both quick to make and surprisingly healthy. From no-bake treats to fruit-forward delights, these desserts prove you don’t need hours in the kitchen or loads of sugar to satisfy your cravings. Get ready to discover your new favorite guilt-free indulgences—let’s dive into these delicious creations!
Berry Chia Pudding Parfaits
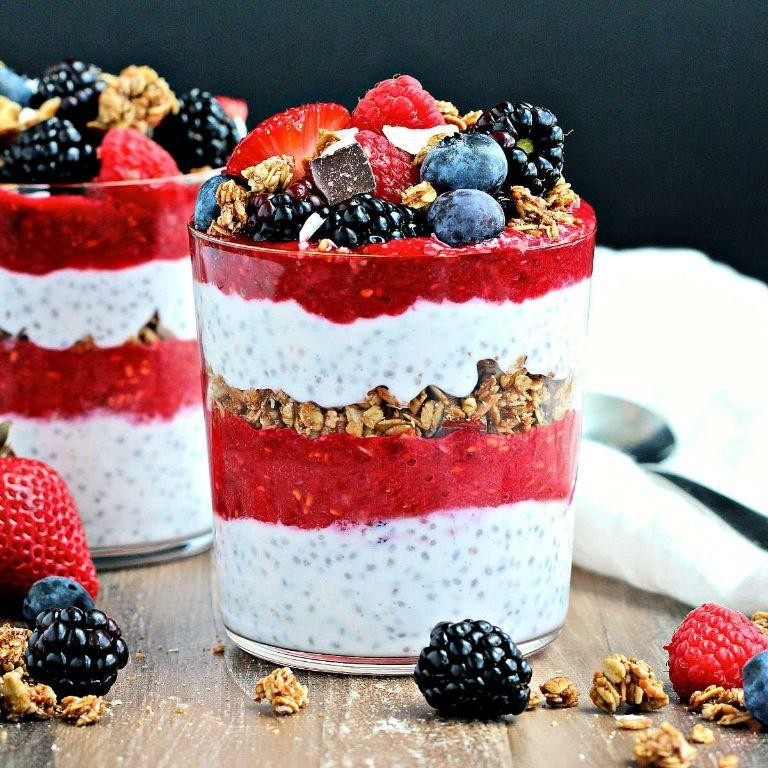
Never underestimate the power of overnight prep. These berry chia pudding parfaits come together with minimal effort but deliver maximum flavor. Perfect for busy mornings or healthy desserts.
2
portions10
minutesIngredients
– 1/2 cup creamy coconut milk
– 3 tablespoons small black chia seeds
– 2 tablespoons golden raw honey
– 1 teaspoon pure vanilla extract
– 1 cup fresh mixed berries
– 1/2 cup crunchy granola
Instructions
1. Combine 1/2 cup creamy coconut milk, 3 tablespoons small black chia seeds, 2 tablespoons golden raw honey, and 1 teaspoon pure vanilla extract in a medium bowl.
2. Whisk vigorously for 30 seconds to prevent clumping and ensure even distribution.
3. Cover the bowl tightly with plastic wrap, pressing it directly against the pudding surface to prevent skin formation.
4. Refrigerate for at least 6 hours or overnight until the mixture thickens to a spoonable consistency.
5. Wash and thoroughly dry 1 cup fresh mixed berries, then slice any larger strawberries into uniform pieces.
6. Layer 1/3 of the chia pudding into the bottom of two 8-ounce glasses.
7. Top with 1/3 of the fresh mixed berries, arranging them evenly across the surface.
8. Sprinkle 1/3 of the 1/2 cup crunchy granola over the berry layer for textural contrast.
9. Repeat the layering process twice more, ending with a final granola topping.
10. Serve immediately or refrigerate for up to 2 hours before serving to maintain crunch.
Gel-like chia seeds create a satisfying thickness that contrasts beautifully with juicy berry bursts. The granola adds essential crunch against the creamy coconut base. Try swapping berries for stone fruits in summer or adding dark chocolate shavings for decadent evenings.
Avocado Chocolate Mousse
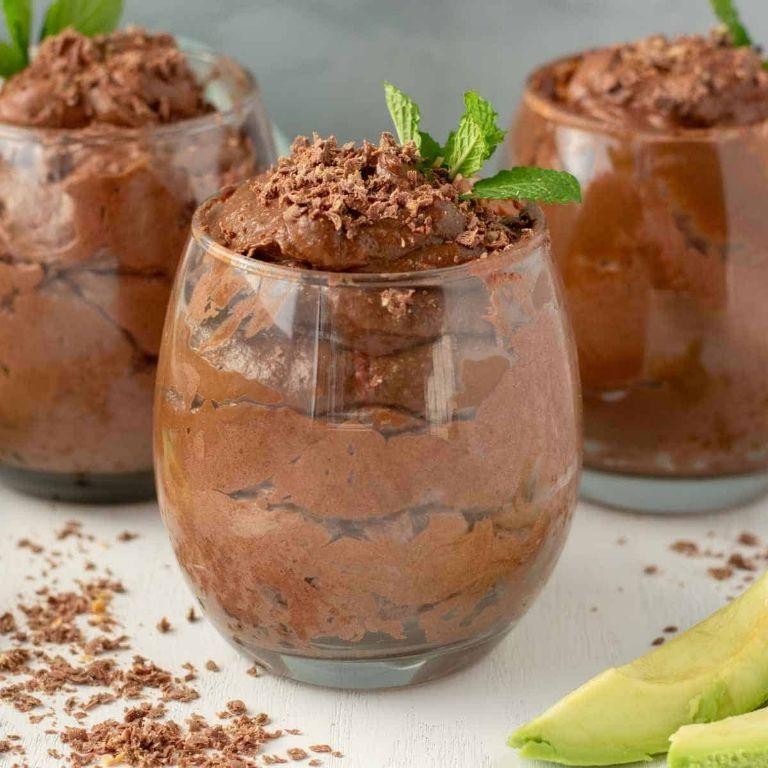
Just when you thought avocados couldn’t get more versatile, they transform into this decadent dessert. Jazzing up your dessert game has never been simpler or more nutritious. This creamy mousse delivers rich chocolate flavor with surprising lightness.
3
servings15
minutesIngredients
– 2 ripe Hass avocados, perfectly soft and buttery
– 1/4 cup high-quality cocoa powder, deeply rich and unsweetened
– 1/3 cup pure maple syrup, amber-colored and robust
– 1/4 cup creamy almond butter, smooth and nutty
– 1 tsp pure vanilla extract, aromatic and warm
– Pinch of fine sea salt, delicate and balancing
– Optional: fresh raspberries for garnish, bright and tart
Instructions
1. Slice 2 ripe Hass avocados in half lengthwise and remove the pits.
2. Scoop the soft green flesh into a high-speed blender or food processor.
3. Add 1/4 cup cocoa powder, 1/3 cup maple syrup, and 1/4 cup almond butter to the blender.
4. Pour in 1 tsp vanilla extract and add a pinch of fine sea salt.
5. Blend on high speed for 60-90 seconds until completely smooth, scraping down the sides halfway through to ensure no chunks remain.
6. Taste the mixture and adjust sweetness by adding more maple syrup if desired, blending for another 15 seconds to incorporate.
7. Transfer the mousse to individual serving glasses using a spatula to get every bit.
8. Chill in the refrigerator for at least 2 hours to allow flavors to meld and texture to firm up.
9. Garnish with fresh raspberries just before serving for a pop of color and acidity. Getting the texture right is key—this mousse should be velvety smooth with no avocado graininess. Great served in elegant glasses for dinner parties or simple mason jars for casual gatherings. The rich chocolate flavor dominates while the avocado provides incredible creaminess without any dairy.
Greek Yogurt and Honey Popsicles
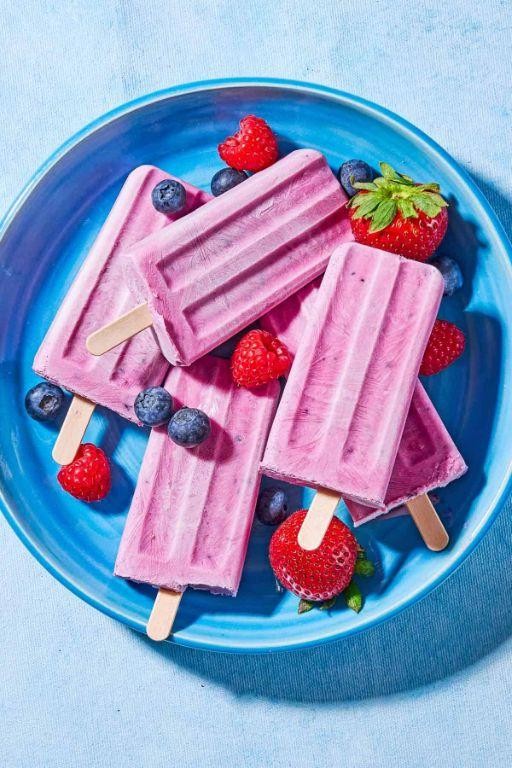
Yogurt lovers, meet your new summer obsession. These creamy popsicles deliver tangy richness balanced with floral sweetness. They’re the perfect frozen treat for hot days.
6
popsicles10
minutesIngredients
– 2 cups thick, creamy Greek yogurt
– 1/3 cup golden, raw honey
– 1/4 cup cold whole milk
– 1 teaspoon fragrant vanilla extract
– Pinch of flaky sea salt
Instructions
1. Combine 2 cups thick, creamy Greek yogurt and 1/3 cup golden, raw honey in a medium mixing bowl.
2. Whisk vigorously for 1 minute until honey is fully incorporated and mixture appears smooth.
3. Add 1/4 cup cold whole milk and whisk for 30 seconds to create a pourable consistency.
4. Stir in 1 teaspoon fragrant vanilla extract and a pinch of flaky sea salt until evenly distributed.
5. Tip: Scrape down the bowl sides with a spatula to ensure no honey pockets remain.
6. Carefully pour the mixture into 6 standard popsicle molds, leaving 1/4 inch headspace at the top.
7. Gently tap molds on countertop 3-4 times to release any air bubbles trapped in the mixture.
8. Insert popsicle sticks into the center of each mold, ensuring they stand straight.
9. Tip: Freeze for 1 hour before inserting sticks if they tend to slide or tilt.
10. Place molds in freezer and freeze for 6-8 hours until completely solid.
11. Tip: Overnight freezing ensures the creamiest texture without ice crystals.
12. Run warm water over mold exteriors for 15 seconds to release popsicles easily.
13. Serve immediately or store in airtight freezer bags for up to 2 months.
Dense and creamy with a delightful tang, these popsicles offer sophisticated sweetness from the honey. The vanilla adds subtle warmth that complements the yogurt’s brightness. Try drizzling with extra honey and crushed pistachios for an elegant dessert presentation.
Banana Oatmeal Cookies
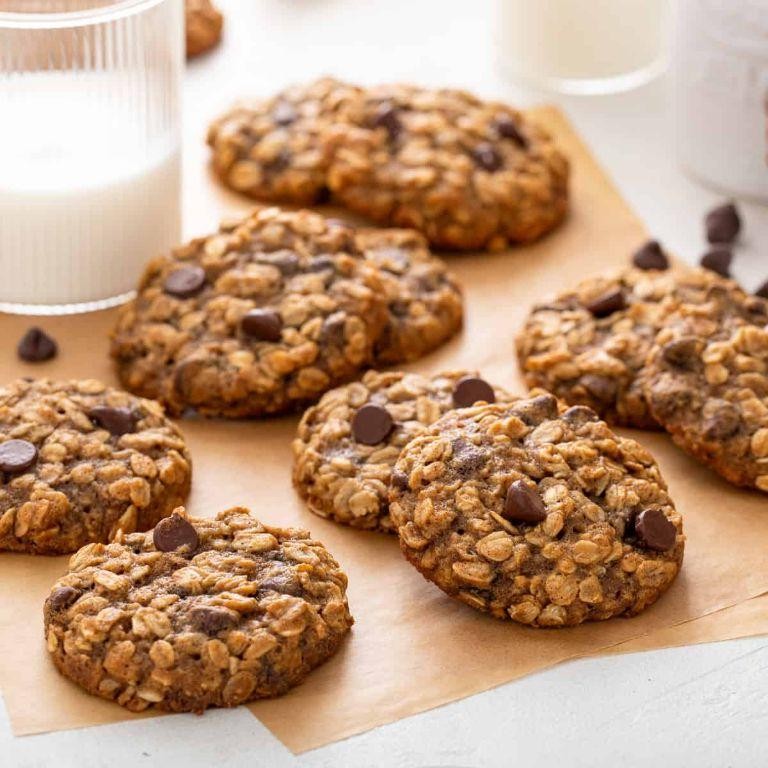
Kickstart your baking with these wholesome banana oatmeal cookies that deliver soft, chewy texture and natural sweetness without refined sugar. Perfect for breakfast on-the-go or an afternoon pick-me-up, they come together quickly with pantry staples. Ripe bananas provide moisture while oats add satisfying heartiness to every bite.
12
cookies10
minutes15
minutesIngredients
– 2 large overripe bananas with brown speckles
– 1 ½ cups old-fashioned rolled oats
– ¼ cup creamy natural peanut butter
– 2 tablespoons pure maple syrup
– 1 teaspoon vanilla extract
– ½ teaspoon ground cinnamon
– ¼ teaspoon fine sea salt
– ⅓ cup dark chocolate chips
Instructions
1. Preheat your oven to 350°F and line a baking sheet with parchment paper.
2. In a medium bowl, mash the overripe bananas with a fork until smooth with minimal lumps.
3. Add the old-fashioned rolled oats, creamy natural peanut butter, and pure maple syrup to the mashed bananas.
4. Stir in the vanilla extract, ground cinnamon, and fine sea salt until fully combined.
5. Gently fold in the dark chocolate chips, being careful not to overmix the batter.
6. Using a cookie scoop or tablespoon, drop rounded mounds of dough onto the prepared baking sheet, spacing them 2 inches apart.
7. Flatten each cookie slightly with the back of a spoon to ensure even baking.
8. Bake at 350°F for 12-15 minutes until the edges are golden brown and the centers appear set.
9. Let the cookies cool on the baking sheet for 5 minutes before transferring to a wire rack.
10. Allow cookies to cool completely for firm texture, about 20 minutes.
These cookies emerge from the oven with chewy centers and slightly crisp edges, the banana flavor shining through with warm cinnamon notes. The chocolate chips create molten pockets that contrast beautifully with the oat texture. For an extra treat, serve warm with a glass of cold milk or crumble over Greek yogurt for breakfast.
Quick Mango Sorbet
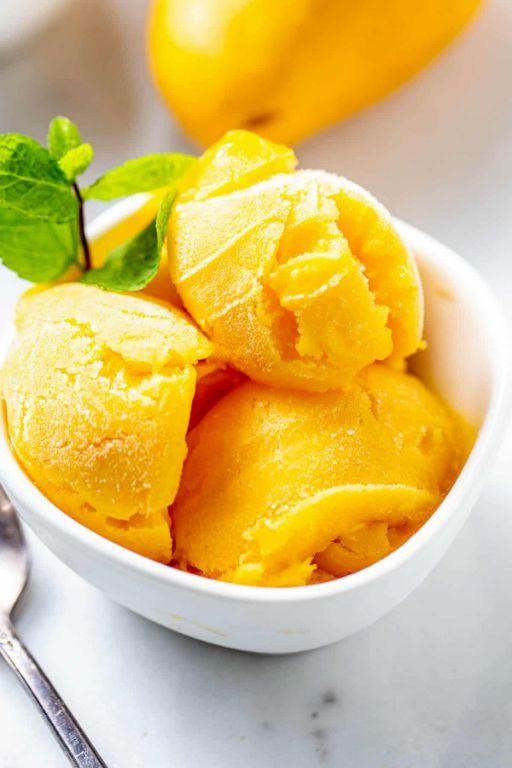
Easy mango sorbet brings tropical sweetness to your table in minutes. Frozen mango chunks eliminate the need for ice cream makers. This refreshing dessert requires just three simple ingredients.
5
servings5
minutesIngredients
- 4 cups frozen ripe mango chunks
- 1/3 cup sweet honey
- 2 tablespoons fresh lime juice
Instructions
- Place 4 cups frozen ripe mango chunks in a food processor.
- Add 1/3 cup sweet honey to the mango chunks.
- Pour 2 tablespoons fresh lime juice over the ingredients.
- Process the mixture on high speed for 30 seconds until crumbly.
- Scrape down the sides of the processor bowl with a spatula.
- Process again for 45-60 seconds until completely smooth and creamy.
- Check the texture – it should resemble soft-serve ice cream consistency.
- Transfer the sorbet to an airtight freezer-safe container immediately.
- Smooth the surface with a spatula for even freezing.
- Freeze the sorbet for at least 2 hours until firm enough to scoop.
Mango sorbet delivers an intensely fruity flavor with bright citrus notes. The texture remains scoopably soft straight from the freezer. Serve it in chilled glasses garnished with fresh mint sprigs for an elegant presentation.
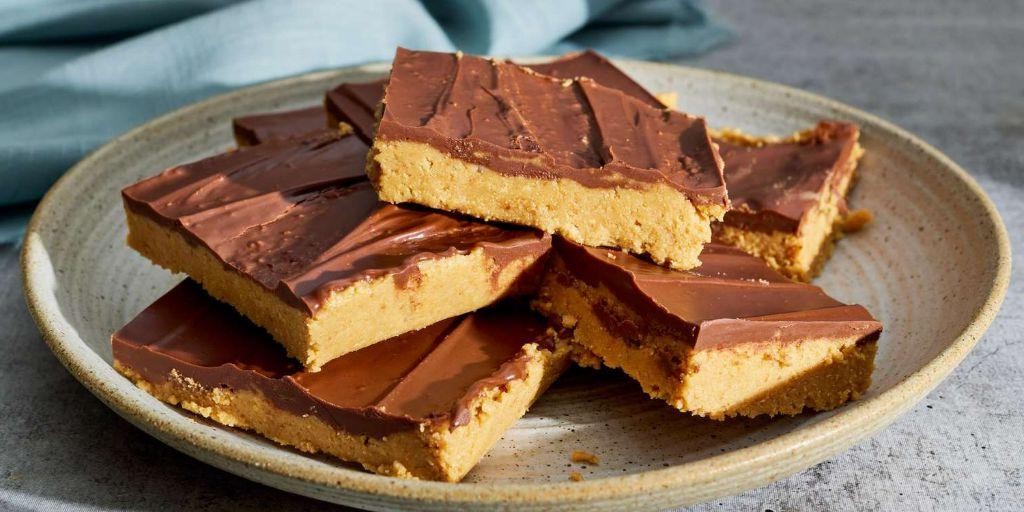
Dark Chocolate Almond Bites
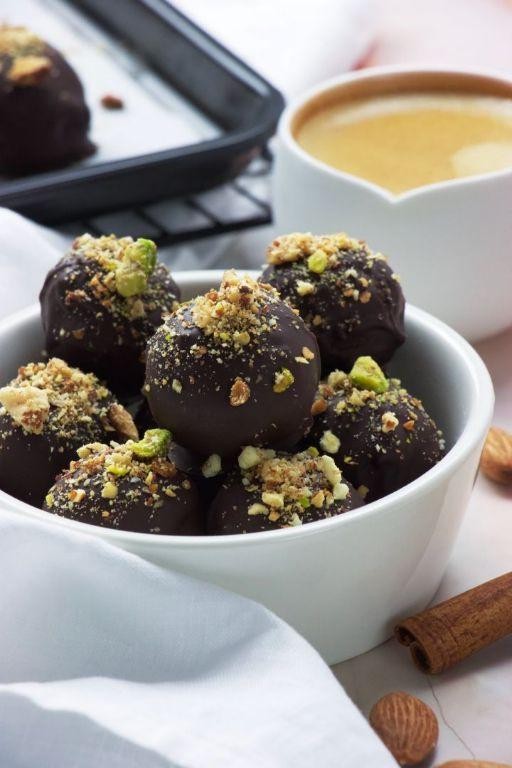
Lately, I’ve been craving something sweet but not overly indulgent. These dark chocolate almond bites hit that perfect balance between treat and sensible snack. They come together in minutes with minimal cleanup required.
16
portions15
minutesIngredients
– 1 cup creamy almond butter
– 1/2 cup pure maple syrup
– 1/3 cup rich cocoa powder
– 1/4 cup finely chopped roasted almonds
– 1/4 cup unsweetened shredded coconut
– 1 tsp pure vanilla extract
– 1/4 tsp flaky sea salt
Instructions
1. Line a baking sheet with parchment paper.
2. Combine 1 cup creamy almond butter and 1/2 cup pure maple syrup in a medium bowl.
3. Stir vigorously until the mixture becomes smooth and well-incorporated.
4. Add 1/3 cup rich cocoa powder and mix until no dry spots remain.
5. Fold in 1/4 cup finely chopped roasted almonds and 1/4 cup unsweetened shredded coconut.
6. Add 1 tsp pure vanilla extract and 1/4 tsp flaky sea salt, mixing thoroughly.
7. Scoop tablespoon-sized portions of the mixture onto the prepared baking sheet.
8. Roll each portion between your palms to form smooth, round balls.
9. Chill the bites in the refrigerator for at least 30 minutes until firm.
10. Store in an airtight container in the refrigerator for up to one week.
Ultra-fudgy with a subtle crunch, these bites deliver intense chocolate flavor balanced by nutty undertones. Their firm yet yielding texture makes them perfect for portion-controlled indulgence. Try rolling them in additional cocoa powder or crushed almonds for visual appeal.
Frozen Yogurt Bark with Berries
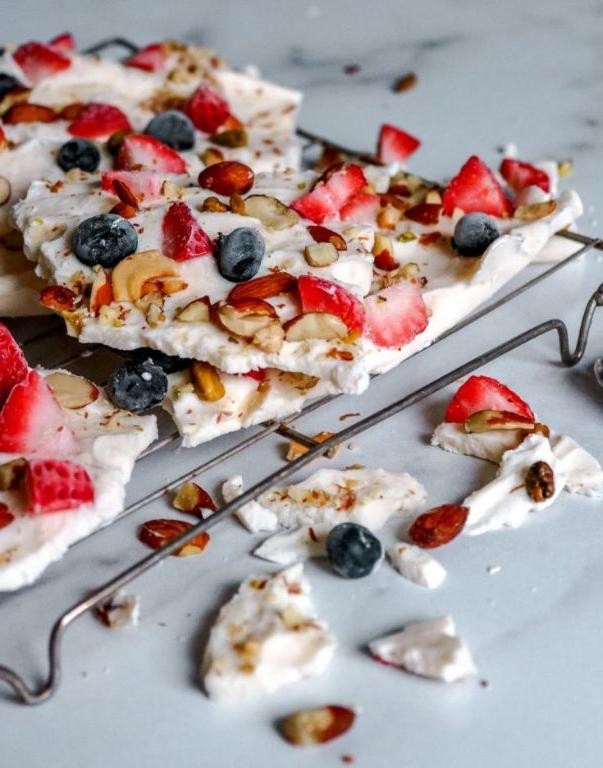
A refreshing frozen treat that comes together in minutes. This vibrant yogurt bark delivers creamy texture with bursts of berry flavor. Perfect for quick snacks or healthy dessert options.
1
bark10
minutes240
minutesIngredients
– 2 cups thick Greek yogurt
– 3 tablespoons golden honey
– 1 teaspoon pure vanilla extract
– 1 cup mixed fresh berries (raspberries, blueberries, sliced strawberries)
– 2 tablespoons chopped roasted almonds
Instructions
1. Line a standard baking sheet with parchment paper.
2. In a medium bowl, combine 2 cups thick Greek yogurt, 3 tablespoons golden honey, and 1 teaspoon pure vanilla extract.
3. Whisk the mixture vigorously for 1 minute until completely smooth and well incorporated.
4. Spread the yogurt mixture evenly onto the prepared baking sheet, creating a ¼-inch thick layer.
5. Scatter 1 cup mixed fresh berries evenly across the yogurt surface.
6. Sprinkle 2 tablespoons chopped roasted almonds over the berries.
7. Gently press the toppings into the yogurt layer using the back of a spoon.
8. Freeze the baking sheet for at least 4 hours or until completely solid.
9. Remove the frozen bark from the freezer and let it sit at room temperature for 2 minutes.
10. Break the bark into irregular pieces using your hands or a knife.
11. Transfer the broken pieces to an airtight container.
12. Store in the freezer until ready to serve. Expect a satisfying snap when breaking the frozen bark, with creamy yogurt giving way to juicy berry pockets. The honey-sweetened base balances the tart berries beautifully. Serve as an after-school snack or crumble over morning oatmeal for extra texture.
Apple Cinnamon Energy Balls
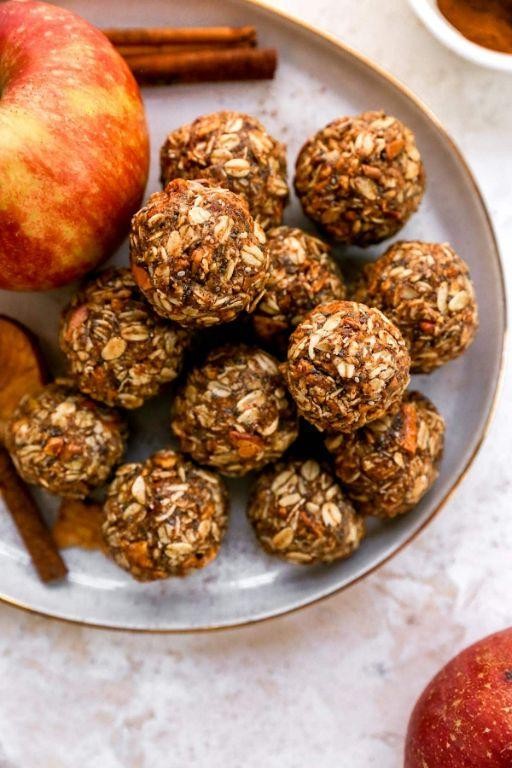
Grab these no-bake apple cinnamon energy balls when you need a quick, wholesome snack. They come together in minutes using pantry staples and deliver natural sweetness with a cozy spice kick. Perfect for busy mornings or afternoon slumps.
24
balls15
minutesIngredients
- 1 cup creamy almond butter
- ½ cup finely chopped dried apples
- ⅓ cup pure maple syrup
- 1 cup old-fashioned rolled oats
- 1 tsp ground cinnamon
- ¼ tsp fine sea salt
Instructions
- Line a baking sheet with parchment paper.
- Measure 1 cup creamy almond butter into a large mixing bowl.
- Add ½ cup finely chopped dried apples to the bowl.
- Pour in ⅓ cup pure maple syrup.
- Sprinkle 1 tsp ground cinnamon and ¼ tsp fine sea salt over the mixture.
- Add 1 cup old-fashioned rolled oats to the bowl.
- Stir all ingredients with a spatula until fully combined and a thick, sticky dough forms.
- Chill the mixture in the refrigerator for 15 minutes to make rolling easier.
- Scoop 1 tablespoon of dough and roll firmly between your palms into a 1-inch ball.
- Place each ball on the prepared baking sheet.
- Repeat until all dough is used, spacing balls 1 inch apart.
- Refrigerate balls for 30 minutes until firm and set.
Keep these energy balls chilled for a firm, chewy texture that holds its shape. The soft dried apples and warm cinnamon create a comforting flavor reminiscent of baked goods. Try rolling them in extra cinnamon or crushed nuts for added crunch.
No-Bake Peanut Butter Bars
Mouthwatering no-bake peanut butter bars satisfy every sweet tooth without turning on your oven. These creamy, nutty treats come together in minutes using simple pantry staples. Perfect for last-minute desserts or afternoon pick-me-ups.
16
squares15
minutesIngredients
– 1 cup creamy natural peanut butter
– ½ cup rich honey
– ½ cup melted coconut oil
– 1 tsp pure vanilla extract
– ¼ tsp fine sea salt
– 2 cups old-fashioned rolled oats
– ½ cup mini chocolate chips
– ½ cup chopped roasted peanuts
Instructions
1. Line an 8×8 inch baking pan with parchment paper, leaving overhang on two sides.
2. Combine 1 cup creamy natural peanut butter, ½ cup rich honey, and ½ cup melted coconut oil in a large mixing bowl.
3. Whisk vigorously for 60 seconds until completely smooth and emulsified.
4. Stir in 1 tsp pure vanilla extract and ¼ tsp fine sea salt until fully incorporated.
5. Add 2 cups old-fashioned rolled oats and mix until every oat is coated in the peanut butter mixture.
6. Fold in ½ cup mini chocolate chips and ½ cup chopped roasted peanuts until evenly distributed.
7. Press the mixture firmly into the prepared pan using the bottom of a measuring cup to create an even layer.
8. Chill in refrigerator for at least 2 hours until completely firm and sliceable.
9. Lift the bars from the pan using the parchment paper overhang.
10. Cut into 16 even squares using a sharp knife wiped clean between cuts.
Perfectly chewy with satisfying crunch from the peanuts, these bars deliver intense peanut butter flavor balanced by sweet honey notes. Try them crumbled over vanilla ice cream or packed in lunchboxes for an energy-boosting snack.
Coconut and Matcha Chia Seed Pudding
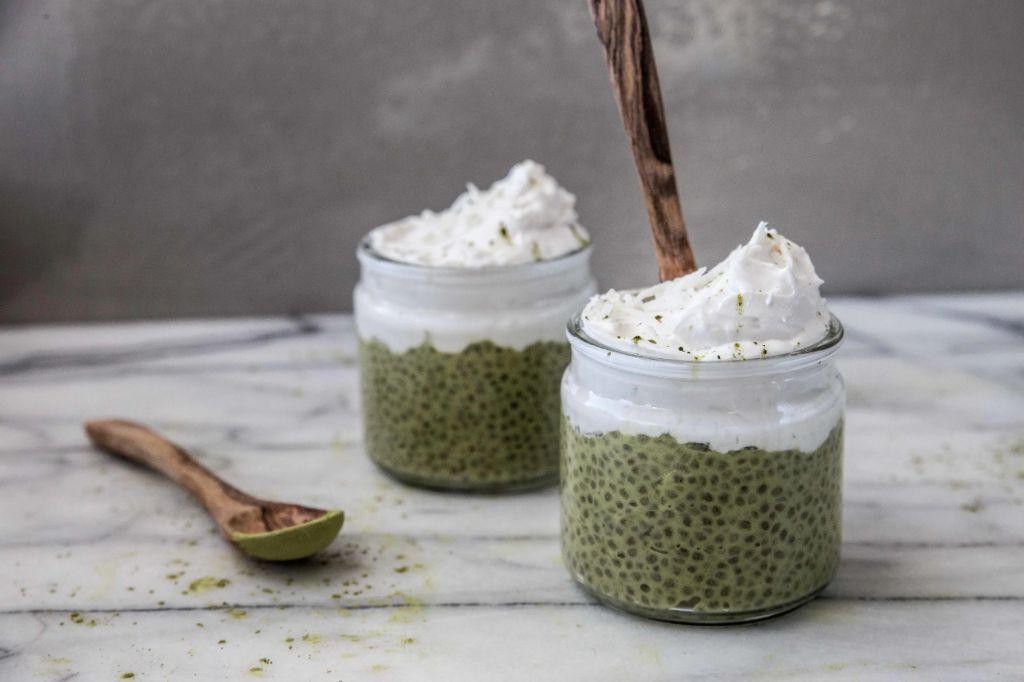
Haven’t we all needed a breakfast that feels indulgent but takes minimal effort? Coconut and matcha chia seed pudding delivers exactly that—a creamy, energizing start to your day with just minutes of prep. This vibrant green treat combines tropical flavors with antioxidant-rich matcha in a make-ahead wonder.
2
servings10
minutesIngredients
– 1/2 cup creamy coconut milk
– 1 1/2 tbsp vibrant ceremonial-grade matcha powder
– 1/4 cup small black chia seeds
– 2 tbsp pure maple syrup
– 1/4 tsp fine sea salt
– 1/2 tsp pure vanilla extract
Instructions
1. Pour 1/2 cup creamy coconut milk into a medium mixing bowl.
2. Add 1 1/2 tbsp vibrant ceremonial-grade matcha powder to the coconut milk.
3. Whisk vigorously for 60 seconds until no green clumps remain—this prevents bitter matcha lumps.
4. Stir in 2 tbsp pure maple syrup until fully dissolved.
5. Add 1/4 tsp fine sea salt and 1/2 tsp pure vanilla extract, whisking to combine.
6. Gradually sprinkle in 1/4 cup small black chia seeds while continuously whisking to prevent clumping.
7. Let mixture rest for 5 minutes, then whisk again to break up any seed clusters that formed.
8. Divide pudding evenly between two 8-ounce jars or containers.
9. Seal containers tightly with lids.
10. Refrigerate for at least 8 hours or overnight until pudding reaches thick, spoonable consistency.
11. Check texture after 8 hours—it should hold its shape when tilted but remain creamy.
12. Serve chilled directly from refrigerator.
For maximum creaminess, give the pudding one final stir before serving to redistribute any settled liquid. The finished texture is luxuriously thick with a subtle gelatinous bite from the chia seeds. Fresh berries or toasted coconut flakes make excellent toppings that complement the earthy matcha flavor. This pudding also layers beautifully in parfait glasses with mango chunks for a tropical twist.
Two-Ingredient Nice Cream

Eliminate complicated ice cream recipes with this ridiculously simple frozen treat. Essentially frozen bananas transformed into creamy perfection, this requires zero special equipment or cooking skills. You’ll be amazed at how two basic ingredients create such luxurious texture.
3
servings10
minutesIngredients
– 4 large ripe bananas with brown speckles
– 2 tablespoons creamy natural peanut butter
Instructions
1. Peel 4 large ripe bananas with brown speckles and slice them into 1-inch thick coins.
2. Arrange banana coins in a single layer on a parchment-lined baking sheet.
3. Freeze banana coins for exactly 4 hours or until completely solid and hard to the touch.
4. Transfer frozen banana coins to a high-speed blender or food processor bowl.
5. Add 2 tablespoons creamy natural peanut butter to the blender with frozen bananas.
6. Blend mixture on high speed for 30 seconds, then scrape down sides with a spatula.
7. Continue blending in 15-second intervals, scraping between each, until completely smooth and creamy.
8. Serve immediately for soft-serve consistency or transfer to an airtight container.
9. Freeze for 2 additional hours for scoopable ice cream texture.
Just blended, this nice cream delivers incredible creaminess that rivals traditional dairy versions. The natural sweetness from ripe bananas pairs perfectly with the nutty richness of peanut butter. Try swirling in chocolate chips or drizzling with honey for instant dessert upgrades.
Zesty Lemon Yogurt Tart
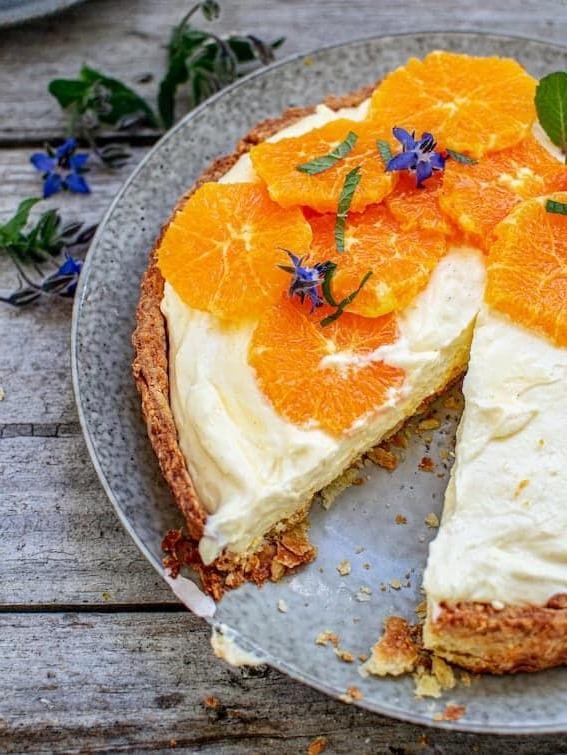
Zesty lemon yogurt tart brings bright citrus flavor to creamy, no-bake desserts. This refreshing treat comes together quickly with simple ingredients. Perfect for warm days when you want something cool and tangy.
8
servings35
minutesIngredients
– 1 ½ cups finely crushed graham cracker crumbs
– 6 tablespoons melted unsalted butter
– 2 cups thick Greek yogurt
– ⅓ cup freshly squeezed lemon juice
– 1 tablespoon finely grated lemon zest
– ¾ cup granulated sugar
– 1 envelope unflavored gelatin powder
– ¼ cup cold water
– Pinch of fine sea salt
– Fresh mint leaves for garnish
Instructions
1. Combine 1 ½ cups finely crushed graham cracker crumbs with 6 tablespoons melted unsalted butter in a medium bowl.
2. Press the crumb mixture firmly into the bottom and up the sides of a 9-inch tart pan using the bottom of a measuring cup.
3. Chill the crust in the refrigerator for 30 minutes until firm.
4. Sprinkle 1 envelope unflavored gelatin powder over ¼ cup cold water in a small bowl and let bloom for 5 minutes.
5. Warm the gelatin mixture in the microwave for 15 seconds until completely dissolved.
6. Whisk together 2 cups thick Greek yogurt, ⅓ cup freshly squeezed lemon juice, 1 tablespoon finely grated lemon zest, ¾ cup granulated sugar, and a pinch of fine sea salt in a large bowl.
7. Slowly pour the warm gelatin mixture into the yogurt mixture while continuously whisking.
8. Pour the filling into the chilled crust and smooth the top with a spatula.
9. Refrigerate the tart for at least 4 hours or until completely set.
10. Garnish with fresh mint leaves before serving.
Lemon yogurt tart delivers a perfect balance of creamy and bright textures. The smooth filling contrasts beautifully with the crunchy graham cracker crust. Serve chilled with fresh berries or a drizzle of honey for extra sweetness.
Conclusion
Overall, these 32 fast and healthy desserts prove that treating yourself doesn’t have to be complicated or guilt-inducing. We hope you find some new favorites to whip up in your kitchen! Don’t forget to leave a comment telling us which recipe you loved most, and share this roundup on Pinterest so other home cooks can discover these delicious treats too.


