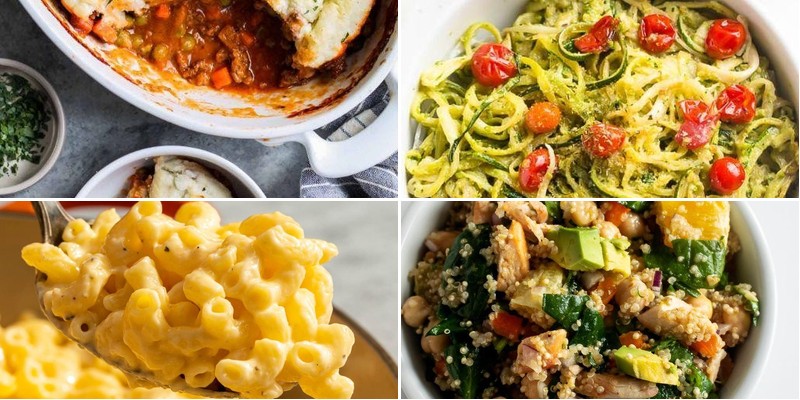
Tired of the same old gluten-free meals? We’ve gathered 21 delicious, family-friendly recipes that are anything but boring! From quick weeknight dinners to comforting classics, these dishes are sure to please everyone at the table. Get ready to discover new favorites that make eating gluten-free both easy and exciting—let’s dive in!
Crispy Baked Chicken Tenders with Honey Mustard Sauce

Ready to transform your Tuesday night from “meh” to magnificent? These crispy baked chicken tenders are about to become your new kitchen superhero—no deep-fryer required, just pure golden-brown magic that’ll have even the pickiest eaters begging for seconds. Trust me, your air fryer FOMO just met its match!
2
servings15
minutes30
minutesIngredients
– 1.5 lbs chicken tenders
– 1 cup all-purpose flour
– 2 large eggs
– 2 cups panko breadcrumbs
– 1 tsp garlic powder
– 1 tsp paprika
– 1/2 tsp black pepper
– 1/2 cup mayonnaise
– 2 tbsp Dijon mustard
– 2 tbsp honey
– 1 tbsp lemon juice
– 2 tbsp olive oil
Instructions
1. Preheat your oven to 425°F and line a baking sheet with parchment paper.
2. Pat the chicken tenders completely dry with paper towels—this is your secret weapon for maximum crispiness.
3. In a shallow bowl, whisk together the flour, garlic powder, paprika, and black pepper.
4. Crack the eggs into a second bowl and beat them until fully blended.
5. Pour the panko breadcrumbs into a third bowl, creating your crispy coating station.
6. Dredge each chicken tender in the flour mixture, shaking off any excess.
7. Dip the floured tender into the beaten eggs, letting the excess drip back into the bowl.
8. Press the chicken firmly into the panko breadcrumbs, coating all sides evenly.
9. Arrange the breaded tenders in a single layer on the prepared baking sheet.
10. Drizzle the olive oil evenly over the top of each tender—this mimics deep-frying without the grease.
11. Bake for 15-18 minutes, then flip each tender using tongs.
12. Continue baking for another 10-12 minutes until the internal temperature reaches 165°F and the coating is deep golden brown.
13. While the chicken bakes, whisk together the mayonnaise, Dijon mustard, honey, and lemon juice in a small bowl.
14. Let the chicken rest for 5 minutes before serving—this keeps the juices locked in.
Crispy on the outside, tender on the inside, these beauties deliver that satisfying crunch you crave without the guilt. The honey mustard sauce adds the perfect sweet-tangy punch that makes these irresistible—try serving them stacked high on a wooden board with extra sauce for dipping, because let’s be real, everything’s better when it’s shareable.
Savory Quinoa and Black Bean Stuffed Peppers
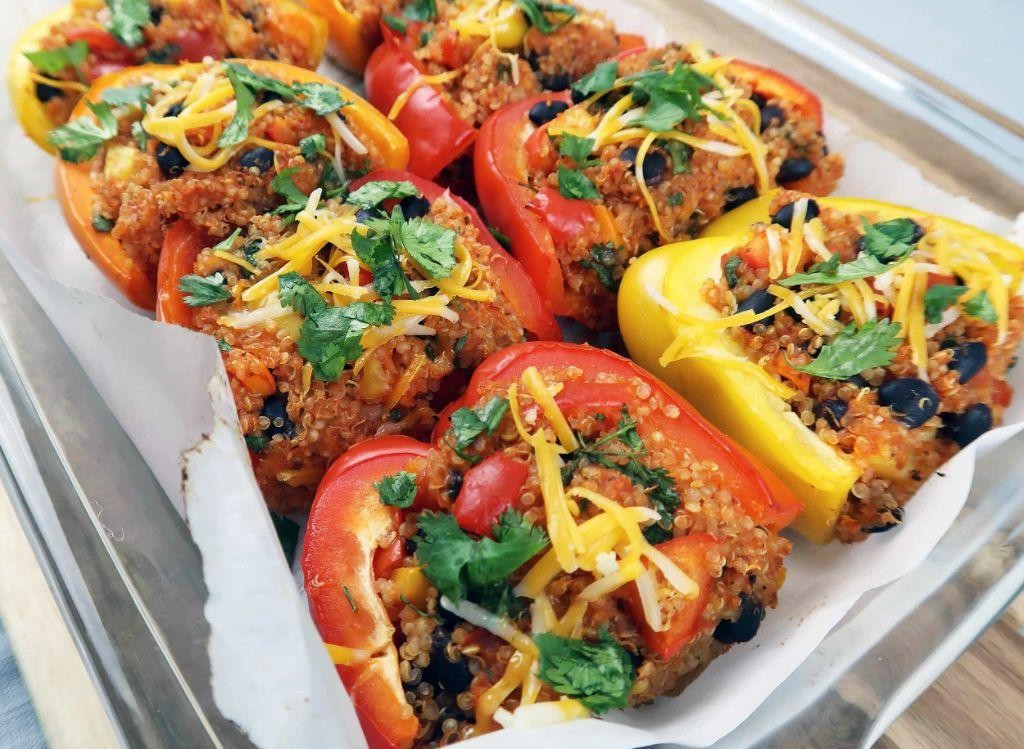
Unbelievably delicious and secretly healthy—these stuffed peppers are the culinary equivalent of finding money in your winter coat pocket. Who knew quinoa and black beans could party so hard inside a bell pepper? Let’s get stuffing!
2
servings20
minutes55
minutesIngredients
- 4 large bell peppers
- 1 cup quinoa
- 2 cups vegetable broth
- 1 can (15 oz) black beans, rinsed and drained
- 1 cup corn kernels
- 1 small onion, diced
- 2 cloves garlic, minced
- 1 tbsp olive oil
- 1 tsp cumin
- 1/2 tsp chili powder
- 1/2 cup shredded Monterey Jack cheese
- 1/4 cup chopped fresh cilantro
- 1 tbsp lime juice
- 1/2 tsp salt
- 1/4 tsp black pepper
Instructions
- Preheat your oven to 375°F and lightly grease a baking dish.
- Slice the tops off the bell peppers and remove all seeds and membranes.
- Rinse the quinoa thoroughly in a fine-mesh strainer to remove any bitterness.
- Heat olive oil in a medium saucepan over medium heat and sauté the diced onion for 4-5 minutes until translucent.
- Add minced garlic and cook for 1 more minute until fragrant.
- Stir in the rinsed quinoa, vegetable broth, cumin, chili powder, salt, and black pepper.
- Bring the mixture to a boil, then reduce heat to low, cover, and simmer for 15 minutes until the quinoa has absorbed all the liquid.
- Remove the quinoa from heat and fluff with a fork, then let it cool for 5 minutes.
- Mix in the black beans, corn, shredded cheese, cilantro, and lime juice until well combined.
- Spoon the quinoa mixture evenly into the prepared bell peppers, packing it down gently.
- Place the stuffed peppers upright in the greased baking dish and cover with foil.
- Bake for 25 minutes, then remove the foil and bake for another 10 minutes until the peppers are tender and the filling is heated through.
- Let the peppers rest for 5 minutes before serving to allow the filling to set.
Outrageously satisfying with a perfect textural contrast between the tender pepper shells and the fluffy, protein-packed filling. The melted cheese creates little pockets of creamy goodness throughout, while the fresh cilantro and lime brighten every bite. Try serving these over a bed of crisp romaine lettuce for a deconstructed taco bowl situation that’ll make your Tuesday night feel like a fiesta!
Gluten-Free Pancakes with Fresh Berries
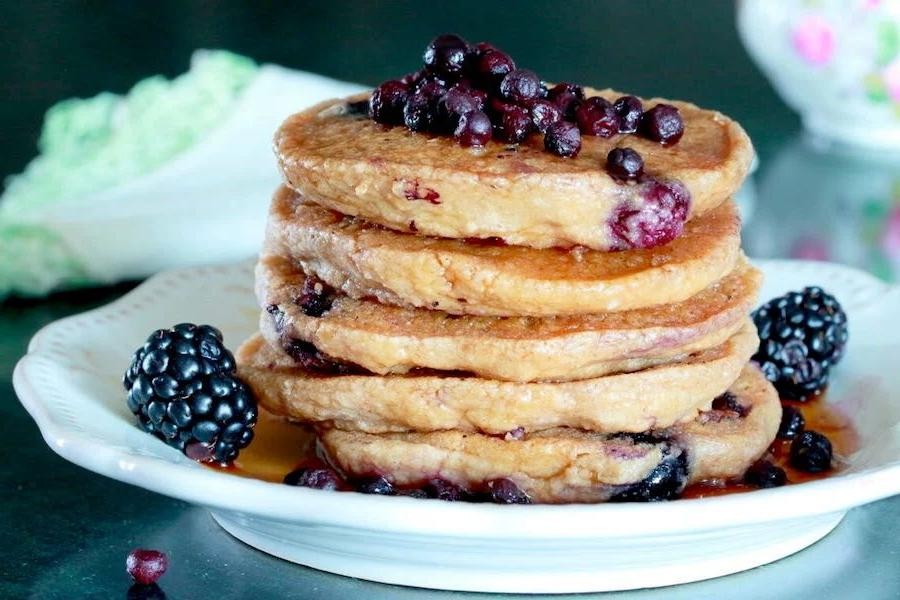
Virtually every weekend warrior knows the struggle: you want fluffy pancakes, but gluten wants to ruin your parade. Fear not, breakfast rebels! These gluten-free pancakes are here to save your morning with berry-bursting glory that’ll make you forget wheat ever existed.
2
servings10
minutes15
minutesIngredients
– 1 cup gluten-free all-purpose flour
– 2 tbsp granulated sugar
– 1 tsp baking powder
– 1/2 tsp baking soda
– 1/4 tsp salt
– 1 cup buttermilk
– 1 large egg
– 2 tbsp melted butter
– 1 tsp vanilla extract
– 1 cup mixed fresh berries
– 2 tbsp vegetable oil
Instructions
1. Whisk together 1 cup gluten-free all-purpose flour, 2 tbsp granulated sugar, 1 tsp baking powder, 1/2 tsp baking soda, and 1/4 tsp salt in a large bowl.
2. In a separate bowl, combine 1 cup buttermilk, 1 large egg, 2 tbsp melted butter, and 1 tsp vanilla extract until smooth.
3. Pour the wet ingredients into the dry ingredients and stir until just combined—don’t overmix! (Tip: Lumps are fine and prevent tough pancakes.)
4. Gently fold in 1 cup mixed fresh berries until evenly distributed.
5. Heat a non-stick skillet or griddle over medium heat and add 1 tbsp vegetable oil.
6. Pour 1/4 cup batter for each pancake onto the hot surface.
7. Cook for 2-3 minutes until bubbles form on the surface and edges look set.
8. Flip pancakes carefully and cook for another 1-2 minutes until golden brown. (Tip: Wait for those bubbles—they’re your visual cue for perfect flipping timing.)
9. Repeat with remaining batter, adding remaining 1 tbsp vegetable oil as needed between batches.
10. Serve immediately while hot. (Tip: Keep finished pancakes in a 200°F oven to stay warm while cooking the rest.)
Remarkably fluffy with tender crumb and juicy berry pockets, these pancakes deliver sweet-tart perfection in every bite. Try stacking them high with extra fresh berries and a drizzle of maple syrup for Instagram-worthy breakfast glory, or get fancy with whipped coconut cream for dairy-free indulgence.
Easy Shepherd’s Pie with Cauliflower Mash
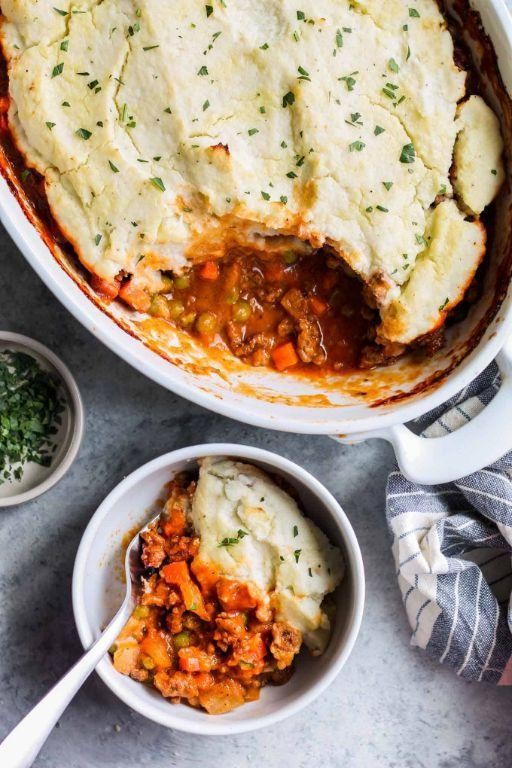
Juggling dinner and sanity? This easy shepherd’s pie swaps traditional mashed potatoes for a sneaky cauliflower mash that’ll have even the pickiest eaters asking for seconds. Just when you thought comfort food couldn’t get any cozier, we’re turning cauliflower into the star of the show with zero guilt and maximum flavor.
3
portions25
minutes55
minutesIngredients
– 1 lb ground beef
– 1 medium onion, diced
– 2 carrots, diced
– 2 cloves garlic, minced
– 1 cup frozen peas
– 1 cup beef broth
– 2 tbsp tomato paste
– 1 tbsp Worcestershire sauce
– 1 large head cauliflower, cut into florets
– 1/2 cup heavy cream
– 4 tbsp butter
– 1/2 cup shredded cheddar cheese
– 1 tsp salt
– 1/2 tsp black pepper
– 1 tbsp olive oil
Instructions
1. Preheat your oven to 400°F and grease a 9-inch baking dish with olive oil.
2. Place cauliflower florets in a large pot and cover with water, then boil for 12-15 minutes until fork-tender.
3. While cauliflower cooks, heat 1 tablespoon olive oil in a large skillet over medium-high heat.
4. Add ground beef and cook for 6-8 minutes, breaking it up with a spatula until browned.
5. Drain excess fat from the skillet, leaving about 1 tablespoon behind for flavor.
6. Add diced onion and carrots to the skillet, cooking for 5-7 minutes until vegetables soften.
7. Stir in minced garlic and cook for 1 minute until fragrant.
8. Mix in tomato paste and cook for 2 minutes to deepen the flavor.
9. Pour in beef broth and Worcestershire sauce, scraping any browned bits from the pan bottom.
10. Add frozen peas and simmer for 5 minutes until the sauce thickens slightly.
11. Season the beef mixture with 1/2 teaspoon salt and 1/4 teaspoon black pepper.
12. Transfer the beef mixture to the prepared baking dish, spreading it evenly.
13. Drain the cooked cauliflower thoroughly in a colander, then return it to the hot pot for 1 minute to evaporate excess moisture.
14. Mash the cauliflower with a potato masher until smooth, then stir in heavy cream, butter, remaining salt, and pepper.
15. Spread the cauliflower mash evenly over the beef layer, creating decorative peaks with a fork.
16. Sprinkle shredded cheddar cheese evenly over the cauliflower layer.
17. Bake for 20-25 minutes until the cheese is golden and the filling is bubbling around the edges.
18. Let the shepherd’s pie rest for 10 minutes before serving to allow the layers to set.
Hearty doesn’t begin to describe the glorious layers of savory beef and velvety cauliflower mash that emerge from your oven. The cheesy crust gives way to a rich, meaty filling that’s somehow both comforting and surprisingly light. Try serving individual portions in rustic ramekins for a dinner party showstopper that proves comfort food can be both elegant and effortless.
Zucchini Noodles with Pesto and Grilled Cherry Tomatoes
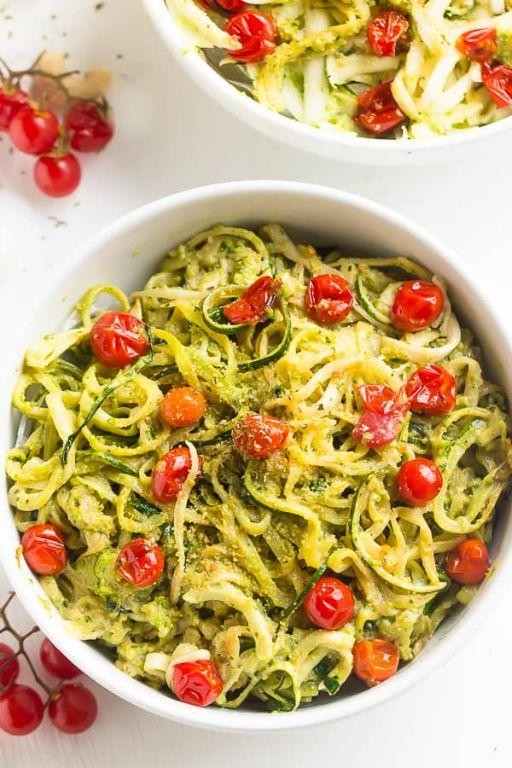
Oh, the eternal struggle of trying to eat your veggies without feeling like a rabbit on a sad diet! This zucchini noodle situation is here to rescue your taste buds from boredom, tossing spiralized squash with vibrant pesto and sweet, blistered tomatoes for a dish that’s basically summer on a plate—no guilt trips allowed.
4
servings20
minutes5
minutesIngredients
- 4 medium zucchinis
- 2 cups fresh basil leaves
- 1/2 cup grated Parmesan cheese
- 1/3 cup pine nuts
- 2 cloves garlic
- 1/2 cup extra-virgin olive oil
- 1 pint cherry tomatoes
- 1 tbsp olive oil
- 1/2 tsp salt
- 1/4 tsp black pepper
Instructions
- Preheat a grill or grill pan to medium-high heat (400°F).
- Spiralize the zucchinis into noodles using a spiralizer, then set them aside in a colander to drain excess moisture for 10 minutes—this prevents a watery sauce later.
- In a food processor, combine the basil leaves, Parmesan cheese, pine nuts, and garlic cloves, pulsing until finely chopped.
- With the processor running, slowly drizzle in the extra-virgin olive oil until the pesto is smooth and emulsified, about 1 minute.
- Toss the cherry tomatoes with 1 tablespoon of olive oil, salt, and black pepper in a bowl.
- Place the tomatoes on the preheated grill, cooking for 4–5 minutes until they’re blistered and slightly charred, shaking occasionally for even cooking.
- Transfer the grilled tomatoes to a large mixing bowl.
- Add the zucchini noodles to the same bowl, then pour the pesto over the top.
- Gently toss everything together until the noodles are evenly coated with pesto and tomatoes are distributed throughout—this keeps the zucchini crisp instead of mushy.
Just imagine that first forkful: the zucchini noodles offer a fresh, al dente crunch, while the pesto brings a garlicky, herbaceous punch balanced by the sweet, smoky tomatoes. Serve it chilled for a refreshing lunch or top with grilled shrimp to turn it into a show-stopping dinner—either way, it’s a veggie victory you’ll want to repeat.
Cheesy Broccoli and Chicken Casserole

Let’s be real—when comfort food calls, this cheesy broccoli and chicken casserole answers with a triumphant “cheese pull!” It’s the cozy hug your weeknight dinner deserves, packed with tender chicken, vibrant broccoli, and a blanket of melty cheese that’ll make you forget all about that pile of laundry waiting for you. Trust me, this dish is so good, it might just become your new favorite excuse to skip meal prep.
6
servings15
minutes35
minutesIngredients
– 2 cups cooked chicken, shredded
– 4 cups broccoli florets
– 1 cup heavy cream
– 2 cups shredded cheddar cheese
– 1/2 cup grated Parmesan cheese
– 1/2 cup breadcrumbs
– 2 tbsp unsalted butter
– 1 tsp garlic powder
– 1/2 tsp black pepper
– 1/2 tsp salt
Instructions
1. Preheat your oven to 375°F and grease a 9×13-inch baking dish with butter or non-stick spray.
2. Steam the broccoli florets for 5 minutes until bright green and slightly tender, then drain thoroughly to avoid a watery casserole.
3. In a large bowl, combine the shredded chicken, steamed broccoli, heavy cream, 1 1/2 cups cheddar cheese, Parmesan cheese, garlic powder, salt, and pepper.
4. Transfer the mixture to the prepared baking dish and spread it into an even layer.
5. Sprinkle the remaining 1/2 cup cheddar cheese evenly over the top.
6. In a small bowl, melt the butter and mix it with the breadcrumbs until well combined.
7. Scatter the buttered breadcrumbs over the cheese layer for a crispy, golden finish.
8. Bake for 25–30 minutes, or until the top is bubbly and the breadcrumbs are golden brown.
9. Let the casserole rest for 5 minutes before serving to allow the sauce to thicken slightly.
The casserole emerges gloriously bubbly, with a golden crust that gives way to a creamy, cheesy interior where the broccoli stays perfectly crisp-tender. Serve it straight from the dish with a side of garlic bread for dipping, or spoon it over baked potatoes for a carb-loaded twist that’ll have everyone asking for seconds.
Classic Gluten-Free Spaghetti Carbonara
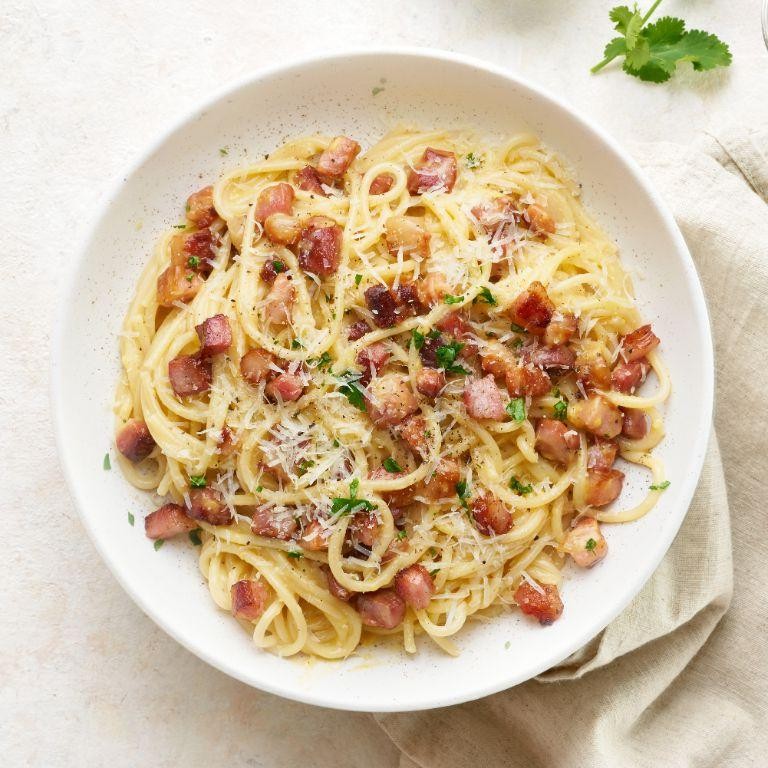
Kick your gluten-free worries to the curb, because we’re about to dive headfirst into a bowl of pure, unadulterated comfort that just happens to be celiac-friendly. This isn’t your average, timid “healthy” alternative—this is a gloriously rich, creamy, and deeply satisfying spaghetti carbonara that will have you questioning why you ever bothered with wheat in the first place.
4
servings15
minutes20
minutesIngredients
- 12 oz gluten-free spaghetti
- 4 large eggs
- 1 cup grated Pecorino Romano cheese
- 6 oz pancetta, diced
- 3 cloves garlic, minced
- 1/2 tsp black pepper
- 1/4 tsp salt
Instructions
- Bring a large pot of heavily salted water to a rolling boil over high heat.
- Add 12 oz gluten-free spaghetti to the boiling water and cook for 8-10 minutes, stirring occasionally to prevent sticking, until al dente (firm to the bite).
- While pasta cooks, whisk 4 large eggs, 1 cup grated Pecorino Romano cheese, and 1/2 tsp black pepper in a medium bowl until smooth and well-combined.
- Cook 6 oz diced pancetta in a large skillet over medium heat for 5-7 minutes, stirring frequently, until crisp and golden brown.
- Add 3 cloves minced garlic to the skillet with the pancetta and cook for 1 minute, just until fragrant.
- Remove the skillet from heat and let it cool for 1 minute to prevent scrambling the eggs in the next step.
- Reserve 1 cup of the starchy pasta water before draining the cooked spaghetti.
- Immediately transfer the hot, drained spaghetti directly into the skillet with the pancetta and garlic.
- Working quickly, pour the egg and cheese mixture over the hot pasta, tossing continuously with tongs for 1-2 minutes until a creamy sauce forms.
- Add reserved pasta water 1/4 cup at a time, tossing between additions, until the sauce reaches your desired consistency (usually about 1/2 cup total).
- Season with 1/4 tsp salt and additional black pepper to taste, tossing to combine.
- Serve immediately in warm bowls. Oh my goodness, the magic here is in that silky, egg-based sauce clinging to every nook of the gluten-free spaghetti—it’s salty from the pancetta, sharp from the Pecorino, and so luxuriously creamy you’ll want to eat it straight from the skillet. Try topping with an extra sprinkle of cheese and serving with a simple arugula salad for the perfect salty-green contrast.
Hearty Lentil and Vegetable Stew
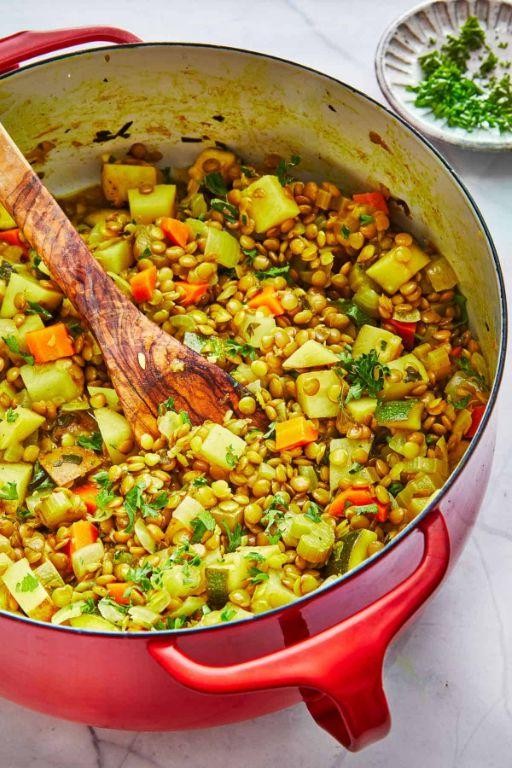
Fancy something that’ll hug your soul tighter than your favorite blanket? This hearty lentil and vegetable stew is here to rescue your dinner game with zero drama and maximum flavor fireworks. Let’s turn those humble ingredients into a pot of pure comfort magic!
3
servings15
minutes52
minutesIngredients
– 2 tbsp olive oil
– 1 large onion, diced
– 3 cloves garlic, minced
– 2 carrots, chopped
– 2 celery stalks, chopped
– 1 cup brown lentils, rinsed
– 6 cups vegetable broth
– 1 (14.5 oz) can diced tomatoes
– 1 tsp dried thyme
– 1 bay leaf
– 1 tsp salt
– ½ tsp black pepper
– 2 cups chopped kale
Instructions
1. Heat 2 tbsp olive oil in a large pot over medium heat for 2 minutes until shimmering.
2. Add 1 large diced onion and cook for 5 minutes, stirring occasionally, until translucent.
3. Add 3 minced garlic cloves and cook for 1 minute until fragrant.
4. Stir in 2 chopped carrots and 2 chopped celery stalks, cooking for 4 minutes until slightly softened.
5. Add 1 cup rinsed brown lentils, 6 cups vegetable broth, 1 can diced tomatoes, 1 tsp dried thyme, 1 bay leaf, 1 tsp salt, and ½ tsp black pepper.
6. Bring to a boil, then reduce heat to low, cover, and simmer for 30 minutes.
7. Remove lid and stir in 2 cups chopped kale, cooking uncovered for 10 more minutes until kale is wilted and lentils are tender.
8. Discard the bay leaf and let stew rest for 5 minutes before serving.
So velvety and satisfying, this stew delivers earthy lentils swimming in a rich tomato broth with pops of sweet carrot and sturdy kale. Serve it with crusty bread for dipping or over mashed potatoes for the ultimate cozy bowl—your taste buds will throw a thank-you party!
Gluten-Free Pizza with Roasted Vegetable Toppings
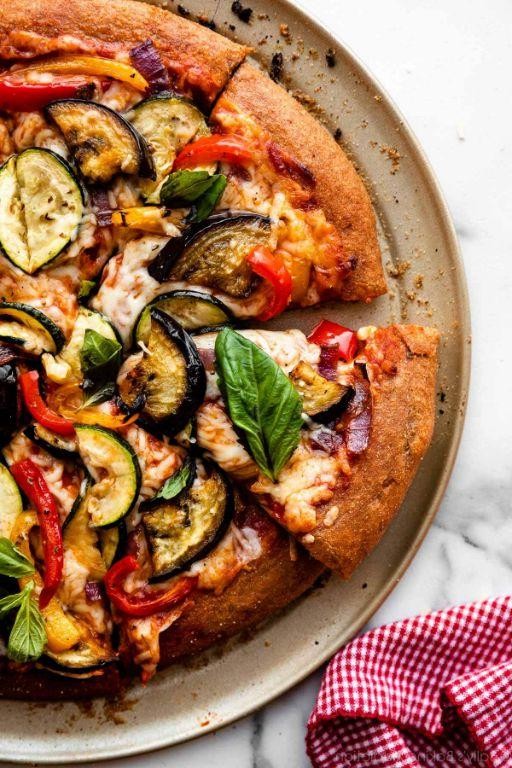
Gluten-free pizza that actually tastes like pizza? Get ready to have your mind (and taste buds) blown! This isn’t your average cardboard-like imposter – we’re talking crispy crust, melty cheese, and roasted veggies that’ll make you forget gluten ever existed. Who needs wheat when you’ve got this flavor party happening?
1
pizza20
minutes38
minutesIngredients
– 1 ½ cups gluten-free flour blend
– 1 tsp active dry yeast
– ¾ cup warm water (110°F)
– 1 tbsp olive oil
– ½ tsp salt
– 1 cup pizza sauce
– 2 cups shredded mozzarella cheese
– 1 cup sliced bell peppers
– 1 cup sliced zucchini
– 1 cup sliced mushrooms
– 2 tbsp olive oil
– ½ tsp garlic powder
Instructions
1. Combine 1 ½ cups gluten-free flour blend, 1 tsp active dry yeast, and ½ tsp salt in a large mixing bowl.
2. Pour in ¾ cup warm water (110°F) and 1 tbsp olive oil, then mix until a dough forms.
3. Knead the dough on a floured surface for 3 minutes until smooth. Tip: Gluten-free dough won’t become elastic like regular dough, so stop when it feels cohesive.
4. Place the dough in a greased bowl, cover with a damp cloth, and let rise in a warm place for 1 hour.
5. Preheat your oven to 425°F while the dough rises.
6. Toss 1 cup sliced bell peppers, 1 cup sliced zucchini, and 1 cup sliced mushrooms with 2 tbsp olive oil and ½ tsp garlic powder on a baking sheet.
7. Roast the vegetables at 425°F for 15 minutes until slightly caramelized and tender.
8. Press the risen dough into a 12-inch pizza pan, creating a slight rim around the edges.
9. Spread 1 cup pizza sauce evenly over the dough, leaving ½ inch border uncovered.
10. Sprinkle 2 cups shredded mozzarella cheese over the sauce.
11. Arrange the roasted vegetables evenly across the cheese layer. Tip: Distribute veggies evenly to ensure every slice gets perfect coverage.
12. Bake at 425°F for 18-20 minutes until the crust is golden brown and cheese is bubbly. Tip: Rotate the pizza halfway through baking for even browning.
13. Let the pizza rest for 5 minutes before slicing to allow the cheese to set.
Nothing beats that first bite of crispy gluten-free crust giving way to melty cheese and sweet roasted veggies. The caramelized edges on those peppers add just enough smoky sweetness to balance the tangy sauce. Try serving slices with a drizzle of balsamic glaze for an extra flavor boost that’ll make your taste buds do a happy dance!
Homemade Gluten-Free Mac and Cheese

Oh, the cheesy, comforting embrace of mac and cheese—now gluten-free and ready to hug your soul without the gluten guilt! We’ve ditched the wheat but kept all the gooey, dreamy goodness, because who says you can’t have it all? Let’s dive into this bowl of pure joy, where every bite is a creamy, cheesy high-five to your taste buds.
5
servings15
minutes40
minutesIngredients
– 8 ounces gluten-free elbow pasta
– 2 tablespoons unsalted butter
– 2 tablespoons gluten-free all-purpose flour
– 2 cups whole milk
– 1 teaspoon garlic powder
– 1 teaspoon onion powder
– 1/2 teaspoon paprika
– 1/2 teaspoon salt
– 1/4 teaspoon black pepper
– 2 cups shredded sharp cheddar cheese
– 1/2 cup grated Parmesan cheese
Instructions
1. Preheat your oven to 375°F and lightly grease a 9×13-inch baking dish.
2. Bring a large pot of salted water to a rolling boil over high heat.
3. Add 8 ounces of gluten-free elbow pasta to the boiling water and cook for 7-9 minutes, stirring occasionally, until al dente (tip: check a piece for firmness to avoid mush).
4. Drain the pasta in a colander and set it aside; do not rinse to keep the starch for creaminess.
5. In the same pot, melt 2 tablespoons of unsalted butter over medium heat.
6. Whisk in 2 tablespoons of gluten-free all-purpose flour and cook for 1-2 minutes until bubbly and golden, stirring constantly to prevent burning.
7. Gradually pour in 2 cups of whole milk, whisking continuously to avoid lumps, and cook for 3-5 minutes until the mixture thickens slightly.
8. Stir in 1 teaspoon garlic powder, 1 teaspoon onion powder, 1/2 teaspoon paprika, 1/2 teaspoon salt, and 1/4 teaspoon black pepper until well combined.
9. Reduce the heat to low and add 2 cups of shredded sharp cheddar cheese and 1/2 cup of grated Parmesan cheese, stirring until fully melted and smooth (tip: shred cheese yourself for better meltability).
10. Combine the cheese sauce with the drained pasta in the pot, tossing gently to coat evenly.
11. Transfer the mixture to the prepared baking dish and spread it into an even layer.
12. Bake at 375°F for 20-25 minutes, until the top is lightly browned and bubbly (tip: broil for the last 1-2 minutes for extra crispiness if desired).
13. Remove from the oven and let it rest for 5 minutes before serving. Every spoonful delivers a velvety, rich texture with a sharp cheddar kick, perfect for topping with crispy bacon or serving alongside a fresh salad for a balanced, indulgent meal that’ll have everyone begging for seconds.
Sweet and Spicy Glazed Salmon
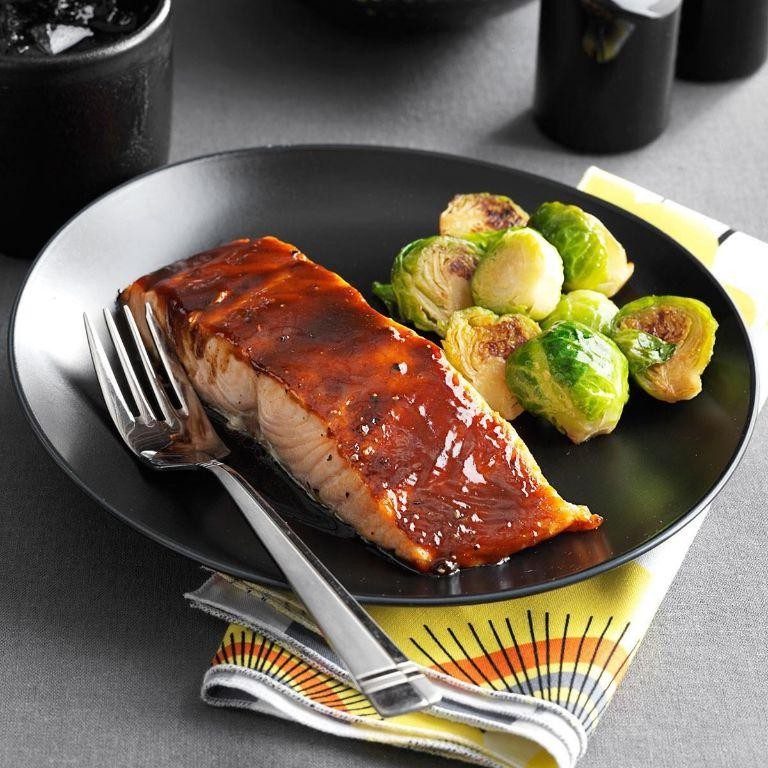
Oh, the eternal struggle between sweet and spicy—until now, when this glazed salmon swoops in like a culinary superhero to settle the score. Picture this: a fillet so perfectly balanced it could probably mediate family arguments, with a sticky-sweet glaze that’s got just enough kick to keep things interesting. Let’s dive into a dish that’s as easy to make as it is to devour in record time.
5
servings10
minutes17
minutesIngredients
– 4 (6-ounce) salmon fillets, skin-on
– 1/4 cup honey
– 2 tablespoons soy sauce
– 1 tablespoon sriracha
– 1 tablespoon olive oil
– 2 cloves garlic, minced
– 1 teaspoon grated fresh ginger
– 1/2 teaspoon black pepper
– 1/4 teaspoon salt
Instructions
1. Preheat your oven to 400°F and line a baking sheet with parchment paper.
2. Pat the salmon fillets dry with paper towels to ensure a crispier finish.
3. In a small bowl, whisk together the honey, soy sauce, sriracha, olive oil, minced garlic, grated ginger, black pepper, and salt until fully combined.
4. Brush half of the glaze evenly over the top of each salmon fillet, reserving the remainder.
5. Place the salmon skin-side down on the prepared baking sheet.
6. Bake for 12–15 minutes, or until the salmon flakes easily with a fork and reaches an internal temperature of 145°F.
7. Brush the reserved glaze over the salmon during the last 2 minutes of baking for an extra glossy coat.
8. Let the salmon rest for 3 minutes before serving to allow the juices to redistribute.
Just imagine that first bite: the caramelized glaze crackles slightly, giving way to tender, flaky fish that melts in your mouth. Serve it over a bed of coconut rice to tame the heat, or chop it into tacos for a fun twist—either way, it’s a flavor fiesta that’ll have everyone asking for seconds.
Fluffy Almond Flour Banana Muffins
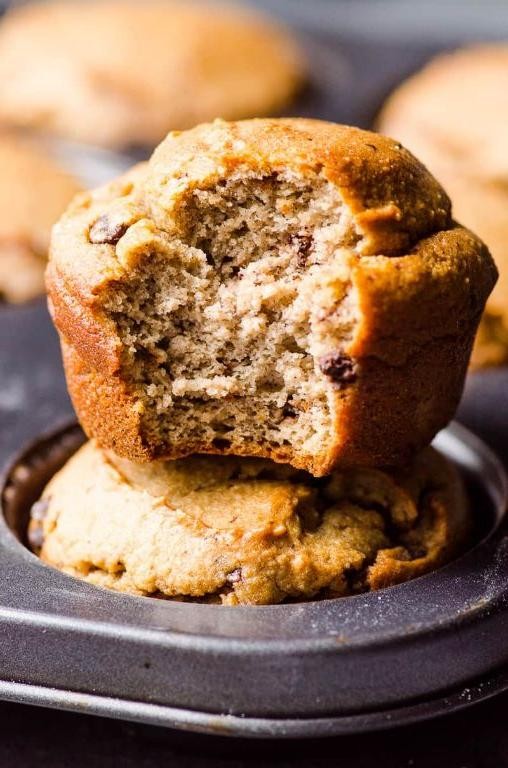
Let’s be honest—when life gives you bananas turning browner than your favorite leather boots, you’ve got two choices: compost them or transform them into something spectacular. Lucky for you, we’re choosing the delicious route with these almond flour banana muffins that are so fluffy, they practically float off the plate.
12
muffins15
minutes22
minutesIngredients
– 2 cups almond flour
– 3 ripe bananas
– 2 large eggs
– 1/4 cup honey
– 1 tsp baking soda
– 1 tsp vanilla extract
– 1/2 tsp cinnamon
– 1/4 tsp salt
Instructions
1. Preheat your oven to 350°F and line a muffin tin with paper liners.
2. In a large bowl, mash the 3 ripe bananas with a fork until smooth with only small lumps remaining.
3. Crack the 2 large eggs directly into the banana mixture and whisk vigorously until fully combined.
4. Pour in the 1/4 cup honey and 1 tsp vanilla extract, then stir until the mixture becomes uniform in texture.
5. Add the 2 cups almond flour, 1 tsp baking soda, 1/2 tsp cinnamon, and 1/4 tsp salt all at once.
6. Gently fold the dry ingredients into the wet mixture using a spatula—just until no dry streaks remain, being careful not to overmix.
7. Divide the batter evenly among the 12 muffin cups, filling each about 3/4 full.
8. Bake at 350°F for 18-22 minutes, until the tops are golden brown and a toothpick inserted into the center comes out clean.
9. Remove the muffins from the oven and let them cool in the pan for 5 minutes before transferring to a wire rack.
10. Allow the muffins to cool completely on the rack for at least 15 minutes before serving. Here’s the magic: these muffins achieve an incredibly moist, cake-like crumb with subtle nuttiness from the almond flour. Honestly, they’re so good warm with a pat of butter, you might just forget regular muffins exist—plus they make the perfect grab-and-go breakfast that actually tastes like dessert.
Taco Night with Corn Tortilla Tacos

Whoever said “don’t play with your food” clearly never experienced the glorious chaos of taco night—where every messy bite is a victory dance for your taste buds. Welcome to the culinary fiesta that will make your Tuesday feel like a Saturday and your kitchen smell like a Mexican cantina.
12
tacos15
minutes15
minutesIngredients
– 1 lb ground beef
– 1 tbsp olive oil
– 1 packet taco seasoning
– 12 corn tortillas
– 1 cup shredded lettuce
– 1 cup diced tomatoes
– 1 cup shredded cheddar cheese
– 1/2 cup sour cream
– 1/4 cup chopped cilantro
Instructions
1. Heat 1 tbsp olive oil in a large skillet over medium-high heat until shimmering (about 1 minute).
2. Add 1 lb ground beef, breaking it apart with a wooden spoon, and cook for 6-8 minutes until no pink remains.
3. Drain excess fat from the skillet using a slotted spoon.
4. Sprinkle 1 packet taco seasoning over the beef and stir to coat evenly.
5. Add 3/4 cup water, bring to a simmer, and cook for 5 minutes until the sauce thickens.
6. Warm 12 corn tortillas by heating them in a dry skillet over medium heat for 30 seconds per side until pliable.
7. Place 1/4 cup of the seasoned beef in the center of each warm tortilla.
8. Top each taco with 1 tbsp shredded lettuce, 1 tbsp diced tomatoes, and 1 tbsp shredded cheddar cheese.
9. Add 2 tsp sour cream and 1 tsp chopped cilantro to each taco.
Finally, behold your masterpiece: the crisp corn tortillas provide a sturdy base for the savory beef, while the cool sour cream cuts through the spice beautifully. For maximum enjoyment, serve these tacos with extra napkins and the proud realization that you’ve just won Tuesday.
Refreshing Quinoa and Citrus Salad
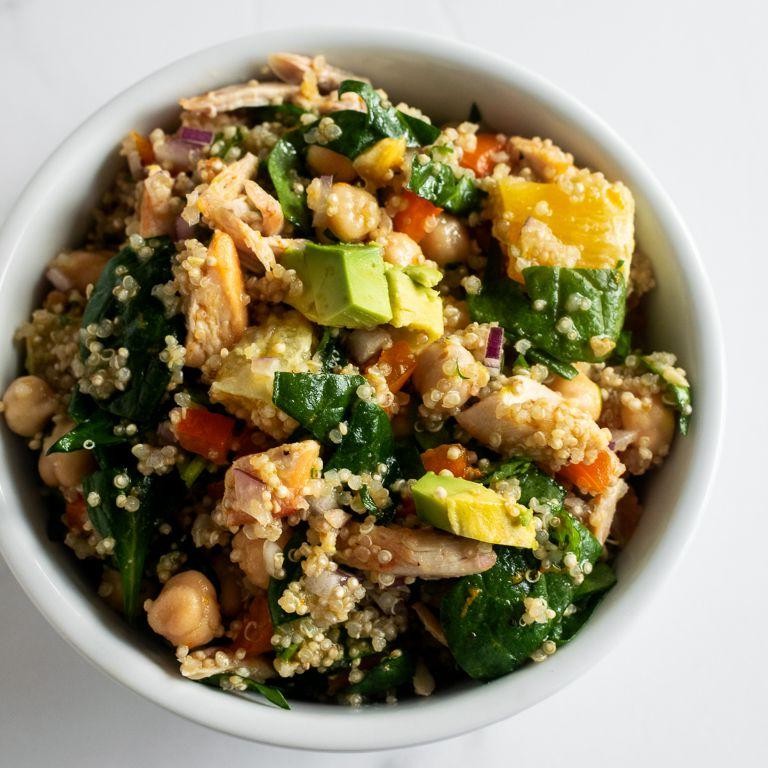
Feeling like your taste buds are stuck in a flavor rut? This vibrant quinoa and citrus salad is here to rescue your palate from boredom with a zesty party that’ll make your mouth do a happy dance. It’s the perfect antidote to heavy meals and will have you feeling refreshed faster than you can say “more please!”
5
servings25
minutes15
minutesIngredients
– 1 cup quinoa
– 2 cups water
– 1/4 cup olive oil
– 3 tbsp fresh lemon juice
– 2 tbsp fresh orange juice
– 1 tsp honey
– 1/2 tsp salt
– 1/4 tsp black pepper
– 2 oranges, peeled and segmented
– 1 grapefruit, peeled and segmented
– 1/4 cup chopped fresh mint
– 1/4 cup sliced almonds
Instructions
1. Rinse 1 cup quinoa under cold running water in a fine-mesh strainer for 1 minute to remove the natural bitter coating.
2. Combine rinsed quinoa and 2 cups water in a medium saucepan over high heat.
3. Bring the mixture to a rolling boil, then immediately reduce heat to low and cover the saucepan.
4. Simmer quinoa for exactly 15 minutes until all water is absorbed and little “tails” appear on the grains.
5. Remove saucepan from heat and let quinoa stand covered for 5 minutes to finish steaming.
6. Fluff cooked quinoa with a fork and spread it on a baking sheet to cool completely to room temperature, about 20 minutes.
7. Whisk together 1/4 cup olive oil, 3 tbsp lemon juice, 2 tbsp orange juice, 1 tsp honey, 1/2 tsp salt, and 1/4 tsp black pepper in a small bowl until emulsified.
8. Peel 2 oranges and 1 grapefruit, then carefully segment them by cutting between membranes to release perfect citrus pieces.
9. Combine cooled quinoa, citrus segments, 1/4 cup chopped mint, and 1/4 cup sliced almonds in a large mixing bowl.
10. Pour the dressing over the salad mixture and toss gently until everything is evenly coated.
11. Chill the assembled salad in the refrigerator for at least 30 minutes to allow flavors to meld.
Every bite delivers a delightful crunch from the toasted almonds against the fluffy quinoa, while the citrus dressing provides the perfect sweet-tart balance that makes this salad seriously addictive. Try serving it alongside grilled chicken or stuffed into pita pockets for a lunch that’ll make your coworkers green with envy!
Creamy Mushroom and Herb Risotto
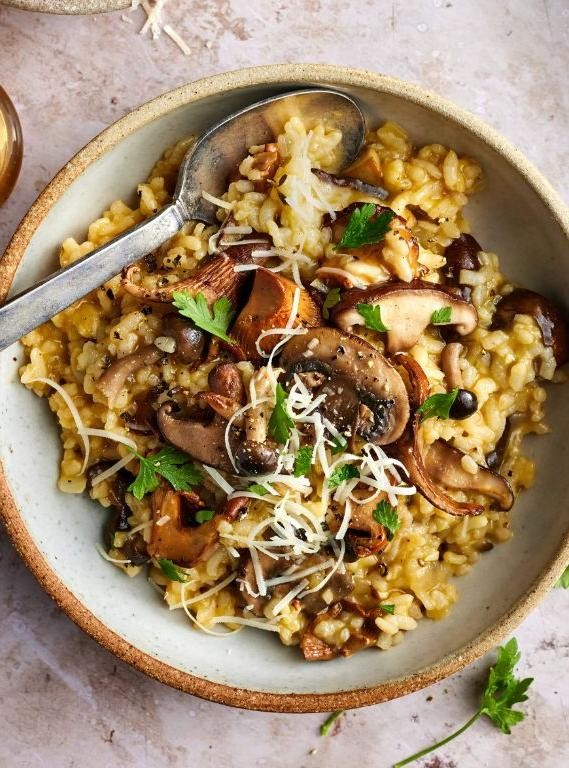
Ever had one of those days where your stomach demands something fancy but your energy levels scream “nope”? This creamy mushroom and herb risotto is here to save your dignity—it’s basically a hug in a bowl that’s ridiculously easy to pull off, even if your cooking skills are more “microwave master” than “Michelin star.”
2
servings15
minutes45
minutesIngredients
- 1 tbsp olive oil
- 1 tbsp unsalted butter
- 1 small yellow onion
- 2 cloves garlic
- 8 oz cremini mushrooms
- 1 cup Arborio rice
- 1/2 cup dry white wine
- 4 cups chicken broth
- 1/2 cup grated Parmesan cheese
- 2 tbsp chopped fresh parsley
- 1 tbsp chopped fresh thyme
- 1/4 tsp black pepper
Instructions
- Heat the chicken broth in a separate saucepan over medium heat until it simmers, then reduce the heat to low to keep it warm—this helps the rice absorb liquid evenly without cooling the pan.
- Heat the olive oil and unsalted butter in a large, heavy-bottomed pot over medium heat until the butter melts and foams slightly.
- Dice the yellow onion finely and add it to the pot, sautéing for 4–5 minutes until translucent and fragrant.
- Mince the garlic cloves and stir them into the onions, cooking for 1 minute until aromatic but not browned.
- Slice the cremini mushrooms and add them to the pot, sautéing for 6–8 minutes until they release their liquid and turn golden brown.
- Add the Arborio rice to the pot and toast it for 2 minutes, stirring constantly until the edges look slightly translucent—this step enhances the nutty flavor and helps the rice stay firm.
- Pour in the dry white wine and stir continuously until the liquid is fully absorbed, about 2–3 minutes.
- Ladle in 1 cup of the warm chicken broth, stirring frequently until the rice absorbs almost all the liquid, about 5–7 minutes.
- Repeat adding the broth 1/2 cup at a time, stirring after each addition until absorbed, for 20–25 minutes total; the rice is done when it’s tender but still slightly firm to the bite (al dente).
- Remove the pot from the heat and stir in the grated Parmesan cheese, chopped fresh parsley, chopped fresh thyme, and black pepper until the risotto is creamy and well-combined.
Keep that spoon ready—this risotto boasts a luxuriously creamy texture with earthy mushrooms and fresh herbs dancing in every bite. Serve it straight from the pot for maximum coziness, or fancy it up with a extra sprinkle of Parmesan and a side of crusty bread to soak up every last drop.
Gluten-Free Chicken Piccata with Lemon Butter Sauce
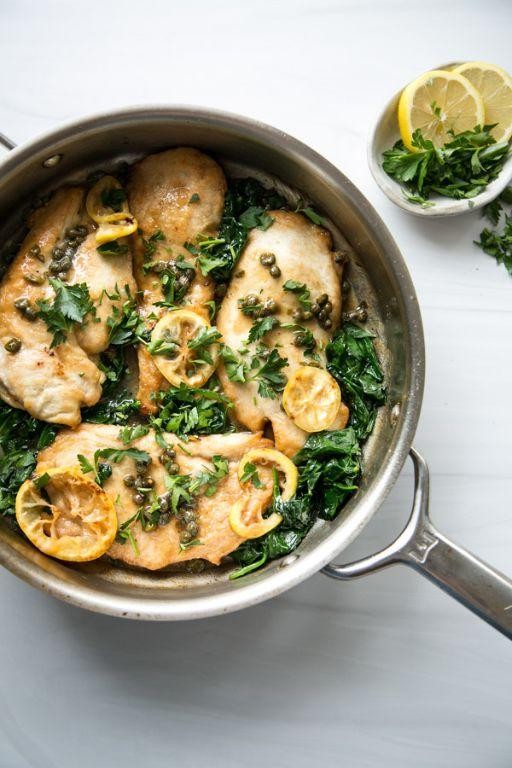
Tired of gluten-free meals that taste like cardboard? This chicken piccata will make you forget you’re eating responsibly—tender chicken swimming in a zesty lemon butter sauce that’s so good, you’ll want to lick the plate (no judgment). Get ready to impress your taste buds and maybe even your mother-in-law.
5
portions15
minutes15
minutesIngredients
– 4 boneless, skinless chicken breasts
– 1/2 cup gluten-free all-purpose flour
– 1 tsp salt
– 1/2 tsp black pepper
– 2 tbsp olive oil
– 2 tbsp unsalted butter
– 2 cloves garlic, minced
– 1/2 cup chicken broth
– 1/4 cup fresh lemon juice
– 2 tbsp capers, drained
– 2 tbsp fresh parsley, chopped
Instructions
1. Place each chicken breast between two sheets of plastic wrap and pound to 1/2-inch thickness using a meat mallet or rolling pin.
2. Combine gluten-free flour, salt, and black pepper in a shallow dish.
3. Dredge each chicken breast thoroughly in the flour mixture, shaking off excess.
4. Heat olive oil in a large skillet over medium-high heat until shimmering.
5. Cook chicken for 4-5 minutes per side until golden brown and internal temperature reaches 165°F.
6. Transfer chicken to a plate and cover loosely with foil.
7. Reduce heat to medium and melt butter in the same skillet.
8. Add minced garlic and sauté for 30 seconds until fragrant.
9. Pour in chicken broth and lemon juice, scraping up browned bits from the pan bottom.
10. Simmer sauce for 3-4 minutes until slightly reduced.
11. Stir in capers and cook for 1 additional minute.
12. Return chicken to skillet, spooning sauce over each piece.
13. Sprinkle with fresh parsley before serving.
Gluten-free never tasted so decadent—the chicken stays juicy beneath its crispy coating while the lemon butter sauce brings bright, tangy notes that cut through the richness. Serve it over zucchini noodles for a complete low-carb meal, or go classic with mashed potatoes to soak up every last drop of that glorious sauce.
Baked Eggplant Parmesan with Marinara Sauce
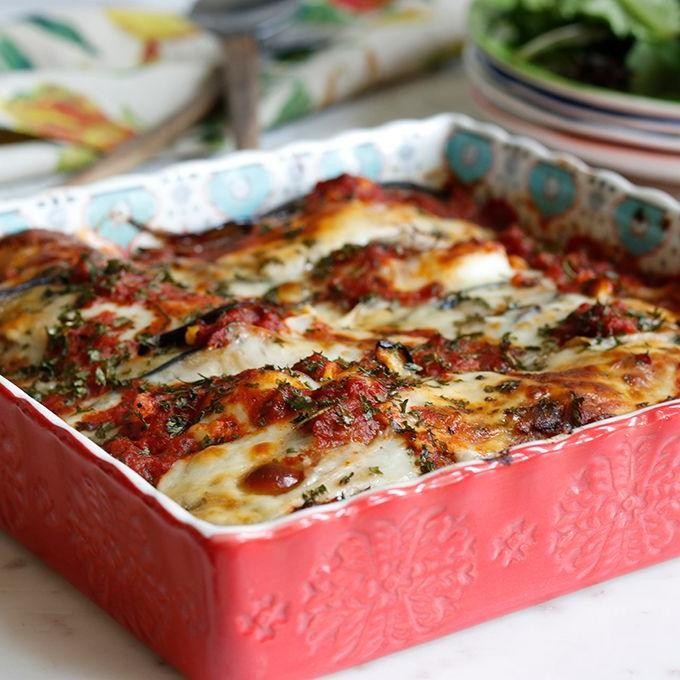
Unbelievably delicious and surprisingly simple, this baked eggplant parmesan will have you questioning why you ever bothered with the fried version. We’re talking crispy, golden-brown eggplant slices layered with gooey cheese and tangy marinara sauce—all without the messy oil splatters. Your kitchen will smell like an Italian grandmother’s dream, and your taste buds will throw a party.
6
servings40
minutes60
minutesIngredients
- 2 large eggplants
- 1 cup all-purpose flour
- 3 large eggs
- 2 cups Italian-style breadcrumbs
- 1/2 cup grated Parmesan cheese
- 2 cups shredded mozzarella cheese
- 3 cups marinara sauce
- 2 tablespoons olive oil
- 1 teaspoon salt
- 1/2 teaspoon black pepper
- 1 teaspoon dried oregano
Instructions
- Preheat your oven to 375°F and line two baking sheets with parchment paper.
- Slice the eggplants into 1/4-inch thick rounds using a sharp knife.
- Sprinkle the eggplant slices with salt and let them sit for 20 minutes to draw out excess moisture.
- Pat the eggplant slices completely dry with paper towels to ensure crispy baking.
- Set up three shallow bowls: one with flour, one with beaten eggs, and one with breadcrumbs mixed with Parmesan cheese, oregano, salt, and pepper.
- Dredge each eggplant slice first in flour, shaking off any excess.
- Dip the floured slice into the beaten eggs, coating both sides.
- Press the egg-coated slice into the breadcrumb mixture, ensuring an even coating on both sides.
- Arrange the breaded eggplant slices in a single layer on the prepared baking sheets.
- Lightly brush or spray the breaded eggplant with olive oil.
- Bake for 20 minutes, then flip the slices and bake for another 15 minutes until golden brown and crispy.
- Spread 1/2 cup of marinara sauce in the bottom of a 9×13 inch baking dish.
- Arrange one layer of baked eggplant slices over the sauce.
- Sprinkle 1/3 of the mozzarella cheese over the eggplant layer.
- Repeat the layers twice more, ending with a final layer of marinara sauce and mozzarella cheese.
- Bake uncovered at 375°F for 25 minutes until the cheese is melted and bubbly.
- Let the dish rest for 10 minutes before serving to allow the layers to set properly.
Golden and glorious straight from the oven, this eggplant parmesan delivers satisfying crunch from the baked coating that gives way to tender, creamy eggplant underneath. The tangy marinara cuts through the richness of the melted cheeses beautifully, creating a symphony of textures in every bite. Try serving it over zucchini noodles for a low-carb twist, or stuff the leftovers into a crusty baguette for an epic next-day sandwich that might just be better than the original.
Berry and Yogurt Parfaits with Granola
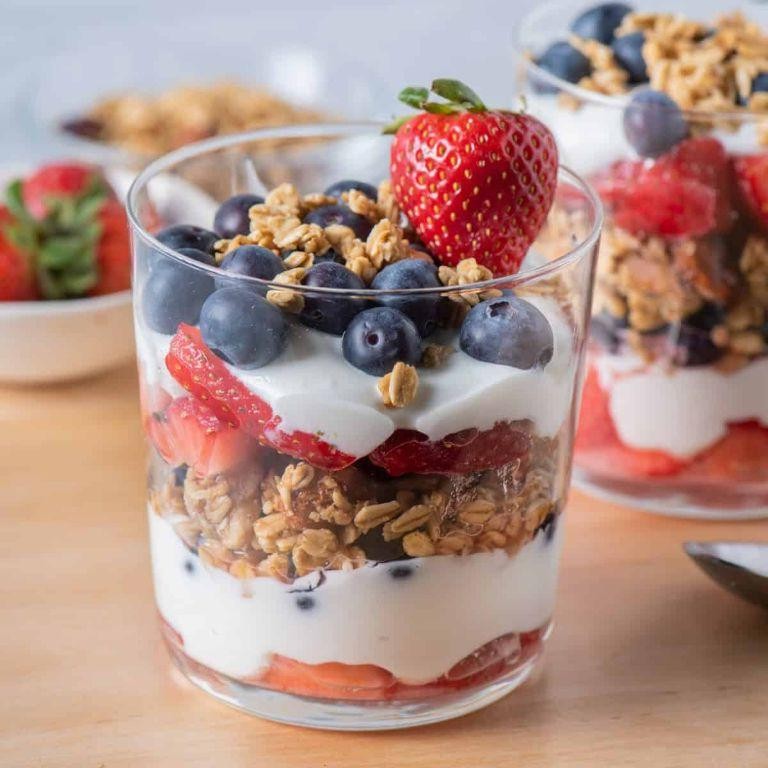
Juggling breakfast, snack time, and dessert cravings? These Berry and Yogurt Parfaits with Granola are about to become your multitasking MVP—layering creamy, crunchy, and fruity goodness into one gloriously simple jar of joy that’s basically a party for your taste buds.
3
parfaits15
minutesIngredients
- 2 cups plain Greek yogurt
- 1 cup mixed fresh berries (strawberries, blueberries, raspberries)
- 1 cup granola
- 2 tablespoons honey
- 1 teaspoon vanilla extract
Instructions
- Wash and pat dry 1 cup of mixed fresh berries thoroughly to remove any moisture.
- Slice strawberries into ¼-inch thick pieces if using, keeping blueberries and raspberries whole.
- In a medium bowl, combine 2 cups plain Greek yogurt, 2 tablespoons honey, and 1 teaspoon vanilla extract, stirring until fully incorporated and smooth.
- Tip: For easier mixing, let the yogurt sit at room temperature for 5 minutes before combining ingredients.
- Spoon 2 tablespoons of the yogurt mixture into the bottom of a 12-ounce glass or jar.
- Add 2 tablespoons of granola evenly over the yogurt layer.
- Top the granola with 2 tablespoons of the prepared mixed berries.
- Repeat the layering process—yogurt, granola, berries—two more times, ending with a berry layer.
- Tip: Gently press down each granola layer with the back of a spoon to prevent air pockets and ensure even layers.
- Cover the parfait and refrigerate for at least 15 minutes to allow the granola to soften slightly and flavors to meld.
- Tip: For optimal texture, assemble parfaits no more than 1 hour before serving to maintain granola crunch.
Zesty, creamy, and delightfully crunchy, each spoonful delivers a tangy yogurt punch followed by sweet berry bursts and granola’s toasty warmth. Serve these parfaits in mason jars for a picnic-perfect portable treat, or layer them in wine glasses for a brunch upgrade that’ll have everyone asking for seconds.
Conclusion
So many wonderful gluten-free options await your family! Whether you’re cooking for dietary needs or just exploring new flavors, these 21 recipes make eating well delicious and stress-free. We’d love to hear which dishes become your family favorites—drop us a comment below! Don’t forget to share these tasty ideas with friends by pinning this article to your Pinterest boards. Happy cooking!


