
There’s nothing quite like the joyful chaos of a potluck gathering, where friends and family come together to share delicious homemade dishes. If you’re searching for crowd-pleasing vegetarian recipes that are both easy to prepare and guaranteed to impress, you’ve come to the right place. Get ready to discover 34 mouthwatering veggie options that will make you the star of any potluck party!
Zesty Grilled Veggie Skewers

Veggie skewers are one of those perfect summer dishes that make you feel like you’re winning at life without much effort. You get all those beautiful charred edges and smoky flavors that just scream backyard barbecue vibes. They’re seriously the easiest way to impress guests or just treat yourself to something colorful and delicious.
8
skewers20
minutes12
minutesIngredients
– 2 large zucchinis, cut into 1-inch chunks (I like them on the thicker side so they don’t get mushy)
– 1 red bell pepper, cut into 1-inch squares (the sweetest ones you can find)
– 1 yellow bell pepper, cut into 1-inch squares (adds such pretty color)
– 1 red onion, cut into 1-inch wedges (they caramelize so nicely)
– 8 oz whole mushrooms, stems trimmed (baby bellas are my favorite here)
– 1/4 cup extra virgin olive oil (my go-to for that fruity flavor)
– 2 tbsp fresh lemon juice (bottled just doesn’t hit the same)
– 2 cloves garlic, minced (fresh is always better than jarred)
– 1 tsp dried oregano
– 1/2 tsp smoked paprika (adds that subtle smoky depth)
– 1/2 tsp salt
– 1/4 tsp black pepper
Instructions
1. Soak 8 wooden skewers in water for at least 30 minutes to prevent burning.
2. Preheat your grill to medium-high heat, around 400°F.
3. Whisk together olive oil, lemon juice, garlic, oregano, smoked paprika, salt, and pepper in a large bowl.
4. Add all chopped vegetables to the bowl and toss until evenly coated with the marinade.
5. Thread vegetables onto skewers in alternating patterns, leaving small spaces between pieces.
6. Place skewers on the preheated grill and cook for 4 minutes.
7. Flip skewers and cook for another 4 minutes until vegetables have nice grill marks.
8. Continue flipping every 2 minutes until vegetables are tender-crisp, about 10-12 minutes total.
9. Remove skewers from grill and let rest for 2 minutes before serving.
Nothing beats that perfect combination of smoky char and bright lemon flavor dancing together. The vegetables should have just enough bite left while being tender enough to slide right off the skewer. Try serving these over a bed of quinoa or alongside some grilled chicken for a complete meal that’ll have everyone asking for seconds.
Savory Spinach and Artichoke Dip
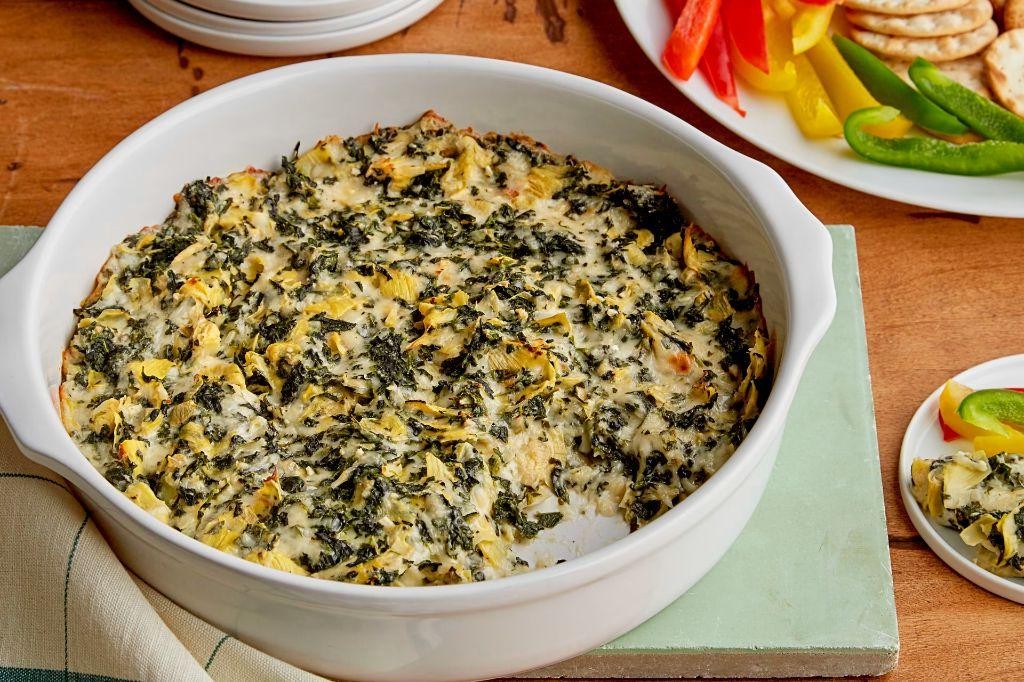
Craving something warm, cheesy, and perfect for sharing? This savory spinach and artichoke dip is your new go-to for game days, parties, or just a cozy night in. You’re going to love how easy it is to whip up this crowd-pleaser.
8
servings15
minutes25
minutesIngredients
– 1 (10 oz) package frozen chopped spinach, thawed and squeezed dry (I press it in a clean kitchen towel to get every bit of moisture out)
– 1 (14 oz) can artichoke hearts, drained and chopped (the kind packed in water works best here)
– 1 cup mayonnaise (full-fat gives the creamiest texture)
– 1 cup sour cream
– 1 cup grated Parmesan cheese (I like the fresh-grated kind from the refrigerated section)
– 1 cup shredded mozzarella cheese
– 2 cloves garlic, minced (fresh garlic makes all the difference)
– 1/2 tsp black pepper
– 1/4 tsp salt
Instructions
1. Preheat your oven to 375°F.
2. Combine the thawed, squeezed-dry spinach and chopped artichoke hearts in a large mixing bowl.
3. Add the mayonnaise, sour cream, grated Parmesan, shredded mozzarella, minced garlic, black pepper, and salt to the bowl.
4. Mix all ingredients thoroughly until fully combined.
5. Transfer the mixture to a 9-inch baking dish, spreading it evenly with a spatula.
6. Bake at 375°F for 25 minutes, or until the edges are bubbly and the top is lightly golden brown.
7. Remove the baking dish from the oven using oven mitts.
8. Let the dip rest for 5 minutes before serving to allow it to set slightly.
A creamy, garlicky delight awaits with every scoop—the melted cheeses create perfect stretchy pulls while the spinach and artichokes keep it grounded. Serve it straight from the baking dish with crispy tortilla chips, or spread it on toasted baguette slices for an extra crunch.
Crunchy Veggie Spring Rolls with Peanut Sauce

Getting that perfect crunch in a homemade appetizer can feel tricky, but these veggie spring rolls deliver every time. You’ll love how fresh and vibrant they taste, especially when dipped in that creamy peanut sauce. They’re way easier to make than you might think, and perfect for impressing guests or just treating yourself.
8
rolls15
minutes15
minutesIngredients
– 8 rice paper wrappers (I find the round ones easiest to work with when they’re slightly damp)
– 1 cup shredded carrots (the pre-shredded bagged kind saves so much time)
– 1 cup thinly sliced purple cabbage (the color contrast makes them so pretty)
– 1 cup bean sprouts (crunchy and fresh straight from the bag)
– 1/2 cup chopped fresh cilantro leaves (I’m generous here because I love the bright flavor)
– 2 green onions, thinly sliced (use both the white and green parts)
– 1/4 cup smooth peanut butter (the creamy kind blends into sauce perfectly)
– 2 tbsp soy sauce (regular or low-sodium both work great)
– 1 tbsp rice vinegar (this little splash balances the richness)
– 1 tsp sesame oil (toasted sesame oil gives the best flavor)
– 1/4 cup warm water (helps thin the sauce to dipping consistency)
– 1 tbsp vegetable oil (for brushing the rolls before baking)
Instructions
1. Preheat your oven to 400°F and line a baking sheet with parchment paper.
2. Fill a large shallow bowl with warm water for softening the rice paper wrappers.
3. Dip one rice paper wrapper into the warm water for 10 seconds until pliable but still slightly firm.
4. Lay the softened wrapper flat on a clean cutting board.
5. Place 2 tablespoons of shredded carrots in a horizontal line across the center of the wrapper.
6. Top the carrots with 2 tablespoons of sliced purple cabbage.
7. Add 2 tablespoons of bean sprouts over the cabbage.
8. Sprinkle 1 tablespoon of chopped cilantro over the vegetables.
9. Scatter 1 tablespoon of sliced green onions over the filling.
10. Fold the bottom edge of the wrapper tightly over the filling.
11. Fold the left and right sides inward toward the center.
12. Roll the spring roll upward firmly but gently to form a tight cylinder.
13. Repeat steps 3-12 with remaining wrappers and filling.
14. Arrange all spring rolls seam-side down on the prepared baking sheet.
15. Brush each spring roll lightly with vegetable oil using a pastry brush.
16. Bake at 400°F for 15 minutes until the wrappers are crisp and lightly golden.
17. While spring rolls bake, combine peanut butter and soy sauce in a small bowl.
18. Whisk in rice vinegar until the mixture is smooth.
19. Add sesame oil and continue whisking to incorporate.
20. Gradually whisk in warm water until the sauce reaches your desired dipping consistency.
21. Remove spring rolls from oven when they’re golden and crisp to the touch.
Seriously, that first bite into the crispy wrapper gives way to the freshest vegetable crunch inside. The peanut sauce adds this incredible creamy, savory element that makes them completely addictive. Try serving them alongside a simple cucumber salad for the perfect light meal, or pack them for a picnic where they’ll hold their crunch beautifully.
Creamy Avocado and Black Bean Salad
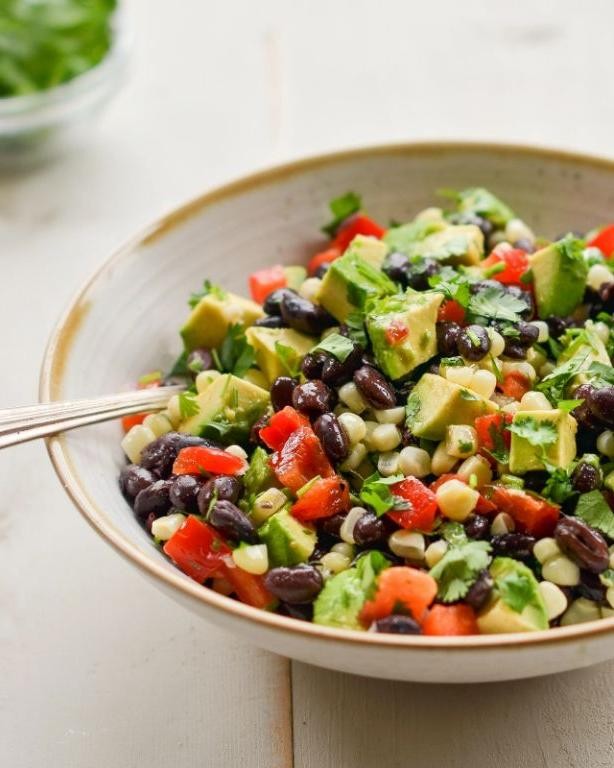
Tired of the same old side dishes? This creamy avocado and black bean salad is about to become your new favorite. You’ll love how the creamy avocado pairs perfectly with the hearty beans and zesty lime.
3
servings15
minutesIngredients
– 2 ripe avocados (I look for ones that yield slightly to gentle pressure)
– 1 can (15 oz) black beans, rinsed and drained (this removes excess sodium)
– 1/4 cup red onion, finely diced (soak in cold water for 10 minutes if you want to tame the sharpness)
– 1/4 cup fresh cilantro, chopped (I use the stems too for extra flavor)
– 2 tbsp lime juice (freshly squeezed makes all the difference)
– 1 tbsp extra virgin olive oil (my go-to for dressings)
– 1/2 tsp ground cumin
– 1/4 tsp salt
Instructions
1. Cut the avocados in half lengthwise, remove the pits, and scoop the flesh into a medium bowl.
2. Mash the avocado with a fork until mostly smooth but with some small chunks remaining for texture.
3. Add the rinsed and drained black beans to the bowl with the mashed avocado.
4. Stir in the finely diced red onion and chopped cilantro until evenly distributed.
5. Pour in the freshly squeezed lime juice, extra virgin olive oil, ground cumin, and salt.
6. Mix everything together gently until well combined and creamy.
7. Let the salad sit at room temperature for 10 minutes to allow the flavors to meld together.
What makes this salad special is the contrast between the creamy avocado base and the firm black beans. The lime juice keeps everything bright and fresh while preventing the avocado from browning. Try serving it as a dip with tortilla chips or as a topping for grilled chicken – it’s incredibly versatile!
Herb-Roasted Vegetable Medley

Veggies don’t have to be boring, and this herb-roasted vegetable medley proves it. You’ll love how simple ingredients transform into something truly special with just a bit of time in the oven. It’s the perfect side dish that might just steal the show at your next dinner.
4
servings15
minutes30
minutesIngredients
– 3 cups chopped mixed vegetables (I love using carrots, bell peppers, and zucchini for color)
– 2 tablespoons extra virgin olive oil (my go-to for roasting)
– 1 tablespoon fresh rosemary, chopped (fresh makes all the difference here)
– 1 tablespoon fresh thyme leaves
– 1 teaspoon garlic powder
– 1/2 teaspoon salt
– 1/4 teaspoon black pepper
Instructions
1. Preheat your oven to 425°F and line a baking sheet with parchment paper.
2. Chop all your vegetables into 1-inch pieces for even cooking.
3. Place the chopped vegetables in a large mixing bowl.
4. Drizzle the olive oil over the vegetables and toss to coat evenly.
5. Sprinkle the rosemary, thyme, garlic powder, salt, and pepper over the vegetables.
6. Toss everything together until the vegetables are evenly coated with herbs and seasoning.
7. Spread the vegetables in a single layer on your prepared baking sheet.
8. Roast for 25-30 minutes, flipping halfway through, until the edges are golden brown and crispy.
9. Remove from the oven and let rest for 5 minutes before serving.
The roasted vegetables develop this wonderful caramelized sweetness while the herbs create this earthy, aromatic flavor that fills your kitchen. I love serving these over creamy polenta or tossing them with pasta for a quick vegetarian meal—the crispy edges and tender centers make every bite interesting.
Spicy Thai Peanut Veggie Noodles

Busy weeknights call for something quick, flavorful, and satisfying. You’re going to love these spicy Thai peanut veggie noodles—they come together in under 30 minutes and pack a serious flavor punch. It’s the perfect way to use up whatever veggies you have hanging out in the fridge.
4
servings15
minutes12
minutesIngredients
– 8 oz rice noodles (I like the wide, flat ones for maximum sauce coverage)
– 2 tbsp sesame oil (this adds such a nice nutty base flavor)
– 3 cloves garlic, minced (fresh is best here, but jarred works in a pinch)
– 1 tbsp fresh ginger, grated (I keep a knob in the freezer for easy grating)
– 1 red bell pepper, thinly sliced (adds great color and crunch)
– 2 medium carrots, julienned (I use a julienne peeler to make this super fast)
– 1/2 cup creamy peanut butter (I prefer the natural kind you have to stir)
– 1/4 cup soy sauce (regular or low-sodium both work fine)
– 2 tbsp rice vinegar (this brightens up the whole dish)
– 1 tbsp honey (just enough to balance the spice)
– 1 tsp sriracha (or more if you’re feeling brave)
– 1/4 cup chopped peanuts (for that essential crunchy topping)
– 1/4 cup fresh cilantro, chopped (don’t skip this—it makes everything taste fresher)
– 2 green onions, thinly sliced (both white and green parts)
– 1 lime, cut into wedges (for squeezing over at the end)
Instructions
1. Bring a large pot of water to a rolling boil over high heat.
2. Add rice noodles and cook for exactly 6 minutes, stirring occasionally to prevent sticking.
3. While noodles cook, heat sesame oil in a large skillet over medium heat until it shimmers.
4. Add minced garlic and grated ginger, cooking for 1 minute until fragrant but not browned.
5. Add sliced bell pepper and julienned carrots, stirring constantly for 3 minutes until slightly softened but still crisp.
6. In a small bowl, whisk together peanut butter, soy sauce, rice vinegar, honey, and sriracha until smooth.
7. Drain cooked noodles thoroughly and immediately add them to the skillet with vegetables.
8. Pour peanut sauce over noodles and vegetables, tossing everything together until evenly coated and heated through, about 2 minutes.
9. Remove skillet from heat and stir in chopped cilantro and green onions.
10. Transfer to serving bowls and top with chopped peanuts.
11. Serve immediately with lime wedges on the side for squeezing over.
Perfectly chewy noodles coated in that creamy, spicy peanut sauce make every bite irresistible. The crisp-tender vegetables provide nice texture contrast, while the fresh lime juice cuts through the richness beautifully. Try serving it with extra sriracha on the side for heat lovers, or add grilled chicken if you want some protein.
Fresh Tomato and Mozzarella Salad
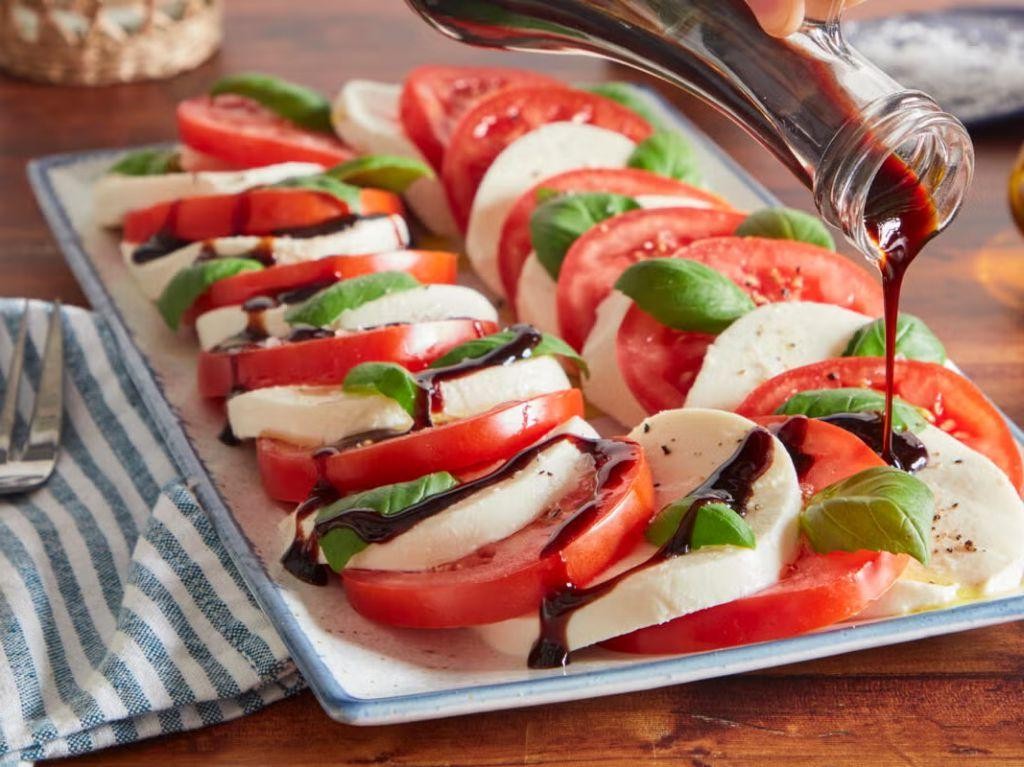
Craving something fresh and effortless? This tomato and mozzarella salad is your new go-to for busy weeknights or lazy weekends. You’ll love how the juicy tomatoes pair with creamy cheese—it’s a no-fuss dish that always hits the spot.
3
servings15
minutesIngredients
- 2 large ripe tomatoes (I look for ones that feel heavy for their size—they’re usually the juiciest!)
- 8 oz fresh mozzarella cheese (the kind packed in water gives the best texture)
- 1/4 cup extra virgin olive oil (my go-to for its fruity flavor)
- 2 tbsp balsamic vinegar (a good quality one makes all the difference)
- 1/4 cup fresh basil leaves (torn by hand for the most fragrance)
- 1/2 tsp salt (I use fine sea salt for even distribution)
- 1/4 tsp black pepper (freshly cracked is my preference)
Instructions
- Wash the tomatoes under cool running water and pat them completely dry with paper towels.
- Slice each tomato into 1/4-inch thick rounds, using a sharp serrated knife to prevent crushing.
- Drain the mozzarella from its liquid and slice it into 1/4-inch thick rounds matching the tomato size.
- Arrange the tomato and mozzarella slices alternately on a large serving platter, slightly overlapping them.
- Drizzle the extra virgin olive oil evenly over the arranged slices, covering all pieces.
- Sprinkle the salt and black pepper directly over the salad, ensuring even seasoning.
- Tear the fresh basil leaves by hand and scatter them over the top for maximum aroma.
- Drizzle the balsamic vinegar in a back-and-forth motion across the entire salad.
- Let the salad sit at room temperature for 10 minutes before serving to allow flavors to meld.
Nothing beats the juicy burst of tomatoes against that creamy mozzarella. Try serving it over toasted crusty bread to soak up every bit of the dressing—it’s a game-changer for summer lunches.
Garlic Lemon Herb Roasted Cauliflower

Brace yourself for the easiest, most flavorful side dish that might just steal the show at dinner. You’re going to love how simple ingredients transform humble cauliflower into something truly special. Seriously, this garlic lemon herb roasted cauliflower is about to become your new go-to.
3
servings10
minutes25
minutesIngredients
– 1 large head of cauliflower, cut into florets (I like them bite-sized for even roasting)
– 3 tablespoons extra virgin olive oil (my go-to for that fruity flavor)
– 4 cloves garlic, minced (fresh is best here for maximum punch)
– 1 tablespoon fresh lemon juice (about half a juicy lemon)
– 1 teaspoon dried oregano
– 1/2 teaspoon salt
– 1/4 teaspoon black pepper
– 2 tablespoons chopped fresh parsley (for that bright finish)
Instructions
1. Preheat your oven to 425°F and line a baking sheet with parchment paper.
2. In a large bowl, combine the olive oil, minced garlic, lemon juice, oregano, salt, and pepper.
3. Add the cauliflower florets to the bowl and toss until evenly coated with the oil mixture.
4. Spread the cauliflower in a single layer on your prepared baking sheet, making sure pieces aren’t touching.
5. Roast for 20-25 minutes until the edges are golden brown and crispy.
6. Check at the 15-minute mark and give the pan a shake for even browning.
7. Remove from oven when the cauliflower is tender when pierced with a fork.
8. Transfer to a serving dish and sprinkle with fresh parsley while still hot.
Every bite delivers that perfect crispy-tender texture with bright lemon cutting through the rich garlic. Enjoy it as is, or get creative by tossing it with pasta or topping it with grated Parmesan. Either way, you’ll be making this on repeat.
Sweet Potato and Kale Quinoa Salad
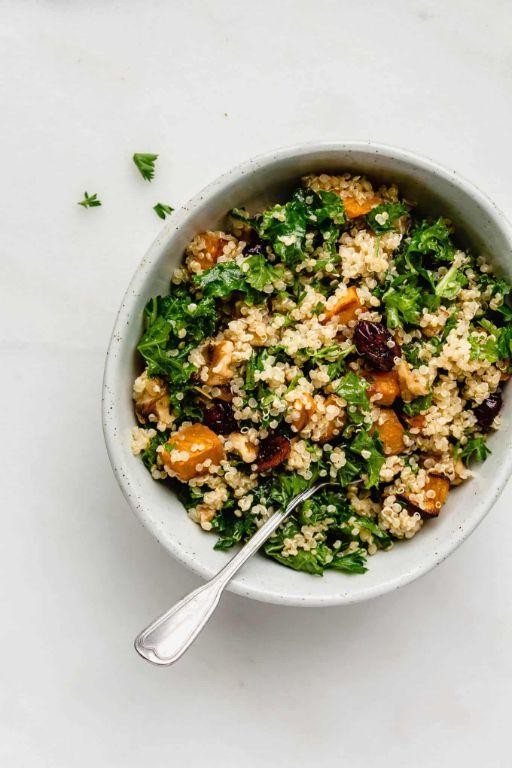
Bust out your favorite mixing bowl because this sweet potato and kale quinoa salad is about to become your new go-to lunch. You’ll love how the roasted sweet potatoes get all caramelized and sweet, while the kale stays fresh and vibrant. It’s the kind of meal that makes you feel good from the inside out.
2
servings20
minutes40
minutesIngredients
– 1 cup quinoa (I always rinse mine first to remove any bitterness)
– 2 medium sweet potatoes, peeled and cubed into ½-inch pieces (don’t make them too small or they’ll overcook)
– 4 cups chopped kale, stems removed (I prefer lacinato kale for its tender leaves)
– ¼ cup extra virgin olive oil (this is my go-to for roasting)
– 3 tablespoons lemon juice (freshly squeezed makes all the difference)
– 2 tablespoons maple syrup (the real stuff, not pancake syrup)
– 1 teaspoon smoked paprika (it gives that wonderful smoky depth)
– ½ teaspoon garlic powder
– ½ teaspoon salt
Instructions
1. Preheat your oven to 400°F and line a baking sheet with parchment paper.
2. Rinse 1 cup quinoa under cold water in a fine-mesh strainer for 1 minute to remove the natural coating.
3. Combine quinoa with 2 cups water in a medium saucepan and bring to a boil over high heat.
4. Reduce heat to low, cover the saucepan, and simmer for 15 minutes until all water is absorbed.
5. Remove quinoa from heat, fluff with a fork, and let it sit covered for 5 minutes to steam.
6. While quinoa cooks, peel 2 medium sweet potatoes and cut them into ½-inch cubes.
7. Toss sweet potato cubes with 2 tablespoons olive oil, 1 teaspoon smoked paprika, ½ teaspoon garlic powder, and ½ teaspoon salt in a large bowl.
8. Spread sweet potatoes in a single layer on your prepared baking sheet.
9. Roast at 400°F for 20-25 minutes until edges are caramelized and potatoes are tender when pierced with a fork.
10. Remove stems from 4 cups kale and chop the leaves into bite-sized pieces.
11. Massage kale with your hands for 1 minute with remaining 2 tablespoons olive oil to soften the leaves.
12. Whisk together 3 tablespoons lemon juice and 2 tablespoons maple syrup in a small bowl.
13. Combine cooked quinoa, roasted sweet potatoes, massaged kale, and dressing in a large mixing bowl.
14. Toss everything together until evenly coated.
Keep this salad in mind for meal prep—it actually gets better as the flavors meld overnight. The quinoa stays pleasantly chewy while the sweet potatoes add creamy sweetness against the kale’s slight bitterness. Try serving it warm with grilled chicken or cold straight from the fridge for a quick lunch.
Vibrant Roasted Red Pepper Hummus

Did you know that making your own hummus is way easier than you think? This vibrant roasted red pepper version adds a sweet, smoky twist to the classic dip. You’ll be amazed at how a few simple ingredients transform into something so delicious.
3
servings30
minutesIngredients
- 1 can (15 oz) chickpeas – I always keep a few cans in my pantry for last-minute dips
- 2 large red bell peppers – look for ones that feel heavy and have smooth, shiny skin
- 1/4 cup tahini – the good quality stuff makes all the difference here
- 3 tablespoons extra virgin olive oil – my go-to for that fruity, rich flavor
- 2 cloves garlic – fresh is best, but I won’t judge if you use pre-minced
- 2 tablespoons lemon juice – freshly squeezed gives it that bright, zesty kick
- 1/2 teaspoon cumin – toasty and warm, it really brings everything together
- 1/4 teaspoon smoked paprika – for that extra smoky depth
- 1/2 teaspoon salt – I use fine sea salt for even distribution
Instructions
- Preheat your oven to 425°F and line a baking sheet with parchment paper.
- Cut the red bell peppers in half lengthwise and remove all seeds and white membranes.
- Place pepper halves cut-side down on the prepared baking sheet.
- Roast peppers for 25-30 minutes until skins are completely blackened and blistered.
- Transfer hot peppers to a bowl and cover tightly with plastic wrap for 15 minutes – this steam helps loosen the skins.
- Peel away and discard all the blackened pepper skins using your fingers.
- Drain and rinse the canned chickpeas, reserving 1/4 cup of the liquid.
- Combine roasted peppers, chickpeas, tahini, olive oil, garlic, lemon juice, cumin, smoked paprika, and salt in a food processor.
- Process for 1 minute, then scrape down the sides with a spatula.
- Add 2 tablespoons of reserved chickpea liquid and process for another 2 minutes until completely smooth.
- Check consistency and add remaining chickpea liquid if needed for your preferred texture.
- Taste and adjust seasoning, processing briefly to incorporate any changes.
Makes the creamiest, dreamiest hummus with that beautiful coral color and smoky sweetness from the peppers. The texture stays perfectly scoopable for days in the fridge. Try it with pita chips, as a sandwich spread, or even thinned out as a salad dressing – it’s seriously versatile!
Mediterranean Veggie Pasta Salad
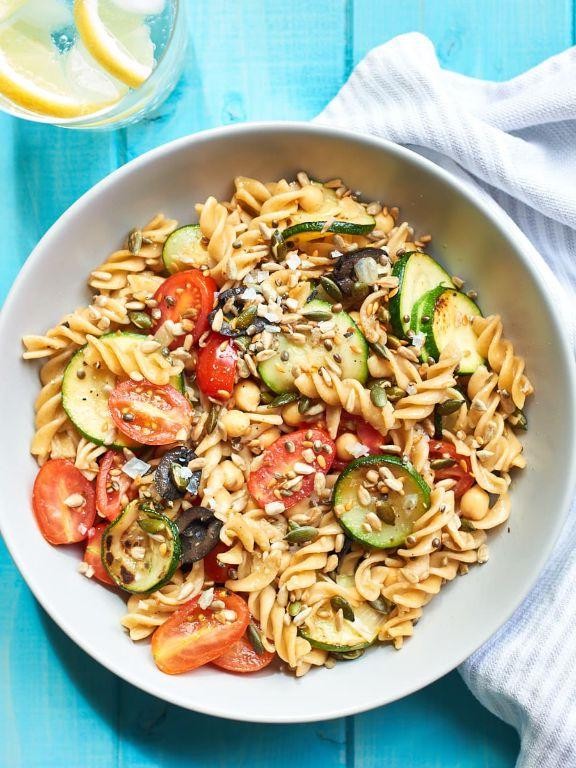
Sometimes you just need a meal that feels like sunshine in a bowl, and this Mediterranean veggie pasta salad delivers exactly that. You’ll love how the bright flavors come together with minimal effort—perfect for busy weeknights or casual gatherings with friends.
4
servings20
minutes9
minutesIngredients
– 8 ounces rotini pasta (I find the spirals hold the dressing beautifully)
– 1 cup cherry tomatoes, halved (the sweet little ones work best here)
– 1 medium cucumber, diced (I prefer English cucumbers for fewer seeds)
– 1/2 red onion, thinly sliced (soaking in ice water for 10 minutes takes the bite out)
– 1/2 cup kalamata olives, pitted and halved (these briny gems are essential)
– 1/2 cup crumbled feta cheese (I always buy block feta and crumble it myself for better texture)
– 1/4 cup extra virgin olive oil (this is my go-to for the best flavor)
– 2 tablespoons red wine vinegar
– 1 teaspoon dried oregano
– 1/2 teaspoon garlic powder
– 1/4 teaspoon black pepper
– 1/4 teaspoon salt
Instructions
1. Bring a large pot of salted water to a rolling boil over high heat.
2. Add the rotini pasta and cook for 9 minutes, stirring occasionally to prevent sticking.
3. Drain the pasta in a colander and rinse with cold water for 1 minute to stop the cooking process.
4. Transfer the cooled pasta to a large mixing bowl.
5. Add the halved cherry tomatoes, diced cucumber, and thinly sliced red onion to the bowl.
6. Sprinkle in the halved kalamata olives and crumbled feta cheese.
7. In a small bowl, whisk together the extra virgin olive oil and red wine vinegar for 30 seconds until emulsified.
8. Stir in the dried oregano, garlic powder, black pepper, and salt until fully combined.
9. Pour the dressing over the pasta and vegetables in the large bowl.
10. Toss everything together gently but thoroughly until all ingredients are evenly coated.
11. Cover the bowl with plastic wrap and refrigerate for at least 30 minutes to allow flavors to meld.
Now this salad really comes alive after that chilling time—the pasta soaks up the tangy dressing while the vegetables stay wonderfully crisp. Nothing beats the combination of creamy feta against the briny olives and sweet tomatoes, making it perfect for picnics or as a make-ahead lunch that actually gets better overnight.
Caramelized Onion and Mushroom Tart

Unbelievably, this savory tart comes together faster than you’d think, and the rich caramelized onions paired with earthy mushrooms create a flavor combo that’ll have everyone asking for seconds. You’ll love how the flaky crust contrasts with the tender filling—it’s perfect for everything from weeknight dinners to impressing guests.
4
portions20
minutes50
minutesIngredients
- 1 sheet frozen puff pastry, thawed (I like to let it sit on the counter for 40 minutes—no rushing!)
- 2 large yellow onions, thinly sliced (sweet onions work great too if you have them)
- 8 oz cremini mushrooms, sliced (baby bellas add such nice earthiness)
- 2 tbsp extra virgin olive oil (my go-to for sautéing)
- 1 tbsp balsamic vinegar (adds that lovely sweet-tangy depth)
- 1 tsp fresh thyme leaves (fresh really makes a difference here)
- 1/2 cup shredded Gruyère cheese (it melts so beautifully)
- 1/4 tsp salt
- 1/4 tsp black pepper
Instructions
- Preheat your oven to 400°F and line a baking sheet with parchment paper.
- Heat olive oil in a large skillet over medium heat until it shimmers.
- Add sliced onions and cook for 15 minutes, stirring occasionally, until they turn golden brown and sweet.
- Tip: Don’t rush the onions—low and slow cooking develops their natural sugars.
- Add mushrooms to the skillet and cook for 8 minutes until they release their liquid and become tender.
- Stir in balsamic vinegar, thyme, salt, and pepper, then cook for 2 more minutes until the liquid evaporates.
- Unfold the puff pastry onto the prepared baking sheet and prick it all over with a fork.
- Tip: Pricking the pastry prevents it from puffing up too much in the center.
- Sprinkle 1/4 cup of Gruyère cheese over the pastry, leaving a 1-inch border around the edges.
- Spread the onion-mushroom mixture evenly over the cheese layer.
- Top with the remaining 1/4 cup of Gruyère cheese.
- Fold the pastry edges over the filling to create a rustic border.
- Bake for 20-25 minutes until the crust is golden brown and puffed.
- Tip: Let it rest for 5 minutes before slicing—this helps the filling set perfectly.
Perfectly flaky pastry gives way to that sweet-savory onion and mushroom filling, with the Gruyère adding just the right nutty richness. Try serving warm slices alongside a simple arugula salad for contrast, or cut into smaller squares for an elegant appetizer that disappears fast at parties.
Crispy Baked Zucchini Fries

Crispy baked zucchini fries are that perfect snack when you want something crunchy but don’t feel like deep-frying. You get all the satisfaction of a fry without the mess, and they’re surprisingly easy to pull off. Let’s get these golden sticks into your oven!
3
servings15
minutes22
minutesIngredients
- 2 medium zucchinis, sliced into fry-shaped sticks (I like them about ¼-inch thick for the best crunch)
- ½ cup all-purpose flour (this helps the coating stick beautifully)
- 2 large eggs, lightly beaten (room temp works best for even coating)
- 1 cup panko breadcrumbs (they give an extra-crispy texture I love)
- ¼ cup grated Parmesan cheese (the salty kick is a must)
- 1 tsp garlic powder (for a little savory boost)
- ½ tsp paprika (adds a hint of color and mild spice)
- 2 tbsp olive oil (extra virgin is my go-to for roasting)
- ½ tsp salt (adjust if your Parmesan is very salty)
- ¼ tsp black pepper (freshly cracked if you have it)
Instructions
- Preheat your oven to 425°F and line a baking sheet with parchment paper.
- Slice each zucchini into ¼-inch thick sticks, about 3 inches long.
- Place the all-purpose flour in a shallow bowl.
- Add the lightly beaten eggs to a second shallow bowl.
- In a third bowl, combine the panko breadcrumbs, grated Parmesan, garlic powder, paprika, salt, and black pepper.
- Toss the zucchini sticks in the flour until lightly coated on all sides.
- Dip each floured zucchini stick into the beaten eggs, letting excess drip off.
- Press the zucchini firmly into the panko mixture, coating evenly. Tip: Press gently to help the crumbs adhere without squashing the zucchini.
- Arrange the coated zucchini in a single layer on the prepared baking sheet.
- Drizzle the olive oil evenly over the zucchini fries. Tip: A light spray of cooking oil can also work if you prefer.
- Bake for 18–22 minutes, flipping halfway through, until golden brown and crisp. Tip: Don’t crowd the pan—this ensures they crisp up instead of steaming.
Mmm, these come out with a shatteringly crisp exterior and a tender, almost creamy center. The Parmesan adds a salty richness that pairs perfectly with a cool dipping sauce like ranch or marinara. Try serving them alongside burgers or as a fun appetizer—they disappear fast!
Colorful Roasted Veggie Platter

Craving something vibrant and healthy that’s actually exciting to eat? This roasted veggie platter is my go-to when I want maximum flavor with minimal effort. You’ll love how the natural sweetness comes out in every colorful bite.
4
servings15
minutes25
minutesIngredients
– 2 cups cherry tomatoes (I look for the multi-colored ones – they’re so pretty on the platter)
– 1 large red bell pepper, sliced into 1-inch strips (the sweetest variety in my opinion)
– 1 large yellow bell pepper, sliced into 1-inch strips
– 2 medium zucchini, cut into ½-inch rounds
– 1 small red onion, cut into wedges (keep the root end intact so they don’t fall apart)
– 3 tbsp extra virgin olive oil (my absolute favorite for roasting)
– 1 tsp dried oregano
– ½ tsp garlic powder
– ½ tsp salt
– ¼ tsp black pepper
Instructions
1. Preheat your oven to 425°F and line a large baking sheet with parchment paper.
2. Wash all vegetables thoroughly and pat them completely dry with paper towels.
3. Cut the cherry tomatoes in half and place them in a large mixing bowl.
4. Slice both bell peppers into 1-inch wide strips and add them to the bowl.
5. Cut the zucchini into ½-inch thick rounds and add to the mixing bowl.
6. Cut the red onion into 8 wedges, keeping the root end intact, and add to the bowl.
7. Drizzle 3 tablespoons of olive oil over all the vegetables in the bowl.
8. Sprinkle 1 teaspoon dried oregano, ½ teaspoon garlic powder, ½ teaspoon salt, and ¼ teaspoon black pepper over the vegetables.
9. Toss everything together with your hands until every piece is evenly coated with oil and seasonings.
10. Spread the vegetables in a single layer on your prepared baking sheet, making sure none are overlapping.
11. Roast at 425°F for 20-25 minutes until the edges are caramelized and the tomatoes have burst open.
12. Remove the baking sheet from the oven and let the vegetables rest for 5 minutes before serving. Don’t skip this resting step – it lets the flavors settle and makes them easier to handle.
Did you notice how the zucchini gets tender while maintaining a slight bite? The caramelized edges of the peppers contrast beautifully with the juicy burst tomatoes. Try serving this over creamy polenta or alongside grilled chicken for a complete meal that’ll have everyone asking for seconds.
Savory Stuffed Bell Peppers

Wondering what to do with those beautiful bell peppers sitting in your fridge? These savory stuffed bell peppers are the perfect solution for a cozy weeknight dinner that feels special. You’ll love how the flavors meld together while baking.
5
portions20
minutes56
minutesIngredients
– 4 large bell peppers (I like using different colors for visual appeal)
– 1 lb ground beef (85/15 works great for flavor)
– 1 cup cooked rice (day-old rice absorbs flavors better)
– 1 small yellow onion, finely diced
– 2 cloves garlic, minced (fresh is always worth it)
– 1 cup shredded cheddar cheese (sharp cheddar adds nice bite)
– 1 (15 oz) can tomato sauce
– 2 tbsp olive oil (extra virgin is my go-to)
– 1 tsp dried oregano
– 1/2 tsp salt
– 1/4 tsp black pepper
Instructions
1. Preheat your oven to 375°F.
2. Cut the tops off all 4 bell peppers and remove the seeds and membranes.
3. Heat 2 tablespoons of olive oil in a large skillet over medium-high heat.
4. Add the diced onion and cook for 3-4 minutes until translucent.
5. Add the minced garlic and cook for 1 minute until fragrant.
6. Add the ground beef, breaking it up with a spoon, and cook for 6-7 minutes until browned.
7. Drain any excess grease from the skillet.
8. Stir in the cooked rice, tomato sauce, oregano, salt, and black pepper.
9. Simmer the mixture for 5 minutes to let flavors combine.
10. Stuff each bell pepper with the beef and rice mixture, packing it gently.
11. Place the stuffed peppers upright in a baking dish.
12. Cover the baking dish tightly with aluminum foil.
13. Bake at 375°F for 30 minutes.
14. Remove the foil and sprinkle shredded cheddar cheese over each pepper.
15. Return to the oven uncovered for 10 minutes until cheese is melted and bubbly.
16. Let the peppers rest for 5 minutes before serving.
Keep these beauties piping hot straight from the oven—the tender pepper gives way to that hearty, cheesy filling in the most satisfying way. They’re fantastic with a simple green salad or even some crusty bread to soak up any extra sauce.
Pesto Roasted Tomato and Cheese Flatbread

You know those days when you want something delicious but don’t want to spend hours in the kitchen? Yeah, this pesto roasted tomato and cheese flatbread is your answer. It’s basically fancy pizza’s easier, cooler cousin that comes together in no time.
1
flatbread10
minutes15
minutesIngredients
- 1 pre-made flatbread crust (I grab the whole wheat kind for extra fiber)
- 1/2 cup basil pesto (homemade if you’re ambitious, but store-bought works perfectly)
- 1 cup cherry tomatoes, halved (the sweet little ones are my favorite)
- 1 cup shredded mozzarella cheese (I always go for the whole milk version for maximum meltiness)
- 2 tbsp extra virgin olive oil (my go-to for roasting)
- 1/4 tsp salt (kosher salt distributes so evenly)
- 1/4 tsp black pepper (freshly ground makes all the difference)
Instructions
- Preheat your oven to 400°F and line a baking sheet with parchment paper.
- Place your flatbread crust on the prepared baking sheet.
- Spread the basil pesto evenly over the entire surface of the flatbread, leaving about 1/2-inch border around the edges.
- In a small bowl, toss the halved cherry tomatoes with olive oil, salt, and pepper until well coated.
- Arrange the seasoned tomatoes cut-side up across the pesto-covered flatbread.
- Sprinkle the shredded mozzarella cheese evenly over the tomatoes and pesto.
- Bake for 12-15 minutes at 400°F until the cheese is completely melted and bubbly with golden spots.
- Check that the flatbread edges are crisp and lightly browned before removing from oven.
- Let the flatbread rest for 3 minutes on the baking sheet before slicing.
- Use a pizza cutter or sharp knife to slice into wedges or squares.
Perfectly crisp edges give way to that wonderfully chewy center, while the roasted tomatoes burst with sweet intensity against the garlicky pesto. I love serving this cut into small squares for game day appetizers or in big wedges alongside a simple green salad for an easy weeknight dinner that feels special.
Tangy Greek Salad with Feta
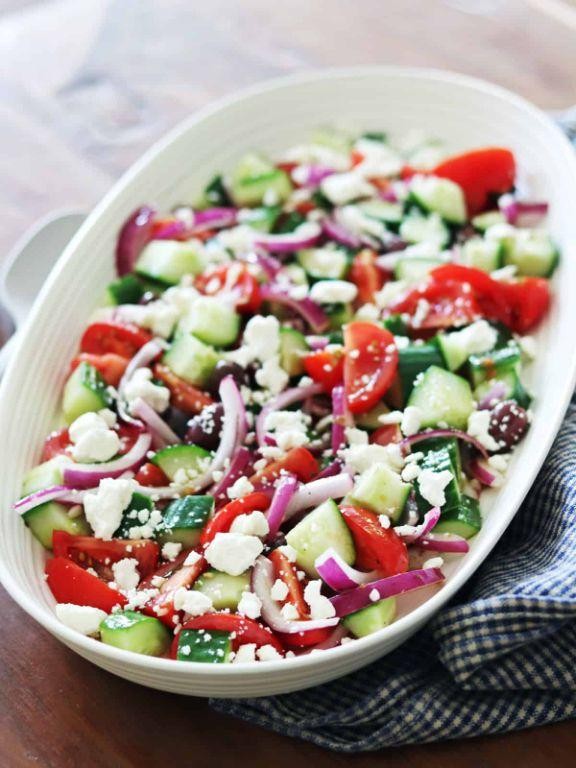
Gosh, there’s nothing quite like the bright, refreshing flavors of a Greek salad on a warm day – it’s the perfect balance of tangy, salty, and crisp that always hits the spot. You’ll love how this version comes together in minutes but tastes like you spent hours in the kitchen. Trust me, once you try this combination, it’ll become your go-to for quick lunches and impressive sides alike.
2
servings20
minutesIngredients
– 1 large English cucumber, chopped into bite-sized pieces (I love leaving the skin on for extra crunch)
– 2 large ripe tomatoes, chopped (go for the deep red ones – they’re sweeter)
– 1 small red onion, thinly sliced (soaking in ice water for 10 minutes first takes away that sharp bite)
– 1 green bell pepper, chopped (the crisp texture is key here)
– 1/2 cup Kalamata olives, pitted (I prefer the briny flavor over black olives)
– 4 oz block feta cheese, cubed (don’t use crumbled – the chunks hold up better)
– 1/4 cup extra virgin olive oil (my go-to for dressings)
– 2 tbsp red wine vinegar (this gives that perfect tangy kick)
– 1 tsp dried oregano (rub it between your palms to wake up the flavor)
– 1/2 tsp salt
– 1/4 tsp black pepper
Instructions
1. Place the sliced red onion in a bowl of ice water and let it soak for exactly 10 minutes to mellow the sharp flavor.
2. Chop the English cucumber into 1/2-inch pieces and add them to a large salad bowl.
3. Dice the tomatoes into similar-sized pieces and add them to the bowl with the cucumber.
4. Drain the red onion thoroughly and add it to the mixing bowl.
5. Chop the green bell pepper into 1/2-inch pieces and combine with the other vegetables.
6. Add the pitted Kalamata olives to the bowl.
7. Cube the feta cheese into 1/2-inch pieces and gently mix into the salad.
8. In a small bowl, whisk together the extra virgin olive oil and red wine vinegar until emulsified.
9. Add the dried oregano, salt, and black pepper to the dressing and whisk vigorously for 30 seconds.
10. Pour the dressing over the salad and toss gently to coat all ingredients evenly.
11. Let the salad sit at room temperature for 15 minutes before serving to allow flavors to meld.
Hearty chunks of feta and crisp vegetables create the most satisfying texture contrast in every bite. The tangy dressing soaks into the tomatoes beautifully while the cucumbers maintain their refreshing crunch. Try serving it alongside grilled chicken or stuffed into pita pockets for a complete meal that feels both light and substantial.
Mouthwatering Veggie Taco Dip
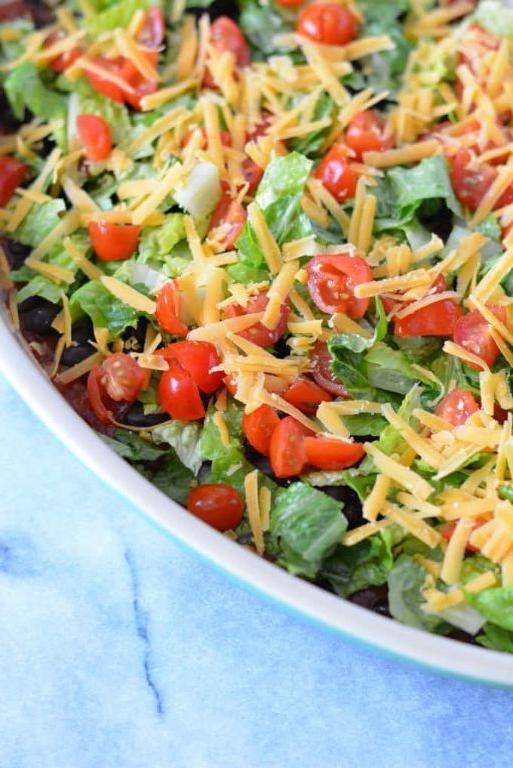
Zesty and vibrant, this veggie taco dip is the ultimate crowd-pleaser for any gathering. You’re going to love how easily it comes together with fresh, colorful ingredients. It’s perfect for game day, parties, or just a fun weeknight snack that everyone can dive into.
8
servings20
minutesIngredients
– 1 (16 oz) can refried beans (I like the traditional kind for that authentic taco flavor)
– 1 cup sour cream (full-fat gives the creamiest texture)
– 1 (1 oz) packet taco seasoning (mild or spicy—your choice!)
– 1 cup shredded cheddar cheese (freshly shredded melts so much better)
– 1 cup shredded lettuce (iceberg gives that perfect crunch)
– 1 large tomato, diced (I prefer Roma tomatoes—less watery)
– 1/2 cup sliced black olives (the canned ones work great here)
– 1/4 cup sliced jalapeños (pickled for that tangy kick)
– Tortilla chips for serving (get the sturdy ones—they won’t break under all that goodness)
Instructions
1. Spread the refried beans evenly in the bottom of a 9-inch pie dish or similar serving dish.
2. In a small bowl, mix the sour cream and taco seasoning until fully combined.
3. Spread the seasoned sour cream mixture over the refried beans layer.
4. Sprinkle the shredded cheddar cheese evenly over the sour cream layer.
5. Top with shredded lettuce, spreading it to cover the cheese.
6. Scatter the diced tomatoes evenly over the lettuce.
7. Arrange the sliced black olives across the tomato layer.
8. Place the sliced jalapeños on top for garnish and heat.
9. Chill the assembled dip in the refrigerator for at least 30 minutes to let the flavors meld.
10. Serve immediately with tortilla chips for dipping.
Great texture and flavor come through in every bite—creamy beans, zesty seasoning, and crisp fresh veggies. The cool sour cream balances the spicy jalapeños perfectly. Try serving it with colorful veggie sticks for a lighter option, or layer it over nachos for an epic loaded snack.
Conclusion
A fantastic collection of veggie dishes perfect for any gathering! These recipes make potluck planning stress-free and guarantee delicious results that everyone will love. We hope you try a few favorites and share your experience in the comments below. Don’t forget to pin this article to your Pinterest boards for easy reference!


