Feeling overwhelmed by hectic schedules but still craving something tasty? You’re in the right place! We’ve gathered 31 delicious, easy sandwich wrap recipes perfect for those busy days when you need a quick, satisfying meal without the fuss. From classic combos to creative twists, these wraps are your ticket to stress-free lunches and dinners. Let’s dive in and find your new go-to wrap!
Chicken Caesar Wrap with Parmesan
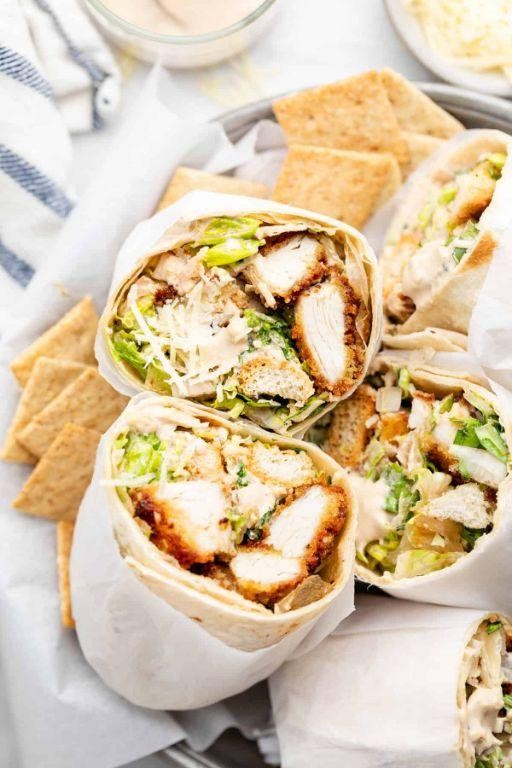
Now, let’s make a Chicken Caesar Wrap with Parmesan—a quick, satisfying lunch that combines classic Caesar flavors in a portable package. This recipe is perfect for beginners, breaking down each step clearly so you can assemble it with confidence. We’ll start by cooking the chicken and preparing the sauce before wrapping everything in a soft tortilla.
Serving: 2 | Pre Time: 10 minutes | Cooking Time: 15 minutes
Ingredients
For the Chicken:
– 1 boneless, skinless chicken breast (about 8 ounces)
– 1 tablespoon olive oil
– 1/4 teaspoon salt
– 1/4 teaspoon black pepper
For the Caesar Sauce:
– 1/4 cup mayonnaise
– 1 tablespoon lemon juice
– 1 teaspoon Dijon mustard
– 1/4 cup grated Parmesan cheese
– 1 small garlic clove, minced
For Assembly:
– 2 large flour tortillas (10-inch diameter)
– 2 cups chopped romaine lettuce
– 1/4 cup shaved Parmesan cheese
Instructions
1. Pat the chicken breast dry with paper towels to ensure even browning. 2. Season both sides of the chicken breast with salt and black pepper. 3. Heat olive oil in a skillet over medium-high heat until it shimmers, about 1 minute. 4. Place the chicken breast in the skillet and cook for 6-7 minutes per side, until the internal temperature reaches 165°F on a meat thermometer. 5. Remove the chicken from the skillet and let it rest on a cutting board for 5 minutes to retain juices. 6. While the chicken rests, whisk together mayonnaise, lemon juice, Dijon mustard, grated Parmesan cheese, and minced garlic in a small bowl until smooth. 7. Slice the rested chicken breast into thin strips. 8. Warm the flour tortillas in a dry skillet over low heat for 30 seconds per side to make them pliable. 9. Spread half of the Caesar sauce evenly over the center of each tortilla. 10. Divide the chopped romaine lettuce evenly over the sauce on each tortilla. 11. Arrange half of the chicken strips on top of the lettuce on each tortilla. 12. Sprinkle shaved Parmesan cheese over the chicken on each tortilla. 13. Fold the sides of each tortilla inward, then roll tightly from the bottom to enclose the filling. 14. Slice each wrap in half diagonally for easier serving.
Zesty and creamy, this wrap offers a satisfying crunch from the romaine against the tender, seasoned chicken. For a creative twist, serve it with extra lemon wedges or a side of crispy sweet potato fries to balance the rich Parmesan flavor.
Spicy Hummus and Veggie Wraps

Let’s make a quick, healthy lunch that’s packed with flavor and crunch. These wraps combine creamy, spicy hummus with fresh, crisp vegetables for a satisfying meal you can assemble in minutes. Perfect for a busy weekday or a light dinner, they’re endlessly customizable based on what you have on hand.
Serving: 4 | Pre Time: 15 minutes | Cooking Time: 0 minutes
Ingredients
For the Spicy Hummus:
– 1 (15-ounce) can chickpeas, drained and rinsed
– 1/4 cup tahini
– 3 tablespoons fresh lemon juice
– 2 tablespoons extra-virgin olive oil
– 1 clove garlic, minced
– 1/2 teaspoon ground cumin
– 1/4 teaspoon cayenne pepper
– 1/4 teaspoon salt
For the Wraps:
– 4 large whole-wheat tortillas (10-inch diameter)
– 1 cup shredded carrots
– 1 cup thinly sliced cucumber
– 1 cup baby spinach leaves
– 1/2 cup thinly sliced red bell pepper
Instructions
1. Place the drained chickpeas, tahini, lemon juice, olive oil, minced garlic, cumin, cayenne pepper, and salt in a food processor or high-speed blender.
2. Process the mixture on high speed for 60–90 seconds, stopping to scrape down the sides with a spatula once, until completely smooth and creamy. Tip: For an extra-smooth hummus, you can peel the chickpeas by rubbing them in a clean kitchen towel after rinsing.
3. Lay one whole-wheat tortilla flat on a clean cutting board or plate.
4. Spread 1/4 of the spicy hummus evenly over the center of the tortilla, leaving a 1-inch border around the edges.
5. Arrange 1/4 cup of shredded carrots in a horizontal line down the center of the hummus.
6. Top the carrots with 1/4 cup of thinly sliced cucumber.
7. Add 1/4 cup of baby spinach leaves over the cucumber.
8. Finish with 2 tablespoons of thinly sliced red bell pepper arranged over the spinach. Tip: Slice all vegetables uniformly to ensure even distribution and easier rolling.
9. Fold the bottom edge of the tortilla up over the fillings, then fold in the left and right sides. Roll the wrap tightly away from you to enclose all ingredients. Tip: If the tortilla cracks, warm it in a dry skillet over medium heat for 15–20 seconds to make it more pliable.
10. Repeat steps 3 through 9 with the remaining tortillas and ingredients.
11. Slice each wrap in half diagonally with a sharp knife for easier serving.
Packed with a creamy, zesty kick from the hummus and a satisfying crunch from the fresh vegetables, these wraps are a textural delight. Serve them immediately with extra lemon wedges on the side, or wrap them tightly in parchment paper for a neat, portable lunch.
Buffalo Chicken Wrap with Ranch Dressing

Now, let’s create a satisfying Buffalo Chicken Wrap with Ranch Dressing, perfect for a quick lunch or dinner that packs bold flavor with minimal fuss. This recipe guides you through preparing tender, spicy chicken and assembling it into a handheld meal, ensuring each step is clear even for first-time cooks.
Serving: 2 | Pre Time: 10 minutes | Cooking Time: 15 minutes
Ingredients
– For the chicken: 1 boneless, skinless chicken breast (about 6 oz), 2 tbsp hot sauce, 1 tbsp unsalted butter, 1/4 tsp garlic powder, 1/4 tsp salt, 1 tbsp olive oil
– For assembly: 2 large flour tortillas (10-inch), 1/4 cup ranch dressing, 1/2 cup shredded lettuce, 1/4 cup shredded cheddar cheese
Instructions
1. Cut the chicken breast into 1-inch cubes to ensure even cooking.
2. In a small bowl, combine the hot sauce, melted butter, garlic powder, and salt to make the Buffalo sauce, stirring until smooth.
3. Heat the olive oil in a skillet over medium-high heat until it shimmers, about 1 minute.
4. Add the chicken cubes to the skillet and cook for 5-7 minutes, stirring occasionally, until the internal temperature reaches 165°F and the pieces are golden brown.
5. Tip: Use a meat thermometer to check doneness for food safety and avoid overcooking.
6. Pour the Buffalo sauce over the cooked chicken in the skillet and toss to coat evenly, cooking for an additional 1 minute to let the flavors meld.
7. Warm the tortillas in a dry skillet over low heat for 30 seconds per side to make them pliable and prevent tearing.
8. Tip: Cover the warmed tortillas with a clean towel to keep them soft while assembling.
9. Lay a tortilla flat and spread 2 tbsp of ranch dressing evenly over the center, leaving a 1-inch border around the edges.
10. Top the dressing with 1/4 cup of shredded lettuce, half of the sauced chicken, and 2 tbsp of shredded cheddar cheese.
11. Fold the bottom edge of the tortilla over the filling, then fold in the sides and roll tightly to form a secure wrap.
12. Tip: For a neater wrap, place the filling slightly off-center toward the bottom edge before folding.
13. Repeat steps 9-12 with the remaining ingredients to make the second wrap.
14. Slice each wrap in half diagonally for easier serving. Very, this wrap delivers a delightful contrast of spicy, tangy chicken against the cool, creamy ranch, with a satisfying crunch from the fresh lettuce. The tender chicken and melted cheese create a hearty texture that holds up well in the wrap, making it ideal for picnics or a quick meal on the go—try adding sliced avocado or celery sticks on the side for extra freshness.
Turkey Bacon Ranch Avocado Wrap
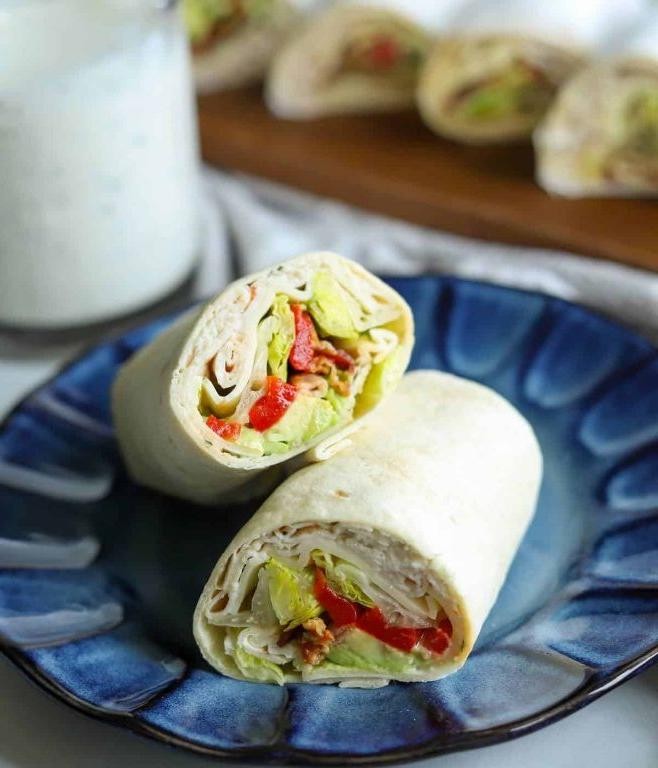
Now that the holiday season has passed, you might be looking for a quick, satisfying lunch that uses up leftover turkey in a fresh way. This Turkey Bacon Ranch Avocado Wrap is a perfect solution—it combines creamy, crunchy, and savory elements in a portable package. Let’s walk through making it together, step by step, so you can enjoy a delicious meal in minutes.
Serving: 1 | Pre Time: 10 minutes | Cooking Time: 5 minutes
Ingredients
For the wrap assembly:
– 1 large flour tortilla (10-inch diameter)
– 4 ounces cooked turkey breast, shredded
– 2 slices cooked bacon, crumbled
– 1/2 avocado, sliced
– 1/4 cup shredded cheddar cheese
For the ranch sauce:
– 2 tablespoons ranch dressing
– 1 tablespoon sour cream
Instructions
1. Lay the flour tortilla flat on a clean work surface.
2. In a small bowl, combine the ranch dressing and sour cream, stirring until smooth to create a creamy sauce.
3. Spread the ranch sauce evenly over the center of the tortilla, leaving a 1-inch border around the edges to prevent overflow when rolling.
4. Evenly distribute the shredded turkey breast over the sauce-covered area of the tortilla.
5. Sprinkle the crumbled bacon on top of the turkey layer.
6. Arrange the avocado slices in a single layer over the bacon.
7. Sprinkle the shredded cheddar cheese evenly over the avocado.
8. Fold the left and right sides of the tortilla inward by about 1 inch to enclose the fillings.
9. Starting from the bottom edge, tightly roll the tortilla upward to form a wrap, applying gentle pressure to keep it compact.
10. If desired, heat a skillet over medium heat (350°F), place the wrap seam-side down, and cook for 2-3 minutes per side until golden brown and crispy—this step is optional but adds a nice texture.
11. Transfer the wrap to a cutting board and slice it in half diagonally with a sharp knife for easier serving.
Out of the kitchen, this wrap offers a delightful contrast: the creamy avocado and ranch sauce balance the savory turkey and bacon, while a quick pan-toast adds a satisfying crunch. Serve it with a side of carrot sticks or chips for a complete meal, or pack it for a picnic—it holds up well and tastes just as good at room temperature.
Mediterranean Veggie Wrap with Feta Cheese
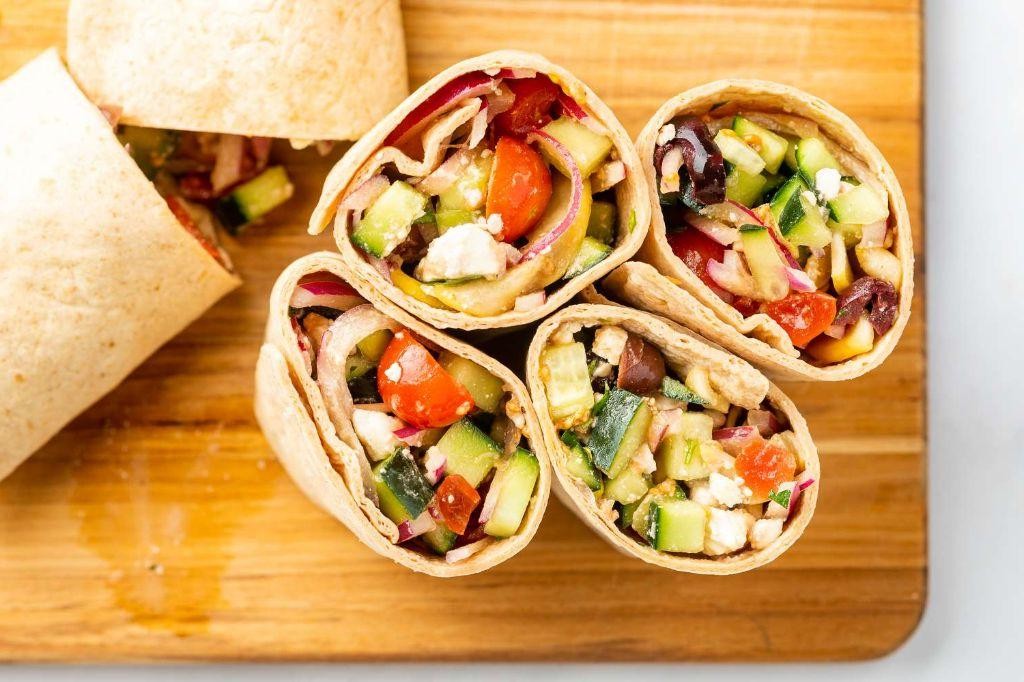
Kick off your weeknight dinner with this vibrant Mediterranean Veggie Wrap with Feta Cheese, a fresh and satisfying meal that comes together in under 30 minutes. Keep it simple by using pre-chopped veggies or leftover roasted vegetables to save time, and feel free to swap in your favorite hummus or cheese for a personalized touch. This wrap is perfect for a quick lunch, a light dinner, or even packed for a picnic, offering a delicious way to enjoy wholesome ingredients without fuss.
Serving: 2 | Pre Time: 15 minutes | Cooking Time: 10 minutes
Ingredients
For the filling:
– 1 tbsp olive oil
– 1 red bell pepper, thinly sliced
– 1 small zucchini, thinly sliced
– 1/2 red onion, thinly sliced
– 1/2 tsp dried oregano
– 1/4 tsp salt
– 1/4 tsp black pepper
For assembly:
– 2 large whole-wheat tortillas (10-inch diameter)
– 1/2 cup hummus
– 1/2 cup crumbled feta cheese
– 1 cup fresh spinach leaves
Instructions
1. Heat 1 tbsp olive oil in a large skillet over medium-high heat until it shimmers, about 1 minute.
2. Add 1 red bell pepper, 1 small zucchini, and 1/2 red onion to the skillet, spreading them in an even layer.
3. Sprinkle 1/2 tsp dried oregano, 1/4 tsp salt, and 1/4 tsp black pepper over the vegetables.
4. Cook the vegetables for 8–10 minutes, stirring occasionally, until they are tender and lightly browned at the edges.
5. Remove the skillet from the heat and let the vegetables cool slightly for 2–3 minutes to prevent the tortillas from becoming soggy.
6. Lay 2 large whole-wheat tortillas flat on a clean surface.
7. Spread 1/4 cup hummus evenly over the center of each tortilla, leaving a 1-inch border around the edges.
8. Divide 1 cup fresh spinach leaves between the tortillas, placing them on top of the hummus.
9. Spoon the cooked vegetable mixture evenly over the spinach on each tortilla.
10. Sprinkle 1/4 cup crumbled feta cheese over the vegetables on each tortilla.
11. Fold the bottom edge of each tortilla up over the filling, then fold in the sides and roll tightly from the bottom to enclose the filling completely.
12. Slice each wrap in half diagonally with a sharp knife for easier serving.
Wrap up your meal with this delightful Mediterranean Veggie Wrap, where the creamy hummus and tangy feta cheese meld beautifully with the tender, herb-roasted vegetables. The whole-wheat tortilla adds a hearty texture that holds everything together without falling apart. For a creative twist, serve it alongside a simple Greek salad or drizzle with a lemon-tahini sauce for extra zest.
Sweet Chili Shrimp Wraps
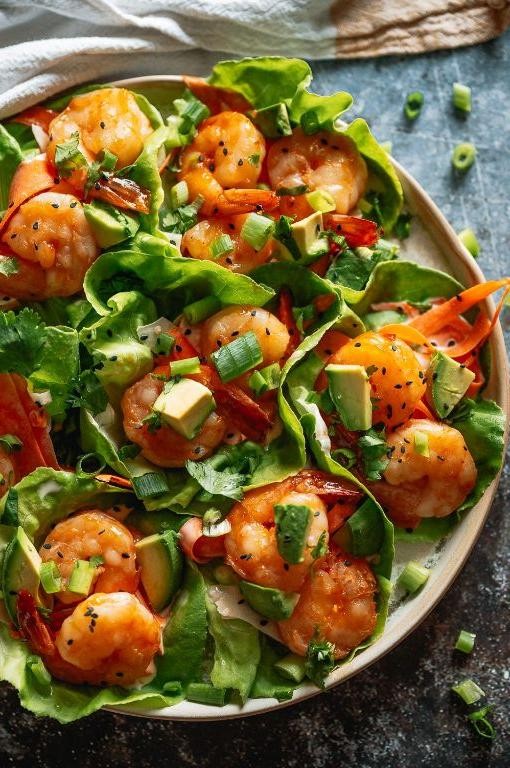
Zesty and quick, these Sweet Chili Shrimp Wraps are a perfect weeknight solution when you crave something flavorful without a fuss. Let’s walk through each step together, ensuring your wraps turn out crisp, tangy, and satisfying every time.
Serving: 4 | Pre Time: 15 minutes | Cooking Time: 10 minutes
Ingredients
For the shrimp:
– 1 lb large shrimp, peeled and deveined
– 1 tbsp olive oil
– ½ tsp salt
– ¼ tsp black pepper
For the sauce:
– ½ cup sweet chili sauce
– 2 tbsp soy sauce
– 1 tbsp lime juice
For assembly:
– 4 large flour tortillas (10-inch)
– 2 cups shredded cabbage
– ½ cup shredded carrots
– ¼ cup chopped cilantro
Instructions
1. Pat the shrimp dry with paper towels to ensure they sear properly instead of steaming.
2. Heat olive oil in a large skillet over medium-high heat until it shimmers, about 1 minute.
3. Add shrimp to the skillet in a single layer, seasoning with salt and pepper.
4. Cook shrimp for 2–3 minutes per side until they turn pink and opaque, then transfer to a plate.
5. In the same skillet, reduce heat to medium and add sweet chili sauce, soy sauce, and lime juice, stirring to combine.
6. Simmer the sauce for 2 minutes until slightly thickened, then return shrimp to the skillet, tossing to coat evenly.
7. Warm tortillas in a dry skillet over medium heat for 30 seconds per side to make them pliable.
8. Lay each tortilla flat and evenly distribute shredded cabbage, carrots, and cilantro in the center.
9. Spoon the saucy shrimp over the vegetables, dividing equally among the wraps.
10. Fold the sides of each tortilla inward, then roll tightly from the bottom to enclose the filling.
Enjoy these wraps immediately for the best texture and flavor. Each bite offers a crunch from the fresh veggies, a tender bite from the shrimp, and a sweet-spicy kick from the sauce. For a fun twist, serve them sliced in half with extra lime wedges on the side.
Grilled Veggie and Pesto Wrap

Grilling season may be winding down, but that doesn’t mean you have to say goodbye to those smoky, charred flavors. This wrap brings the essence of summer grilling indoors with a vibrant pesto that ties everything together in a quick, satisfying meal.
Serving: 2 | Pre Time: 15 minutes | Cooking Time: 10 minutes
Ingredients
For the Grilled Vegetables:
– 1 medium zucchini, sliced into 1/4-inch thick rounds
– 1 medium yellow bell pepper, seeded and sliced into 1/2-inch strips
– 1 small red onion, sliced into 1/2-inch thick rings
– 1 tbsp olive oil
– 1/4 tsp salt
– 1/8 tsp black pepper
For Assembly:
– 2 large (10-inch) flour tortillas
– 1/4 cup prepared basil pesto
– 1/2 cup shredded mozzarella cheese
Instructions
1. Preheat a grill pan or large skillet over medium-high heat (about 400°F surface temperature).
2. In a medium bowl, toss the zucchini rounds, bell pepper strips, and red onion rings with 1 tbsp olive oil, 1/4 tsp salt, and 1/8 tsp black pepper until evenly coated.
3. Place the vegetables in a single layer on the hot grill pan. Tip: Avoid overcrowding to ensure proper charring; cook in batches if necessary.
4. Cook the vegetables for 3-4 minutes per side, or until they develop distinct grill marks and are tender-crisp.
5. Transfer the grilled vegetables to a clean plate. Tip: Let them rest for 2 minutes to allow juices to redistribute, preventing a soggy wrap.
6. Lay the two flour tortillas flat on a clean work surface.
7. Spread 2 tbsp of basil pesto evenly over the center of each tortilla, leaving a 1-inch border around the edges.
8. Divide the grilled vegetables evenly between the two tortillas, arranging them in a horizontal line down the center.
9. Sprinkle 1/4 cup of shredded mozzarella cheese over the vegetables on each tortilla.
10. Fold the bottom edge of each tortilla up over the filling, then fold in the left and right sides. Roll the wrap tightly away from you to enclose the filling completely. Tip: For a secure wrap, place it seam-side down for 1 minute before serving.
Bursting with the smoky sweetness of grilled vegetables against the bright, herby pesto, this wrap offers a satisfying contrast of warm, melty cheese and crisp-tender veggies. Serve it immediately for the best texture, or slice it in half diagonally for a beautiful presentation that showcases the colorful layers inside.
Tuna Salad Wrap with Sunflower Seeds
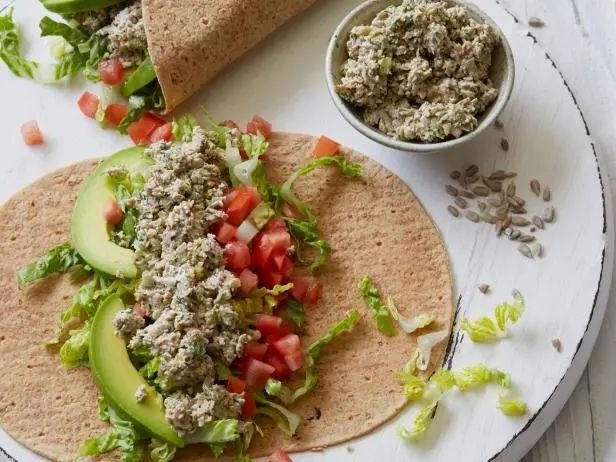
Keeping lunch simple yet satisfying is a skill every home cook should master, and this tuna salad wrap delivers just that with minimal effort. It combines pantry staples with fresh ingredients for a protein-packed meal that’s ready in minutes, perfect for busy weekdays or a light weekend bite.
Serving: 2 | Pre Time: 15 minutes | Cooking Time: 0 minutes
Ingredients
For the tuna salad:
– 2 (5-ounce) cans of tuna in water, drained
– 1/4 cup mayonnaise
– 1 tablespoon Dijon mustard
– 1/4 cup finely chopped celery
– 2 tablespoons finely chopped red onion
– 2 tablespoons sunflower seeds
– 1/4 teaspoon salt
– 1/8 teaspoon black pepper
For assembling:
– 2 large flour tortillas (10-inch diameter)
– 1 cup shredded lettuce
Instructions
1. Place the drained tuna in a medium mixing bowl and flake it with a fork until no large chunks remain.
2. Add the mayonnaise, Dijon mustard, celery, red onion, sunflower seeds, salt, and black pepper to the bowl with the tuna.
3. Stir all ingredients together until evenly combined, using a folding motion to avoid mashing the tuna too finely.
4. Lay the flour tortillas flat on a clean work surface.
5. Divide the shredded lettuce evenly between the tortillas, spreading it in a line down the center of each, leaving about 2 inches of space at the edges.
6. Spoon half of the tuna salad mixture over the lettuce on each tortilla, packing it gently to prevent spillage.
7. Fold the bottom edge of each tortilla up over the filling, then fold in the sides tightly.
8. Roll each tortilla away from you to form a secure wrap, pressing lightly to seal.
9. Slice each wrap in half diagonally with a sharp knife for easier handling.
10. Serve immediately or wrap in parchment paper for on-the-go meals.
Generously textured with the crunch of celery and sunflower seeds against the creamy tuna, this wrap offers a balanced flavor profile that’s both hearty and refreshing. For a creative twist, try adding a sprinkle of dried cranberries or swapping the tortillas for large lettuce leaves to make it low-carb.
Barbecue Pulled Pork Wrap
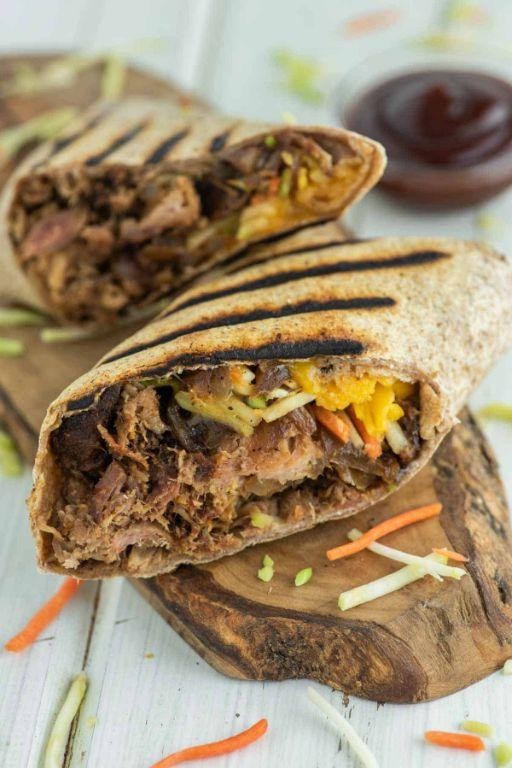
Haven’t you ever craved a handheld barbecue feast that’s both satisfying and simple to make? This barbecue pulled pork wrap combines tender, smoky meat with crisp vegetables in a soft tortilla, perfect for a quick lunch or casual dinner. Let’s walk through each step together to ensure your wrap turns out perfectly every time.
Serving: 4 | Pre Time: 15 minutes | Cooking Time: 8 hours
Ingredients
For the pulled pork:
– 2 lbs pork shoulder, trimmed of excess fat
– 1 tbsp olive oil
– 1 tbsp brown sugar
– 1 tsp smoked paprika
– 1 tsp garlic powder
– 1 tsp onion powder
– 1/2 tsp salt
– 1/2 tsp black pepper
– 1 cup barbecue sauce
For assembling the wraps:
– 4 large flour tortillas (10-inch diameter)
– 1 cup shredded lettuce
– 1/2 cup diced tomatoes
– 1/4 cup sliced red onion
– 1/2 cup shredded cheddar cheese
Instructions
1. Preheat your oven to 300°F.
2. Pat the pork shoulder dry with paper towels to help the seasoning adhere better.
3. Rub the pork shoulder all over with olive oil.
4. In a small bowl, combine brown sugar, smoked paprika, garlic powder, onion powder, salt, and black pepper.
5. Massage the spice mixture evenly onto the pork shoulder.
6. Place the seasoned pork shoulder in a Dutch oven or oven-safe pot with a lid.
7. Cover the pot and transfer it to the preheated oven.
8. Cook the pork for 7 hours until it reaches an internal temperature of 195°F and shreds easily with a fork.
9. Remove the pork from the oven and let it rest for 15 minutes to retain its juices.
10. Use two forks to shred the pork into bite-sized pieces directly in the pot.
11. Stir in 1 cup of barbecue sauce until the pork is evenly coated.
12. Warm the flour tortillas in a dry skillet over medium heat for 30 seconds per side to make them pliable.
13. Lay each warmed tortilla flat on a clean surface.
14. Divide the pulled pork mixture evenly among the tortillas, placing it in the center.
15. Top each with shredded lettuce, diced tomatoes, sliced red onion, and shredded cheddar cheese.
16. Fold the bottom edge of each tortilla up over the filling, then fold in the sides and roll tightly to form a wrap.
17. Serve the wraps immediately while warm. Just imagine biting into that soft tortilla giving way to juicy, smoky pork with a tangy barbecue kick, complemented by the fresh crunch of vegetables. For a fun twist, try serving these wraps with a side of pickled jalapeños or extra barbecue sauce for dipping.
Turkey Cranberry Wrap with Cream Cheese
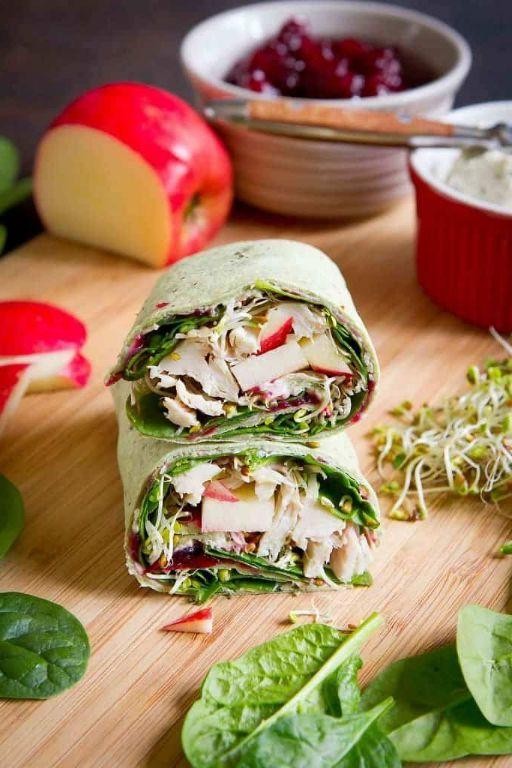
Ready to transform your holiday leftovers into a fresh, satisfying meal? This Turkey Cranberry Wrap with Cream Cheese is a clever way to repurpose that roasted turkey and cranberry sauce into a quick, no-cook lunch that’s bursting with flavor and texture. Let’s walk through the simple assembly process together.
Serving: 1 | Pre Time: 10 minutes | Cooking Time: 0 minutes
Ingredients
For the Spread
– 2 tbsp cream cheese, softened to room temperature
For the Filling
– 1 large (10-inch) flour tortilla
– 1/2 cup shredded or sliced cooked turkey
– 2 tbsp whole-berry cranberry sauce
– 1/4 cup fresh spinach leaves
Instructions
1. Place the 2 tbsp of softened cream cheese in the center of the 1 large flour tortilla. Tip: Letting the cream cheese sit out for 15-20 minutes makes it much easier to spread without tearing the tortilla.
2. Using the back of a spoon or a butter knife, spread the cream cheese evenly over the entire surface of the tortilla, leaving a 1-inch border around the edges.
3. Arrange the 1/4 cup of fresh spinach leaves in a single layer over the lower third of the cream cheese-covered tortilla.
4. Evenly distribute the 1/2 cup of shredded or sliced cooked turkey on top of the spinach layer.
5. Spoon the 2 tbsp of whole-berry cranberry sauce in a horizontal line down the center of the turkey layer. Tip: Using whole-berry sauce provides delightful bursts of tart flavor and a better texture than jellied sauce.
6. Starting from the edge closest to you, tightly roll the tortilla away from you, tucking in the filling as you go to create a compact cylinder.
7. Once fully rolled, press down gently along the seam to help it seal. Tip: For a neater presentation and to prevent filling from falling out, you can wrap the rolled tortilla tightly in parchment paper or plastic wrap and let it rest for 5 minutes before slicing.
8. Using a sharp serrated knife, slice the wrap in half diagonally to serve.
The resulting wrap offers a wonderful contrast: the soft, cool cream cheese and spinach against the savory turkey and the sweet-tart pop of cranberries. Try serving it with a side of crispy sweet potato fries or a simple green salad for a complete meal.
Spicy Thai Peanut Chicken Wrap
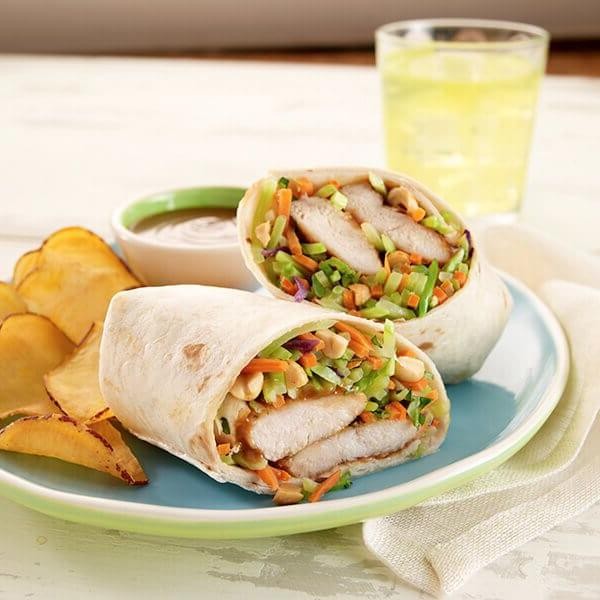
Making a flavorful and satisfying lunch doesn’t have to be complicated. This Spicy Thai Peanut Chicken Wrap combines vibrant, fresh ingredients with a creamy, zesty sauce for a handheld meal that’s both easy to prepare and packed with flavor. Let’s walk through the process step-by-step to ensure perfect results every time.
Serving: 4 | Pre Time: 15 minutes | Cooking Time: 10 minutes
Ingredients
For the Chicken & Marinade:
– 1 lb boneless, skinless chicken breast, cut into 1-inch strips
– 2 tbsp soy sauce
– 1 tbsp lime juice
– 1 tsp grated fresh ginger
For the Sauce:
– 1/4 cup creamy peanut butter
– 2 tbsp soy sauce
– 1 tbsp lime juice
– 1 tbsp honey
– 1 tsp sriracha sauce
– 2 tbsp warm water
For Assembly:
– 4 large flour tortillas (10-inch diameter)
– 1 cup shredded red cabbage
– 1/2 cup shredded carrots
– 1/4 cup chopped fresh cilantro
– 1/4 cup chopped roasted peanuts
Instructions
1. In a medium bowl, combine 1 lb chicken strips, 2 tbsp soy sauce, 1 tbsp lime juice, and 1 tsp grated ginger. Toss to coat evenly and let marinate for 10 minutes at room temperature.
2. While the chicken marinates, make the sauce: In a small bowl, whisk together 1/4 cup peanut butter, 2 tbsp soy sauce, 1 tbsp lime juice, 1 tbsp honey, 1 tsp sriracha, and 2 tbsp warm water until smooth. Tip: Using warm water helps thin the peanut butter for a pourable consistency.
3. Heat a large skillet over medium-high heat. Add the marinated chicken strips in a single layer. Cook for 4-5 minutes, turning once, until the chicken is cooked through and reaches an internal temperature of 165°F. Tip: Avoid overcrowding the pan to ensure the chicken browns properly instead of steaming.
4. Remove the cooked chicken from the skillet and place it on a clean cutting board. Let it rest for 2 minutes, then slice it into bite-sized pieces.
5. Warm the 4 tortillas according to package directions, typically for 15-20 seconds in the microwave wrapped in a damp paper towel. Tip: Warming the tortillas makes them more pliable and less likely to tear when rolling.
6. To assemble each wrap, place one warm tortilla on a flat surface. Spread 2 tbsp of the prepared peanut sauce evenly down the center, leaving a 1-inch border at the top and bottom.
7. Top the sauce with one-quarter of the sliced chicken, 1/4 cup shredded red cabbage, 2 tbsp shredded carrots, 1 tbsp chopped cilantro, and 1 tbsp chopped peanuts.
8. Fold the bottom edge of the tortilla up over the filling, then fold in the sides. Roll tightly from the bottom to the top to form a secure wrap.
9. Repeat steps 6-8 with the remaining tortillas and ingredients.
These wraps offer a delightful contrast of textures, from the tender, savory chicken and crisp vegetables to the rich, slightly spicy peanut sauce. Try serving them with extra sauce for dipping or slice them in half diagonally for an attractive presentation on a platter.
Greek Chicken Wrap with Tzatziki Sauce
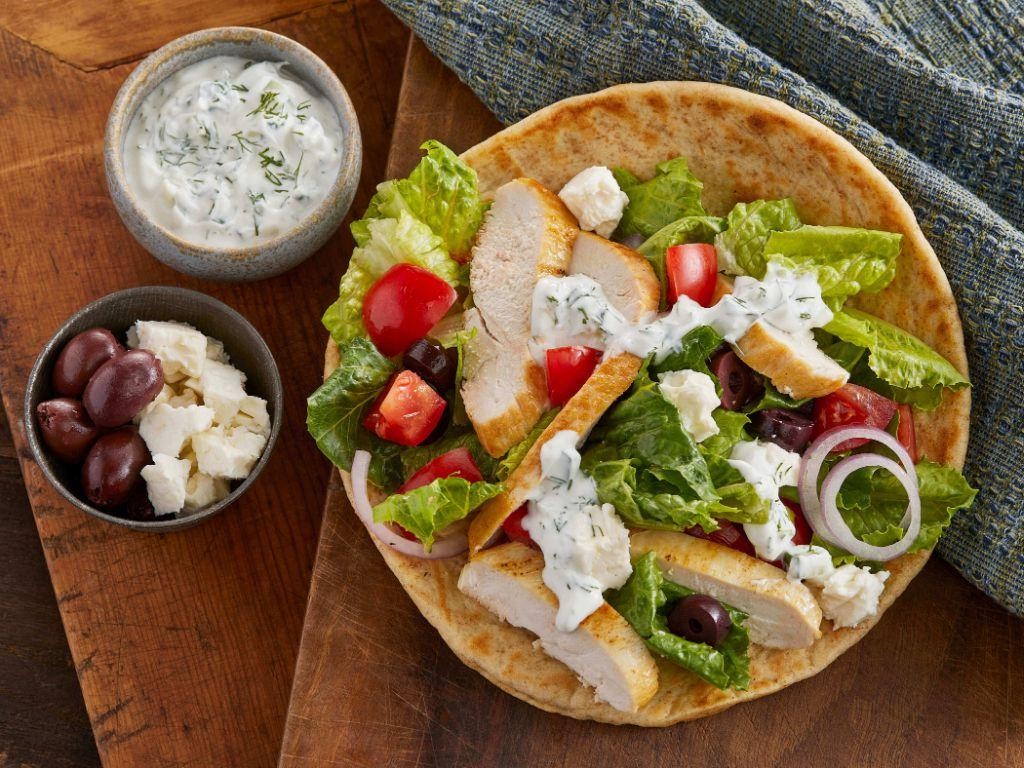
Now, let’s make a fresh and flavorful Greek Chicken Wrap with Tzatziki Sauce, perfect for a quick lunch or light dinner. This recipe combines seasoned chicken, crisp vegetables, and a creamy homemade sauce wrapped in a soft tortilla. Follow these clear steps to assemble a delicious meal that’s both satisfying and easy to prepare.
Serving: 4 | Pre Time: 15 minutes | Cooking Time: 10 minutes
Ingredients
– For the chicken: 1 lb boneless, skinless chicken breasts, 1 tbsp olive oil, 1 tsp dried oregano, 1/2 tsp garlic powder, 1/4 tsp salt, 1/4 tsp black pepper.
– For the tzatziki sauce: 1 cup plain Greek yogurt, 1/2 cup grated cucumber (squeezed dry), 1 tbsp lemon juice, 1 tbsp chopped fresh dill, 1 clove garlic (minced), 1/4 tsp salt.
– For assembly: 4 large flour tortillas (10-inch), 1 cup shredded lettuce, 1/2 cup diced tomatoes, 1/4 cup sliced red onion.
Instructions
1. Pat the chicken breasts dry with paper towels to ensure even browning.
2. In a small bowl, combine the olive oil, dried oregano, garlic powder, salt, and black pepper to make a marinade.
3. Rub the marinade evenly over both sides of the chicken breasts.
4. Heat a large skillet over medium-high heat until a drop of water sizzles, about 2 minutes.
5. Place the chicken in the skillet and cook for 5-6 minutes per side, or until the internal temperature reaches 165°F on a meat thermometer.
6. Tip: Let the chicken rest for 5 minutes after cooking to keep it juicy before slicing.
7. While the chicken rests, prepare the tzatziki sauce by mixing the Greek yogurt, grated cucumber, lemon juice, chopped fresh dill, minced garlic, and salt in a medium bowl.
8. Tip: Squeeze the grated cucumber in a clean towel to remove excess moisture, preventing a watery sauce.
9. Slice the rested chicken into thin strips, about 1/4-inch thick.
10. Warm the flour tortillas in a dry skillet over low heat for 30 seconds per side, or until pliable.
11. Lay a tortilla flat and spread 2 tablespoons of tzatziki sauce evenly in the center.
12. Top with 1/4 of the sliced chicken, 1/4 cup shredded lettuce, 2 tablespoons diced tomatoes, and 1 tablespoon sliced red onion.
13. Fold the sides of the tortilla inward, then roll tightly from the bottom to enclose the filling.
14. Tip: Wrap the finished wrap in parchment paper for easier handling and to prevent leaks.
15. Repeat steps 11-13 with the remaining tortillas and ingredients.
Zesty and creamy, this wrap offers a delightful contrast between the tender, herb-seasoned chicken and the cool, tangy tzatziki sauce. The crisp vegetables add a refreshing crunch, making it a balanced meal that’s easy to customize—try adding olives or feta cheese for extra Greek flair.
Egg and Avocado Breakfast Wrap

Unwrapping a delicious and nutritious breakfast doesn’t have to be complicated, especially with this simple egg and avocado wrap. Using just a handful of fresh ingredients, you can create a satisfying morning meal that’s ready in minutes and perfect for busy days. Let’s walk through each step together to ensure your wrap turns out perfectly every time.
Serving: 1 | Pre Time: 5 minutes | Cooking Time: 5 minutes
Ingredients
For the Filling:
– 2 large eggs
– 1/4 teaspoon kosher salt
– 1/8 teaspoon black pepper
– 1 teaspoon unsalted butter
For Assembly:
– 1 (10-inch) flour tortilla
– 1/2 ripe avocado, sliced
– 2 tablespoons shredded cheddar cheese
Instructions
1. Crack the 2 large eggs into a small bowl and add the 1/4 teaspoon kosher salt and 1/8 teaspoon black pepper.
2. Whisk the eggs vigorously with a fork for 30 seconds until the yolks and whites are fully combined and slightly frothy.
3. Place a medium non-stick skillet over medium-low heat and add the 1 teaspoon unsalted butter, letting it melt completely and coat the pan.
4. Pour the whisked egg mixture into the skillet and let it cook undisturbed for 20 seconds to set the bottom.
5. Gently push the cooked edges toward the center with a spatula, tilting the pan to let the uncooked egg flow to the edges, repeating until no liquid egg remains, about 2-3 minutes total. Tip: Cooking eggs slowly over medium-low heat prevents them from becoming rubbery.
6. Transfer the cooked scrambled eggs to a plate and set the skillet aside.
7. Place the 1 (10-inch) flour tortilla in the same warm skillet over low heat for 15 seconds per side to soften it slightly. Tip: Warming the tortilla makes it more pliable and less likely to tear when folded.
8. Lay the warmed tortilla flat on a clean surface and arrange the sliced 1/2 ripe avocado in the center, leaving a 2-inch border at the bottom.
9. Spoon the scrambled eggs evenly over the avocado slices.
10. Sprinkle the 2 tablespoons shredded cheddar cheese over the eggs.
11. Fold the bottom edge of the tortilla up over the filling, then fold in the left and right sides, and roll it tightly away from you to form a secure wrap. Tip: Rolling the wrap tightly helps hold all the ingredients together for neat eating.
12. Return the wrap to the skillet, seam-side down, and cook over medium heat for 1 minute per side until golden brown and crispy.
Gently biting into this wrap reveals a delightful contrast of textures: the warm, fluffy scrambled eggs and melted cheese pair beautifully with the cool, creamy avocado, all wrapped in a lightly crisped tortilla. For a creative twist, serve it sliced in half on a diagonal with a side of fresh salsa or hot sauce for dipping, making it an easy, handheld breakfast that’s both comforting and energizing.
Southwestern Beef Wrap with Pepper Jack Cheese
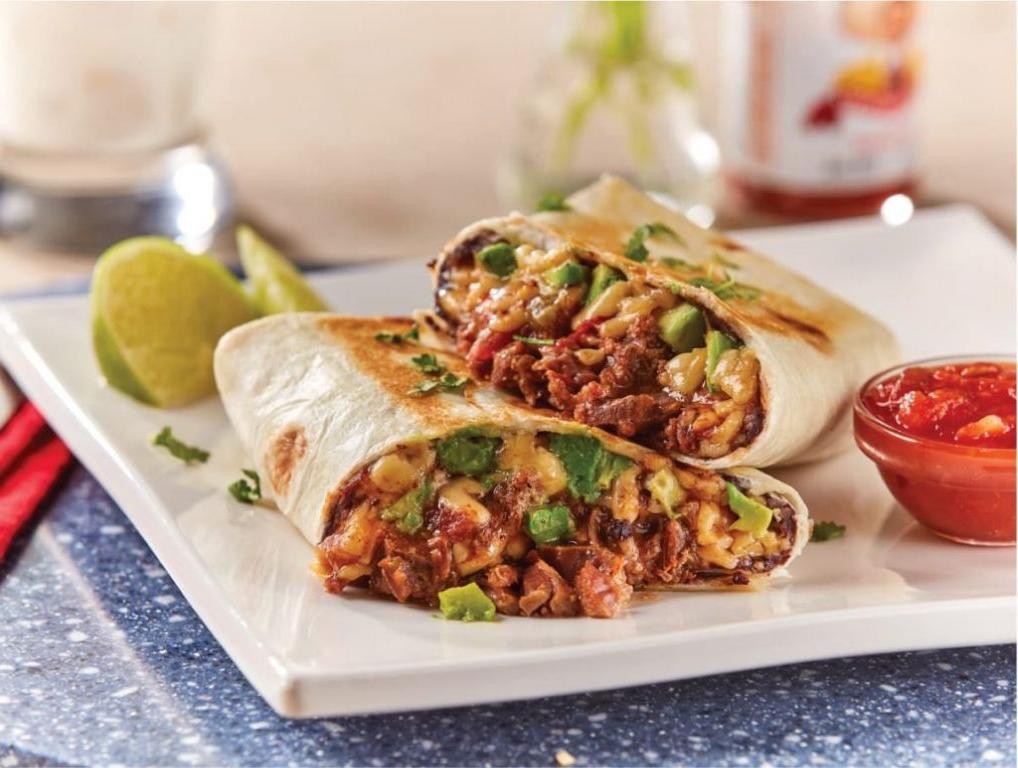
Whether you’re craving a quick weeknight dinner or a satisfying lunch, this Southwestern beef wrap delivers bold flavors in a handheld package. With seasoned ground beef, melted pepper jack cheese, and fresh toppings, it’s a customizable meal that comes together in under 30 minutes.
Serving: 4 | Pre Time: 10 minutes | Cooking Time: 15 minutes
Ingredients
For the beef filling:
– 1 lb ground beef (80% lean)
– 1 tbsp olive oil
– 1 small yellow onion, finely diced
– 1 red bell pepper, thinly sliced
– 2 cloves garlic, minced
– 1 tbsp chili powder
– 1 tsp ground cumin
– 1/2 tsp smoked paprika
– 1/2 tsp salt
– 1/4 tsp black pepper
For assembling the wraps:
– 4 large flour tortillas (10-inch diameter)
– 1 cup shredded pepper jack cheese
– 1 cup shredded iceberg lettuce
– 1/2 cup diced tomatoes
– 1/4 cup sour cream
– 1/4 cup salsa
Instructions
1. Heat 1 tbsp olive oil in a large skillet over medium-high heat until shimmering, about 1 minute.
2. Add 1 small diced yellow onion and 1 sliced red bell pepper to the skillet, cooking for 4-5 minutes until softened.
3. Stir in 2 minced garlic cloves and cook for 30 seconds until fragrant.
4. Add 1 lb ground beef to the skillet, breaking it apart with a spatula into small crumbles.
5. Cook the beef for 6-7 minutes until no pink remains, stirring occasionally.
6. Sprinkle 1 tbsp chili powder, 1 tsp cumin, 1/2 tsp smoked paprika, 1/2 tsp salt, and 1/4 tsp black pepper over the beef mixture.
7. Stir the spices into the beef and cook for 1 minute to toast the spices.
8. Remove the skillet from heat and let the filling cool slightly for 2 minutes.
9. Warm 4 flour tortillas in a dry skillet over medium heat for 20 seconds per side until pliable.
10. Place each warmed tortilla on a clean work surface.
11. Divide the beef filling evenly among the tortillas, spreading it in a horizontal line down the center.
12. Top each with 1/4 cup shredded pepper jack cheese while the filling is still warm.
13. Add 1/4 cup shredded lettuce and 2 tbsp diced tomatoes over the cheese.
14. Drizzle 1 tbsp sour cream and 1 tbsp salsa over the vegetables.
15. Fold the bottom edge of each tortilla up over the filling, then fold in the sides and roll tightly away from you.
16. Cut each wrap in half diagonally and serve immediately.
Just out of the skillet, these wraps offer a satisfying contrast of textures: the warm, spiced beef melts the pepper jack into creamy pockets, while the crisp lettuce and cool toppings provide freshness. For a fun twist, try grilling the assembled wraps for 2 minutes per side to create a crispy, golden exterior that holds all the fillings securely.
Caprese Wrap with Balsamic Glaze
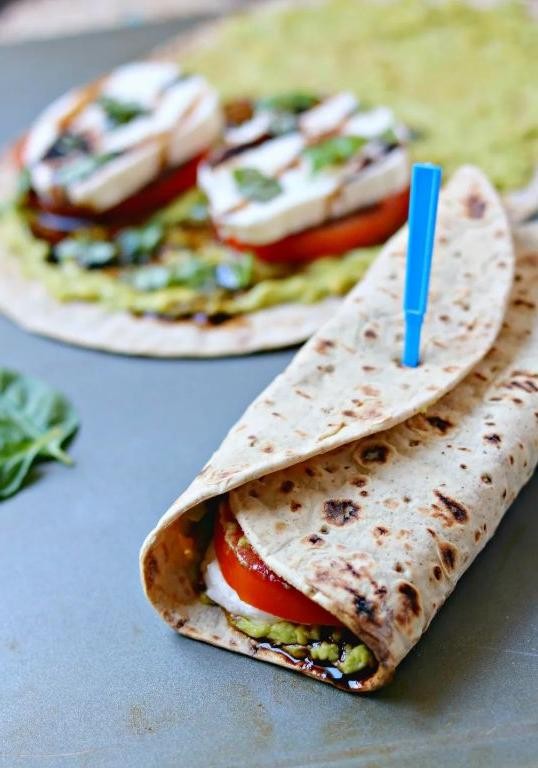
Finally, let’s create a fresh, no-cook lunch that’s perfect for busy days—this Caprese Wrap with Balsamic Glaze combines classic Italian flavors in a portable, easy-to-assemble package. Follow along step-by-step, and you’ll have a delicious meal ready in minutes.
Serving: 1 | Pre Time: 10 minutes | Cooking Time: 0 minutes
Ingredients
– For the wrap: 1 large flour tortilla (10-inch), 4 slices fresh mozzarella cheese (about 4 ounces), 1 medium tomato (sliced into ¼-inch rounds), 4 large fresh basil leaves
– For the glaze: ¼ cup balsamic vinegar, 1 tablespoon honey
Instructions
1. Place the flour tortilla flat on a clean cutting board or plate.
2. Arrange the mozzarella cheese slices evenly in a single layer over the center of the tortilla, leaving a 1-inch border around the edges.
3. Layer the tomato slices on top of the mozzarella cheese.
4. Tear the basil leaves into pieces and sprinkle them over the tomatoes.
5. In a small saucepan over medium heat, combine the balsamic vinegar and honey.
6. Bring the mixture to a simmer, then reduce the heat to low.
7. Cook the glaze for 5–7 minutes, stirring occasionally, until it thickens enough to coat the back of a spoon. Tip: Watch closely to prevent burning, as the glaze can go from perfect to scorched quickly.
8. Remove the glaze from the heat and let it cool for 2 minutes to thicken slightly more.
9. Drizzle 1 tablespoon of the balsamic glaze evenly over the fillings in the wrap. Tip: Reserve any extra glaze for dipping or future use—it stores well in the refrigerator for up to a week.
10. Fold the sides of the tortilla inward over the fillings, then roll it tightly from the bottom to enclose everything. Tip: Roll firmly but gently to avoid tearing the tortilla and ensure the wrap holds together when sliced.
11. Slice the wrap in half diagonally with a sharp knife for easier serving.
Delightfully creamy from the mozzarella and bright from the basil, this wrap offers a satisfying contrast of textures with the soft tortilla and juicy tomatoes. The sweet-tangy balsamic glaze adds a rich depth that ties all the flavors together beautifully. For a creative twist, serve it alongside a simple arugula salad or pack it for a picnic—it travels well without getting soggy.
Falafel and Tabbouleh Wrap
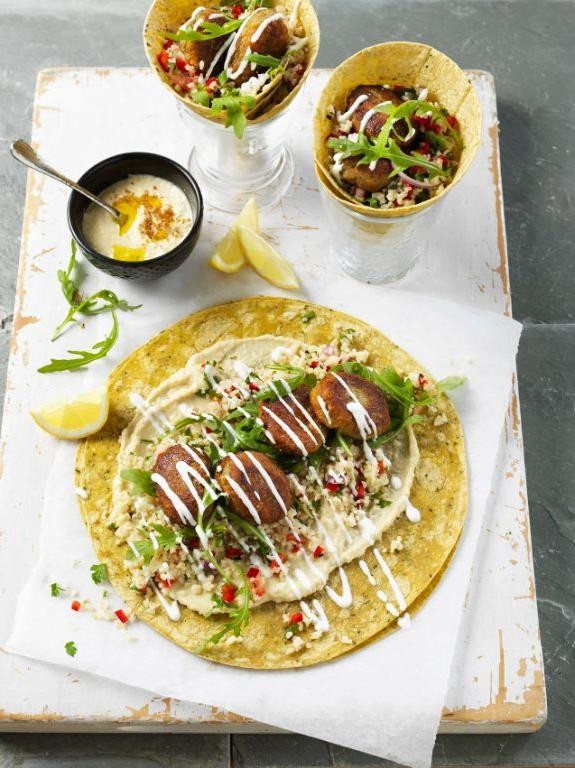
Haven’t you ever craved a portable, protein-packed lunch that’s bursting with fresh Mediterranean flavors? This falafel and tabbouleh wrap combines crispy chickpea patties, herby parsley salad, and creamy tahini sauce all rolled into a soft tortilla—it’s a complete meal you can assemble in about 30 minutes. Let’s walk through each component step-by-step so you can recreate this vibrant dish at home.
Serving: 4 | Pre Time: 20 minutes | Cooking Time: 10 minutes
Ingredients
For the Falafel:
– 1 (15-ounce) can chickpeas, drained and rinsed
– 1/4 cup finely chopped yellow onion
– 2 cloves garlic, minced
– 1/4 cup fresh parsley leaves
– 1 teaspoon ground cumin
– 1/2 teaspoon salt
– 1/4 teaspoon black pepper
– 2 tablespoons all-purpose flour
– 2 tablespoons olive oil
For the Tabbouleh:
– 1 cup finely chopped fresh parsley
– 1/2 cup finely chopped cucumber
– 1/4 cup finely chopped tomato
– 2 tablespoons finely chopped red onion
– 2 tablespoons fresh lemon juice
– 1 tablespoon olive oil
– 1/4 teaspoon salt
For Assembly:
– 4 large flour tortillas (10-inch)
– 1/4 cup tahini sauce
Instructions
1. Preheat a large skillet over medium heat and add 2 tablespoons olive oil.
2. In a food processor, combine the chickpeas, yellow onion, garlic, 1/4 cup parsley, cumin, 1/2 teaspoon salt, and black pepper; pulse until the mixture is coarse but holds together when pressed, about 10 pulses.
3. Transfer the chickpea mixture to a bowl and stir in 2 tablespoons all-purpose flour to bind it.
4. Shape the mixture into 8 small patties, each about 2 inches wide and 1/2-inch thick.
5. Place the patties in the preheated skillet and cook for 4-5 minutes per side, until golden brown and crispy; tip: avoid overcrowding the skillet to ensure even browning.
6. While the falafel cooks, make the tabbouleh: in a medium bowl, combine 1 cup parsley, cucumber, tomato, red onion, lemon juice, 1 tablespoon olive oil, and 1/4 teaspoon salt; toss gently to mix.
7. Warm the tortillas in a dry skillet over low heat for 30 seconds per side to make them pliable; tip: covering them with a towel keeps them soft.
8. Spread 1 tablespoon tahini sauce evenly over each tortilla.
9. Place 2 falafel patties in the center of each tortilla.
10. Top the falafel with a generous scoop of tabbouleh, about 1/2 cup per wrap.
11. Fold the sides of the tortilla inward, then roll tightly from the bottom to enclose the filling; tip: if the wrap feels bulky, tuck in the ingredients as you roll to prevent tearing.
12. Serve immediately or wrap in parchment paper for easy transport.
Gently biting into this wrap reveals a delightful contrast: the crispy, spiced falafel against the fresh, lemony tabbouleh, all smoothed by the nutty tahini. For a creative twist, try adding pickled vegetables or swapping the tortilla for a lettuce wrap to keep it light—it’s a versatile meal that’s as perfect for picnics as it is for quick weeknight dinners.
Conclusion
Just what you need for those hectic days! This roundup of 31 easy sandwich wraps is your ticket to quick, delicious meals without the fuss. We hope you find a new favorite to add to your rotation. Give a recipe a try, then drop a comment below to tell us which one you loved, and don’t forget to share this article on Pinterest to spread the inspiration!


