
Ready to ditch complicated cooking and enjoy delicious solo meals? We’ve gathered 23 effortless recipes perfect for one person—from quick dinners to comforting favorites. Whether you’re short on time or just want something simple and satisfying, these easy-to-follow dishes will make cooking for yourself a joy. Let’s dive in and discover your new go-to meals!
Quick Stir-Fried Teriyaki Chicken Bowl
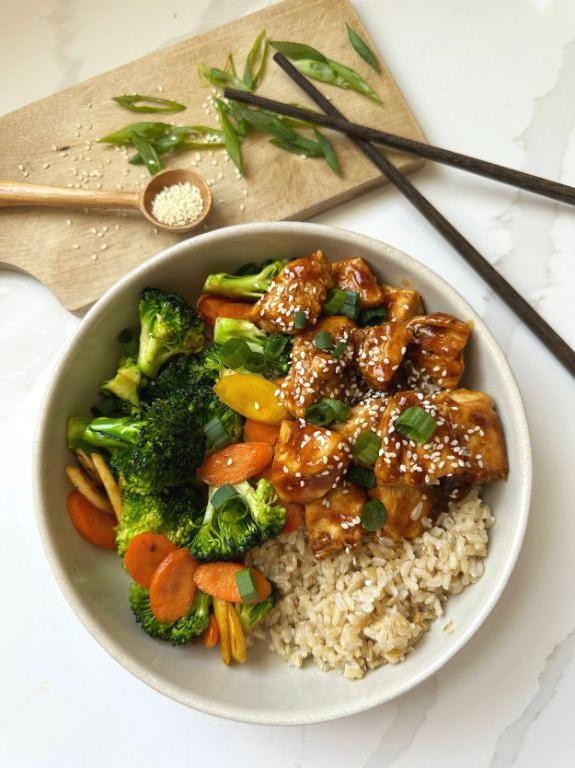
Glistening with a glossy, savory-sweet glaze that clings perfectly to tender chicken and crisp vegetables, this quick stir-fried teriyaki chicken bowl brings restaurant-quality elegance to your weeknight table in under thirty minutes. Imagine succulent bites of chicken caramelized in a homemade teriyaki sauce, mingling with vibrant bell peppers and broccoli over a bed of fluffy jasmine rice. It’s the kind of effortless yet impressive meal that makes you feel like a home chef without the fuss.
2
bowls10
minutes15
minutesIngredients
– 1 lb boneless, skinless chicken thighs, cut into 1-inch pieces (I find thighs stay juicier than breast meat)
– 2 tbsp vegetable oil (a neutral oil like this prevents burning at high heat)
– 1 red bell pepper, thinly sliced into strips (for a pop of color and slight sweetness)
– 1 cup broccoli florets, cut into bite-sized pieces (fresh broccoli crisps up beautifully)
– 3 cloves garlic, minced (freshly minced garlic makes all the difference)
– 1/2 cup low-sodium soy sauce (this balances saltiness so the dish isn’t overpowering)
– 1/4 cup honey (my preferred sweetener for its floral notes)
– 1 tbsp rice vinegar (a splash brightens the sauce)
– 1 tsp grated fresh ginger (don’t skip this—it adds a warm, aromatic kick)
– 1 tbsp cornstarch mixed with 2 tbsp cold water (this slurry creates that glossy, thick sauce)
– 2 cups cooked jasmine rice, hot (I always steam mine just before serving for maximum fluffiness)
Instructions
1. In a small bowl, whisk together 1/2 cup low-sodium soy sauce, 1/4 cup honey, 1 tbsp rice vinegar, and 1 tsp grated fresh ginger until fully combined.
2. Heat 2 tbsp vegetable oil in a large skillet or wok over medium-high heat until it shimmers, about 1 minute.
3. Add 1 lb boneless, skinless chicken thigh pieces to the hot skillet in a single layer, and cook undisturbed for 3 minutes to develop a golden-brown sear.
4. Flip the chicken pieces and cook for another 3 minutes until browned on all sides and nearly cooked through.
5. Stir in 3 cloves minced garlic and cook for 30 seconds until fragrant, being careful not to burn it.
6. Add 1 red bell pepper (sliced) and 1 cup broccoli florets to the skillet, and stir-fry for 4 minutes until the vegetables are tender-crisp.
7. Pour the prepared teriyaki sauce over the chicken and vegetables, stirring to coat everything evenly.
8. Bring the mixture to a gentle simmer, then reduce heat to medium and cook for 2 minutes, stirring occasionally.
9. Add the cornstarch slurry (1 tbsp cornstarch mixed with 2 tbsp cold water) to the skillet, stirring constantly until the sauce thickens and coats the back of a spoon, about 1–2 minutes.
10. Divide 2 cups hot cooked jasmine rice between two bowls, then top evenly with the teriyaki chicken and vegetable mixture.
Lusciously glossy and deeply savory, each bite delivers a perfect harmony of tender chicken, crisp-tender vegetables, and that signature sticky-sweet teriyaki glaze. For a creative twist, garnish with toasted sesame seeds or thinly sliced scallions to add a nutty crunch and fresh contrast. Serve it immediately while the rice is steaming and the sauce is at its peak glossiness.
Simple Garlic Butter Shrimp Pasta
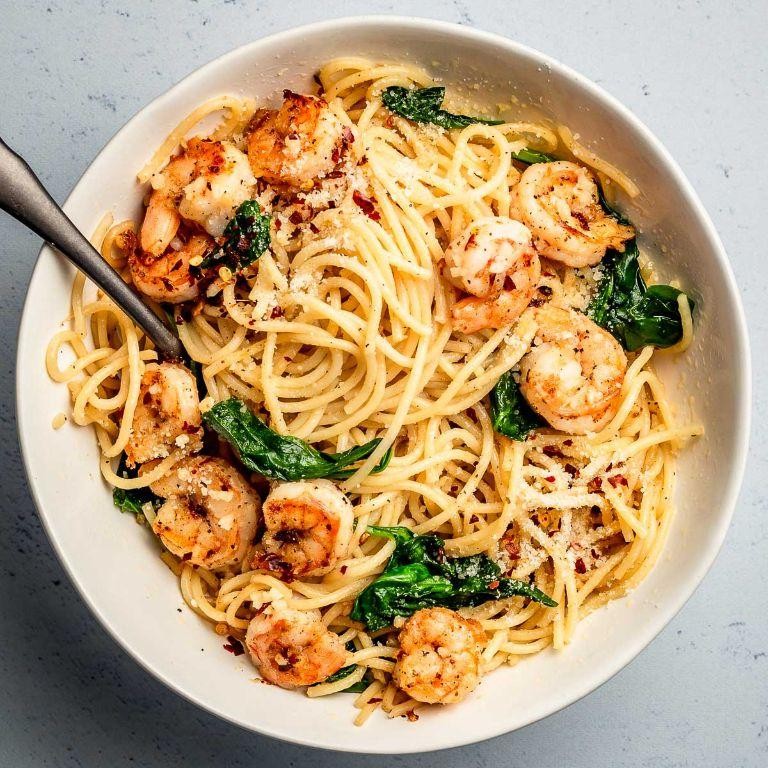
Oozing with sophistication yet remarkably approachable, this garlic butter shrimp pasta transforms humble ingredients into an elegant weeknight masterpiece. The rich aroma of sizzling garlic and plump shrimp will have your kitchen smelling like a coastal Italian trattoria in minutes. Perfectly al dente pasta coated in a luscious butter sauce creates a dish that feels both indulgent and effortlessly simple.
2
servings15
minutes20
minutesIngredients
– 8 ounces linguine pasta (I find the flat shape holds the sauce beautifully)
– 1 pound large raw shrimp, peeled and deveined (fresh wild-caught shrimp make all the difference)
– 4 tablespoons unsalted butter (I always use European-style for its higher fat content)
– 4 cloves garlic, minced (freshly minced garlic releases the most aromatic oils)
– 1/4 cup dry white wine (a crisp Sauvignon Blanc adds lovely acidity)
– 1/4 cup heavy cream (room temperature cream incorporates more smoothly)
– 2 tablespoons fresh parsley, chopped (flat-leaf parsley provides the best flavor)
– 1/2 teaspoon red pepper flakes (adjust to your preferred heat level)
– 1/2 teaspoon kosher salt
– 1/4 teaspoon freshly ground black pepper
– 1 tablespoon extra virgin olive oil (my go-to for its fruity notes)
Instructions
1. Bring a large pot of salted water to a rolling boil over high heat.
2. Add linguine to the boiling water and cook for 9-10 minutes until al dente, stirring occasionally to prevent sticking.
3. While pasta cooks, pat shrimp completely dry with paper towels to ensure proper searing.
4. Heat olive oil in a large skillet over medium-high heat until shimmering, about 2 minutes.
5. Season shrimp evenly with kosher salt and black pepper on both sides.
6. Add shrimp to the hot skillet in a single layer, cooking for 2 minutes per side until pink and opaque.
7. Transfer cooked shrimp to a clean plate, being careful not to overcrowd the pan during cooking.
8. Reduce heat to medium and add butter to the same skillet, swirling until melted and foamy.
9. Add minced garlic and red pepper flakes, cooking for 45-60 seconds until fragrant but not browned.
10. Pour in white wine, scraping up any browned bits from the bottom of the pan.
11. Simmer the wine mixture for 2 minutes until reduced by half, allowing alcohol to evaporate.
12. Stir in heavy cream and continue cooking for 1 minute until slightly thickened.
13. Drain cooked pasta, reserving 1/4 cup of pasta water for adjusting sauce consistency.
14. Add drained pasta directly to the skillet with the sauce.
15. Toss pasta with sauce over low heat for 1 minute, adding reserved pasta water as needed.
16. Return cooked shrimp to the skillet and gently fold into the pasta.
17. Remove from heat and stir in chopped parsley until evenly distributed.
Creating this dish yields tender shrimp that contrast beautifully with the firm pasta texture, while the garlic butter sauce clings to every strand with luxurious richness. Consider serving it in warmed bowls with a sprinkle of additional parsley and crusty bread for soaking up every last drop of sauce.
Easy Caprese Salad with Balsamic Reduction
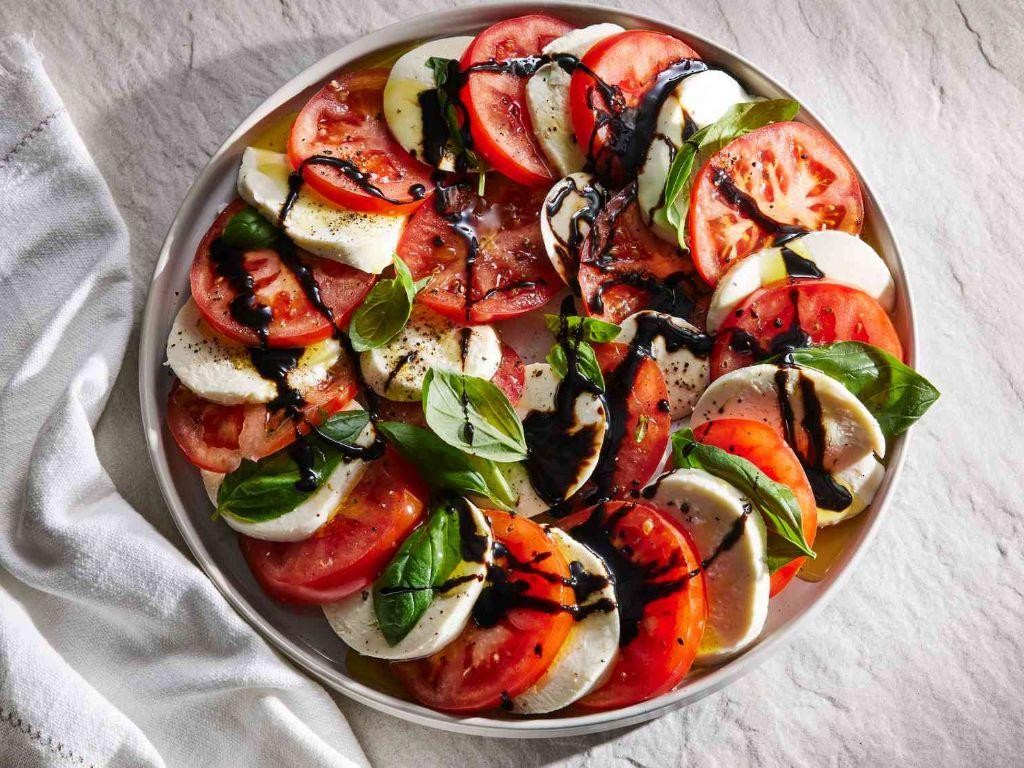
Nestled between the vibrant reds of summer tomatoes and the creamy white of fresh mozzarella lies a classic Italian masterpiece that requires minimal effort for maximum elegance. This effortless Caprese salad transforms humble ingredients into a stunning centerpiece through the magic of a rich balsamic reduction. Perfect for entertaining or a sophisticated weeknight dinner, it celebrates simplicity while delivering complex, layered flavors that dance across the palate.
3
servings15
minutes15
minutesIngredients
– 4 large heirloom tomatoes (I find the varied colors and irregular shapes make for a more visually striking presentation)
– 16 ounces fresh mozzarella cheese balls (the pearl-sized ones create beautiful distribution throughout the salad)
– 1 cup balsamic vinegar (a high-quality aged variety makes all the difference in the reduction)
– 1/4 cup extra virgin olive oil (my go-to for its fruity notes that complement the acidity)
– 1/2 cup fresh basil leaves (torn by hand to release their aromatic oils)
– 1 teaspoon sea salt (I prefer flaky Maldon salt for its delicate crunch)
– 1/2 teaspoon freshly ground black pepper
Instructions
1. Pour 1 cup of balsamic vinegar into a small saucepan and place it over medium heat.
2. Bring the vinegar to a gentle simmer, watching for small bubbles forming around the edges of the pan.
3. Reduce heat to low and continue simmering for 12-15 minutes, stirring occasionally with a wooden spoon.
4. Check the reduction’s consistency by dipping a spoon into the liquid – it should coat the back of the spoon without running off immediately.
5. Remove the saucepan from heat when the reduction has thickened to a syrup-like consistency and measures approximately 1/4 cup.
6. Allow the balsamic reduction to cool completely to room temperature, which takes about 20 minutes.
7. While the reduction cools, slice the 4 heirloom tomatoes into 1/4-inch thick rounds using a sharp serrated knife.
8. Arrange the tomato slices in a single layer on a large serving platter, slightly overlapping them for visual appeal.
9. Distribute the 16 ounces of fresh mozzarella balls evenly among the tomato slices.
10. Tear the 1/2 cup of fresh basil leaves by hand and scatter them generously over the tomatoes and cheese.
11. Drizzle the 1/4 cup of extra virgin olive oil evenly across the entire arrangement.
12. Sprinkle the 1 teaspoon of sea salt and 1/2 teaspoon of freshly ground black pepper over the salad.
13. Finally, artistically drizzle the cooled balsamic reduction over the completed salad in a zigzag pattern.
Each bite delivers the satisfying contrast of juicy tomato against creamy mozzarella, punctuated by the bright freshness of basil. The reduced balsamic provides a sweet-tart complexity that elevates the simple ingredients into something truly extraordinary. For a creative presentation, try serving individual portions in martini glasses or layering the components vertically in clear jars for a portable picnic option.
Single-Serve Vegetable Omelette with Cheese

Wrapped in golden perfection, this single-serving vegetable omelette offers a sophisticated yet approachable morning ritual that transforms humble ingredients into a culinary masterpiece. With its vibrant vegetable confetti and molten cheese center, this elegant dish proves that breakfast need not be elaborate to feel indulgent. The gentle folding technique creates delicate layers that cradle the filling like a savory envelope of morning comfort.
1
servings8
minutes7
minutesIngredients
– 2 large eggs at room temperature (they incorporate more air for a fluffier texture)
– 1 tablespoon whole milk or cream (my secret for extra richness)
– 1/4 cup finely diced bell peppers, preferably a mix of red and yellow for color
– 2 tablespoons finely chopped yellow onion
– 1/4 cup fresh spinach, roughly chopped (I love how it wilts into silky ribbons)
– 2 tablespoons shredded sharp cheddar cheese (aged cheddar adds wonderful depth)
– 1 tablespoon unsalted butter (European-style butter is my preference for its higher fat content)
– Pinch of kosher salt and freshly ground black pepper
Instructions
1. Crack 2 large eggs into a medium bowl and add 1 tablespoon of whole milk.
2. Whisk the eggs and milk vigorously for 45 seconds until pale yellow and slightly frothy.
3. Heat a 8-inch nonstick skillet over medium heat for 2 minutes until properly preheated.
4. Add 1 tablespoon of unsalted butter and swirl until melted and foamy but not browned.
5. Sauté 2 tablespoons of chopped onion and 1/4 cup of diced bell peppers for 3 minutes until slightly softened.
6. Add 1/4 cup of chopped spinach and cook for 1 minute until just wilted.
7. Season the vegetables with a pinch of kosher salt and freshly ground black pepper.
8. Pour the whisked egg mixture evenly over the vegetables in the skillet.
9. Let the eggs set undisturbed for 90 seconds until the edges begin to pull away from the pan.
10. Use a spatula to gently lift the edges and tilt the pan to let uncooked egg flow underneath.
11. Sprinkle 2 tablespoons of shredded cheddar cheese evenly over one half of the omelette.
12. Continue cooking for another 60 seconds until the bottom is golden but the top remains slightly wet.
13. Carefully fold the empty half of the omelette over the cheese-covered half using your spatula.
14. Cook for 30 seconds more to melt the cheese, then slide onto a warm plate immediately.
Offering a delightful contrast between the crisp-tender vegetables and the creamy, melted cheese interior, this omelette presents beautifully when garnished with fresh herbs. The golden exterior gives way to a tender, almost custardy center that makes each bite feel like a special occasion. For an elegant presentation, serve alongside toasted artisan bread and a simple arugula salad dressed with lemon vinaigrette.
One-Pot Creamy Tomato Basil Soup

Beneath the crisp autumn air, there’s nothing quite as comforting as a bowl of creamy tomato basil soup, simmered to velvety perfection in a single pot. This recipe transforms humble ingredients into an elegant, soul-warming dish that feels both rustic and refined. It’s the kind of effortless meal that brings a touch of sophistication to even the busiest weeknight.
4
servings15
minutes28
minutesIngredients
- 2 tablespoons extra virgin olive oil (my go-to for its fruity depth)
- 1 medium yellow onion, finely diced (I find this sweeter than white onions)
- 3 cloves garlic, minced (freshly minced releases the best aroma)
- 1 (28-ounce) can crushed tomatoes (San Marzano are my favorite for their bright acidity)
- 2 cups vegetable broth (low-sodium lets you control the seasoning)
- 1/2 cup heavy cream (room temperature blends in smoothly)
- 1/4 cup fresh basil leaves, chopped (plus extra for garnish—it makes all the difference)
- 1 teaspoon granulated sugar (just a pinch to balance the tomatoes’ tang)
- 1/2 teaspoon salt (I use fine sea salt for even distribution)
- 1/4 teaspoon black pepper (freshly cracked adds a subtle warmth)
Instructions
- Heat 2 tablespoons of extra virgin olive oil in a large Dutch oven or heavy-bottomed pot over medium heat until shimmering.
- Add 1 finely diced yellow onion and cook for 5–7 minutes, stirring occasionally, until translucent and fragrant.
- Stir in 3 minced garlic cloves and cook for 1 minute exactly, until aromatic but not browned.
- Pour in 1 can of crushed tomatoes and 2 cups of vegetable broth, scraping the bottom of the pot to lift any browned bits.
- Bring the mixture to a gentle boil, then reduce the heat to low and simmer uncovered for 15 minutes, stirring every 5 minutes to prevent sticking.
- Carefully blend the soup until smooth using an immersion blender, or transfer to a countertop blender in batches.
- Stir in 1/2 cup of room temperature heavy cream, 1/4 cup of chopped fresh basil, 1 teaspoon of granulated sugar, 1/2 teaspoon of salt, and 1/4 teaspoon of black pepper.
- Simmer for 5 more minutes over low heat, until the soup is heated through and the flavors have melded.
Creamy and luxuriously smooth, this soup boasts a rich tomato base brightened by fresh basil. For an elegant twist, swirl in a drizzle of basil pesto or serve alongside crusty artisanal bread for dipping. It’s a bowl that feels both nourishing and indulgent.
Minimalist Avocado Toast with Poached Egg

Mastering the art of simplicity, this avocado toast with poached egg elevates humble ingredients into a breakfast masterpiece where creamy textures meet delicate flavors in perfect harmony.
2
servings10
minutes8
minutesIngredients
- 2 slices of artisan sourdough bread—I find the tangy flavor complements the rich avocado beautifully
- 1 perfectly ripe avocado, slightly soft to gentle pressure
- 2 large eggs—I prefer room temperature eggs here for more consistent poaching
- 1 tablespoon white vinegar, which helps the egg whites coagulate faster
- 1 tablespoon extra virgin olive oil—this fruity, high-quality oil is my go-to for drizzling
- ½ teaspoon flaky sea salt, for that satisfying crunch
- ¼ teaspoon freshly cracked black pepper, ground just before using
- 1 teaspoon lemon juice, squeezed fresh to prevent the avocado from browning
Instructions
- Fill a medium saucepan with 3 inches of water and bring to a gentle simmer over medium heat, where small bubbles rise but the water isn’t boiling vigorously.
- Add 1 tablespoon white vinegar to the simmering water, which helps the egg whites tighten around the yolk for a neater poach.
- Crack one room temperature egg into a small ramekin or cup, being careful not to break the yolk.
- Create a gentle whirlpool in the simmering water using a slotted spoon, then carefully slide the egg from the ramekin into the center of the vortex.
- Poach the egg for exactly 3 minutes for a runny yolk with set whites, using a timer for precision.
- While the egg poaches, toast 2 slices of sourdough bread in a toaster or oven until golden brown and crisp around the edges.
- Remove the poached egg with a slotted spoon and transfer to a paper towel-lined plate to drain excess water.
- Repeat the poaching process with the second egg, maintaining the water at the same gentle simmer.
- Cut the ripe avocado in half, remove the pit, and scoop the flesh into a small bowl.
- Add 1 teaspoon fresh lemon juice to the avocado and mash with a fork until slightly chunky but spreadable.
- Drizzle 1 tablespoon extra virgin olive oil over the toasted sourdough slices.
- Spread the mashed avocado evenly across both toast slices, leaving a slight border around the edges.
- Sprinkle ½ teaspoon flaky sea salt and ¼ teaspoon freshly cracked black pepper over the avocado.
- Carefully place one poached egg on top of each avocado toast slice.
Glistening with olive oil and seasoned with flaky salt, this creation offers a symphony of textures from the crisp toast to the velvety egg yolk. The creaminess of perfectly ripe avocado provides a lush foundation for the delicate poached egg, while the lemon juice cuts through the richness with bright acidity. For an elegant presentation, garnish with microgreens or serve alongside roasted cherry tomatoes for a complete breakfast experience.
Quick Pan-Seared Salmon with Lemon Dill Sauce

Nestled between busy weeknights and elegant dinner parties, this quick pan-seared salmon with lemon dill sauce offers the perfect balance of sophistication and simplicity. Nothing elevates a humble fillet quite like the bright, herbaceous notes of fresh dill and the zesty kick of lemon, creating a dish that feels both indulgent and effortlessly achievable. With crisp skin and tender flesh, it’s a celebration of texture and flavor that comes together in mere minutes.
2
servings5
minutes8
minutesIngredients
– 2 (6-ounce) salmon fillets, skin-on—I always pat them dry thoroughly for that perfect sear
– 1 tablespoon extra virgin olive oil, my go-to for its fruity depth
– ½ teaspoon kosher salt, which I find distributes more evenly than fine salt
– ¼ teaspoon freshly ground black pepper, for a subtle warmth
– ¼ cup heavy cream, which lends a luxurious richness to the sauce
– 2 tablespoons freshly squeezed lemon juice, strained to avoid any bitter seeds
– 1 tablespoon chopped fresh dill, as its delicate flavor shines brightest when just picked
– 1 teaspoon Dijon mustard, adding a tangy complexity that balances the cream
Instructions
1. Pat the salmon fillets completely dry with paper towels on both sides, including the skin—this ensures a crisp sear without steaming.
2. Season the salmon evenly on both sides with kosher salt and freshly ground black pepper.
3. Heat the extra virgin olive oil in a non-stick skillet over medium-high heat until it shimmers, about 1–2 minutes.
4. Place the salmon skin-side down in the hot skillet and press gently with a spatula for 10 seconds to prevent curling.
5. Cook the salmon skin-side down for 4–5 minutes, until the skin is golden and releases easily from the pan.
6. Flip the salmon and cook for another 2–3 minutes, until the internal temperature reaches 125°F for medium-rare.
7. Transfer the salmon to a plate and tent loosely with foil to rest.
8. Reduce the skillet heat to medium-low and pour in the heavy cream, scraping up any browned bits from the pan.
9. Whisk in the Dijon mustard until fully incorporated, about 30 seconds.
10. Stir in the freshly squeezed lemon juice and simmer for 1 minute to meld the flavors.
11. Remove the skillet from heat and stir in the chopped fresh dill just before serving to preserve its vibrant color.
12. Spoon the lemon dill sauce over the rested salmon fillets. Offering a buttery flakiness against the silky sauce, this salmon delights with its contrast of crisp skin and tender interior. For a stunning presentation, serve it atop a bed of wilted spinach or alongside roasted asparagus, letting the sauce drizzle over everything.
Personal Margherita Flatbread Pizza

Oozing with rustic charm, this Personal Margherita Flatbread Pizza transforms simple ingredients into an elegant weeknight masterpiece that feels both sophisticated and effortlessly achievable. With its crisp golden crust, vibrant tomato sauce, and milky fresh mozzarella, this single-serving delight brings trattoria-quality pizza to your kitchen in mere minutes. The aromatic basil finish provides that final touch of Italian authenticity that elevates it beyond ordinary flatbread.
1
servings5
minutes10
minutesIngredients
– 1 pre-made flatbread (I always keep these in my freezer for last-minute meals)
– 1/4 cup crushed San Marzano tomatoes (their sweet, low-acid flavor makes all the difference)
– 2 ounces fresh mozzarella ball, thinly sliced (room temperature cheese melts more evenly)
– 4-5 fresh basil leaves (torn by hand to preserve their delicate oils)
– 1 tablespoon extra virgin olive oil (my go-to for its fruity notes)
– 1/4 teaspoon sea salt flakes (they provide delightful texture and clean salinity)
– 1/8 teaspoon freshly ground black pepper (freshly cracked releases more aroma)
Instructions
1. Preheat your oven to 425°F and position a rack in the center for even heating.
2. Place the flatbread on a baking sheet and brush the entire surface with olive oil using a pastry brush.
3. Spread the crushed tomatoes evenly over the flatbread, leaving a 1/2-inch border around the edges.
4. Arrange the mozzarella slices in a single layer over the tomato sauce, slightly overlapping them.
5. Sprinkle the sea salt and black pepper evenly across the cheese and tomatoes.
6. Bake for 8-10 minutes until the crust edges are golden brown and the cheese is bubbly with light brown spots.
7. Remove from oven and immediately top with torn basil leaves while the pizza is still hot.
8. Let rest for 2 minutes on the baking sheet to allow the crust to crisp further.
9. Transfer to a cutting board and slice into quarters using a pizza cutter.
Delightfully crisp yet tender, this flatbread pizza offers the perfect balance of textures with its charred edges and molten cheese center. The bright acidity of the tomatoes cuts through the rich mozzarella, while the basil provides an herbal freshness that lingers on the palate. For an elegant presentation, serve alongside a simple arugula salad dressed in lemon vinaigrette to complement the pizza’s Mediterranean flavors.
Fast Sautéed Chicken Breast with Herbs
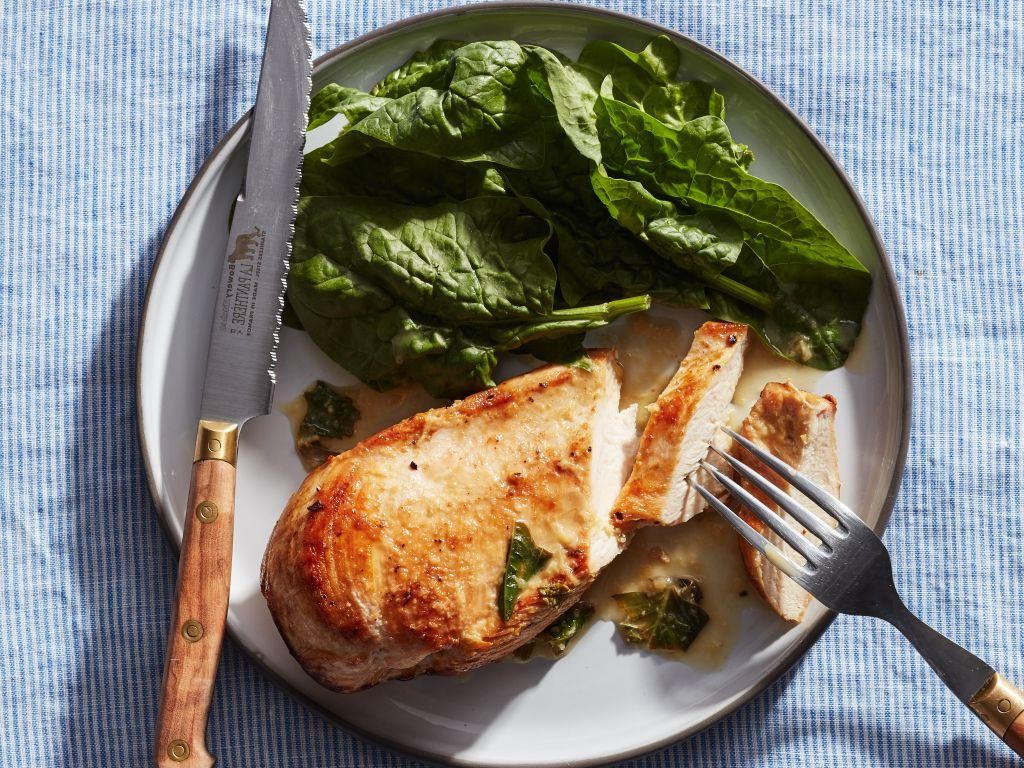
Vibrant and versatile, this sautéed chicken breast transforms simple ingredients into an elegant weeknight masterpiece. With aromatic herbs creating a fragrant crust and juicy interior, this dish delivers restaurant-quality results in mere minutes. Perfect for busy evenings when you crave something sophisticated yet effortlessly prepared.
2
servings10
minutes15
minutesIngredients
- 2 boneless, skinless chicken breasts (I always pound them to even thickness for consistent cooking)
- 2 tablespoons extra virgin olive oil (my go-to for its fruity notes)
- 3 cloves garlic, minced (freshly minced makes all the difference)
- 1 tablespoon fresh thyme leaves (I prefer stripping them from stems right before use)
- 1 teaspoon fresh rosemary, finely chopped (the piney aroma elevates everything)
- ½ teaspoon kosher salt (I find it distributes more evenly than table salt)
- ¼ teaspoon freshly ground black pepper (always freshly ground for maximum flavor)
- 2 tablespoons unsalted butter (cold butter creates the most luxurious sauce)
- ¼ cup chicken broth (low-sodium lets you control the seasoning)
- 1 tablespoon fresh parsley, chopped (added at the very end for bright freshness)
Instructions
- Place chicken breasts between two sheets of plastic wrap and pound to ½-inch uniform thickness using a meat mallet or rolling pin.
- Pat chicken completely dry with paper towels to ensure proper browning.
- Season both sides evenly with kosher salt and freshly ground black pepper.
- Heat extra virgin olive oil in a large skillet over medium-high heat until shimmering, about 2 minutes.
- Carefully place chicken in the hot skillet and cook undisturbed for 5-6 minutes until a golden-brown crust forms.
- Flip chicken using tongs and cook for another 4-5 minutes until internal temperature reaches 165°F on an instant-read thermometer.
- Transfer chicken to a clean plate and let rest for 5 minutes to redistribute juices.
- Reduce heat to medium and add minced garlic to the same skillet, cooking for 30 seconds until fragrant.
- Add fresh thyme leaves and chopped rosemary, stirring constantly for 15 seconds to release their oils.
- Pour in chicken broth, scraping up all the browned bits from the bottom of the pan.
- Add cold unsalted butter and swirl the pan continuously until the butter melts and emulsifies into a glossy sauce.
- Remove skillet from heat and stir in freshly chopped parsley.
- Return rested chicken to the skillet, turning to coat completely in the herb butter sauce.
Heavenly in its simplicity, the chicken emerges with a crisp herb crust giving way to remarkably tender flesh. The pan sauce, rich with garlic and fresh herbs, clings beautifully to each slice. Consider serving over creamy polenta or alongside roasted asparagus for a complete meal that feels both rustic and refined.
Solo Portion Quinoa and Black Bean Bowl

Beneath the simple elegance of this solo quinoa and black bean bowl lies a symphony of textures and flavors that transforms everyday ingredients into something truly special. Perfectly cooked quinoa provides a nutty foundation, while black beans add creamy substance, creating a dish that feels both nourishing and indulgent. This single-serving masterpiece proves that cooking for one can be an act of culinary artistry rather than mere necessity.
1
portions10
minutes20
minutesIngredients
- ½ cup quinoa, rinsed thoroughly—I find this removes any bitterness and ensures fluffy results
- 1 cup vegetable broth, which adds more depth than water alone
- ¾ cup canned black beans, rinsed well to remove excess sodium
- 1 tablespoon extra virgin olive oil—my go-to for its fruity notes
- 2 tablespoons fresh lime juice, squeezed just before using for maximum brightness
- 1 tablespoon chopped fresh cilantro, which I prefer over dried for its vibrant freshness
- ¼ teaspoon ground cumin, toasty and warm
- ⅛ teaspoon smoked paprika, for that subtle smoky complexity
- Salt, measured precisely—about ¼ teaspoon works perfectly here
Instructions
- Rinse ½ cup quinoa under cold running water in a fine-mesh strainer for 1 full minute, swirling with your fingers to ensure all surfaces are cleaned.
- Combine the rinsed quinoa and 1 cup vegetable broth in a small saucepan over medium-high heat.
- Bring the mixture to a rolling boil, then immediately reduce heat to low and cover the pan tightly with a lid.
- Simmer the quinoa for exactly 15 minutes—resist peeking, as this releases precious steam needed for proper cooking.
- Remove the pan from heat and let it stand covered for 5 minutes to allow the quinoa to steam and become perfectly fluffy.
- While quinoa rests, heat 1 tablespoon extra virgin olive oil in a small skillet over medium heat for 1 minute until shimmering but not smoking.
- Add ¾ cup rinsed black beans to the skillet and cook for 3 minutes, stirring occasionally until beans are heated through and slightly crisped at the edges.
- Sprinkle ¼ teaspoon salt, ¼ teaspoon ground cumin, and ⅛ teaspoon smoked paprika over the beans, stirring constantly for 30 seconds to toast the spices and release their aromas.
- Fluff the rested quinoa with a fork to separate the grains, creating light, individual kernels rather than clumps.
- Combine the seasoned black beans, fluffed quinoa, 2 tablespoons fresh lime juice, and 1 tablespoon chopped fresh cilantro in a serving bowl, gently folding everything together until evenly distributed.
Savor the delightful contrast between the fluffy quinoa and creamy beans, with the bright lime cutting through the warm spices beautifully. For an elegant presentation, top with avocado slices or a sprinkle of cotija cheese, turning this simple bowl into restaurant-worthy fare. The dish maintains its wonderful texture even when enjoyed at room temperature, making it perfect for picnics or desk lunches where reheating isn’t an option.
Single-Serve Cheese and Tomato Frittata

T
This elegant single-serve frittata transforms humble ingredients into a sophisticated breakfast or light lunch, with the vibrant acidity of tomatoes perfectly complementing the rich, creamy cheese in a dish that feels both indulgent and nourishing. The beauty lies in its simplicity—requiring just a handful of pantry staples yet delivering restaurant-worthy results in under twenty minutes. Perfect for those mornings when you crave something special without the fuss, it’s a testament to how a few quality ingredients can create magic in a skillet.
1
servings5
minutes13
minutesIngredients
– 2 large eggs (I prefer room temperature eggs here for better volume and even cooking)
– 1 tablespoon whole milk or heavy cream (a splash of cream adds luxurious richness)
– 1/4 cup shredded sharp cheddar cheese (freshly grated melts more smoothly than pre-shredded)
– 1/4 cup cherry tomatoes, halved (I love using sweet, sun-ripened ones for their burst of flavor)
– 1 teaspoon extra virgin olive oil (my go-to for its fruity notes that enhance the tomatoes)
– Pinch of kosher salt and freshly ground black pepper (seasoning generously here makes all the difference)
– 1 teaspoon chopped fresh chives (for a subtle oniony finish that brightens the dish)
Instructions
1. Preheat your oven to 375°F to ensure it’s ready for the final bake.
2. Crack 2 large eggs into a small bowl and whisk vigorously with 1 tablespoon of whole milk until frothy and pale yellow, about 30 seconds.
3. Stir in 1/4 cup shredded sharp cheddar cheese, a pinch of kosher salt, and freshly ground black pepper until evenly combined.
4. Heat 1 teaspoon of extra virgin olive oil in a 6-inch oven-safe skillet over medium heat until it shimmers, about 1 minute.
5. Add 1/4 cup halved cherry tomatoes cut-side down and cook undisturbed until slightly softened and caramelized, about 2 minutes.
6. Pour the egg mixture evenly over the tomatoes, tilting the skillet to distribute it to the edges.
7. Cook without stirring for 3–4 minutes, until the edges are set but the center remains slightly jiggly.
8. Transfer the skillet to the preheated oven and bake for 5–7 minutes, until the top is puffed and golden brown.
9. Remove from the oven using an oven mitt and let it rest for 1 minute to firm up.
10. Slide the frittata onto a plate and garnish with 1 teaspoon chopped fresh chives.
Heavenly in its simplicity, this frittata emerges with a fluffy, custard-like interior dotted with juicy tomatoes and pockets of melted cheddar. The edges boast a delicate crispness from the skillet, while the chives add a fresh, aromatic finish. Serve it warm with a side of toasted sourdough or atop a bed of peppery arugula for a complete meal that feels effortlessly elegant.
Easy One-Pan Chili Lime Shrimp
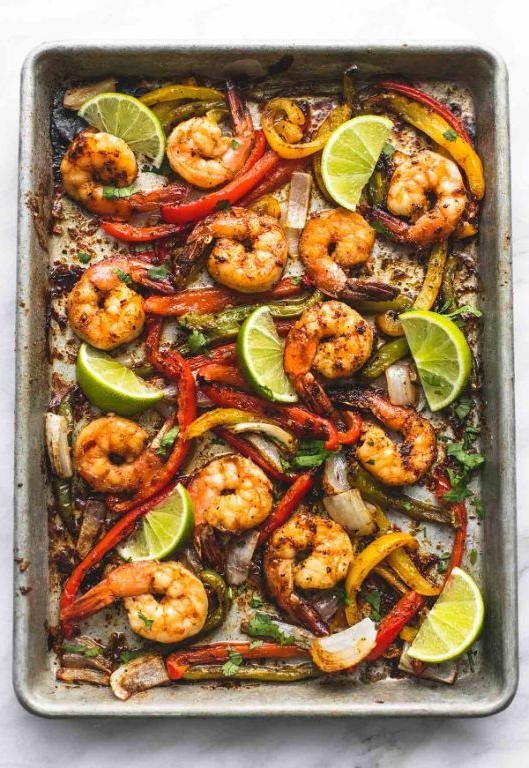
Radiant with vibrant citrus notes and a subtle kick of heat, this one-pan chili lime shrimp transforms simple ingredients into an elegant weeknight masterpiece. Juicy shrimp bask in a glossy, aromatic sauce that clings beautifully to each morsel, creating a dish that feels both sophisticated and effortlessly approachable. Just a handful of pantry staples come together in minutes, proving that impressive flavor requires no complicated techniques.
5
servings10
minutes7
minutesIngredients
- 1 lb large raw shrimp, peeled and deveined—I always pat them thoroughly dry with paper towels for the perfect sear
- 2 tbsp extra virgin olive oil, my go-to for its fruity depth that complements the chili
- 3 cloves garlic, minced—freshly crushed releases the most fragrant oils
- 1 tsp chili powder, providing a warm, smoky base without overwhelming heat
- 1/4 cup fresh lime juice, squeezed from about 2 limes for that bright, zesty punch
- 2 tbsp honey, which beautifully balances the acidity and spice
- 1/4 cup chopped fresh cilantro, stirred in at the end to preserve its vibrant color
- 1/2 tsp fine sea salt, evenly seasoning the shrimp throughout
Instructions
- Pat the shrimp completely dry with paper towels—this crucial step ensures they sear rather than steam.
- Heat the olive oil in a large skillet over medium-high heat until it shimmers, about 1 minute.
- Add the shrimp in a single layer, cooking for exactly 2 minutes until the bottoms turn pink and develop a light crust.
- Flip each shrimp and cook for 1 more minute, then transfer them to a clean plate.
- Reduce the heat to medium and add the minced garlic to the skillet, sautéing for 30 seconds until fragrant but not browned.
- Whisk in the chili powder, lime juice, honey, and salt, simmering for 2 minutes until the sauce thickens slightly.
- Return the shrimp to the skillet, tossing to coat them evenly in the glossy sauce for 1 minute.
- Remove from heat and stir in the fresh cilantro just before serving.
Juicy shrimp glisten in the sticky, sweet-tart glaze, offering a delightful contrast between the firm, succulent texture and the vibrant sauce. Serve this chili lime shrimp over fluffy jasmine rice to soak up every drop, or tuck it into warm tortillas with crunchy slaw for a fresh twist.
Simple Pesto Zucchini Noodles
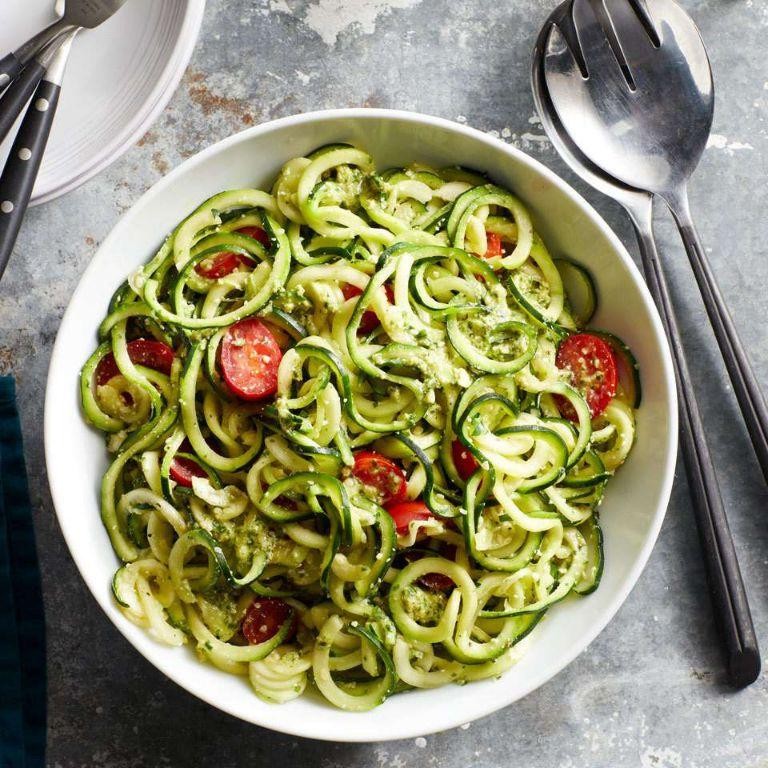
For those seeking a light yet satisfying meal that celebrates summer’s bounty, this pesto zucchini noodle dish offers both elegance and simplicity in every forkful. Fresh zucchini transforms into delicate ribbons that cradle a vibrant basil pesto, creating a dish that feels both nourishing and indulgent. It’s the perfect answer when you crave something wholesome yet sophisticated, ready in mere minutes.
2
portions10
minutes6
minutesIngredients
– 2 medium zucchini, spiralized into noodles (I find slightly thicker noodles hold the sauce better)
– 1/4 cup extra virgin olive oil, my go-to for its fruity notes
– 2 cups fresh basil leaves, packed (from my little windowsill herb garden)
– 1/3 cup pine nuts, lightly toasted for deeper flavor
– 2 cloves garlic, minced (I prefer fresh over pre-minced for brightness)
– 1/2 cup grated Parmesan cheese, plus extra for serving
– 1/4 tsp sea salt, to enhance all the flavors
– 1/8 tsp black pepper, freshly ground
Instructions
1. Place pine nuts in a dry skillet over medium heat and toast for 3-4 minutes, shaking the pan frequently, until golden and fragrant.
2. Combine toasted pine nuts, basil leaves, minced garlic, Parmesan cheese, sea salt, and black pepper in a food processor.
3. Pulse the ingredients 5-6 times until coarsely chopped, then scrape down the sides with a spatula.
4. With the food processor running on low speed, slowly drizzle in the olive oil through the feed tube over 30 seconds until the pesto emulsifies.
5. Spiralize both zucchini into noodles using the medium blade setting, catching them in a large bowl.
6. Heat a large non-stick skillet over medium-high heat for 2 minutes until hot but not smoking.
7. Add zucchini noodles to the dry skillet and sauté for exactly 2 minutes, tossing constantly with tongs.
8. Remove the skillet from heat immediately and transfer noodles to a serving bowl.
9. Pour the prepared pesto over the warm zucchini noodles and toss gently until every strand is coated.
10. Divide the pesto zucchini noodles between two plates and garnish with additional Parmesan cheese.
Keeping the zucchini noodles al dente ensures they maintain a pleasant bite rather than turning watery. The vibrant pesto clings beautifully to each ribbon, offering bursts of garlicky freshness against the subtle sweetness of zucchini. For an elegant presentation, I love serving this in shallow pasta bowls with a drizzle of olive oil and a few whole basil leaves scattered over the top.
Quick Individual Greek Salad with Feta
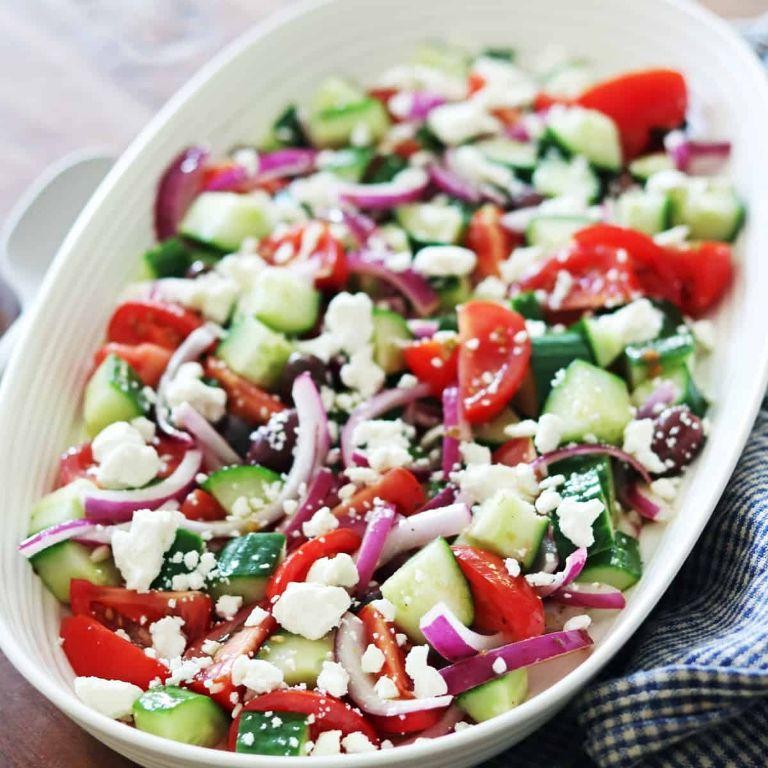
Zestful and vibrant, this Quick Individual Greek Salad with Feta brings the sun-drenched flavors of the Mediterranean to your table in mere minutes. Perfectly balanced with crisp vegetables, briny olives, and creamy feta, it’s an elegant yet effortless dish that celebrates freshness in every bite. Whether as a light lunch or sophisticated side, this salad delivers both simplicity and sophistication.
1
servings10
minutesIngredients
– 1 cup cherry tomatoes, halved (I look for the sweetest, ripest ones I can find)
– 1/2 English cucumber, diced (its thin skin needs no peeling)
– 1/4 red onion, thinly sliced (soaked in ice water to mellow its sharpness)
– 1/4 cup Kalamata olives, pitted (their briny depth is essential)
– 2 ounces feta cheese, cubed (I prefer blocks over crumbles for better texture)
– 2 tablespoons extra virgin olive oil (my go-to for its fruity notes)
– 1 tablespoon red wine vinegar (a splash brightens everything)
– 1/2 teaspoon dried oregano (rubbed between your palms to awaken its aroma)
– 1/4 teaspoon fine sea salt (to enhance, not overwhelm)
– 1/8 teaspoon freshly ground black pepper
Instructions
1. Halve 1 cup of cherry tomatoes and place them in a medium bowl.
2. Dice 1/2 English cucumber into 1/2-inch pieces and add to the bowl.
3. Thinly slice 1/4 red onion and submerge in ice water for 5 minutes to reduce pungency, then drain and add to the bowl.
4. Pit 1/4 cup Kalamata olives and mix them gently with the vegetables.
5. Cube 2 ounces of feta cheese into 1/2-inch pieces and fold into the salad to prevent breaking.
6. In a small jar, combine 2 tablespoons extra virgin olive oil, 1 tablespoon red wine vinegar, 1/2 teaspoon dried oregano, 1/4 teaspoon fine sea salt, and 1/8 teaspoon black pepper; shake vigorously for 10 seconds until emulsified.
7. Drizzle the dressing over the salad and toss lightly with a large spoon to coat evenly without crushing the ingredients.
8. Let the salad rest at room temperature for 5 minutes to allow the flavors to meld.Understated yet unforgettable, this salad offers a crisp crunch from the cucumber, a juicy burst from the tomatoes, and a creamy saltiness from the feta. Serve it nestled in lettuce cups for a portable lunch or alongside grilled lamb for a Mediterranean-inspired feast.
Effortless Grilled Cheese and Tomato Soup

Venerable comfort food receives a sophisticated makeover in this effortless pairing that transforms simple ingredients into culinary poetry. Velvety tomato soup, rich with roasted depth, cradles the crisp, golden embrace of a perfectly grilled cheese sandwich. This timeless duo achieves new heights of elegance through careful technique and quality components.
2
sandwiches15
minutes40
minutesIngredients
- 4 slices of sourdough bread (I find its tangy flavor complements the tomatoes beautifully)
- 4 tablespoons unsalted butter, softened (room temperature spreads evenly without tearing the bread)
- 6 ounces sharp white cheddar cheese, thinly sliced (this melts beautifully while maintaining structure)
- 2 tablespoons extra virgin olive oil (my go-to for its fruity notes)
- 1 medium yellow onion, finely diced
- 2 cloves garlic, minced
- 28 ounces canned whole peeled tomatoes (San Marzano are worth the splurge for their sweet acidity)
- 1 cup vegetable broth
- ½ cup heavy cream
- 1 teaspoon dried basil
- ½ teaspoon smoked paprika
Instructions
- Heat olive oil in a heavy-bottomed pot over medium heat until shimmering.
- Add diced onion and cook for 5-7 minutes until translucent and fragrant.
- Stir in minced garlic and cook for 1 minute until aromatic but not browned.
- Pour in canned tomatoes with their juices, using a wooden spoon to gently break them apart.
- Add vegetable broth, dried basil, and smoked paprika, then bring to a gentle simmer.
- Reduce heat to low, cover, and simmer for 20 minutes to allow flavors to meld.
- While soup simmers, spread ½ tablespoon softened butter on one side of each bread slice.
- Place two bread slices buttered-side down on a cold skillet.
- Arrange sliced cheddar cheese evenly over the unbuttered sides.
- Top with remaining bread slices, buttered sides facing up.
- Heat skillet over medium-low heat and cook sandwiches for 3-4 minutes until golden brown.
- Carefully flip sandwiches using a spatula and cook for another 3-4 minutes until second side is golden and cheese is melted.
- Remove sandwiches from heat and let rest for 2 minutes before cutting.
- Transfer simmered soup to a blender and puree until completely smooth.
- Return pureed soup to the pot and stir in heavy cream over low heat.
- Heat soup for 3-4 minutes until warmed through but not boiling.
Nothing compares to the symphony of textures when crisp, buttery bread gives way to molten cheese alongside the silken soup. Nuanced smokiness from the paprika plays against the bright tomato acidity, while the rich cream provides luxurious mouthfeel. Consider serving in shallow bowls with the sandwich quartered and arranged artfully alongside for maximum dipping pleasure.
Conclusion
Just imagine—no more mealtime stress! These 23 effortless recipes are your ticket to delicious, single-serving meals that save time and reduce waste. Pick your favorites, give them a try, and let us know which ones you love in the comments below. Don’t forget to share this roundup on Pinterest to help other solo cooks discover easy, tasty options!


