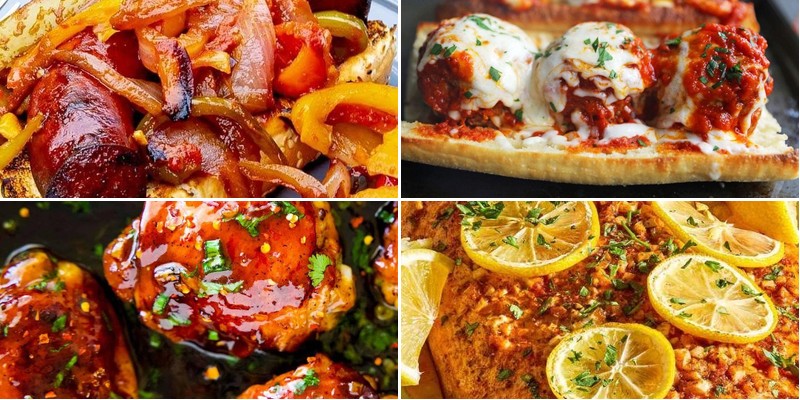
You’ve got the passion for creating amazing meals but need recipes that won’t keep you in the kitchen all night. Whether you’re craving hearty comfort food, quick weeknight dinners, or impressive dishes to share, we’ve gathered 26 irresistible recipes that deliver big flavor with minimal fuss. Get ready to fire up your stove and discover your next favorite meal—these easy winners are guaranteed to satisfy.
Hearty Beef and Beer Stew
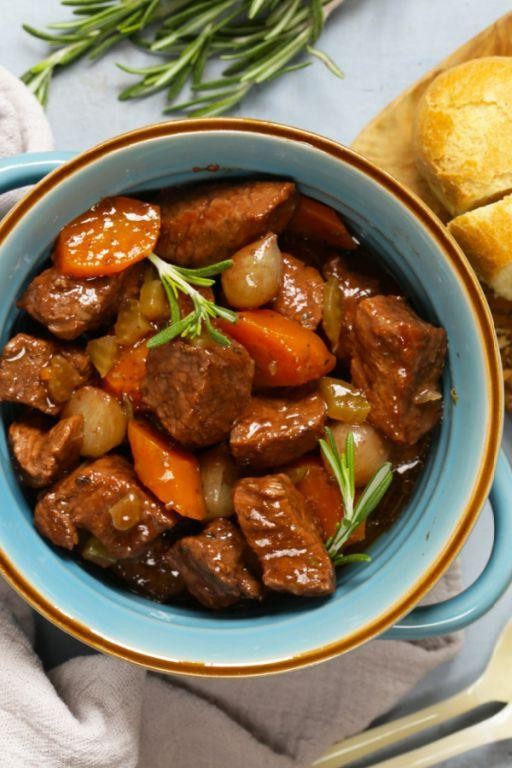
Just now, as the afternoon light fades, I find myself craving something that simmers slowly, something that fills the kitchen with the kind of warmth that seeps into your bones. Hearty Beef and Beer Stew is that dish for me—a quiet meditation in a pot, where tough cuts become tender and simple ingredients transform into profound comfort. It’s the kind of meal that asks for patience and rewards you with depth, each bubble on the surface a reminder that good things take time.
5
servings20
minutes165
minutesIngredients
– 2 lbs chuck roast, cut into 1-inch cubes
– 3 tbsp clarified butter
– 1 large yellow onion, finely diced
– 3 cloves garlic, minced
– 2 large carrots, peeled and cut into ½-inch rounds
– 2 celery stalks, cut into ½-inch slices
– 2 tbsp tomato paste
– 12 oz dark ale
– 4 cups beef stock
– 2 sprigs fresh thyme
– 1 bay leaf
– 1 tsp kosher salt
– ½ tsp freshly cracked black pepper
Instructions
1. Pat the chuck roast cubes completely dry with paper towels to ensure a proper sear.
2. Heat the clarified butter in a heavy-bottomed Dutch oven over medium-high heat until it shimmers, about 2 minutes.
3. Working in two batches to avoid overcrowding, sear the beef cubes until deeply browned on all sides, approximately 4–5 minutes per batch.
4. Transfer the seared beef to a clean plate, leaving the fond in the pot.
5. Reduce the heat to medium and add the diced onion, sautéing until translucent and lightly golden, about 6–8 minutes.
6. Stir in the minced garlic and cook until fragrant, 45–60 seconds.
7. Add the carrot rounds and celery slices, cooking until slightly softened, about 4 minutes.
8. Incorporate the tomato paste, stirring constantly until it darkens and coats the vegetables, 1–2 minutes.
9. Deglaze the pot with the dark ale, scraping the bottom to lift all the browned bits.
10. Simmer the ale until reduced by half, about 4–5 minutes.
11. Return the seared beef and any accumulated juices to the pot.
12. Pour in the beef stock, ensuring it just covers the ingredients.
13. Submerge the fresh thyme sprigs and bay leaf into the liquid.
14. Season with kosher salt and freshly cracked black pepper.
15. Bring the stew to a gentle boil, then immediately reduce the heat to low.
16. Cover the pot and simmer for 2 hours 30 minutes, stirring occasionally, until the beef is fork-tender.
17. Remove and discard the thyme sprigs and bay leaf.
18. Let the stew rest, uncovered, for 15 minutes to allow the flavors to meld. Here, the rich, malty notes of the beer meld with the deep savoriness of the beef, creating a broth that’s both robust and nuanced. Heaped over creamy mashed potatoes or nestled beside a crusty loaf of bread, it offers a satisfying chew from the tender meat and a subtle sweetness from the slow-cooked vegetables—a humble, heartfelt meal that feels like a quiet celebration.
Spicy Garlic Shrimp Skillet
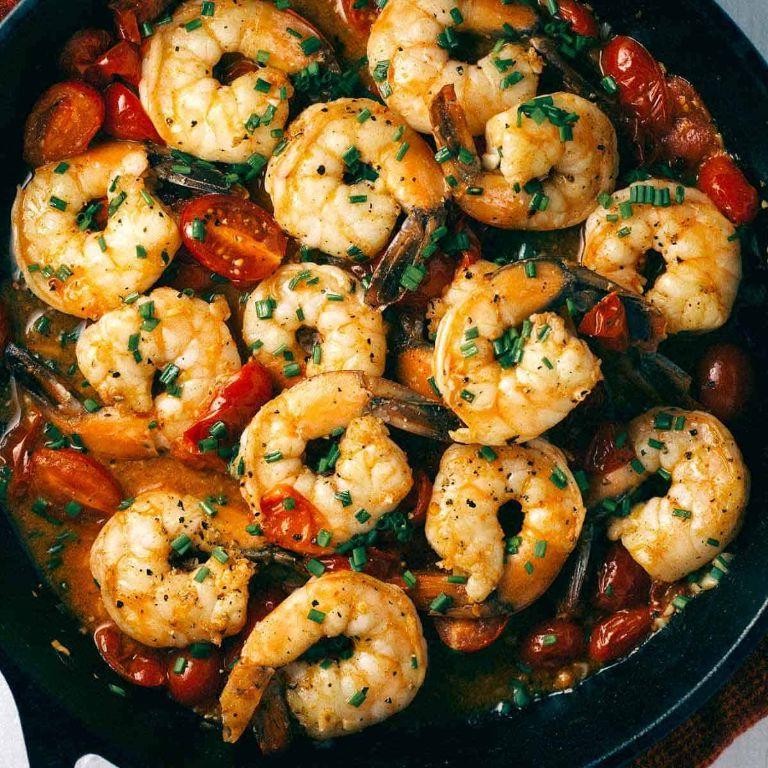
Beneath the soft evening light, I find myself drawn to the kitchen, where memories of coastal meals and shared laughter seem to linger in the air. There’s something quietly comforting about preparing a dish that carries both warmth and spice, a gentle reminder of summer evenings spent with good company. This skillet creation has become my go-to when I crave something that feels both special and effortlessly simple.
3
servings10
minutes8
minutesIngredients
– 1 pound wild-caught large shrimp, peeled and deveined
– 3 tablespoons clarified butter
– 8 cloves garlic, thinly sliced
– 1 teaspoon crushed red pepper flakes
– ½ cup dry white wine
– 2 tablespoons freshly squeezed lemon juice
– ¼ cup finely chopped fresh flat-leaf parsley
– ½ teaspoon fine sea salt
– ¼ teaspoon freshly cracked black pepper
Instructions
1. Pat the wild-caught shrimp completely dry using paper towels to ensure proper searing.
2. Season the shrimp evenly on both sides with fine sea salt and freshly cracked black pepper.
3. Heat a 12-inch cast-iron skillet over medium-high heat for 90 seconds until properly preheated.
4. Add clarified butter to the hot skillet and swirl to coat the entire surface evenly.
5. Arrange the shrimp in a single layer without overcrowding and sear for exactly 2 minutes.
6. Flip each shrimp carefully using kitchen tongs and cook for another 90 seconds until opaque.
7. Transfer the shrimp to a clean plate using a slotted spoon, leaving the butter in the skillet.
8. Reduce the heat to medium-low and add the thinly sliced garlic to the same skillet.
9. Sauté the garlic for 45-60 seconds until fragrant and lightly golden at the edges.
10. Sprinkle crushed red pepper flakes into the skillet and toast for 15 seconds to release their oils.
11. Pour dry white wine into the skillet, using a wooden spoon to scrape up any browned bits from the bottom.
12. Simmer the wine reduction for 2-3 minutes until reduced by half and slightly syrupy.
13. Stir in freshly squeezed lemon juice and cook for 30 seconds to meld the flavors.
14. Return the shrimp to the skillet along with any accumulated juices from the plate.
15. Toss the shrimp gently in the sauce until thoroughly coated and heated through.
16. Remove the skillet from heat and sprinkle with finely chopped fresh flat-leaf parsley.
17. Serve immediately directly from the skillet for optimal temperature and presentation.
When you take that first bite, the shrimp should yield with a satisfying snap, their natural sweetness balanced by the garlic’s mellow warmth and the subtle heat that builds gradually. The sauce clings to each curve of the shrimp, creating little pools of flavor that beg to be sopped up with crusty bread. For a lovely variation, try serving it over creamy polenta or tossing it with fresh linguine, letting the sauce become a delicate coating for the pasta.
Simple BBQ Pulled Pork Sandwiches
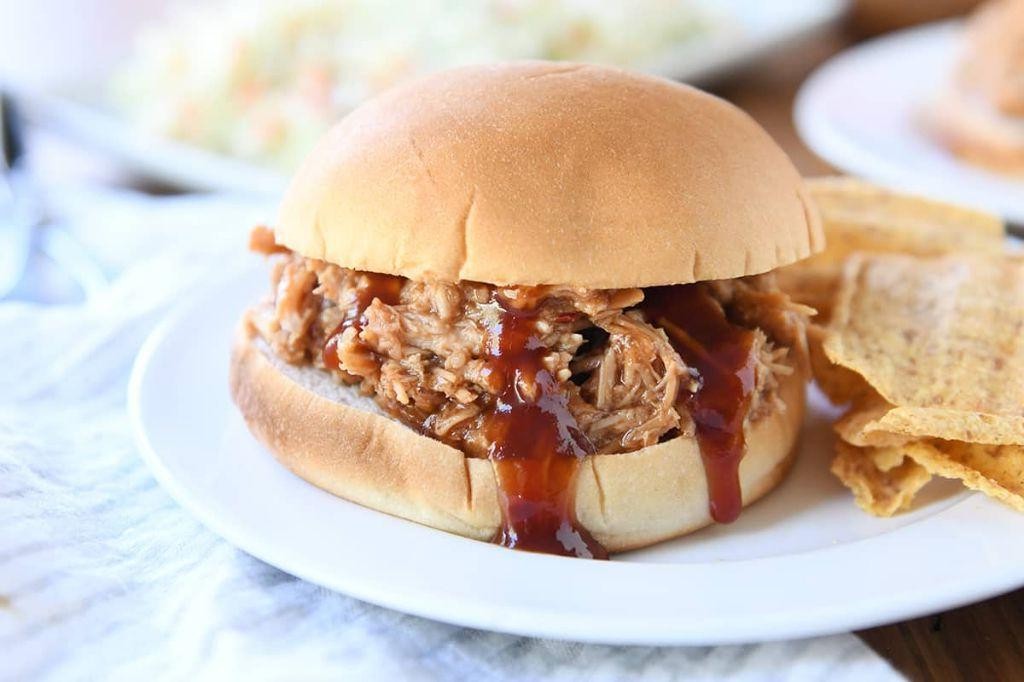
Lately, I’ve found myself returning to this recipe whenever the evenings grow cooler, the slow transformation of pork into something tender and deeply flavored feeling like a quiet meditation in my kitchen. There’s something profoundly comforting about the way the spices meld and the meat falls apart with gentle pressure, creating sandwiches that feel like a warm embrace after a long day.
6
sandwiches15
minutes240
minutesIngredients
– 4 pounds bone-in pork shoulder roast
– 2 tablespoons smoked paprika
– 1 tablespoon garlic powder
– 1 tablespoon onion powder
– 2 teaspoons freshly ground black pepper
– 1 tablespoon kosher salt
– 1 cup apple cider vinegar
– ½ cup dark brown sugar, firmly packed
– 2 tablespoons Worcestershire sauce
– 1 tablespoon Dijon mustard
– 6 soft brioche burger buns
– 1 cup homemade barbecue sauce
Instructions
1. Pat the pork shoulder completely dry using paper towels to ensure proper spice adhesion and browning.
2. Combine smoked paprika, garlic powder, onion powder, black pepper, and kosher salt in a small bowl, whisking thoroughly to create an even spice rub.
3. Massage the spice mixture evenly over all surfaces of the pork shoulder, covering every crevice for maximum flavor penetration.
4. Place the seasoned pork shoulder in a Dutch oven or heavy-bottomed pot with the fat cap facing upward to self-baste during cooking.
5. Combine apple cider vinegar, dark brown sugar, Worcestershire sauce, and Dijon mustard in a separate bowl, whisking until the sugar completely dissolves.
6. Pour the liquid mixture around the pork shoulder, being careful not to wash the spice rub from the meat’s surface.
7. Cover the Dutch oven tightly with its lid and transfer to a preheated 300°F oven for 4 hours.
8. Check the pork after 4 hours by inserting a fork and twisting gently; the meat should shred easily with no resistance.
9. Transfer the cooked pork shoulder to a large cutting board, reserving all cooking liquids in the pot.
10. Using two forks, shred the pork completely, discarding any large fat deposits and the bone.
11. Return the shredded pork to the Dutch oven with the reserved cooking liquids, stirring to coat every strand.
12. Stir in the homemade barbecue sauce until the pork is evenly coated and glossy.
13. Toast the brioche buns in a dry skillet over medium heat for 1-2 minutes per side until golden brown and slightly crisp.
14. Spoon the saucy pulled pork generously onto the bottom halves of the toasted brioche buns.
Just pulled from the oven, the pork collapses into silken strands that soak up the tangy-sweet sauce, creating a texture that’s both substantial and meltingly tender. The slow-cooked meat carries whispers of smoke and spice that deepen with each bite, while the soft brioche provides a buttery contrast to the robust filling. For a delightful variation, try serving the pulled pork over crispy potato wedges or tucked into warm corn tortillas with pickled red onions.
One-Pot Cheesy Chicken Alfredo

Beneath the soft glow of the kitchen light, there’s a quiet comfort in watching ingredients meld into something warm and nourishing, a gentle reminder that simplicity often holds the deepest flavors. This one-pot wonder, with its creamy sauce and tender chicken, feels like a soft exhale at the end of a long day, where every stir brings you closer to a meal that wraps you in warmth. It’s the kind of dish that asks for little but gives so much, a humble pot of solace waiting to be shared.
5
servings15
minutes25
minutesIngredients
– 1 lb boneless, skinless chicken thighs, trimmed and diced into 1-inch pieces
– 2 tbsp clarified butter
– 3 cloves garlic, minced
– 1 cup heavy cream
– 2 cups low-sodium chicken broth
– 8 oz fettuccine pasta, broken in half
– 1 cup freshly grated Parmigiano-Reggiano cheese
– ¼ tsp freshly grated nutmeg
– 1 tbsp freshly chopped flat-leaf parsley
– Kosher salt and freshly cracked black pepper, to season
Instructions
1. Season the diced chicken thighs evenly with kosher salt and freshly cracked black pepper.
2. Heat the clarified butter in a large, heavy-bottomed Dutch oven over medium-high heat until it shimmers.
3. Add the chicken in a single layer and sear for 4–5 minutes, until golden brown on all sides and the internal temperature reaches 165°F; remove and set aside.
4. Reduce the heat to medium-low and add the minced garlic, sautéing for 45–60 seconds until fragrant but not browned.
5. Pour in the heavy cream and chicken broth, stirring gently to combine, then bring to a gentle simmer.
6. Add the broken fettuccine pasta, submerging it fully in the liquid, and cook for 12–14 minutes, stirring occasionally to prevent sticking, until the pasta is al dente.
7. Stir in the freshly grated Parmigiano-Reggiano cheese and freshly grated nutmeg until the sauce is smooth and emulsified.
8. Return the seared chicken to the pot, folding it gently into the sauce to warm through for 2–3 minutes.
9. Finish by sprinkling with freshly chopped flat-leaf parsley just before serving.
Kindly, the sauce clings to each strand of pasta with a velvety richness, while the chicken remains succulent against the subtle sharpness of Parmigiano-Reggiano. For a playful twist, top with toasted pine nuts or serve alongside roasted asparagus spears, letting their crisp texture contrast the creamy depths of the dish.
Easy Beef Tacos with Fresh Salsa

Remembering how the golden hour light used to spill across my grandmother’s kitchen table, I find myself drawn back to these simple beef tacos, where the warmth of seasoned meat meets the bright freshness of homemade salsa in a quiet moment of culinary comfort.
8
tacos15
minutes15
minutesIngredients
– 1 lb grass-fed ground beef (85/15 lean-to-fat ratio)
– 8 corn tortillas (6-inch diameter)
– 2 ripe heirloom tomatoes, finely diced
– 1/4 cup finely minced red onion
– 2 tbsp freshly chopped cilantro
– 1 jalapeño pepper, seeded and minced
– 1 tbsp freshly squeezed lime juice
– 1 tsp Diamond Crystal kosher salt
– 1/2 tsp freshly ground black pepper
– 1 tsp ground cumin
– 1 tsp smoked paprika
– 2 tbsp avocado oil
– 1/4 cup crumbled cotija cheese
– 1/4 cup Mexican crema
Instructions
1. Heat a 12-inch cast-iron skillet over medium-high heat until a drop of water sizzles immediately upon contact.
2. Add 1 tablespoon avocado oil to the heated skillet, swirling to coat the surface evenly.
3. Place the grass-fed ground beef in the skillet, breaking it apart with a wooden spatula into small, irregular crumbles.
4. Cook the beef for 5-7 minutes, stirring occasionally, until no pink remains and the edges begin to develop a golden-brown crust.
5. Sprinkle 1 teaspoon Diamond Crystal kosher salt, 1/2 teaspoon freshly ground black pepper, 1 teaspoon ground cumin, and 1 teaspoon smoked paprika over the beef.
6. Stir the seasoning mixture into the beef thoroughly, cooking for an additional 1 minute to bloom the spices.
7. Transfer the seasoned beef to a bowl and cover loosely with aluminum foil to retain warmth.
8. Wipe the skillet clean with a paper towel and return it to medium heat.
9. Brush both sides of each corn tortilla lightly with the remaining avocado oil using a pastry brush.
10. Heat the tortillas one at a time in the skillet for 30-45 seconds per side until pliable and lightly charred at the edges.
11. Stack the warmed tortillas between clean kitchen towels to maintain warmth and prevent drying.
12. Combine the finely diced heirloom tomatoes, minced red onion, chopped cilantro, minced jalapeño, and freshly squeezed lime juice in a glass bowl.
13. Gently fold the salsa ingredients together until just combined, being careful not to crush the tomatoes.
14. Let the salsa rest at room temperature for 5 minutes to allow the flavors to meld.
15. Spoon approximately 1/4 cup of the seasoned beef into the center of each warmed tortilla.
16. Top each taco with 2 tablespoons of the fresh salsa mixture.
17. Drizzle 1/2 tablespoon Mexican crema over each taco in a zigzag pattern.
18. Sprinkle 1/2 tablespoon crumbled cotija cheese over the top of each assembled taco.
Vibrant textures play beautifully here—the crisp-edged beef crumbles against the soft tortilla, while the juicy salsa provides cooling contrast to the warm spices. For a stunning presentation, arrange them on a rustic wooden board with lime wedges tucked between, letting the deep red of the tomatoes and white crema create visual poetry against the golden tortillas.
Loaded Baked Potato Casserole

Perhaps it’s the chill in the air or the quiet comfort of a dim kitchen, but there’s something deeply soothing about transforming humble potatoes into a dish that feels like a warm embrace. This casserole, with its layers of creamy potato and sharp cheddar, is the kind of meal that asks for little but gives so much in return, a quiet celebration of simplicity and warmth.
8
portions25
minutes60
minutesIngredients
– 3 pounds russet potatoes, peeled and cut into ½-inch cubes
– 1 cup heavy cream
– ½ cup sour cream
– 4 ounces cream cheese, softened
– 6 slices thick-cut bacon, diced
– 1 large yellow onion, finely diced
– 2 cloves garlic, minced
– 1½ cups sharp white cheddar cheese, grated
– 2 tablespoons unsalted butter, melted
– 1 teaspoon kosher salt
– ½ teaspoon freshly ground black pepper
– ¼ teaspoon smoked paprika
– 2 tablespoons fresh chives, finely chopped
Instructions
1. Preheat your oven to 375°F and lightly grease a 9×13-inch baking dish with unsalted butter.
2. Place the peeled, cubed russet potatoes in a large pot, cover with cold water by 1 inch, and bring to a boil over high heat.
3. Reduce heat to medium and simmer potatoes for 12–15 minutes, until just tender when pierced with a fork but not falling apart.
4. While potatoes cook, sauté diced bacon in a skillet over medium heat for 8–10 minutes until crisp, then transfer to a paper towel-lined plate using a slotted spoon.
5. In the same skillet with 1 tablespoon of bacon fat, cook finely diced yellow onion over medium-low heat for 6–8 minutes until translucent and lightly golden.
6. Add minced garlic to the skillet and cook for 1 minute until fragrant, then remove from heat.
7. Drain the cooked potatoes thoroughly and return them to the warm pot off the heat.
8. Gently fold in heavy cream, sour cream, softened cream cheese, melted unsalted butter, kosher salt, black pepper, and smoked paprika until just combined.
9. Stir in the cooked onion-garlic mixture and half of the crisp bacon until evenly distributed.
10. Transfer the potato mixture to the prepared baking dish and spread into an even layer.
11. Sprinkle grated sharp white cheddar cheese evenly over the top, followed by the remaining bacon.
12. Bake at 375°F for 25–30 minutes, until the cheese is fully melted and bubbly with lightly browned edges.
13. Remove from oven and let rest for 5 minutes to allow the layers to set.
14. Garnish with freshly chopped chives before serving.
Each spoonful reveals a harmony of textures—the soft, creamy potatoes giving way to the crisp bacon and molten cheese. The sharp cheddar cuts through the richness, while a hint of smoked paprika lingers in the background. For a delightful contrast, serve it alongside a bright, acidic salad or top individual portions with a fried egg, its runny yolk mingling with the savory layers.
Classic Bacon Cheeseburger Sliders

Evenings like this call for something comforting, something that feels like a warm embrace after a long day. There’s a quiet satisfaction in preparing these miniature classics, each component coming together like familiar notes in a cherished melody. The gentle sizzle from the stove becomes a soothing soundtrack to this culinary meditation.
8
sandwiches15
minutes15
minutesIngredients
– 1 lb freshly ground chuck beef (80/20 blend)
– 8 soft Hawaiian sweet roll slider buns
– 8 slices thick-cut applewood smoked bacon
– 8 slices sharp white cheddar cheese
– ¼ cup Duke’s mayonnaise
– 2 tbsp unsalted butter, clarified
– 1 small sweet onion, thinly sliced
– 2 tbsp bread and butter pickle chips
– 1 tsp Worcestershire sauce
– ½ tsp smoked paprika
– Kosher salt and freshly ground black pepper
Instructions
1. Preheat a cast-iron skillet over medium-high heat until water droplets sizzle and evaporate immediately.
2. Arrange bacon slices in a single layer in the cold skillet, then cook for 6-8 minutes until the fat renders and edges become deeply caramelized.
3. Transfer bacon to a wire rack set over a sheet pan using tongs, preserving 2 tablespoons of rendered bacon fat in the skillet.
4. Season ground beef with Worcestershire sauce, smoked paprika, 1 teaspoon kosher salt, and ½ teaspoon black pepper, gently combining without overworking the meat.
5. Divide the seasoned beef into 8 equal portions, forming each into ½-inch thick patties slightly larger than your slider buns.
6. Create a shallow dimple in the center of each patty with your thumb to prevent doming during cooking.
7. Increase skillet heat to high and sear patties for 2 minutes until a dark brown crust forms on the bottom.
8. Flip patties using a thin metal spatula and immediately top each with a cheese slice.
9. Cover skillet and cook for 90 seconds until cheese melts and internal temperature reaches 160°F on an instant-read thermometer.
10. Remove patties from skillet and rest on a clean plate for 3 minutes to allow juices to redistribute.
11. Reduce skillet heat to medium-low and add clarified butter, swirling to coat the surface.
12. Toast slider buns cut-side down for 45-60 seconds until golden brown with lightly crisped edges.
13. Spread 1½ teaspoons mayonnaise on the bottom half of each toasted bun.
14. Layer each bottom bun with a cheese-topped patty, one bacon slice folded in half, 3-4 onion slices, and 2-3 pickle chips.
15. Cap each slider with the remaining bun halves, pressing gently to compact the layers.
Zesty and satisfying, these sliders offer a delightful textural journey—the crisp bacon contrasting with the juicy beef patty, all embraced by the pillowy softness of the sweet rolls. Consider serving them arranged on a wooden board with spears of dill pickle and cherry tomatoes for a rustic presentation that invites sharing and conversation.
Quick and Easy Fajita Stir-Fry
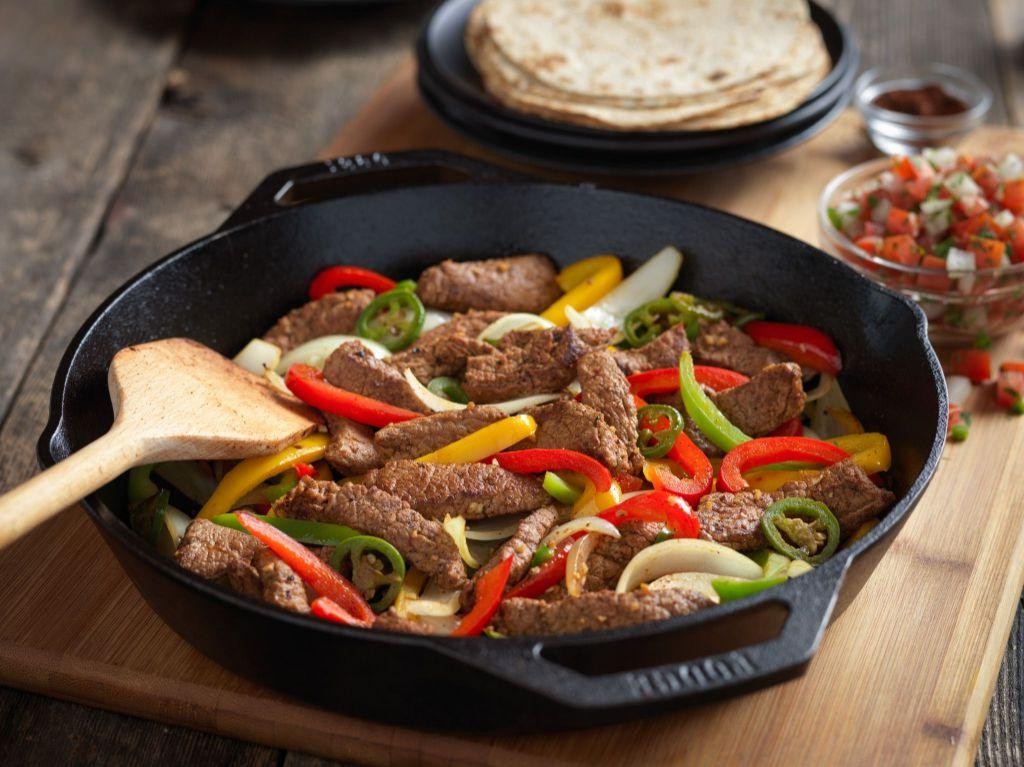
Folding the vibrant bell peppers into the sizzling skillet, I’m reminded how this quick fajita stir-fry transforms ordinary weeknights into something quietly special. Velvety strips of pasture-raised chicken mingle with colorful vegetables in a dance that feels both nourishing and deeply comforting.
8
servings15
minutes15
minutesIngredients
– 1 pound pasture-raised chicken breast, sliced into ¼-inch strips
– 2 tablespoons cold-pressed avocado oil
– 1 large yellow onion, julienned
– 3 mixed bell peppers (red, yellow, green), seeded and sliced into ¼-inch strips
– 3 cloves garlic, minced
– 2 teaspoons smoked paprika
– 1 teaspoon ground cumin
– ½ teaspoon chili powder
– ½ teaspoon fine sea salt
– ¼ teaspoon freshly cracked black pepper
– 2 tablespoons fresh lime juice
– ¼ cup chopped fresh cilantro
– 8 small flour tortillas, warmed
Instructions
1. Pat the chicken strips completely dry with paper towels to ensure proper searing.
2. Heat avocado oil in a large cast-iron skillet over medium-high heat until shimmering, about 2 minutes.
3. Add chicken strips in a single layer, cooking undisturbed for 3 minutes to develop golden-brown crust.
4. Flip chicken and cook for another 2 minutes until opaque throughout, then transfer to a clean plate.
5. Add julienned onion to the same skillet, sautéing for 4 minutes until translucent and slightly caramelized.
6. Incorporate bell pepper strips, cooking for 5 minutes until slightly softened but still crisp.
7. Stir in minced garlic and cook for 45 seconds until fragrant but not browned.
8. Sprinkle smoked paprika, cumin, chili powder, sea salt, and black pepper over vegetables, stirring to coat evenly.
9. Return chicken to skillet, tossing to combine with spiced vegetables.
10. Drizzle fresh lime juice over the mixture, stirring gently to incorporate.
11. Remove from heat and fold in chopped cilantro.
12. Serve immediately with warmed flour tortillas.
Velvety chicken contrasts beautifully with the crisp-tender vegetables, each bite carrying the warm smokiness of paprika and bright citrus notes. The flexible tortillas cradle the filling perfectly, though this stir-fry also shines when served over cilantro-lime rice or tucked into lettuce cups for a lighter alternative.
Smoky Grilled Sausage and Peppers
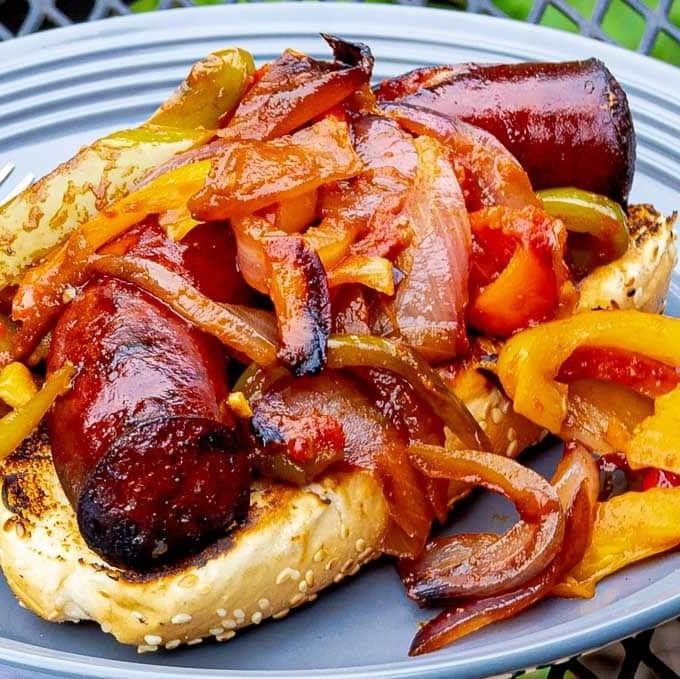
Zigzagging between the lingering warmth of summer and autumn’s crisp approach, I find myself drawn to the simple comfort of fire-kissed ingredients mingling in the cast iron. There’s something deeply grounding about the ritual of grilling as daylight softens, the smoke weaving memories into each bite.
2
sandwiches15
minutes22
minutesIngredients
- 1 pound smoked Andouille sausage, sliced into ½-inch coins
- 2 large red bell peppers, seeded and sliced into ¼-inch strips
- 1 large yellow onion, sliced into ¼-inch half-moons
- 3 tablespoons extra-virgin olive oil
- 2 cloves garlic, minced into a fine paste
- 1 teaspoon smoked paprika
- ½ teaspoon freshly cracked black pepper
- ¼ teaspoon fine sea salt
- 2 tablespoons roughly chopped fresh flat-leaf parsley
- 4 soft hoagie rolls, lightly toasted
Instructions
- Preheat a gas grill to 425°F, establishing two heat zones by leaving one burner off for indirect cooking.
- Toss the sliced bell peppers and onion with 2 tablespoons of olive oil in a large mixing bowl until evenly coated.
- Arrange the vegetables in a single layer on a perforated grill pan to prevent them from falling through the grates.
- Place the grill pan over direct heat and cook for 8 minutes, stirring once halfway through, until peppers develop slight char marks.
- Brush the sliced sausage with the remaining 1 tablespoon of olive oil and arrange directly on the grill grates over direct heat.
- Sear the sausage for 2 minutes per side until deeply browned and crisp at the edges, then move to the indirect heat zone.
- Transfer the partially cooked vegetables to the indirect zone, combining them with the sausage in a cast iron skillet.
- Stir in the garlic paste, smoked paprika, black pepper, and sea salt, coating everything evenly.
- Cover the grill and cook over indirect heat for 12 minutes, allowing the flavors to meld and the vegetables to soften completely.
- Remove the skillet from the grill and fold in the chopped parsley just before serving.
Kaleidoscopic in both color and flavor, the finished dish offers a satisfying contrast between the snap of caramelized sausage casing and the yielding softness of sweet peppers. The smoke-kissed vegetables melt into the onion’s savory foundation, creating a juicy mixture that begs to be piled into toasted rolls. For a delightful twist, spoon any remaining peppers and onions over creamy polenta or fold them into morning scrambled eggs, extending the comfort into tomorrow’s meals.
Buffalo Chicken Wings with Blue Cheese

Often, I find myself craving that perfect balance of heat and coolness that only comes from well-executed bar food. On evenings like this, when the light fades early and the air carries the first chill of autumn, my kitchen becomes a sanctuary for recreating those comforting flavors. There’s something deeply satisfying about the ritual of preparing buffalo chicken wings—the sizzle, the aroma, the anticipation of that first crispy, saucy bite.
3
servings20
minutes50
minutesIngredients
– 2 lbs chicken wing sections (drumettes and flats)
– 2 tbsp baking powder
– 1 tsp fine sea salt
– ½ cup Frank’s RedHot sauce
– ¼ cup unsalted European-style butter
– 1 tbsp white vinegar
– ¼ tsp Worcestershire sauce
– ¼ tsp garlic powder
– ¼ tsp smoked paprika
– ½ cup crumbled Danish blue cheese
– ¼ cup full-fat Greek yogurt
– 2 tbsp mayonnaise
– 1 tbsp fresh lemon juice
– 1 tbsp finely chopped fresh chives
– ¼ tsp freshly ground black pepper
Instructions
1. Pat chicken wing sections completely dry using paper towels.
2. Arrange wings in a single layer on a wire rack set over a baking sheet.
3. Combine baking powder and fine sea salt in a small bowl.
4. Sprinkle the baking powder mixture evenly over all surfaces of the wings.
5. Refrigerate uncovered for 8 hours to dry the skin thoroughly.
6. Preheat oven to 425°F (218°C) with convection setting if available.
7. Bake wings for 25 minutes until skin appears dry and lightly golden.
8. Flip each wing carefully using tongs.
9. Continue baking for another 20-25 minutes until skin is deeply browned and crispy.
10. Melt unsalted European-style butter in a small saucepan over medium heat.
11. Whisk in Frank’s RedHot sauce, white vinegar, Worcestershire sauce, garlic powder, and smoked paprika until fully emulsified.
12. Remove saucepan from heat and let sauce cool slightly.
13. Transfer baked wings to a large mixing bowl.
14. Pour warm sauce over wings and toss gently until evenly coated.
15. Combine crumbled Danish blue cheese, full-fat Greek yogurt, mayonnaise, fresh lemon juice, finely chopped fresh chives, and freshly ground black pepper in a separate bowl.
16. Whisk blue cheese mixture until smooth but still textured.
17. Refrigerate blue cheese dressing for 15 minutes to allow flavors to meld.
18. Arrange sauced wings on a serving platter.
19. Serve immediately with chilled blue cheese dressing for dipping.
These wings emerge with skin so crisp it crackles audibly, giving way to impossibly tender meat beneath. The fiery sauce clings perfectly, its vinegar tang cutting through the richness while the blue cheese dressing provides creamy respite. Try serving them alongside crisp celery stalks and carrot batons for contrasting textures that make each bite feel newly discovered.
Savory Herb-Crusted Pork Chops
Beneath the golden afternoon light, I find myself drawn to the quiet comfort of preparing a meal that feels both elegant and deeply nourishing—a dish that fills the kitchen with the earthy aroma of herbs and the gentle sizzle of searing pork. There’s something meditative about pressing fresh herbs into meat, about watching a simple chop transform into something golden and crisp. It’s a small ritual, one that slows the day and rewards patience with rich, layered flavor.
5
servings25
minutes19
minutesIngredients
- 4 bone-in, heritage-breed pork chops, 1 ½ inches thick
- 2 tbsp extra-virgin olive oil
- ½ cup panko breadcrumbs
- ¼ cup finely grated Parmigiano-Reggiano
- 2 tbsp fresh thyme leaves, finely minced
- 1 tbsp fresh rosemary, finely minced
- 1 tsp flaky sea salt
- ½ tsp freshly cracked black pepper
- 1 large pasture-raised egg, lightly beaten
- 2 tbsp clarified butter
Instructions
- Pat the pork chops completely dry with paper towels to ensure a crisp crust.
- In a shallow bowl, combine panko breadcrumbs, Parmigiano-Reggiano, thyme, rosemary, sea salt, and black pepper.
- Brush each pork chop lightly with extra-virgin olive oil on both sides.
- Coat each chop thoroughly in the beaten egg, allowing excess to drip off.
- Press the herb-breadcrumb mixture firmly onto both sides of each chop until evenly adhered.
- Place the coated chops on a wire rack set over a baking sheet and refrigerate uncovered for 20 minutes to set the crust.
- Preheat the oven to 400°F (204°C).
- Heat clarified butter in a large, heavy-bottomed oven-safe skillet over medium-high heat until shimmering but not smoking.
- Sear the pork chops for 3 minutes per side until the crust is deep golden brown.
- Transfer the skillet to the preheated oven and roast for 8–10 minutes, or until the internal temperature reaches 145°F (63°C) on an instant-read thermometer.
- Rest the chops on a clean wire rack for 5 minutes before serving to allow juices to redistribute.
Velvety and aromatic, these chops emerge with a crackling herb crust that gives way to tender, juicy meat beneath. The rosemary and thyme lend a woodsy fragrance, while the Parmigiano-Reggiano adds a subtle umami depth. For a lovely presentation, slice against the grain and serve over a bed of creamy polenta or alongside roasted root vegetables to catch the savory pan drippings.
Zesty Lemon Garlic Salmon
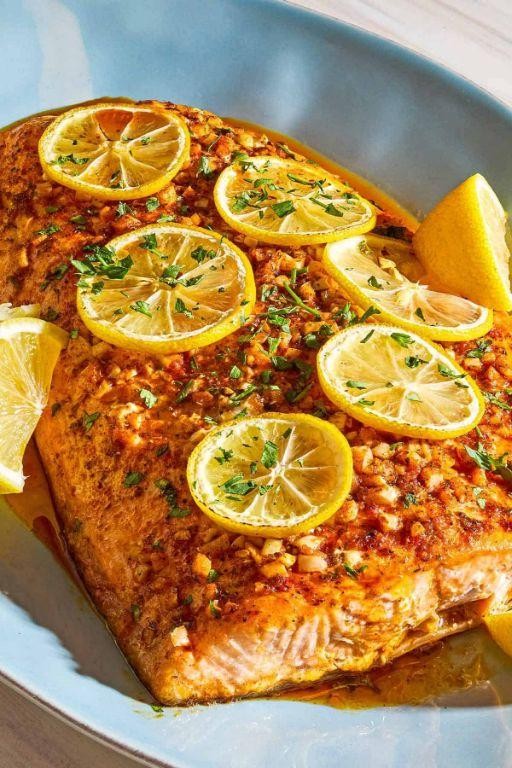
Often, the simplest meals become the most cherished memories, especially when golden hour light spills across the kitchen counter. On evenings like this, I find myself drawn to recipes that feel both nourishing and effortless, a quiet celebration of the day’s end. This zesty lemon garlic salmon is exactly that—a dish that comes together with gentle, deliberate motions, filling the air with the most comforting aromas.
2
servings15
minutes10
minutesIngredients
- 2 (6-ounce) skin-on salmon fillets, patted dry
- 2 tablespoons extra-virgin olive oil
- 3 garlic cloves, minced into a fine paste
- 1 lemon, zested and juiced (approximately 3 tablespoons juice)
- 1 teaspoon freshly cracked black pepper
- ½ teaspoon flaky sea salt
- 1 tablespoon unsalted butter
- 2 tablespoons fresh dill, finely chopped
Instructions
- Position an oven rack 6 inches from the broiler element and preheat your broiler to 450°F for 10 minutes.
- Pat the salmon fillets completely dry with paper towels to ensure a crisp skin surface.
- Whisk together the extra-virgin olive oil, minced garlic paste, lemon zest, and cracked black pepper in a small bowl until fully emulsified.
- Brush the garlic-lemon oil mixture evenly over the flesh side of each salmon fillet, coating every surface.
- Sprinkle the flaky sea salt uniformly across the oiled salmon flesh.
- Place the prepared salmon fillets skin-side down on a broiler-safe baking sheet lined with parchment paper.
- Broil the salmon for 8–10 minutes, watching closely until the edges become golden and the internal temperature reaches 125°F on an instant-read thermometer.
- Remove the baking sheet from the oven and immediately transfer the salmon to a warm serving platter using a thin metal spatula.
- Add the unsalted butter and fresh lemon juice to the hot baking sheet, swirling until the butter melts and combines with the pan juices.
- Spoon the lemon-butter pan sauce generously over the plated salmon fillets.
- Garnish with the finely chopped fresh dill just before serving.
A buttery, flaky texture gives way to the bright acidity of lemon and the gentle warmth of garlic in every forkful. The crisp-edged skin provides a satisfying contrast to the moist, medium-rare interior. For a complete meal, serve it alongside roasted asparagus spears or over a bed of creamy polenta to soak up the vibrant pan sauce.
Sticky Honey Garlic Chicken Thighs

Zestful evenings call for dishes that warm both kitchen and soul, where the gentle sizzle of chicken thighs meets the sweet whisper of honey in a dance that feels both familiar and extraordinary. There’s something deeply comforting about watching golden sauce cling to tender meat, creating a meal that feels like a quiet celebration of simple pleasures.
5
servings15
minutes25
minutesIngredients
– 2 pounds bone-in, skin-on chicken thighs
– 1/3 cup raw wildflower honey
– 4 cloves garlic, finely minced
– 2 tablespoons tamari
– 1 tablespoon rice vinegar
– 1 teaspoon freshly grated ginger
– 1/2 teaspoon crushed red pepper flakes
– 2 tablespoons avocado oil
– 1 tablespoon cornstarch
– 2 tablespoons cold filtered water
– 2 tablespoons sliced scallions
– 1 teaspoon toasted sesame seeds
Instructions
1. Pat chicken thighs completely dry using paper towels to ensure crisp skin during cooking.
2. Season both sides of chicken generously with kosher salt and freshly cracked black pepper.
3. Heat avocado oil in a large cast-iron skillet over medium-high heat until shimmering but not smoking.
4. Place chicken skin-side down in the hot skillet, arranging thighs without overcrowding.
5. Cook undisturbed for 8-10 minutes until skin achieves deep golden-brown coloration and releases easily from the skillet.
6. Flip chicken using tongs and cook for additional 6-7 minutes until internal temperature reaches 165°F when tested with an instant-read thermometer.
7. Transfer chicken to a clean plate, allowing rendered fat to remain in the skillet.
8. Reduce heat to medium and add minced garlic, cooking for 45-60 seconds until fragrant but not browned.
9. Whisk together honey, tamari, rice vinegar, grated ginger, and red pepper flakes in a small bowl.
10. Pour honey mixture into the skillet, stirring constantly with a wooden spoon to incorporate pan drippings.
11. Create a slurry by combining cornstarch with cold water until completely smooth.
12. Gradually whisk slurry into the simmering sauce and continue cooking for 2-3 minutes until thickened to a glossy, coating consistency.
13. Return chicken thighs to the skillet, turning repeatedly to coat all surfaces with the sticky glaze.
14. Simmer for 2 additional minutes, basting chicken continuously with the reduced sauce.
15. Garnish with sliced scallions and toasted sesame seeds before serving. Youthful memories of sticky fingers and happy kitchens come rushing back with each bite of this dish. The chicken yields with gentle pressure, its crisp skin giving way to impossibly tender meat that carries the perfect balance of sweet honey and pungent garlic. Consider serving these glazed thighs over jasmine rice to catch every drop of the glossy sauce, or shred the meat into lettuce cups for a refreshing contrast to the rich flavors.
Garlic Butter Steak Bites
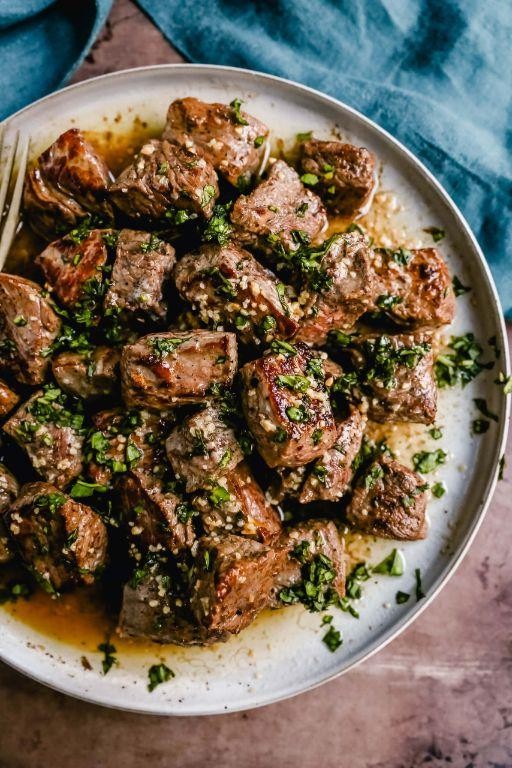
Just now, as golden hour light spills across my kitchen counter, I find myself returning to this simple comfort—the sizzle of beef meeting hot cast iron, the earthy perfume of garlic softening in butter. Journey with me through these quiet moments of preparation, where humble ingredients transform into something deeply nourishing for both body and spirit.
3
servings15
minutes7
minutesIngredients
– 1.5 pounds sirloin steak, trimmed and cubed into 1-inch pieces
– 3 tablespoons clarified butter, divided
– 6 garlic cloves, thinly sliced
– 2 tablespoons fresh thyme leaves
– 1 teaspoon coarse sea salt
– ½ teaspoon freshly cracked black pepper
– ¼ cup dry white wine
– 2 tablespoons heavy cream
Instructions
1. Pat steak cubes completely dry using paper towels to ensure proper searing.
2. Season all sides of steak pieces evenly with coarse sea salt and freshly cracked black pepper.
3. Heat 2 tablespoons clarified butter in a heavy cast-iron skillet over medium-high heat until it shimmers and lightly smokes, approximately 2 minutes.
4. Arrange steak cubes in a single layer without crowding, working in batches if necessary to maintain pan temperature.
5. Sear undisturbed for 90 seconds until a deep golden crust forms on the bottom surface.
6. Flip each piece using tongs and cook for another 60 seconds until browned but medium-rare inside.
7. Transfer seared steak to a clean plate, allowing juices to redistribute while preparing sauce.
8. Reduce heat to medium-low and add remaining 1 tablespoon clarified butter to the same skillet.
9. Sauté thinly sliced garlic cloves for 45 seconds until fragrant but not browned, stirring constantly.
10. Deglaze the pan with dry white wine, scraping all browned bits from the bottom with a wooden spoon.
11. Simmer the wine reduction for 2 minutes until reduced by half and slightly syrupy.
12. Stir in heavy cream and fresh thyme leaves, heating through for 30 seconds until the sauce lightly coats the back of a spoon.
13. Return steak bites and any accumulated juices to the skillet, tossing gently to coat in the garlic-thyme cream sauce.
14. Remove from heat immediately to prevent overcooking the beef.
Knowing how the crisp sear gives way to tender, juice-filled centers creates such satisfaction. The garlic-infused cream sauce clings to each piece, while the thyme offers its subtle forest-floor aroma. Consider serving these over creamy polenta or tossing with al dente pappardelle to catch every drop of the luxurious pan sauce.
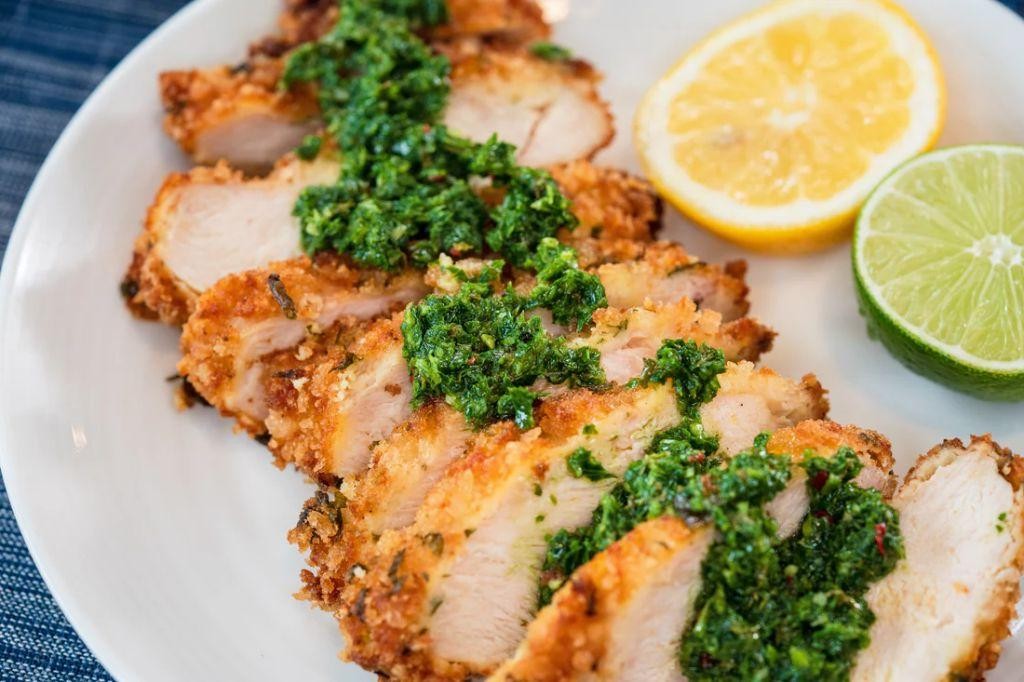
Crispy Breaded Chicken Tenders

Vividly, I remember the first time these golden tenders emerged from my oven—how their crisp exterior gave way to the tender, juicy chicken within, a humble comfort transformed by careful preparation. There’s something quietly satisfying in the ritual of breading and baking, a slow dance of patience and precision that yields a dish both nostalgic and refined. Let’s begin with the essentials, gathering what we need to create this simple yet soulful meal.
4
servings15
minutes18
minutesIngredients
– 1 ½ pounds boneless, skinless chicken breasts, sliced into ¾-inch strips
– 1 cup all-purpose flour
– 2 large pasture-raised eggs, lightly beaten
– 1 ½ cups panko breadcrumbs
– ½ cup grated Parmigiano-Reggiano cheese
– 1 teaspoon smoked paprika
– ½ teaspoon garlic powder
– ½ teaspoon onion powder
– ¼ teaspoon cayenne pepper
– 2 tablespoons extra-virgin olive oil
– Kosher salt and freshly ground black pepper, to season
Instructions
1. Preheat your oven to 425°F and line a rimmed baking sheet with parchment paper.
2. Pat the chicken strips completely dry with paper towels to ensure the coating adheres properly.
3. Season the chicken strips evenly on all sides with kosher salt and freshly ground black pepper.
4. Place the all-purpose flour in a shallow dish.
5. In a second shallow dish, add the lightly beaten pasture-raised eggs.
6. Combine the panko breadcrumbs, grated Parmigiano-Reggiano cheese, smoked paprika, garlic powder, onion powder, and cayenne pepper in a third shallow dish, mixing thoroughly.
7. Dredge each chicken strip in the flour, shaking off any excess.
8. Dip the floured chicken into the beaten eggs, allowing any excess to drip back into the dish.
9. Press the chicken firmly into the breadcrumb mixture, coating all sides evenly for maximum crispiness.
10. Arrange the breaded chicken strips in a single layer on the prepared baking sheet.
11. Drizzle the extra-virgin olive oil evenly over the tops of the tenders.
12. Bake for 15-18 minutes, or until the internal temperature reaches 165°F and the coating is golden brown and crisp.
13. Flip the tenders halfway through baking to promote even browning on both sides.
14. Let the tenders rest for 3-4 minutes on the baking sheet before serving to allow the juices to redistribute.
Crisp, golden, and impossibly tender, these chicken strips offer a satisfying crunch that gives way to moist, flavorful meat. Consider serving them alongside a bright lemon aioli or drizzled with hot honey for a sweet-spicy contrast that elevates this classic comfort food into something truly memorable.
Cheesy Meatball Parmesan Subs

Just now, as golden hour light spills across the kitchen counter, I find myself thinking about how some meals feel like edible comfort—warm, generous, and deeply satisfying. Cheesy meatball Parmesan subs are one of those dishes, where the humble meatball finds a cozy home in a soft roll, blanketed in rich sauce and molten cheese. It’s the kind of meal that turns an ordinary evening into something quietly special.
2
sandwiches15
minutes30
minutesIngredients
- 1 lb ground beef (80/20 blend)
- 1/2 cup panko breadcrumbs
- 1/4 cup whole milk
- 1 large pasture-raised egg, lightly beaten
- 2 cloves garlic, minced
- 1/4 cup freshly grated Parmigiano-Reggiano
- 2 tbsp extra virgin olive oil
- 24 oz jarred marinara sauce
- 4 sub rolls
- 8 oz fresh mozzarella, sliced into 1/4-inch thick pieces
- 1/4 cup fresh basil leaves
Instructions
- In a medium bowl, combine panko breadcrumbs and whole milk; let stand for 5 minutes until the breadcrumbs fully absorb the liquid.
- Add ground beef, lightly beaten pasture-raised egg, minced garlic, and freshly grated Parmigiano-Reggiano to the breadcrumb mixture.
- Gently mix the ingredients with your hands until just combined, being careful not to overwork the meat.
- Form the mixture into 12 equal-sized meatballs, each about 1.5 inches in diameter.
- Heat extra virgin olive oil in a large skillet over medium heat until it shimmers.
- Place meatballs in the skillet, leaving space between them, and cook for 8-10 minutes, turning occasionally, until browned on all sides.
- Pour jarred marinara sauce over the meatballs, scraping any browned bits from the bottom of the skillet.
- Reduce heat to low, cover the skillet, and simmer for 15 minutes until the meatballs reach an internal temperature of 165°F.
- While the meatballs simmer, slice sub rolls lengthwise, leaving one edge intact to form a hinge.
- Place the rolls on a baking sheet and toast under a broiler set to high for 2-3 minutes until lightly golden.
- Arrange 3 cooked meatballs in each toasted roll, spooning extra sauce over them.
- Top each sub with 2 oz of fresh mozzarella slices, covering the meatballs completely.
- Return the subs to the broiler and cook for 3-4 minutes until the cheese is bubbly and develops golden spots.
- Remove the subs from the oven and immediately garnish with fresh basil leaves.
Knowing how the crisp-edged mozzarella gives way to tender meatballs and the slight chew of the toasted roll makes each bite a study in textures. The garlic-infused meatballs carry the bright acidity of the marinara, while the fresh basil cuts through the richness with its peppery finish. For a delightful variation, try serving these open-faced on ciabatta with a drizzle of basil oil, letting the ingredients shine in a more composed presentation.
Classic Chili Con Carne
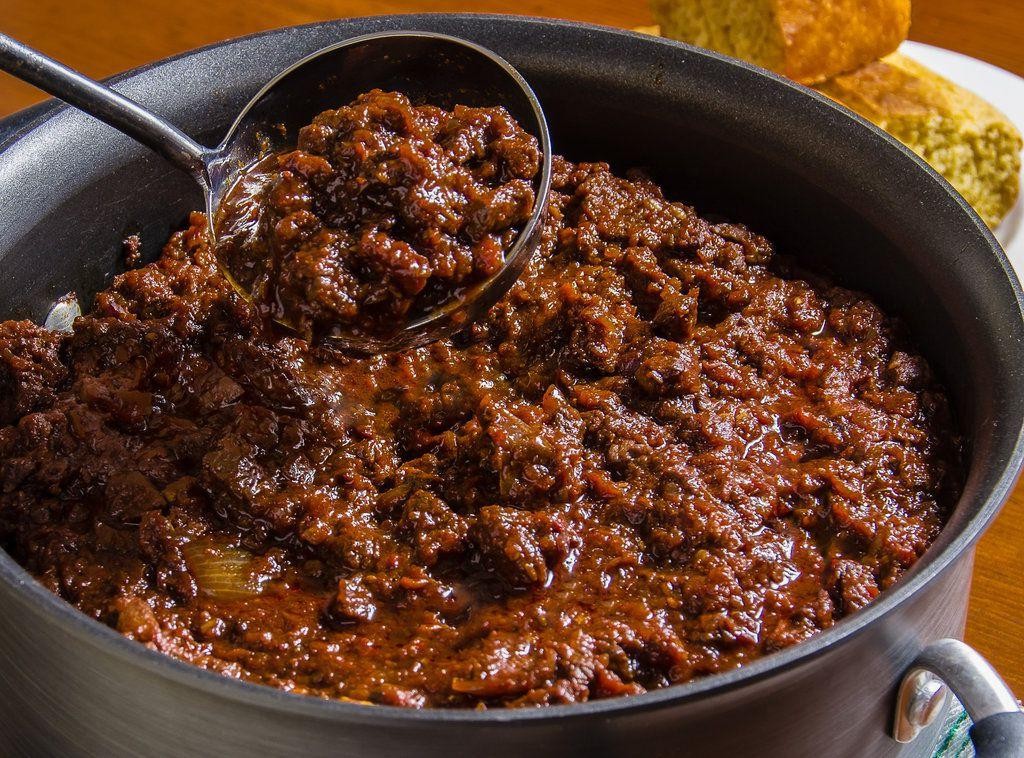
Cradling a warm bowl on a crisp autumn evening feels like returning to something deeply familiar, something that settles the soul with its rich, earthy aroma and comforting warmth. This classic chili con carne, with its layers of slowly developed flavor and tender texture, has been my quiet companion through many reflective evenings, each spoonful telling stories of patience and simplicity. There’s something profoundly grounding about watching the ingredients transform together, creating a harmony that feels both timeless and deeply personal.
3
servings20
minutes75
minutesIngredients
– 2 tablespoons extra virgin olive oil
– 1 large yellow onion, finely diced
– 4 cloves garlic, minced
– 1 pound grass-fed ground beef (80/20 blend)
– 2 tablespoons ancho chili powder
– 1 tablespoon ground cumin
– 1 teaspoon smoked paprika
– 1/2 teaspoon dried oregano
– 1 (28-ounce) can fire-roasted diced tomatoes
– 1 cup rich beef stock
– 1 (15-ounce) can kidney beans, drained and rinsed
– 1 teaspoon fine sea salt
– 1/2 teaspoon freshly cracked black pepper
Instructions
1. Heat 2 tablespoons extra virgin olive oil in a heavy-bottomed Dutch oven over medium heat until shimmering.
2. Add 1 large finely diced yellow onion and cook for 8-10 minutes, stirring occasionally, until translucent and fragrant.
3. Stir in 4 cloves minced garlic and cook for 1 minute until aromatic but not browned.
4. Add 1 pound grass-fed ground beef, breaking it apart with a wooden spoon, and cook for 6-8 minutes until evenly browned.
5. Sprinkle 2 tablespoons ancho chili powder, 1 tablespoon ground cumin, 1 teaspoon smoked paprika, and 1/2 teaspoon dried oregano over the meat mixture.
6. Toast the spices with the meat for 2 minutes, stirring constantly, to deepen their flavor profile.
7. Pour in 1 (28-ounce) can fire-roasted diced tomatoes with their juices, scraping any browned bits from the bottom of the pot.
8. Add 1 cup rich beef stock, 1 teaspoon fine sea salt, and 1/2 teaspoon freshly cracked black pepper, stirring to combine.
9. Bring the mixture to a gentle simmer, then reduce heat to low and cover partially.
10. Simmer for 45 minutes, stirring occasionally, until the liquid has reduced and thickened slightly.
11. Stir in 1 (15-ounce) can drained and rinsed kidney beans during the last 15 minutes of cooking.
12. Taste and adjust seasoning if necessary, then simmer uncovered for final 5 minutes to achieve desired consistency.
Gradually, the chili develops a velvety texture where the tender beans melt into the rich, spiced tomato base, while the grass-fed beef maintains its satisfying bite. The deep warmth of ancho chili and cumin lingers on the palate, balanced by the subtle sweetness of fire-roasted tomatoes. For a particularly memorable presentation, serve it over creamy polenta or alongside warm cornbread to soak up every last bit of the deeply developed sauce.
Tasty Pepperoni Pizza Dip

Sometimes, the simplest comfort foods become the ones we crave most deeply, and this pepperoni pizza dip captures that cozy nostalgia in every warm, cheesy bite. Softly bubbling with familiar flavors, it transforms classic pizza elements into a shareable dip that feels both indulgent and comforting, perfect for quiet evenings or casual gatherings. Starting with quality ingredients makes all the difference here, allowing each component to shine while melting together into something greater than the sum of its parts.
4
servings15
minutes25
minutesIngredients
– 8 ounces full-fat cream cheese, softened to room temperature
– 1 cup whole-milk ricotta cheese
– 1/2 cup heavy cream
– 1/4 cup grated Pecorino Romano cheese
– 1 teaspoon dried oregano, lightly crushed between your palms
– 1/2 teaspoon garlic powder
– 1/4 teaspoon crushed red pepper flakes
– 4 ounces thinly sliced pepperoni, half finely diced and half reserved for topping
– 1 cup low-moisture, whole-milk mozzarella cheese, shredded
– 2 tablespoons unsalted butter, melted
– 1/4 cup finely chopped fresh basil leaves
Instructions
1. Preheat your oven to 375°F and lightly grease a 1-quart baking dish with unsalted butter.
2. In a medium mixing bowl, combine the softened cream cheese, whole-milk ricotta, heavy cream, and grated Pecorino Romano, whisking vigorously for 2 minutes until completely smooth and free of lumps.
3. Fold in the crushed dried oregano, garlic powder, crushed red pepper flakes, and finely diced pepperoni until evenly distributed throughout the cheese mixture.
4. Transfer the mixture to the prepared baking dish, spreading it into an even layer with a spatula.
5. Sprinkle the shredded mozzarella cheese evenly over the top, covering the entire surface.
6. Arrange the remaining sliced pepperoni in a single layer over the mozzarella, slightly overlapping the edges for full coverage.
7. Brush the pepperoni topping lightly with melted unsalted butter to encourage browning.
8. Bake at 375°F for 22–25 minutes, until the edges are actively bubbling and the top is golden brown with crisp-edged pepperoni.
9. Remove from the oven and let rest for 5 minutes to allow the dip to set slightly before serving.
10. Garnish with finely chopped fresh basil leaves just before serving.
Out of the oven, this dip emerges creamy and luxuriously textured, with the ricotta providing a subtle graininess against the smooth cream cheese base. The pepperoni lends a gentle spice and salty depth, while the fresh basil brightens each bite with its herbal notes. For a playful twist, serve it alongside toasted baguette slices or crisp breadsticks for dipping, or spoon it over baked potatoes for a comforting, complete meal.
Conclusion
Cooking these 26 irresistible recipes is your ticket to delicious, stress-free meals that impress every time. We hope you’ll fire up the stove, try a few dishes, and discover your new favorites. Don’t forget to leave a comment telling us which recipe you loved most and share this roundup on Pinterest to spread the cooking inspiration!


