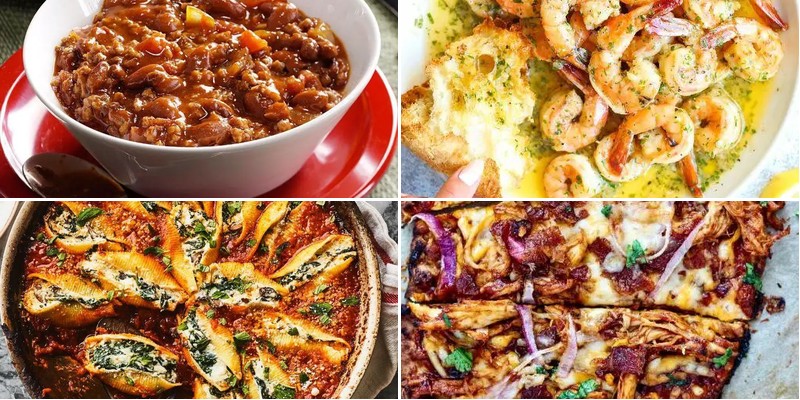
Maybe you’ve got a house full of hungry mouths to feed, or you’re hosting a last-minute gathering—either way, you need recipes that are as easy as they are delicious. From comforting casseroles to quick skillet dinners, this roundup is packed with crowd-pleasing dishes that come together without the stress. So grab your apron and get ready to dive into 27 simple solutions for your next group meal!
Creamy Chicken Alfredo Pasta for a Crowd
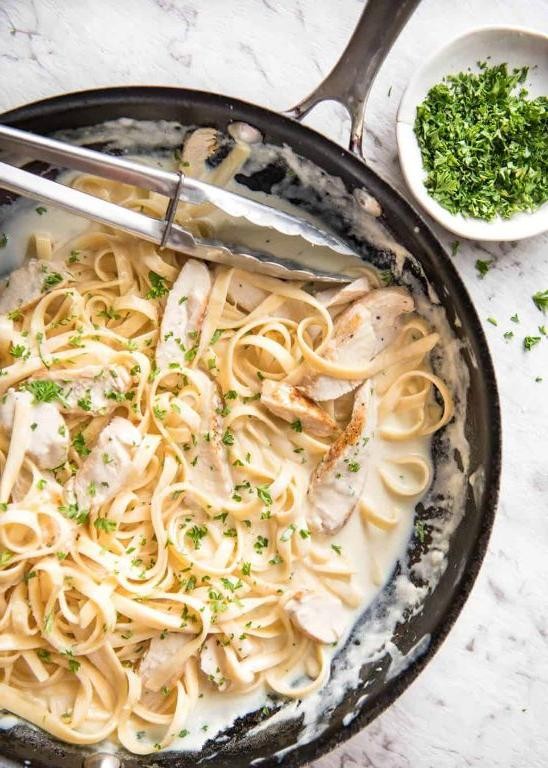
Now, I know what you’re thinking—another Alfredo recipe? But trust me, this creamy chicken Alfredo pasta is my go-to when I’m feeding a hungry crowd, and it never fails to disappear faster than my kids can ask for seconds. I first perfected this recipe after a chaotic family reunion where my usual batch just wasn’t cutting it, and now I always make extra because someone inevitably asks for the recipe.
6
servings15
minutes20
minutesIngredients
– A couple of boneless, skinless chicken breasts, sliced into bite-sized pieces
– A pound of fettuccine pasta
– 4 tablespoons of unsalted butter
– 3 cloves of garlic, minced
– 1 cup of heavy cream
– 1 cup of grated Parmesan cheese
– A splash of olive oil
– A pinch of salt and black pepper
– A handful of fresh parsley, chopped
Instructions
1. Bring a large pot of salted water to a rolling boil over high heat.
2. Add the fettuccine pasta to the boiling water and cook for 10–12 minutes, stirring occasionally, until al dente (it should have a slight bite to it).
3. While the pasta cooks, heat a splash of olive oil in a large skillet over medium-high heat.
4. Add the sliced chicken breasts to the skillet and cook for 6–8 minutes, turning occasionally, until golden brown and the internal temperature reaches 165°F.
5. Remove the chicken from the skillet and set it aside on a plate.
6. In the same skillet, melt 4 tablespoons of unsalted butter over medium heat.
7. Add the minced garlic and sauté for 1–2 minutes, until fragrant but not browned.
8. Pour in 1 cup of heavy cream and bring it to a gentle simmer, stirring constantly.
9. Gradually whisk in 1 cup of grated Parmesan cheese until the sauce is smooth and creamy.
10. Tip: If the sauce seems too thick, add a splash of pasta water to thin it out.
11. Drain the cooked pasta and add it directly to the skillet with the Alfredo sauce.
12. Toss the pasta in the sauce until evenly coated.
13. Add the cooked chicken back to the skillet and stir to combine.
14. Season with a pinch of salt and black pepper to taste.
15. Tip: Let the pasta sit off the heat for 2 minutes to allow the flavors to meld.
16. Garnish with a handful of chopped fresh parsley before serving.
17. Tip: For a richer flavor, use freshly grated Parmesan instead of pre-shredded.
The creamy sauce clings beautifully to every strand of pasta, with the tender chicken adding a savory depth that’s downright comforting. I love serving this family-style in a big bowl, maybe with a side of garlic bread to soak up every last bit of that velvety Alfredo goodness.
Hearty Beef and Bean Chili
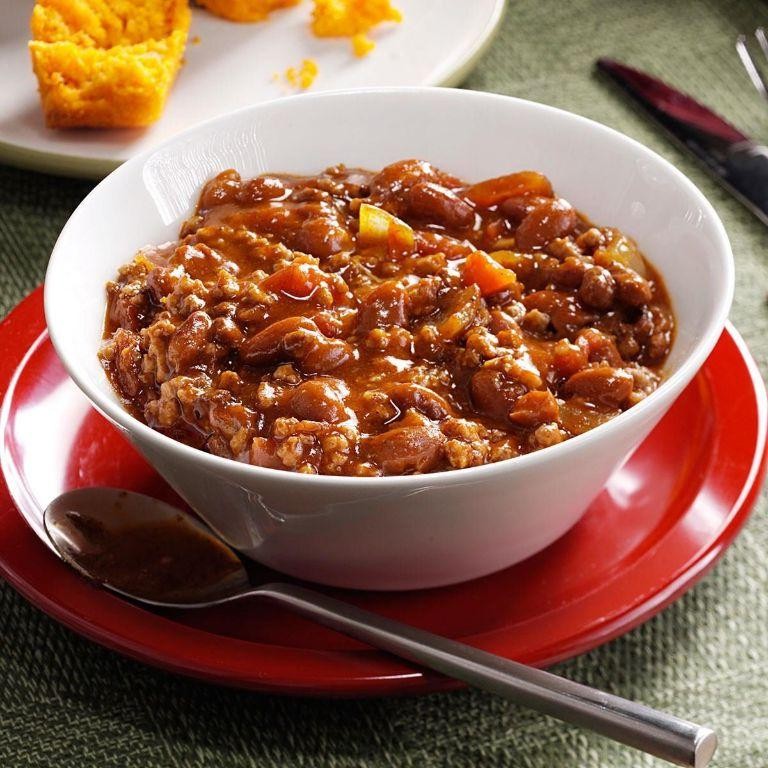
Gosh, there’s nothing quite like a big pot of chili simmering on the stove to make a chilly autumn day feel cozy. I first perfected this recipe during a particularly blustery football season when my husband declared store-bought chili “just wouldn’t cut it” anymore—and after many tweaks, this hearty beef and bean version became our go-to.
3
servings15
minutes60
minutesIngredients
– A couple pounds of ground beef
– One large yellow onion, chopped up
– A few cloves of garlic, minced
– One 15-ounce can of kidney beans, drained and rinsed
– One 15-ounce can of diced tomatoes
– A big glug of beef broth (about 2 cups)
– A couple tablespoons of chili powder
– A splash of olive oil
– A pinch of salt and black pepper
Instructions
1. Heat a large pot over medium-high heat and add a splash of olive oil.
2. Add the chopped onion and cook for about 5 minutes, until it turns translucent.
3. Stir in the minced garlic and cook for 1 more minute, just until fragrant.
4. Crumble in the ground beef and cook until it’s fully browned, breaking it up with a spoon as it cooks.
5. Drain any excess grease from the pot.
6. Sprinkle in the chili powder, salt, and black pepper, stirring to coat the beef evenly.
7. Pour in the diced tomatoes with their juices and the beef broth.
8. Add the drained kidney beans and give everything a good stir.
9. Bring the chili to a boil, then reduce the heat to low and let it simmer uncovered for 45 minutes, stirring occasionally. Tip: Simmering uncovered helps thicken the chili to the perfect consistency.
10. After 45 minutes, check if the chili has thickened to your liking—if it’s too thin, let it simmer for another 10–15 minutes. Tip: For deeper flavor, let it simmer a bit longer; the beans will soften and absorb the spices beautifully.
11. Ladle the chili into bowls and serve hot. Tip: Top with shredded cheese or a dollop of sour cream for extra creaminess.
Every spoonful of this chili is packed with tender beef, creamy beans, and a rich, slightly smoky broth that clings to each ingredient. I love serving it over a bed of cornbread crumbles or with a side of crispy tortilla strips for added crunch—it’s the kind of meal that warms you from the inside out.
Spicy Pulled Pork Sliders
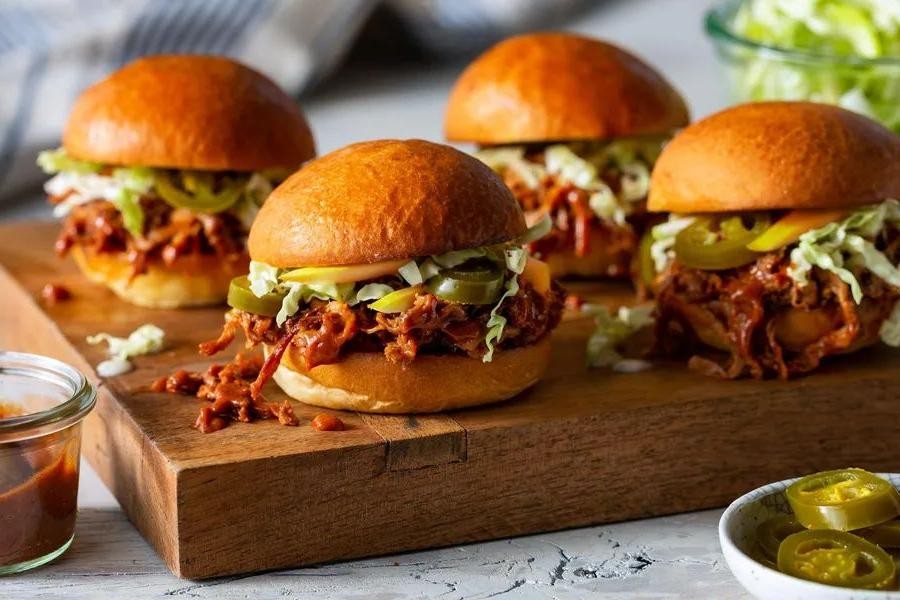
Oh my goodness, these spicy pulled pork sliders have become my absolute go-to for game day gatherings—they disappear faster than I can make them! I first threw these together when my brother-in-law challenged me to create something with “real kick,” and now they’re a family favorite that I love sharing with you all.
6
sandwiches15
minutes240
minutesIngredients
– About 3 pounds of pork shoulder (I usually grab whatever looks good at the butcher counter)
– A generous splash of apple cider vinegar, maybe ¼ cup
– A couple of tablespoons of your favorite hot sauce (I’m partial to Frank’s RedHot)
– A good glug of olive oil, around 2 tablespoons
– 1 tablespoon of brown sugar for that subtle sweetness
– 2 teaspoons of smoked paprika (this stuff is magic!)
– 1 teaspoon of garlic powder
– ½ teaspoon of cayenne pepper (adjust if you’re sensitive to heat)
– 6 slider buns
– A handful of coleslaw mix for topping
Instructions
1. Preheat your oven to 300°F—low and slow is key for tender pork.
2. Pat the pork shoulder completely dry with paper towels (this helps with browning!).
3. Rub the olive oil all over the pork shoulder, making sure every surface is coated.
4. Mix together the brown sugar, smoked paprika, garlic powder, and cayenne pepper in a small bowl.
5. Massage the spice mixture evenly over the entire surface of the pork shoulder.
6. Place the seasoned pork shoulder in a Dutch oven or oven-safe pot with a lid.
7. Pour the apple cider vinegar and hot sauce around (not over) the pork.
8. Cover the pot tightly with the lid and place in the preheated oven.
9. Bake for 4 hours exactly—don’t peek! The steam needs to stay trapped.
10. Remove the pot from the oven and carefully transfer the pork to a cutting board.
11. Use two forks to shred the pork—it should pull apart effortlessly if it’s done right.
12. Return the shredded pork to the pot and mix with the cooking juices.
13. Split your slider buns and lightly toast them in a dry skillet for about 30 seconds per side.
14. Pile the warm pulled pork onto the bottom halves of your toasted buns.
15. Top each slider with a small handful of coleslaw mix before adding the bun tops.
Getting that perfect balance between spicy and savory makes these sliders truly special. The pork becomes incredibly tender after its long oven bath, practically melting in your mouth with each bite. I love serving these with extra hot sauce on the side for my heat-loving friends, and they’re fantastic with a cold beer or crisp lemonade to cut through the richness.
Savory Sheet Pan Herb-Roasted Chicken and Vegetables
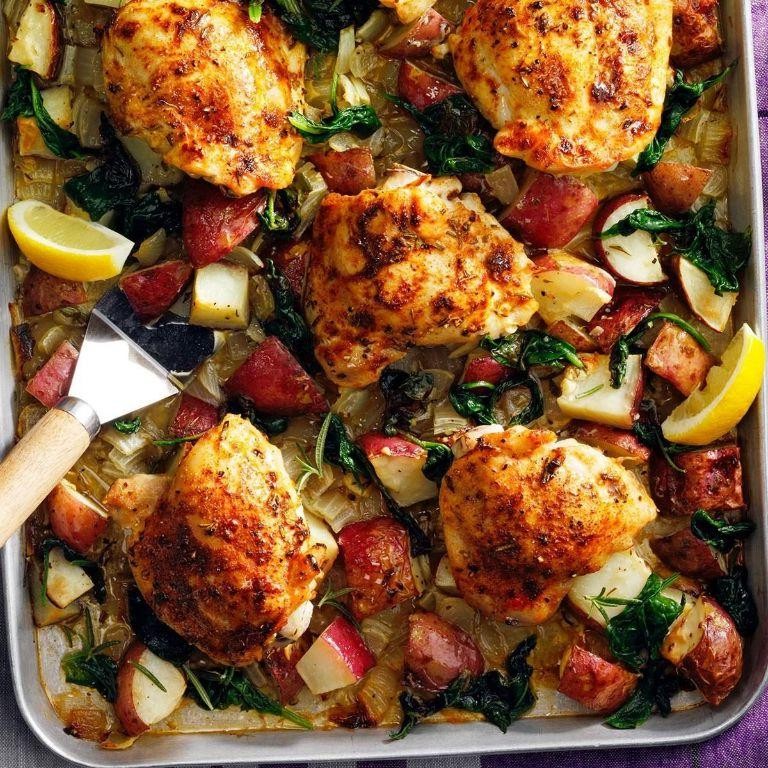
Gosh, there’s something so comforting about a meal that comes together on one pan with minimal cleanup—especially on busy weeknights when I’m juggling work emails and hungry kids begging for dinner. This savory sheet pan herb-roasted chicken and vegetables has become my go-to because it fills the whole house with the most incredible aroma while letting me actually relax for a bit.
2
servings15
minutes45
minutesIngredients
– About 2 pounds of chicken thighs (bone-in, skin-on for maximum flavor)
– 4 medium Yukon gold potatoes, cut into 1-inch chunks
– 2 large carrots, sliced into ½-inch coins
– 1 large red onion, cut into wedges
– 3 tablespoons of olive oil
– 2 tablespoons of fresh rosemary, finely chopped
– 1 tablespoon of fresh thyme leaves
– 3 cloves of garlic, minced
– A good sprinkle of kosher salt (about 1½ teaspoons)
– A generous pinch of black pepper (about ½ teaspoon)
– A squeeze of fresh lemon juice (about 1 tablespoon)
Instructions
1. Preheat your oven to 425°F and line a large sheet pan with parchment paper for easy cleanup.
2. Pat the chicken thighs completely dry with paper towels—this helps the skin get extra crispy.
3. In a large bowl, toss the potato chunks, carrot coins, and onion wedges with 2 tablespoons of olive oil, 1 teaspoon of salt, and ¼ teaspoon of black pepper until evenly coated.
4. Spread the vegetables in a single layer on the prepared sheet pan, leaving space in the center for the chicken.
5. In the same bowl, combine the remaining olive oil, rosemary, thyme, minced garlic, remaining salt and pepper, and lemon juice.
6. Rub this herb mixture thoroughly over both sides of each chicken thigh, making sure to get under the skin too for maximum flavor penetration.
7. Arrange the chicken thighs skin-side up in the center of the sheet pan among the vegetables.
8. Roast in the preheated oven for 35 minutes, then check if the vegetables are tender when pierced with a fork.
9. Continue roasting for another 5-10 minutes until the chicken skin is golden brown and crispy, and the internal temperature reaches 165°F when measured with a meat thermometer.
10. Let the pan rest out of the oven for 5 minutes before serving—this allows the juices to redistribute throughout the chicken.
Crispy-skinned chicken and tender, caramelized vegetables make this feel like a fancy dinner with zero stress. I love serving it straight from the pan at the table, letting everyone dig into those delicious crispy potato bits that get stuck to the parchment. The rosemary and garlic perfume every bite, while the lemon keeps it bright enough that you’ll want seconds.
Mouthwatering Loaded Nachos Supreme
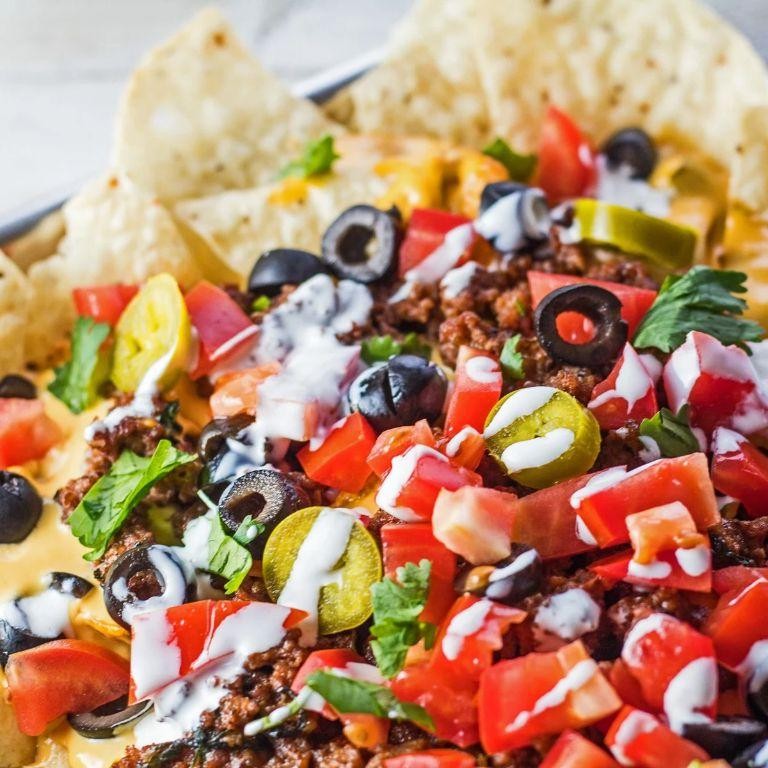
Picture this: it’s game day at my house, and I’m craving that perfect combination of crispy, cheesy, and savory all in one bite. After years of experimenting, I’ve finally perfected my loaded nachos supreme recipe—the one dish that disappears faster than I can refill the bowl. Trust me, your friends will be begging for the recipe after just one taste.
2
servings15
minutes20
minutesIngredients
- One bag of your favorite tortilla chips (about 12 ounces)
- A pound of ground beef
- A packet of taco seasoning
- A couple of cups of shredded cheddar cheese
- A generous handful of sliced black olives
- A big dollop of sour cream
- A good squeeze of bottled salsa
- A few slices of pickled jalapeños
- A handful of chopped green onions
Instructions
- Preheat your oven to 375°F and grab a large baking sheet.
- Spread the tortilla chips in a single layer on the baking sheet—this prevents soggy spots. Tip: Don’t overcrowd the chips or they won’t crisp evenly.
- Brown the ground beef in a skillet over medium-high heat for about 8–10 minutes, breaking it up with a spoon until no pink remains.
- Drain any excess grease from the skillet.
- Sprinkle the taco seasoning over the beef and stir in 1/4 cup of water, cooking for 2–3 minutes until the liquid is absorbed.
- Evenly scatter the seasoned beef over the tortilla chips.
- Top everything with the shredded cheddar cheese, making sure to cover the edges. Tip: Shred your own cheese for better melt—it’s worth the extra minute!
- Bake for 8–10 minutes, until the cheese is fully melted and bubbly.
- Remove the baking sheet from the oven and let it sit for 2 minutes—this helps the cheese set.
- Drizzle the sour cream and salsa over the top in zigzag patterns.
- Scatter the sliced black olives, pickled jalapeños, and chopped green onions evenly. Tip: Add cold toppings last to keep that hot-and-cool contrast.
Just look at that glorious mess! The chips stay surprisingly crisp under all that goodness, and the spicy jalapeños cut through the rich cheese beautifully. I love serving these straight on the baking sheet with extra salsa for dipping—it makes for such a fun, shareable centerpiece.
Flavorful Veggie and Cheese Stuffed Shells
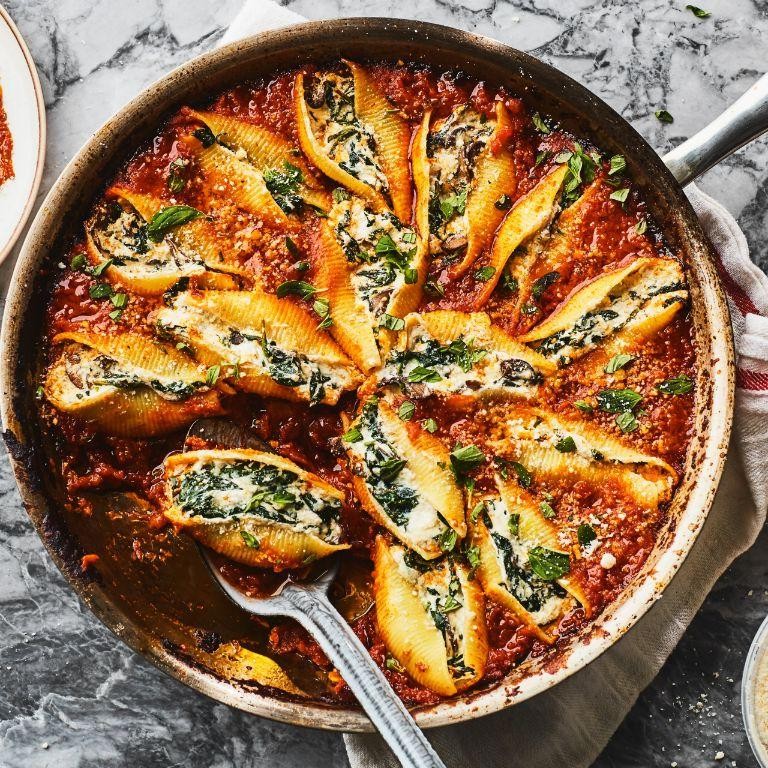
Aren’t we all looking for that perfect comfort food that feels like a warm hug? As someone who’s been making stuffed shells for years, I’ve found this veggie-packed version hits the spot every time—it’s become my go-to for cozy Sunday dinners when I want something satisfying but not too heavy. Honestly, I love how forgiving this recipe is; even on those days when I’m rushing between soccer practice and homework help, these shells come together beautifully.
24
shells25
minutes53
minutesIngredients
– A box of jumbo pasta shells (about 24 shells)
– 2 cups of ricotta cheese
– 1 cup of shredded mozzarella cheese
– ½ cup of grated Parmesan cheese
– 1 egg
– 2 cups of marinara sauce
– 1 zucchini, finely chopped
– 1 cup of fresh spinach, chopped
– 2 cloves of garlic, minced
– A splash of olive oil
– A pinch of salt and black pepper
Instructions
1. Preheat your oven to 375°F (190°C) and lightly grease a 9×13-inch baking dish.
2. Bring a large pot of salted water to a rolling boil and cook the jumbo pasta shells for 9 minutes until they’re al dente (they should be firm but pliable).
3. Drain the cooked shells and rinse them under cool water to stop the cooking process, then lay them out on a baking sheet to prevent sticking.
4. Heat a splash of olive oil in a skillet over medium heat and sauté the minced garlic for 1 minute until fragrant.
5. Add the chopped zucchini to the skillet and cook for 5-7 minutes until it’s tender and lightly browned.
6. Stir in the chopped spinach and cook for another 2 minutes until it’s wilted, then remove the skillet from the heat.
7. In a mixing bowl, combine the ricotta cheese, ½ cup of mozzarella cheese, Parmesan cheese, egg, and the cooked veggie mixture, mixing until well blended.
8. Season the filling with a pinch of salt and black pepper, tasting to adjust if needed (I always sneak a bite here!).
9. Spread 1 cup of marinara sauce evenly across the bottom of the prepared baking dish.
10. Carefully stuff each pasta shell with about 2 tablespoons of the cheese and veggie filling, using a small spoon to avoid tearing the shells.
11. Arrange the stuffed shells in a single layer in the baking dish, nestling them close together.
12. Pour the remaining 1 cup of marinara sauce over the top of the shells, covering them evenly.
13. Sprinkle the remaining ½ cup of mozzarella cheese over the sauce for a golden, bubbly finish.
14. Cover the dish with aluminum foil and bake at 375°F for 25 minutes.
15. Remove the foil and bake for an additional 10 minutes until the cheese is melted and lightly browned.
16. Let the stuffed shells rest for 5 minutes before serving to allow the flavors to meld.
Just imagine cutting into one of these shells—the creamy, herby filling oozes out alongside the tender zucchini bits, while the tangy marinara keeps everything balanced. I love serving these with a simple side salad for a complete meal, or you could get creative and top them with fresh basil for an extra pop of flavor.
Cheesy Baked Potato Casserole
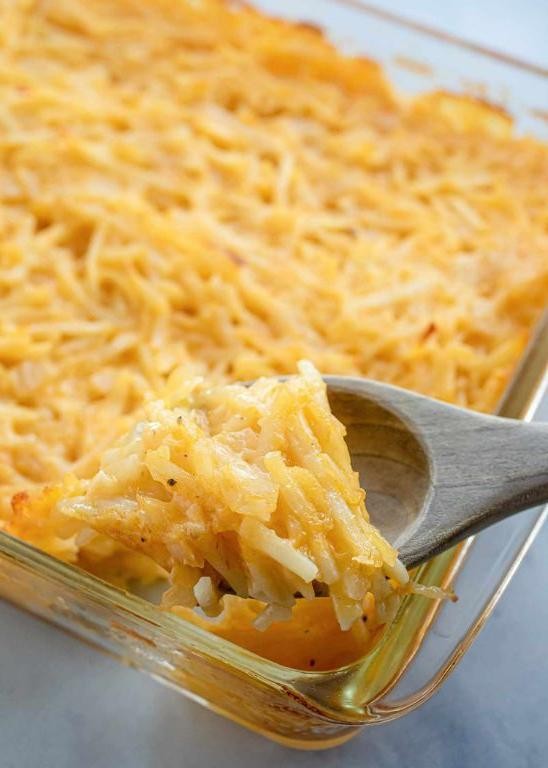
Oh my goodness, you guys—this cheesy baked potato casserole is the ultimate comfort food that I whip up whenever I need a cozy, no-fuss dinner. I first made it for a potluck years ago, and now my family requests it every holiday (and honestly, most Sundays too). It’s like a loaded baked potato, but in scoopable, shareable form—perfect for feeding a crowd or just treating yourself.
8
servings25
minutes45
minutesIngredients
– 4 large russet potatoes, peeled and cubed
– 1 cup of sour cream
– 1/2 cup of whole milk
– 4 tablespoons of unsalted butter, melted
– 1 1/2 cups of shredded sharp cheddar cheese
– 6 slices of crispy cooked bacon, crumbled
– 2 green onions, thinly sliced
– 1 teaspoon of garlic powder
– 1/2 teaspoon of black pepper
– A good pinch of salt
Instructions
1. Preheat your oven to 375°F and lightly grease a 9×13-inch baking dish.
2. Place the peeled, cubed potatoes in a large pot, cover with cold water, and bring to a boil over high heat.
3. Boil the potatoes for 12–15 minutes, until they’re fork-tender but not mushy.
4. Drain the potatoes thoroughly and return them to the warm pot.
5. Add the melted butter, sour cream, and milk to the potatoes.
6. Mash everything together until smooth but still a bit rustic—I like leaving a few small lumps for texture.
7. Stir in 1 cup of the shredded cheddar, all of the crumbled bacon, garlic powder, black pepper, and salt until well combined.
8. Transfer the mixture to the greased baking dish and spread it evenly.
9. Sprinkle the remaining 1/2 cup of cheddar cheese on top.
10. Bake for 25–30 minutes, until the cheese is bubbly and golden brown.
11. Remove from the oven and let it rest for 5 minutes—this helps it set so it slices neatly.
12. Garnish with the sliced green onions before serving.
Right out of the oven, this casserole is creamy with little bursts of salty bacon and a golden, cheesy crust. I love scooping it straight from the dish with tortilla chips or serving it alongside a simple green salad for a full meal. It’s the kind of dish that disappears fast, so maybe double the recipe if you’ve got hungry folks around!
Garlic Butter Shrimp Scampi
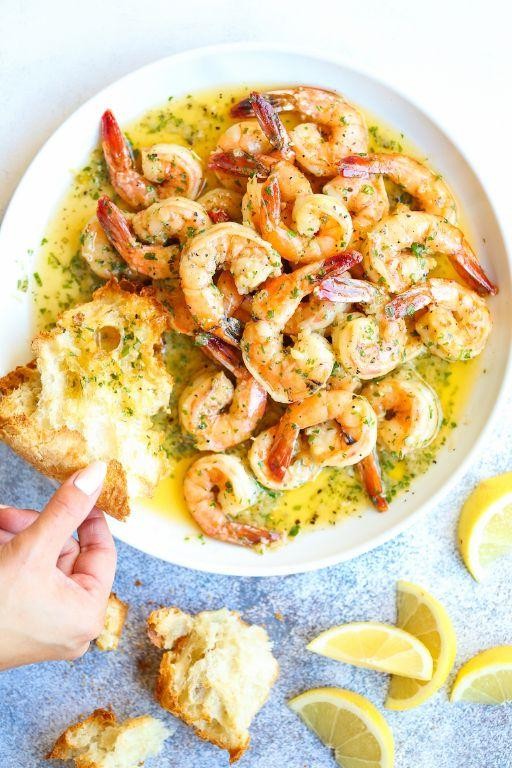
Finally, after a long day at work, I find myself craving something that feels fancy but comes together in minutes—enter this garlic butter shrimp scampi, my go-to for when I want to impress without the stress. It’s the kind of dish that makes my tiny kitchen smell like an Italian bistro, and honestly, isn’t that half the joy?
2
servings10
minutes7
minutesIngredients
– A pound of large raw shrimp, peeled and deveined (I keep the tails on for extra flavor)
– 4 tablespoons of unsalted butter
– A couple of cloves of garlic, minced
– A splash of dry white wine (about 1/4 cup)
– A squeeze of fresh lemon juice (around 1 tablespoon)
– A handful of chopped fresh parsley
– A pinch of red pepper flakes for a little kick
– Salt and freshly ground black pepper to season
Instructions
1. Pat the shrimp completely dry with paper towels to ensure they sear nicely instead of steaming.
2. Season the shrimp evenly with salt and black pepper on both sides.
3. Heat a large skillet over medium-high heat and melt 2 tablespoons of butter until it’s foamy.
4. Add the shrimp to the skillet in a single layer, cooking for 1–2 minutes per side until they turn pink and opaque.
5. Remove the shrimp from the skillet and set them aside on a plate.
6. Reduce the heat to medium and add the remaining 2 tablespoons of butter to the same skillet.
7. Sauté the minced garlic and red pepper flakes for about 30 seconds until fragrant, being careful not to burn the garlic.
8. Pour in the white wine and let it simmer for 2 minutes to reduce slightly and cook off the alcohol.
9. Stir in the lemon juice and half of the chopped parsley.
10. Return the shrimp to the skillet, tossing them in the sauce for 1 minute to warm through and coat evenly.
11. Sprinkle the remaining parsley over the top just before serving.
Just look at that glossy, buttery sauce clinging to each tender shrimp—it’s irresistibly rich with a bright, zesty kick from the lemon. I love serving this over a bed of angel hair pasta to soak up every last drop, or even with crusty bread for a no-fuss appetizer that always disappears fast.
Classic Meat Lasagna
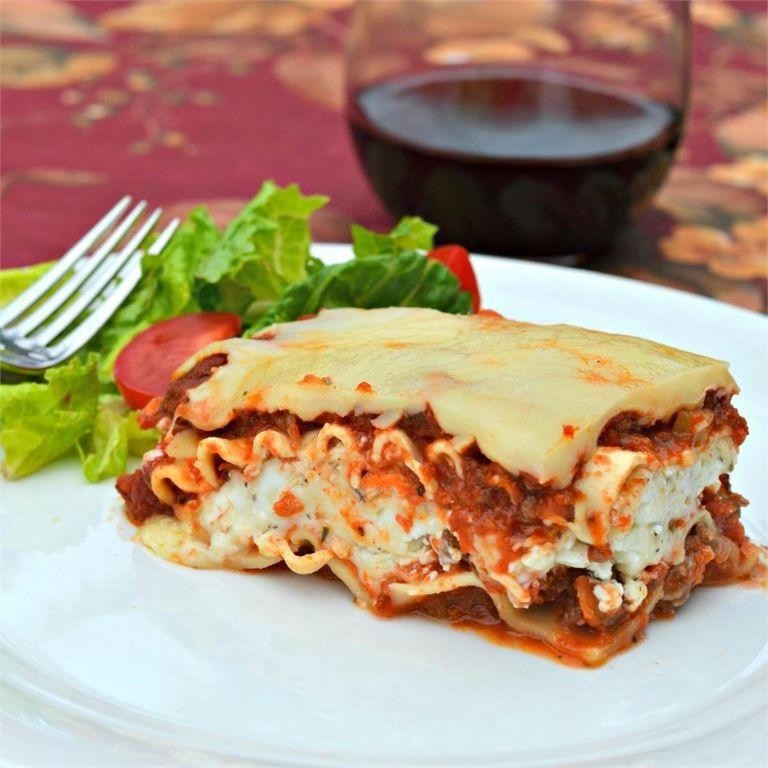
Oh my, nothing says comfort like a bubbling pan of classic meat lasagna straight from the oven. I’ve been making this recipe for years, tweaking it here and there until it became my go-to for family dinners and potlucks alike. There’s something magical about how the layers meld together while baking, filling the whole house with that irresistible Italian aroma.
12
portions30
minutes74
minutesIngredients
– A box of about 12 lasagna noodles
– A pound of ground beef
– One medium yellow onion, chopped up
– A couple of cloves of garlic, minced
– A 24-ounce jar of your favorite marinara sauce
– 15 ounces of ricotta cheese
– One large egg
– A quarter cup of fresh parsley, chopped
– Two cups of shredded mozzarella cheese
– A cup of grated Parmesan cheese
– A tablespoon of olive oil
– A teaspoon of dried oregano
– Half a teaspoon of salt
– A quarter teaspoon of black pepper
Instructions
1. Preheat your oven to 375°F.
2. Bring a large pot of salted water to a rolling boil.
3. Cook the lasagna noodles for 8 minutes until they’re flexible but still firm.
4. Drain the noodles and lay them flat on baking sheets to prevent sticking.
5. Heat the olive oil in a large skillet over medium-high heat.
6. Add the chopped onion and cook for 5 minutes until translucent.
7. Add the minced garlic and cook for 1 minute until fragrant.
8. Add the ground beef and cook for 8-10 minutes, breaking it up with a spoon until browned.
9. Drain any excess grease from the skillet.
10. Stir in the marinara sauce, oregano, salt, and pepper.
11. Simmer the meat sauce for 10 minutes to let flavors combine.
12. In a medium bowl, mix the ricotta, egg, and chopped parsley until well combined.
13. Spread 1 cup of the meat sauce evenly in a 9×13 inch baking dish.
14. Arrange 4 lasagna noodles over the sauce, slightly overlapping.
15. Spread half of the ricotta mixture over the noodles.
16. Sprinkle 1 cup of mozzarella and 1/3 cup of Parmesan over the ricotta.
17. Repeat the layers: sauce, noodles, remaining ricotta, and another 1 cup mozzarella with 1/3 cup Parmesan.
18. Top with the final layer of noodles and remaining meat sauce.
19. Sprinkle the remaining mozzarella and Parmesan over the top.
20. Cover the dish tightly with aluminum foil.
21. Bake for 25 minutes.
22. Remove the foil and bake for another 15 minutes until the cheese is golden and bubbly.
23. Let the lasagna rest for 15 minutes before slicing.
Every time I pull this lasagna from the oven, I’m rewarded with perfectly distinct layers that hold their shape when sliced. The rich meat sauce pairs beautifully with the creamy ricotta, while the golden cheese crust adds that satisfying crunch. Try serving squares alongside a simple green salad with balsamic dressing – the fresh acidity cuts through the richness perfectly.
BBQ Chicken and Bacon Flatbread Pizza

Gosh, I can still remember the first time I threw together this BBQ chicken and bacon flatbread pizza during a hectic weeknight—it was one of those “what’s in the fridge?” moments that turned into a family favorite. Now, I make it almost every Friday when we’re craving something cozy but don’t want to fuss with delivery. It’s the kind of meal that feels indulgent but comes together in a flash, perfect for busy days or casual get-togethers.
2
flatbreads15
minutes12
minutesIngredients
– A couple of pre-made flatbreads (I grab the ones from the bakery section)
– About 1 cup of shredded cooked chicken (leftover rotisserie chicken works wonders here)
– 4 slices of thick-cut bacon, chopped into little bits
– Half a red onion, thinly sliced
– A generous ½ cup of your favorite BBQ sauce (I’m partial to the smoky kind)
– A handful of shredded mozzarella cheese (around 1 cup)
– A small handful of fresh cilantro, roughly chopped
– A splash of olive oil (just enough to brush the flatbreads)
Instructions
1. Preheat your oven to 425°F and line a baking sheet with parchment paper for easy cleanup.
2. Brush both flatbreads lightly with olive oil to help them crisp up in the oven.
3. Spread BBQ sauce evenly over each flatbread, leaving a tiny border around the edges for that rustic look.
4. Sprinkle shredded mozzarella cheese over the sauce, covering most of the surface.
5. Top with shredded chicken, chopped bacon, and thinly sliced red onion, distributing them evenly.
6. Bake in the preheated oven for 10–12 minutes, until the cheese is bubbly and the edges of the flatbread are golden brown.
7. Remove from the oven and let it rest for 2–3 minutes—this keeps the toppings from sliding off when you slice it.
8. Garnish with fresh cilantro just before serving to add a bright, herby kick.
Really, the magic here is in the textures: the flatbread stays crisp underneath while the BBQ sauce soaks into the chicken, and every bite has that salty crunch from the bacon. I love serving it sliced into wedges with a simple side salad, but it’s also fantastic torn into pieces for sharing straight from the baking sheet—no plates needed!
Tangy Lemon Garlic Baked Salmon
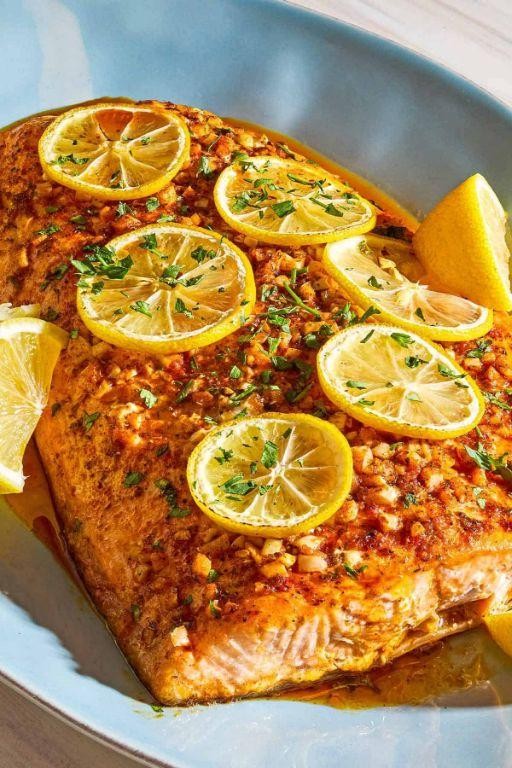
Sometimes the best dinners are the ones that come together with minimal effort but deliver maximum flavor. I discovered this lemon garlic salmon during a busy weeknight when I needed something healthy but didn’t want to sacrifice taste—now it’s my go-to when I’m craving something bright and satisfying.
2
servings10
minutes15
minutesIngredients
– 2 salmon fillets (about 6 ounces each)
– A couple of tablespoons of olive oil
– 3 cloves of garlic, minced
– The juice from one large lemon
– A generous pinch of salt
– A few cracks of black pepper
– A handful of fresh parsley, chopped
– A couple of lemon slices for topping
Instructions
1. Preheat your oven to 400°F and line a baking sheet with parchment paper.
2. Pat the salmon fillets completely dry with paper towels—this helps the skin get crispy!
3. Place the salmon skin-side down on the prepared baking sheet.
4. Drizzle the olive oil evenly over both fillets.
5. Rub the minced garlic onto the top of each salmon fillet.
6. Squeeze the fresh lemon juice over the garlic-rubbed salmon.
7. Sprinkle the salt and black pepper evenly across both fillets.
8. Lay the lemon slices on top of the salmon.
9. Bake for 12-15 minutes, until the salmon flakes easily with a fork and reaches 145°F internally.
10. Remove from the oven and let rest for 2 minutes.
11. Sprinkle the chopped parsley over the top before serving. Vibrant and flaky, this salmon emerges from the oven with a perfect balance of zesty lemon and mellow garlic. I love serving it over a bed of quinoa with roasted asparagus, or flaking it into tacos with a crunchy slaw for a fun twist.
Rustic Vegetable and Sausage Stew
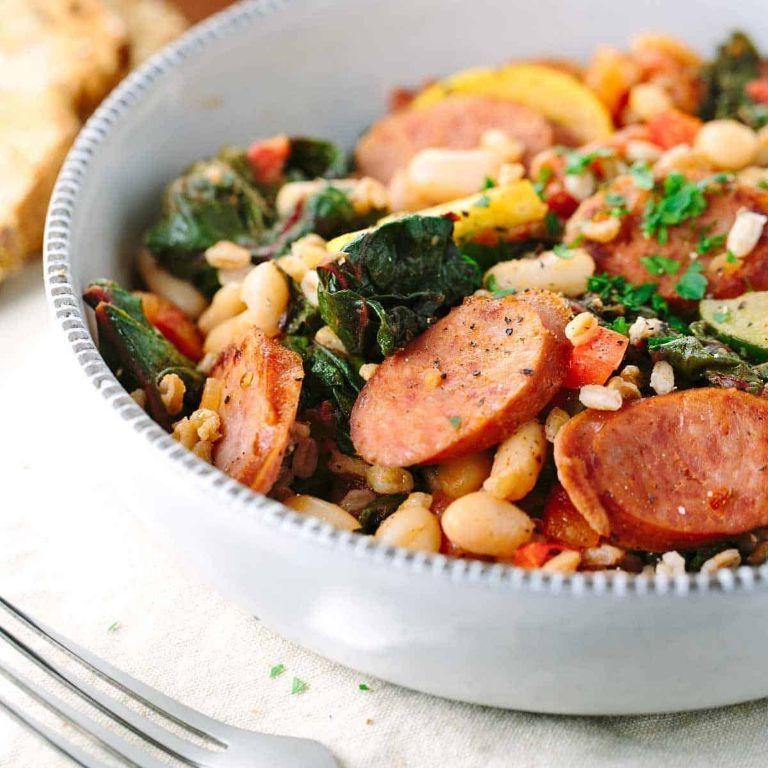
As the crisp autumn air settles in, I find myself craving hearty, one-pot meals that fill the kitchen with incredible aromas. This rustic vegetable and sausage stew has become my go-to comfort food on busy weeknights—it’s the kind of dish that makes you want to curl up with a blanket and a good book.
5
servings15
minutes45
minutesIngredients
- 1 pound of Italian sausage, casings removed
- 1 large yellow onion, chopped into bite-sized pieces
- 3 cloves of garlic, minced
- 2 large carrots, sliced into half-moons
- 2 stalks of celery, chopped
- 4 cups of chicken broth
- 1 can (14.5 ounces) of diced tomatoes
- 2 medium potatoes, cubed
- 1 teaspoon of dried thyme
- 1 bay leaf
- A couple of handfuls of fresh spinach
- A splash of olive oil
- Salt and freshly ground black pepper
Instructions
- Heat a large Dutch oven or heavy-bottomed pot over medium heat and add a splash of olive oil.
- Add the Italian sausage, breaking it up with a wooden spoon, and cook for 6–8 minutes until browned and cooked through.
- Tip: If there’s excess grease, drain off all but 1 tablespoon to keep the stew from being too oily.
- Add the chopped onion, carrots, and celery to the pot and sauté for 5–7 minutes until the vegetables start to soften.
- Stir in the minced garlic and cook for 1 minute until fragrant.
- Pour in the chicken broth and diced tomatoes with their juices, scraping the bottom of the pot to lift any browned bits.
- Add the cubed potatoes, dried thyme, bay leaf, and a pinch of salt and pepper.
- Bring the stew to a boil, then reduce the heat to low, cover, and simmer for 25–30 minutes until the potatoes are fork-tender.
- Tip: For a thicker stew, mash a few potato pieces against the side of the pot with the back of a spoon.
- Stir in the fresh spinach and cook for 2–3 minutes until wilted.
- Remove the bay leaf and discard it.
- Tip: Taste and adjust seasoning with more salt and pepper if needed—I usually add another pinch of each at this stage.
Come winter, this stew is my ultimate comfort food. The potatoes melt into the broth, making it wonderfully thick, while the sausage adds a savory depth that pairs perfectly with crusty bread for dipping. I love serving it in deep bowls with a sprinkle of fresh parsley on top for a pop of color.
Ultimate Baked Ziti with Four Cheese Blend
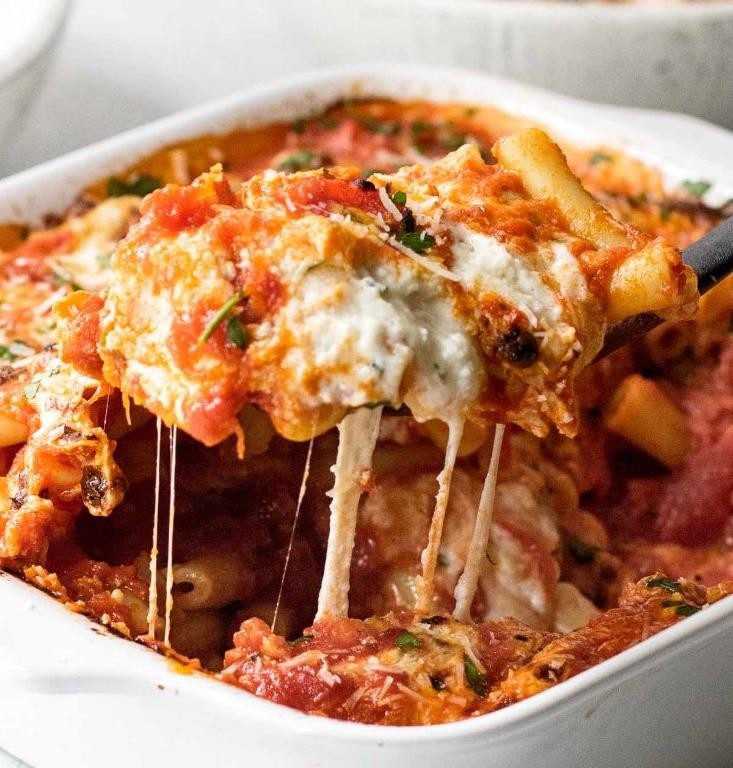
Ugh, is there anything more comforting than a bubbling dish of baked ziti coming out of the oven? Ultimate is the only word for this version, perfected after a particularly chaotic family potluck where my original recipe was a little too… simple. This four-cheese blend is my secret weapon for the creamiest, most decadent pasta bake you’ll ever make.
8
servings25
minutes55
minutesIngredients
– A 1-pound box of ziti pasta
– A tablespoon of olive oil
– One medium yellow onion, finely chopped
– Three cloves of garlic, minced
– A 24-ounce jar of your favorite marinara sauce
– A 15-ounce container of whole milk ricotta cheese
– One large egg
– A big handful of fresh basil, chopped (about 1/4 cup)
– A cup of shredded low-moisture mozzarella cheese
– A half cup of freshly grated Parmesan cheese
– A half cup of shredded provolone cheese
– A pinch of salt and a few cracks of black pepper
Instructions
1. Preheat your oven to 375°F (190°C).
2. Bring a large pot of salted water to a rolling boil.
3. Add the entire box of ziti pasta to the boiling water and cook for exactly 9 minutes, until just al dente. (Tip: The pasta will continue cooking in the oven, so undercooking it now prevents mushiness).
4. While the pasta cooks, heat the tablespoon of olive oil in a large skillet over medium heat.
5. Add the finely chopped onion and cook for 5-7 minutes, stirring occasionally, until it becomes soft and translucent.
6. Add the minced garlic and cook for 1 more minute, just until fragrant.
7. Pour the entire jar of marinara sauce into the skillet with the onions and garlic, stir to combine, and let it simmer for 5 minutes.
8. In a medium bowl, combine the ricotta cheese, egg, chopped basil, a pinch of salt, and a few cracks of black pepper. Mix until fully incorporated.
9. Drain the cooked ziti pasta and return it to the empty pot.
10. Pour the simmered marinara sauce over the drained pasta and stir until every piece is coated.
11. Fold the ricotta mixture into the sauced pasta until you see lovely white streaks throughout. (Tip: Don’t overmix here—you want pockets of creamy ricotta).
12. Transfer half of the pasta mixture into a 9×13 inch baking dish, spreading it into an even layer.
13. Sprinkle half of the mozzarella, half of the Parmesan, and half of the provolone cheese over this first layer.
14. Spoon the remaining pasta mixture on top of the cheese layer and spread it evenly.
15. Top with the remaining mozzarella, Parmesan, and provolone cheeses.
16. Cover the baking dish tightly with aluminum foil.
17. Bake at 375°F (190°C) for 25 minutes.
18. Carefully remove the foil. (Tip: The steam is hot, so lift the foil away from you).
19. Continue baking, uncovered, for another 15-20 minutes, until the cheese on top is completely melted and has golden-brown spots.
20. Remove the baked ziti from the oven and let it rest on a wire rack for 10 minutes before serving.
Creamy, cheesy, and impossibly satisfying, the top layer gets beautifully blistered while the inside stays wonderfully saucy. I love serving this straight from the dish with a simple green salad for the perfect weeknight feast that feels anything but ordinary.
Conclusion
Many of these crowd-pleasing recipes make feeding a hungry group simple and satisfying. We hope you’ll whip up a few favorites, share which dishes your crew loved most in the comments below, and pin this roundup on Pinterest to save for your next gathering!