Get ready to impress with minimal effort! Whether you’re craving sweet seasonal treats or savory comfort food, these 32 easy pie recipes require just a few simple ingredients. Perfect for busy home cooks looking to whip up something delicious without a complicated shopping list. Let’s dive into these fuss-free favorites that will have everyone asking for seconds!
Classic Three-Ingredient Apple Pie
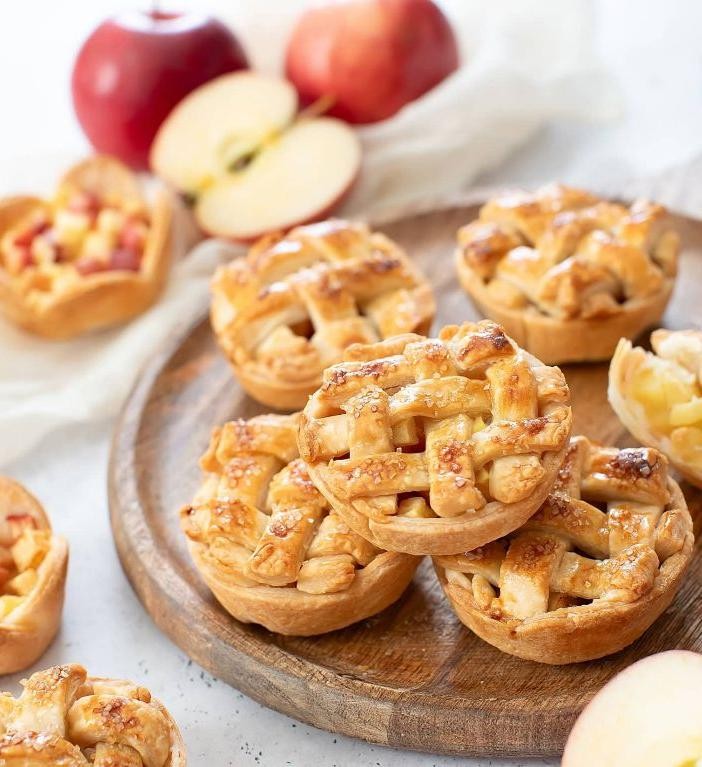
Cradling a warm apple pie feels like holding autumn itself in your hands, the simple comfort of this classic dessert wrapping around you like a favorite sweater on a crisp October afternoon. There’s something quietly magical about how just three humble ingredients can transform into such a beloved tradition, each slice telling stories of harvest seasons and family gatherings. Sometimes the most profound flavors come not from complexity, but from honoring ingredients in their purest form.
8
servings45
minutes50
minutesIngredients
– 2 cups all-purpose flour, freshly sifted and light as air
– 1 cup unsalted butter, cold and cut into perfect pea-sized cubes
– 6 large Granny Smith apples, peeled and thinly sliced into elegant half-moons
Instructions
1. Preheat your oven to 375°F, positioning the rack in the center for even heat distribution.
2. Combine the freshly sifted all-purpose flour and cold cubed butter in a large mixing bowl.
3. Use your fingertips to gently work the butter into the flour until the mixture resembles coarse crumbs with some larger butter pieces remaining.
4. Gradually add 5-6 tablespoons of ice water, one tablespoon at a time, mixing lightly with a fork until the dough just comes together.
5. Divide the dough into two equal portions, shaping each into a disk about 1-inch thick.
6. Wrap both dough disks tightly in plastic wrap and refrigerate for exactly 30 minutes to allow the gluten to relax.
7. While the dough chills, peel and core the Granny Smith apples, then slice them uniformly into 1/4-inch thick half-moons.
8. Roll out one chilled dough disk on a lightly floured surface to form a 12-inch circle that’s exactly 1/8-inch thick.
9. Carefully transfer the rolled dough to a 9-inch pie plate, gently pressing it into the corners without stretching.
10. Arrange the sliced apples in the pie crust, creating concentric circles that mound slightly higher in the center.
11. Roll out the second dough disk to the same dimensions, then place it over the apple filling.
12. Trim the excess dough to leave a 1-inch overhang around the pie plate’s edge.
13. Crimp the edges together using your thumb and forefinger to create a decorative seal that will catch any bubbling juices.
14. Cut four 2-inch slits in the top crust in a symmetrical pattern to allow steam to escape during baking.
15. Brush the entire top crust with a light egg wash made from one beaten egg and 1 tablespoon of milk.
16. Sprinkle the surface with 1 tablespoon of coarse sugar for a sparkling, crisp finish.
17. Bake at 375°F for 45-50 minutes, until the crust turns deep golden brown and apple juices bubble visibly through the steam vents.
18. Cool the pie completely on a wire rack for at least 3 hours before slicing to allow the filling to set properly.
Nothing compares to that first forkful breaking through the flaky, buttery crust into the tender apples that still maintain their shape. The tartness of the Granny Smith apples balances beautifully with the rich pastry, creating layers of texture that melt and crunch in perfect harmony. Consider serving warm slices with a sharp cheddar cheese wedge on the side, the contrast of creamy saltiness against sweet fruit elevating this simple pie into something extraordinary.
Simple Chocolate Pudding Pie
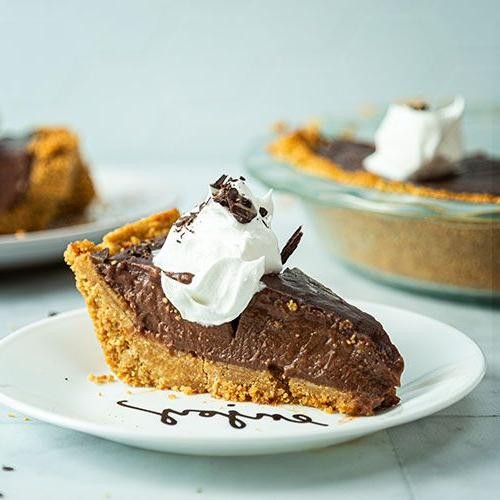
Wandering through my grandmother’s recipe box this afternoon, I found her handwritten card for chocolate pudding pie, the ink faded to sepia and the edges softened from years of handling. There’s something profoundly comforting about this simple dessert, how it requires little effort yet yields such deep satisfaction. Making it feels like returning to a quieter time, when desserts were humble and hearts were full.
8
servings15
minutes10
minutesIngredients
– 1 9-inch store-bought graham cracker crust
– 1/2 cup granulated white sugar
– 1/3 cup high-quality cocoa powder
– 3 tablespoons cornstarch
– 1/4 teaspoon fine sea salt
– 2 1/2 cups whole milk
– 2 large farm-fresh egg yolks
– 2 tablespoons European-style unsalted butter
– 1 teaspoon pure vanilla extract
– 1 cup heavy whipping cream
– 2 tablespoons powdered sugar
Instructions
1. Whisk together 1/2 cup granulated white sugar, 1/3 cup high-quality cocoa powder, 3 tablespoons cornstarch, and 1/4 teaspoon fine sea salt in a medium saucepan until thoroughly combined.
2. Gradually pour in 2 1/2 cups whole milk while continuously whisking to prevent lumps from forming.
3. Cook the mixture over medium heat for 5-7 minutes, stirring constantly with a wooden spoon until it begins to thicken and bubble gently.
4. Reduce heat to low and simmer for exactly 2 minutes, continuing to stir as the pudding develops a glossy sheen.
5. Whisk 2 large farm-fresh egg yolks in a small bowl until pale yellow and slightly frothy.
6. Temper the eggs by slowly pouring 1/2 cup of the hot pudding mixture into the yolks while vigorously whisking to prevent curdling.
7. Pour the tempered egg mixture back into the saucepan and cook for 1 additional minute over low heat, stirring constantly.
8. Remove the saucepan from heat and stir in 2 tablespoons European-style unsalted butter and 1 teaspoon pure vanilla extract until fully incorporated and glossy.
9. Immediately pour the warm pudding into 1 9-inch store-bought graham cracker crust, using a spatula to spread it evenly.
10. Press plastic wrap directly onto the pudding surface to prevent a skin from forming as it cools.
11. Refrigerate the pie for at least 4 hours, or until completely chilled and firm to the touch.
12. Whip 1 cup heavy whipping cream with 2 tablespoons powdered sugar using an electric mixer on medium-high speed for 3-4 minutes until soft peaks form.
13. Spread the whipped cream over the chilled pudding pie, creating decorative swirls with the back of a spoon.
Zesty chocolate notes mingle with the subtle sweetness of vanilla in every spoonful, while the creamy texture melts luxuriously against the crisp graham crust. For a delightful variation, try garnishing with chocolate shavings or fresh raspberries that provide a tart contrast to the rich pudding. This pie tastes even better the next day, when the flavors have fully melded and the texture becomes impossibly smooth.
Effortless Lemon Icebox Pie
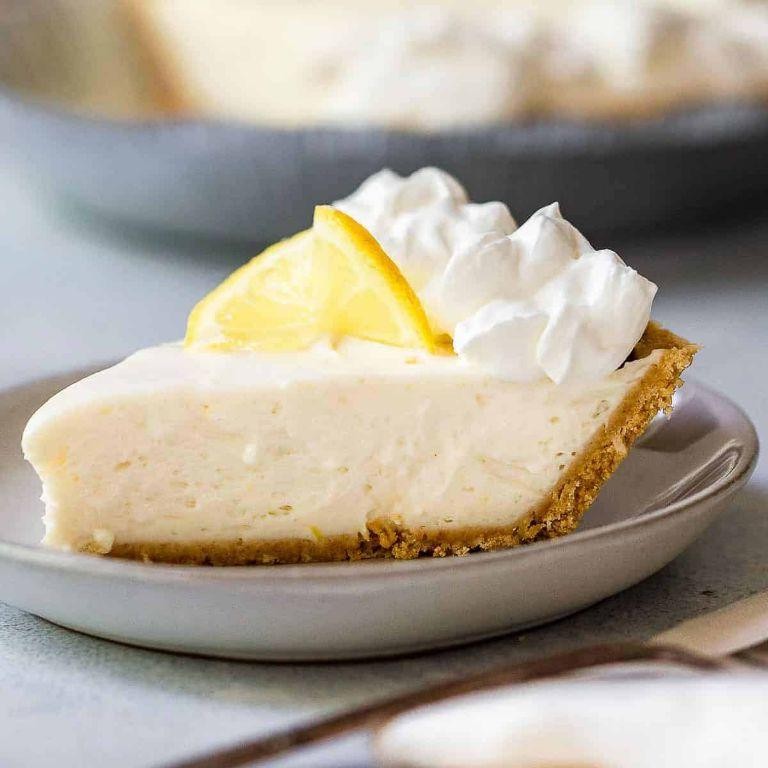
Mellow afternoons like this one find me craving something simple yet soul-satisfying, a dessert that requires little effort but delivers pure comfort. This lemon icebox pie is exactly that—a no-bake treasure that comes together in moments and chills into something magical. It’s the kind of recipe that feels like a quiet gift to yourself, bright and soothing all at once.
8
servings25
minutesIngredients
– 1 ½ cups finely crushed graham cracker crumbs
– ⅓ cup gently melted unsalted butter
– ¼ cup granulated sugar
– 1 (14-ounce) can of sweetened condensed milk
– ¾ cup freshly squeezed lemon juice
– 2 teaspoons finely grated lemon zest
– 1 cup heavy whipping cream
Instructions
1. Combine 1 ½ cups finely crushed graham cracker crumbs, ⅓ cup gently melted unsalted butter, and ¼ cup granulated sugar in a medium bowl until the mixture resembles wet sand.
2. Firmly press the crumb mixture into the bottom and up the sides of a 9-inch pie plate, using the flat bottom of a measuring cup to create an even layer.
3. Chill the crust in the refrigerator for 15 minutes to help it set, which prevents crumbling when you add the filling.
4. Whisk together 1 (14-ounce) can of sweetened condensed milk, ¾ cup freshly squeezed lemon juice, and 2 teaspoons finely grated lemon zest in a large bowl until the mixture thickens slightly, about 1 minute.
5. In a separate chilled bowl, whip 1 cup heavy whipping cream on medium-high speed until stiff peaks form, which takes about 2–3 minutes.
6. Gently fold the whipped cream into the lemon mixture using a spatula, moving in broad, sweeping motions to keep the filling light and airy.
7. Pour the filling into the chilled crust and spread it evenly with the spatula.
8. Cover the pie loosely with plastic wrap and refrigerate for at least 4 hours, or until the filling is firm to the touch.
9. Slice the chilled pie with a warm, dry knife for clean edges, wiping the blade between cuts.
This pie sets with a velvety, cloud-like texture that melts on the tongue, its vibrant lemon flavor balanced by the creamy sweetness. Try serving it with a sprinkle of extra lemon zest or a few fresh berries for a pop of color and tartness.
Quick Peanut Butter Pie
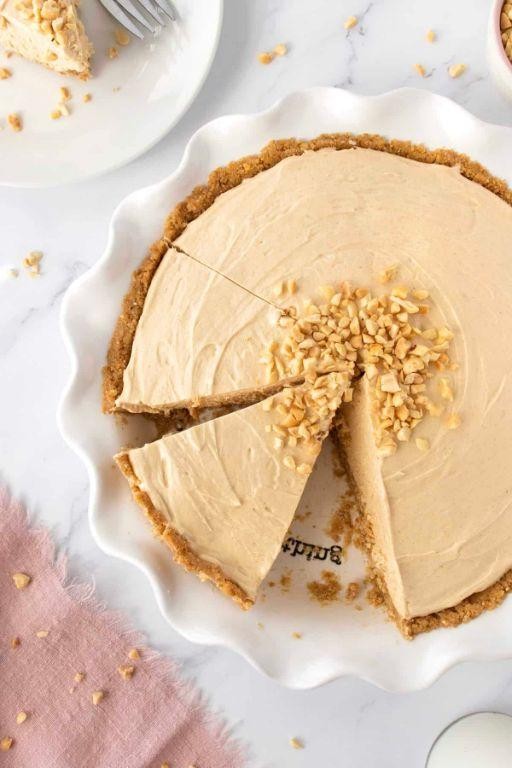
Unfolding the creamy layers of this peanut butter pie feels like uncovering a cherished family secret, one that transforms simple pantry staples into something truly magical on a quiet afternoon. There’s a gentle comfort in how it comes together, almost like a whispered promise of sweetness waiting at the end of the day.
8
servings25
minutes8
minutesIngredients
– 1 ½ cups finely crushed chocolate graham cracker crumbs
– ⅓ cup melted salted butter, rich and golden
– 8 ounces full-fat cream cheese, softened to room temperature
– 1 cup smooth creamy peanut butter, preferably natural and well-stirred
– 1 cup powdered sugar, lightly sifted to avoid lumps
– 1 teaspoon pure vanilla extract, with its warm, aromatic notes
– 1 ½ cups heavy whipping cream, cold and lush
– ¼ cup semi-sweet chocolate chips, for a delicate drizzle
– 1 teaspoon coconut oil, refined and neutral
Instructions
1. Preheat your oven to 350°F to prepare for toasting the crust, which will enhance its nutty flavor.
2. In a medium bowl, combine the finely crushed chocolate graham cracker crumbs with the melted salted butter until the mixture resembles wet sand.
3. Firmly press the crumb mixture into the bottom and up the sides of a 9-inch pie dish, using the back of a measuring cup for an even layer.
4. Bake the crust for 8 minutes exactly, until it is fragrant and slightly firm to the touch, then let it cool completely on a wire rack.
5. In a large mixing bowl, beat the softened full-fat cream cheese with an electric mixer on medium speed for 2 minutes until it is smooth and free of lumps.
6. Add the smooth creamy peanut butter and beat for another 1 minute until fully incorporated and creamy.
7. Gradually add the sifted powdered sugar and pure vanilla extract, mixing on low speed for 30 seconds to avoid a powdery cloud, then increase to medium for 1 minute until fluffy.
8. In a separate chilled bowl, whip the cold heavy whipping cream on high speed for 3-4 minutes until stiff peaks form that hold their shape when the beaters are lifted.
9. Gently fold the whipped cream into the peanut butter mixture in three additions, using a spatula and sweeping from the bottom to keep it light and airy.
10. Spoon the filling into the cooled crust and smooth the top with an offset spatula for an even finish.
11. Cover the pie loosely with plastic wrap and refrigerate for at least 4 hours, or ideally overnight, to allow it to set firmly.
12. Just before serving, melt the semi-sweet chocolate chips with the refined coconut oil in a microwave-safe bowl in 20-second intervals, stirring until smooth, then drizzle it over the pie in zigzag patterns.
From the first bite, the silky peanut butter filling melts against the crisp chocolate crust, offering a balance of sweet and salty that feels like a cozy embrace. For a playful twist, crumble extra graham crackers on top or serve each slice with a dollop of whipped cream and a sprinkle of sea salt to highlight its rich depths.
Easy No-Bake Cheesecake Pie
Perhaps there are days when the oven feels too demanding, when the warmth of the kitchen calls for something simpler, something that settles gently into the afternoon. This no-bake cheesecake pie is for those quiet moments, a creamy dream that requires nothing more than patience and a willing spoon.
8
servings30
minutesIngredients
– 1 ½ cups finely crushed graham cracker crumbs
– ½ cup melted salted butter, golden and fragrant
– 2 (8-ounce) packages full-fat cream cheese, perfectly softened at room temperature
– 1 cup granulated sugar, fine and sparkling
– 1 teaspoon pure vanilla extract, warm and aromatic
– 1 cup heavy whipping cream, cold from the refrigerator
– 1 cup fresh raspberries, bright and tender
Instructions
1. Combine the finely crushed graham cracker crumbs and melted salted butter in a medium bowl until the mixture resembles wet sand.
2. Press the crumb mixture firmly and evenly into the bottom and up the sides of a 9-inch pie plate using the flat bottom of a measuring cup.
3. Chill the crust in the refrigerator for exactly 30 minutes to set completely.
4. Beat the softened full-fat cream cheese in a large mixing bowl with an electric mixer on medium speed for 2 minutes until completely smooth and free of lumps.
5. Gradually add the granulated sugar to the cream cheese while mixing on low speed until fully incorporated.
6. Mix in the pure vanilla extract until just combined.
7. In a separate chilled bowl, whip the cold heavy whipping cream on high speed for 3-4 minutes until stiff peaks form that hold their shape when the beaters are lifted.
8. Gently fold the whipped cream into the cream cheese mixture using a rubber spatula until no white streaks remain, being careful not to deflate the air bubbles.
9. Spoon the filling into the chilled crust and smooth the top with an offset spatula.
10. Arrange the fresh raspberries evenly over the top of the filling, gently pressing them in just enough to secure them.
11. Cover the pie loosely with plastic wrap and refrigerate for at least 6 hours, or preferably overnight, until completely set.
Every slice reveals a contrast that feels like a small miracle—the crisp, buttery crust giving way to cloud-like filling, the tart burst of raspberries cutting through the sweet creaminess. Serve it chilled with a drizzle of honey or crumble extra graham crackers over the top for added texture, letting each bite unfold slowly like the quiet afternoon it was made for.
Minimalist Pumpkin Pie

Years of autumns have taught me that the simplest traditions often hold the deepest comfort. Yet sometimes, the classic recipes we return to year after year feel heavy, asking more of us than we have to give on a quiet afternoon. This pumpkin pie asks for very little—just a few thoughtful ingredients and a gentle hand—offering the same spiced warmth with far less effort.
8
servings25
minutes58
minutesIngredients
– 1 ½ cups finely crushed gingersnap cookies
– 6 tablespoons melted salted butter, rich and golden
– 1 (15-ounce) can pure pumpkin purée, velvety and deep orange
– ¾ cup dark brown sugar, packed with molasses warmth
– 3 large farm-fresh eggs, at room temperature
– 1 cup heavy cream, luxuriously thick
– 1 teaspoon ground cinnamon, fragrant and sweet
– ½ teaspoon ground ginger, warmly spicy
– ¼ teaspoon freshly grated nutmeg, aromatic and subtle
– ¼ teaspoon fine sea salt, to balance the sweetness
Instructions
1. Preheat your oven to 350°F (175°C).
2. In a medium bowl, combine the finely crushed gingersnap cookies and melted salted butter until the mixture resembles wet sand.
3. Press the cookie mixture firmly and evenly into the bottom and up the sides of a 9-inch pie plate. Tip: Use the flat bottom of a measuring cup to compact the crust for a sturdy base that won’t crumble.
4. Bake the empty crust for 8 minutes at 350°F (175°C) until it’s lightly fragrant and slightly firm to the touch.
5. Remove the crust from the oven and let it cool on a wire rack while you prepare the filling.
6. In a large mixing bowl, whisk together the velvety pumpkin purée and dark brown sugar until completely smooth and no sugar streaks remain.
7. Add the room-temperature eggs one at a time, whisking thoroughly after each addition until fully incorporated.
8. Pour in the heavy cream, then sprinkle in the ground cinnamon, ground ginger, freshly grated nutmeg, and fine sea salt.
9. Whisk the filling gently but consistently for about 2 minutes until the spices are evenly distributed and the mixture is silky. Tip: Avoid overmixing to prevent incorporating too much air, which can cause the filling to puff and crack as it cools.
10. Carefully pour the filling into the partially cooled crust, smoothing the top with a spatula.
11. Bake at 350°F (175°C) for 45–50 minutes. Tip: The pie is done when the edges are set but the center still jiggles slightly like firm gelatin when you gently shake the pan—this carryover cooking will finish the setting process.
12. Transfer the pie to a wire rack and let it cool completely to room temperature, about 2 hours.
13. Refrigerate the cooled pie for at least 4 hours, or ideally overnight, to allow the flavors to meld and the texture to firm.
Perhaps what I love most is the silkiness of the filling against the spicy, snappy crust—it’s a quiet dessert that feels both familiar and new. Serve each chilled slice with a dollop of barely sweetened whipped cream or a drizzle of maple syrup for a layered sweetness that doesn’t overwhelm.
Efficient Coconut Cream Pie
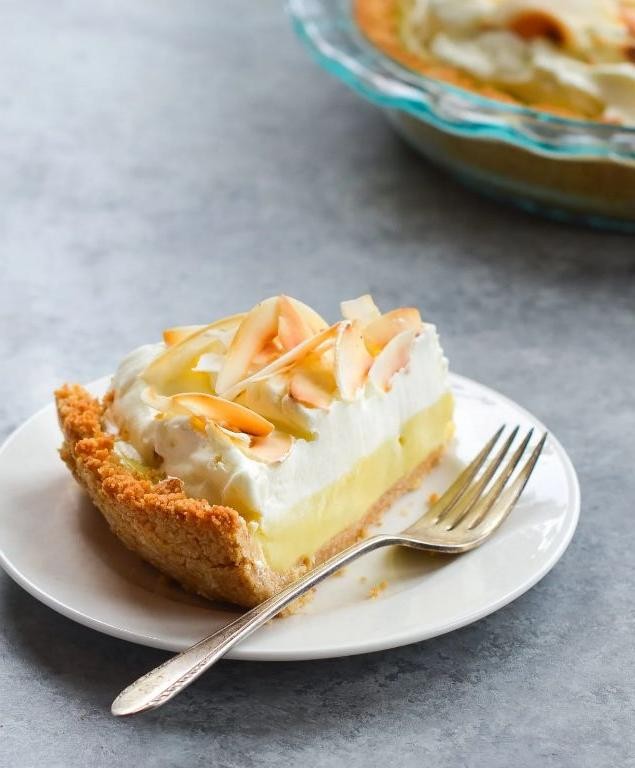
Musing on quiet afternoons, I find myself drawn to recipes that feel like gentle comforts rather than complicated projects. This coconut cream pie comes together with such graceful efficiency, it feels less like baking and more like creating a sweet, creamy sanctuary in your kitchen.
8
servings25
minutes20
minutesIngredients
– 1 ½ cups finely crushed graham cracker crumbs
– 6 tablespoons melted unsalted butter
– ⅓ cup granulated sugar
– ¼ teaspoon flaky sea salt
– 2 (13.5 oz) cans rich coconut cream
– ¾ cup fine granulated sugar
– ⅓ cup cornstarch
– 4 large pasture-raised egg yolks
– 2 teaspoons pure vanilla extract
– 1 cup heavy whipping cream
– 2 tablespoons powdered sugar
– ½ cup toasted coconut flakes
Instructions
1. Preheat your oven to 350°F.
2. Combine 1 ½ cups finely crushed graham cracker crumbs, 6 tablespoons melted unsalted butter, ⅓ cup granulated sugar, and ¼ teaspoon flaky sea salt in a medium bowl.
3. Press the mixture firmly into a 9-inch pie plate, creating an even layer across the bottom and up the sides.
4. Bake the crust for 8-10 minutes until lightly golden and fragrant.
5. Cool the crust completely on a wire rack for at least 30 minutes.
6. Whisk together 2 (13.5 oz) cans rich coconut cream, ¾ cup fine granulated sugar, and ⅓ cup cornstarch in a heavy-bottomed saucepan.
7. Cook over medium heat, stirring constantly with a wooden spoon, until the mixture thickens and begins to bubble gently.
8. Beat 4 large pasture-raised egg yolks in a small bowl.
9. Slowly temper the eggs by adding ½ cup of the hot coconut mixture to the yolks while whisking vigorously.
10. Pour the tempered egg mixture back into the saucepan, stirring continuously.
11. Cook for 2 more minutes until the filling is very thick and coats the back of a spoon.
12. Remove from heat and stir in 2 teaspoons pure vanilla extract.
13. Pour the warm filling into the cooled crust, smoothing the top with a spatula.
14. Press plastic wrap directly onto the surface of the filling to prevent a skin from forming.
15. Refrigerate the pie for at least 4 hours, or until completely set and chilled through.
16. Whip 1 cup heavy whipping cream with 2 tablespoons powdered sugar until stiff peaks form.
17. Spread the whipped cream over the chilled pie filling.
18. Sprinkle ½ cup toasted coconut flakes evenly over the whipped cream.
Remember how the creamy filling yields gently to your spoon, its tropical sweetness balanced by the crisp, buttery crust? Refrigerate any leftovers, though I’ve found this pie tends to disappear quickly when shared over coffee with good company.
Streamlined Pecan Pie
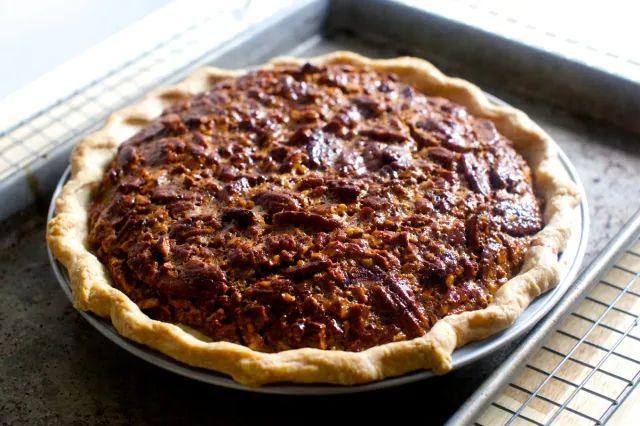
Remembering how my grandmother’s kitchen would fill with the scent of toasted pecans and caramel each autumn, I find myself drawn to this simpler version that captures all the warmth without the fuss. There’s something deeply comforting about the way melted butter and dark brown sugar mingle, creating a syrup that holds memories in every sticky spoonful. This streamlined pecan pie lets the ingredients speak for themselves while still wrapping you in that familiar holiday embrace.
8
servings20
minutes50
minutesIngredients
– 1 9-inch unbaked pie crust, chilled and flaky
– 1 cup dark brown sugar, packed and molasses-rich
– 3/4 cup light corn syrup, smooth and golden
– 1/3 cup unsalted butter, melted and fragrant
– 3 large eggs, farm-fresh and room temperature
– 2 teaspoons pure vanilla extract, warm and aromatic
– 1/4 teaspoon fine sea salt, delicate and balancing
– 2 cups pecan halves, toasted and buttery
Instructions
1. Preheat your oven to 350°F and position the rack in the center for even heating.
2. Place the chilled pie crust in a 9-inch pie plate, gently pressing it into the corners without stretching.
3. In a medium bowl, whisk together the dark brown sugar and light corn syrup until no lumps remain.
4. Pour the melted butter into the sugar mixture while whisking continuously to emulsify.
5. Crack the eggs into a separate bowl, then add them one at a time to the filling, whisking thoroughly after each addition.
6. Stir in the vanilla extract and fine sea salt until the filling becomes smooth and glossy.
7. Scatter the toasted pecan halves evenly across the bottom of the pie crust.
8. Slowly pour the filling mixture over the pecans, allowing it to seep into all the empty spaces.
9. Place the pie on a baking sheet to catch any potential drips during baking.
10. Bake at 350°F for 45-50 minutes until the center jiggles slightly when shaken but the edges are firmly set.
11. Transfer the pie to a wire cooling rack and let it cool completely for 4 hours before slicing.
What emerges from the oven is a pie with a crackly, caramelized top that gives way to a filling both firm and yielding. The toasted pecans provide satisfying crunch against the smooth, buttery sweetness, while the flaky crust offers textural contrast that makes each bite complete. Consider serving it slightly warmed with a dollop of freshly whipped cream or alongside a sharp cheddar cheese slice for that classic sweet-salty combination that feels both nostalgic and new.
Time-Saving Strawberry Cream Pie
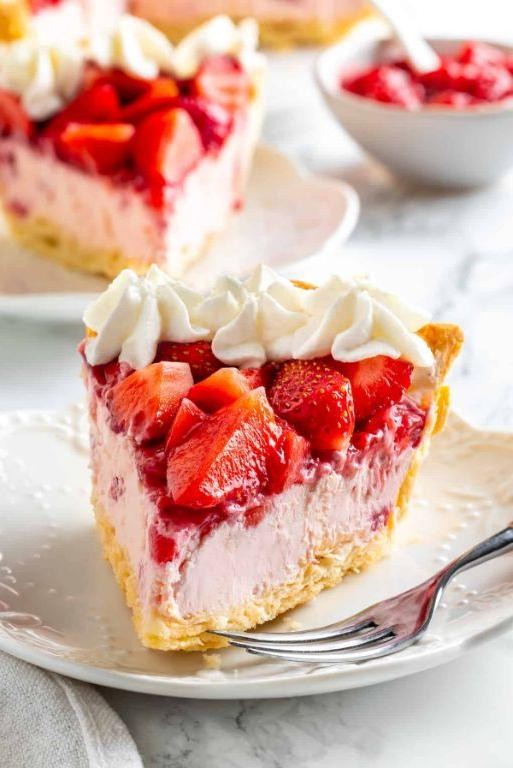
Remembering how my grandmother would spend hours in the kitchen, I find myself drawn to simpler pleasures these days—recipes that honor tradition while respecting our modern pace. This strawberry cream pie captures that balance beautifully, requiring just enough hands-on time to feel like a labor of love without consuming an entire afternoon.
8
servings25
minutesIngredients
– 1 9-inch pre-made graham cracker crust
– 8 ounces softened cream cheese
– 1 cup chilled heavy whipping cream
– 1/3 cup granulated sugar
– 1 teaspoon pure vanilla extract
– 2 cups fresh ripe strawberries, hulled and sliced
– 1/4 cup strawberry jam
Instructions
1. Place the softened cream cheese in a large mixing bowl and beat with an electric mixer on medium speed for 1 minute until completely smooth.
2. Add the granulated sugar and vanilla extract to the cream cheese, then continue beating for 2 minutes until the mixture becomes light and fluffy.
3. Pour the chilled heavy whipping cream into a separate clean bowl and whip on high speed for 3-4 minutes until stiff peaks form.
4. Gently fold the whipped cream into the cream cheese mixture using a rubber spatula, being careful not to deflate the air bubbles.
5. Spread half of the cream mixture evenly across the bottom of the graham cracker crust.
6. Arrange the sliced fresh strawberries in a single layer over the cream layer.
7. Spoon the remaining cream mixture over the strawberries, using an offset spatula to create a smooth top.
8. Warm the strawberry jam in a small microwave-safe bowl for 15 seconds until it becomes pourable.
9. Drizzle the warmed jam over the top of the pie in a decorative pattern.
10. Refrigerate the completed pie for at least 4 hours, or until the filling is firmly set.
Nothing compares to that first slice revealing the layers—the creamy filling cushioning bright berries, the jam glaze catching the light. Sometimes I’ll garnish individual servings with fresh mint leaves or serve alongside iced coffee for a perfect afternoon treat.
Basic Blueberry Pie
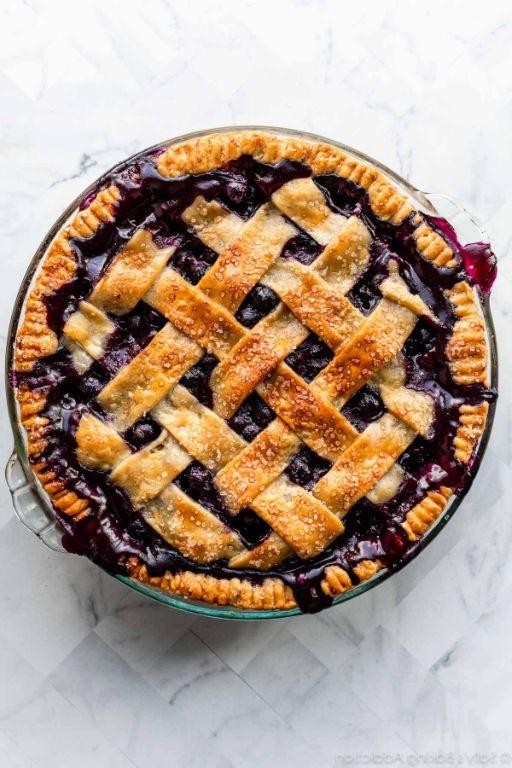
Perhaps there’s something quietly profound about transforming humble ingredients into a dessert that feels like a warm embrace. Picture this: plump berries bursting with summer’s sweetness, encased in a flaky golden crust that shatters delicately with each forkful. It’s the kind of simple perfection that makes you pause and appreciate the gentle art of baking.
8
servings40
minutes50
minutesIngredients
- 2 cups all-purpose flour, sifted and light as air
- 1 cup cold unsalted butter, cubed into tiny ice-cold pieces
- 6 tablespoons ice water, crystal clear and chilled
- 4 cups fresh blueberries, plump and bursting with juice
- 3/4 cup granulated sugar, fine and sparkling
- 3 tablespoons cornstarch, silky and smooth
- 1 tablespoon fresh lemon juice, bright and tangy
- 1 large egg, farm-fresh and golden-yolked
- 1 tablespoon coarse sugar, for a glittering finish
Instructions
- Whisk together the sifted all-purpose flour and 1/2 teaspoon of fine salt in a large mixing bowl.
- Add the cold, cubed unsalted butter and use a pastry cutter to work it into the flour until the mixture resembles coarse crumbs with pea-sized butter pieces.
- Drizzle in the ice water, 1 tablespoon at a time, and gently stir with a fork until the dough just comes together.
- Divide the dough into two equal discs, wrap tightly in plastic wrap, and chill in the refrigerator for exactly 30 minutes to relax the gluten.
- While the dough chills, combine the fresh blueberries, granulated sugar, cornstarch, and fresh lemon juice in a separate bowl, folding gently to coat without crushing the berries.
- Preheat your oven to 375°F and place a baking sheet on the lower rack to catch any drips.
- On a lightly floured surface, roll one disc of dough into a 12-inch circle and carefully transfer it to a 9-inch pie dish, pressing it gently into the edges.
- Spoon the blueberry filling evenly into the crust, mounding it slightly in the center.
- Roll the second dough disc into another 12-inch circle and place it over the filling, then crimp the edges firmly with your fingers or a fork to seal.
- Brush the top crust with the beaten egg and sprinkle generously with coarse sugar for a sparkling, crisp finish.
- Cut four 2-inch slits in the top crust in a circular pattern to allow steam to escape during baking.
- Bake the pie on the center oven rack for 45–50 minutes, until the crust is deep golden brown and the filling bubbles thickly through the slits.
- Transfer the pie to a wire rack and let it cool completely for at least 3 hours to allow the filling to set properly.
Softly yielding crust gives way to a jammy, violet-hued filling that holds its shape without being overly stiff. Serve each slice slightly warm with a drift of vanilla bean ice cream melting into the berries, or enjoy it at room temperature the next day when the flavors have deepened into something even more comforting.
Swift Key Lime Pie
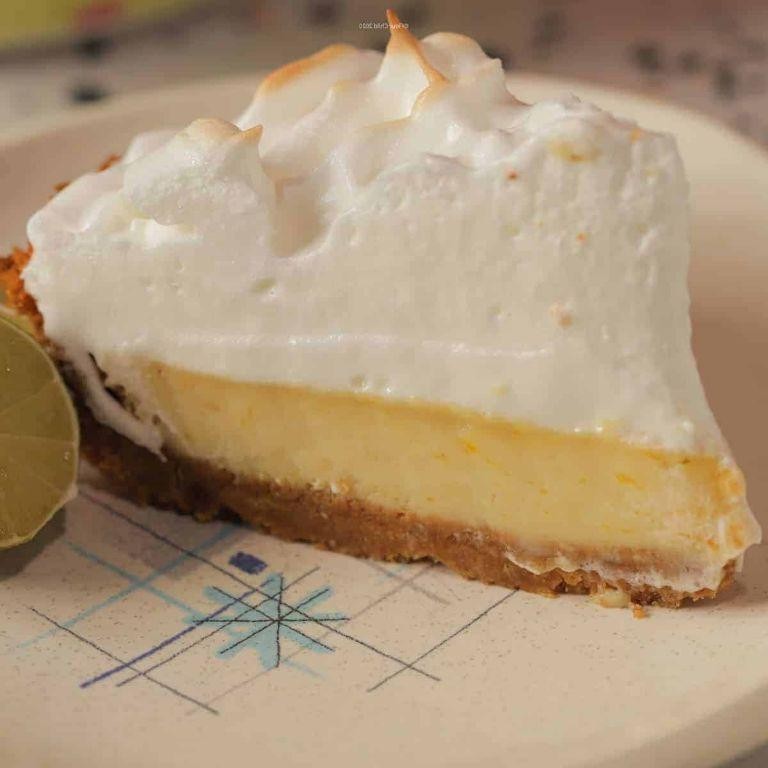
Kind of like a quiet afternoon that slips through your fingers, this pie captures those fleeting moments of tart brightness and creamy comfort. There’s something about the way the sharp lime cuts through the sweet, velvety filling that feels both nostalgic and perfectly present. It’s the kind of dessert that asks you to slow down and just be with it for a while.
8
servings40
minutes23
minutesIngredients
– 1 ½ cups of finely crushed graham cracker crumbs
– ⅓ cup of rich, golden granulated sugar
– 6 tablespoons of creamy, melted unsalted butter
– 4 large farm-fresh egg yolks
– 1 (14-ounce) can of sweetened condensed milk
– ½ cup of freshly squeezed key lime juice
– 1 cup of softly whipped heavy cream
– Thin slices of fresh key lime for garnish
Instructions
1. Preheat your oven to 350°F (175°C).
2. In a medium bowl, combine the finely crushed graham cracker crumbs and rich, golden granulated sugar.
3. Pour the 6 tablespoons of creamy, melted unsalted butter over the crumb mixture.
4. Stir the mixture with a fork until the crumbs are evenly moistened and hold together when pressed.
5. Firmly press the crumb mixture into the bottom and up the sides of a 9-inch pie plate, using the bottom of a measuring cup to create an even layer.
6. Bake the crust in the preheated oven for 8 minutes, until lightly fragrant and slightly firm to the touch.
7. Remove the crust from the oven and let it cool completely on a wire rack, about 30 minutes.
8. In a separate bowl, whisk the 4 large farm-fresh egg yolks until they become pale and slightly thickened, about 2 minutes.
9. Gradually whisk in the entire can of sweetened condensed milk until the mixture is smooth and fully combined.
10. Slowly pour in the ½ cup of freshly squeezed key lime juice while continuously whisking to prevent curdling.
11. Pour the filling into the completely cooled crust and spread it evenly with a spatula.
12. Bake the pie for 15 minutes, until the filling is set around the edges but still slightly jiggly in the center.
13. Cool the pie on a wire rack for 1 hour, then refrigerate for at least 4 hours or until thoroughly chilled.
14. Just before serving, gently spread the 1 cup of softly whipped heavy cream over the chilled pie filling.
15. Garnish with thin slices of fresh key lime arranged in a circular pattern. For the smoothest filling, make sure all ingredients are at room temperature before mixing—this helps prevent the filling from separating during baking. When pressing the crust, work from the center outward to create even sides that won’t slump during baking. Chill the bowl and whisk attachment before whipping the cream; this helps it hold its shape better and creates lighter, more stable peaks. Freshly squeezed lime juice makes all the difference here, as bottled juice lacks the vibrant, aromatic quality that defines this dessert.
Fluffy cream pillows over that tangy-sweet filling create a beautiful contrast, both in texture and temperature. The crisp graham cracker crust gives way to the smooth, almost custard-like center that melts on your tongue with each bite. Try serving thin slices with an extra sprinkle of lime zest or alongside a small glass of chilled herbal tea to highlight its refreshing qualities.
Hassle-Free Banana Cream Pie
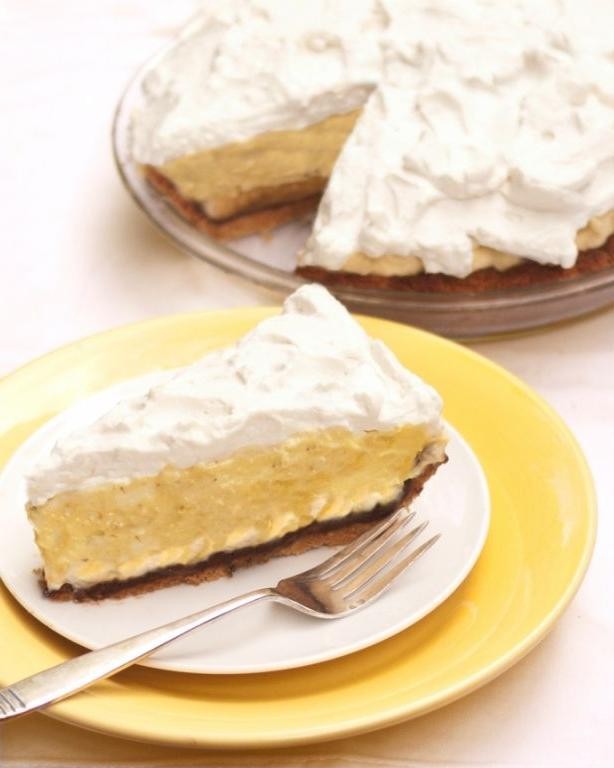
Musing on the simple pleasures that make autumn afternoons feel complete, I find myself drawn to desserts that require little effort yet deliver profound comfort. This banana cream pie comes together with such gentle ease, it feels less like baking and more like arranging a sweet, creamy dream in a crust. The kind of treat that fills the kitchen with warmth while leaving plenty of time to watch the leaves turn gold outside.
8
servings25
minutes14
minutesIngredients
– 1 pre-made graham cracker crust with buttery, crisp texture
– 3 ripe bananas with sweet, speckled skins
– 2 cups whole milk with rich, creamy body
– 3/4 cup granulated sugar with fine, sparkling crystals
– 1/3 cup all-purpose flour with soft, snow-white appearance
– 3 large egg yolks with golden, velvety richness
– 2 tablespoons unsalted butter with smooth, creamy texture
– 1 teaspoon pure vanilla extract with warm, aromatic notes
– 1 cup heavy whipping cream with thick, luxurious consistency
– 2 tablespoons powdered sugar with delicate, snowy fineness
Instructions
1. Slice the ripe bananas into 1/4-inch thick rounds and arrange them in a single layer across the bottom of the graham cracker crust.
2. Combine the whole milk, granulated sugar, and all-purpose flour in a medium saucepan, whisking until no flour lumps remain.
3. Cook the milk mixture over medium heat for 5-7 minutes, stirring constantly with a wooden spoon until it thickens enough to coat the back of the spoon.
4. Place the egg yolks in a small bowl and whisk vigorously until they become pale yellow and slightly frothy.
5. Temper the eggs by slowly pouring 1/2 cup of the hot milk mixture into the yolks while whisking continuously to prevent curdling.
6. Pour the tempered egg mixture back into the saucepan and cook for exactly 2 more minutes over medium-low heat, stirring constantly until the custard becomes thick and pudding-like.
7. Remove the saucepan from heat and stir in the unsalted butter and pure vanilla extract until fully incorporated and glossy.
8. Immediately pour the warm custard over the banana slices in the crust, using a spatula to spread it evenly to the edges.
9. Press plastic wrap directly onto the surface of the custard to prevent a skin from forming and refrigerate for at least 4 hours until completely chilled and set.
10. Just before serving, combine the heavy whipping cream and powdered sugar in a chilled bowl and whip with an electric mixer on high speed for 3-4 minutes until stiff peaks form that hold their shape when the beaters are lifted.
11. Spread the whipped cream over the chilled pie filling, creating soft, billowy peaks with the back of a spoon.
12. Slice and serve immediately, or refrigerate for up to 30 minutes if not serving right away.
Creating this pie feels like composing a sweet symphony where the crisp crust provides the foundation, the velvety custard sings the melody, and the cloud-like whipped cream offers the delicate finish. Consider serving thin slices with strong coffee for breakfast—because some days deserve dessert first, when the morning light catches the creamy layers just so.
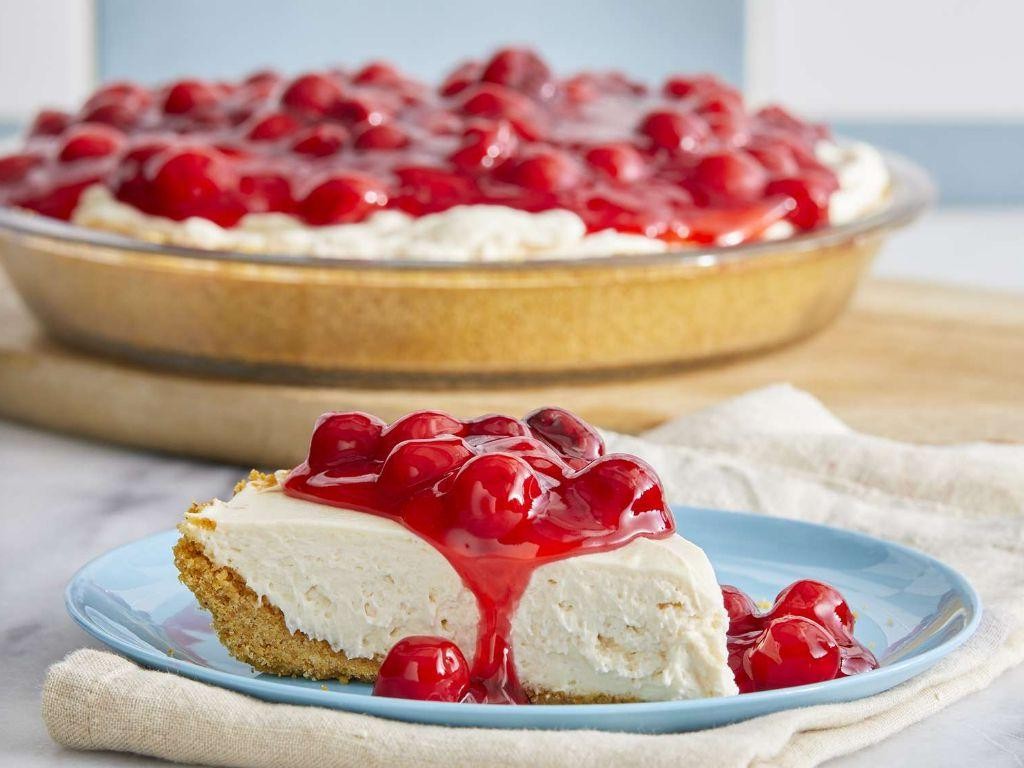
Straightforward Cherry Pie
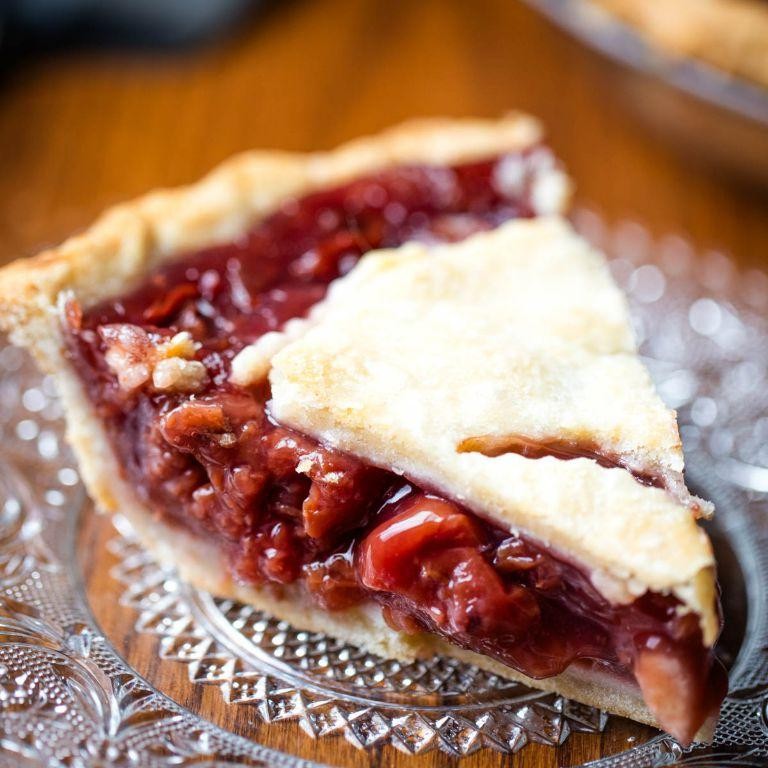
Often, the simplest recipes hold the most comfort, and this straightforward cherry pie is no exception—it’s a humble, heartfelt dessert that feels like a warm embrace on a quiet afternoon, with its flaky crust and jewel-like filling whispering of sun-ripened orchards and slow, mindful baking.
8
portions40
minutes50
minutesIngredients
– 2 ½ cups all-purpose flour, finely sifted for a featherlight crust
– 1 cup unsalted butter, chilled and cubed into pea-sized pieces
– 1 teaspoon granulated sugar, for a subtle sweetness in the dough
– 1 teaspoon fine sea salt, to enhance the buttery notes
– 6-8 tablespoons ice-cold water, added gradually for perfect hydration
– 4 cups fresh or frozen cherries, pitted and bursting with tart-sweet flavor
– ¾ cup granulated sugar, to balance the cherries’ natural acidity
– ¼ cup cornstarch, for a glossy, thickened filling
– 1 tablespoon fresh lemon juice, bright and zesty
– 1 teaspoon pure vanilla extract, aromatic and warm
– 1 large egg, beaten until smooth for a golden glaze
Instructions
1. In a large mixing bowl, combine the finely sifted all-purpose flour, 1 teaspoon granulated sugar, and fine sea salt, whisking gently to distribute evenly.
2. Add the chilled, cubed unsalted butter to the flour mixture, using a pastry cutter or your fingertips to work it in until the texture resembles coarse crumbs with visible butter pieces—this ensures a flaky crust.
3. Drizzle in the ice-cold water, one tablespoon at a time, stirring with a fork until the dough just comes together; avoid overmixing to prevent toughness.
4. Divide the dough into two equal portions, shape each into a disk, wrap tightly in plastic wrap, and refrigerate for at least 30 minutes to firm up and relax the gluten.
5. Preheat your oven to 375°F (190°C), placing a rack in the center position for even baking.
6. In a separate bowl, toss the pitted cherries with ¾ cup granulated sugar, cornstarch, fresh lemon juice, and pure vanilla extract until evenly coated and glossy.
7. On a lightly floured surface, roll out one dough disk into a 12-inch circle, then carefully transfer it to a 9-inch pie dish, gently pressing it into the bottom and sides.
8. Pour the cherry filling into the crust, spreading it evenly without overfilling to prevent bubbling over during baking.
9. Roll out the second dough disk into another 12-inch circle, then place it over the filling, trimming any excess dough and crimping the edges with a fork to seal.
10. Brush the top crust with the beaten egg for a shiny, golden finish, and cut 4-5 small slits in the center to allow steam to escape.
11. Bake the pie at 375°F (190°C) for 45-50 minutes, or until the crust is deeply golden brown and the filling bubbles thickly through the slits.
12. Cool the pie completely on a wire rack for at least 2 hours before slicing—this allows the filling to set properly for clean cuts. The finished pie boasts a buttery, shatteringly crisp crust that gives way to a lush, jammy filling, with cherries that burst with tangy-sweet intensity; serve it slightly warm with a dollop of vanilla bean ice cream, letting the cold cream melt into the warm fruit for a contrast that feels like pure nostalgia.
Super Easy Custard Pie
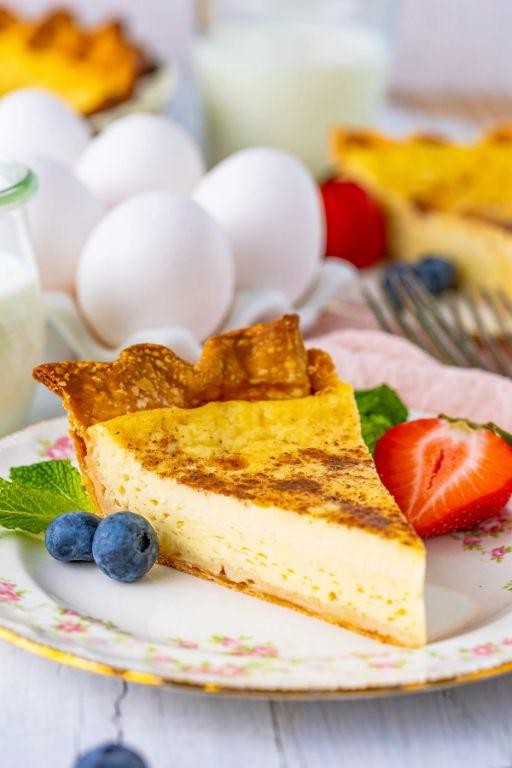
Often, on quiet afternoons like this, I find myself drawn to recipes that feel like a warm embrace—the kind that fill your kitchen with comforting aromas and leave you with something tender to savor. This custard pie is one of those gentle creations, simple enough for a beginner yet deeply satisfying in its creamy, unpretentious charm.
8
servings25
minutes65
minutesIngredients
– 1 ½ cups all-purpose flour, finely sifted for a delicate crust
– ½ cup unsalted butter, cold and cubed to ensure flakiness
– 3 tablespoons granulated sugar, for a subtle sweetness
– 4 large eggs, farm-fresh and room temperature for smooth blending
– 1 ½ cups whole milk, gently warmed to just above body temperature
– ½ cup heavy cream, rich and velvety
– ⅔ cup granulated sugar, fine-grained to dissolve effortlessly
– 1 teaspoon pure vanilla extract, fragrant and warm
– ¼ teaspoon freshly grated nutmeg, for a whisper of spice
Instructions
1. Preheat your oven to 375°F (190°C) to ensure even baking from the start.
2. In a medium bowl, combine the finely sifted all-purpose flour, cold cubed unsalted butter, and 3 tablespoons granulated sugar until the mixture resembles coarse crumbs.
3. Press the dough firmly into a 9-inch pie dish, building up the edges to about ½-inch thickness for a sturdy crust.
4. Blind bake the crust for 15 minutes at 375°F (190°C) until lightly golden; this prevents sogginess later.
5. In a separate bowl, whisk the 4 room-temperature farm-fresh eggs until pale and frothy, about 2 minutes, for a silkier custard.
6. Gradually pour in the gently warmed whole milk and rich heavy cream while whisking continuously to avoid curdling.
7. Add the ⅔ cup fine-grained granulated sugar, fragrant pure vanilla extract, and freshly grated nutmeg, whisking until fully dissolved.
8. Strain the custard mixture through a fine-mesh sieve into the pre-baked crust to remove any lumps for an ultra-smooth texture.
9. Reduce the oven temperature to 325°F (163°C) and bake the pie for 45–50 minutes, or until the center jiggles slightly but the edges are set.
10. Cool the pie completely on a wire rack for at least 2 hours before slicing to allow the custard to firm up properly.
Cool and velvety, this pie settles into a delicate firmness that melts on the tongue, with the nutmeg lending a nostalgic warmth to the sweet, eggy creaminess. For a playful twist, serve it chilled with a drizzle of local honey or topped with fresh berries that burst with tart contrast.
Conclusion
Kitchen magic awaits with these 32 simple pie recipes! Whether you’re a baking novice or seasoned pro, these few-ingredient wonders prove delicious desserts are within reach. Pick your favorite, give it a try, and let us know which one stole your heart in the comments below. Loved this roundup? Share the pie love by pinning this article to your Pinterest boards for easy future reference!