Hungry for healthy dinners that won’t derail your low-carb lifestyle? You’re in luck! We’ve gathered 35 delicious, easy-to-make recipes perfect for busy weeknights. From comforting classics to fresh seasonal favorites, these dishes prove that eating well doesn’t mean sacrificing flavor. Get ready to transform your evening meals—your taste buds (and waistline) will thank you!
Garlic Butter Shrimp with Zucchini Noodles
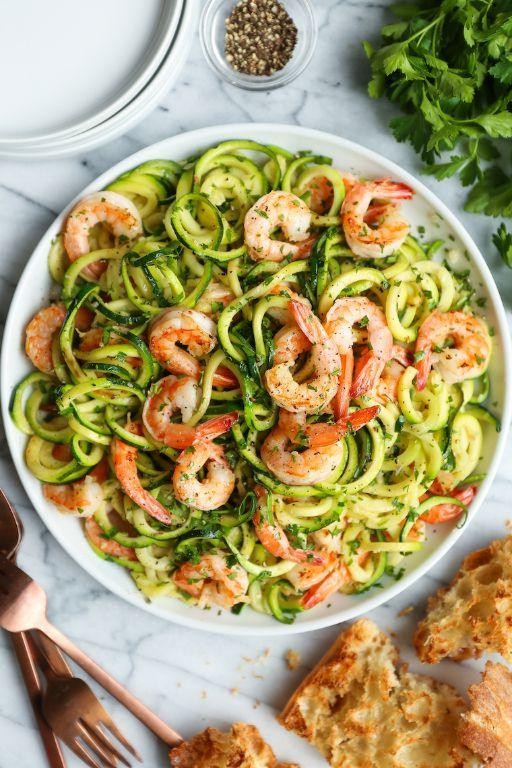
Keeping my kitchen stocked with fresh zucchini and plump shrimp has become my weekly ritual—this garlic butter shrimp with zucchini noodles is my go-to when I need something delicious but don’t want to spend hours cooking. Just last Tuesday, I whipped this up after a long workday, and the aroma alone had my family gathered around the stove before I’d even finished. There’s something magical about how quickly these simple ingredients come together into something truly special.
5
servings15
minutes10
minutesIngredients
– 1 lb large raw shrimp, peeled and deveined (I always ask the fish counter to do this for me—total time saver!)
– 4 medium zucchini (about 2 lbs total), spiralized into noodles
– 4 tbsp unsalted butter (I keep mine European-style for richer flavor)
– 4 cloves garlic, minced (fresh only—jarred just doesn’t compare here)
– 2 tbsp fresh lemon juice (squeezed right before using)
– 1/4 cup chopped fresh parsley
– 1/2 tsp red pepper flakes (adjust based on your heat preference)
– 1 tbsp olive oil (extra virgin is my kitchen staple)
– Salt to taste (I use kosher salt for better control)
Instructions
1. Pat the shrimp completely dry with paper towels—this ensures they’ll get a nice sear instead of steaming.
2. Spiralize all zucchini into noodles, then spread them on a clean kitchen towel to absorb excess moisture while you prep other ingredients.
3. Melt 2 tablespoons of butter in a large skillet over medium-high heat until it begins to foam slightly.
4. Add shrimp in a single layer and cook for exactly 2 minutes without moving them to develop golden-brown crust.
5. Flip each shrimp and cook for another 1-2 minutes until opaque and firm to the touch.
6. Transfer shrimp to a clean plate using tongs, leaving any butter and juices in the skillet.
7. Reduce heat to medium and add remaining 2 tablespoons butter along with olive oil to the same skillet.
8. Add minced garlic and red pepper flakes, cooking for 45 seconds until fragrant but not browned.
9. Add zucchini noodles and toss continuously with tongs for 2-3 minutes until just tender but still slightly crisp.
10. Return shrimp to the skillet along with any accumulated juices.
11. Drizzle lemon juice over everything and toss to combine thoroughly.
12. Remove from heat and stir in chopped parsley until evenly distributed.
13. Season with salt, starting with 1/2 teaspoon and adding more if needed after tasting.
The buttery sauce clings beautifully to each zucchini noodle while the shrimp remain plump and juicy. I love serving this directly from the skillet with an extra squeeze of lemon at the table—it makes even a weeknight dinner feel special. Sometimes I’ll top it with grated Parmesan if I’m feeling fancy, but honestly, it’s perfect just as it is.
Baked Chicken Thighs with Asparagus
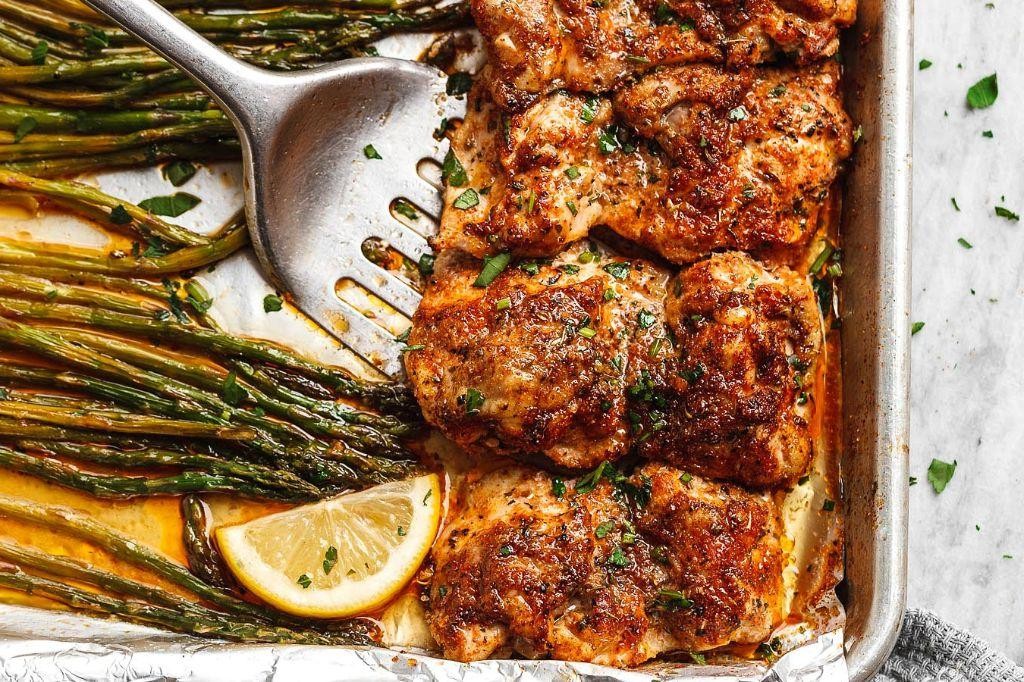
My family’s weeknight dinners used to be a chaotic scramble until I discovered this one-pan wonder. There’s something so satisfying about sliding a sheet pan into the oven and knowing a complete, flavorful meal is just minutes away—plus, cleanup is a breeze, which this busy parent truly appreciates.
6
portions15
minutes30
minutesIngredients
- 6 bone-in, skin-on chicken thighs (the skin gets wonderfully crispy!)
- 1 lb fresh asparagus, ends trimmed (I snap off the woody ends—they naturally break where they should)
- 3 tbsp extra virgin olive oil (my go-to for roasting)
- 4 cloves garlic, minced (fresh is best here for that punch of flavor)
- 1 tsp smoked paprika (adds a subtle smokiness I love)
- 1 tsp dried thyme
- 1/2 tsp black pepper, freshly ground
- 1 tsp kosher salt (it sticks to the chicken better than fine salt)
- 1 lemon, sliced into thin rounds (for zesty brightness)
Instructions
- Preheat your oven to 425°F and line a large baking sheet with parchment paper for easy cleanup.
- Pat the chicken thighs completely dry with paper towels—this helps the skin crisp up beautifully.
- In a small bowl, whisk together the olive oil, minced garlic, smoked paprika, dried thyme, black pepper, and kosher salt.
- Brush the oil and spice mixture evenly over both sides of each chicken thigh, making sure to get under the skin a bit for maximum flavor.
- Arrange the chicken thighs skin-side up on one half of the prepared baking sheet, spacing them apart so they roast evenly.
- Toss the trimmed asparagus in any remaining oil mixture left in the bowl, coating them lightly.
- Spread the asparagus in a single layer on the other half of the baking sheet, avoiding overlap.
- Scatter the lemon slices over the asparagus and around the chicken thighs.
- Roast in the preheated oven for 25 minutes, then check the chicken—the skin should be golden brown and crispy.
- Insert an instant-read thermometer into the thickest part of a chicken thigh; it should read 165°F for doneness.
- If the asparagus is tender-crisp and chicken is cooked, remove the pan; if needed, roast 5 more minutes.
- Let the chicken rest on the pan for 5 minutes before serving to allow juices to redistribute.
Buttery, juicy chicken with crackling-crisp skin pairs so well with the tender, slightly charred asparagus. I love squeezing the roasted lemon over everything right at the table for a bright, zesty finish—it’s a simple touch that makes the whole dish sing.
Beef and Broccoli Stir Fry
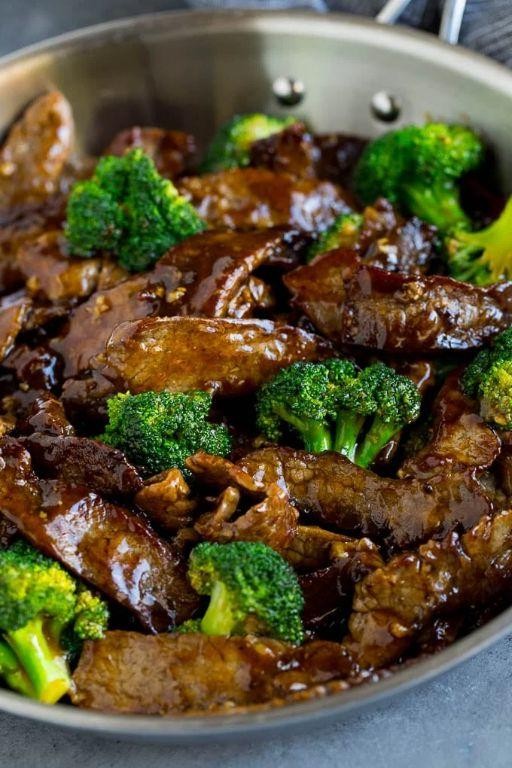
A weeknight dinner hero in my kitchen, this beef and broccoli stir fry has saved me from countless “what’s for dinner?” dilemmas. I first discovered this recipe during my college days when my budget was tight but my cravings for takeout were strong—now it’s become my go-to comfort meal that comes together faster than delivery.
4
servings15
minutes9
minutesIngredients
– 1 lb flank steak, sliced thin against the grain (I always freeze it for 15 minutes first—makes slicing so much easier!)
– 4 cups broccoli florets (I like mine with some stem for extra crunch)
– 3 cloves garlic, minced (fresh is non-negotiable in my kitchen)
– 1 tbsp fresh ginger, grated (I keep mine frozen and just grate what I need)
– ¼ cup low-sodium soy sauce
– 2 tbsp brown sugar (the secret to that perfect glaze)
– 1 tbsp cornstarch
– 2 tbsp vegetable oil (peanut oil works great too for higher heat)
– ½ cup beef broth
– 1 tsp sesame oil (I add this at the very end for maximum aroma)
Instructions
1. Slice 1 lb flank steak against the grain into ¼-inch thick strips.
2. Whisk together ¼ cup soy sauce, 2 tbsp brown sugar, 1 tbsp cornstarch, and ½ cup beef broth in a small bowl until smooth.
3. Heat 1 tbsp vegetable oil in a large skillet or wok over high heat until shimmering.
4. Add sliced steak in a single layer and cook for 2 minutes without stirring to get a good sear.
5. Flip steak and cook for 1 more minute until browned but not cooked through.
6. Transfer steak to a clean plate using tongs.
7. Add remaining 1 tbsp vegetable oil to the same skillet.
8. Add 4 cups broccoli florets and stir-fry for 3 minutes until bright green but still crisp.
9. Add 3 cloves minced garlic and 1 tbsp grated ginger, cooking for 30 seconds until fragrant.
10. Pour the sauce mixture into the skillet, stirring constantly.
11. Return the cooked steak to the skillet along with any accumulated juices.
12. Simmer for 2 minutes until sauce thickens and coats the ingredients.
13. Remove from heat and stir in 1 tsp sesame oil.
Perfect over steamed rice, this stir fry delivers tender beef with crisp-tender broccoli in a glossy, savory-sweet sauce that clings to every bite. I love serving it family-style with extra chili flakes for those who like heat, and the leftovers somehow taste even better the next day—if there are any!
Creamy Cauliflower Mash with Grilled Salmon
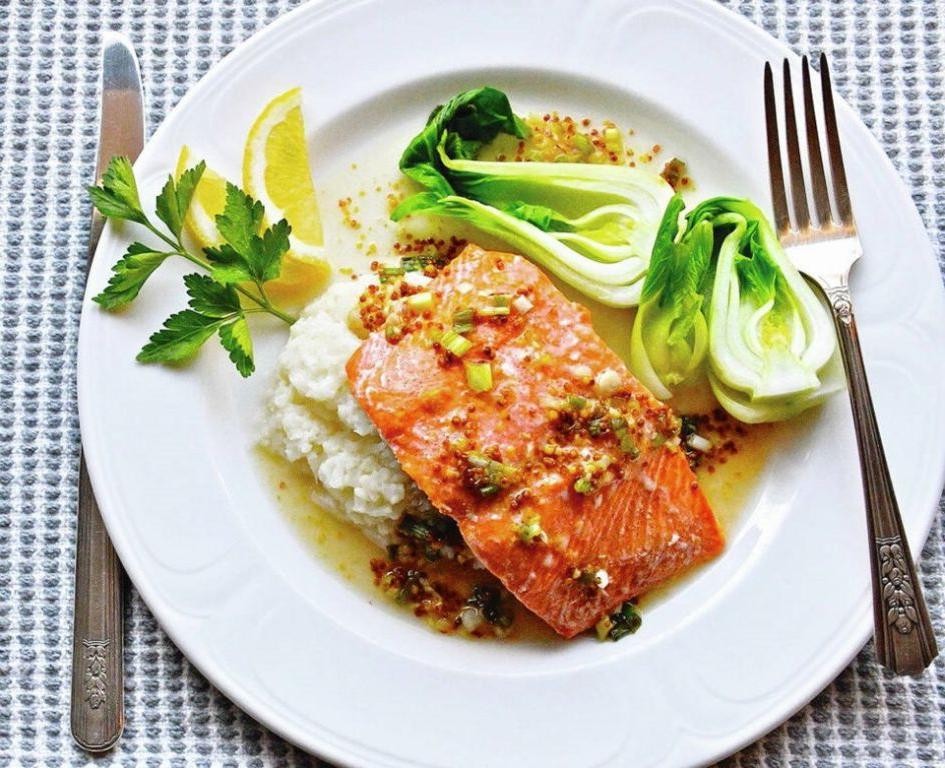
Sometimes you just need a comforting meal that feels indulgent but won’t weigh you down—that’s exactly what this creamy cauliflower mash with grilled salmon delivers. I first made this for my husband after a long work week, and now it’s our go-to Friday night dinner that feels special without the fuss. The combination of silky mash and perfectly flaky salmon never fails to hit the spot.
4
portions15
minutes20
minutesIngredients
– 1 large head cauliflower, cut into florets (I look for one that feels heavy for its size)
– 2 tablespoons unsalted butter (I always use European-style for that richer flavor)
– 1/4 cup heavy cream, warmed (cold cream can make the mash grainy)
– 1/2 teaspoon garlic powder (fresh garlic can be too overpowering here)
– 1/4 teaspoon freshly ground black pepper
– 4 (6-ounce) salmon fillets, skin-on (the skin gets wonderfully crispy)
– 2 tablespoons olive oil (extra virgin is my go-to for its fruity notes)
– 1 teaspoon smoked paprika (this adds a subtle smokiness that complements the salmon beautifully)
– 1/2 teaspoon kosher salt
Instructions
1. Preheat your grill to medium-high heat (about 400°F) if using an outdoor grill, or heat a grill pan over medium-high heat on the stove.
2. Place cauliflower florets in a large pot and cover with water by 1 inch.
3. Bring the water to a boil over high heat, then reduce to a simmer and cook for 10 minutes until the cauliflower is fork-tender.
4. While the cauliflower cooks, pat the salmon fillets completely dry with paper towels—this helps achieve that perfect sear.
5. Brush both sides of each salmon fillet with olive oil.
6. Sprinkle the salmon evenly with smoked paprika, kosher salt, and black pepper.
7. Place salmon skin-side up on the preheated grill and cook for 4 minutes.
8. Flip the salmon using a spatula and cook for another 4 minutes until the internal temperature reaches 125°F for medium.
9. Drain the cooked cauliflower thoroughly in a colander, then return it to the hot pot for 1 minute to evaporate any excess moisture—this prevents watery mash.
10. Transfer the cauliflower to a food processor and add butter, warm heavy cream, garlic powder, and remaining salt.
11. Process for 45 seconds until completely smooth and creamy, scraping down the sides once halfway through.
12. Divide the cauliflower mash among four plates and top each with a grilled salmon fillet.
During our last dinner, I noticed how the creamy cauliflower mash cradles each flaky bite of salmon, creating this wonderful textural contrast. The subtle smokiness from the paprika really elevates the natural richness of the fish. Sometimes I’ll sprinkle fresh chives over the top for a pop of color and mild onion flavor that ties everything together beautifully.
Zucchini Lasagna with Turkey
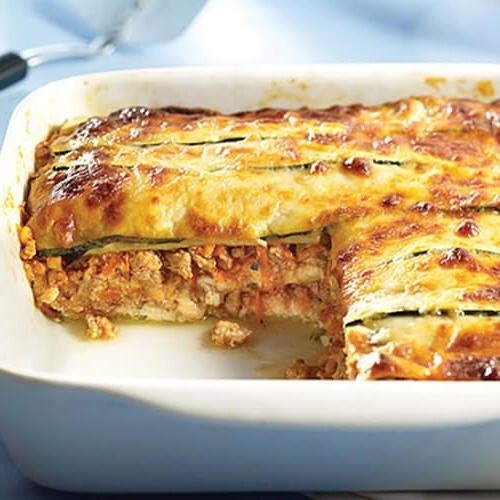
Yesterday, I found myself staring at three massive zucchinis from my garden that needed using up—and let’s be honest, who hasn’t been in that exact situation? That’s when I decided to create this lighter twist on classic lasagna, swapping pasta for zucchini slices and using lean ground turkey for a protein-packed family dinner that doesn’t leave you feeling weighed down.
8
portions25
minutes60
minutesIngredients
– 2 large zucchinis, sliced lengthwise into 1/4-inch thick strips (I always look for firm ones with glossy skin—they hold up better)
– 1 lb lean ground turkey (the 93/7 blend is my go-to for optimal flavor without excess grease)
– 1 24-oz jar of your favorite marinara sauce (I’m partial to Rao’s Homemade for its rich tomato flavor)
– 2 cups whole milk ricotta cheese (let it sit out for 15 minutes to take the chill off—it blends more smoothly)
– 1 large egg, at room temperature (this helps bind the ricotta mixture without making it watery)
– 2 cups shredded mozzarella cheese, divided (I like to shred my own—it melts more evenly than pre-shredded)
– 1/2 cup grated Parmesan cheese (the good stuff from the refrigerated section, not the shelf-stable kind)
– 1 tbsp extra virgin olive oil (my everyday cooking oil for its fruity notes)
– 2 cloves garlic, minced (freshly minced makes all the difference compared to jarred)
– 1 tsp dried oregano (crush it between your palms to release its oils before adding)
– 1/2 tsp salt
– 1/4 tsp black pepper
Instructions
1. Preheat your oven to 375°F and lightly grease a 9×13 inch baking dish with olive oil.
2. Arrange zucchini slices in a single layer on paper towels and sprinkle with 1/4 teaspoon salt to draw out excess moisture.
3. Let zucchini sit for 15 minutes while you prepare other ingredients—this prevents a watery lasagna.
4. Pat zucchini slices completely dry with fresh paper towels, removing all surface moisture.
5. Heat 1 tablespoon olive oil in a large skillet over medium-high heat until it shimmers.
6. Add ground turkey and cook for 6-8 minutes, breaking it up with a wooden spoon until no pink remains.
7. Stir in minced garlic and cook for 1 minute until fragrant but not browned.
8. Pour in marinara sauce, add oregano, remaining salt, and pepper, then simmer for 5 minutes.
9. In a medium bowl, combine ricotta, egg, 1 cup mozzarella, and Parmesan cheese until fully incorporated.
10. Spread 1/2 cup of turkey sauce evenly across the bottom of your prepared baking dish.
11. Layer half of the zucchini slices over the sauce, slightly overlapping them like traditional lasagna noodles.
12. Spread half of the ricotta mixture evenly over the zucchini layer using a spatula.
13. Spoon half of the remaining turkey sauce over the ricotta layer.
14. Repeat layers with remaining zucchini, ricotta mixture, and turkey sauce.
15. Top with remaining 1 cup mozzarella cheese, distributing it evenly across the surface.
16. Cover dish tightly with aluminum foil and bake for 30 minutes at 375°F.
17. Remove foil and bake uncovered for 15-20 minutes until cheese is golden and bubbly.
18. Let lasagna rest for 10 minutes before slicing—this allows layers to set for cleaner cuts.
My family can never wait the full resting time because the aroma of bubbling cheese and herbs fills the kitchen so invitingly. The zucchini becomes tender but still holds its structure, creating satisfying layers between the savory turkey and creamy cheeses. Make this ahead and reheat individual portions—it tastes even better the next day when the flavors have fully melded together.
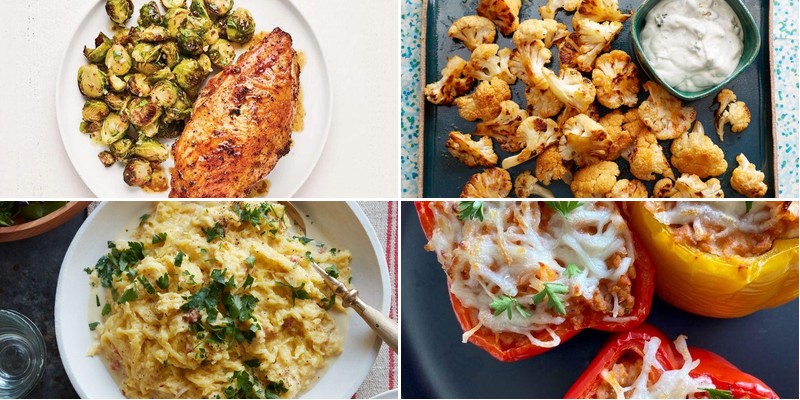
Stuffed Bell Peppers with Ground Chicken
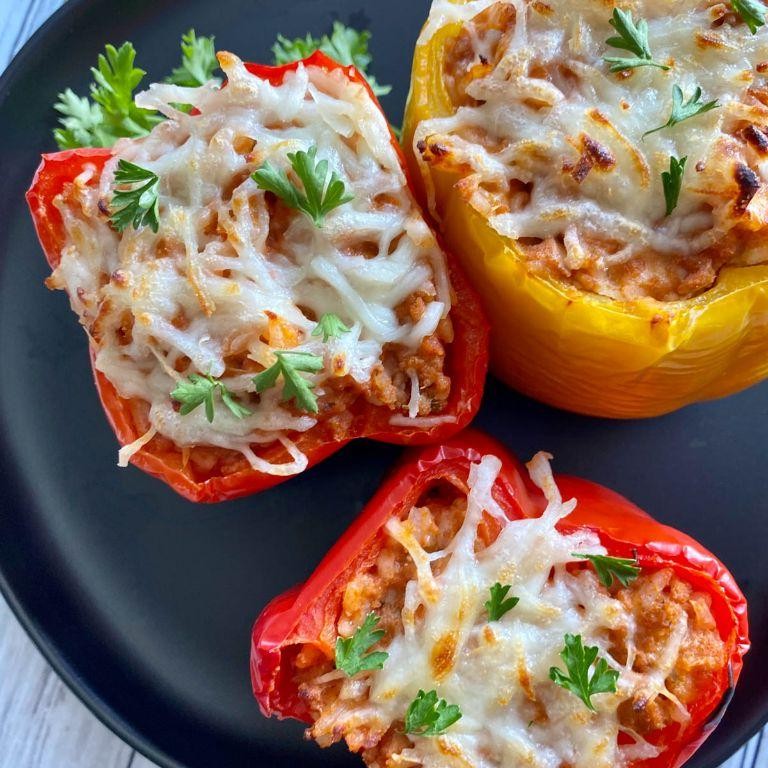
Every time I make these stuffed bell peppers, I’m transported back to my grandmother’s kitchen, where the aroma of savory filling and roasted peppers would fill the entire house. There’s something so comforting about pulling these colorful beauties out of the oven, knowing you’ve got a complete, healthy meal all wrapped up in nature’s perfect containers. I love how versatile this recipe is—you can easily swap ingredients based on what’s in your fridge.
5
portions20
minutes46
minutesIngredients
- 4 large bell peppers (I always go for a mix of colors—the red ones are sweeter, but green hold their shape beautifully)
- 1 lb ground chicken (I find the 93% lean works best for flavor without being too greasy)
- 1 cup cooked rice (leftover jasmine rice from last night’s takeout works perfectly here)
- 1 small yellow onion, finely diced (I let mine sit in the freezer for 10 minutes first—no tears!)
- 2 cloves garlic, minced (fresh is non-negotiable for me—that jarred stuff just doesn’t compare)
- 1 cup marinara sauce (my secret is using the good stuff from the Italian market)
- 1/2 cup shredded mozzarella cheese (I grate my own—it melts so much creamier than pre-shredded)
- 1 tbsp olive oil (extra virgin is my kitchen workhorse)
- 1 tsp dried oregano (rub it between your palms first to wake up the oils)
- 1/2 tsp salt (I use kosher—it distributes more evenly)
- 1/4 tsp black pepper (freshly ground makes all the difference)
Instructions
- Preheat your oven to 375°F and line a baking dish with parchment paper.
- Slice the tops off the bell peppers and remove all seeds and membranes, creating hollow pepper cups.
- Heat olive oil in a large skillet over medium-high heat until it shimmers, about 1 minute.
- Add diced onion and cook until translucent, 3-4 minutes, stirring frequently.
- Add minced garlic and cook for 30 seconds until fragrant but not browned.
- Add ground chicken, breaking it up with a wooden spoon, and cook until no pink remains, 5-6 minutes.
- Stir in cooked rice, marinara sauce, oregano, salt, and pepper until fully combined.
- Fill each pepper cup with the chicken mixture, packing it down gently but not too tightly.
- Place stuffed peppers in the prepared baking dish and cover tightly with foil.
- Bake covered for 25 minutes until peppers are tender when pierced with a fork.
- Remove foil and sprinkle mozzarella cheese evenly over each pepper.
- Return to oven uncovered and bake for 10 more minutes until cheese is bubbly and lightly golden.
- Let rest for 5 minutes before serving—this allows the filling to set properly.
Out of the oven, these peppers have the most wonderful contrast—the tender-crisp pepper walls give way to the savory, moist filling that’s studded with melty cheese pockets. I love serving them with a simple green salad for a complete meal, but they’re also fantastic chopped up and stuffed into tortillas for next-day lunch wraps. The flavors deepen overnight, making the leftovers arguably even better than the first serving.
Spaghetti Squash Carbonara
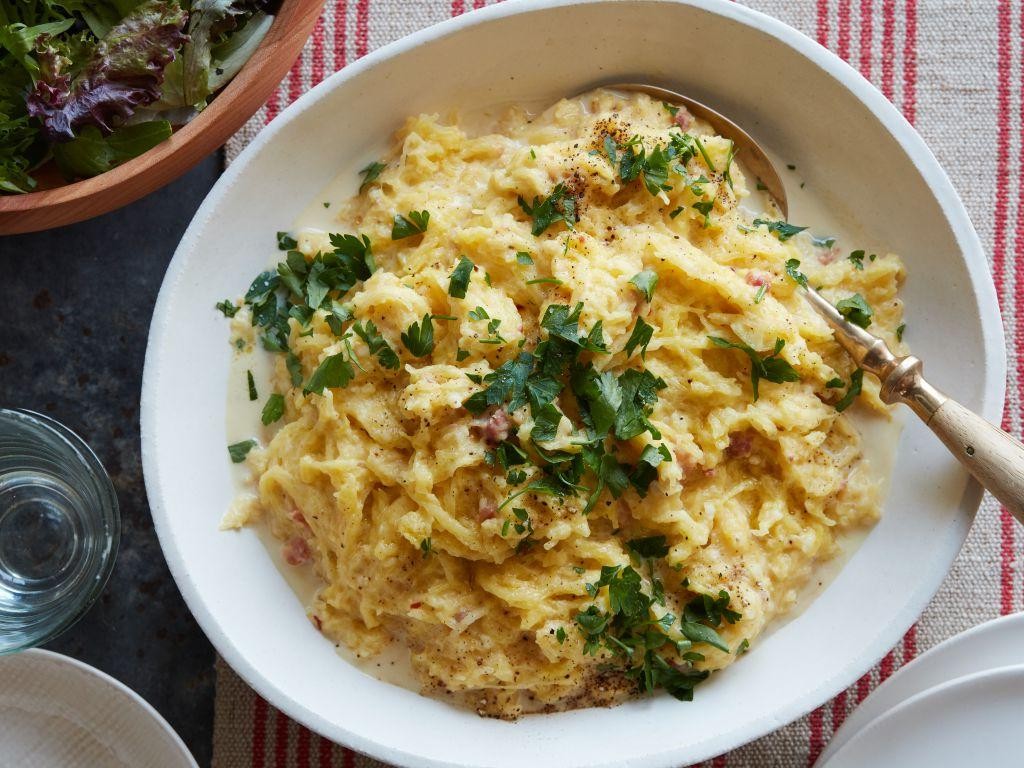
Zesty spaghetti squash carbonara has become my go-to comfort food when I want something indulgent yet healthy—it’s the dish I always make when my vegetarian friends come over for dinner. I first discovered this recipe when my garden produced three massive spaghetti squashes last fall, and now it’s in our regular rotation because it feels fancy but comes together in under an hour.
4
servings15
minutes50
minutesIngredients
– 1 medium spaghetti squash (about 3 pounds) – I look for one that feels heavy for its size
– 2 tablespoons extra virgin olive oil – this is my everyday cooking oil
– 4 large eggs at room temperature – they incorporate better into the sauce when not cold
– 1 cup grated Parmesan cheese – I prefer the nuttiness of freshly grated
– 4 slices thick-cut bacon, chopped – the crispy bits make all the difference
– 3 cloves garlic, minced – because everything’s better with garlic
– 1/2 teaspoon black pepper – freshly cracked adds nice warmth
– 1/4 cup chopped fresh parsley – from my windowsill herb garden
Instructions
1. Preheat your oven to 400°F and line a baking sheet with parchment paper.
2. Carefully slice the spaghetti squash in half lengthwise using a sharp chef’s knife.
3. Scoop out all the seeds and stringy pulp from both squash halves with a spoon.
4. Brush the cut sides of the squash with 1 tablespoon of olive oil and place them cut-side down on the prepared baking sheet.
5. Roast the squash for 35-40 minutes until the flesh is easily pierced with a fork.
6. While the squash roasts, cook the chopped bacon in a large skillet over medium heat for 8-10 minutes until crispy.
7. Transfer the cooked bacon to a paper towel-lined plate, leaving 1 tablespoon of bacon drippings in the skillet.
8. Add the remaining 1 tablespoon of olive oil and minced garlic to the skillet and cook for 1 minute until fragrant.
9. Remove the squash from the oven and let it cool for 5 minutes until safe to handle.
10. Use a fork to scrape the squash flesh into spaghetti-like strands into a large bowl.
11. In a separate medium bowl, whisk together the eggs, Parmesan cheese, and black pepper until well combined.
12. Add the hot squash strands to the skillet with the garlic and toss to coat evenly.
13. Remove the skillet from heat and quickly pour in the egg mixture while continuously stirring.
14. Stir in the cooked bacon and chopped parsley until everything is well incorporated.
15. Serve immediately while the sauce is still creamy and warm.
Seriously, the way the creamy egg sauce clings to those tender squash strands creates this magical texture that’s both light and satisfying. I love how the salty bacon and nutty Parmesan balance the subtle sweetness of the squash—it’s a flavor combination that always impresses. Sometimes I’ll top it with extra parsley and red pepper flakes for a colorful presentation that makes it feel restaurant-worthy.
Lemon Herb Roasted Chicken with Brussels Sprouts
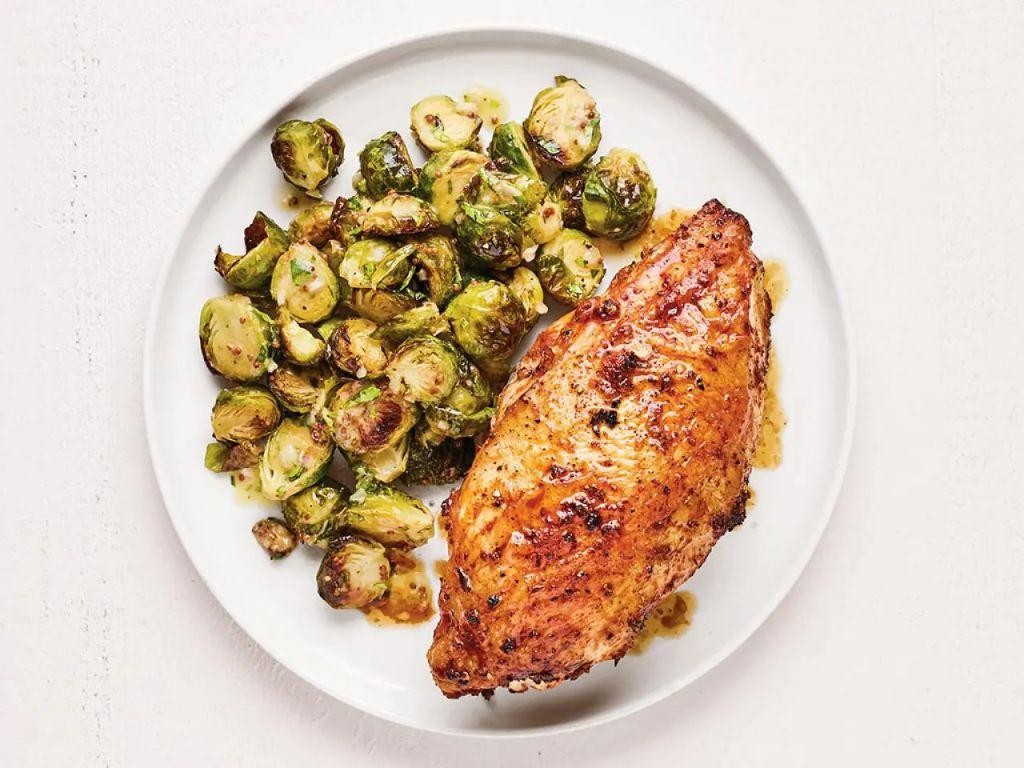
Whenever I’m craving that perfect cozy dinner that feels both fancy and completely doable on a busy weeknight, this lemon herb roasted chicken with Brussels sprouts is my absolute go-to. There’s something magical about how the chicken gets so juicy while the Brussels sprouts caramelize into little flavor bombs in the same pan—plus my kitchen smells incredible for hours afterward, which is honestly half the reward!
4
servings15
minutes75
minutesIngredients
- 1 whole chicken (about 4 lbs) – I always pat mine dry with paper towels first for extra crispy skin
- 1 lb Brussels sprouts, trimmed and halved – look for the smaller ones; they’re sweeter and more tender
- 2 lemons – one sliced thin, one juiced (I roll mine on the counter first to get more juice)
- 3 tbsp extra virgin olive oil – my everyday cooking oil that I always have within arm’s reach
- 4 cloves garlic, minced – because is there ever such a thing as too much garlic?
- 1 tbsp fresh rosemary, chopped – I grow this in my kitchen window herb garden
- 1 tsp kosher salt – I prefer the larger crystals for better seasoning control
- ½ tsp black pepper, freshly ground – my pepper mill gets a serious workout in this house
Instructions
- Preheat your oven to 425°F and position the rack in the middle—this ensures even cooking from all sides.
- Pat the chicken completely dry inside and out with paper towels; this is my secret for achieving that perfectly crispy, golden skin everyone loves.
- In a small bowl, combine the olive oil, minced garlic, chopped rosemary, salt, and pepper to create your herb rub.
- Gently loosen the skin over the chicken breast and thighs with your fingers, being careful not to tear it.
- Spread about half of the herb mixture evenly underneath the skin, directly onto the chicken meat.
- Rub the remaining herb mixture all over the outside of the chicken, making sure to cover every surface.
- Stuff the chicken cavity with the thin lemon slices—they’ll steam from the inside and infuse incredible flavor.
- Arrange the halved Brussels sprouts around the chicken in your roasting pan, cut sides down for maximum caramelization.
- Drizzle the Brussels sprouts with the fresh lemon juice and toss them gently to coat.
- Roast for 60-75 minutes at 425°F until the chicken skin is deep golden brown and crispy, and the internal temperature reaches 165°F when measured at the thickest part of the thigh.
- Remove the pan from the oven and let the chicken rest for 15 minutes before carving—this allows the juices to redistribute throughout the meat.
You’ll love how the chicken stays incredibly moist while the skin turns shatteringly crisp, and those Brussels sprouts become sweet and caramelized with just the right amount of char. Yesterday I served this over creamy polenta to soak up all those amazing pan juices, and it was absolute perfection—definitely worth trying if you want to take it to the next level!
Keto Cheeseburger Casserole
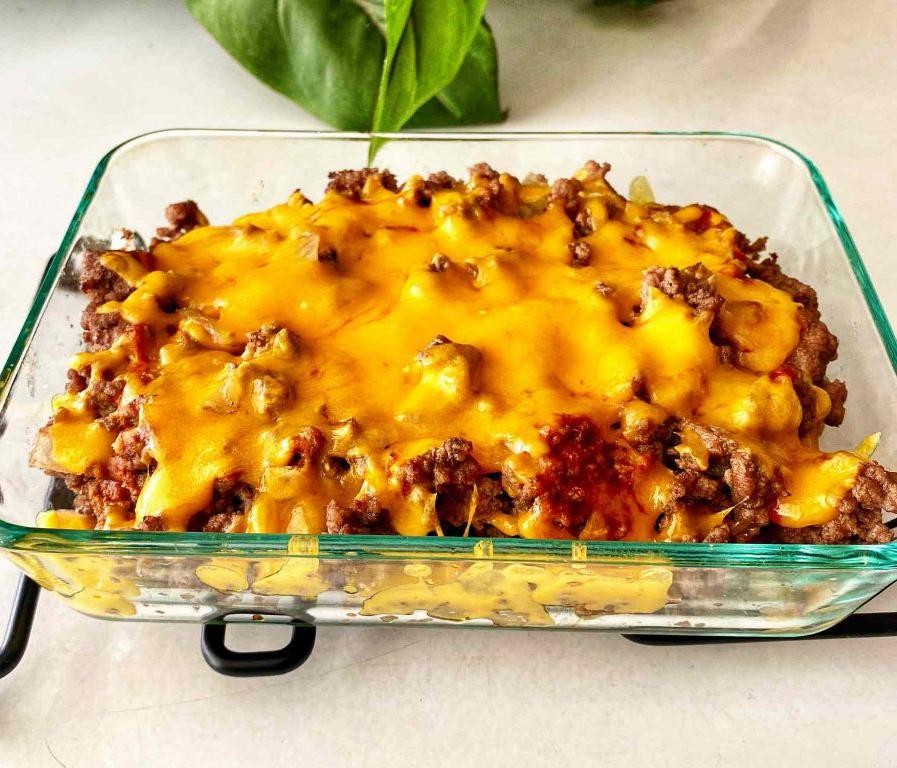
Gosh, I remember the first time I tried this keto cheeseburger casserole—it was one of those busy weeknights when my family was craving burgers but I wanted something more substantial. This dish has since become our go-to comfort food that satisfies those cheeseburger cravings without the carbs.
6
portions15
minutes40
minutesIngredients
– 1 lb ground beef (I like 80/20 for the best flavor and moisture)
– 1 medium yellow onion, diced (I always shed a few tears while chopping these)
– 2 cloves garlic, minced (fresh is my preference for that aromatic punch)
– 1 cup sugar-free tomato sauce (check those labels carefully for hidden sugars)
– 1 cup heavy cream (I use the good stuff from the local dairy)
– 8 oz cream cheese, softened (room temp makes it blend so much easier)
– 2 cups shredded cheddar cheese (I buy blocks and shred my own for better melting)
– 1 tbsp Worcestershire sauce (that umami kick is essential)
– 1 tsp paprika
– 1/2 tsp black pepper
– 1/2 tsp salt (I use sea salt for better flavor distribution)
Instructions
1. Preheat your oven to 375°F and grease a 9×13 inch baking dish with cooking spray.
2. Brown 1 lb ground beef in a large skillet over medium-high heat for 8-10 minutes until no pink remains.
3. Add diced onion and cook for 4-5 minutes until translucent and fragrant.
4. Stir in minced garlic and cook for 1 minute until aromatic but not browned.
5. Drain excess grease from the skillet using a slotted spoon.
6. Reduce heat to medium-low and add sugar-free tomato sauce, heavy cream, and softened cream cheese.
7. Stir continuously for 3-4 minutes until the cream cheese is fully melted and incorporated.
8. Mix in Worcestershire sauce, paprika, black pepper, and salt until well combined.
9. Transfer the mixture to your prepared baking dish and spread evenly.
10. Top generously with shredded cheddar cheese, covering the entire surface.
11. Bake at 375°F for 20-25 minutes until the cheese is golden and bubbly.
12. Let the casserole rest for 5-7 minutes before serving to allow it to set properly. Perfectly cheesy and satisfying, this casserole delivers all the classic burger flavors in every forkful. I love serving it with a crisp side salad for contrast, and the leftovers taste even better the next day when the flavors have fully melded together.
Eggplant Parmesan with Marinara Sauce
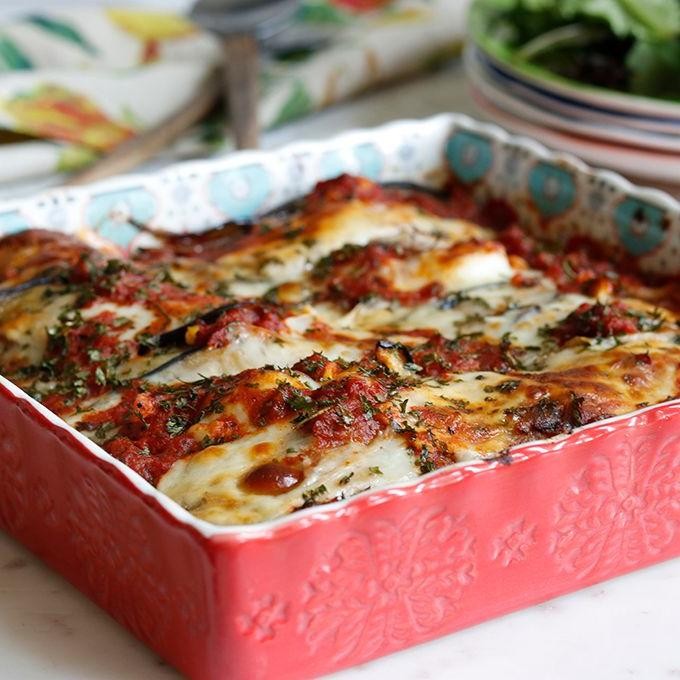
Vividly layered and wonderfully comforting, this Eggplant Parmesan has become my go-to Sunday dinner—it reminds me of my grandmother’s kitchen, where the scent of simmering marinara would fill the house for hours. I love how the crispy eggplant melds with rich sauce and gooey cheese, creating a dish that feels both rustic and celebratory. Whether you’re feeding a crowd or just craving something cozy, this recipe never disappoints.
6
servings45
minutes60
minutesIngredients
– 2 large eggplants, sliced into ½-inch rounds (I always salt them first to draw out bitterness—trust me, it makes a difference!)
– 1 cup all-purpose flour (I keep mine in a shallow bowl for easy dredging)
– 3 large eggs, lightly beaten (room temp eggs help the breading stick better)
– 2 cups Italian-style breadcrumbs (I like the ones with herbs already mixed in for extra flavor)
– ½ cup extra virgin olive oil (my go-to for frying—it adds a fruity note)
– 3 cups marinara sauce (homemade or your favorite jarred brand)
– 2 cups shredded mozzarella cheese (I sometimes mix in a handful of provolone for extra meltiness)
– ½ cup grated Parmesan cheese (the real stuff, please—it’s worth the splurge!)
– 1 tsp dried basil (I rub it between my palms to wake up the aroma)
– ½ tsp black pepper (freshly ground, if you have it)
Instructions
1. Arrange eggplant slices in a single layer on a baking sheet and sprinkle both sides generously with salt.
2. Let the eggplant sit for 30 minutes to draw out excess moisture and bitterness.
3. Pat the eggplant slices completely dry with paper towels to ensure crispy frying.
4. Place flour in a shallow bowl, beaten eggs in a second bowl, and breadcrumbs in a third bowl.
5. Dredge each eggplant slice in flour, shaking off any excess.
6. Dip the floured slice into the beaten eggs, coating both sides evenly.
7. Press the egg-coated slice into the breadcrumbs, ensuring full coverage.
8. Heat olive oil in a large skillet over medium heat until it shimmers (about 350°F).
9. Fry breaded eggplant slices in batches for 3–4 minutes per side, until golden brown and crispy.
10. Transfer fried eggplant to a paper towel-lined plate to drain excess oil.
11. Preheat your oven to 375°F and spread 1 cup of marinara sauce in the bottom of a 9×13-inch baking dish.
12. Arrange a single layer of fried eggplant over the sauce.
13. Sprinkle half of the mozzarella and Parmesan cheeses over the eggplant layer.
14. Spoon another cup of marinara sauce evenly over the cheese.
15. Repeat with remaining eggplant, sauce, and cheeses.
16. Sprinkle dried basil and black pepper over the top layer.
17. Bake uncovered for 25–30 minutes, until the cheese is bubbly and lightly browned.
18. Let the dish rest for 10 minutes before serving to allow the layers to set.
Perfectly golden and bubbling straight from the oven, this Eggplant Parmesan boasts a satisfying contrast of crispy edges and tender, saucy centers. The melty mozzarella and sharp Parmesan create a rich blanket over the savory marinara-soaked eggplant. I love serving it over a bed of spaghetti or with a simple arugula salad to cut through the richness—leftovers (if there are any!) taste even better the next day.
Blackened Tilapia with Cucumber Salad
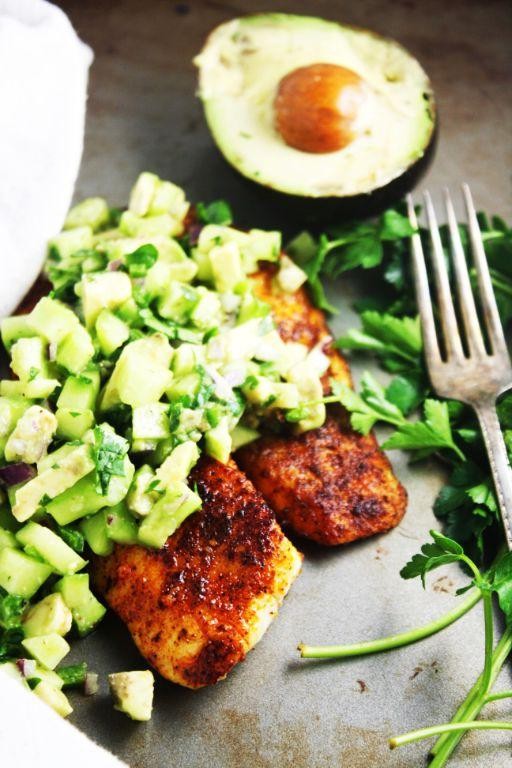
Zesty and satisfying, this blackened tilapia with cucumber salad has become my go-to weeknight dinner that feels fancy without the fuss. I first discovered this combination during a summer vacation in Florida, where the local fish market convinced me to try tilapia with their signature spice blend – now I make my own version weekly when I need something quick but impressive.
5
servings15
minutes10
minutesIngredients
– 4 tilapia fillets (I always pat them extra dry with paper towels for better searing)
– 2 tbsp blackening seasoning (my homemade blend includes smoked paprika and a touch of cayenne)
– 2 tbsp olive oil (extra virgin is my kitchen staple for everything)
– 2 medium cucumbers, thinly sliced (I prefer English cucumbers for fewer seeds)
– 1/4 red onion, thinly sliced (soaking in ice water for 10 minutes takes the bite out)
– 2 tbsp fresh dill, chopped (nothing beats the fragrance of fresh herbs)
– 1/4 cup plain Greek yogurt (I use full-fat for creamier texture)
– 1 tbsp lemon juice (freshly squeezed makes all the difference)
– 1/2 tsp salt
– 1/4 tsp black pepper
Instructions
1. Pat the tilapia fillets completely dry with paper towels on both sides.
2. Rub 2 tablespoons of blackening seasoning evenly over all surfaces of each fillet.
3. Heat 2 tablespoons of olive oil in a large skillet over medium-high heat until shimmering, about 2 minutes.
4. Place seasoned tilapia fillets in the hot skillet without crowding them.
5. Cook for 3-4 minutes until the bottom develops a dark crust and releases easily from the pan.
6. Flip each fillet carefully using a thin spatula.
7. Cook for another 2-3 minutes until the fish flakes easily with a fork and reaches 145°F internally.
8. Transfer cooked tilapia to a clean plate to rest while preparing the salad.
9. In a medium bowl, combine 2 thinly sliced cucumbers and 1/4 sliced red onion.
10. Add 2 tablespoons chopped fresh dill, 1/4 cup Greek yogurt, and 1 tablespoon lemon juice.
11. Sprinkle with 1/2 teaspoon salt and 1/4 teaspoon black pepper.
12. Toss everything together until the cucumber slices are evenly coated with the yogurt dressing.
Perfectly flaky fish with that signature blackened crust pairs wonderfully with the cool, creamy cucumber salad. The contrast between the spicy exterior and refreshing salad makes this dish feel balanced and complete. I love serving this over quinoa or with crusty bread to soak up any extra dressing.
Grilled Pork Chops with Garlic Spinach
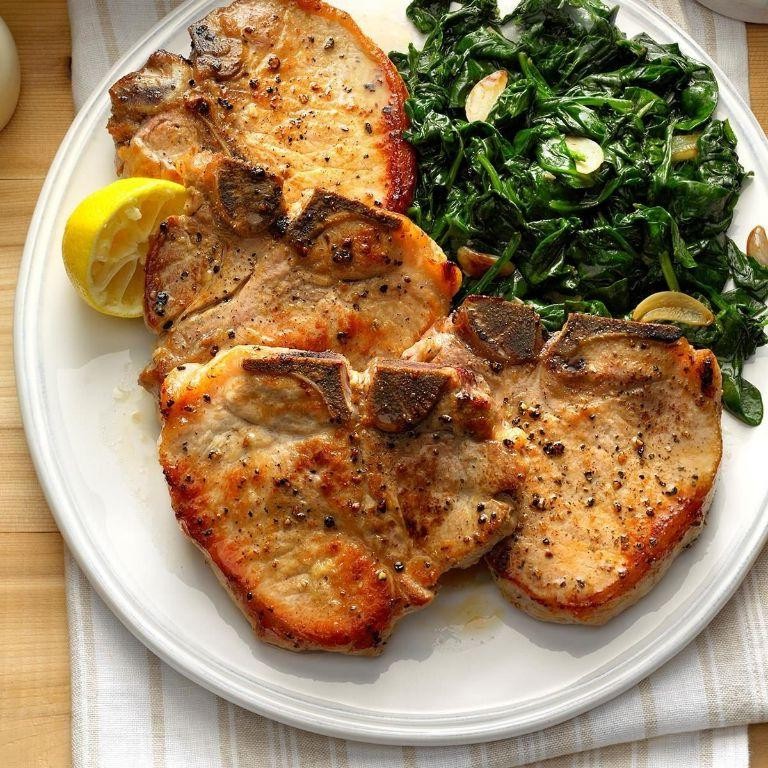
Believe me when I say that nothing beats the satisfaction of perfectly grilled pork chops paired with garlicky spinach—it’s my go-to weeknight dinner that always feels special. I first fell in love with this combo after a summer barbecue at my cousin’s, where the smoky chops and vibrant greens stole the show. Now, it’s a regular in my rotation, especially when I want something hearty but not heavy.
3
servings10
minutes20
minutesIngredients
– 4 bone-in pork chops, about 1-inch thick (I always pick chops with a nice fat cap for extra flavor)
– 3 tablespoons extra virgin olive oil (my go-to for its fruity notes)
– 4 cloves garlic, minced (freshly minced makes all the difference—I avoid jarred here)
– 1 teaspoon kosher salt (I prefer this over table salt for better control)
– ½ teaspoon black pepper, freshly ground (it just tastes brighter this way)
– 10 ounces fresh spinach (I grab a couple of bags to save on prep time)
– 2 tablespoons unsalted butter (room temp blends in smoothly)
– 1 lemon, cut into wedges (for a zesty finish—my little secret)
Instructions
1. Preheat your grill to medium-high heat, around 400°F, and lightly oil the grates to prevent sticking.
2. Pat the pork chops dry with paper towels—this helps them sear nicely instead of steaming.
3. Rub the pork chops evenly with 2 tablespoons of olive oil, then season both sides with kosher salt and black pepper.
4. Place the pork chops on the grill and cook for 5–6 minutes per side, until they reach an internal temperature of 145°F for juicy results.
5. Transfer the grilled pork chops to a plate and let them rest for 5 minutes to redistribute the juices.
6. While the chops rest, heat the remaining 1 tablespoon of olive oil in a large skillet over medium heat.
7. Add the minced garlic to the skillet and sauté for 1 minute, until fragrant but not browned.
8. Tip: Stir the garlic constantly to avoid burning—it can turn bitter if overcooked.
9. Add the fresh spinach to the skillet in batches, stirring until wilted, which takes about 3–4 minutes.
10. Stir in the unsalted butter until melted and combined with the spinach for a silky texture.
11. Serve the garlic spinach alongside the pork chops, topped with a squeeze of fresh lemon juice from the wedges.
Crisp-edged pork chops with tender, garlic-infused spinach make for a dish that’s both rustic and refined. The lemon brightens everything up, and I love serving it with crusty bread to soak up the buttery juices—it’s a simple touch that turns dinner into a feast.
Buttery Parmesan Garlic Roasted Mushrooms
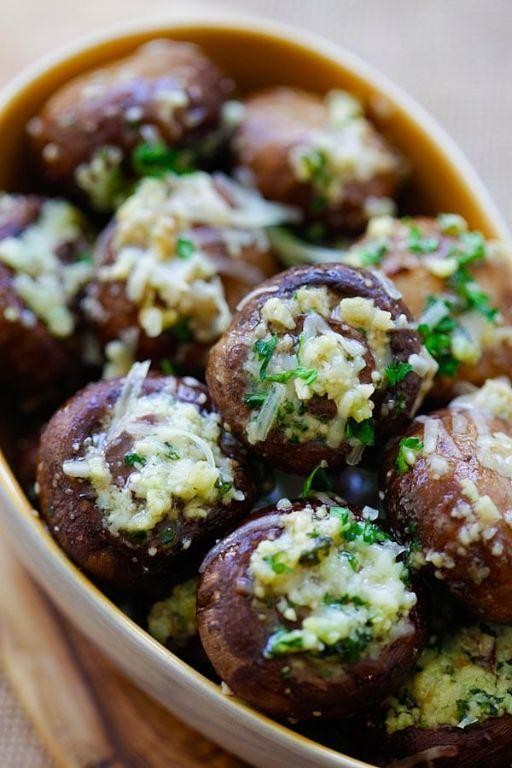
Wandering through the farmers market last weekend, I spotted these gorgeous cremini mushrooms that practically begged to be roasted with garlic and cheese—my absolute weakness. There’s something magical about how mushrooms transform in the oven, turning meaty and rich while soaking up all those savory flavors.
3
servings10
minutes27
minutesIngredients
- 1 pound cremini mushrooms (I always choose ones with tight caps—they roast up so much better)
- 3 tablespoons unsalted butter (melted, because it coats every nook so perfectly)
- 2 tablespoons extra virgin olive oil (my trusty go-to for roasting)
- 4 large garlic cloves (minced—don’t be shy here, we want that punch!)
- 1/2 cup freshly grated Parmesan cheese (the real stuff, none of that powdery business)
- 1 tablespoon fresh parsley (chopped, for that bright finish I adore)
- 1/2 teaspoon kosher salt (it sticks to the mushrooms better than table salt)
- 1/4 teaspoon black pepper (freshly ground makes all the difference)
Instructions
- Preheat your oven to 400°F and line a baking sheet with parchment paper.
- Wipe the mushrooms clean with a damp paper towel—never soak them, they’re like little sponges! (Tip: This prevents them from getting waterlogged.)
- Trim the very ends of the mushroom stems if they look dry.
- In a large bowl, combine the melted butter, olive oil, and minced garlic.
- Add the cleaned mushrooms to the bowl and toss until every mushroom is thoroughly coated.
- Sprinkle the kosher salt and black pepper over the mushrooms, tossing again to distribute evenly.
- Spread the mushrooms in a single layer on your prepared baking sheet. (Tip: Crowding will steam them—we want crispy edges!)
- Roast for 15 minutes at 400°F until the mushrooms start releasing their liquid.
- Remove the baking sheet from the oven and sprinkle the Parmesan cheese evenly over the mushrooms.
- Return to the oven and roast for another 10-12 minutes at 400°F until the cheese is golden and the mushrooms are tender. (Tip: Watch closely during the last few minutes—Parmesan can go from golden to burnt quickly!)
- Sprinkle with fresh parsley immediately after removing from the oven.
Velvety and rich, these mushrooms develop an almost meaty texture while the Parmesan forms the most delightful crispy bits. I love serving them over creamy polenta or tossing them with hot pasta—the buttery garlic sauce that forms is absolutely divine.
Thai Basil Beef Lettuce Wraps

Never underestimate the power of a quick, flavorful meal that makes you feel like you’re dining at your favorite Thai spot! My family actually discovered this dish during a hectic weeknight when takeout wasn’t an option, and now it’s our go-to when we crave something fresh yet satisfying. Nothing beats wrapping that savory beef in crisp lettuce leaves for a perfect handheld dinner.
8
portions15
minutes12
minutesIngredients
– 1 lb ground beef (I like 85/15 for optimal flavor without too much grease)
– 2 tbsp vegetable oil (my trusty wok loves a good high-heat oil)
– 3 garlic cloves, minced (freshly minced makes all the difference—I keep a garlic press right by my cutting board)
– 1 Thai chili, finely chopped (adjust to your heat preference, but one gives a nice gentle kick)
– 1 red bell pepper, thinly sliced (I always grab the brightest one at the store for maximum crunch)
– 1 tbsp fish sauce (this is the secret umami booster—don’t skip it!)
– 1 tbsp soy sauce (I use low-sodium to control saltiness)
– 1 tsp brown sugar (just a hint to balance the savory notes)
– 1 cup fresh Thai basil leaves (stems removed—they’re tougher, so I pluck just the leaves)
– 8 large butter lettuce leaves (rinsed and patted dry thoroughly so they don’t get soggy)
Instructions
1. Heat vegetable oil in a large skillet or wok over medium-high heat until it shimmers, about 1 minute.
2. Add ground beef and cook for 5–6 minutes, breaking it up with a spatula until no pink remains and it’s lightly browned.
3. Stir in minced garlic and chopped Thai chili, cooking for 1 minute until fragrant—be careful not to burn the garlic!
4. Add thinly sliced red bell pepper and cook for 2 minutes until slightly softened but still crisp.
5. Pour in fish sauce, soy sauce, and brown sugar, stirring to coat everything evenly.
6. Cook for another 2 minutes, allowing the sauces to reduce slightly and cling to the beef.
7. Remove the skillet from heat and immediately stir in fresh Thai basil leaves until just wilted, about 30 seconds.
8. Spoon the beef mixture into the prepared butter lettuce leaves, dividing it evenly among them.
My favorite part is that first bite—the cool, crisp lettuce gives way to warm, savory beef with a hint of spice and that unmistakable basil aroma. We sometimes serve these with extra lime wedges for squeezing over the top, or even alongside steamed jasmine rice for a heartier meal.
Buffalo Cauliflower with Blue Cheese Dressing
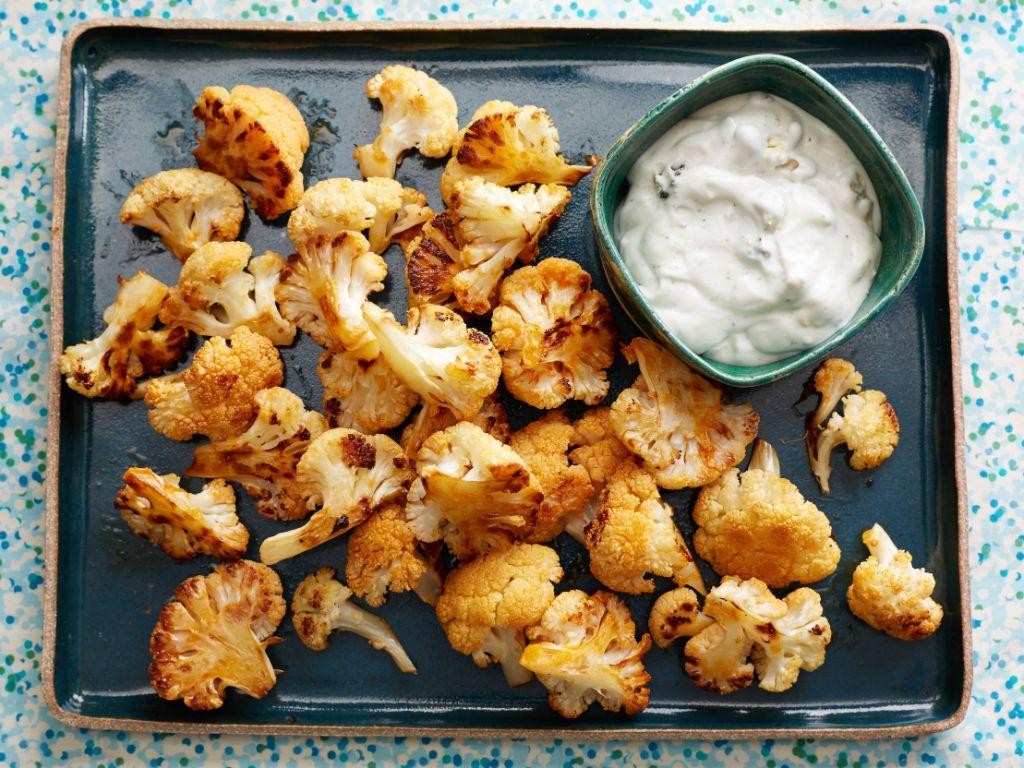
Last week, I was craving that classic buffalo wing flavor but wanted something a bit lighter—enter this genius Buffalo Cauliflower with Blue Cheese Dressing. It’s become my go-to for game day or even a quick weeknight treat when I need that spicy, tangy fix without the guilt.
2
servings15
minutes30
minutesIngredients
- 1 large head of cauliflower, cut into bite-sized florets (I look for one that feels heavy for its size)
- 1 cup all-purpose flour (I always use unbleached—it gives a nicer color)
- 1 cup milk (whole milk makes the coating extra crispy, but any works)
- 1/2 cup hot sauce, like Frank’s RedHot (this is non-negotiable for authentic flavor)
- 2 tablespoons unsalted butter, melted (salted will make it too salty)
- 1/2 cup crumbled blue cheese (get the good stuff—it makes the dressing)
- 1/4 cup sour cream (full-fat for creaminess)
- 2 tablespoons mayonnaise (this secret ingredient prevents curdling)
- 1 tablespoon white vinegar (a splash brightens everything up)
- 1/2 teaspoon garlic powder (I prefer powder over fresh here for smoothness)
- 1/4 teaspoon black pepper, freshly ground
Instructions
- Preheat your oven to 450°F and line a baking sheet with parchment paper.
- Whisk together the flour and milk in a large bowl until smooth—no lumps allowed.
- Toss the cauliflower florets in the flour mixture until evenly coated. Tip: Let excess batter drip off to avoid sogginess.
- Arrange the coated cauliflower in a single layer on the baking sheet, leaving space between pieces.
- Bake for 20 minutes until the edges start turning golden. Tip: Rotate the pan halfway for even browning.
- While baking, whisk the hot sauce and melted butter in a medium bowl.
- Remove the cauliflower from the oven and carefully toss it in the hot sauce mixture until fully coated.
- Return the cauliflower to the baking sheet and bake for another 10 minutes until crispy.
- Meanwhile, combine blue cheese, sour cream, mayonnaise, vinegar, garlic powder, and black pepper in a small bowl. Tip: Stir gently to keep some blue cheese chunks intact.
- Serve the hot cauliflower immediately with the blue cheese dressing on the side. Every bite delivers that perfect crunch followed by a spicy kick, balanced by the cool, tangy dressing. I love piling these onto a salad for a full meal or stacking them as sliders with celery sticks—they’re dangerously addictive.
Grilled Steak with Chimmichurri Cauliflower Rice
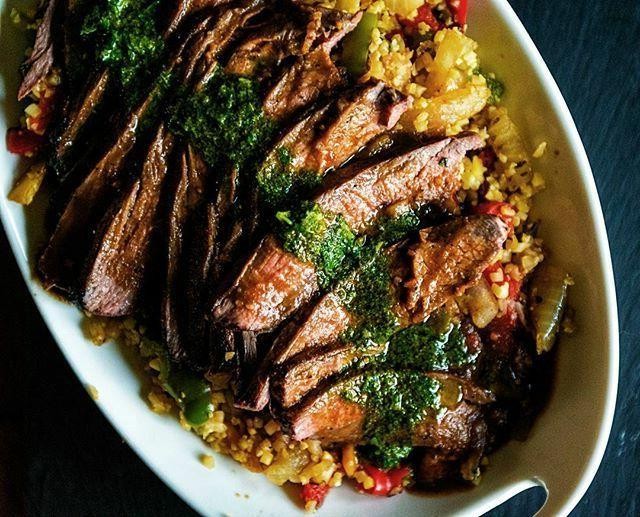
Warm summer evenings always make me crave something fresh yet satisfying, and this grilled steak with chimichurri cauliflower rice has become my go-to weeknight dinner. Just last week, my neighbor caught a whiff of the chimichurri from across the yard and texted me for the recipe—it’s that good! I love how the bright, herby sauce cuts through the richness of the steak while keeping things light with cauliflower rice.
2
plates15
minutes18
minutesIngredients
– 1.5 lbs ribeye steak (I always let it sit out for 30 minutes to take the chill off—it sears so much better!)
– 4 cups riced cauliflower (fresh or frozen both work, but I grab the frozen bags for convenience)
– 1 cup fresh parsley leaves (flat-leaf is my preference for its milder flavor)
– 1/2 cup fresh cilantro leaves (don’t skip this—it gives the chimichurri its signature zing)
– 1/4 cup extra virgin olive oil (my go-to for dressings and sauces)
– 3 tbsp red wine vinegar (this adds the perfect tangy punch)
– 3 cloves garlic (I always use fresh—the pre-minced stuff just doesn’t compare)
– 1 tsp kosher salt (coarse salt sticks to the steak beautifully)
– 1/2 tsp black pepper (freshly cracked, please!)
– 1/2 tsp red pepper flakes (adjust to your spice tolerance—I like a little heat)
Instructions
1. Pat the ribeye steak completely dry with paper towels on both sides.
2. Rub 1/2 tsp kosher salt and 1/4 tsp black pepper evenly over both sides of the steak.
3. Preheat your grill to high heat, aiming for 450°F—this ensures a perfect sear.
4. Place the steak on the hot grill and cook for 4 minutes without moving it to develop a crust.
5. Flip the steak using tongs and cook for another 4 minutes for medium-rare (135°F internal temperature).
6. Transfer the steak to a cutting board and let it rest for 8 minutes—this keeps the juices inside.
7. While the steak rests, heat 2 tbsp olive oil in a large skillet over medium-high heat.
8. Add the riced cauliflower to the skillet and cook for 6 minutes, stirring occasionally, until tender but not mushy.
9. Combine parsley, cilantro, garlic, red wine vinegar, remaining 2 tbsp olive oil, 1/2 tsp salt, 1/4 tsp black pepper, and red pepper flakes in a food processor.
10. Pulse the mixture 8-10 times until finely chopped but not pureed—you want some texture.
11. Slice the rested steak against the grain into 1/2-inch thick strips.
12. Stir half of the chimichurri sauce into the cooked cauliflower rice until well combined.
13. Divide the chimichurri cauliflower rice between two plates and top with sliced steak.
14. Drizzle the remaining chimichurri sauce over the steak just before serving.
Juicy steak slices melt alongside the vibrant, herb-packed cauliflower rice, creating a satisfying contrast between rich and fresh. The chimichurri’s sharpness cuts through the steak’s richness beautifully, while the cauliflower rice stays light and fluffy—no heaviness here! For a fun twist, I sometimes serve it in shallow bowls with extra sauce for dipping, or pile it into lettuce cups for a low-carb taco night vibe.
Conclusion
Zesty, nutritious, and simple—these 35 low-carb dinners make healthy living deliciously achievable. We hope you find new favorites to add to your weekly rotation! Give a recipe a try, then let us know which one you loved in the comments below. If this roundup inspired you, please share it on Pinterest to help other home cooks discover these easy, wholesome meals. Happy cooking!


