Anyone who thinks Italian desserts require fancy techniques or hard-to-find ingredients is in for a sweet surprise! From creamy tiramisu to simple almond cookies, these delightful treats prove that authentic Italian flavor can be wonderfully easy to achieve. Get ready to bring a taste of Italy into your kitchen with these 19 irresistible sweets that are perfect for any occasion.
Tiramisu with a Hint of Espresso
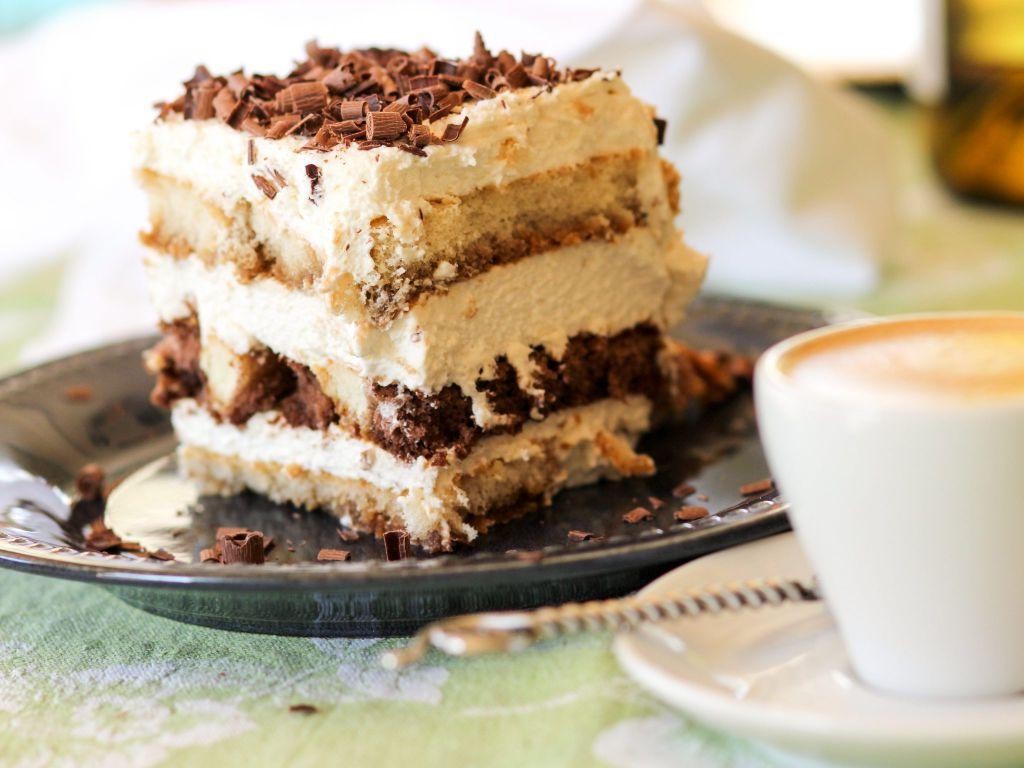
Under the soft glow of the kitchen light, there’s something quietly comforting about layering flavors that feel like a warm embrace, a dessert that whispers of cozy evenings and shared stories. This tiramisu, with its gentle hint of espresso, unfolds like a cherished memory, each spoonful a delicate balance of sweet and subtle bitterness. It’s the kind of treat that invites you to slow down, to savor the moment as much as the taste.
8
servings25
minutesIngredients
- A couple of cups of heavy whipping cream
- About 8 ounces of mascarpone cheese, softened
- Half a cup of granulated sugar
- A splash of pure vanilla extract
- Around 1 cup of strongly brewed espresso, cooled to room temperature
- A package of ladyfinger cookies (roughly 24 pieces)
- A dusting of unsweetened cocoa powder for finishing
Instructions
- Pour the heavy whipping cream into a large, chilled bowl and use an electric mixer to whip it on medium-high speed until stiff peaks form, which should take about 3–4 minutes.
- In a separate bowl, gently whisk the softened mascarpone cheese with the granulated sugar and vanilla extract until smooth and creamy, being careful not to overmix to avoid graininess.
- Fold the whipped cream into the mascarpone mixture using a spatula, using broad, gentle strokes to maintain airiness until fully combined.
- Pour the cooled espresso into a shallow dish wide enough to dip the ladyfingers without breaking them.
- Quickly dip each ladyfinger into the espresso for about 2–3 seconds per side, just until moist but not soggy, to prevent them from falling apart in the layers.
- Arrange a single layer of dipped ladyfingers in the bottom of an 8×8-inch baking dish, covering the surface evenly.
- Spread half of the mascarpone cream mixture over the ladyfingers in a smooth, even layer using a spatula.
- Repeat the dipping and layering with the remaining ladyfingers, then top with the rest of the cream mixture.
- Cover the dish tightly with plastic wrap and refrigerate for at least 4 hours, or ideally overnight, to allow the flavors to meld and the texture to set firmly.
- Just before serving, sift a light dusting of unsweetened cocoa powder over the top for a bittersweet finish that contrasts beautifully with the creamy layers.
Kindly let it rest in the fridge, where the cream softens the espresso-kissed ladyfingers into a velvety, cloud-like texture that melts on the tongue. The flavor deepens with time, offering whispers of coffee that don’t overpower but simply linger, like a quiet afterthought. For a playful twist, serve it in individual glasses layered with fresh berries, letting the bright fruit cut through the richness for a delightful contrast.
Classic Panna Cotta with Berry Compote
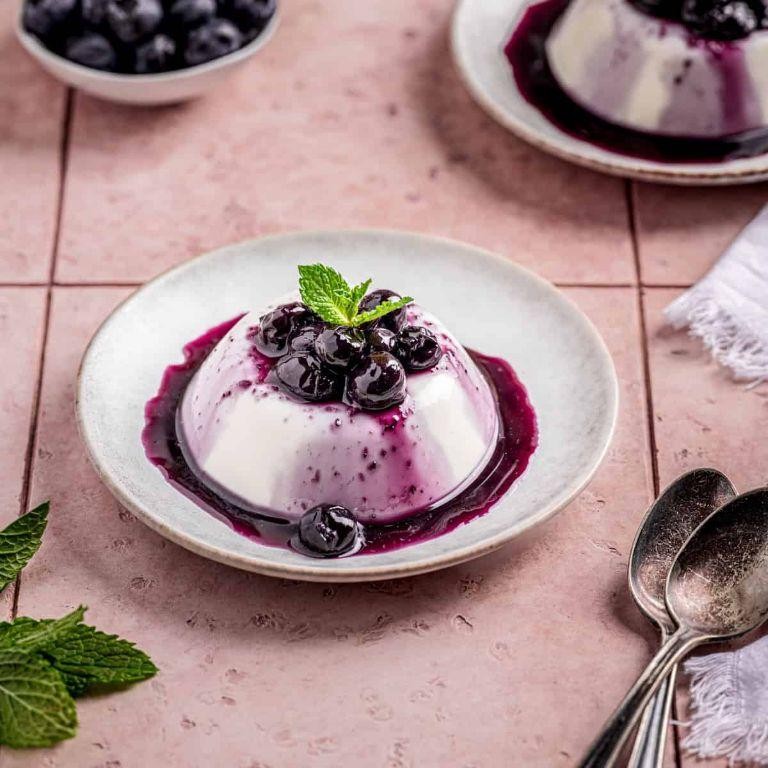
Zigzagging through my kitchen thoughts today, I find myself craving something that feels both elegant and comforting, a dessert that whispers rather than shouts. Panna cotta has always been that quiet companion, its smooth simplicity a canvas for whatever the season offers, and today it’s calling for a berry compote to dance alongside.
3
servings15
minutes20
minutesIngredients
– A couple of cups of heavy cream
– Half a cup of granulated sugar
– A packet of unflavored gelatin (about 2 1/4 teaspoons)
– A splash of pure vanilla extract
– A pint of mixed fresh berries (like strawberries, blueberries, and raspberries)
– A quarter cup of water
– A tablespoon of lemon juice
Instructions
1. Pour 1/4 cup of cold water into a small bowl and sprinkle the packet of gelatin evenly over the surface. Let it sit for 5 minutes until the granules swell and look spongy.
2. In a medium saucepan over low heat, combine the heavy cream and granulated sugar, stirring gently with a whisk until the sugar dissolves completely, which should take about 3–4 minutes—do not let it boil.
3. Remove the cream mixture from the heat and whisk in the bloomed gelatin until it’s fully dissolved and no lumps remain, which ensures a silky texture later.
4. Stir in the vanilla extract, then carefully pour the mixture into 4 ramekins or small glasses, filling each about three-quarters full.
5. Cover the ramekins loosely with plastic wrap and refrigerate for at least 4 hours, or until the panna cotta is firmly set and doesn’t jiggle when gently shaken.
6. While the panna cotta chills, make the compote: in a clean saucepan over medium heat, combine the mixed berries, water, and lemon juice, and cook for 8–10 minutes, mashing the berries lightly with a spoon as they soften and release their juices.
7. Reduce the heat to low and simmer the compote for another 5 minutes until it thickens slightly and coats the back of a spoon, then remove it from the heat and let it cool to room temperature.
8. To serve, run a thin knife around the edge of each ramekin, dip the bottom briefly in warm water for 10 seconds, and invert onto a plate, then spoon the berry compote over the top.
A delicate wobble greets you with each spoonful, the creaminess melting into the bright, tart compote that stains the plate like watercolor. Try layering it in a glass with extra berries for a casual, sun-dappled treat that feels like a slow afternoon captured in a dessert.
Quick and Simple Cannoli

Dipping my spoon into the creamy filling, I remember how these little shells transport me back to Sunday afternoons at my grandmother’s kitchen table, where time moved slower and sweets were always shared with stories.
12
cannoli15
minutesIngredients
– 1 cup of whole milk ricotta cheese, drained overnight
– 1/4 cup of powdered sugar, plus a couple of tablespoons extra for dusting
– 1/2 teaspoon of pure vanilla extract
– a tiny pinch of cinnamon
– 12 store-bought cannoli shells (the crisp, pre-fried kind)
– 1/4 cup of mini chocolate chips
– a splash of heavy cream, if your filling feels too thick
Instructions
1. Place the drained ricotta cheese in a medium mixing bowl.
2. Sift in 1/4 cup of powdered sugar to avoid lumps in your filling.
3. Add the vanilla extract and that tiny pinch of cinnamon.
4. Use a spatula to fold everything together gently until just combined—overmixing can make the filling grainy.
5. Stir in the mini chocolate chips until they’re evenly distributed.
6. Check the consistency: if the filling seems too stiff, mix in that splash of heavy cream one teaspoon at a time until it’s pipeable.
7. Spoon the filling into a piping bag fitted with a large round tip—no piping bag? A zip-top bag with the corner snipped off works perfectly.
8. Hold a cannoli shell in one hand and pipe the filling into one end until it reaches the middle.
9. Rotate the shell and pipe from the other end until the filling meets in the center—this prevents the shell from cracking.
10. Repeat with all remaining shells, placing them gently on a serving plate.
11. Dust the filled cannoli lightly with the extra powdered sugar using a fine-mesh sieve for an even coating.
12. Serve immediately to maintain the shells’ delightful crunch. They truly shine when the crisp shell gives way to the cool, creamy center; try drizzling them with a little melted chocolate or serving alongside fresh berries for a bright contrast.
Italian Lemon Ricotta Cookies

Vividly, I remember the first time these delicate cookies crossed my path—a quiet afternoon where sunlight pooled on the kitchen counter, and the simple act of baking felt like a gentle exhale. They’re soft, cake-like morsels that carry the bright whisper of lemon and the tender comfort of ricotta, perfect for those moments when you need a little sweetness without any fuss.
24
cookies15
minutes15
minutesIngredients
– 2 cups of all-purpose flour, just scooped and leveled
– 1 teaspoon of baking powder for a bit of lift
– a pinch of fine salt to balance it all out
– 1/2 cup (1 stick) of unsalted butter, softened until it gives easily
– 1 cup of granulated sugar for sweetness
– 1 large egg, brought to room temperature
– 1 cup of whole milk ricotta cheese, drained if it’s watery
– the zest of one large lemon, finely grated
– 2 tablespoons of fresh lemon juice, squeezed right from the fruit
– 1/2 teaspoon of pure vanilla extract for warmth
Instructions
1. Preheat your oven to 350°F and line two baking sheets with parchment paper.
2. In a medium bowl, whisk together the 2 cups of all-purpose flour, 1 teaspoon of baking powder, and a pinch of salt until well combined.
3. In a separate large bowl, use an electric mixer on medium speed to cream the 1/2 cup of softened unsalted butter and 1 cup of granulated sugar for about 2 minutes, until light and fluffy.
4. Beat in the 1 large egg until fully incorporated, scraping down the sides of the bowl with a spatula.
5. Mix in the 1 cup of whole milk ricotta cheese, the zest of one large lemon, 2 tablespoons of fresh lemon juice, and 1/2 teaspoon of pure vanilla extract until the mixture is smooth and uniform.
6. Gradually add the dry flour mixture to the wet ingredients, mixing on low speed just until no streaks of flour remain; avoid overmixing to keep the cookies tender.
7. Drop rounded tablespoons of dough onto the prepared baking sheets, spacing them about 2 inches apart to allow for spreading.
8. Bake in the preheated 350°F oven for 12–15 minutes, or until the edges are lightly golden and the tops spring back when gently touched.
9. Let the cookies cool on the baking sheets for 5 minutes before transferring them to a wire rack to cool completely. Now, for the glaze: whisk together 1 cup of powdered sugar, 1–2 tablespoons of fresh lemon juice, and a splash of milk until smooth, then drizzle it over the cooled cookies.
10. Allow the glaze to set for about 20 minutes before serving. Naturally, these cookies emerge with a pillowy texture that melts softly in your mouth, infused with a zesty lemon tang that brightens each bite. I love pairing them with a cup of herbal tea in the morning or crumbling them over vanilla ice cream for a simple, elegant dessert that feels like a quiet celebration.
Easy Amaretti Biscuits
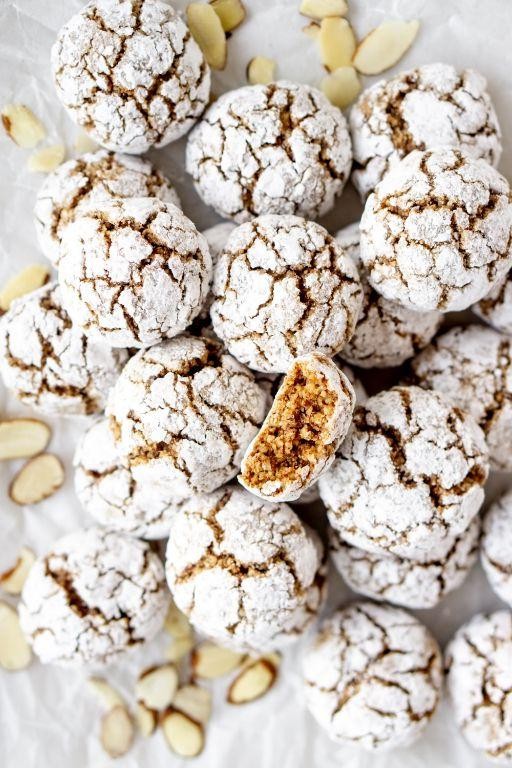
Zigzagging through my recipe box this morning, I found this stained card for amaretti biscuits, the kind my grandmother would make when the autumn light turned golden and the kitchen smelled like almonds and forgiveness. There’s something about their cracked tops and chewy centers that feels like a quiet conversation with someone you love, a simple pleasure that asks for nothing more than your attention and a warm oven.
24
biscuits15
minutes20
minutesIngredients
– 2 cups of almond flour, the fine kind that feels like velvet between your fingers
– 1 cup of granulated sugar, just enough to sweeten without overwhelming
– 2 large egg whites, at room temperature so they whip up nicely
– A splash of pure almond extract, about half a teaspoon for that deep, nutty fragrance
– A couple of tablespoons of powdered sugar for rolling, because everything deserves a little sparkle
Instructions
1. Preheat your oven to 300°F and line a baking sheet with parchment paper, which prevents sticking and makes cleanup a breeze.
2. In a medium bowl, whisk together the almond flour and granulated sugar until they’re fully combined and no streaks remain.
3. In a separate, clean bowl, use an electric mixer on medium speed to beat the egg whites until they form soft peaks that hold their shape when you lift the beaters.
4. Gently fold the whipped egg whites into the almond flour mixture with a spatula, using broad, sweeping motions to keep the air in the batter.
5. Stir in the almond extract until just incorporated, being careful not to overmix, which can deflate the egg whites and make the biscuits dense.
6. Place the powdered sugar in a shallow dish and use a tablespoon to scoop portions of the dough, rolling each into a smooth ball between your palms.
7. Roll each ball in the powdered sugar until it’s fully coated, then place them about 2 inches apart on the prepared baking sheet to allow for spreading.
8. Bake for 18–20 minutes, until the biscuits are lightly golden and have those characteristic cracks on top, which signal they’re ready.
9. Let the biscuits cool on the baking sheet for 5 minutes before transferring them to a wire rack to cool completely, as they firm up as they cool.
Lingering over a warm biscuit, I love how the crisp shell gives way to a tender, chewy interior that melts with the flavor of toasted almonds. They’re perfect with a cup of tea in the afternoon or crumbled over vanilla ice cream for a simple dessert that feels like a hug.
Chocolate Hazelnut Biscotti

Evenings like this call for something that lingers—a twice-baked cookie with the deep warmth of chocolate and the earthy crunch of hazelnuts, perfect for quiet moments with a cup of tea.
12
biscotti15
minutes45
minutesIngredients
– 2 cups of all-purpose flour
– ¾ cup of granulated sugar
– 2 large eggs
– ½ cup of cocoa powder
– ½ cup of chopped hazelnuts
– 1 teaspoon of baking powder
– A pinch of salt
– A splash of vanilla extract
– A couple of tablespoons of melted butter
Instructions
1. Preheat your oven to 350°F and line a baking sheet with parchment paper.
2. In a large bowl, whisk together the flour, cocoa powder, sugar, baking powder, and salt until no streaks remain.
3. Tip: Sift the cocoa powder to avoid lumps for a smoother dough.
4. Crack in the eggs, pour in the melted butter and vanilla extract, then stir until a sticky dough forms.
5. Fold in the chopped hazelnuts gently, making sure they’re evenly distributed.
6. On the prepared baking sheet, shape the dough into a log about 12 inches long and 3 inches wide.
7. Bake for 25 minutes, or until the log feels firm to the touch and a toothpick inserted comes out clean.
8. Tip: Let the log cool for 10 minutes before slicing to prevent crumbling.
9. Using a serrated knife, slice the log diagonally into ½-inch thick pieces.
10. Arrange the slices cut-side down on the baking sheet and bake for another 10 minutes.
11. Flip each slice and bake for an additional 10 minutes until crisp and dry.
12. Tip: Store biscotti in an airtight container to keep them crunchy for weeks.
So satisfyingly crisp, these biscotti snap with each bite, revealing rich chocolate notes and toasty hazelnuts. Dunk them into a frothy latte or crumble over vanilla ice cream for a simple, elegant dessert.
Zabaglione with Fresh Berries

Very occasionally, a dessert comes along that feels less like a recipe and more like a quiet, personal ritual. This zabaglione, with its cloud-like texture and the bright burst of fresh berries, is one of those rare, gentle treats that seems to slow the world down for just a moment.
4
servings15
minutes10
minutesIngredients
- 4 large egg yolks
- 1/4 cup of granulated sugar
- a generous 1/3 cup of Marsala wine
- a couple of cups of mixed fresh berries (like raspberries and blueberries)
- a tiny pinch of fine sea salt
Instructions
- Place your egg yolks and sugar in a heatproof bowl that fits snugly over a saucepan.
- Whisk the yolks and sugar together by hand for a solid 2-3 minutes until the mixture becomes pale yellow and slightly thickened.
- Pour in the Marsala wine and add the tiny pinch of salt, then whisk again until everything is fully combined.
- Fill a saucepan with about an inch of water and bring it to a gentle simmer over medium-low heat, ensuring the water isn’t touching the bottom of the bowl you’ll place on top.
- Set the bowl over the simmering water, making sure it’s stable, and immediately begin whisking the mixture continuously.
- Whisk for 8-10 minutes, scraping the sides occasionally; the zabaglione is ready when it thickens significantly, becomes pale, and holds soft peaks on the whisk. (Tip: If it starts to look grainy or scramble, you’ve overheated it—pull the bowl off the heat for a moment and whisk vigorously to cool it down.)
- Remove the bowl from the heat and continue whisking for another minute as it cools slightly.
- Divide the fresh berries evenly among your serving glasses or bowls.
- Immediately spoon the warm zabaglione over the berries, using all of it.
- Serve right away while the zabaglione is still warm and airy. (Tip: For the best texture, avoid making this ahead of time, as it can deflate and separate if it sits too long.)
What you’re left with is a dessert of beautiful contrasts: the warm, frothy custard, almost like a sweet, boozy cloud, melting into the cool, tart berries. It’s lovely just as it is, but for a different twist, try layering it with crushed amaretti cookies for a subtle crunch that plays wonderfully against the silkiness.
No-Bake Italian Semifreddo
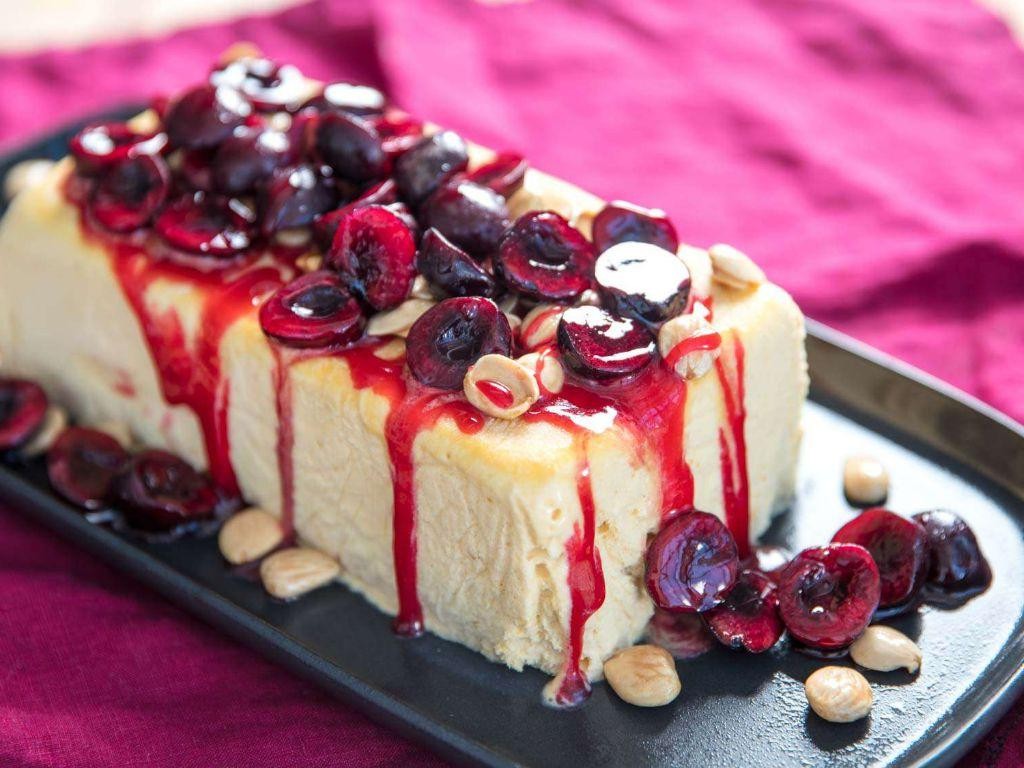
Under the soft afternoon light, I find myself craving something cool and creamy, something that whispers of Italian summers and effortless elegance. This no-bake semifreddo feels like a gentle promise of sweetness without the heat of the oven, a quiet indulgence for these lingering warm days. It’s the kind of dessert that settles the soul as much as it delights the palate.
8
portions20
minutes7
minutesIngredients
– 2 cups of heavy cream, chilled straight from the fridge
– 4 large egg yolks, at room temperature
– ¾ cup of granulated sugar
– a generous splash of pure vanilla extract
– a couple of tablespoons of amaretto liqueur (optional, but lovely)
– a pinch of fine sea salt
– ½ cup of toasted almond slices, for that gentle crunch
– a handful of dark chocolate shavings, to finish
Instructions
1. Line a standard 9×5-inch loaf pan with plastic wrap, letting the edges hang over the sides for easy removal later.
2. In a large mixing bowl, pour the chilled heavy cream and whip it on medium-high speed until it forms soft peaks that hold their shape when you lift the whisk, about 3–4 minutes.
3. In a separate heatproof bowl, combine the egg yolks, granulated sugar, vanilla extract, amaretto liqueur (if using), and a pinch of fine sea salt.
4. Set the bowl over a saucepan of gently simmering water (making sure the bottom doesn’t touch the water) and whisk continuously for 5–7 minutes, until the mixture is pale, thickened, and warm to the touch—this pasteurizes the eggs safely.
5. Remove the bowl from the heat and let the egg mixture cool to room temperature, stirring occasionally to prevent a skin from forming.
6. Gently fold the cooled egg mixture into the whipped cream using a spatula, moving in broad, sweeping motions to keep the air in.
7. Sprinkle in the toasted almond slices and fold just until they’re evenly distributed, being careful not to overmix.
8. Pour the mixture into the prepared loaf pan and smooth the top with the spatula.
9. Cover the pan tightly with more plastic wrap and freeze for at least 8 hours, or overnight, until firm and sliceable.
10. To serve, lift the semifreddo out using the overhanging plastic wrap, peel it away, and slice into thick portions.
11. Garnish each slice with a scattering of dark chocolate shavings just before serving.
Gently slice into this dreamy creation, and you’ll find a texture that’s both airy and rich, like frozen clouds melting on your tongue. The almonds add a subtle crunch, while the vanilla and amaretto weave through with warmth. For a playful twist, serve it alongside fresh berries or drizzle with a shot of espresso—it’s a quiet celebration in every bite.
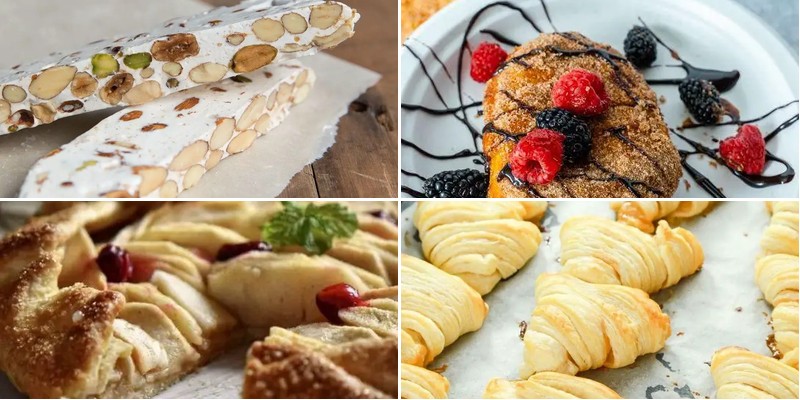
Traditional Italian Pizzelle
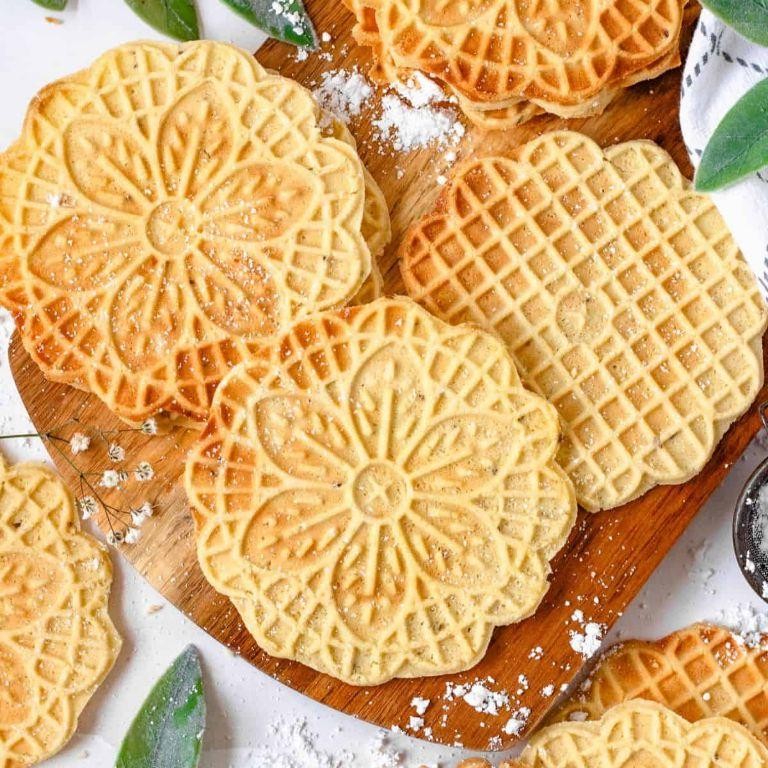
Perhaps there’s something quietly magical about pressing generations of tradition between two hot irons, transforming simple batter into delicate snowflake-patterned cookies that carry the warmth of Italian kitchens across oceans and time.
24
pizzelle15
minutes18
minutesIngredients
– 2 cups of all-purpose flour
– 3 large eggs from the fridge
– ¾ cup of granulated sugar
– ½ cup of melted unsalted butter that’s cooled slightly
– A generous tablespoon of pure vanilla extract
– A couple of teaspoons of baking powder
– A good pinch of fine salt
– Some extra butter for greasing the pizzelle iron
Instructions
1. Plug in your pizzelle iron and set it to 375°F, allowing it to fully preheat while you prepare the batter.
2. Crack 3 large eggs into a medium mixing bowl and whisk them until they’re pale yellow and slightly frothy.
3. Gradually add ¾ cup of granulated sugar to the eggs while continuously whisking until the mixture becomes smooth and slightly thickened.
4. Pour in ½ cup of cooled melted butter and 1 tablespoon of vanilla extract, stirring until everything is well combined.
5. In a separate bowl, whisk together 2 cups of flour, 2 teaspoons of baking powder, and a pinch of salt.
6. Slowly add the dry ingredients to the wet mixture, folding gently until you have a thick, smooth batter with no flour streaks remaining.
7. Lightly grease both plates of the preheated pizzelle iron with a small amount of butter using a pastry brush.
8. Drop a heaping tablespoon of batter onto the center of the bottom iron plate.
9. Close the iron and press the handles together firmly for about 30-45 seconds until steam stops escaping from the sides.
10. Check for doneness by peeking quickly – the pizzelle should be golden brown with crisp edges.
11. Carefully lift the hot pizzelle from the iron using a fork or small spatula and immediately drape it over a rolling pin or bottle to curve it while still pliable.
12. Transfer the shaped pizzelle to a wire rack to cool completely, repeating the process with remaining batter, regreasing the iron every few cookies.
Now they’ve cooled completely, notice how these delicate wafers carry the perfect balance of crispness and slight chew, with vanilla notes that deepen as they rest. Try stacking them with layers of sweetened ricotta for an elegant dessert, or simply enjoy their lace-like beauty with your afternoon coffee.
Light and Fluffy Sfogliatelle

Often I find myself craving the delicate layers of sfogliatelle, those shell-shaped pastries that feel like edible origami. On quiet mornings like this, when the light filters through the kitchen window just so, I remember how their crisp exterior gives way to an almost impossibly airy interior. There’s something magical about transforming simple ingredients into these flaky treasures.
12
pastries65
minutes25
minutesIngredients
– 2 cups of all-purpose flour
– A pinch of fine sea salt
– ½ cup of cool water
– ¾ cup of unsalted butter, softened
– 1 cup of ricotta cheese
– ⅓ cup of semolina flour
– ¼ cup of granulated sugar
– 1 large egg
– A splash of pure vanilla extract
– A couple of tablespoons of orange zest
– ½ cup of candied citrus peel, chopped small
Instructions
1. Combine 2 cups of all-purpose flour with a pinch of fine sea salt in a large mixing bowl.
2. Gradually mix in ½ cup of cool water until a shaggy dough forms, then knead on a floured surface for 8 minutes until smooth and elastic.
3. Wrap the dough in plastic and refrigerate for exactly 1 hour to relax the gluten.
4. Roll the chilled dough into a 16×12-inch rectangle on a lightly floured surface.
5. Spread ¾ cup of softened unsalted butter evenly over the entire surface of the dough using an offset spatula.
6. Starting from one long edge, tightly roll the dough into a log, then wrap in plastic and chill for 30 minutes.
7. While the dough chills, mix 1 cup of ricotta cheese, ⅓ cup of semolina flour, ¼ cup of granulated sugar, 1 large egg, a splash of pure vanilla extract, a couple of tablespoons of orange zest, and ½ cup of chopped candied citrus peel in a bowl until well combined.
8. Slice the chilled dough log into ½-inch thick rounds using a sharp knife.
9. Press each round into a 3-inch circle with your fingers, then place 1 tablespoon of the ricotta filling in the center.
10. Fold the dough over the filling and pinch the edges to form a shell shape, ensuring no filling leaks out.
11. Arrange the shaped pastries on a parchment-lined baking sheet and bake at 375°F for 25 minutes until golden brown and flaky.
12. Transfer to a wire rack and cool for 15 minutes before serving.
Remarkably crisp layers shatter at first bite, revealing the creamy, citrus-kissed filling within. These pastries taste particularly wonderful when still slightly warm, perhaps with a dusting of powdered sugar or alongside a small cup of strong espresso. The way the delicate shells hold both texture and memory makes each one feel like a small, edible miracle.
Italian Almond and Honey Torrone
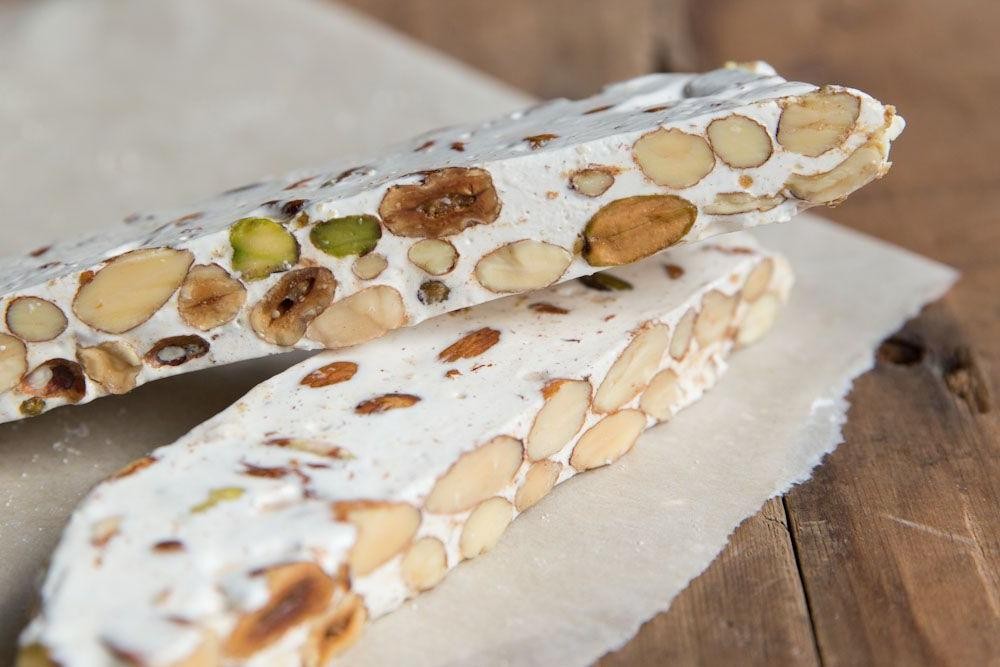
A quiet afternoon like this calls for something sweet and nostalgic, something that fills the kitchen with the warm scent of honey and toasted nuts, a simple pleasure that feels like a gentle embrace. Italian almond and honey torrone is just that—a classic confection of crisp nuts suspended in a delicate, chewy candy, a treat that invites you to slow down and savor each bite.
12
bars20
minutes25
minutesIngredients
– 2 cups of granulated sugar
– A generous ¾ cup of light, floral honey
– A couple of large egg whites, brought to room temperature
– A good 2 cups of whole raw almonds
– A splash of pure vanilla extract
– A light dusting of powdered sugar for your work surface
Instructions
1. Preheat your oven to 350°F and spread the almonds in a single layer on a baking sheet.
2. Toast the almonds for 8–10 minutes, until they are fragrant and lightly golden, then set them aside to cool completely.
3. Tip: Toasting the almonds deepens their flavor and helps them stay crisp in the torrone, so don’t skip this step.
4. In a heavy-bottomed saucepan, combine the sugar and honey over medium heat, stirring just until the sugar dissolves.
5. Attach a candy thermometer to the pan and cook the mixture without stirring until it reaches 300°F (the hard crack stage), which should take about 10–15 minutes.
6. While the syrup cooks, use an electric mixer to beat the egg whites in a clean, dry bowl until they form stiff peaks.
7. Tip: Ensure your bowl and beaters are completely free of grease for the best volume in your egg whites.
8. Once the syrup hits 300°F, immediately remove it from the heat and slowly pour it in a thin stream into the beaten egg whites while mixing on low speed.
9. Continue to mix for 5–7 minutes until the mixture thickens, becomes glossy, and holds its shape.
10. Quickly fold in the toasted almonds and vanilla extract until everything is evenly coated.
11. Tip: Work swiftly here as the candy will begin to set, and a silicone spatula makes folding easier without deflating the mixture.
12. Turn the torrone out onto a surface dusted with powdered sugar and use your hands (lightly oiled if needed) to press it into a 1-inch-thick rectangle.
13. Let the torrone cool completely at room temperature for at least 2 hours until firm, then slice it into bars with a sharp knife. The torrone offers a delightful contrast—crisp almonds nestled in a chewy, honey-sweet base that melts on the tongue. Serve it alongside a strong espresso for a traditional touch, or wrap pieces in parchment as thoughtful homemade gifts for friends.
Simplified Italian Apple Crostata
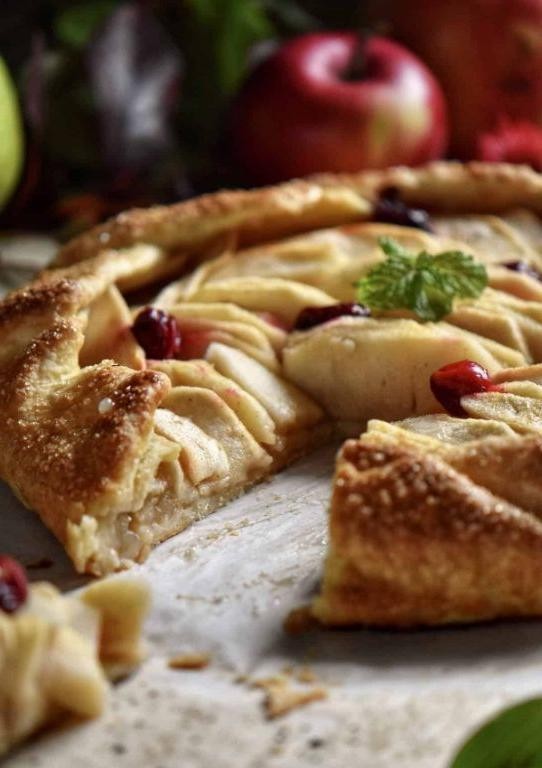
Holding this warm plate, I’m reminded how some of the most comforting recipes are born from simplicity—this rustic apple crostata feels like a quiet autumn afternoon captured in pastry, where the apples do most of the talking and the crust cradles them gently.
1
crostata30
minutes40
minutesIngredients
– 1 ½ cups all-purpose flour
– A pinch of fine sea salt
– 8 tablespoons cold unsalted butter, cut into small cubes
– 3–4 tablespoons ice water
– 2 large Granny Smith apples, peeled and thinly sliced
– ¼ cup granulated sugar
– A squeeze of fresh lemon juice
– 1 teaspoon ground cinnamon
– A splash of milk for brushing
– A sprinkle of coarse sugar for topping
Instructions
1. Whisk together 1 ½ cups all-purpose flour and a pinch of fine sea salt in a large bowl.
2. Add 8 tablespoons cold, cubed unsalted butter and use your fingertips to rub it into the flour until the mixture resembles coarse crumbs with some pea-sized butter pieces remaining.
3. Drizzle in 3–4 tablespoons of ice water, one tablespoon at a time, and mix gently with a fork until the dough just comes together.
4. Tip: Handle the dough as little as possible to keep the butter cold, which ensures a flaky crust.
5. Shape the dough into a disk, wrap it in plastic, and refrigerate for at least 30 minutes.
6. While the dough chills, toss 2 peeled, thinly sliced Granny Smith apples with ¼ cup granulated sugar, a squeeze of lemon juice, and 1 teaspoon ground cinnamon in a medium bowl.
7. Preheat your oven to 375°F and line a baking sheet with parchment paper.
8. On a lightly floured surface, roll the chilled dough into a rough 12-inch circle about ⅛-inch thick.
9. Transfer the dough to the prepared baking sheet and arrange the apple slices in the center, leaving a 2-inch border all around.
10. Fold the edges of the dough over the apples, pleating loosely as you go to create a rustic, free-form tart.
11. Brush the folded crust edges lightly with a splash of milk and sprinkle with coarse sugar for a golden, sparkly finish.
12. Tip: Don’t worry about perfect folds—the charm is in the uneven, homemade look.
13. Bake at 375°F for 35–40 minutes, until the crust is golden brown and the apples are tender and bubbling.
14. Tip: Let the crostata cool on the baking sheet for 15 minutes before slicing to allow the juices to set.
15. Just out of the oven, the crostata fills the kitchen with the scent of cinnamon and baked apples, the crust shattering delicately against the soft, warm fruit inside. Serve it slightly warm with a dollop of vanilla ice cream melting into the crevices, or enjoy a slice plain with your morning coffee for a quietly sweet start to the day.
Fast and Easy Frittelle
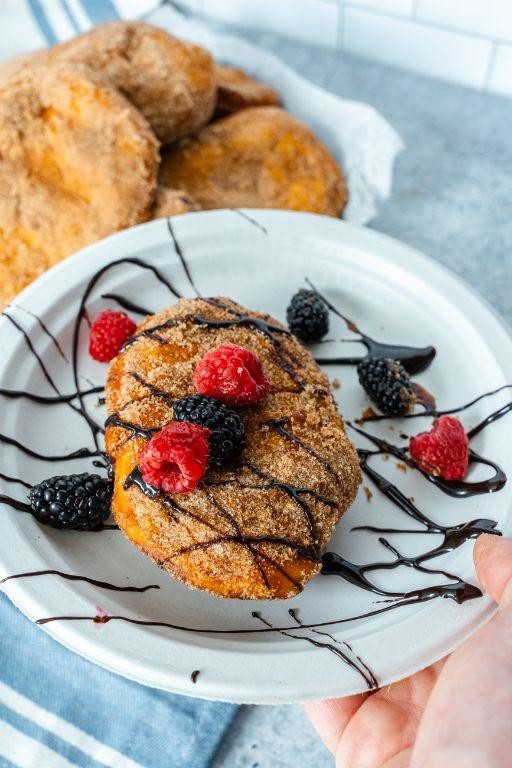
Now and then, a simple craving for something warm and comforting settles in, and these fast and easy frittelle answer that call perfectly. They come together in moments, filling the kitchen with the gentle aroma of vanilla and cinnamon, like a quiet morning remembered. Sometimes the simplest things are exactly what we need.
12
portions15
minutes24
minutesIngredients
– 1 cup of all-purpose flour
– A couple of tablespoons of granulated sugar
– 1 teaspoon of baking powder
– A good pinch of salt
– A splash of vanilla extract
– 1 large egg
– About 3/4 cup of whole milk
– A teaspoon of ground cinnamon
– A generous glug of vegetable oil for frying
– A little extra sugar for dusting
Instructions
1. In a medium bowl, whisk together 1 cup of all-purpose flour, a couple of tablespoons of granulated sugar, 1 teaspoon of baking powder, a good pinch of salt, and a teaspoon of ground cinnamon until well combined.
2. Crack 1 large egg into a separate small bowl and lightly beat it with a fork until uniform in color.
3. Pour the beaten egg into the dry ingredients, followed by about 3/4 cup of whole milk and a splash of vanilla extract.
4. Gently stir the mixture with a spatula just until the ingredients are incorporated and no dry pockets remain; a few small lumps are fine—overmixing can make the frittelle tough.
5. Let the batter rest on the counter for 10 minutes to allow the flour to hydrate, which helps create a lighter texture.
6. While the batter rests, pour a generous glug of vegetable oil into a heavy-bottomed skillet to a depth of about 1/2 inch and heat it over medium heat until it reaches 350°F on a kitchen thermometer.
7. Carefully drop heaping tablespoons of the batter into the hot oil, working in batches to avoid crowding the pan, which ensures even cooking and browning.
8. Fry the frittelle for about 2–3 minutes per side, flipping them once they turn a deep golden brown and puff up slightly.
9. Use a slotted spoon to transfer the cooked frittelle to a plate lined with paper towels to drain any excess oil.
10. While the frittelle are still warm, sprinkle them with a little extra sugar for a delicate, sweet coating. Very often, these frittelle emerge with a crisp, golden exterior that gives way to a soft, cake-like center, fragrant with vanilla and spice. Try serving them stacked high with a drizzle of honey or a dollop of lemon curd for a bright contrast to their warmth.
Conclusion
From biscotti to tiramisu, these 19 Italian sweets prove that delicious desserts don’t need to be complicated. I hope you’ll try a few recipes and discover your new favorite treat! Don’t forget to share which one you loved most in the comments below and pin this article to your Pinterest boards for easy reference. Happy baking!


