Picture this: you’re hosting a cozy gathering and want to impress with authentic Irish flavors without spending hours in the kitchen. From savory bites to cheesy delights, these easy appetizers bring the warmth of Ireland right to your table. Get ready to discover 30 delicious recipes that will have your guests asking for seconds—and the recipes!
Irish Potato Farls
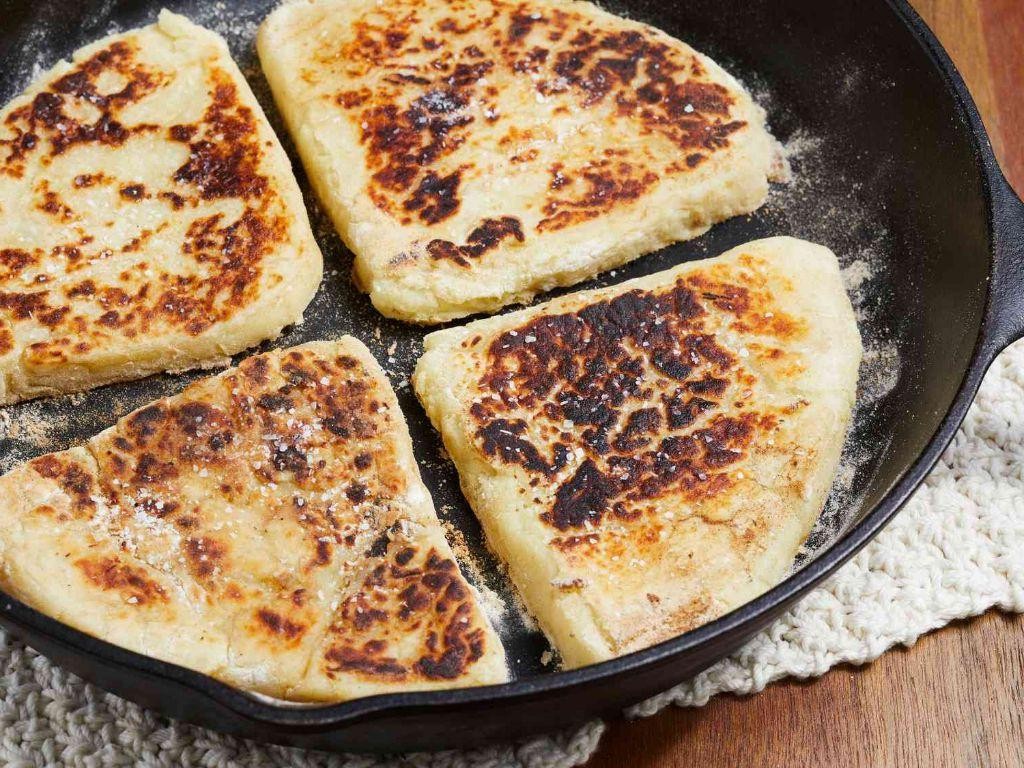
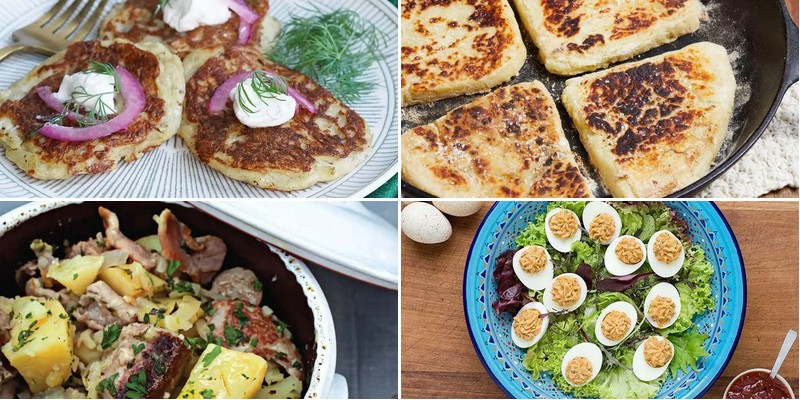
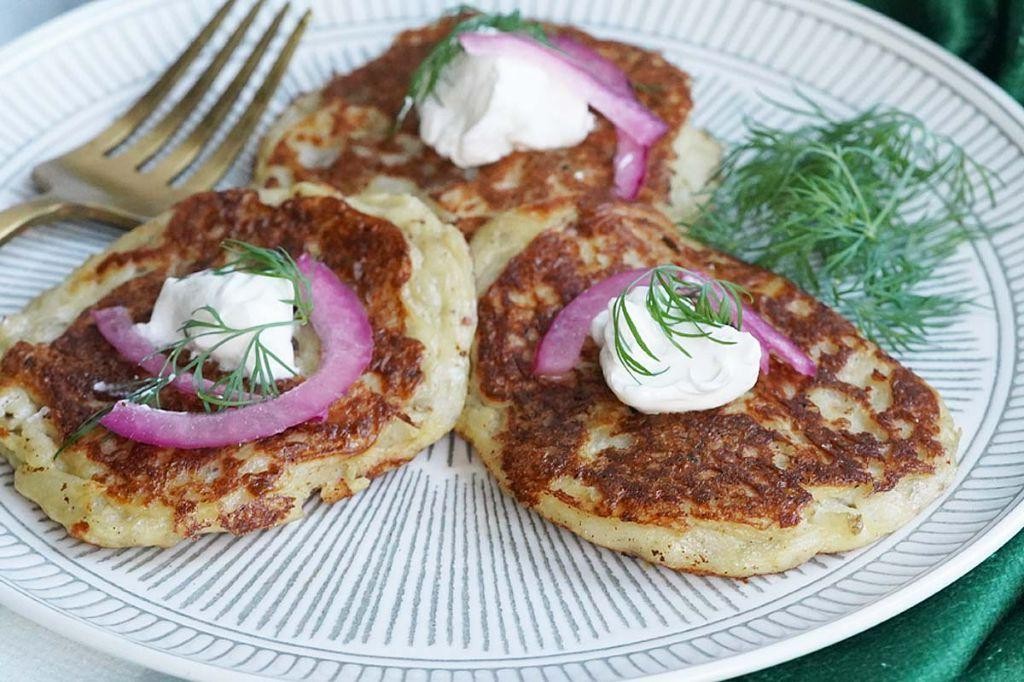
There’s something so comforting about turning humble potatoes into something truly special, and Irish Potato Farls are my latest obsession. These griddled potato cakes are perfect for using up leftover mashed potatoes, and they’ve become my go-to weekend breakfast treat that always makes me feel like I’m starting the day right.
2
portions15
minutes10
minutesIngredients
– 2 cups mashed potatoes (I always use yesterday’s leftovers – they bind better when cold)
– 1 cup all-purpose flour, plus extra for dusting (I keep mine in the freezer to prevent weevils)
– 1 teaspoon baking powder (make sure it’s fresh – I test mine with hot water before using)
– 1/2 teaspoon salt (I prefer fine sea salt for even distribution)
– 2 tablespoons unsalted butter, melted (I always brown mine slightly for extra flavor)
– 2-3 tablespoons milk (whole milk works best for tenderness)
Instructions
1. Combine 2 cups mashed potatoes, 1 cup flour, 1 teaspoon baking powder, and 1/2 teaspoon salt in a large bowl.
2. Make a well in the center and pour in 2 tablespoons melted butter and 2 tablespoons milk.
3. Mix gently with a fork until just combined – don’t overwork the dough or the farls will be tough.
4. If the dough feels too dry, add the remaining 1 tablespoon milk, one teaspoon at a time.
5. Turn the dough out onto a lightly floured surface and knead gently for about 30 seconds until smooth.
6. Roll the dough into a circle about 1/2-inch thick – I use my grandmother’s wooden rolling pin for this.
7. Cut the circle into 4 equal wedges using a sharp knife or pizza cutter.
8. Heat a dry cast iron skillet or griddle over medium heat (350°F if you have an infrared thermometer).
9. Cook the farls for 4-5 minutes per side until golden brown spots appear – look for that perfect toasty color.
10. Flip carefully with a spatula and cook the second side for another 4-5 minutes.
11. Transfer to a wire rack to cool slightly before serving. For extra crispy edges, I sometimes brush them with a little more melted butter right after cooking. Fresh from the griddle, these farls have the most wonderful combination of crispy exterior and fluffy, potato-y interior that just melts in your mouth. I love serving them alongside fried eggs with runny yolks for dipping, or slathered with good Irish butter and a sprinkle of chives from my windowsill garden.
Mini Guinness Beef Pies
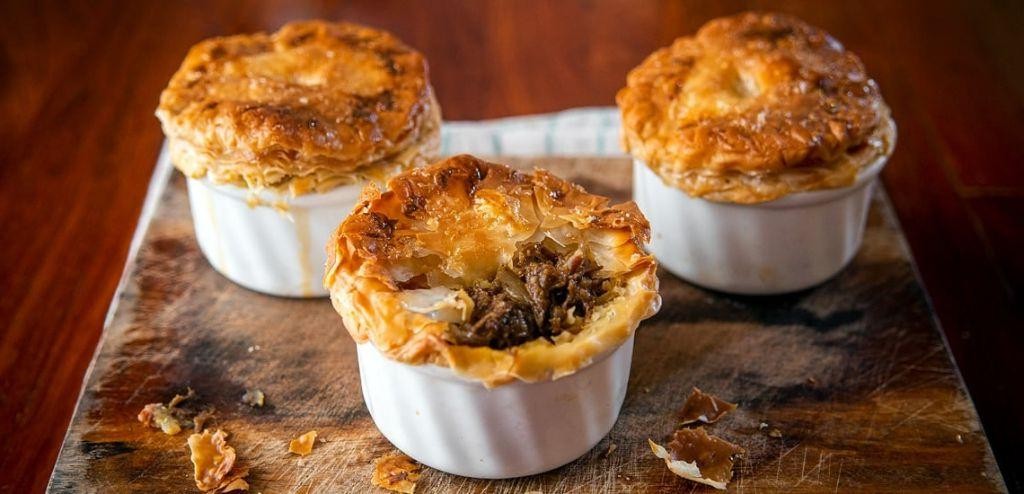
Zesty and comforting, these Mini Guinness Beef Pies are my go-to for cozy fall evenings. I first made them for a football watch party last year, and now my friends request them every season. There’s something magical about that rich, dark beer melding with tender beef in a flaky pastry shell.
12
pies25
minutes145
minutesIngredients
– 1 lb chuck roast, cut into ½-inch cubes (I like the marbling in chuck for maximum flavor)
– 1 cup Guinness beer (leave it out for 30 minutes to lose the chill)
– 1 cup beef broth (I use low-sodium to control the salt)
– 1 yellow onion, finely diced (sweet onions work great here)
– 2 carrots, peeled and diced into ¼-inch pieces
– 2 cloves garlic, minced (fresh is always better than jarred)
– 2 tbsp tomato paste
– 2 tbsp all-purpose flour
– 1 tbsp Worcestershire sauce
– 1 tsp fresh thyme leaves (dried works in a pinch)
– ½ tsp black pepper
– ¼ tsp salt
– 2 tbsp olive oil (extra virgin is my kitchen staple)
– 1 package refrigerated pie crust (2 crusts), thawed if frozen (homemade is wonderful but store-bought saves time)
Instructions
1. Preheat your oven to 375°F and lightly grease a 12-cup muffin tin with cooking spray.
2. Heat 2 tbsp olive oil in a large Dutch oven or heavy-bottomed pot over medium-high heat until shimmering.
3. Add 1 lb cubed chuck roast in a single layer and sear for 3-4 minutes per side until deeply browned.
4. Transfer the browned beef to a plate using a slotted spoon, leaving the drippings in the pot.
5. Add the diced onion and carrots to the pot and cook for 5 minutes, stirring occasionally, until softened.
6. Stir in 2 cloves minced garlic and cook for 1 minute until fragrant.
7. Sprinkle 2 tbsp all-purpose flour over the vegetables and cook for 1 minute, stirring constantly to coat.
8. Whisk in 1 cup Guinness beer, scraping up any browned bits from the bottom of the pot.
9. Add 1 cup beef broth, 2 tbsp tomato paste, 1 tbsp Worcestershire sauce, 1 tsp thyme leaves, ½ tsp black pepper, and ¼ tsp salt.
10. Return the seared beef to the pot and bring the mixture to a simmer.
11. Reduce heat to low, cover, and simmer for 90 minutes until the beef is fork-tender.
12. Uncover and simmer for an additional 15 minutes to thicken the sauce.
13. Roll out the pie crusts on a lightly floured surface to ⅛-inch thickness.
14. Cut out 12 circles using a 4-inch round cutter or bowl.
15. Press each crust circle into the prepared muffin tin cups, ensuring they reach the top edges.
16. Spoon the beef filling evenly into the crust-lined cups, filling each about ¾ full.
17. Bake at 375°F for 20-25 minutes until the crust edges are golden brown.
18. Let the pies cool in the tin for 10 minutes before carefully removing.
19. Serve warm. So satisfying with that flaky crust giving way to the deeply savory filling. I love serving these with a simple green salad to cut through the richness, and they reheat beautifully for lunch the next day.
Cheesy Irish Soda Bread Bites

Very rarely does a recipe come along that feels both comforting and exciting, but these Cheesy Irish Soda Bread Bites are exactly that. I first made them for a last-minute St. Patrick’s Day gathering when I realized I had nothing green to serve, and they disappeared so fast I had to make a second batch. They’ve become my go-to when I want something warm, cheesy, and impressively easy.
16
bites15
minutes20
minutesIngredients
- 2 cups all-purpose flour (I always use King Arthur for consistent results)
- 1 tsp baking soda (make sure it’s fresh for maximum rise)
- 1 tsp salt (I prefer fine sea salt for even distribution)
- 1 cup buttermilk (room temperature helps everything combine smoothly)
- 1 cup shredded sharp cheddar cheese (I like to buy a block and shred it myself for better melting)
- 2 tbsp cold unsalted butter, cubed (straight from the fridge creates the best texture)
- 1 tbsp honey (this is my secret ingredient for a subtle sweetness)
Instructions
- Preheat your oven to 375°F and line a baking sheet with parchment paper.
- Whisk together the flour, baking soda, and salt in a large bowl until well combined.
- Add the cold cubed butter to the flour mixture and use your fingertips to rub it in until the mixture resembles coarse crumbs.
- Stir in the shredded cheddar cheese until evenly distributed throughout the flour mixture.
- Pour in the buttermilk and honey, then mix gently with a fork until just combined – don’t overmix or the bites will be tough.
- Turn the dough out onto a lightly floured surface and gently pat it into a 1-inch thick circle.
- Use a sharp knife to cut the dough into 1-inch squares, separating them slightly on the prepared baking sheet.
- Bake for 18-20 minutes until golden brown and a toothpick inserted comes out clean.
- Transfer the bites to a wire rack and let them cool for at least 5 minutes before serving.
Crazy how something so simple can be so delicious – these bites have a wonderfully tender crumb with crispy edges and pockets of melted cheddar throughout. They’re perfect served warm with a pat of butter melting on top, or try dipping them in a creamy soup for the ultimate comfort food experience.
Irish Smoked Salmon Crostini
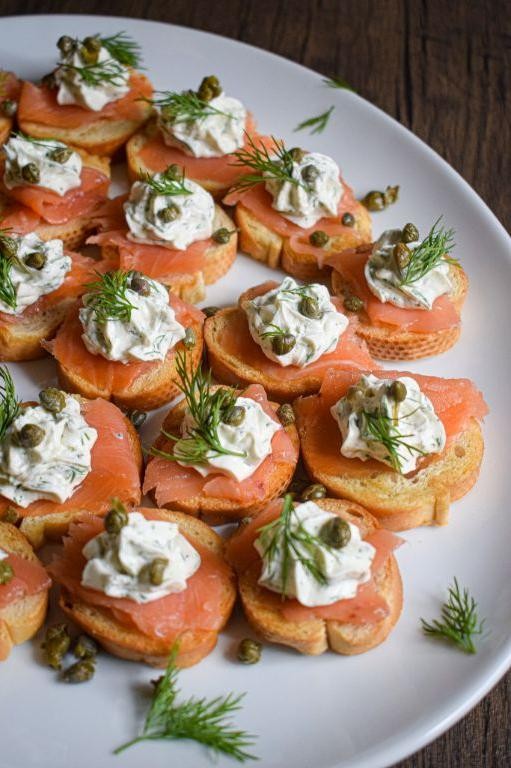
Here’s a recipe I’ve been making for years whenever I want something elegant but effortless for gatherings. Honestly, my first attempt at these was for a St. Patrick’s Day party where I forgot to plan ahead, but they came together so quickly they’ve been my go-to ever since.
20
crostini15
minutes10
minutesIngredients
- 1 baguette, sliced into ½-inch thick pieces (I like to pick up a fresh one from the bakery section—it makes all the difference)
- 8 ounces Irish smoked salmon, thinly sliced (the kind with that beautiful silky texture, not the overly salty variety)
- 4 ounces cream cheese, softened to room temperature (this helps it spread easily without tearing the bread)
- 1 tablespoon fresh dill, finely chopped (I always snip mine right from the little pot on my windowsill)
- 1 teaspoon lemon zest (just the yellow part, avoid the bitter white pith)
- 1 tablespoon extra virgin olive oil (my everyday go-to for brushing bread)
- ½ teaspoon freshly cracked black pepper (I grind it coarse for a nice texture)
Instructions
- Preheat your oven to 375°F and line a baking sheet with parchment paper.
- Arrange the baguette slices in a single layer on the prepared baking sheet.
- Brush the top of each baguette slice lightly with olive oil using a pastry brush.
- Bake the slices for 8-10 minutes, or until the edges turn golden brown and the centers are crisp.
- Remove the baking sheet from the oven and let the crostini cool completely on a wire rack—this keeps them crunchy.
- While the crostini cools, combine the softened cream cheese, chopped dill, lemon zest, and black pepper in a small bowl.
- Mix the cream cheese mixture with a spatula until all ingredients are fully incorporated and smooth.
- Spread about 1 teaspoon of the cream cheese mixture evenly onto each cooled crostini.
- Top each crostini with one slice of smoked salmon, gently folding it for a rustic look.
- Arrange the finished crostini on a serving platter and serve immediately.
So perfectly crisp from the toasted baguette against that creamy, herby spread and the silky salmon. Serve these with a crisp white wine or as a starter before a cozy soup—they always disappear faster than I can make them.
Dublin Coddle Cups
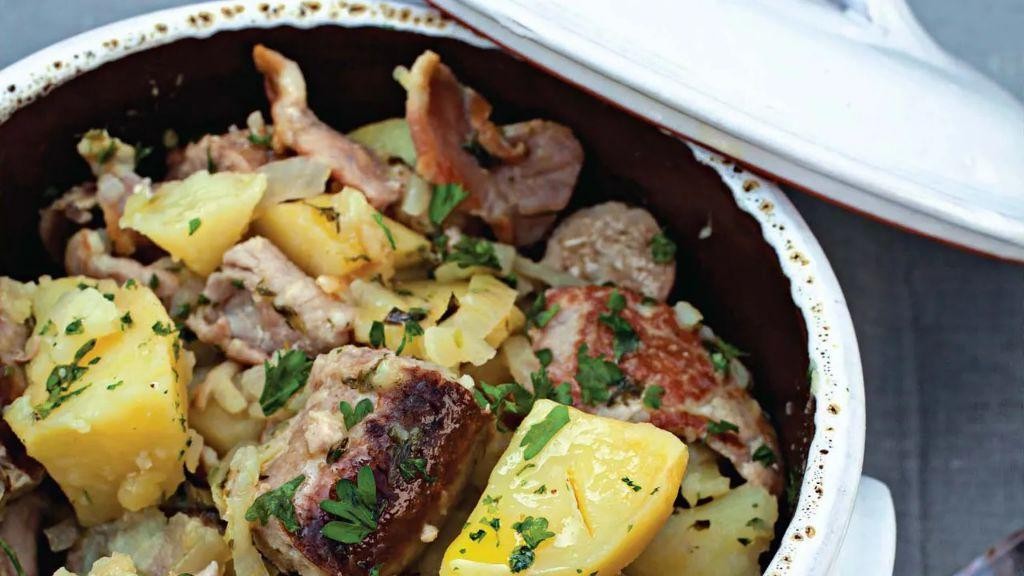
During those chilly autumn evenings when I’m craving something hearty but don’t want to spend hours in the kitchen, these Dublin Coddle Cups have become my go-to comfort food. I first discovered this recipe during a rainy weekend when my Irish grandmother visited and shared her simplified version of the traditional dish, and now I make it whenever I need that cozy, home-cooked feeling without the fuss.
6
portions20
minutes88
minutesIngredients
– 1 lb pork sausage links (I always use Johnsonville brand for that perfect snap)
– 6 slices thick-cut bacon, chopped (my butcher’s applewood-smoked is worth the splurge)
– 2 large yellow onions, sliced (sweet onions work beautifully here)
– 4 medium russet potatoes, peeled and cubed (I prefer russets for their fluffy texture)
– 4 cups chicken broth (homemade if I have it, but Pacific Foods organic works great)
– 2 tbsp fresh parsley, chopped (always fresh—it makes such a difference)
– 1 tsp black pepper, freshly ground (I keep my pepper mill on the counter for this)
– 1 bay leaf (don’t skip this—it adds that subtle earthy note)
Instructions
1. Preheat your oven to 375°F and lightly grease 6 oven-safe ramekins.
2. Place pork sausage links in a large skillet over medium-high heat and cook for 8-10 minutes, turning occasionally until browned on all sides and cooked through.
3. Remove sausages from skillet and slice them into 1-inch pieces—tip: letting them rest for 2 minutes before slicing prevents juices from escaping.
4. Add chopped bacon to the same skillet and cook over medium heat for 6-8 minutes until crispy, stirring occasionally.
5. Transfer cooked bacon to a paper towel-lined plate using a slotted spoon, leaving 2 tablespoons of drippings in the skillet.
6. Add sliced onions to the skillet and cook over medium heat for 8-10 minutes until softened and lightly golden, stirring every 2 minutes.
7. Arrange sliced potatoes evenly among the prepared ramekins, filling each about one-third full.
8. Layer cooked sausage pieces and bacon over the potatoes in each ramekin.
9. Top each ramekin with the cooked onions, dividing them evenly.
10. Pour chicken broth over the ingredients in each ramekin until nearly full, leaving ¼-inch space at the top.
11. Sprinkle fresh parsley and black pepper over each cup, then add one bay leaf to each—tip: remember to remove bay leaves before serving as they’re not edible.
12. Cover each ramekin tightly with aluminum foil and place on a baking sheet for stability.
13. Bake at 375°F for 45 minutes, then remove foil and bake for another 15 minutes until potatoes are fork-tender and liquid is bubbling—tip: test potatoes with a fork; they should slide off easily when done.
14. Carefully remove from oven using oven mitts and let rest for 5 minutes before serving.
Just imagine breaking through that savory broth to find tender potatoes that have soaked up all the wonderful pork flavors—the sausages stay surprisingly juicy while the bacon adds that essential smoky depth. I love serving these straight from the oven with crusty bread for dipping, and sometimes I’ll top them with an extra sprinkle of fresh parsley for color.
Stout-Glazed Bacon Skewers

Very few things beat the combination of smoky bacon and rich stout beer, especially when you’re looking for that perfect game-day snack that feels a bit fancy but is actually super simple to throw together. I first tried these at a friend’s backyard BBQ last summer, and now they’re my go-to whenever I want to impress without stressing—trust me, they disappear faster than you can say “seconds, please!”
5
portions15
minutes40
minutesIngredients
– 1 pound thick-cut bacon slices (I always go for applewood-smoked—it adds a subtle sweetness that pairs beautifully with the glaze)
– 1/2 cup stout beer (like Guinness; don’t skimp here, as it gives that deep, malty flavor)
– 1/4 cup brown sugar, packed (light or dark works, but I lean toward dark for a richer caramel note)
– 2 tablespoons soy sauce (I use low-sodium to control saltiness, but regular is fine too)
– 1 tablespoon apple cider vinegar (a splash brightens the glaze and cuts through the fat)
– 1/2 teaspoon smoked paprika (this is my secret for an extra smoky kick without overdoing it)
– Wooden skewers, soaked in water for 30 minutes (a must to prevent burning—I keep a jar in my pantry just for recipes like this)
Instructions
1. Preheat your oven to 400°F and line a baking sheet with aluminum foil for easy cleanup. 2. In a small saucepan over medium heat, combine the stout beer, brown sugar, soy sauce, apple cider vinegar, and smoked paprika. 3. Bring the mixture to a simmer, stirring occasionally with a whisk to dissolve the sugar completely, about 3–4 minutes. 4. Reduce the heat to low and let the glaze simmer for 8–10 minutes, stirring frequently, until it thickens slightly and coats the back of a spoon. 5. While the glaze simmers, thread each bacon slice onto the soaked wooden skewers in a zigzag pattern, leaving small gaps between folds to ensure even cooking. 6. Arrange the bacon skewers in a single layer on the prepared baking sheet, making sure they don’t overlap. 7. Brush half of the glaze evenly over the bacon skewers, reserving the rest for later. 8. Bake the skewers in the preheated oven for 15 minutes, then flip them carefully with tongs. 9. Brush the skewers with the remaining glaze and bake for another 10–15 minutes, until the bacon is crispy and the edges are caramelized. 10. Transfer the skewers to a wire rack to cool for 5 minutes before serving. You’ll love how the glaze caramelizes into a sticky, sweet-and-savory coating that contrasts with the crispy bacon—it’s downright addictive. Serve these skewers warm alongside a cold beer or as part of a charcuterie board; they’re so versatile, I’ve even crumbled them over salads for a smoky crunch.
Potato and Leek Galettes
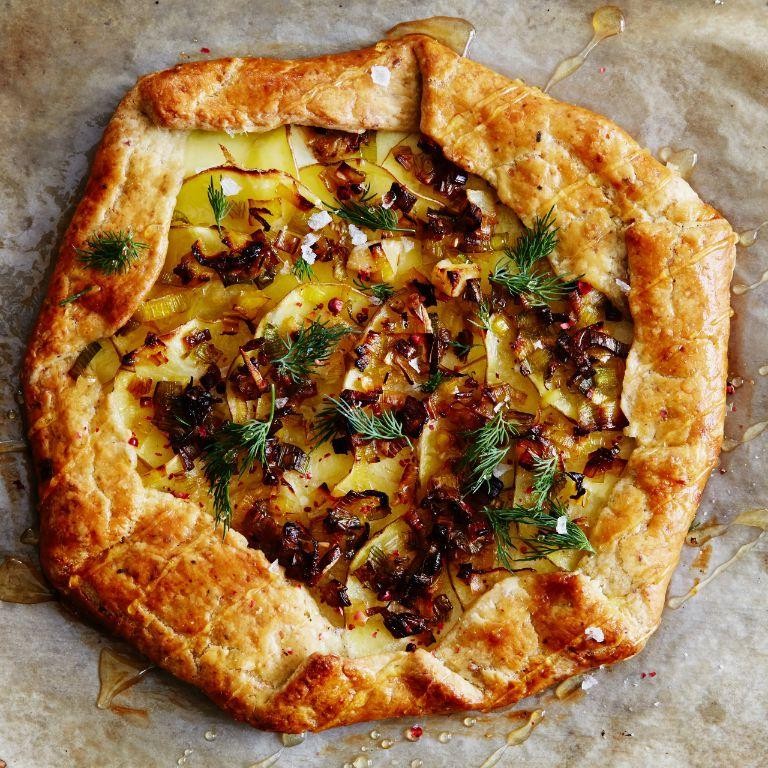
Diving into my kitchen on this crisp October afternoon, I’m reminded why potato and leek galettes have become my ultimate comfort food—they’re like edible hugs that fill the house with the most incredible buttery, earthy aroma. My grandmother first taught me this recipe during a rainy fall weekend, and I’ve been tweaking it ever since to achieve that perfect golden crispiness.
4
portions25
minutes32
minutesIngredients
– 2 large russet potatoes (I always choose ones that feel heavy for their size—they tend to be less watery)
– 2 medium leeks (make sure to clean them thoroughly, as they love hiding dirt between their layers)
– 3 tbsp unsalted butter (I keep mine cold straight from the fridge for flakier results)
– 1/4 cup all-purpose flour
– 1/2 tsp salt (I prefer fine sea salt for even distribution)
– 1/4 tsp black pepper
– 2 tbsp olive oil (extra virgin is my weekday go-to)
Instructions
1. Preheat your oven to 400°F and line a baking sheet with parchment paper.
2. Thoroughly wash the leeks, then slice them into thin rounds, using only the white and light green parts.
3. Melt 1 tablespoon of butter in a skillet over medium heat until it stops foaming, about 2 minutes.
4. Add the sliced leeks to the skillet and cook for 8-10 minutes until they become soft and translucent, stirring occasionally.
5. Peel the potatoes and grate them using the large holes of a box grater.
6. Squeeze the grated potatoes firmly in a clean kitchen towel to remove excess moisture—this step is crucial for crispy galettes.
7. In a large bowl, combine the grated potatoes, cooked leeks, flour, salt, and pepper, mixing until evenly distributed.
8. Divide the mixture into 4 equal portions and shape each into a 1/2-inch thick round patty on the prepared baking sheet.
9. Brush the top of each galette with olive oil using a pastry brush.
10. Bake for 25 minutes at 400°F until the bottoms are golden brown.
11. Carefully flip each galette using a spatula and bake for another 20 minutes until both sides are deeply golden and crispy.
12. Dot the remaining 2 tablespoons of cold butter over the hot galettes as soon as they come out of the oven.
Perfectly crisp on the outside while remaining tender within, these galettes deliver that wonderful contrast I crave. Personally, I love serving them topped with a fried egg for breakfast or alongside a simple green salad for dinner—the versatility makes them a year-round favorite in my kitchen.
Irish Cheddar and Herb Scones
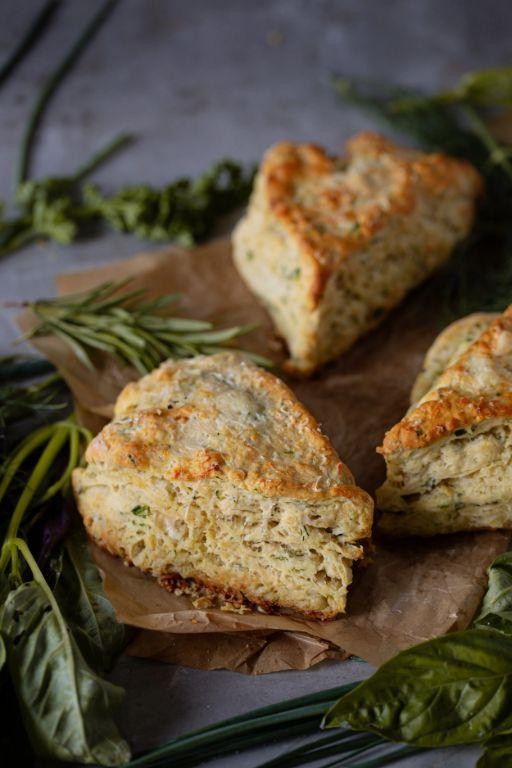
Diving into my recipe box always brings back memories of rainy afternoons in my grandmother’s kitchen, and these Irish Cheddar and Herb Scones are one of those treasures I’m excited to share. There’s something magical about how the sharp cheddar and fresh herbs come together in these flaky, tender scones that always makes me feel cozy and content. I love how they fill the house with that irresistible baked-cheese aroma that somehow makes everything better.
8
scones15
minutes20
minutesIngredients
- 2 cups all-purpose flour (I always spoon and level mine for accuracy)
- 1 tablespoon baking powder (make sure yours is fresh for maximum rise)
- 1 teaspoon salt (I use fine sea salt for even distribution)
- 1/2 cup cold unsalted butter, cubed (straight from the fridge works best)
- 1 cup shredded Irish cheddar (I prefer the extra-sharp variety for more flavor)
- 2 tablespoons fresh chives, finely chopped (from my little kitchen herb garden)
- 1 tablespoon fresh thyme leaves (rubbed between my fingers to release the oils)
- 3/4 cup cold whole milk (the fat content makes them extra tender)
- 1 large egg (I always crack mine into a separate bowl first to check for shells)
Instructions
- Preheat your oven to 400°F and line a baking sheet with parchment paper.
- Whisk together the flour, baking powder, and salt in a large bowl until thoroughly combined.
- Add the cold butter cubes and use a pastry cutter to cut them into the flour mixture until it resembles coarse crumbs with pea-sized butter pieces remaining.
- Stir in the shredded Irish cheddar, chopped chives, and thyme leaves until evenly distributed throughout the flour mixture.
- Tip: Keep everything cold—this ensures your scones will be flaky rather than dense.
- In a separate small bowl, whisk together the cold milk and egg until completely blended.
- Pour the milk mixture into the dry ingredients and use a fork to gently mix just until a shaggy dough forms—don’t overmix.
- Turn the dough out onto a lightly floured surface and gently knead it 3-4 times just to bring it together.
- Pat the dough into a 1-inch thick circle, about 7 inches in diameter.
- Tip: Handle the dough as little as possible to avoid developing gluten, which makes scones tough.
- Use a sharp knife to cut the circle into 8 equal wedges, like you’re cutting a pizza.
- Arrange the wedges on your prepared baking sheet, spacing them about 1 inch apart.
- Brush the tops of the scones lightly with a little extra milk using a pastry brush.
- Tip: The milk wash gives them that beautiful golden-brown finish when baked.
- Bake for 18-20 minutes until the scones are golden brown on top and sound hollow when tapped on the bottom.
- Transfer the scones to a wire rack and let them cool for at least 10 minutes before serving.
Coming out of the oven, these scones have the most wonderful flaky layers and that irresistible cheesy pull when you break them apart. The combination of sharp cheddar with the fresh herbal notes creates such a sophisticated flavor that’s perfect for brunch or afternoon tea. I love serving them warm with a pat of butter melting into all those nooks and crannies, or alongside a bowl of tomato soup for the ultimate comfort meal.
Ballymaloe Relish Deviled Eggs
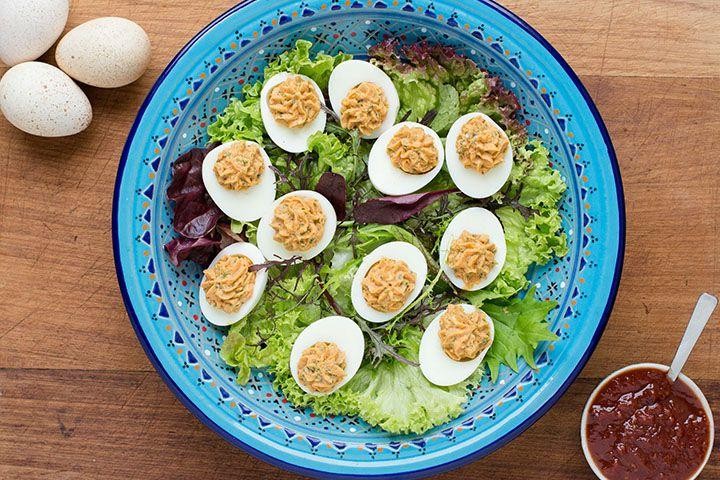
Zesty, tangy, and with just the right amount of kick—these Ballymaloe Relish Deviled Eggs have become my go-to party appetizer ever since I discovered that little jar of Irish magic at a specialty food market last fall. I love how the sweet-sour relish cuts through the richness of the yolks, creating a flavor that’s both comforting and sophisticated. Honestly, they disappear faster than I can plate them!
12
portions25
minutes12
minutesIngredients
– 6 large eggs (I prefer room temp eggs here—they peel so much easier!)
– 1/4 cup mayonnaise (Duke’s is my Southern secret for creaminess)
– 2 tbsp Ballymaloe Relish (that sweet-tangy Irish condiment I’m obsessed with)
– 1 tsp Dijon mustard (adds a subtle sharpness I love)
– 1/8 tsp smoked paprika, plus extra for garnish
– Pinch of salt (I use flaky sea salt for texture)
– Fresh chives, finely chopped (from my little windowsill herb garden)
Instructions
1. Place 6 large eggs in a single layer in a saucepan and cover with cold water by 1 inch.
2. Bring the water to a rolling boil over high heat, then immediately cover the pan and remove it from heat.
3. Let the eggs sit in the hot water for exactly 12 minutes for perfectly cooked yolks.
4. Transfer the eggs to an ice water bath and let them cool completely for 15 minutes—this stops the cooking and makes peeling effortless.
5. Gently tap each egg on the counter and roll to crackle the shell, then peel under cool running water.
6. Slice each peeled egg in half lengthwise with a sharp knife.
7. Carefully pop out the yolks into a medium bowl and arrange the whites on a serving platter.
8. Mash the yolks with a fork until they resemble fine crumbs.
9. Add 1/4 cup mayonnaise, 2 tbsp Ballymaloe Relish, 1 tsp Dijon mustard, 1/8 tsp smoked paprika, and a pinch of salt to the yolks.
10. Mix everything together until completely smooth and well-combined.
11. Spoon or pipe the yolk mixture evenly into the egg white halves.
12. Sprinkle with additional smoked paprika and fresh chives for garnish.
These deviled eggs have the creamiest texture with little bursts of tangy relish throughout. The smoky paprika adds depth while the chives give a fresh, oniony finish. Try serving them on a slate board with cornichons—the contrast makes for a stunning presentation that always impresses guests.
Mini Shepherd’s Pie Bites

Aren’t you tired of the same old party appetizers? I was too, until I remembered how much my grandma’s shepherd’s pie comforted me during rainy afternoons—so I decided to shrink that cozy classic into perfect party bites that disappeared faster than I could photograph them at my last gathering.
24
bites15
minutes40
minutesIngredients
– 1 lb ground beef (I always use 85/15 for the perfect fat content)
– 1 cup frozen peas and carrots mix (my secret for saving prep time)
– 1/2 cup beef broth (low sodium is my preference for better flavor control)
– 2 tbsp tomato paste (the concentrated kind that comes in a tube)
– 1 tbsp Worcestershire sauce (Lea & Perrins has been my go-to since college)
– 2 cups mashed potatoes (I make mine extra creamy with extra butter)
– 1/2 cup shredded cheddar cheese (sharp cheddar gives that nice tang)
– 1 tbsp olive oil (extra virgin is what I always have on hand)
– 1/2 tsp garlic powder (I’m too impatient to mince fresh garlic for this)
Instructions
1. Preheat your oven to 375°F and lightly grease a 24-cup mini muffin tin with olive oil.
2. Heat 1 tablespoon olive oil in a large skillet over medium-high heat until it shimmers.
3. Add 1 pound ground beef to the hot skillet, breaking it into small crumbles with a wooden spoon.
4. Cook the beef for 5-7 minutes until no pink remains, stirring frequently to prevent burning.
5. Drain excess fat from the skillet using a slotted spoon—this prevents greasy bites.
6. Stir in 2 tablespoons tomato paste and cook for 1 minute until fragrant and darkened.
7. Add 1 cup frozen peas and carrots, 1/2 cup beef broth, 1 tablespoon Worcestershire sauce, and 1/2 teaspoon garlic powder.
8. Simmer the mixture for 8-10 minutes until the liquid reduces by half and coats the meat.
9. Spoon 1 tablespoon of the meat mixture into each prepared mini muffin cup.
10. Top each cup with 1 tablespoon mashed potatoes, spreading evenly to cover the meat.
11. Sprinkle 1/2 cup shredded cheddar cheese evenly over all the potato-topped cups.
12. Bake for 15-18 minutes until the cheese is bubbly and golden brown at the edges.
13. Let the bites cool in the pan for 5 minutes before removing—they firm up perfectly.
These little beauties come out with that wonderful crispy potato edge that gives way to the savory filling underneath. The cheese forms a gorgeous golden crust while keeping the interior moist and flavorful. Try serving them on a wooden board with small forks for easy grabbing—they’re equally perfect for game day or fancy holiday parties.
Boxty Pancake Appetizers
Last weekend, I was digging through my grandmother’s old recipe box when I stumbled upon her handwritten boxty recipe—those Irish potato pancakes she’d make for special occasions. I decided to give them a modern twist by turning them into perfect bite-sized appetizers that disappeared faster than I could plate them at my last gathering.
24
portions15
minutes28
minutesIngredients
- 2 large russet potatoes, peeled and grated (I squeeze out the excess moisture with a clean kitchen towel—it makes all the difference for crispy edges)
- 1 cup all-purpose flour (I always use unbleached—it gives a nicer color to the final pancakes)
- 1 teaspoon baking powder (make sure it’s fresh for the best lift)
- 1/2 teaspoon salt (I use fine sea salt for even distribution)
- 1/4 teaspoon black pepper, freshly ground
- 3/4 cup buttermilk (room temperature blends more smoothly with the dry ingredients)
- 1 large egg, lightly beaten (room temperature helps everything incorporate evenly)
- 2 tablespoons unsalted butter, melted (plus extra for cooking—I always have extra on hand)
- 1/4 cup chopped fresh chives (from my windowsill herb garden)
- Sour cream for serving (I prefer full-fat for the creamiest texture)
- Smoked salmon slices for topping (about 4 ounces—I look for wild-caught when possible)
Instructions
- Place the grated potatoes in a clean kitchen towel and squeeze firmly over the sink to remove as much liquid as possible.
- In a large mixing bowl, whisk together the flour, baking powder, salt, and black pepper until thoroughly combined.
- Add the buttermilk, beaten egg, and melted butter to the dry ingredients, stirring just until the batter comes together—don’t overmix or the pancakes will be tough.
- Gently fold in the squeezed potatoes and chopped chives until evenly distributed throughout the batter.
- Heat a large non-stick skillet or griddle over medium heat and melt 1 tablespoon of butter, swirling to coat the surface evenly.
- Drop tablespoon-sized portions of batter onto the hot skillet, spacing them about 2 inches apart to allow for spreading.
- Cook for 3-4 minutes until the edges look set and the bottoms are golden brown with lacy edges.
- Flip each pancake carefully using a thin spatula and cook for another 3-4 minutes until the second side is golden brown and the centers are cooked through.
- Transfer the cooked boxties to a wire rack set over a baking sheet—this keeps them crispy instead of steaming on a plate.
- Repeat with the remaining batter, adding more butter to the skillet as needed between batches.
- Top each warm boxty pancake with a small dollop of sour cream and a folded piece of smoked salmon.
Here’s why these became an instant favorite: the boxties have this wonderful contrast between crispy, lacy edges and tender potato centers, while the cool sour cream and smoky salmon balance everything perfectly. I’ve also served them with apple chutney for a sweet-savory variation that guests rave about.
Colcannon Fritters

Unbelievably delicious and surprisingly simple, these Colcannon Fritters have become my go-to comfort food this fall. I first discovered them when trying to use up leftover mashed potatoes after a big family dinner, and now I find myself making extra mashed potatoes just so I can whip up a batch the next day. There’s something magical about how humble ingredients transform into these crispy, golden patties that everyone absolutely loves.
8
fritters15
minutes32
minutesIngredients
– 2 cups leftover mashed potatoes (I always make extra for this purpose)
– 1 cup finely chopped cabbage (I prefer savoy cabbage for its tender texture)
– 2 large eggs, at room temperature for better binding
– ½ cup all-purpose flour (I often use half whole wheat for extra fiber)
– ¼ cup finely chopped green onions (the green parts add such fresh flavor)
– 1 teaspoon baking powder (this creates the perfect light texture)
– ½ teaspoon salt (I use fine sea salt for even distribution)
– ¼ teaspoon black pepper, freshly ground
– ½ cup vegetable oil for frying (I find avocado oil works beautifully for high heat)
Instructions
1. In a large mixing bowl, combine 2 cups mashed potatoes, 1 cup chopped cabbage, and ¼ cup green onions.
2. Crack 2 large eggs directly into the potato mixture and mix thoroughly until well combined.
3. Sprinkle ½ cup flour, 1 teaspoon baking powder, ½ teaspoon salt, and ¼ teaspoon black pepper over the mixture.
4. Gently fold all ingredients together until just combined, being careful not to overmix.
5. Heat ½ cup vegetable oil in a large skillet over medium heat until it reaches 350°F.
6. Use a ¼-cup measuring cup to scoop the potato mixture and carefully drop it into the hot oil.
7. Gently flatten each scoop with the back of a spatula to form ½-inch thick patties.
8. Fry the fritters for 3-4 minutes per side until they develop a deep golden-brown crust.
9. Use a slotted spoon to transfer cooked fritters to a paper towel-lined plate to drain excess oil.
10. Repeat the frying process with remaining batter, adding more oil if needed.
Not only do these fritters have the most satisfying crispy exterior that gives way to a fluffy, savory interior, but they’re incredibly versatile too. I love serving them with a dollop of sour cream and extra green onions scattered on top, though they’re equally delicious dipped in spicy ketchup or paired with fried eggs for breakfast. The cabbage adds just enough texture to keep things interesting without overpowering the comforting potato flavor.
Guinness and Cheddar Cheese Dip

Remember that one St. Patrick’s Day party where I brought this dip on a whim? It disappeared so fast I barely got a taste myself, and now it’s my most-requested game day recipe. There’s something magical about how the rich, malty Guinness melds with sharp cheddar—it’s cozy, a little fancy, and always a hit.
1
dip10
minutes25
minutesIngredients
- 1 (12 oz) bottle Guinness stout (I like to pour it early so it goes a bit flat—less foam means smoother melting)
- 8 oz sharp cheddar cheese, shredded (I always shred my own; pre-shredded has anti-caking agents that can make the dip grainy)
- 1 cup heavy cream (full-fat is non-negotiable for that velvety texture)
- 2 tbsp all-purpose flour (this is my secret to a lump-free, thickened base)
- 1 tbsp Worcestershire sauce (a splash adds umami depth without overpowering)
- 1 tsp Dijon mustard (my grandma’s trick—it brightens the richness)
- 1/2 tsp garlic powder (easy, but toasts nicely in the roux)
- 1/4 tsp smoked paprika (for a hint of smokiness that pairs with the beer)
- Salt, to taste (I wait until the end to season, since the cheese and Worcestershire are salty)
Instructions
- Pour the Guinness into a small saucepan and simmer over medium heat for 8–10 minutes until reduced by half—this concentrates the malty flavor and removes excess bitterness.
- In a separate medium saucepan, whisk the flour and heavy cream together over medium-low heat until no lumps remain, about 2 minutes. Tip: A silicone whisk is my go-to here to avoid scratching the pan.
- Add the shredded cheddar cheese gradually, stirring constantly with a wooden spoon until fully melted and smooth, about 3–4 minutes.
- Pour the reduced Guinness into the cheese mixture, stirring to combine completely.
- Stir in the Worcestershire sauce, Dijon mustard, garlic powder, and smoked paprika until evenly incorporated.
- Continue cooking over low heat, stirring frequently, for 5–7 minutes until the dip thickens slightly and coats the back of a spoon. Tip: Don’t rush this—low heat prevents the cheese from breaking or becoming oily.
- Remove from heat and season with salt to taste, starting with 1/4 tsp and adjusting as needed.
- Transfer the dip to a serving bowl and let it rest for 2–3 minutes before serving. Tip: A brief rest allows the flavors to meld and the dip to thicken to the perfect dippable consistency.
My favorite thing about this dip is its velvety, almost fondue-like texture that clings to pretzels or crispy potato wedges without being overly heavy. The sharp cheddar shines through, balanced by the deep, toasty notes from the Guinness—it’s robust enough to stand up to bold dippers like spicy sausage or rustic bread, but mellow enough to keep you coming back for just one more scoop.
Irish Cheese Board with Honey Whiskey Sauce
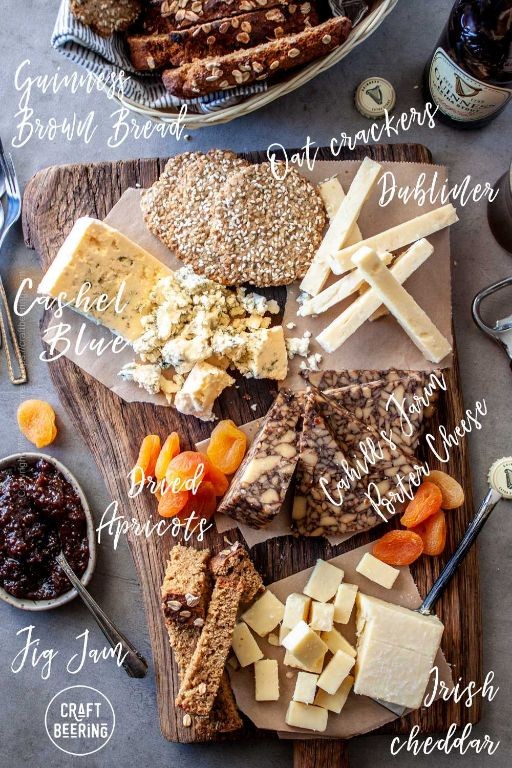
A cheese board always reminds me of cozy gatherings with friends, and this Irish-inspired version with its sweet honey whiskey sauce has become my absolute favorite for autumn entertaining. I first discovered this combination during a rainy Dublin pub visit, and I’ve been perfecting my homemade version ever since.
3
servings15
minutes15
minutesIngredients
– 8 oz Irish cheddar cheese, cubed (I love the sharpness of Kerrygold for this)
– 4 oz Irish blue cheese, crumbled (Cashel Blue adds the perfect tang)
– 6 oz sliced Irish smoked salmon
– 1/2 cup honey (local wildflower honey gives the best flavor)
– 1/4 cup Irish whiskey (Jameson works beautifully here)
– 2 tbsp unsalted butter (I always use European-style for richer flavor)
– 1 tsp fresh lemon juice (freshly squeezed makes all the difference)
– 1/4 tsp sea salt (Maldon flakes are my go-to for finishing)
– 1 baguette, sliced and toasted
– 1 green apple, thinly sliced (Granny Smith adds nice tartness)
Instructions
1. Arrange the cubed Irish cheddar, crumbled Irish blue cheese, and sliced smoked salmon on a large wooden board.
2. Place the baguette slices on a baking sheet and toast in a 375°F oven for 8-10 minutes until golden brown and crisp.
3. Thinly slice the green apple and arrange around the cheese and salmon.
4. Combine honey and Irish whiskey in a small saucepan over medium heat.
5. Whisk constantly until the mixture begins to bubble gently, about 3-4 minutes.
6. Reduce heat to low and whisk in unsalted butter until fully melted and incorporated.
7. Stir in fresh lemon juice and sea salt, then remove from heat.
8. Let the sauce cool for 5 minutes until slightly thickened but still pourable.
9. Drizzle half of the honey whiskey sauce over the cheese board components.
10. Serve the remaining sauce in a small bowl alongside the board.
Creamy Irish cheeses meet the sweet warmth of whiskey-infused honey in the most delightful way. The smoked salmon adds savory depth that balances the sauce’s sweetness perfectly. I love serving this with extra toasted baguette slices for dipping and watching guests create their own perfect bites.
Conclusion
Looking for the perfect start to your Irish feast? These 30 easy appetizers bring authentic flavors to your table with minimal effort. I hope you find some new favorites to share with family and friends! Don’t forget to leave a comment telling me which recipes you loved most, and pin this article to your Pinterest boards for your next celebration. Sláinte!


