Tired of dinnertime dilemmas with IBS? You’re not alone. We’ve gathered 24 delicious, easy recipes that are kind to your gut and a joy to make. From quick weeknight wonders to cozy comfort meals, these dishes prove that managing your symptoms doesn’t mean sacrificing flavor. Let’s dive into a world of stress-free cooking where every bite supports your well-being.
Lemon Herb Grilled Chicken with Quinoa
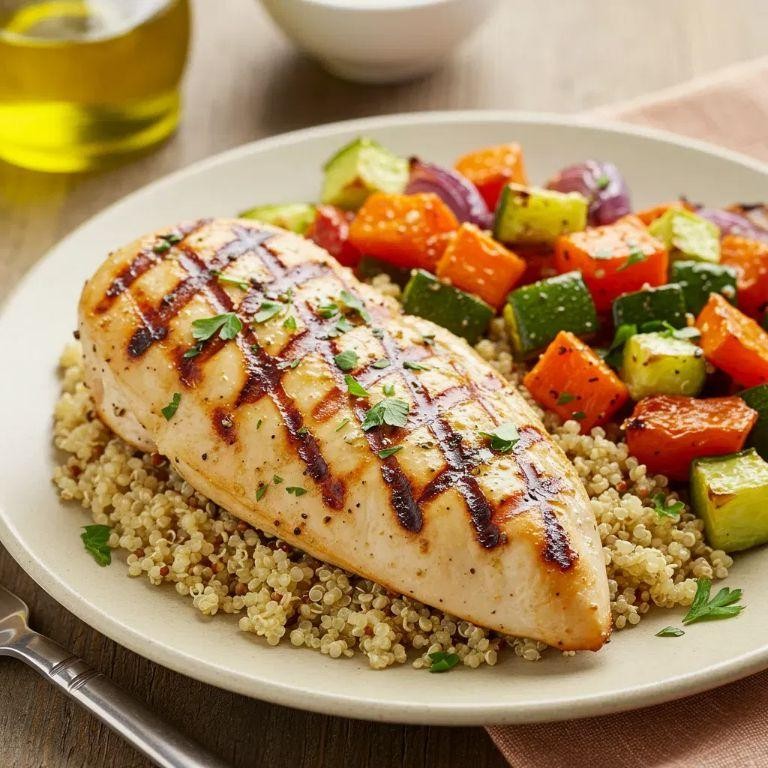
Just when you need a fresh, healthy dinner that doesn’t skimp on flavor, this lemon herb grilled chicken with quinoa comes to the rescue. It’s bright, satisfying, and perfect for a weeknight or a casual weekend meal.
Serving: 4 | Pre Time: 15 minutes | Cooking Time: 25 minutes
Ingredients
– 4 boneless, skinless chicken breasts
– 1 cup quinoa
– 2 cups low-sodium chicken broth
– 2 lemons
– 3 tbsp olive oil
– 2 tbsp fresh rosemary, chopped
– 2 tbsp fresh thyme, chopped
– 3 cloves garlic, minced
– 1 tsp kosher salt
– 1/2 tsp black pepper
Instructions
1. Rinse 1 cup of quinoa under cold water in a fine-mesh strainer for 1 minute to remove bitterness.
2. In a medium saucepan, combine the rinsed quinoa and 2 cups of low-sodium chicken broth.
3. Bring the mixture to a boil over high heat, then reduce the heat to low, cover, and simmer for 15 minutes until the liquid is absorbed.
4. While the quinoa cooks, zest and juice 2 lemons into a small bowl.
5. Add 3 tbsp olive oil, 2 tbsp chopped fresh rosemary, 2 tbsp chopped fresh thyme, 3 cloves minced garlic, 1 tsp kosher salt, and 1/2 tsp black pepper to the lemon mixture, whisking to combine.
6. Place 4 boneless, skinless chicken breasts in a shallow dish and pour the marinade over them, coating evenly.
7. Let the chicken marinate at room temperature for 10 minutes to allow the flavors to penetrate.
8. Preheat a grill or grill pan to medium-high heat, about 400°F.
9. Grill the chicken for 6-7 minutes per side, or until the internal temperature reaches 165°F on an instant-read thermometer.
10. Remove the chicken from the grill and let it rest on a cutting board for 5 minutes to retain juices.
11. Fluff the cooked quinoa with a fork and divide it among four plates.
12. Slice the rested chicken against the grain and arrange it over the quinoa.
13. Drizzle any remaining marinade from the dish over the chicken for extra flavor.
Every bite offers tender, juicy chicken with a zesty lemon-herb crust, paired with fluffy, nutty quinoa. Enjoy it warm with a side salad, or pack the leftovers cold for a delicious lunch the next day.
Zucchini Noodle Stir-Fry with Tofu
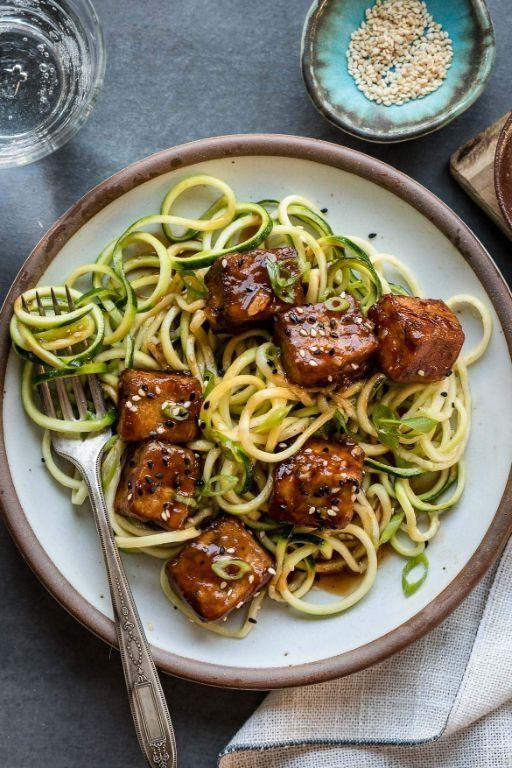
Kicking off a healthy weeknight dinner? This zucchini noodle stir-fry with tofu is your new go-to—it’s light, packed with flavor, and ready in under 30 minutes. You’ll love how the crispy tofu pairs with the fresh veggie noodles, and it’s totally customizable with whatever you have on hand.
Serving: 4 | Pre Time: 15 minutes | Cooking Time: 12 minutes
Ingredients
– 14 oz extra-firm tofu
– 4 medium zucchini
– 1 red bell pepper
– 3 cloves garlic
– 1 tbsp fresh ginger
– 3 tbsp soy sauce
– 2 tbsp sesame oil
– 1 tbsp rice vinegar
– 1 tbsp cornstarch
– 2 tbsp vegetable oil
– 1 tsp red pepper flakes
– 2 green onions
Instructions
1. Press the tofu: Wrap the tofu block in paper towels, place it on a plate, and set a heavy pan on top for 10 minutes to remove excess water.
2. While the tofu presses, spiralize the zucchini into noodles using a spiralizer or julienne peeler.
3. Slice the red bell pepper into thin strips, mince the garlic and ginger, and thinly slice the green onions, separating the white and green parts.
4. Cut the pressed tofu into 1-inch cubes and toss them in a bowl with 1 tbsp cornstarch until evenly coated.
5. Heat 1 tbsp vegetable oil in a large skillet or wok over medium-high heat until shimmering.
6. Add the tofu cubes in a single layer and cook for 3–4 minutes per side until golden brown and crispy, then transfer to a plate.
7. In the same skillet, add 1 tbsp vegetable oil and sauté the white parts of the green onions, garlic, ginger, and red pepper flakes for 1 minute until fragrant.
8. Add the bell pepper strips and stir-fry for 2–3 minutes until slightly softened.
9. Push the vegetables to the side, add the zucchini noodles, and stir-fry for 2–3 minutes until just tender but still crisp.
10. Return the tofu to the skillet, then pour in 3 tbsp soy sauce, 2 tbsp sesame oil, and 1 tbsp rice vinegar, tossing everything together for 1 minute to combine.
11. Remove from heat and garnish with the green parts of the onions.
So, what’s the final dish like? You get a satisfying mix of textures—crispy tofu, tender-crisp zucchini noodles, and a savory, slightly spicy sauce that clings to every bite. Try serving it over a bed of quinoa or brown rice for a heartier meal, or top it with a sprinkle of sesame seeds for extra crunch.
Ginger-Infused Fish Tacos with Cabbage Slaw

Tired of the same old taco Tuesday? These ginger-infused fish tacos are about to become your new go-to. They’re fresh, flavorful, and surprisingly simple to pull together, even on a busy weeknight.
Serving: 4 | Pre Time: 20 minutes | Cooking Time: 10 minutes
Ingredients
– 1 lb white fish fillets (like cod or tilapia)
– 2 tbsp olive oil
– 1 tbsp grated fresh ginger
– 2 cloves garlic, minced
– 1 tsp ground cumin
– 1/2 tsp chili powder
– 1/2 tsp salt
– 8 small corn tortillas
– 2 cups shredded green cabbage
– 1/4 cup chopped fresh cilantro
– 2 tbsp lime juice
– 1/4 cup sour cream
– 1/4 cup mayonnaise
– 1 tbsp hot sauce (optional)
Instructions
1. Pat the 1 lb white fish fillets completely dry with paper towels.
2. In a small bowl, whisk together 2 tbsp olive oil, 1 tbsp grated fresh ginger, 2 cloves minced garlic, 1 tsp ground cumin, 1/2 tsp chili powder, and 1/2 tsp salt to create a marinade.
3. Place the fish fillets in a shallow dish and pour the marinade over them, ensuring they are fully coated. Let them sit for 10 minutes at room temperature.
4. While the fish marinates, prepare the slaw by combining 2 cups shredded green cabbage, 1/4 cup chopped fresh cilantro, and 2 tbsp lime juice in a medium bowl. Toss to coat evenly and set aside.
5. In another small bowl, mix 1/4 cup sour cream, 1/4 cup mayonnaise, and 1 tbsp hot sauce (if using) to create the sauce.
6. Heat a large non-stick skillet or grill pan over medium-high heat until a drop of water sizzles on the surface.
7. Carefully place the marinated fish fillets in the hot skillet. Cook for 3-4 minutes per side, or until the fish is opaque and flakes easily with a fork. Tip: Avoid moving the fish too soon to get a nice sear.
8. While the fish cooks, warm the 8 small corn tortillas. You can do this by wrapping them in a damp paper towel and microwaving for 30 seconds, or heating them directly in a dry skillet for 20 seconds per side. Tip: Warming tortillas prevents them from cracking when folded.
9. Once the fish is cooked, transfer it to a plate and use a fork to gently break it into large chunks.
10. To assemble each taco, place a warm tortilla on a plate, add a portion of the flaked fish, top with a generous scoop of the cabbage slaw, and drizzle with the creamy sauce. Tip: For extra crunch, you can quickly toast the tortillas in the same skillet after cooking the fish.
Eat these tacos right away while everything is warm and fresh. The flaky, ginger-spiced fish pairs perfectly with the crisp, tangy slaw and creamy sauce, creating a delightful mix of textures in every bite. For a fun twist, try serving them with extra lime wedges and a side of black beans or grilled corn.
Simple Quinoa Salad with Grilled Vegetables
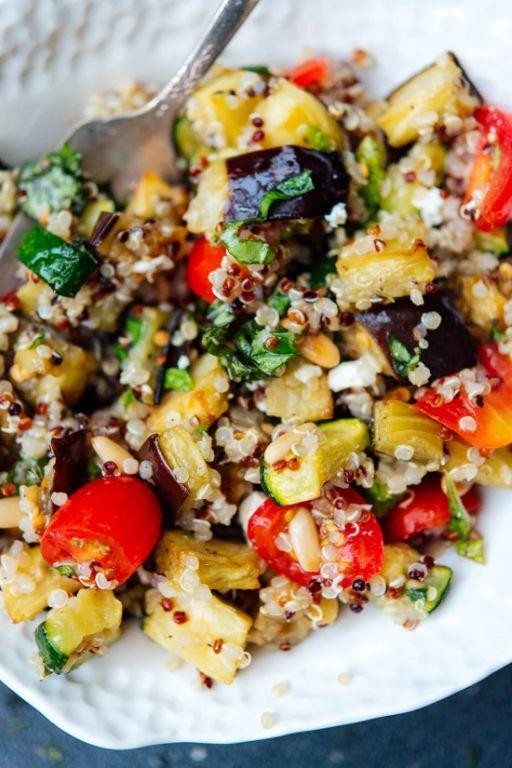
Craving something fresh, healthy, and ridiculously easy to throw together? You’re in the right place. This quinoa salad with grilled veggies is your new go-to for a satisfying lunch or a simple, colorful side dish that comes together with minimal fuss.
Serving: 4 | Pre Time: 15 minutes | Cooking Time: 25 minutes
Ingredients
– 1 cup quinoa
– 2 cups water
– 1/4 cup olive oil, divided
– 1 red bell pepper, sliced into 1-inch strips
– 1 zucchini, sliced into 1/2-inch rounds
– 1 yellow squash, sliced into 1/2-inch rounds
– 1 red onion, sliced into 1/2-inch wedges
– 2 tbsp lemon juice
– 1/4 cup chopped fresh parsley
– 1/2 tsp salt
– 1/4 tsp black pepper
Instructions
1. Rinse 1 cup of quinoa thoroughly in a fine-mesh strainer under cold running water for 1 minute to remove its natural bitter coating.
2. Combine the rinsed quinoa and 2 cups of water in a medium saucepan and bring to a boil over high heat.
3. Once boiling, reduce the heat to low, cover the saucepan, and simmer for 15 minutes until all the water is absorbed.
4. Remove the saucepan from the heat, keep it covered, and let the quinoa steam off the heat for 10 minutes to finish cooking and become fluffy.
5. While the quinoa steams, preheat a grill or grill pan to medium-high heat (about 400°F).
6. In a large bowl, toss the sliced red bell pepper, zucchini, yellow squash, and red onion with 2 tablespoons of the olive oil, ensuring all pieces are lightly coated.
7. Place the oiled vegetables directly on the preheated grill grates in a single layer.
8. Grill the vegetables for 4-5 minutes per side, turning once with tongs, until they develop visible grill marks and are tender-crisp.
9. Transfer the grilled vegetables to a cutting board and let them cool for 5 minutes, then chop them into bite-sized pieces.
10. Fluff the steamed quinoa with a fork and transfer it to a large serving bowl.
11. Add the chopped grilled vegetables to the bowl with the quinoa.
12. Pour the remaining 2 tablespoons of olive oil and 2 tablespoons of lemon juice over the quinoa and vegetables.
13. Add 1/4 cup of chopped fresh parsley, 1/2 teaspoon of salt, and 1/4 teaspoon of black pepper to the bowl.
14. Gently toss all ingredients together until everything is evenly combined and coated with the dressing.
Making this salad ahead lets the flavors meld beautifully in the fridge. You’ll love the contrast of the fluffy, nutty quinoa with the smoky, slightly charred vegetables and the bright, herby dressing. Try serving it over a bed of greens, stuffed into a pita, or alongside grilled chicken for a complete meal.
Baked Salmon with Dill and Asparagus
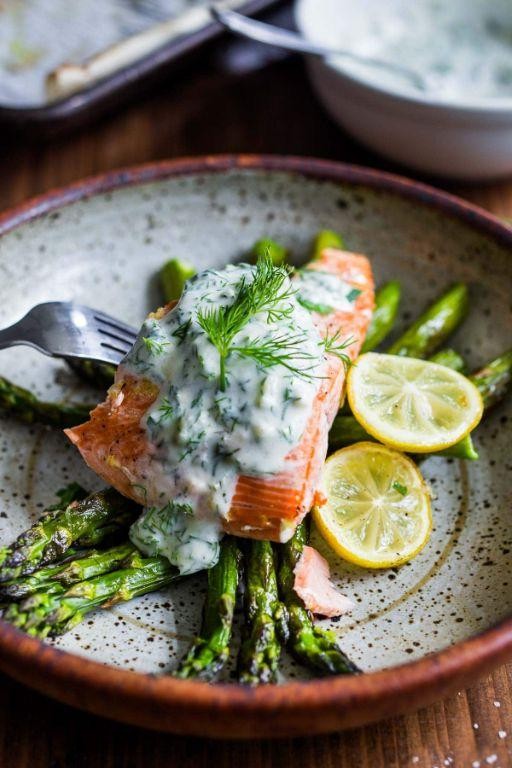
Venturing into a healthy dinner that feels fancy but is actually super simple? This baked salmon with dill and asparagus is your new weeknight hero. It’s a one-pan wonder that comes together with minimal fuss for maximum flavor.
Serving: 4 | Pre Time: 10 minutes | Cooking Time: 15 minutes
Ingredients
– 4 (6-ounce) salmon fillets, skin-on
– 1 pound asparagus, tough ends trimmed
– 2 tablespoons olive oil
– 2 tablespoons fresh dill, chopped
– 1 lemon, sliced into 4 rounds
– 1/2 teaspoon salt
– 1/4 teaspoon black pepper
Instructions
1. Preheat your oven to 400°F (200°C) and line a large baking sheet with parchment paper for easy cleanup.
2. Pat the 4 salmon fillets completely dry with paper towels to ensure a crispy skin.
3. Place the salmon fillets and 1 pound of trimmed asparagus on the prepared baking sheet.
4. Drizzle 2 tablespoons of olive oil evenly over the salmon and asparagus.
5. Sprinkle 1/2 teaspoon of salt and 1/4 teaspoon of black pepper evenly over everything on the sheet.
6. Place one lemon slice on top of each salmon fillet.
7. Evenly sprinkle 2 tablespoons of chopped fresh dill over the salmon and asparagus.
8. Bake in the preheated oven at 400°F for 12-15 minutes, until the salmon flakes easily with a fork and the asparagus is tender-crisp.
9. Remove the baking sheet from the oven and let the salmon rest for 3 minutes before serving.
You’ll love the contrast of the flaky, buttery salmon against the crisp-tender asparagus, all brightened by that fresh dill and lemon. Try serving it over a bed of quinoa or with a simple side salad for a complete, satisfying meal.
Slow-Cooked Turmeric Chicken with Coconut Rice
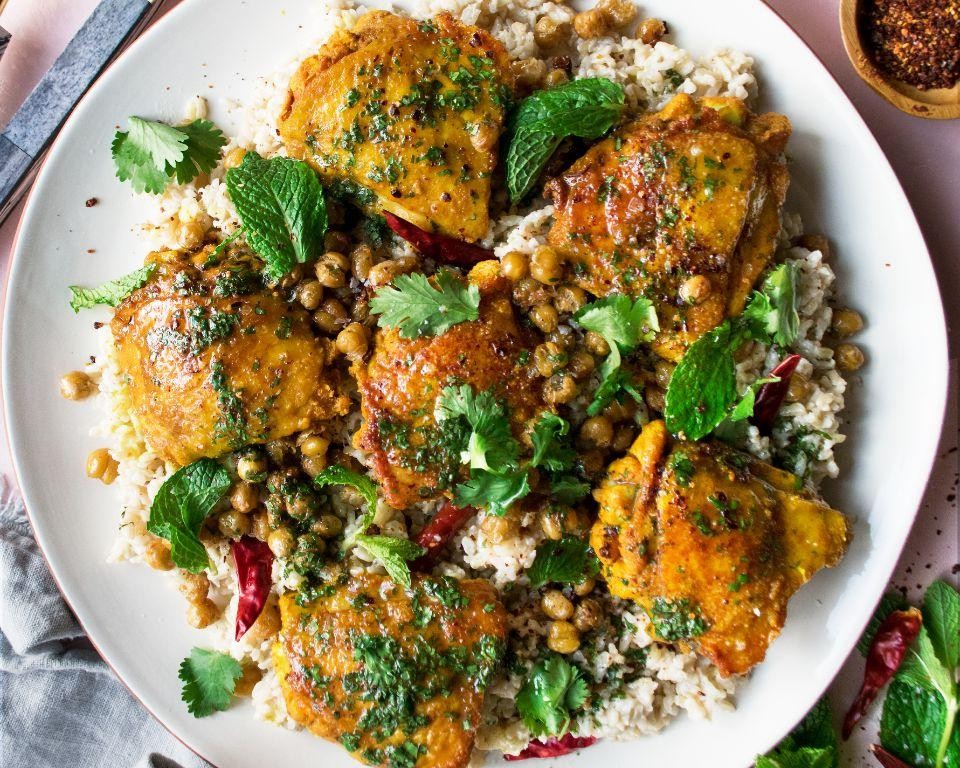
Fancy a cozy meal that practically cooks itself? This slow-cooked turmeric chicken with coconut rice is your ticket to a flavorful, hands-off dinner. It’s perfect for busy weeknights when you want something comforting without the fuss.
Serving: 4 | Pre Time: 15 minutes | Cooking Time: 4 hours
Ingredients
– 1.5 lbs boneless, skinless chicken thighs
– 1 tbsp olive oil
– 1 onion, diced
– 3 cloves garlic, minced
– 1 tbsp fresh ginger, grated
– 2 tsp ground turmeric
– 1 tsp ground cumin
– 1/2 tsp black pepper
– 1/2 tsp salt
– 1 (13.5 oz) can coconut milk
– 1 cup chicken broth
– 1 cup jasmine rice
– 1/2 cup water
– 1/4 cup fresh cilantro, chopped
Instructions
1. Heat 1 tbsp olive oil in a large skillet over medium-high heat until shimmering, about 2 minutes.
2. Add 1.5 lbs boneless, skinless chicken thighs and sear for 3 minutes per side until golden brown.
3. Transfer the chicken to a slow cooker.
4. In the same skillet, add 1 diced onion and cook for 5 minutes until softened.
5. Add 3 cloves minced garlic, 1 tbsp grated ginger, 2 tsp ground turmeric, 1 tsp ground cumin, 1/2 tsp black pepper, and 1/2 tsp salt, stirring for 1 minute until fragrant.
6. Pour in 1 can coconut milk and 1 cup chicken broth, scraping up any browned bits from the skillet.
7. Transfer the mixture to the slow cooker, covering the chicken completely.
8. Cover and cook on low for 4 hours until the chicken is tender and easily shreds with a fork.
9. About 30 minutes before serving, rinse 1 cup jasmine rice under cold water until the water runs clear.
10. In a medium saucepan, combine the rinsed rice, 1/2 cup water, and the remaining liquid from the slow cooker (about 1 cup), bringing to a boil over high heat.
11. Reduce heat to low, cover, and simmer for 15 minutes until the rice is fluffy and has absorbed all the liquid.
12. Shred the cooked chicken in the slow cooker using two forks.
13. Stir in 1/4 cup chopped fresh cilantro into the chicken mixture.
14. Serve the turmeric chicken over the coconut rice.
Ready to dig in? The chicken turns out incredibly tender and juicy, infused with warm turmeric and coconut flavors that pair perfectly with the fluffy, aromatic rice. For a fun twist, try serving it in bowls topped with extra cilantro or a squeeze of lime for a bright finish.
Veggie-Packed Lentil Soup
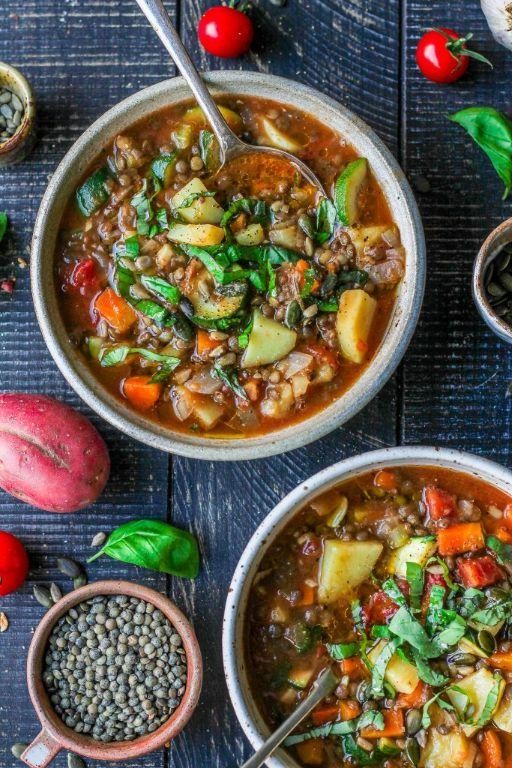
Nothing beats a cozy bowl of soup on a chilly day, and this veggie-packed lentil soup is my go-to. You’ll love how hearty and flavorful it turns out with minimal effort. Let’s get cooking!
Serving: 6 | Pre Time: 15 minutes | Cooking Time: 40 minutes
Ingredients
– 2 tbsp olive oil
– 1 medium yellow onion, diced
– 2 medium carrots, diced
– 2 celery stalks, diced
– 3 cloves garlic, minced
– 1 tsp ground cumin
– 1 tsp smoked paprika
– 1 cup dried brown lentils, rinsed
– 6 cups vegetable broth
– 1 (14.5 oz) can diced tomatoes
– 1 bay leaf
– 1 tsp salt
– 1/2 tsp black pepper
– 2 cups fresh spinach, chopped
– 2 tbsp lemon juice
Instructions
1. Heat 2 tbsp olive oil in a large pot over medium heat for 1 minute.
2. Add 1 diced onion, 2 diced carrots, and 2 diced celery stalks to the pot.
3. Sauté the vegetables for 8-10 minutes, stirring occasionally, until the onion is translucent and the carrots soften.
4. Stir in 3 minced garlic cloves, 1 tsp ground cumin, and 1 tsp smoked paprika, cooking for 1 minute until fragrant.
5. Add 1 cup rinsed lentils, 6 cups vegetable broth, 1 can diced tomatoes, 1 bay leaf, 1 tsp salt, and 1/2 tsp black pepper to the pot.
6. Bring the mixture to a boil over high heat, then reduce to a simmer.
7. Cover the pot and simmer for 25-30 minutes, until the lentils are tender but not mushy.
8. Remove the bay leaf from the pot and discard it.
9. Stir in 2 cups chopped spinach and 2 tbsp lemon juice, cooking for 2-3 minutes until the spinach wilts.
10. Taste the soup and adjust seasoning if needed, then remove from heat.
So creamy and satisfying, this soup has a rich depth from the spices and a bright finish from the lemon. Serve it with crusty bread for dipping or top with a dollop of Greek yogurt for extra creaminess.
Spinach and Feta Stuffed Bell Peppers
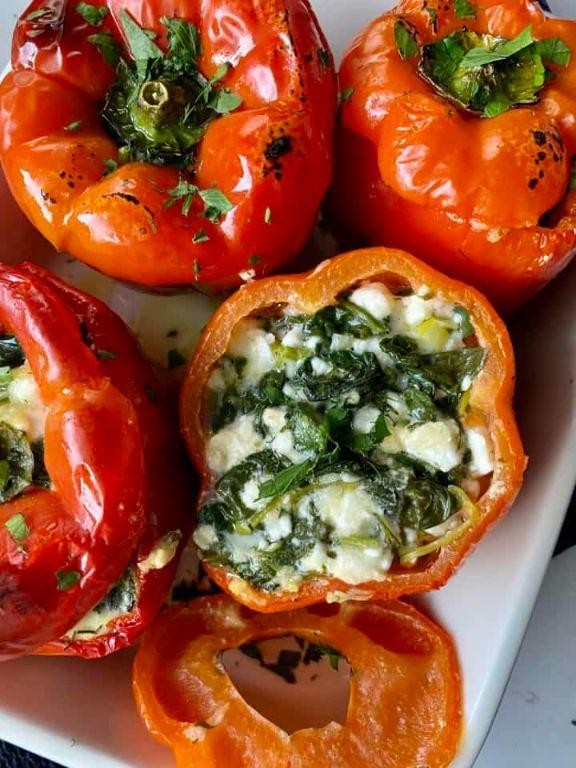
Now, if you’re looking for a cozy meal that’s packed with flavor but doesn’t keep you in the kitchen all day, these stuffed peppers are your answer. They’re a perfect mix of hearty and healthy, with a cheesy, savory filling that everyone will love.
Serving: 4 | Pre Time: 15 minutes | Cooking Time: 35 minutes
Ingredients
– 4 large bell peppers
– 1 tablespoon olive oil
– 1/2 cup chopped onion
– 2 cloves garlic, minced
– 5 ounces fresh spinach
– 1 cup cooked quinoa
– 1 cup crumbled feta cheese
– 1/2 teaspoon dried oregano
– 1/4 teaspoon black pepper
– 1/4 cup water
Instructions
1. Preheat your oven to 375°F.
2. Slice the tops off the bell peppers and remove the seeds and membranes.
3. Place the peppers upright in a baking dish.
4. Heat the olive oil in a large skillet over medium heat.
5. Add the chopped onion and cook for 3-4 minutes until softened.
6. Add the minced garlic and cook for 30 seconds until fragrant.
7. Stir in the fresh spinach and cook for 2-3 minutes until wilted.
8. Remove the skillet from the heat and let it cool slightly.
9. In a mixing bowl, combine the cooked quinoa, crumbled feta cheese, dried oregano, and black pepper.
10. Add the spinach mixture from the skillet to the bowl and mix everything together thoroughly.
11. Spoon the filling evenly into the prepared bell peppers, packing it down gently.
12. Pour the water into the bottom of the baking dish around the peppers.
13. Cover the dish tightly with aluminum foil.
14. Bake for 25 minutes.
15. Remove the foil and bake for an additional 10 minutes until the peppers are tender and the tops are lightly golden.
16. Let the peppers rest for 5 minutes before serving.
But the best part is biting into that tender pepper with the warm, melty feta and fluffy quinoa inside—it’s a texture dream. Serve them with a simple green salad or some crusty bread to soak up any juices, and you’ve got a meal that feels fancy without any fuss.
Turmeric Ginger Carrot Soup

Dive into a cozy bowl of turmeric ginger carrot soup—it’s the perfect way to warm up on a chilly day. You’ll love how the earthy turmeric and zippy ginger play off the sweet carrots. It’s simple to make and packed with comforting flavor.
Serving: 4 | Pre Time: 15 minutes | Cooking Time: 30 minutes
Ingredients
– 1 tbsp olive oil
– 1 medium yellow onion, diced
– 3 cloves garlic, minced
– 1 tbsp fresh ginger, grated
– 1 tsp ground turmeric
– 1 lb carrots, peeled and chopped into 1-inch pieces
– 4 cups vegetable broth
– 1 cup coconut milk
– 1 tsp salt
– 1/2 tsp black pepper
– 2 tbsp fresh lemon juice
Instructions
1. Heat 1 tbsp olive oil in a large pot over medium heat until shimmering, about 2 minutes.
2. Add 1 medium yellow onion, diced, and cook, stirring occasionally, until softened and translucent, about 5 minutes.
3. Stir in 3 cloves garlic, minced, 1 tbsp fresh ginger, grated, and 1 tsp ground turmeric, and cook for 1 minute until fragrant to bloom the spices.
4. Add 1 lb carrots, peeled and chopped, and toss to coat in the spice mixture.
5. Pour in 4 cups vegetable broth, bring to a boil, then reduce heat to low, cover, and simmer until carrots are very tender when pierced with a fork, about 20 minutes.
6. Carefully transfer the soup to a blender, working in batches if needed, and blend on high until completely smooth and creamy, holding the lid down with a towel for safety.
7. Return the blended soup to the pot over low heat.
8. Stir in 1 cup coconut milk, 1 tsp salt, and 1/2 tsp black pepper until fully combined.
9. Remove from heat and stir in 2 tbsp fresh lemon juice to brighten the flavors.
Just ladle it into bowls and enjoy its velvety texture and vibrant golden color. The soup has a rich, slightly sweet base with a warm kick from the ginger and turmeric. For a fun twist, top it with a swirl of extra coconut milk, a sprinkle of toasted pumpkin seeds, or a dash of chili flakes for heat.
Light and Savory Shrimp Scampi with Zoodles
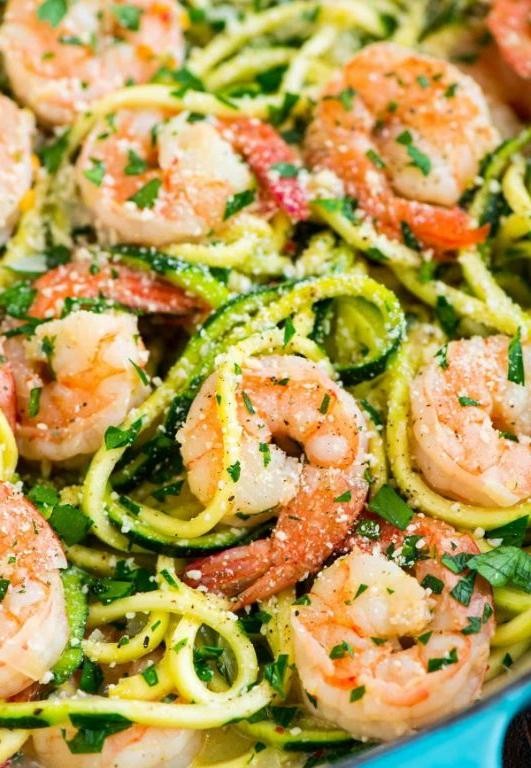
Picture this: a quick, healthy dinner that feels indulgent but won’t weigh you down. You’re about to make a garlicky, lemony shrimp scampi that’s perfect for a busy weeknight, and we’re swapping traditional pasta for light zucchini noodles.
Serving: 4 | Prep Time: 15 minutes | Cooking Time: 10 minutes
Ingredients
- 1.5 lbs large shrimp, peeled and deveined
- 4 medium zucchini
- 4 tbsp unsalted butter
- 4 cloves garlic, minced
- 1/2 cup dry white wine
- 1/4 cup fresh lemon juice
- 1/4 cup chopped fresh parsley
- 1/4 tsp red pepper flakes
- Salt to taste
- Black pepper to taste
- 2 tbsp olive oil
Instructions
- Pat the 1.5 lbs of shrimp completely dry with paper towels to ensure a good sear.
- Use a spiralizer to turn the 4 zucchini into noodles, or zoodles, and set them aside.
- Season the shrimp generously with salt and black pepper on both sides.
- Heat 2 tbsp of olive oil in a large skillet over medium-high heat until it shimmers, about 1 minute.
- Add the shrimp to the skillet in a single layer and cook for 2 minutes per side, until pink and opaque, then transfer to a plate.
- Reduce the heat to medium and melt 4 tbsp of unsalted butter in the same skillet.
- Add the 4 cloves of minced garlic and 1/4 tsp of red pepper flakes, sautéing for 1 minute until fragrant but not browned.
- Pour in 1/2 cup of dry white wine and 1/4 cup of fresh lemon juice, scraping up any browned bits from the bottom of the pan.
- Let the sauce simmer for 3 minutes to reduce slightly and cook off the alcohol.
- Add the zucchini noodles to the skillet and toss for 2 minutes until just tender but still crisp.
- Return the cooked shrimp to the skillet along with any accumulated juices.
- Stir in 1/4 cup of chopped fresh parsley and toss everything together for 1 minute to heat through.
- Taste and adjust seasoning with more salt or black pepper if needed, then remove from heat.
Mouthwatering and ready in a flash, this dish combines tender shrimp with a bright, garlicky sauce that clings to every zoodle. The zucchini stays pleasantly al dente, offering a fresh crunch against the rich butter and lemon. For a fun twist, try serving it in shallow bowls with a sprinkle of Parmesan or alongside a simple arugula salad to soak up the extra sauce.
Grilled Eggplant with Herb Yogurt Sauce
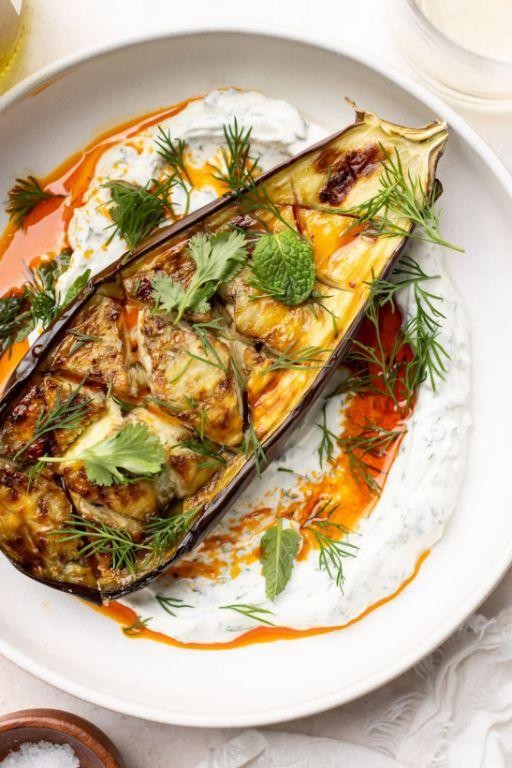
Perfect for a summer evening or a quick weeknight side, this grilled eggplant with herb yogurt sauce is a simple dish that feels special. You get smoky, tender eggplant paired with a bright, creamy sauce—it’s a combo that never disappoints. Let’s fire up the grill and make it happen!
Serving: 4 | Pre Time: 15 minutes | Cooking Time: 10 minutes
Ingredients
– 2 medium eggplants
– 2 tablespoons olive oil
– 1 teaspoon salt
– ½ teaspoon black pepper
– 1 cup plain Greek yogurt
– 2 tablespoons fresh lemon juice
– 2 tablespoons chopped fresh dill
– 2 tablespoons chopped fresh mint
– 1 garlic clove, minced
– ¼ teaspoon salt
Instructions
1. Preheat a grill or grill pan to medium-high heat (about 400°F).
2. Slice the eggplants lengthwise into ½-inch thick planks.
3. Brush both sides of the eggplant slices evenly with the olive oil.
4. Sprinkle the salt and black pepper over both sides of the eggplant slices.
5. Place the eggplant slices on the preheated grill.
6. Grill the eggplant for 4-5 minutes per side, until you see deep grill marks and the flesh is tender when pierced with a fork.
7. While the eggplant grills, combine the Greek yogurt, lemon juice, dill, mint, minced garlic, and ¼ teaspoon salt in a medium bowl.
8. Whisk the yogurt mixture until it is smooth and fully combined.
9. Transfer the grilled eggplant slices to a serving platter.
10. Drizzle the herb yogurt sauce over the warm eggplant slices.
Enjoy the contrast of the smoky, silky eggplant with the cool, tangy sauce—it’s a texture dream. This dish is fantastic served warm right off the grill, or you can let it chill for a refreshing cold salad. Either way, it’s a versatile winner that’s sure to please.
Quinoa Stuffed Acorn Squash with Almonds
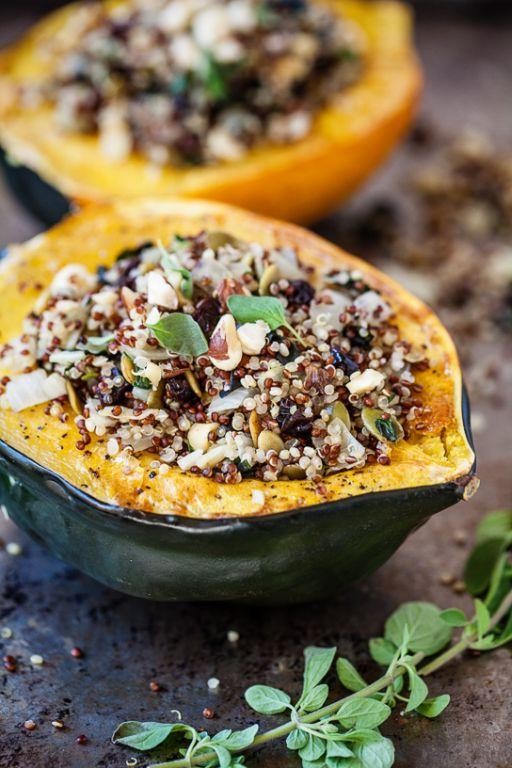
Oh, it’s that cozy time of year when you want something hearty but healthy. This quinoa-stuffed acorn squash is just the thing—it’s packed with flavor, easy to make, and looks impressive on the table. You’ll love how the almonds add a nice crunch to every bite.
Serving: 4 | Pre Time: 15 minutes | Cooking Time: 60 minutes
Ingredients
– 2 medium acorn squashes
– 1 cup quinoa
– 2 cups vegetable broth
– 1/2 cup sliced almonds
– 1/4 cup olive oil
– 2 cloves garlic, minced
– 1 tsp dried thyme
– 1/2 tsp salt
– 1/4 tsp black pepper
Instructions
1. Preheat your oven to 400°F.
2. Cut each acorn squash in half lengthwise and scoop out the seeds with a spoon.
3. Brush the cut sides of the squash halves with 2 tablespoons of olive oil and place them cut-side down on a baking sheet.
4. Roast the squash in the preheated oven for 30 minutes, or until the flesh is tender when pierced with a fork.
5. While the squash roasts, rinse the quinoa under cold water in a fine-mesh strainer to remove any bitterness.
6. In a medium saucepan, heat the remaining 2 tablespoons of olive oil over medium heat.
7. Add the minced garlic to the saucepan and sauté for 1 minute, until fragrant.
8. Stir in the rinsed quinoa and toast it for 2 minutes, stirring constantly.
9. Pour in the vegetable broth, add the dried thyme, salt, and black pepper, and bring to a boil.
10. Reduce the heat to low, cover the saucepan, and simmer the quinoa for 15 minutes, or until all the liquid is absorbed.
11. Remove the saucepan from the heat and let the quinoa sit, covered, for 5 minutes to steam.
12. Fluff the cooked quinoa with a fork and stir in the sliced almonds.
13. Take the roasted squash halves out of the oven and flip them over so the cut sides face up.
14. Divide the quinoa mixture evenly among the four squash halves, packing it in gently.
15. Return the stuffed squash to the oven and bake for an additional 10 minutes, until heated through.
16. Serve the stuffed squash warm, garnished with extra almonds if desired.
Perfectly roasted squash gives a sweet, tender base that pairs wonderfully with the nutty quinoa and crunchy almonds. The thyme adds an earthy note that ties it all together—try serving it with a simple green salad for a complete meal.
Seared Tofu Steaks with Garlic Spinach
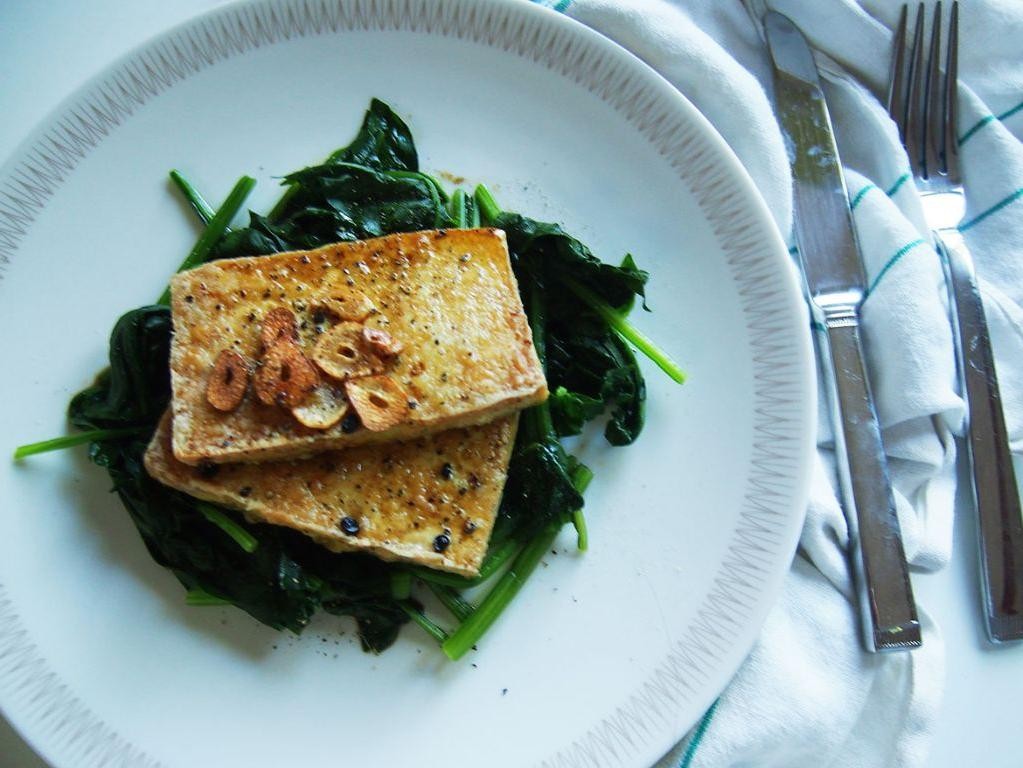
Kicking off a weeknight dinner with something satisfying yet simple? These seared tofu steaks with garlic spinach are your answer—they come together fast, pack plenty of flavor, and feel like a treat without the fuss. You’ll love how the crispy tofu pairs with the wilted greens.
Serving: 2 | Pre Time: 10 minutes | Cooking Time: 15 minutes
Ingredients
– 1 (14-ounce) block extra-firm tofu
– 2 tablespoons olive oil, divided
– 1/2 teaspoon salt
– 1/4 teaspoon black pepper
– 4 cups fresh spinach
– 3 cloves garlic, minced
– 1 tablespoon soy sauce
– 1/2 teaspoon red pepper flakes
Instructions
1. Press the tofu block between paper towels for 10 minutes to remove excess water, then slice it into 1/2-inch-thick steaks.
2. Heat 1 tablespoon of olive oil in a large skillet over medium-high heat until it shimmers, about 2 minutes.
3. Season the tofu steaks on both sides with salt and black pepper.
4. Place the tofu steaks in the hot skillet and sear for 4-5 minutes per side until golden brown and crispy.
5. Tip: Don’t move the tofu too early—let it form a crust to prevent sticking.
6. Transfer the seared tofu to a plate and set aside.
7. Reduce the heat to medium and add the remaining 1 tablespoon of olive oil to the same skillet.
8. Add the minced garlic and sauté for 30 seconds until fragrant, being careful not to burn it.
9. Tip: Stir the garlic constantly to avoid bitterness.
10. Add the fresh spinach to the skillet and cook for 2-3 minutes, stirring occasionally, until wilted.
11. Pour in the soy sauce and sprinkle the red pepper flakes over the spinach, stirring to combine.
12. Tip: For extra flavor, deglaze the pan with a splash of water if bits are stuck.
13. Return the tofu steaks to the skillet and heat through for 1 minute.
14. Serve immediately while hot.
Here’s what makes this dish shine: the tofu gets wonderfully crispy on the outside while staying tender inside, and the garlic spinach adds a savory, slightly spicy kick. Try it over rice or quinoa for a complete meal—it’s versatile enough to become a regular in your rotation.
Brown Rice and Veggie Buddha Bowl
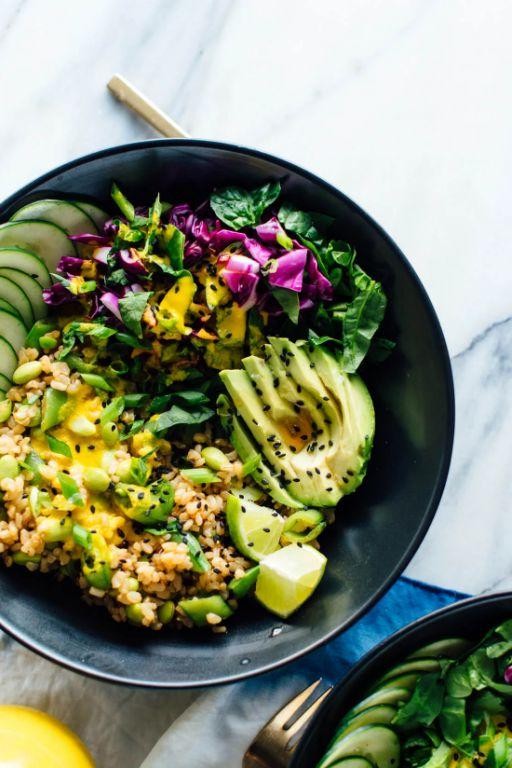
Kicking off a new week with a nourishing meal doesn’t have to be complicated. This Brown Rice and Veggie Buddha Bowl is your answer—a vibrant, customizable dish packed with wholesome ingredients that comes together with minimal fuss. You’ll love how satisfying it is.
Serving: 2 | Pre Time: 15 minutes | Cooking Time: 25 minutes
Ingredients
– 1 cup brown rice
– 2 cups water
– 1 tbsp olive oil
– 1 medium sweet potato, peeled and diced into 1/2-inch cubes
– 1/2 tsp salt
– 1/4 tsp black pepper
– 1 (15 oz) can chickpeas, drained and rinsed
– 1/2 tsp smoked paprika
– 2 cups fresh baby spinach
– 1 avocado, sliced
– 2 tbsp tahini
– 1 tbsp lemon juice
– 2 tbsp water
Instructions
1. Rinse 1 cup of brown rice under cold water in a fine-mesh strainer.
2. Combine the rinsed rice and 2 cups of water in a medium saucepan and bring to a boil over high heat.
3. Once boiling, reduce the heat to low, cover the saucepan, and simmer for 25 minutes, or until all the water is absorbed and the rice is tender. (Tip: Let the rice rest, covered and off the heat, for 5 minutes after cooking for a fluffier texture.)
4. While the rice cooks, preheat your oven to 400°F and line a baking sheet with parchment paper.
5. Toss the diced sweet potato with 1 tablespoon of olive oil, 1/2 teaspoon of salt, and 1/4 teaspoon of black pepper on the prepared baking sheet.
6. Roast the sweet potatoes in the preheated oven for 20 minutes, or until they are fork-tender and lightly browned at the edges.
7. In a medium bowl, toss the drained chickpeas with 1/2 teaspoon of smoked paprika.
8. Spread the seasoned chickpeas on a separate section of the baking sheet with the sweet potatoes during the last 10 minutes of roasting, until they are slightly crispy. (Tip: Shake the baking sheet halfway through roasting to ensure even cooking.)
9. Whisk together 2 tablespoons of tahini, 1 tablespoon of lemon juice, and 2 tablespoons of water in a small bowl until smooth to create a simple dressing.
10. Divide the cooked brown rice between two bowls.
11. Top each bowl evenly with the roasted sweet potatoes, crispy chickpeas, 2 cups of fresh baby spinach, and sliced avocado.
12. Drizzle the tahini dressing over each bowl just before serving. (Tip: Add the spinach last to keep it vibrant and fresh.)
Zesty lemon brightens the creamy tahini dressing, perfectly complementing the earthy sweet potatoes and hearty chickpeas. For a fun twist, try serving the components separately and letting everyone build their own bowl, or add a sprinkle of sesame seeds for extra crunch.
Herbed Turkey Meatballs with Zucchini Spaghetti
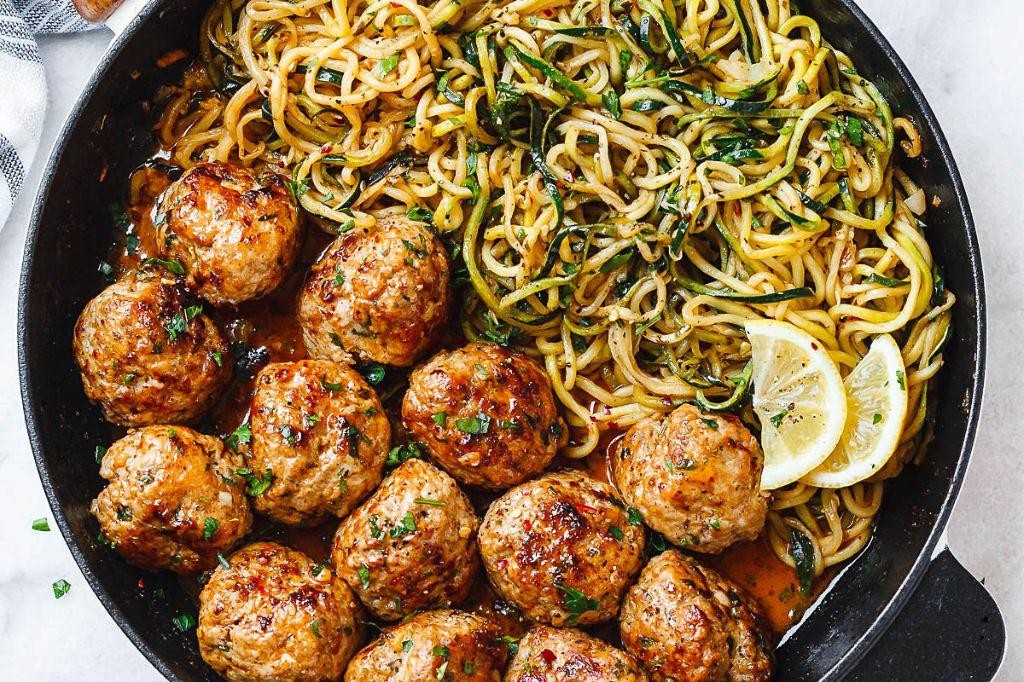
Just when you need a cozy, healthy dinner that feels like a hug in a bowl, these herbed turkey meatballs with zucchini spaghetti come to the rescue. They’re packed with flavor but light enough that you won’t feel sluggish afterward. You’ll love how simple they are to pull together on a busy weeknight.
Serving: 4 | Pre Time: 15 minutes | Cooking Time: 25 minutes
Ingredients
– 1 lb ground turkey
– 1 large egg
– 1/2 cup breadcrumbs
– 1/4 cup grated Parmesan cheese
– 2 tbsp chopped fresh parsley
– 1 tbsp chopped fresh oregano
– 2 cloves garlic, minced
– 1 tsp salt
– 1/2 tsp black pepper
– 2 tbsp olive oil
– 4 medium zucchinis
– 2 cups marinara sauce
Instructions
1. Preheat your oven to 400°F and line a baking sheet with parchment paper.
2. In a large bowl, combine the ground turkey, egg, breadcrumbs, Parmesan cheese, parsley, oregano, garlic, salt, and black pepper.
3. Mix the ingredients gently with your hands until just combined—overmixing can make the meatballs tough.
4. Shape the mixture into 20 even meatballs, each about 1 inch in diameter, and place them on the prepared baking sheet.
5. Drizzle the meatballs with 1 tbsp of olive oil and bake for 20 minutes, or until they reach an internal temperature of 165°F and are golden brown.
6. While the meatballs bake, use a spiralizer to turn the zucchinis into spaghetti-like strands.
7. Heat the remaining 1 tbsp of olive oil in a large skillet over medium heat.
8. Add the zucchini spaghetti to the skillet and sauté for 3–5 minutes, until just tender but still slightly crisp—this keeps it from getting soggy.
9. Warm the marinara sauce in a small saucepan over low heat for 5 minutes, stirring occasionally.
10. Divide the zucchini spaghetti among four plates, top with the baked meatballs, and spoon the warm marinara sauce over everything.
Here’s the best part: the meatballs are juicy and herby, while the zucchini spaghetti adds a fresh, light crunch that pairs perfectly. Try serving it with a sprinkle of extra Parmesan or a side of crusty bread to soak up any extra sauce—it’s a meal that’ll have everyone asking for seconds.
Conclusion
Perfect for anyone seeking gut-friendly meals, this roundup offers 24 easy, delicious dinners that support IBS management. We hope these recipes bring comfort and flavor to your table. Give them a try, share your favorites in the comments below, and don’t forget to pin this article on Pinterest to help others discover these helpful ideas!


