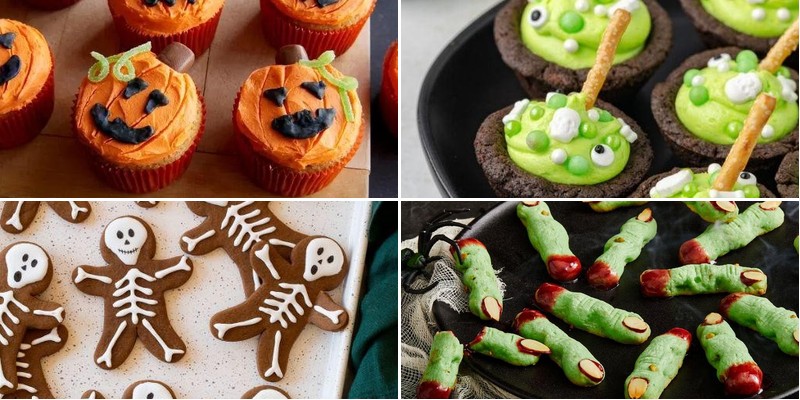
Ready to make your Halloween celebration spooktacular? We’ve gathered 25 frightfully easy cookie recipes that are perfect for home bakers looking to add some ghoulish fun to their festivities. From creepy crawlers to ghostly treats, these simple creations will delight kids and adults alike. Get your baking sheets ready—these hauntingly delicious cookies are sure to make your Halloween party unforgettable!
Witch’s Hat Sugar Cookies

Crafting these bewitchingly adorable Witch’s Hat Sugar Cookies is the perfect way to summon some spooky-season spirit without needing a magic wand—just a rolling pin and a serious sweet tooth. These little pointed hats are almost too cute to eat, but the buttery, melt-in-your-mouth texture will have you casting spells for just one more.
24
cookies45
minutes11
minutesIngredients
- 2 ¾ cups all-purpose flour (I always fluff it before measuring for lighter cookies)
- 1 cup unsalted butter, softened to room temperature (this is non-negotiable for perfect creaming)
- 1 ½ cups granulated sugar (the real magic potion)
- 2 large eggs, at room temperature (they incorporate so much better this way)
- 1 tsp pure vanilla extract (the good stuff makes all the difference)
- ½ tsp baking powder
- ¼ tsp salt (to balance all that sweetness)
- Orange and black gel food coloring (gel gives vibrant color without thinning the dough)
- 1 cup powdered sugar (for the royal icing glue)
- 2 tbsp meringue powder (my secret for sturdy, non-runny icing)
- 2-3 tbsp water (add slowly until it’s thick but pipeable)
- 24 Hershey’s Kisses, unwrapped (the classic chocolate peak for our witchy hats)
Instructions
- Preheat your oven to 350°F and line two baking sheets with parchment paper.
- In a medium bowl, whisk together the 2 ¾ cups all-purpose flour, ½ tsp baking powder, and ¼ tsp salt until fully combined.
- In a large mixing bowl, beat the 1 cup softened unsalted butter and 1 ½ cups granulated sugar together on medium-high speed for 3 full minutes until light and fluffy. Tip: Don’t skimp on creaming time—this incorporates air for a tender cookie.
- Beat in the 2 room-temperature eggs, one at a time, followed by the 1 tsp vanilla extract, scraping down the bowl after each addition.
- Gradually add the dry flour mixture to the wet ingredients, mixing on low speed just until no white streaks remain.
- Divide the dough in half; tint one portion with orange gel food coloring and the other with black gel food coloring, kneading each until the color is uniform.
- Roll each colored dough between two sheets of parchment paper to ¼-inch thickness. Tip: Rolling between parchment prevents sticking without extra flour, which can toughen cookies.
- Use a 3-inch round cookie cutter to cut circles from the dough, re-rolling scraps as needed.
- Place the circles 2 inches apart on the prepared baking sheets.
- Bake for 9-11 minutes, until the edges are just set but the centers are still soft. Tip: For chewy cookies, pull them out when they look slightly underdone—they’ll firm up as they cool.
- Transfer the cookies to a wire rack to cool completely, about 30 minutes.
- While cookies cool, make the icing: In a bowl, whisk the 1 cup powdered sugar and 2 tbsp meringue powder with 2 tbsp water until smooth, adding more water ½ tsp at a time if needed for piping consistency.
- Pipe a ring of icing around the edge of each cooled cookie.
- Immediately press a Hershey’s Kiss, pointed side up, into the center of each iced ring to form the hat’s peak.
- Let the icing set completely, about 1 hour, before serving or storing.
Zesty orange and deep black dough create a visual spell, but the real magic is in that crisp-edged, soft-centered bite. The chocolate kiss adds a creamy counterpoint to the sweet, vanilla-kissed cookie, making these hats disappear faster than a ghost in a haunted house. Stack them on a spooky tiered stand for a Halloween centerpiece, or pack them in witchy gift bags for your favorite little goblins.
Mummy Peanut Butter Blossoms
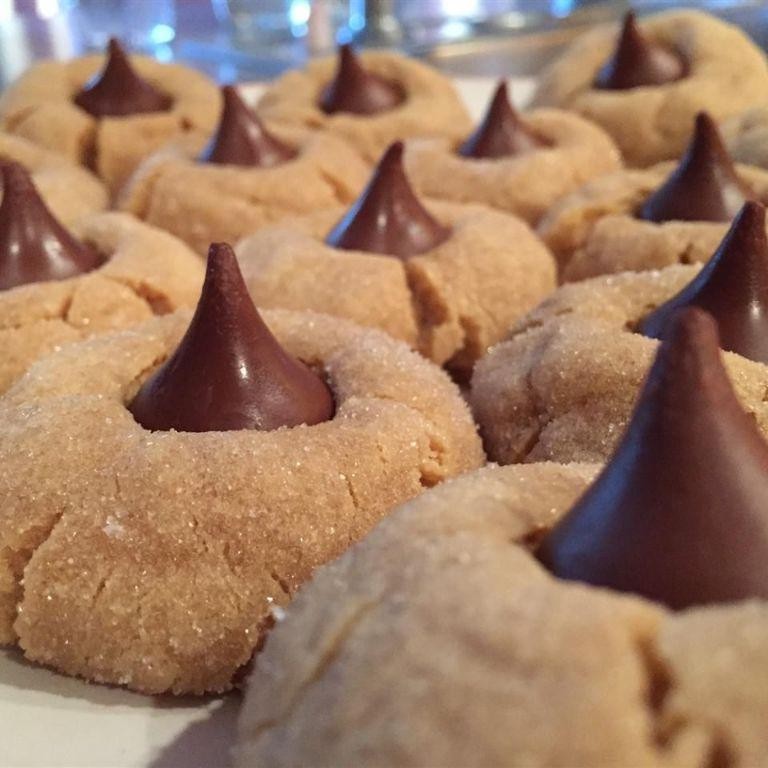
Aren’t you tired of the same old holiday cookies that look like they’ve been photocopied from your grandma’s 1978 recipe box? Let’s wrap peanut butter blossoms in a spooky new costume that’ll have your Halloween party guests squealing with delight—in the best way possible! These mummy-wrapped treats combine the nostalgic charm of peanut butter and chocolate with a playful twist that’s almost too cute to eat (almost).
24
cookies15
minutes10
minutesIngredients
– 1 cup creamy peanut butter (I swear by Jif for that perfect smooth texture—none of that chunky business here!)
– 1 cup granulated sugar (because let’s be real, Halloween is no time for sugar-free experiments)
– 1 large egg, at room temperature (this helps everything blend smoothly without a fight)
– 1 tsp vanilla extract (the real stuff, not the imitation—your taste buds will thank you)
– 1/2 cup all-purpose flour (just enough to hold these guys together without turning them into hockey pucks)
– 24 milk chocolate kisses, unwrapped (go for Hershey’s—they’re the classic MVP)
– 1/2 cup white chocolate chips (for the mummy “bandages”—melted and drizzled with flair)
– 2 tbsp vegetable oil (a splash to keep the white chocolate flowing like a smooth, spooky river)
Instructions
1. Preheat your oven to 350°F and line a baking sheet with parchment paper—no sticking, no drama!
2. In a medium bowl, combine 1 cup creamy peanut butter, 1 cup granulated sugar, 1 large egg, and 1 tsp vanilla extract using a hand mixer on medium speed for 1–2 minutes until fully blended and slightly fluffy.
3. Gently fold in 1/2 cup all-purpose flour with a spatula until just incorporated; overmixing can make the cookies tough, so stop as soon as no white streaks remain.
4. Scoop dough into 24 rounded balls (about 1 tablespoon each) and place them 2 inches apart on the prepared baking sheet—they’ll spread a bit, so give ’em space to breathe!
5. Bake for 8–10 minutes at 350°F until the edges are lightly golden but the centers still look soft; they’ll firm up as they cool, so don’t overbake.
6. Immediately press 1 unwrapped milk chocolate kiss into the center of each warm cookie, letting it sink in slightly—work quickly so the kisses melt just enough to stick.
7. In a microwave-safe bowl, melt 1/2 cup white chocolate chips with 2 tbsp vegetable oil in 20-second bursts, stirring between each, until smooth and drippy (no lumps allowed!).
8. Transfer the melted white chocolate to a piping bag or zip-top bag with a tiny corner snipped off, then drizzle it back and forth over each cookie to create “mummy bandages,” leaving the chocolate kiss peeking through like eyes.
9. Let the cookies cool completely on the baking sheet for 20–30 minutes so the white chocolate sets into crisp, adorable wrappings. Seriously, these mummy cookies are irresistibly soft with a rich peanut butter base that hugs the melty chocolate kiss, while the white chocolate drizzle adds a sweet, crackly contrast. Serve them stacked like a mini monster army or tucked into Halloween treat bags—they’re so fun, they might just haunt your dreams (in the tastiest way possible).
Ghostly Meringue Cookies
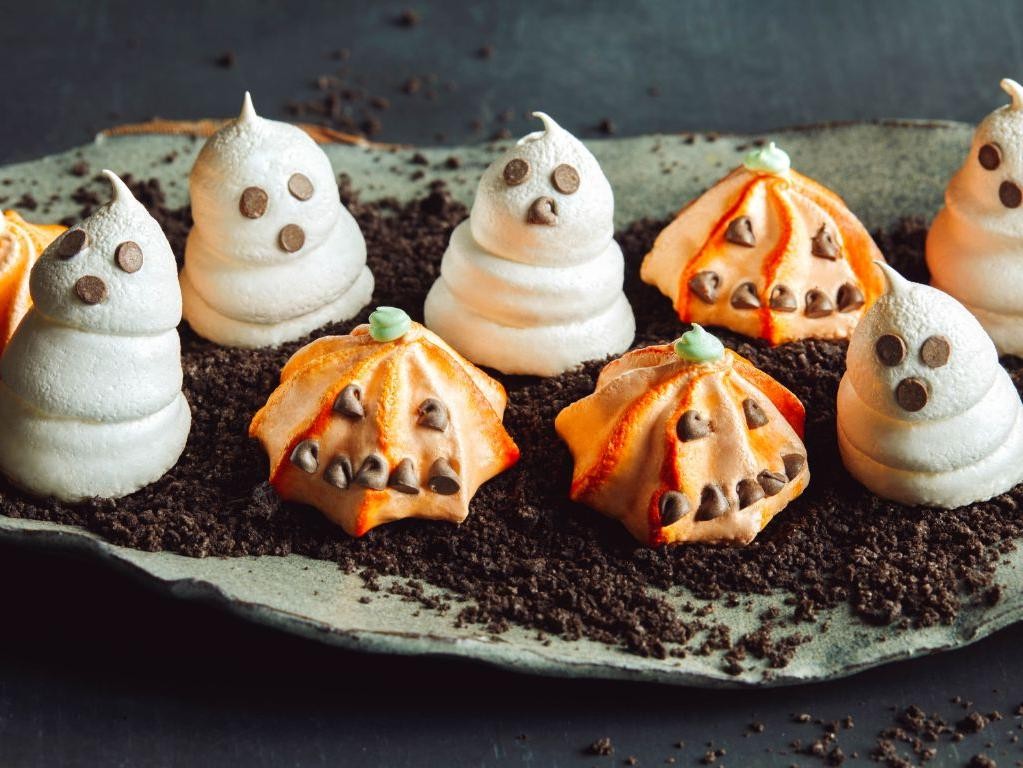
Terrifyingly tasty and surprisingly simple, these ghostly meringue cookies will haunt your dessert table in the best way possible—they’re so light and airy, they practically float off the plate with spooky elegance.
24
cookies20
minutes150
minutesIngredients
– 4 large egg whites (room temperature—they whip up fluffier, trust me!)
– 1 cup granulated sugar (I always use extra-fine for smoother ghosts)
– 1/4 tsp cream of tartar (your secret weapon for stiff peaks)
– 1/2 tsp pure vanilla extract (the good stuff makes all the difference)
– 1/4 cup mini chocolate chips (for those adorable ghost eyes)
Instructions
1. Preheat your oven to 200°F and line two baking sheets with parchment paper.
2. Combine room temperature egg whites and cream of tartar in a perfectly clean metal bowl.
3. Beat the mixture on medium speed until soft peaks form, about 2-3 minutes.
4. Gradually add sugar one tablespoon at a time while beating on high speed.
5. Continue beating for 5-7 minutes until the meringue forms stiff, glossy peaks that hold their shape.
6. Gently fold in vanilla extract with a spatula until just incorporated.
7. Transfer the meringue to a piping bag fitted with a large round tip.
8. Pipe 2-inch tall ghost shapes onto prepared baking sheets, leaving 1 inch between each.
9. Immediately press two mini chocolate chips into each ghost for eyes before the meringue sets.
10. Bake for 90 minutes at 200°F until the meringues are dry and lift easily from the parchment.
11. Turn off the oven and let the meringues cool completely inside for 1 hour to prevent cracking.
12. Store the cooled ghosts in an airtight container for up to two weeks.
Remarkably crisp shells give way to melt-in-your-mouth centers that vanish faster than a ghost in daylight. These ethereal treats make fantastic cupcake toppers or look adorable peeking out of hot chocolate mugs for a ghoulishly good presentation.
Pumpkin Spice Jack-O’-Lanterns

Vividly capturing the essence of fall in every bite, these Pumpkin Spice Jack-O’-Lanterns are the edible embodiment of cozy sweater weather and crisp autumn air. They’re basically Halloween cheer you can eat, with a spicy-sweet personality that’ll make you want to carve one for every day of October. Consider this your official permission slip to embrace pumpkin spice season with delicious, mischievous abandon.
24
cookies25
minutes12
minutesIngredients
– 2 cups all-purpose flour (I always spoon and level mine for accuracy)
– 1 tsp baking soda (make sure yours is fresh—nothing sadder than flat jack-o’-lanterns)
– 2 tsp pumpkin pie spice (the star of the show, obviously)
– ½ tsp salt (I use fine sea salt for even distribution)
– ¾ cup unsalted butter at room temperature (soft enough to leave a thumbprint but not melted)
– ¾ cup granulated sugar (for that perfect sweetness level)
– ½ cup brown sugar (pack it firmly—no wimpy packing allowed)
– ¾ cup pumpkin puree (not pumpkin pie filling—big difference!)
– 1 large egg (room temperature eggs incorporate better, trust me)
– 1 tsp vanilla extract (pure vanilla makes all the difference)
– Orange food coloring gel (gel gives vibrant color without thinning the dough)
– Mini chocolate chips (for the jack-o’-lantern faces—semisweet are my favorite)
Instructions
1. Preheat your oven to 350°F and line two baking sheets with parchment paper.
2. Whisk together the flour, baking soda, pumpkin pie spice, and salt in a medium bowl until fully combined.
3. Cream the room temperature butter with both sugars in a large bowl using an electric mixer on medium speed for 2 minutes until light and fluffy.
4. Add the pumpkin puree to the butter mixture and mix on low speed until just incorporated.
5. Beat in the room temperature egg and vanilla extract until the mixture is smooth.
6. Gradually add the dry ingredients to the wet ingredients, mixing on low speed until a soft dough forms.
7. Mix in orange food coloring gel until the dough reaches your desired pumpkin hue.
8. Chill the dough in the refrigerator for 30 minutes to prevent spreading during baking.
9. Scoop 2-tablespoon portions of dough and roll into smooth balls between your palms.
10. Place dough balls 2 inches apart on prepared baking sheets and gently flatten slightly with your palm.
11. Press mini chocolate chips into each cookie to create jack-o’-lantern faces before baking.
12. Bake at 350°F for 10-12 minutes until the edges are set but centers still look slightly soft.
13. Cool cookies on baking sheets for 5 minutes before transferring to wire racks.
Remarkably soft with just the right amount of chew, these spiced delights deliver autumn in cookie form. The pumpkin keeps them incredibly moist while the chocolate chip faces add both personality and bitter contrast to the sweetness. Serve them stacked like a pumpkin patch or tucked into lunchboxes for a festive surprise that’s guaranteed to disappear faster than Halloween candy.
Black Cat Chocolate Dipped Cookies
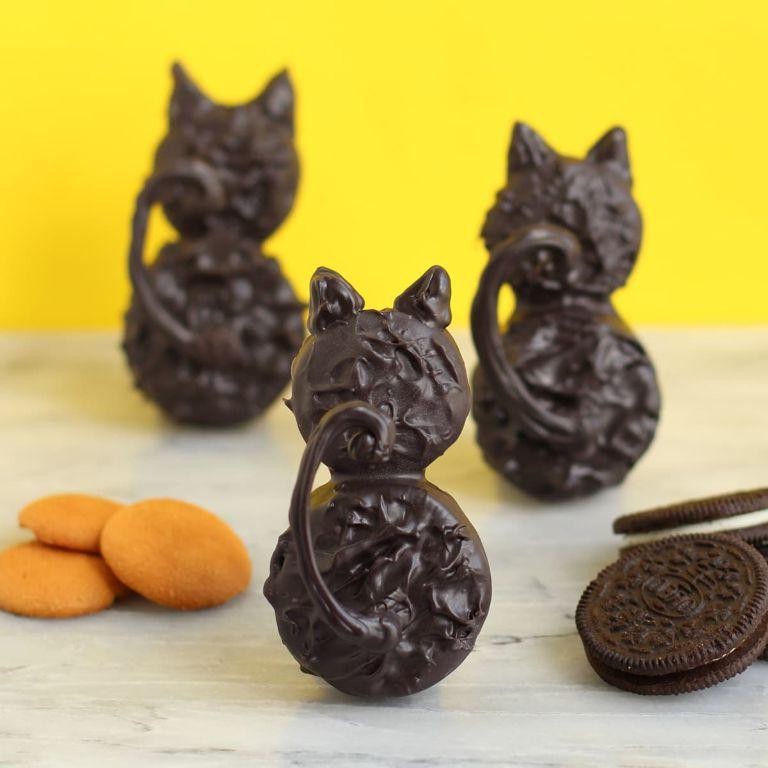
Ready to whip up some spooky magic in your kitchen? These Black Cat Chocolate Dipped Cookies are the purr-fect treat to satisfy your sweet tooth while adding a dash of Halloween mischief. With rich chocolate dough and an adorable feline shape, they’re almost too cute to eat—almost!
24
cookies25
minutes12
minutesIngredients
- 1 cup all-purpose flour—I always spoon and level mine to avoid dense cookies
- 1/2 cup unsweetened cocoa powder, the darker the better for that midnight fur effect
- 1/2 cup unsalted butter, softened (I leave mine on the counter for 30 minutes—no microwave shortcuts!)
- 3/4 cup granulated sugar, because life’s too short for less sweetness
- 1 large egg, at room temperature for easier mixing
- 1 tsp vanilla extract, the real stuff makes all the difference
- 1/4 tsp salt, to balance that chocolate intensity
- 1 cup semi-sweet chocolate chips for dipping—go for quality here, your taste buds will thank you
- 24 candy eyes, because every cat needs a mischievous gaze
Instructions
- Preheat your oven to 350°F and line two baking sheets with parchment paper.
- Whisk together the flour, cocoa powder, and salt in a medium bowl until no streaks remain.
- Beat the softened butter and granulated sugar in a large bowl with an electric mixer on medium speed for 2 minutes, until light and fluffy.
- Add the room temperature egg and vanilla extract to the butter mixture, beating for 1 minute until fully incorporated.
- Gradually add the dry ingredients to the wet ingredients, mixing on low speed just until a dough forms—don’t overmix! (Tip: Scrape the bowl sides halfway through to ensure even blending.)
- Roll tablespoon-sized portions of dough into balls and place them 2 inches apart on the prepared baking sheets.
- Gently flatten each ball slightly with your palm to about 1/2-inch thickness.
- Pinch the top of each cookie to form two cat ears, shaping them into pointed triangles.
- Bake for 10-12 minutes, until the edges are set but the centers are still slightly soft. (Tip: Rotate the pans halfway through baking for even browning.)
- Transfer the cookies to a wire rack and let them cool completely, about 30 minutes.
- Melt the semi-sweet chocolate chips in a microwave-safe bowl in 30-second intervals, stirring between each, until smooth.
- Dip the bottom third of each cooled cookie into the melted chocolate, letting excess drip off.
- Place the dipped cookies back on the parchment-lined sheet and immediately press two candy eyes onto each cat face before the chocolate sets. (Tip: Use tweezers for precise eye placement—no cross-eyed kitties!)
- Allow the chocolate to fully set at room temperature, about 15 minutes.
Unbelievably fudgy with a crisp snap from that chocolate dip, these cookies deliver deep cocoa flavor balanced by sweet decorations. Serve them stacked like a sly cat parade or tucked into lunch boxes for a playful surprise that’ll have everyone meowing for more.
Spiderweb Chocolate Chip Cookies
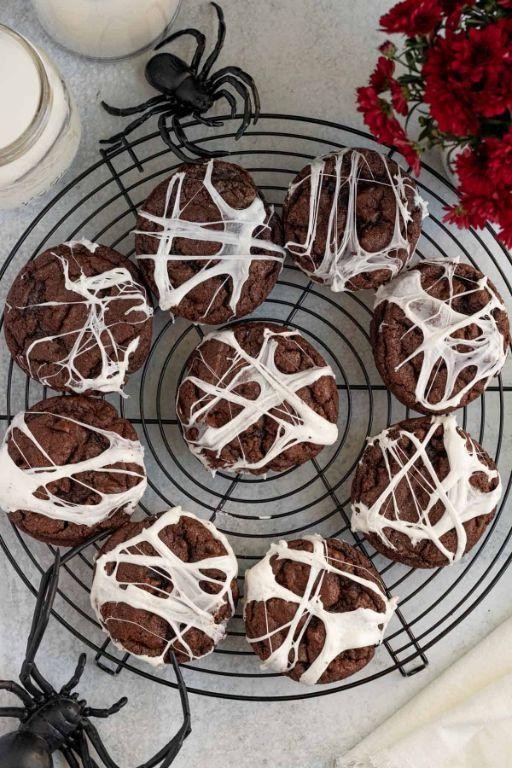
Mmm, just when you thought chocolate chip cookies couldn’t get any more perfect, along comes these spooky-licious spiderweb versions that’ll have you weaving edible magic in your kitchen. Seriously, these aren’t your grandma’s cookies—they’re the cookie equivalent of finding a twenty-dollar bill in last year’s Halloween costume.
24
cookies20
minutes11
minutesIngredients
– 2¼ cups all-purpose flour (I always spoon and level mine—no packing!)
– 1 tsp baking soda (freshness matters, folks)
– 1 tsp fine sea salt (the secret flavor booster)
– 1 cup unsalted butter, softened (room temp is key for that perfect cream)
– ¾ cup granulated sugar (for that crisp edge we all crave)
– ¾ cup packed brown sugar (dark brown adds extra molasses magic)
– 2 large eggs, room temp (they incorporate so much better this way)
– 2 tsp vanilla extract (real deal only—imitation need not apply)
– 2 cups semi-sweet chocolate chips (I’m Team More Chocolate, always)
– ½ cup melted dark chocolate for webbing (go for quality—it shows!)
Instructions
1. Preheat your oven to 375°F and line two baking sheets with parchment paper.
2. Whisk together the flour, baking soda, and salt in a medium bowl until fully combined.
3. In a separate large bowl, beat the softened butter with both sugars on medium speed for exactly 2 minutes until light and fluffy.
4. Add the room temperature eggs one at a time, beating for 30 seconds after each addition until fully incorporated.
5. Mix in the vanilla extract until just combined.
6. Gradually add the dry ingredients to the wet mixture, mixing on low speed until no flour streaks remain.
7. Fold in the chocolate chips by hand using a spatula to avoid overmixing.
8. Scoop 2-tablespoon portions of dough onto prepared baking sheets, spacing them 2 inches apart.
9. Bake for 9-11 minutes until edges are golden brown but centers still look slightly underdone.
10. Transfer cookies to a wire rack and let cool completely for 30 minutes.
11. Place melted dark chocolate in a piping bag or zip-top bag with a tiny corner snipped off.
12. Pipe concentric circles starting from the center of each cooled cookie.
13. Immediately drag a toothpick from center to edge through the circles at regular intervals to create web patterns.
14. Let chocolate set completely for 15 minutes before serving.
Look at these masterpieces—you’ve created cookies with crackly edges, chewy centers, and chocolate webs that actually taste as incredible as they look. The bittersweet dark chocolate webbing provides the perfect contrast to the sweet, buttery cookie base. Serve these at your next Halloween party or just hoard them for yourself—we won’t judge!
Bloody Eyeball Macarons
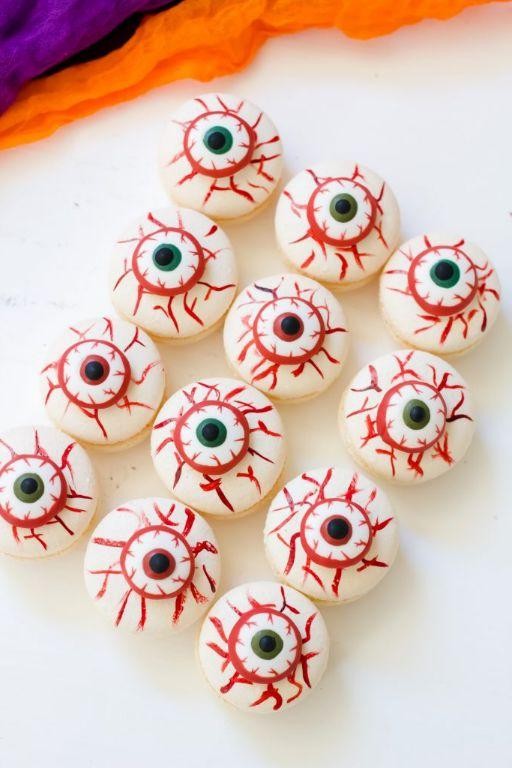
Oh my gourd, just when you thought macarons couldn’t get more delightfully creepy! These bloodshot eyeball treats are the perfect way to give your Halloween party guests a deliciously spooky surprise they’ll actually want to eat. Get ready to impress with these fiendishly fun French confections that are equal parts terrifying and tasty.
24
sandwiches60
minutes17
minutesIngredients
– 1 cup almond flour (I always sift mine twice for that perfectly smooth shell)
– 1 ¾ cups powdered sugar (the fluffier the better for those elegant feet)
– 3 large egg whites at room temperature (seriously, don’t skip the room temp part – it makes all the difference)
– ¼ cup granulated sugar (this is where the magic happens for that signature crunch)
– Red gel food coloring (liquid just won’t give you that vibrant bloody effect)
– ½ cup raspberry jam (seeds add great texture for that authentic eyeball look)
– Black decorating gel (the tiny tube works best for precise pupil placement)
Instructions
1. Sift almond flour and powdered sugar together into a large bowl, repeating the process to ensure no lumps remain.
2. Beat room temperature egg whites on medium speed until foamy, about 2 minutes.
3. Gradually add granulated sugar while continuing to beat, increasing speed to high until stiff peaks form, approximately 4-5 minutes.
4. Gently fold the dry ingredients into the egg white mixture using a spatula, making exactly 65-70 folding strokes for the perfect macaronage consistency.
5. Add 8-10 drops of red gel food coloring and fold 3-4 more times until evenly distributed but not overmixed.
6. Transfer batter to a piping bag fitted with a ½-inch round tip.
7. Pipe 1.5-inch circles onto parchment-lined baking sheets, spacing them 2 inches apart.
8. Tap baking sheets firmly on counter 3-4 times to release air bubbles, then use a toothpick to pop any remaining surface bubbles.
9. Let macarons rest at room temperature for 30-45 minutes until surfaces are dry and not sticky to touch.
10. Preheat oven to 300°F and bake for 15-17 minutes until feet are set and shells don’t wiggle when gently touched.
11. Cool completely on baking sheets before carefully removing from parchment.
12. Pipe a small circle of raspberry jam in the center of half the shells.
13. Place matching shells on top to create sandwiches.
14. Use black decorating gel to draw pupils off-center on each macaron, then add red gel food coloring streaks radiating from the pupils for bloodshot effects.
Just look at these ghoulish beauties! The crisp shell gives way to a chewy interior that perfectly complements the tart raspberry “iris” filling. Serve them peeking out from a bed of green coconut “grass” or arranged on a platter like a bowl of watching eyes – either way, they’re guaranteed to be the talk of your spooky soiree.
Vampire Bat Oreos
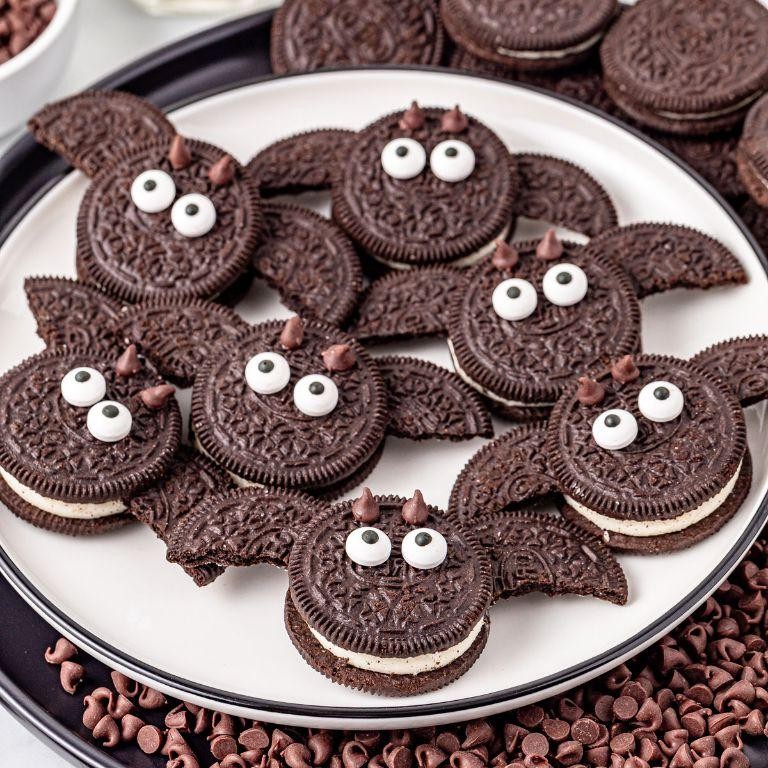
Wondering what happens when Halloween hijacks your favorite cookie? Meet the Vampire Bat Oreos—a delightfully spooky treat that’s equal parts creepy and crave-worthy, perfect for turning your dessert table into a monster mash masterpiece.
12
servings15
minutesIngredients
– 1 package of Oreos (I always grab the classic ones—no fancy flavors to distract from the bat-tastic transformation)
– 1 cup white chocolate chips (go for the good stuff; it melts smoother and tastes less waxy)
– 1 tbsp coconut oil (this little trick keeps the chocolate dippable and glossy, trust me)
– Black gel food coloring (a few drops do the trick—don’t skimp or you’ll get sad gray bats)
– Candy eyes (the tiny ones stick best and give these bats their charmingly startled expression)
Instructions
1. Line a baking sheet with parchment paper to prevent sticky bat disasters.
2. Separate 12 Oreo cookies carefully, keeping the cream intact on one side—this is your bat body base.
3. Melt the white chocolate chips and coconut oil together in a microwave-safe bowl in 30-second bursts, stirring after each until completely smooth.
4. Stir in black gel food coloring until the mixture is uniformly dark as midnight—this usually takes about 10–15 drops.
5. Dip each cream-topped Oreo half into the black chocolate, coating it fully but letting excess drip off.
6. Place each dipped cookie onto the prepared baking sheet.
7. Press two candy eyes onto the upper part of each bat body while the chocolate is still wet.
8. Use a toothpick to draw two small wing shapes on the exposed cookie side—just quick upward curves from the center.
9. Refrigerate the bats for 15–20 minutes, or until the chocolate coating is firm to the touch.
10. Serve immediately or store in an airtight container to avoid bat meltdowns.
Deliciously dramatic, these Vampire Bat Oreos boast a crisp cookie crunch under a smooth chocolate shell, with a sweet cream center that’ll have your guests swooping in for more. Try stacking them into a bat cave display or pairing with a blood-red fruit punch for a full Halloween sensory experience.
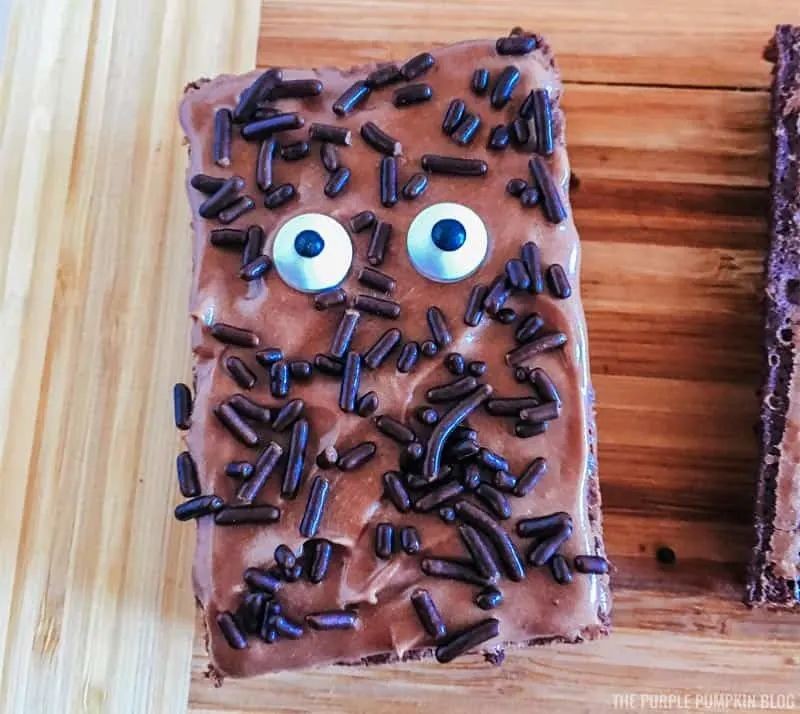
Frankenstein Monster Mash Cookies
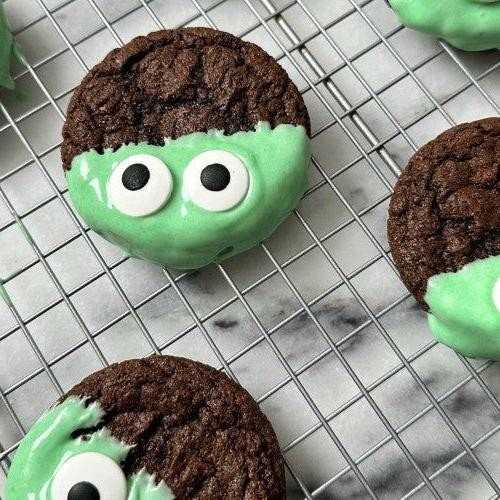
Viciously delicious and monstrously fun, these Frankenstein Monster Mash Cookies are the perfect Halloween treat that’ll have your little monsters begging for more. Imagine chocolate chip cookies colliding with candy-coated chaos in a spooky symphony of flavors. They’re so good, they’re almost scary!
24
cookies15
minutes11
minutesIngredients
– 2 cups all-purpose flour (I always spoon and level for perfect measuring)
– 1 tsp baking soda (fresh is key for that perfect rise)
– 1/2 tsp salt (I prefer fine sea salt for even distribution)
– 3/4 cup unsalted butter, softened (room temp is crucial for creamy texture)
– 3/4 cup packed brown sugar (dark brown gives that caramel depth I love)
– 1/4 cup granulated sugar
– 2 large eggs (room temp eggs incorporate so much better)
– 1 tsp vanilla extract (pure vanilla makes all the difference)
– 1 cup semi-sweet chocolate chips
– 1/2 cup green M&M’s (the classic Halloween green ones)
– 1/2 cup candy eyes for decorating
Instructions
1. Preheat your oven to 375°F and line two baking sheets with parchment paper.
2. Whisk together 2 cups flour, 1 tsp baking soda, and 1/2 tsp salt in a medium bowl.
3. Cream 3/4 cup softened butter with 3/4 cup brown sugar and 1/4 cup granulated sugar until light and fluffy, about 2-3 minutes.
4. Beat in 2 eggs one at a time, then mix in 1 tsp vanilla extract until fully incorporated.
5. Gradually add the dry ingredients to the wet ingredients, mixing just until combined.
6. Fold in 1 cup chocolate chips and 1/2 cup green M&M’s until evenly distributed.
7. Scoop 2-tablespoon portions of dough onto prepared baking sheets, spacing them 2 inches apart.
8. Press 3-4 candy eyes onto each cookie dough ball to create monster faces.
9. Bake for 9-11 minutes until edges are golden brown but centers still look slightly underdone.
10. Let cookies cool on baking sheets for 5 minutes before transferring to wire racks.
These cookies emerge from the oven with chewy centers, crispy edges, and chocolatey surprises in every bite. The candy eyes give them such personality that you’ll almost feel guilty eating them! Try serving them on a spooky platter with dry ice for a truly monstrous presentation that’ll be the hit of any Halloween party.
Coffin Brownie Cutouts
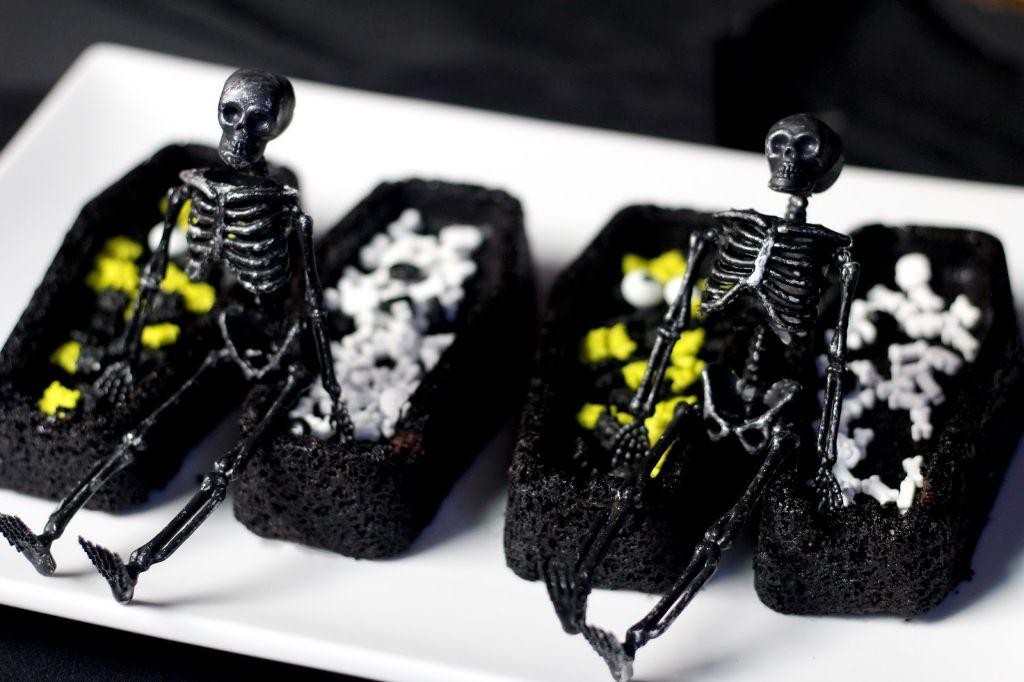
Brace yourselves, spooky season enthusiasts—these coffin-shaped brownie cutouts are about to become the most deliciously morbid treat in your Halloween arsenal. They’re fudgy, rich, and just creepy enough to make your guests do a double-take before devouring them. Consider this your edible ode to all things delightfully dark and chocolatey.
16
cutouts15
minutes30
minutesIngredients
- 1 cup all-purpose flour (I always sift mine first to avoid lumps)
- 1 cup granulated sugar (for that perfect sweetness level)
- 1/2 cup unsalted butter, melted (go for the good stuff—it makes a difference)
- 2 large eggs, at room temperature (they blend into the batter so much smoother this way)
- 1/2 cup cocoa powder (use Dutch-process for a deeper chocolate flavor)
- 1 tsp vanilla extract (the real deal, not imitation—trust me)
- 1/2 tsp baking powder (helps these coffins rise just enough)
- 1/4 tsp salt (to balance all that sweetness)
- 1/2 cup semi-sweet chocolate chips (because extra chocolate is never optional)
Instructions
- Preheat your oven to 350°F and grease an 8×8-inch baking pan—I like to line mine with parchment paper for easy removal.
- Whisk together the melted unsalted butter and granulated sugar in a large bowl until fully combined and slightly glossy.
- Add the room temperature eggs one at a time, mixing well after each addition to incorporate air into the batter.
- Stir in the vanilla extract until the mixture is smooth and fragrant.
- In a separate bowl, sift the all-purpose flour, cocoa powder, baking powder, and salt together to avoid any clumps.
- Tip: Sifting dry ingredients ensures your brownies bake evenly without pockets of flour.
- Gradually fold the dry ingredients into the wet mixture, mixing just until no streaks of flour remain—overmixing can make them tough.
- Gently stir in the semi-sweet chocolate chips until they’re evenly distributed throughout the batter.
- Pour the batter into the prepared pan and spread it into an even layer with a spatula.
- Bake at 350°F for 25–30 minutes, or until a toothpick inserted into the center comes out with a few moist crumbs (not wet batter).
- Tip: Underbaking slightly gives you that coveted fudgy texture—so don’t wait for a clean toothpick!
- Let the brownies cool completely in the pan on a wire rack for at least 1 hour.
- Once cooled, use a coffin-shaped cookie cutter to stamp out brownie cutouts, pressing firmly and wiping the cutter between cuts.
- Tip: If the brownies stick, dip the cutter in cocoa powder first—it prevents mess and adds a dusty grave effect.
These coffin brownies are dense, fudgy, and packed with deep chocolate flavor that’s balanced by a hint of saltiness. Serve them stacked like a tiny chocolate graveyard or drizzle with white chocolate “cobwebs” for an extra eerie touch.
Skeleton Gingerbread Men
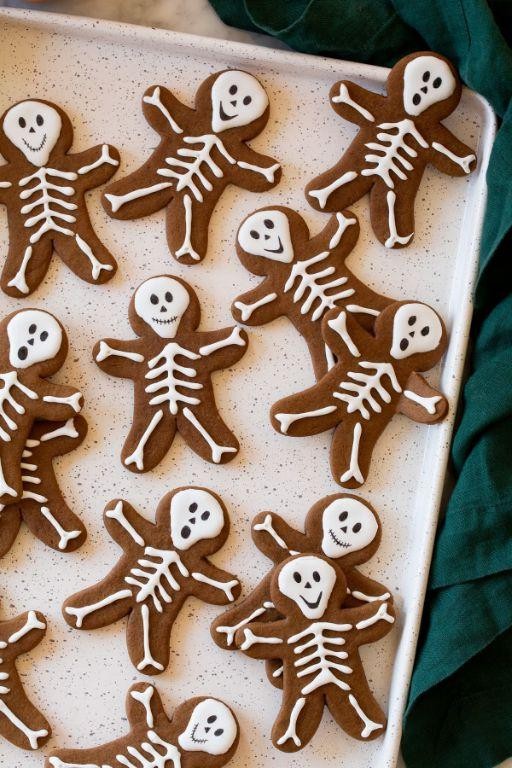
Jingle bells, pumpkin smells, and the delightful terror of edible skeletons! Just in time for spooky season, these Skeleton Gingerbread Men are the perfect blend of creepy and cute—they’ll haunt your cookie jar in the best way possible.
24
cookies25
minutes10
minutesIngredients
– 3 cups all-purpose flour (I always spoon and level it for accuracy—no packed cups here!)
– 1 tsp baking soda (fresh is key; if it doesn’t fizz in vinegar, toss it)
– 2 tsp ground ginger (the star of the show—don’t skimp!)
– 1 tsp ground cinnamon (adds that warm, cozy hug)
– 1/2 tsp ground cloves (a little goes a long way, trust me)
– 1/2 cup unsalted butter, softened (room temp is non-negotiable for easy creaming)
– 3/4 cup dark brown sugar, packed (this deep molasses flavor is my secret weapon)
– 1 large egg, room temperature (cold eggs can make the dough stubborn)
– 1/2 cup molasses (blackstrap gives the richest color and bite)
– 1 tsp pure vanilla extract (imitation vanilla? In this economy? No way.)
– Royal icing for decorating (I whip mine up with powdered sugar and meringue powder for sturdy bones)
Instructions
1. In a medium bowl, whisk together 3 cups all-purpose flour, 1 tsp baking soda, 2 tsp ground ginger, 1 tsp ground cinnamon, and 1/2 tsp ground cloves until fully combined.
2. In a large bowl, use an electric mixer on medium speed to cream 1/2 cup softened unsalted butter with 3/4 cup packed dark brown sugar for 2 minutes, until light and fluffy.
3. Beat in 1 large room temperature egg until just incorporated, about 30 seconds.
4. Mix in 1/2 cup molasses and 1 tsp pure vanilla extract on low speed until smooth.
5. Gradually add the dry ingredients to the wet mixture, mixing on low until a soft dough forms and no dry streaks remain.
6. Divide the dough in half, shape each into a disc, wrap tightly in plastic wrap, and chill in the refrigerator for at least 2 hours or until firm.
7. Preheat your oven to 350°F and line two baking sheets with parchment paper.
8. On a lightly floured surface, roll one dough disc to 1/4-inch thickness.
9. Use a gingerbread man cutter to stamp out shapes, transferring them to the prepared baking sheets with a spatula.
10. Re-roll scraps and repeat until all dough is used, spacing cookies 2 inches apart.
11. Bake for 8–10 minutes, until the edges are set and the centers appear dry.
12. Cool cookies on the baking sheet for 5 minutes before moving to a wire rack to cool completely.
13. Pipe royal icing in bone-like patterns onto cooled cookies to create skeleton designs.
14. Let icing set completely, about 1 hour, before serving or storing.
Fragrant with spice and just sturdy enough to hold their bony details, these gingerbread skeletons deliver a crisp snap and deep molasses warmth. Serve them stacked like a cookie graveyard or dangle them from ribbons for a ghoulish garland—either way, they’re bound to disappear faster than a ghost in the night!
Candy Corn Shortbread Bars
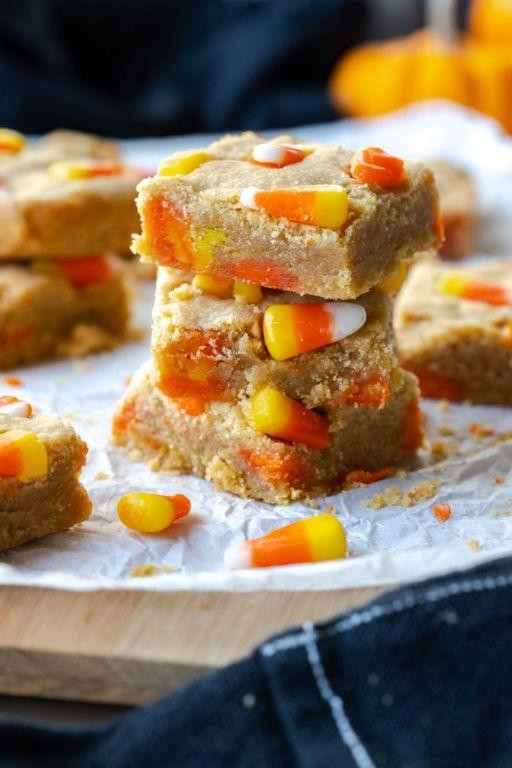
My friends, prepare to have your fall dessert game completely revolutionized by these candy corn shortbread bars that somehow manage to be both ridiculously easy and impressively fancy. Seriously, these buttery delights are about to become your new seasonal obsession—they’re the perfect marriage of sophisticated shortbread and playful candy corn that’ll make you the hero of every autumn gathering.
16
bars15
minutes30
minutesIngredients
- 1 cup unsalted butter (I always use the good European-style butter here—it makes all the difference in flavor)
- 1/2 cup granulated sugar (don’t even think about packing it—just let it flow freely into your measuring cup)
- 2 cups all-purpose flour (I prefer unbleached for that perfect golden color)
- 1/4 teaspoon salt (just a pinch to make the sweet pop)
- 1 teaspoon vanilla extract (the real stuff, please—no imitation vanilla allowed in this kitchen)
- 1 1/2 cups candy corn (go for the classic tri-color variety—they’re the real stars of this show)
Instructions
- Preheat your oven to 350°F and line an 8×8 inch baking pan with parchment paper, leaving some overhang for easy removal later.
- Using an electric mixer on medium speed, cream together 1 cup unsalted butter and 1/2 cup granulated sugar until light and fluffy, about 2-3 minutes—this creates those lovely air pockets that make the shortbread tender.
- Add 1 teaspoon vanilla extract to the butter mixture and mix until fully incorporated.
- In a separate bowl, whisk together 2 cups all-purpose flour and 1/4 teaspoon salt to ensure even distribution.
- Gradually add the flour mixture to the butter mixture on low speed, mixing just until combined—be careful not to overmix or your shortbread will become tough.
- Press two-thirds of the dough evenly into the bottom of your prepared pan using your fingers or the bottom of a measuring cup.
- Arrange 1 1/2 cups candy corn in a single layer over the dough base, pressing them gently into the surface.
- Crumble the remaining dough over the candy corn layer, creating an even but rustic-looking topping.
- Bake for 25-30 minutes until the edges are golden brown and the top looks lightly toasted—the candy corn will have softened and created little caramelized pockets.
- Let the bars cool completely in the pan on a wire rack before lifting them out using the parchment paper overhang.
- Cut into squares using a sharp knife, wiping it clean between cuts for neat edges.
These bars deliver that signature shortbread crumble with delightful chewy candy corn surprises throughout. The buttery base provides the perfect contrast to the sweet, slightly caramelized candy pieces. Try serving them slightly warm with a scoop of vanilla ice cream for the ultimate fall dessert experience that’ll have everyone asking for the recipe.
Zombie Finger Almond Cookies
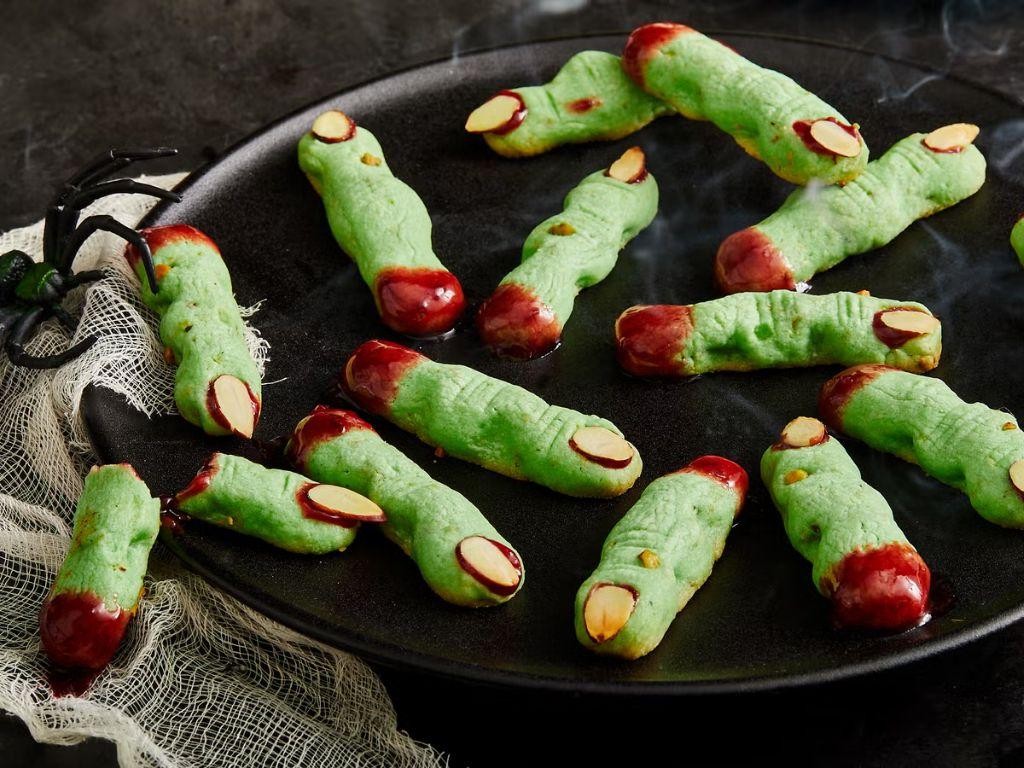
Mmm, nothing says spooky season quite like cookies that look like they crawled out of a graveyard! These Zombie Finger Almond Cookies are the perfect blend of creepy and delicious—they’ll have your guests screaming for more (in a good way, we promise). Get ready to bake up a batch that’s equal parts hilarious and irresistible.
24
cookies20
minutes14
minutesIngredients
- 1 cup all-purpose flour (I always sift mine first for extra fluffiness)
- ½ cup unsalted butter, softened (room temp is key here—don’t rush it!)
- ⅓ cup granulated sugar (because zombies deserve a little sweetness)
- 1 large egg, separated (save that yolk for another project)
- ½ tsp almond extract (the secret weapon for that eerie flavor)
- ¼ tsp salt (just a pinch to balance things out)
- 24 whole almonds (for the “fingernails”—go for the pointy ones!)
- 2 tbsp red decorating gel (the gorier, the better, I say)
Instructions
- Preheat your oven to 350°F and line a baking sheet with parchment paper.
- In a medium bowl, cream together the softened butter and granulated sugar until light and fluffy, about 2 minutes. Tip: Scrape down the sides of the bowl halfway through to ensure everything mixes evenly.
- Beat in the egg white and almond extract until fully incorporated.
- Gradually add the flour and salt, mixing just until a soft dough forms. Tip: Avoid overmixing—this keeps the cookies tender instead of tough.
- Take 1 tablespoon of dough and roll it into a 3-inch-long “finger” shape on a lightly floured surface.
- Press one whole almond firmly into one end of each dough finger to create the “fingernail.”
- Use a small knife to score 2-3 shallow lines across each finger to mimic knuckles.
- Arrange the fingers on the prepared baking sheet, spacing them 1 inch apart.
- Bake for 12-14 minutes, or until the edges are just lightly golden. Tip: Rotate the pan halfway through baking for even browning.
- Let the cookies cool on the baking sheet for 5 minutes before transferring to a wire rack.
- Once completely cool, dab a small amount of red decorating gel around the almond “fingernail” and knuckle lines for a gruesome, bloody effect.
Fabulously creepy and surprisingly tasty, these cookies boast a crisp edge with a tender, almond-scented center. Serve them piled on a platter with plastic spiders for maximum Halloween drama, or just enjoy them with a cup of coffee while pretending you’re in a haunted bakery.
Cauldron Bubble Cup Cookies
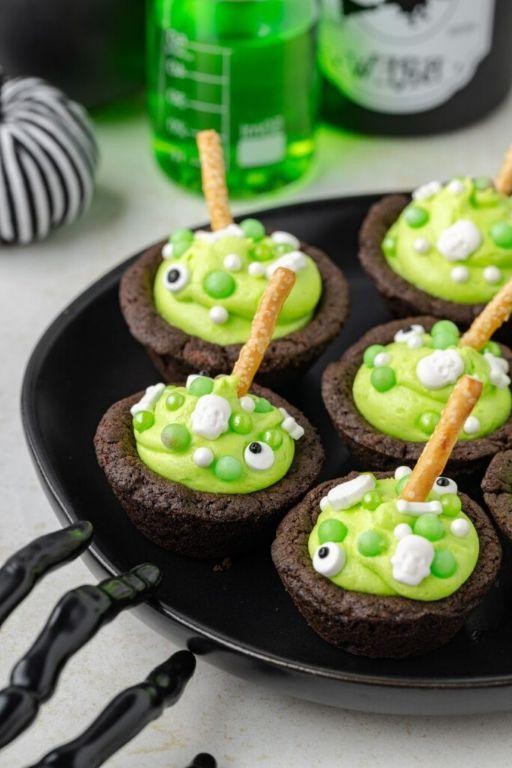
Witches and wizards, gather ’round your mixing bowls! These Cauldron Bubble Cup Cookies are the magical treat that’ll have your kitchen smelling like a potion master’s dream and your taste buds doing happy spells. Forget boring old chocolate chip cookies—we’re brewing up something with personality and just the right amount of kitchen witchcraft.
24
cookies15
minutes12
minutesIngredients
– 2 cups all-purpose flour (I always fluff it before measuring for maximum fluffiness)
– 1 cup unsalted butter, softened (leave it on the counter for an hour—impatient witches get lumpy dough)
– 3/4 cup granulated sugar (the sweet spark that starts the magic)
– 3/4 cup brown sugar, packed (this is where the deep caramel notes come from, folks)
– 2 large eggs at room temperature (cold eggs make butter sad and separated)
– 1 tsp vanilla extract (the real stuff, not that imitation potion)
– 1 tsp baking soda (our rising agent that creates the bubble effect)
– 1/2 tsp salt (to balance all that sweetness)
– 1 cup chocolate chunks (because chips are for amateurs—go big or go home)
Instructions
1. Preheat your oven to 375°F and line two baking sheets with parchment paper.
2. In a medium bowl, whisk together the flour, baking soda, and salt until fully combined.
3. In a large mixing bowl, cream the softened butter with both granulated and brown sugars using an electric mixer on medium speed for exactly 2 minutes until light and fluffy.
4. Add the room temperature eggs one at a time, beating well after each addition until fully incorporated.
5. Mix in the vanilla extract until just combined.
6. Gradually add the flour mixture to the wet ingredients, mixing on low speed until no dry spots remain.
7. Fold in the chocolate chunks using a spatula until evenly distributed throughout the dough.
8. Scoop 2-tablespoon portions of dough and roll into balls between your palms.
9. Place dough balls 2 inches apart on prepared baking sheets—they need room to spread their magical wings.
10. Bake for 10-12 minutes until the edges are golden brown but centers still look slightly underdone.
11. Remove from oven and let cookies cool on baking sheets for 5 minutes before transferring to wire racks.
Remarkably chewy centers meet crispy edges in these enchanting treats, with molten chocolate pockets that burst with every bite. Serve them warm with a cold glass of milk for maximum spell-casting satisfaction, or crumble them over vanilla ice cream for a potion-inspired dessert that’ll disappear faster than you can say “Expelliarmus!”
Werewolf Double Chocolate Treats
Oh my gosh, are you ready for a chocolate experience that’ll make you howl at the moon? These Werewolf Double Chocolate Treats are the fudgy, decadent answer to your deepest dessert cravings, perfect for when you need something sinfully delicious that won’t require a full moon to enjoy.
24
treats15
minutes12
minutesIngredients
- 1 cup all-purpose flour (I always spoon and level mine to avoid dense treats)
- ¾ cup unsweetened cocoa powder (the darker, the better for that midnight color)
- 1 tsp baking soda (make sure it’s fresh—your treats will thank you)
- ½ tsp salt (I use fine sea salt for even distribution)
- 1 cup unsalted butter, softened (room temp is key for proper creaming)
- ¾ cup granulated sugar (this is my sweet spot for balanced sweetness)
- ¾ cup packed brown sugar (the molasses notes add such depth)
- 2 large eggs (I prefer room temp eggs here for smoother mixing)
- 1 tsp vanilla extract (pure vanilla makes all the difference)
- 1 cup semi-sweet chocolate chips (because double chocolate isn’t a suggestion)
Instructions
- Preheat your oven to 350°F and line two baking sheets with parchment paper.
- Whisk together 1 cup all-purpose flour, ¾ cup unsweetened cocoa powder, 1 tsp baking soda, and ½ tsp salt in a medium bowl until fully combined.
- Cream 1 cup softened unsalted butter with ¾ cup granulated sugar and ¾ cup packed brown sugar in a large bowl using an electric mixer on medium speed for exactly 2 minutes until light and fluffy.
- Beat in 2 large eggs one at a time, waiting until each is fully incorporated before adding the next.
- Mix in 1 tsp vanilla extract until just combined.
- Gradually add the dry ingredients to the wet ingredients, mixing on low speed until no flour streaks remain—don’t overmix!
- Fold in 1 cup semi-sweet chocolate chips with a spatula until evenly distributed.
- Scoop tablespoon-sized dough balls onto prepared baking sheets, spacing them 2 inches apart.
- Bake for 10-12 minutes until the edges are set but centers still look slightly soft.
- Cool on baking sheets for 5 minutes before transferring to a wire rack.
Amazingly fudgy with crackly tops and molten chocolate pockets, these treats are pure indulgence. Serve them slightly warm with a glass of cold milk for maximum comfort, or crumble over vanilla ice cream for an instant dessert upgrade that’ll have everyone growling for more.
Conclusion
Ultimately, these 25 spooky cookie recipes make Halloween baking simple and delightful. We hope you’ll whip up some ghoulish treats, share your favorites in the comments below, and pin this roundup to your Pinterest boards for future frightful fun. Happy baking!