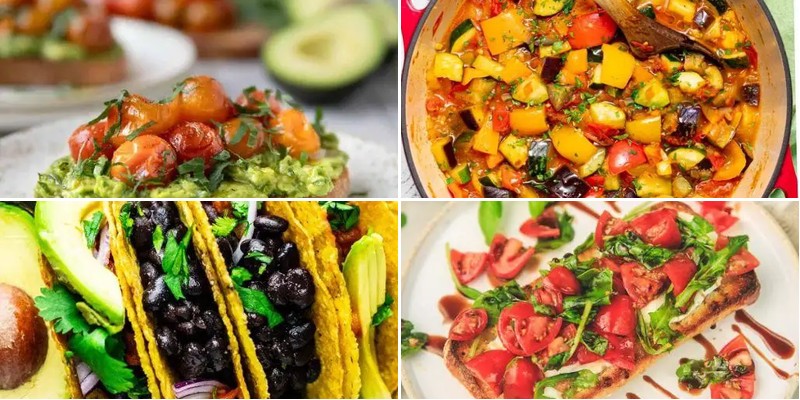
Ready to get delicious vegetarian meals on the table fast? Whether you’re craving a quick weeknight dinner, a cozy comfort food classic, or a fresh seasonal favorite, you’ve come to the right place. We’ve gathered 34 incredibly tasty, easy-to-make recipes that everyone—vegetarians and meat-eaters alike—will absolutely love. Let’s dive in and find your next go-to meal!
Quick Chickpea Stir-Fry
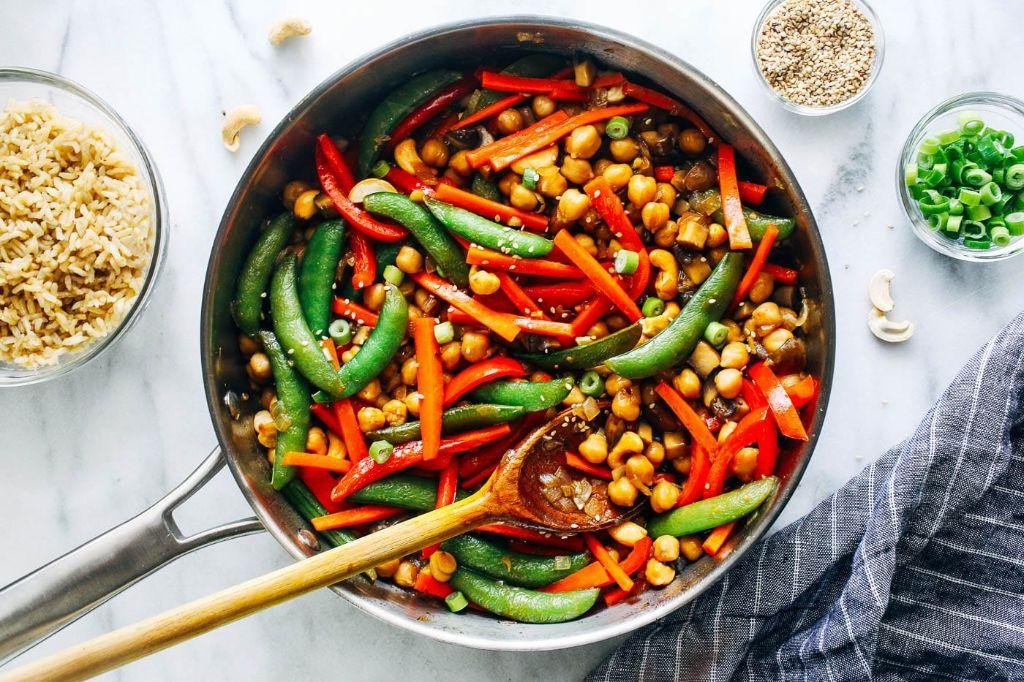
Vibrantly simple and ridiculously satisfying, this Quick Chickpea Stir-Fry is the culinary equivalent of finding money in your pocket—unexpectedly delightful and ready in minutes. Forget complicated recipes that require a PhD in pantry organization; this dish celebrates the humble chickpea with bold flavors and minimal effort. Let’s turn those canned legumes into a weeknight hero that’ll have you doing a happy dance around your kitchen.
5
servings10
minutes11
minutesIngredients
– 2 tablespoons extra virgin olive oil (my go-to for that fruity kick)
– 1 medium yellow onion, diced (the sweeter, the better in my book)
– 3 cloves garlic, minced (fresh only—none of that jarred stuff)
– 1 red bell pepper, sliced into thin strips (for that gorgeous color pop)
– 2 (15-ounce) cans chickpeas, drained and rinsed (I give them a good shake in the colander)
– 3 tablespoons soy sauce (the good stuff, not the sad salty water)
– 1 tablespoon maple syrup (a little sweet magic to balance the savory)
– 1 teaspoon smoked paprika (this is where the flavor party starts)
– 1/2 teaspoon red pepper flakes (adjust based on your spice tolerance)
– 1/4 cup chopped fresh parsley (the fresher, the happier)
Instructions
1. Heat 2 tablespoons extra virgin olive oil in a large skillet over medium-high heat until shimmering, about 1 minute.
2. Add 1 diced yellow onion and cook for 3-4 minutes, stirring occasionally, until translucent and fragrant.
3. Stir in 3 minced garlic cloves and cook for exactly 30 seconds—watch closely to prevent burning.
4. Add 1 sliced red bell pepper and cook for 2 minutes until slightly softened but still crisp.
5. Tip in 2 cans of drained chickpeas and cook for 3 minutes, stirring frequently, until lightly browned.
6. Pour in 3 tablespoons soy sauce and 1 tablespoon maple syrup, stirring to coat everything evenly.
7. Sprinkle 1 teaspoon smoked paprika and 1/2 teaspoon red pepper flakes over the mixture.
8. Cook for 2 more minutes, stirring constantly, until the sauce thickens and clings to the chickpeas.
9. Remove from heat and stir in 1/4 cup chopped fresh parsley until just wilted.
10. Get ready to serve immediately while everything is hot and perfectly textured.
Golden and glorious straight from the pan, this stir-fry delivers crispy chickpeas swimming in a sweet-savory sauce that clings beautifully to every bite. The bell peppers maintain just enough crunch to contrast the tender chickpeas, creating a texture party in your mouth. Try serving it over quinoa for extra protein power or stuff it into warm pita pockets for the ultimate handheld meal.
Speedy Vegetable Curry

Brace yourselves, curry lovers—this is the speediest veggie-packed miracle to ever grace your weeknight dinner table. When life gives you 20 minutes and a vegetable drawer full of questionable carrots, you make this glorious one-pot wonder that somehow tastes like it simmered for hours.
4
servings10
minutes15
minutesIngredients
- 2 tbsp coconut oil (the secret to that dreamy tropical aroma)
- 1 yellow onion, diced (I cry every time, but it’s worth it)
- 3 cloves garlic, minced (because one is never enough)
- 1 tbsp fresh ginger, grated (the zing that makes everything sing)
- 2 tbsp curry powder (my pantry MVP—don’t be shy)
- 1 (14 oz) can coconut milk (full-fat for maximum creaminess)
- 2 cups mixed vegetables (I raid the freezer for peas and corn)
- 1 tsp salt (the flavor booster that ties it all together)
- Fresh cilantro for garnish (the confetti this party deserves)
Instructions
- Heat coconut oil in a large skillet over medium heat until it shimmers—about 1 minute.
- Add diced onion and cook for 3 minutes until translucent, stirring occasionally to prevent burning.
- Stir in minced garlic and grated ginger, cooking for exactly 60 seconds until fragrant.
- Sprinkle curry powder over the onion mixture and toast for 30 seconds to unlock its full flavor potential.
- Pour in coconut milk, scraping any browned bits from the bottom of the skillet.
- Add frozen mixed vegetables and salt, then bring to a gentle bubble.
- Reduce heat to low, cover, and simmer for 8 minutes—this is when the magic happens.
- Remove lid and cook uncovered for 2 more minutes until the sauce thickens slightly.
- Garnish with fresh cilantro leaves right before serving.
And just like that, you’ve got a creamy, aromatic curry that clings perfectly to rice while the vegetables retain just enough crunch. Amazingly versatile, this curry shines whether stuffed into warm pita pockets or served over fluffy quinoa for extra protein power.
Simple Caprese Salad Toast

Unbelievably, we’ve managed to make toast exciting again—this Simple Caprese Salad Toast is basically summer vacation on a slice of bread, minus the sunscreen smell. It’s the kind of effortless masterpiece that makes you look like a culinary genius while secretly requiring the skill level of someone who can operate a toaster. Perfect for when you want to feel fancy but your energy reserves are running on empty.
3
servings10
minutes7
minutesIngredients
- 4 slices of sourdough bread (the chewier, the better—it holds up against those juicy tomatoes)
- 2 large ripe tomatoes, sliced about 1/4-inch thick (go for heirlooms if you’re feeling extra; their weird shapes add character)
- 8 oz fresh mozzarella cheese, sliced into 1/4-inch rounds (the kind floating in water, not the dry brick—trust me on this)
- 1/4 cup fresh basil leaves (torn, not chopped—it keeps them from bruising and looking sad)
- 2 tbsp extra virgin olive oil (my go-to for that fruity kick)
- 1 tbsp balsamic glaze (the thick, syrupy kind that doesn’t run everywhere)
- 1/2 tsp flaky sea salt (because regular salt is boring)
- 1/4 tsp freshly ground black pepper (freshly ground makes all the difference, I swear)
Instructions
- Toast the 4 slices of sourdough bread in a toaster or oven until golden brown and crisp, about 3-4 minutes in a toaster or 5-7 minutes at 400°F in an oven. Tip: Let the bread cool for 1 minute after toasting—this prevents it from getting soggy when you add the toppings.
- Arrange the sliced tomatoes in a single layer on each piece of toast, covering the surface evenly.
- Place the mozzarella slices over the tomatoes, alternating with the tomato slices for a pretty, layered look.
- Scatter the torn basil leaves generously over the mozzarella and tomatoes.
- Drizzle the extra virgin olive oil evenly over all 4 toasts, aiming for about 1/2 tablespoon per toast. Tip: Hold the bottle high while drizzling—it helps distribute the oil more evenly and dramatically.
- Repeat with the balsamic glaze, drizzling it in zigzag patterns over the toasts.
- Sprinkle the flaky sea salt and freshly ground black pepper evenly across the toasts. Tip: Add the salt just before serving to keep the tomatoes from releasing too much liquid and making everything watery.
Remarkably crisp toast gives way to juicy tomatoes and creamy mozzarella, with the basil adding a fresh punch that’ll make you forget you’re basically eating salad for breakfast. Serve it alongside a fried egg for a hearty twist, or cut into strips and call it fancy bruschetta to impress your friends—they’ll never know it took you less than 10 minutes.
Instant Zucchini Noodles with Pesto

Veggie lovers, rejoice! This Instant Zucchini Noodles with Pesto is your new go-to for when you want something fresh, fast, and fabulously green—no spiralizer skills required, just a craving for goodness.
2
servings10
minutes5
minutesIngredients
- 2 medium zucchinis, spiralized (I always pick firm ones—they hold up better and don’t turn to mush!)
- 1/2 cup fresh basil leaves, packed (go for the brightest green bunch you can find—it makes all the difference)
- 1/4 cup extra virgin olive oil (my go-to for that rich, fruity flavor)
- 2 tbsp pine nuts, toasted (trust me, toasting them first brings out a nutty magic)
- 1/4 cup grated Parmesan cheese (freshly grated, please—it melts into the pesto like a dream)
- 1 clove garlic, minced (adjust if you’re not a garlic fiend, but why wouldn’t you be?)
- 1/2 tsp salt (I use fine sea salt for even distribution)
- 1/4 tsp black pepper, freshly ground (because pre-ground just doesn’t hit the same)
Instructions
- Spiralize the zucchinis into noodle-like strands, using a spiralizer on the medium blade setting. Tip: Pat the zucchini noodles dry with a paper towel to prevent a watery sauce.
- Toast the pine nuts in a dry skillet over medium heat for 2–3 minutes, shaking the pan frequently, until they turn golden brown and fragrant.
- Combine the basil, toasted pine nuts, Parmesan, garlic, salt, and pepper in a food processor.
- Pulse the mixture 5–7 times until the ingredients are roughly chopped.
- With the food processor running on low speed, slowly drizzle in the olive oil through the feed tube over 30 seconds, until the pesto is smooth and emulsified.
- Heat a large non-stick skillet over medium-high heat for 1 minute until a drop of water sizzles upon contact.
- Add the zucchini noodles to the skillet and sauté for 2–3 minutes, tossing frequently with tongs, until they soften slightly but still have a bit of crunch. Tip: Avoid overcooking—zucchini noodles go from al dente to soggy in seconds!
- Remove the skillet from heat and immediately add the pesto sauce to the zucchini noodles.
- Toss everything together for 1 minute until the noodles are evenly coated and warmed through. Tip: If the pesto seems thick, stir in 1 tablespoon of warm water to loosen it up.
You’ll love the vibrant, herby punch from the pesto clinging to each tender-crisp zucchini strand. Yum—this dish shines as a light lunch or paired with grilled chicken for a protein boost, and it’s so pretty you might just Instagram it before digging in!
Effortless Veggie Quesadillas

Aren’t we all just one lazy Tuesday away from ordering takeout? Let’s beat those cravings with these ridiculously simple veggie quesadillas that come together faster than you can say “extra guac, please”—your wallet and taste buds will thank you!
4
quesadillas10
minutes20
minutesIngredients
– 4 large flour tortillas (the burrito-sized ones—go big or go home!)
– 1 cup shredded Monterey Jack cheese (I’m team extra melty here)
– 1 cup canned black beans, rinsed and drained (no one wants a salty surprise)
– 1 cup frozen corn kernels, thawed (trust me, it beats shucking)
– 1/2 red bell pepper, diced into tiny confetti pieces
– 2 tbsp olive oil (my trusty non-stick savior)
– 1/2 tsp cumin (for that warm, cozy hug flavor)
– 1/4 tsp smoked paprika (the secret smoky whisper)
– 1/4 cup chopped fresh cilantro (skip if you’re in the soap-taste camp)
Instructions
1. Heat 1 tablespoon of olive oil in a large skillet over medium heat until it shimmers lightly. 2. Add diced red bell pepper and sauté for 3 minutes until slightly softened. 3. Stir in black beans, corn, cumin, and smoked paprika, cooking for 2 more minutes to warm through—this toasts the spices beautifully. 4. Transfer the veggie mixture to a bowl and wipe the skillet clean with a paper towel. 5. Place one tortilla in the dry skillet over medium-low heat. 6. Sprinkle 1/4 cup of cheese evenly over half of the tortilla. 7. Top the cheese with 1/3 cup of the veggie mixture and a sprinkle of cilantro. 8. Fold the bare tortilla half over the filling, pressing gently with a spatula. 9. Cook for 2–3 minutes until the bottom is golden brown with crisp spots. 10. Carefully flip the quesadilla using the spatula and cook for another 2–3 minutes until the second side is equally golden and the cheese is fully melted. 11. Repeat steps 5–10 with remaining tortillas and filling, adding remaining olive oil to the skillet if needed. 12. Let each quesadilla rest for 1 minute on a cutting board before slicing into wedges—this keeps the cheese from oozing out dramatically. Perfectly crisp on the outside and gloriously gooey inside, these quesadillas deliver a fiesta of textures with every bite. Pair them with a zesty salsa dunk or serve alongside a crunchy slaw for a meal that’s anything but basic.
Fast Black Bean Tacos

Hangry? We’ve all been there—staring into the abyss of an empty fridge, wondering if ketchup packets count as dinner. But fear not, my fellow food desperados, because these Fast Black Bean Tacos are here to save your sanity (and your stomach) in under 20 minutes flat.
8
tacos8
minutes12
minutesIngredients
– 1 tablespoon olive oil (extra virgin is my ride-or-die for that fruity kick)
– 1 small yellow onion, diced (because who has time for tears?)
– 2 cloves garlic, minced (fresh only—jarred garlic is a crime against flavor)
– 1 (15-ounce) can black beans, drained but not rinsed (keep that starchy liquid for thickening!)
– 1 teaspoon ground cumin (toasted cumin seeds ground fresh if you’re fancy)
– 1/2 teaspoon chili powder (I go for ancho for smoky vibes)
– 1/4 teaspoon salt (skip the “to taste” guesswork)
– 8 small corn tortillas (warmed—trust me, cold tortillas are sad tortillas)
– 1/2 cup shredded Monterey Jack cheese (the melty, gooey hero)
– 1/4 cup fresh cilantro, chopped (no substitutions, parsley imposters)
– 1 lime, cut into wedges (for that zesty squeeze at the end)
Instructions
1. Heat 1 tablespoon olive oil in a large skillet over medium-high heat until it shimmers, about 1 minute.
2. Add the diced onion and cook, stirring often, until translucent and slightly golden, about 4–5 minutes.
3. Stir in the minced garlic and cook for 30 seconds until fragrant—don’t let it brown or it’ll turn bitter.
4. Tip in the drained black beans, 1 teaspoon cumin, 1/2 teaspoon chili powder, and 1/4 teaspoon salt.
5. Mash half the beans with a fork or potato masher to create a chunky, thick texture that clings to tortillas.
6. Cook the bean mixture for 3–4 minutes, stirring occasionally, until heated through and slightly thickened.
7. Warm the corn tortillas one at a time in a dry skillet over medium heat for 20 seconds per side until pliable.
8. Spoon the black bean mixture evenly onto one half of each warmed tortilla.
9. Sprinkle 1 tablespoon shredded Monterey Jack cheese over the beans on each tortilla.
10. Fold the tortillas in half to form tacos and press gently to seal.
11. Return the tacos to the skillet and cook over medium heat for 1–2 minutes per side until the tortillas are crisp and lightly browned.
12. Flip carefully using a spatula—the cheese should be melty and hold everything together.
13. Remove the tacos from the skillet and transfer to a serving plate.
14. Top each taco with a pinch of fresh cilantro and serve immediately with lime wedges on the side.
Dive into these tacos and you’ll be greeted by a satisfying crunch giving way to creamy, spiced beans and oozy cheese. The lime squeeze cuts through the richness, while the cilantro adds a fresh, herbal pop—perfect for devouring straight from the skillet or stacking high for a casual dinner party centerpiece.
Rapid Ratatouille
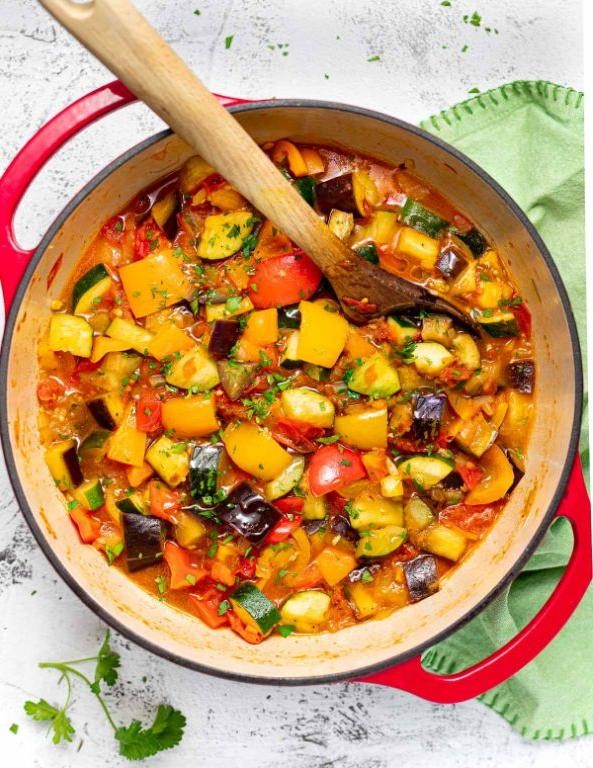
Oh, the classic ratatouille—that French veggie masterpiece that usually takes hours but today we’re hacking it into submission in under 30 minutes! Forget the slow-simmered version your grandma labored over; this rapid rendition delivers all the cozy Mediterranean vibes without the all-day commitment. Let’s turn that farmer’s market haul into weeknight magic before your stomach starts composing angry protest songs.
3
servings15
minutes25
minutesIngredients
– 2 tablespoons extra virgin olive oil (my go-to for that fruity kick)
– 1 medium yellow onion, diced (because nobody wants giant onion surprises)
– 2 cloves garlic, minced (fresh only—jarred garlic is the villain here)
– 1 medium eggplant, cubed into 1-inch pieces (salting optional but reduces bitterness)
– 1 zucchini, sliced into half-moons (the crunchier cousin in this veggie party)
– 1 red bell pepper, chopped (for color pop and sweetness)
– 1 (14.5 oz) can diced tomatoes, undrained (the saucy foundation)
– 1 teaspoon dried oregano (rub between fingers to wake up the oils)
– ½ teaspoon salt (don’t be shy—veggies need seasoning love)
– ¼ teaspoon black pepper (freshly ground if you’re fancy)
Instructions
1. Heat 2 tablespoons extra virgin olive oil in a large skillet over medium-high heat until shimmering—about 1 minute.
2. Add diced yellow onion and cook for 3 minutes, stirring frequently, until translucent but not browned.
3. Stir in minced garlic and cook for 30 seconds until fragrant (tip: burnt garlic turns bitter, so watch closely!).
4. Add cubed eggplant and cook for 5 minutes, stirring occasionally, until slightly softened.
5. Toss in zucchini slices and chopped red bell pepper, cooking for 4 minutes until veggies begin to tenderize.
6. Pour in the entire can of diced tomatoes with their juices, scraping any browned bits from the skillet bottom.
7. Sprinkle dried oregano, salt, and black pepper over the mixture, stirring to combine evenly.
8. Reduce heat to medium-low, cover the skillet, and simmer for 10 minutes (tip: this steam-bath method speeds up softening without mushiness).
9. Uncover and cook for 3 more minutes to thicken the sauce slightly (tip: if it looks too watery, give it an extra 2 minutes).
10. Remove from heat and let stand for 2 minutes before serving. Every vegetable should be tender but still hold its shape.
Expect a vibrant medley where the eggplant melts into velvet, zucchini keeps slight crunch, and tomatoes create a tangy embrace. Serve it piled over creamy polenta, stuffed into a crusty baguette, or alongside grilled chicken—this ratatouille plays well with others while stealing the spotlight.
Easy Garlic Lemon Broccoli Pasta

My goodness, have you ever met a more desperate dinner situation than staring into an empty fridge with a grumbling stomach? This garlic lemon broccoli pasta is basically your kitchen’s superhero—it swoops in with minimal effort and maximum flavor when you’re too tired to think but still want to eat like royalty.
2
servings10
minutes11
minutesIngredients
- 8 oz pasta (I’m partial to linguine here—it hugs the sauce beautifully)
- 3 cups broccoli florets (fresh is great, but frozen works in a pinch—no judgment!)
- 4 cloves garlic, minced (don’t be shy—this is the flavor powerhouse)
- 1/4 cup extra virgin olive oil (my go-to for that fruity, peppery kick)
- 1 lemon, zested and juiced (roll it on the counter first to maximize juice yield)
- 1/4 cup grated Parmesan cheese (the real stuff, please—it melts like a dream)
- 1/4 tsp red pepper flakes (optional, but highly recommended for a gentle kick)
- Salt and black pepper (I use about 1 tsp salt and 1/2 tsp pepper total)
Instructions
- Bring a large pot of salted water to a rolling boil over high heat.
- Add pasta and cook for 8 minutes exactly (set a timer—al dente is key).
- Add broccoli florets directly to the pasta pot during the final 2 minutes of cooking.
- Drain pasta and broccoli together, reserving 1/2 cup of pasta water.
- Heat olive oil in a large skillet over medium heat until shimmering (about 1 minute).
- Add minced garlic and red pepper flakes, sautéing for 45 seconds until fragrant but not browned.
- Tip: Watch the garlic closely—golden is good, brown is bitter!
- Add drained pasta and broccoli to the skillet, tossing to coat in garlic oil.
- Pour in lemon juice and zest, tossing continuously for 30 seconds.
- Add Parmesan cheese and 1/4 cup reserved pasta water, stirring until a light sauce forms.
- Tip: The starchy pasta water is magic—it helps emulsify the sauce perfectly.
- Season with 1 tsp salt and 1/2 tsp black pepper, tossing to combine evenly.
- If sauce seems too thick, add remaining pasta water 1 tbsp at a time until desired consistency.
- Tip: Serve immediately—this dish waits for no one and is best enjoyed hot!
What you get is a vibrant tangle of pasta where the broccoli stays crisp-tender against the silky, garlicky sauce. The lemon zings through every bite while the Parmesan adds just enough salty richness to make it feel indulgent. Try topping it with extra red pepper flakes and a drizzle of olive oil for that restaurant-worthy finish right at your kitchen table.
Swift Spinach and Feta Wraps

Picture this: you’re hangry, the clock is ticking, and your stomach is staging a full-scale rebellion. Enter these Swift Spinach and Feta Wraps—the culinary equivalent of a superhero swooping in to save your lunch hour from total annihilation.
2
wraps5
minutes8
minutesIngredients
- 2 large flour tortillas (the burrito-sized ones that actually hold your life together)
- 2 cups fresh spinach leaves (I like the baby spinach—less stem drama)
- 1/2 cup crumbled feta cheese (the good stuff that actually tastes like something)
- 1/4 cup diced red onion (for that satisfying crunch and slight attitude)
- 2 tbsp olive oil (extra virgin, because we’re fancy but efficient)
- 1 tsp dried oregano (the secret weapon against blandness)
- 1/2 tsp garlic powder (because fresh garlic requires actual effort)
- 1/4 tsp black pepper (freshly ground if you’re feeling extra)
Instructions
- Heat 1 tablespoon olive oil in a large skillet over medium heat until it shimmers like a disco ball.
- Add diced red onion and cook for 2 minutes until slightly softened but still crunchy.
- Toss in all the spinach leaves and watch them dramatically wilt down over 1 minute.
- Sprinkle garlic powder, dried oregano, and black pepper directly over the spinach mixture.
- Remove skillet from heat and stir in crumbled feta cheese until just combined.
- Warm the flour tortillas in a dry skillet for 30 seconds per side until pliable.
- Divide the spinach-feta mixture evenly between the two tortillas.
- Fold the bottom edge of each tortilla up about 1 inch over the filling.
- Fold the sides inward tightly, then roll away from yourself to form secure wraps.
- Heat remaining 1 tablespoon olive oil in the skillet over medium heat.
- Place wraps seam-side down and cook for 2 minutes until golden brown and crispy.
- Flip carefully and cook the other side for another 2 minutes until equally glorious.
Know that magical moment when crispy tortilla gives way to creamy feta and vibrant spinach? That’s what you’re getting here—plus the satisfaction of having created something delicious in less time than it takes to decide what to stream tonight. Serve these warm with a side of smug accomplishment or dunk them in tzatziki for maximum Mediterranean vibes.
Light Avocado Toast with Cherry Tomatoes

Naturally, we’ve all had that moment where we stare into the fridge, hoping a gourmet meal will magically assemble itself. This light avocado toast is the answer to your hungry prayers, delivering a vibrant, no-fuss breakfast that’s as satisfying to make as it is to devour. It’s the culinary equivalent of a high-five for your taste buds.
2
servings10
minutes15
minutesIngredients
– 2 slices of sourdough bread (the chewier, the better for holding all that goodness)
– 1 perfectly ripe avocado (you want it slightly soft when gently pressed)
– 1/2 cup cherry tomatoes (I always grab the sweetest ones I can find)
– 1 tbsp extra virgin olive oil (my go-to for its fruity kick)
– 1 tbsp fresh lemon juice (bottled just won’t give you that bright zing)
– 1/4 tsp flaky sea salt (it clings to the avocado beautifully)
– 1/4 tsp freshly cracked black pepper
Instructions
1. Preheat your oven to 400°F.
2. Halve the cherry tomatoes and toss them with 1/2 tbsp of olive oil on a small baking sheet.
3. Roast the tomatoes for 15 minutes, or until they are lightly blistered and have started to release their juices.
4. While the tomatoes roast, toast your sourdough slices until golden and crisp. Tip: For extra crunch, I sometimes brush the bread with a tiny bit of olive oil before toasting.
5. Halve the avocado, remove the pit, and scoop the flesh into a small bowl.
6. Add the lemon juice, salt, and pepper to the avocado.
7. Mash the avocado mixture with a fork until it’s mostly smooth but still has some small chunks for texture. Tip: Don’t over-mash—you want a bit of rustic texture!
8. Spread the mashed avocado evenly onto the warm toast.
9. Top the avocado toast with the warm, roasted cherry tomatoes.
10. Drizzle the remaining 1/2 tbsp of olive oil over the top. Tip: A final drizzle of olive oil right before serving makes all the difference for richness.
Zesty, creamy, and with a pop of sweet-tart tomatoes, this toast is a textural dream. Serve it immediately with a hot coffee for the ultimate lazy weekend vibe, or get fancy by adding a sprinkle of red pepper flakes if you’re feeling spicy.
Quick Tomato Basil Soup

Unbelievably, the only thing quicker than whipping up this tomato basil soup is how fast it disappears from the bowl—seriously, it’s like magic, but with more garlic and less rabbits.
5
servings15
minutes26
minutesIngredients
- 2 tablespoons extra virgin olive oil (my go-to for that fruity kick)
- 1 medium yellow onion, diced (because nobody wants onion tears ruining their soup-making vibe)
- 3 cloves garlic, minced (fresh only—jarred garlic is a crime in my kitchen)
- 1 (28-ounce) can crushed tomatoes (the secret weapon for instant thickness)
- 2 cups vegetable broth (low-sodium, so you’re the boss of the salt)
- 1/2 cup heavy cream (for that luxurious, velvety finish)
- 1/4 cup fresh basil leaves, chopped (tear them gently—they’ve had a long day)
- 1 teaspoon sugar (to tame the tomato acidity without a fuss)
- 1/2 teaspoon black pepper (freshly ground, because pre-ground is just sad dust)
Instructions
- Heat 2 tablespoons olive oil in a large pot over medium heat until it shimmers, about 1 minute.
- Add the diced onion and cook, stirring often, until translucent and soft, 5–7 minutes (tip: don’t rush this—caramelized onions are the flavor foundation).
- Stir in the minced garlic and cook for 1 minute until fragrant but not browned (garlic burns fast, so keep an eye on it!).
- Pour in the crushed tomatoes and vegetable broth, then add the sugar and black pepper.
- Bring the mixture to a boil over high heat, then reduce to a simmer and cook uncovered for 15 minutes, stirring occasionally.
- Remove the pot from heat and carefully blend the soup until smooth using an immersion blender (tip: if using a countertop blender, work in batches and vent the lid to avoid steam explosions).
- Stir in the heavy cream and chopped basil until fully incorporated.
- Season with salt if needed, then simmer for 2 more minutes to meld the flavors (tip: taste as you go—soups are personal, not one-size-fits-all).
Silky and rich, this soup hugs your spoon with a velvety texture and bursts of sweet tomato balanced by peppery basil. Serve it alongside a grilled cheese for the ultimate cozy duo, or drizzle with extra olive oil and fresh basil for a fancy twist—it’s basically a hug in a bowl.
Simple Greek Wedge Salad
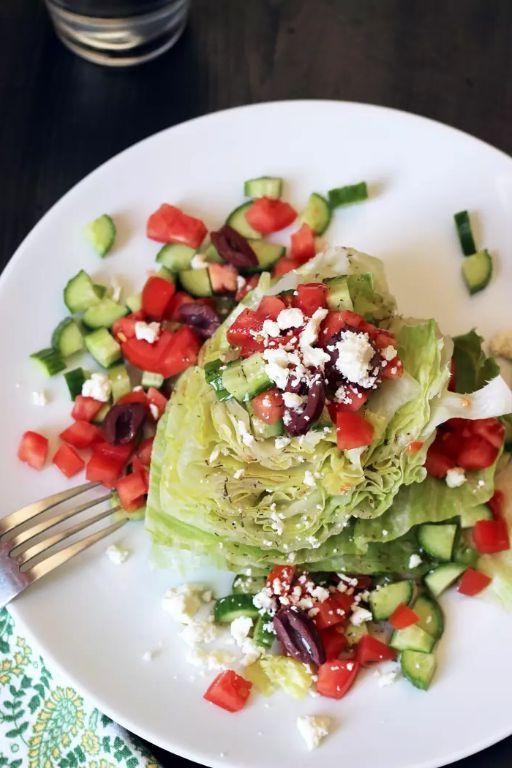
Sick of the same old boring salads that leave you dreaming of something more exciting than limp lettuce? This Simple Greek Wedge Salad is about to become your new crunchy obsession—it’s like a Mediterranean vacation for your taste buds, minus the flight delays and questionable hotel Wi-Fi. With crisp iceberg, tangy feta, and a zesty homemade dressing, it’s the salad that actually makes you want to eat your greens (and maybe even brag about it on Instagram).
4
wedges15
minutesIngredients
- 1 large head of iceberg lettuce—go for the one that feels heavy and tightly packed, it’s the crunch champion
- 1 cup cherry tomatoes, halved—these little guys burst with sweetness, so don’t skip ’em
- 1/2 cup crumbled feta cheese—I’m team block-feta-and-crumble-it-myself for maximum creaminess
- 1/4 cup pitted Kalamata olives, roughly chopped—their briny punch is non-negotiable
- 1/4 cup extra virgin olive oil—my go-to for dressings because it adds fruity depth
- 2 tbsp red wine vinegar—it’s the tangy backbone that balances everything out
- 1 tsp dried oregano—rub it between your palms to wake up those earthy flavors
- 1/2 tsp garlic powder—for a subtle kick without the chopping fuss
- 1/4 tsp black pepper, freshly ground—because pre-ground is just sad dust
Instructions
- Rinse the iceberg lettuce under cool water, then pat it completely dry with paper towels—this keeps the dressing from sliding off later.
- Cut the lettuce in half through the core, then slice each half into two wedges (you’ll get 4 total).
- Arrange the wedges on a serving platter, cut-side up, so they’re ready for topping.
- Halve the cherry tomatoes and scatter them evenly over the wedges.
- Sprinkle the crumbled feta cheese generously across the tomatoes and lettuce.
- Roughly chop the Kalamata olives and sprinkle them over the salad for that salty, briny kick.
- In a small bowl, whisk together the extra virgin olive oil and red wine vinegar for 30 seconds until emulsified—this prevents a separated dressing.
- Add the dried oregano, garlic powder, and black pepper to the dressing, whisking again to combine.
- Drizzle the dressing evenly over each wedge, making sure it soaks into the nooks and crannies.
- Let the salad sit for 5 minutes before serving to allow the flavors to meld—patience is a virtue, especially when feta’s involved.
A crisp, cool bite gives way to creamy feta and briny olives, while the tangy dressing ties it all together like a flavor party in your mouth. Serve it alongside grilled chicken for a hearty meal, or enjoy it solo as a refreshing lunch that’s anything but basic.
Conclusion
Exciting, isn’t it? With 34 delicious, easy vegetarian recipes, you’ve got endless meal inspiration. Try your favorites, leave a comment sharing which ones you loved, and pin this article on Pinterest to save for later. Happy cooking!