You’re about to discover 32 irresistible dairy-free desserts that prove you don’t need milk or butter to create sweet magic. Whether you’re avoiding dairy by choice or necessity, these easy recipes deliver all the indulgence without compromise. From creamy puddings to decadent cakes, get ready to satisfy your sweet tooth with treats everyone will love. Let’s dive into these delicious dairy-free delights!
Vegan Chocolate Avocado Mousse
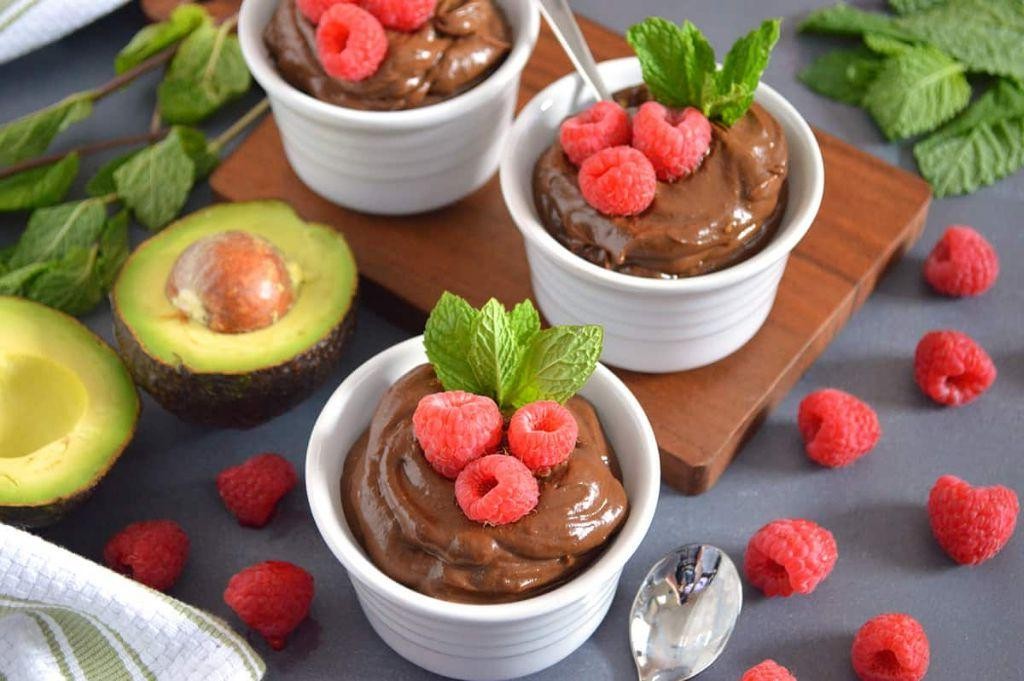
Years of searching for that perfect dairy-free dessert led me here, to this quiet kitchen moment where ripe avocados and dark chocolate promise something truly special. You’d never guess the secret ingredient that makes this mousse so impossibly creamy, so dreamily rich without a hint of dairy. It’s the kind of dessert that feels like a gentle revelation, simple yet profound in its quiet satisfaction.
3
servings15
minutes5
minutesIngredients
– 2 large, perfectly ripe Hass avocados
– 1/2 cup rich, bittersweet dark chocolate chips
– 1/4 cup pure maple syrup with deep caramel notes
– 1/4 cup creamy, unsweetened cocoa powder
– 1 teaspoon pure vanilla extract with warm, floral notes
– 1/4 teaspoon fine sea salt
– Fresh raspberries for serving
Instructions
1. Cut the perfectly ripe Hass avocados in half, remove the pits, and scoop the vibrant green flesh into a food processor bowl.
2. Melt the rich, bittersweet dark chocolate chips in a heatproof bowl set over a saucepan of gently simmering water, stirring constantly with a spatula until completely smooth and glossy.
3. Add the melted chocolate, pure maple syrup with deep caramel notes, creamy unsweetened cocoa powder, pure vanilla extract with warm floral notes, and fine sea salt to the food processor with the avocado.
4. Process the mixture on high speed for exactly 2 minutes, scraping down the sides halfway through to ensure everything incorporates evenly.
5. Taste the mousse and process for another 30 seconds if you prefer a slightly sweeter result, as the flavors continue to meld during chilling.
6. Spoon the mousse into four serving glasses or small bowls, tapping each gently on the counter to settle the mixture and remove air pockets.
7. Cover the glasses tightly with plastic wrap, pressing it directly against the surface of the mousse to prevent oxidation and darkening.
8. Chill the mousse in the refrigerator for at least 2 hours, or until firm and properly set with a velvety texture.
9. Remove the mousse from refrigerator and let it sit at room temperature for 10 minutes before serving to allow the flavors to fully bloom.
10. Top each serving with a handful of fresh raspberries just before serving.
Perhaps what surprises most is how the avocado disappears completely, leaving only its magical creaminess behind. The texture feels like silk against your tongue, while the deep chocolate flavor lingers with just a hint of maple sweetness. Try serving it in small espresso cups for an elegant presentation, or layer it with crushed vegan cookies for a playful parfait variation.
Coconut Milk Panna Cotta

Perhaps it’s the gentle sway of coconut palms I imagine while stirring, or the way this dessert settles into quiet contentment. There’s something deeply soothing about transforming simple ingredients into this silken coconut milk panna cotta, a treat that feels both luxurious and humble in the same spoonful.
3
servings15
minutes4
minutesIngredients
– 2 cups rich, creamy coconut milk
– 1/4 cup delicate raw honey
– 1 1/2 teaspoons powdered gelatin
– 1 teaspoon pure vanilla extract
– Pinch of fine sea salt
Instructions
1. Pour 1/4 cup of the rich, creamy coconut milk into a small bowl and sprinkle 1 1/2 teaspoons of powdered gelatin evenly over the surface. Let it bloom for 5 minutes until the gelatin absorbs the liquid and becomes spongy. Tip: Always sprinkle gelatin over liquid rather than dumping it in to prevent clumping.
2. Combine the remaining 1 3/4 cups of rich, creamy coconut milk, 1/4 cup of delicate raw honey, and a pinch of fine sea salt in a small saucepan over medium heat.
3. Heat the mixture while stirring constantly with a whisk until the delicate raw honey fully dissolves and tiny bubbles form around the edges of the pan, about 3-4 minutes. Do not let it boil.
4. Remove the saucepan from heat and whisk in the bloomed gelatin mixture until completely dissolved and no granules remain visible.
5. Stir in 1 teaspoon of pure vanilla extract until fully incorporated throughout the mixture.
6. Strain the mixture through a fine-mesh sieve into a liquid measuring cup to ensure ultimate smoothness.
7. Divide the strained mixture evenly among four 6-ounce ramekins or serving glasses. Tip: Pouring through a spouted measuring cup helps prevent spills and ensures even distribution.
8. Cover each ramekin with plastic wrap, making sure the wrap doesn’t touch the surface of the panna cotta.
9. Refrigerate for at least 6 hours, or preferably overnight, until completely set. Tip: The panna cotta is ready when the surface jiggles as a single unit rather than appearing liquid when you gently shake the container.
Velvety and cool, this panna cotta melts on the tongue with the subtle sweetness of coconut and honey. I love serving it with fresh mango slices or a sprinkle of toasted coconut for contrasting textures that make each bite feel like a small celebration.
Almond Butter Blondies
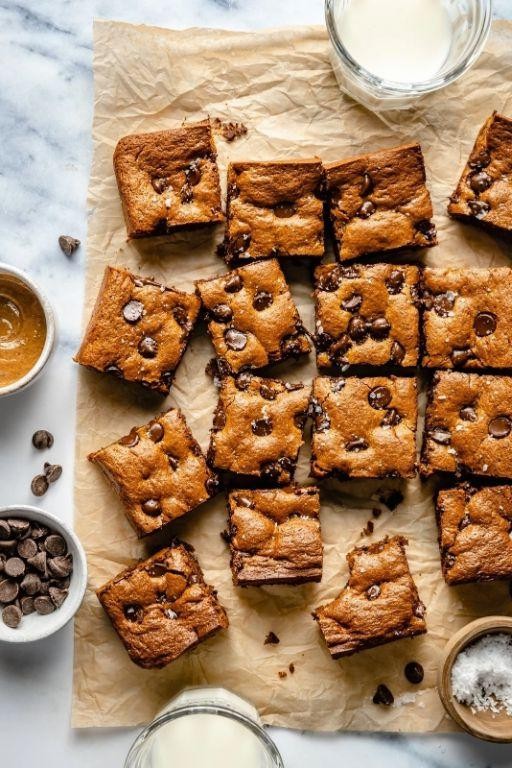
Perhaps some of the most comforting moments happen when the afternoon light slants through the kitchen window, and the simple act of stirring together a few humble ingredients feels like a quiet meditation. These almond butter blondies emerged from one such golden hour, when I wanted something sweet but substantial, something that would fill the house with the warm, toasty scent of baking.
9
squares15
minutes25
minutesIngredients
- 1 cup of creamy, roasted almond butter
- 1 cup of light brown sugar, packed with its molasses warmth
- 2 large, farm-fresh eggs at room temperature
- 1 teaspoon of pure vanilla extract with its sweet, floral notes
- 1 cup of all-purpose flour, spooned and leveled gently
- 1/2 teaspoon of baking soda
- 1/4 teaspoon of fine sea salt
- 1/2 cup of semi-sweet chocolate chips
Instructions
- Preheat your oven to 350°F and line an 8×8-inch baking pan with parchment paper, letting the edges overhang for easy removal later.
- In a large mixing bowl, combine the creamy, roasted almond butter and packed light brown sugar, stirring with a spatula for about 2 minutes until the mixture is smooth and well-blended.
- Add the 2 large, room-temperature eggs and the pure vanilla extract to the bowl, then mix for another minute until the batter is fully incorporated and slightly glossy.
- Tip: Using room-temperature eggs helps them emulsify more easily with the almond butter, preventing a greasy texture in the final blondies.
- Sprinkle the all-purpose flour, baking soda, and fine sea salt evenly over the wet ingredients, then gently fold everything together with the spatula until just combined and no dry streaks remain.
- Fold in the semi-sweet chocolate chips until they are distributed evenly throughout the thick batter.
- Transfer the batter to the prepared baking pan, using the spatula to spread it into an even layer that reaches all four corners.
- Tip: For a perfectly flat top, gently tap the pan on the counter a few times to release any air bubbles before baking.
- Bake at 350°F for 22-25 minutes, until the edges are lightly golden and the center appears set but still soft to a light touch.
- Tip: Avoid overbaking by checking at the 22-minute mark—the blondies will continue to firm up as they cool, resulting in a fudgy texture.
- Remove the pan from the oven and place it on a wire rack to cool completely, about 1 hour, before lifting out the blondies using the parchment paper overhang.
- Slice the cooled blondies into 9 or 12 squares with a sharp knife, wiping the blade clean between cuts for neat edges.
What I love most about these blondies is their tender, fudgy crumb that melts on the tongue, with the nutty depth of almond butter balancing the sweet chocolate chips. They’re wonderful served slightly warm with a drizzle of extra almond butter or crumbled over a bowl of vanilla ice cream for a simple, decadent treat.
Dairy-Free Lemon Sorbet

When the afternoon sun casts long shadows across the kitchen floor, and the world outside seems to hum with warmth, there’s a quiet craving that settles in—something clean, something bright, something that tastes like sunshine captured in a spoon. This dairy-free lemon sorbet is that moment of clarity, a simple pleasure that requires nothing more than a few honest ingredients and a little patience. It’s the kind of recipe that feels less like cooking and more like alchemy, turning tart citrus into frozen velvet.
2
servings20
minutes4
minutesIngredients
- 1 cup freshly squeezed lemon juice from vibrant, sun-ripened lemons
- 3/4 cup granulated sugar with its delicate, crystalline sweetness
- 1 cup cold filtered water, clear and pure
- 1 tablespoon finely grated lemon zest, bursting with citrus oils
- 1/4 teaspoon fine sea salt to heighten the bright flavors
Instructions
- Combine 3/4 cup granulated sugar and 1 cup cold filtered water in a small saucepan.
- Heat the mixture over medium heat, stirring continuously with a wooden spoon until the sugar completely dissolves, about 3–4 minutes. Tip: Avoid boiling to preserve the clean, bright flavor.
- Remove the saucepan from heat and let the simple syrup cool to room temperature, about 20 minutes.
- While the syrup cools, zest two large lemons using a microplane to get 1 tablespoon of fragrant lemon zest.
- Juice 4–5 medium lemons through a fine-mesh strainer to yield 1 cup of smooth, pulp-free lemon juice.
- Whisk the cooled simple syrup, 1 cup freshly squeezed lemon juice, 1 tablespoon lemon zest, and 1/4 teaspoon fine sea salt in a large mixing bowl until fully incorporated.
- Pour the mixture into a shallow, freezer-safe container, cover tightly with a lid, and freeze for 1 hour. Tip: A shallow pan speeds freezing and creates finer ice crystals.
- After 1 hour, remove the container from the freezer and scrape the semi-frozen edges toward the center with a fork.
- Return the container to the freezer and repeat the scraping process every 30 minutes for 2–3 hours, until the sorbet is uniformly frozen. Tip: This technique mimics churning for a creamier texture without an ice cream maker.
- Scoop the finished sorbet into chilled bowls and serve immediately.
Creamy without a drop of dairy, this sorbet melts on the tongue with the sharp, clean punch of lemon, followed by a lingering sweetness that dances on the palate. Consider serving it in hollowed-out lemon halves for a playful presentation, or layer it with fresh berries for a stunning parfait. Each spoonful is like biting into a frozen sunbeam—bright, refreshing, and utterly transformative.
Chia Seed Pudding with Fresh Berries

Perhaps there’s something quietly magical about transforming tiny seeds into creamy comfort overnight, a gentle alchemy that requires nothing more than patience and the promise of morning light. Preparing this chia seed pudding feels like setting a small intention for tomorrow’s self, one that will greet you with cool sweetness and vibrant color when dawn arrives.
2
servings15
minutesIngredients
- 1/2 cup small black chia seeds
- 2 cups cold whole milk
- 3 tablespoons golden raw honey
- 1 teaspoon pure vanilla extract
- 1 cup mixed fresh berries (raspberries, blueberries, blackberries)
- 2 tablespoons toasted sliced almonds
- Fresh mint sprigs for garnish
Instructions
- Measure 1/2 cup of small black chia seeds into a medium glass bowl with high sides.
- Pour 2 cups of cold whole milk over the chia seeds in a steady stream.
- Drizzle 3 tablespoons of golden raw honey into the milk mixture, using the back of a spoon to help incorporate any thick honey.
- Add 1 teaspoon of pure vanilla extract to the bowl, stirring gently to distribute the flavor.
- Whisk the mixture vigorously for 60 seconds to prevent clumping, making sure no dry seeds stick to the bottom. Tip: A proper whisking now ensures perfectly smooth pudding later.
- Cover the bowl tightly with plastic wrap, pressing it directly against the surface of the liquid.
- Refrigerate the mixture for exactly 8 hours or overnight until the pudding thickens to a spoonable consistency.
- Remove the pudding from refrigerator and check that it holds its shape when spooned. Tip: If too thick, stir in 1 tablespoon of milk at a time until desired consistency.
- Rinse 1 cup of mixed fresh berries under cool water and pat completely dry with paper towels.
- Spoon the chia pudding into serving glasses, filling them halfway.
- Layer half of the fresh berries over the pudding in each glass.
- Add another layer of pudding, then top with remaining berries.
- Sprinkle 2 tablespoons of toasted sliced almonds evenly over each serving.
- Garnish with fresh mint sprigs placed delicately on top. Tip: Gently slap mint between your palms before garnishing to release its aromatic oils.
A silky texture gives way to the satisfying pop of chia seeds, while the honey’s floral notes dance with the tart burst of summer berries. Consider serving these in clear mason jars to showcase the beautiful layers, or pack individual portions for a nourishing breakfast on busy mornings when you need both comfort and vitality in one spoonful.
Peanut Butter Banana Ice Cream
Folding into the quiet of my kitchen this afternoon, I find myself reaching for the simplest of comforts—just three humble ingredients waiting to transform into something magical. There’s something deeply soothing about watching frozen bananas and creamy peanut butter become a dessert that feels both nostalgic and new.
2
servings15
minutesIngredients
– 4 large, ripe bananas, sliced and frozen until solid
– ½ cup creamy, natural peanut butter with visible swirls of oil
– 2 tablespoons pure maple syrup, dark and amber-hued
– ¼ teaspoon flaky sea salt for subtle crunch
Instructions
1. Remove the frozen banana slices from the freezer and let them sit at room temperature for 5 minutes to slightly soften—this prevents blender strain.
2. Place the banana slices into a high-speed blender or food processor.
3. Add the creamy peanut butter, dark maple syrup, and flaky sea salt to the blender.
4. Pulse the mixture 5 times at low speed to break down the frozen bananas.
5. Scrape down the sides of the blender with a spatula to ensure even blending.
6. Blend on medium-high speed for 60 seconds until the mixture becomes smooth and creamy.
7. Transfer the soft-serve consistency ice cream into a loaf pan lined with parchment paper.
8. Spread the mixture evenly with a spatula to create a level surface.
9. Cover the pan tightly with plastic wrap, pressing it directly onto the ice cream surface to prevent ice crystals.
10. Freeze the pan for at least 4 hours or until the ice cream is firm enough to scoop.
This dreamy creation emerges with the velvety texture of soft-serve and the comforting embrace of roasted peanut notes. Try serving it sandwiched between chewy oatmeal cookies or drizzled with warm chocolate sauce for a playful twist—each spoonful carries the quiet joy of simplicity made extraordinary.
Maple Walnut Energy Balls

Zigzagging through my thoughts this quiet afternoon, I find myself craving something that feels both nourishing and nostalgic, a simple treat that carries the warmth of autumn in every bite. These little energy balls whisper of crisp walks through fallen leaves and cozy kitchen moments, where sweetness meets substance in the most gentle way.
16
portions15
minutesIngredients
– 1 cup old-fashioned rolled oats
– ½ cup creamy natural almond butter
– ⅓ cup pure maple syrup
– ¼ cup finely chopped toasted walnuts
– 2 tablespoons chia seeds
– 1 teaspoon ground cinnamon
– ¼ teaspoon fine sea salt
Instructions
1. Line a baking sheet with parchment paper.
2. Combine 1 cup old-fashioned rolled oats, ½ cup creamy natural almond butter, ⅓ cup pure maple syrup, ¼ cup finely chopped toasted walnuts, 2 tablespoons chia seeds, 1 teaspoon ground cinnamon, and ¼ teaspoon fine sea salt in a medium mixing bowl.
3. Stir the mixture vigorously with a wooden spoon for exactly 2 minutes until a thick, uniform dough forms and no dry spots remain.
4. Chill the dough in the refrigerator for 15 minutes to make handling easier.
5. Scoop 1 tablespoon of dough and roll between your palms to form 1-inch balls.
6. Arrange the balls on the prepared baking sheet, spacing them 1 inch apart.
7. Refrigerate the energy balls for 30 minutes until firm to the touch.
8. Transfer the chilled energy balls to an airtight container.
Once chilled, these energy balls develop a wonderfully chewy texture that gives way to the satisfying crunch of toasted walnuts. The maple syrup caramelizes slightly against the earthy oats, while the cinnamon adds just a whisper of warmth that lingers. I love tucking them into lunch boxes or enjoying them with a cup of herbal tea when the afternoon light slants golden through the window.
Raspberry Coconut Macaroons
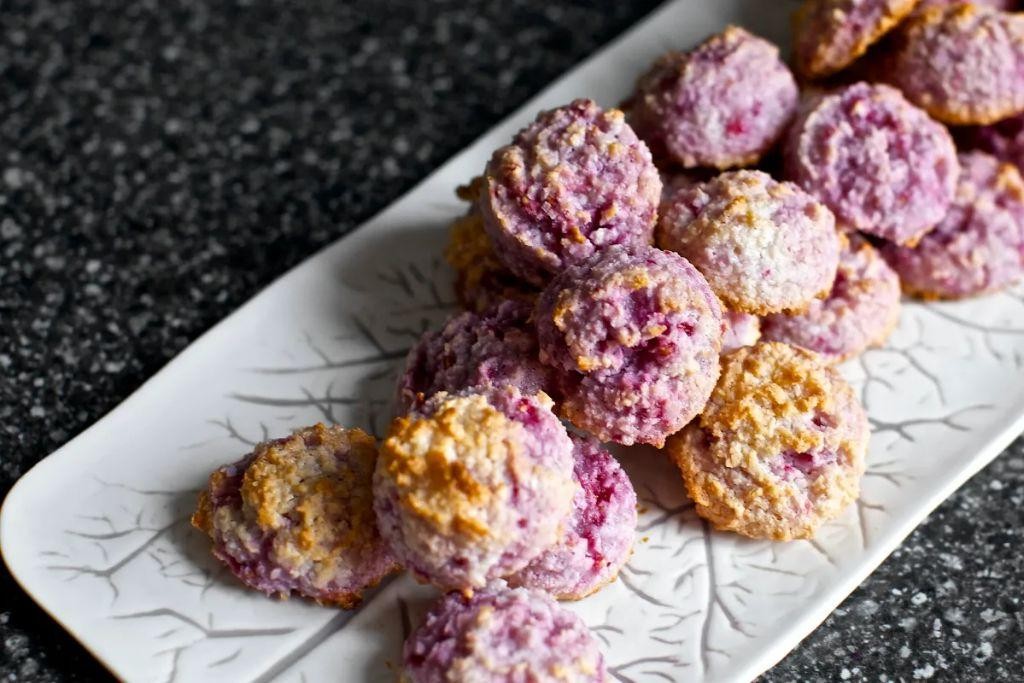
Years have a way of softening memories, but the taste of raspberries always brings me back to summer afternoons—those quiet moments when time seemed to stretch like taffy. Today, I find myself craving that same gentle sweetness, folded into something tender and coconut-kissed, a treat that feels like a whispered secret between friends.
24
macaroons10
minutes20
minutesIngredients
– 2 cups sweetened shredded coconut
– ¾ cup granulated sugar
– 3 large farm-fresh egg whites
– 1 teaspoon pure vanilla extract
– ½ cup freeze-dried raspberries, gently crushed
– Pinch of fine sea salt
Instructions
1. Preheat your oven to 325°F and line a baking sheet with parchment paper.
2. In a medium bowl, whisk the farm-fresh egg whites by hand until frothy and lightly opaque, about 1 minute—this creates a light, airy base without overworking them.
3. Fold in the sweetened shredded coconut, granulated sugar, pure vanilla extract, and fine sea salt until the mixture is evenly moistened and holds together when pressed.
4. Gently stir in the crushed freeze-dried raspberries, being careful not to overmix to preserve their vibrant color and subtle tartness.
5. Using a tablespoon or small cookie scoop, drop rounded mounds of the mixture onto the prepared baking sheet, spacing them 1 inch apart to allow for slight spreading.
6. Bake for 18–20 minutes, or until the edges are golden and the tops feel firm to the touch—a visual cue that they’re ready is when the coconut is lightly toasted.
7. Let the macaroons cool on the baking sheet for 5 minutes before transferring them to a wire rack to cool completely, which helps them set without becoming chewy.
From the first bite, these macaroons offer a delicate crunch that gives way to a soft, chewy center, with the raspberries lending a bright, fruity contrast to the coconut’s sweetness. I love serving them alongside a cup of Earl Grey tea or crumbling them over vanilla bean ice cream for a simple, elegant dessert that feels both nostalgic and new.
Caramel Coconut Flan

Years of chasing perfect desserts led me here, to this quiet kitchen moment where sugar transforms into amber liquid and coconut whispers tropical promises. There’s something deeply comforting about the alchemy of simple ingredients becoming this silken custard, a dessert that feels both elegant and profoundly humble.
8
servings20
minutes65
minutesIngredients
– 1 cup granulated white sugar for the caramel
– 4 large farm-fresh eggs at room temperature
– 1 (14-ounce) can rich coconut cream
– 1 (14-ounce) can sweetened condensed milk
– 1 teaspoon pure vanilla extract
– ¼ teaspoon fine sea salt
– ½ cup sweetened shredded coconut for garnish
Instructions
1. Preheat your oven to 325°F and place a 9-inch round cake pan inside a larger roasting pan.
2. Pour 1 cup granulated white sugar into a heavy-bottomed saucepan over medium heat, swirling occasionally but not stirring.
3. Watch closely as the sugar melts into clear liquid, then turns pale gold and finally deep amber—this should take 8-10 minutes.
4. Immediately pour the hot caramel into the preheated cake pan, tilting to coat the bottom evenly before it hardens.
5. In a large mixing bowl, whisk 4 large farm-fresh eggs until just combined and frothy.
6. Slowly pour in 1 can rich coconut cream while continuously whisking to prevent curdling.
7. Add 1 can sweetened condensed milk, 1 teaspoon pure vanilla extract, and ¼ teaspoon fine sea salt, whisking until perfectly smooth.
8. Strain the custard mixture through a fine-mesh sieve into the caramel-coated pan to remove any egg strands.
9. Create a water bath by pouring hot water into the roasting pan until it reaches halfway up the cake pan’s sides.
10. Bake at 325°F for 55-65 minutes until the edges are set but the center still jiggles slightly when gently shaken.
11. Carefully remove from the oven and water bath, then cool completely on a wire rack for 2 hours.
12. Cover with plastic wrap and refrigerate for at least 8 hours or overnight to fully set.
13. Run a thin knife around the edges to loosen the flan before inverting onto a serving plate.
14. Toast ½ cup sweetened shredded coconut in a dry skillet over medium heat for 3-4 minutes until golden brown, then sprinkle over the flan.
Silken custard yields to the spoon with that distinctive wobble, the caramel pooling around each serving like liquid amber. Toasted coconut adds delicate crunch against the creamy texture, while the tropical notes of coconut cream mingle with the deep bitterness of burnt sugar. Serve it chilled with strong coffee to cut through the richness, or alongside fresh mango slices for a truly transportive dessert experience.
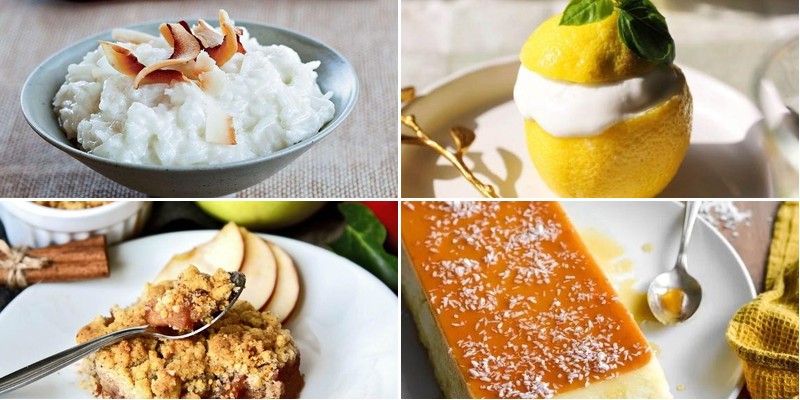
Mango Sticky Rice
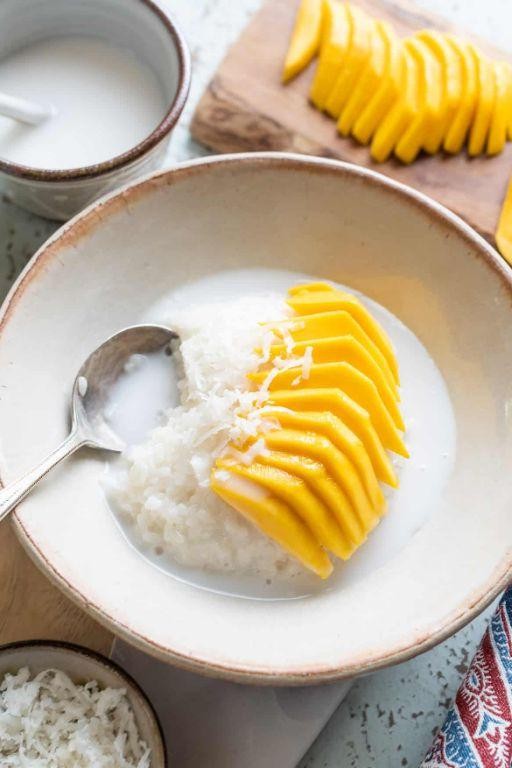
Cradling this bowl feels like holding a small piece of tropical peace, the kind that settles deep in your bones after a long, sun-drenched day. There’s something quietly magical about how the simplest ingredients—creamy coconut, sweet mango, and humble rice—can come together to create a dessert that feels both nostalgic and wonderfully new. It’s a gentle reminder that sometimes, the most comforting things are also the most straightforward.
2
portions250
minutes25
minutesIngredients
– 1 cup sweet glutinous rice, pearly and plump
– 1 ½ cups rich, creamy coconut milk
– ½ cup granulated sugar, fine and sparkling
– ¼ teaspoon fine sea salt, to balance the sweetness
– 2 ripe Ataulfo mangoes, golden and fragrant
– 1 tablespoon toasted sesame seeds, for a nutty finish
– 1 tablespoon coconut cream, chilled and thick
Instructions
1. Rinse 1 cup of sweet glutinous rice under cool running water until the water runs clear, gently swishing the grains with your fingers to release excess starch.
2. Transfer the rinsed rice to a medium bowl and cover with cold water, allowing it to soak for at least 4 hours or overnight until the grains are tender and opaque.
3. Drain the soaked rice thoroughly using a fine-mesh strainer, shaking gently to remove any excess water.
4. Line a steamer basket with cheesecloth or a clean kitchen towel, then spread the drained rice evenly in a single layer.
5. Steam the rice over boiling water for 25 minutes, covered, until the grains are fully translucent and tender when pressed between your fingers.
6. While the rice steams, combine 1 ½ cups of coconut milk, ½ cup granulated sugar, and ¼ teaspoon fine sea salt in a small saucepan over medium heat.
7. Warm the coconut milk mixture, stirring constantly with a wooden spoon, just until the sugar dissolves completely and tiny bubbles form around the edges—do not boil.
8. Transfer the hot steamed rice to a wide, shallow bowl and immediately pour the warm coconut milk mixture over it, folding gently with a spatula to coat every grain.
9. Let the rice rest for 20 minutes, uncovered, to fully absorb the coconut milk and develop a creamy texture.
10. Peel 2 ripe Ataulfo mangoes and slice the flesh away from the flat pit in smooth, even pieces.
11. Arrange the mango slices alongside or over portions of the coconut-infused rice.
12. Drizzle 1 tablespoon of chilled coconut cream over each serving in thin, artistic streams.
13. Sprinkle 1 tablespoon of toasted sesame seeds generously over the top for a subtle crunch and aroma.
Each spoonful offers a lovely contrast—the rice, soft and yielding, against the mango’s juicy firmness, all wrapped in coconut’s velvety embrace. For a playful twist, try serving it in hollowed-out coconut shells or garnishing with edible flowers to elevate its natural beauty. Even the simplest presentation feels special when each component shines so brightly on its own.
Apple Cinnamon Crumble
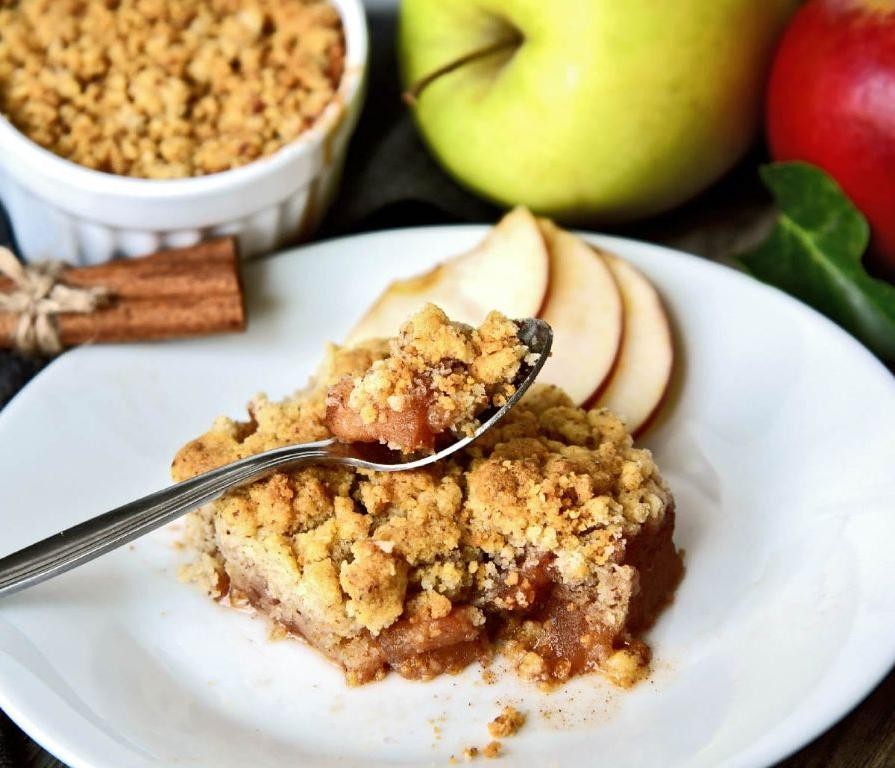
Kindly, as the afternoon light softens, I find myself drawn to the gentle ritual of baking—the way cinnamon-dusted apples fill the kitchen with whispers of warmth and comfort, a quiet embrace for the soul.
6
servings20
minutes40
minutesIngredients
– 4 cups peeled and thinly sliced Honeycrisp apples
– 1/2 cup granulated white sugar
– 1 teaspoon fragrant ground cinnamon
– 1 tablespoon freshly squeezed lemon juice
– 1 cup all-purpose flour
– 1/2 cup packed light brown sugar
– 1/2 cup cold unsalted butter, cubed
– 1/4 teaspoon flaky sea salt
Instructions
1. Preheat your oven to 375°F and lightly grease an 8×8-inch baking dish with butter.
2. In a large mixing bowl, combine the thinly sliced Honeycrisp apples, granulated white sugar, fragrant ground cinnamon, and freshly squeezed lemon juice, tossing gently until the apples are evenly coated.
3. Transfer the apple mixture to the prepared baking dish, spreading it into an even layer.
4. In the same mixing bowl, whisk together the all-purpose flour, packed light brown sugar, and flaky sea salt until well combined.
5. Add the cold cubed unsalted butter to the flour mixture, using your fingertips to rub the butter into the dry ingredients until coarse crumbs form—this creates a tender, flaky topping.
6. Sprinkle the crumble mixture evenly over the apples in the baking dish, covering them completely.
7. Place the baking dish in the preheated oven and bake for 35–40 minutes, or until the topping is golden brown and the apples are bubbling at the edges.
8. Remove the crumble from the oven and let it rest on a wire rack for 15 minutes to allow the juices to thicken slightly.
Momentarily, as you spoon into the warm crumble, the crisp topping gives way to tender, cinnamon-kissed apples—their sweetness balanced by a hint of lemon. Serve it alongside a scoop of vanilla bean ice cream, letting it melt into the crevices, or enjoy it simply with a cup of tea as the day winds down.
Pumpkin Spice Soft Cookies
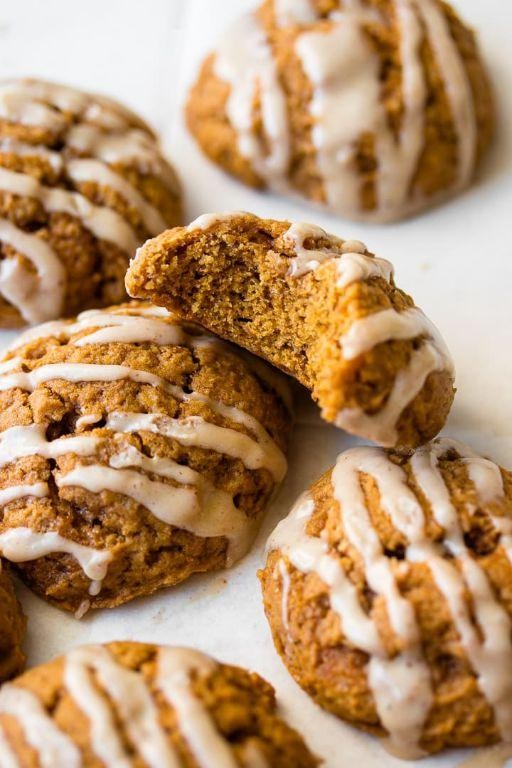
Holding this warm mug of tea, I find myself thinking about how autumn afternoons call for something tender and spiced, something that fills the kitchen with the scent of cinnamon and comfort. These soft pumpkin cookies are just that—a gentle hug in baked form, perfect for quiet moments when the world outside turns golden. They’re simple to make, yet each bite feels like a slow, sweet whisper of the season.
24
cookies15
minutes12
minutesIngredients
– 1 cup creamy pumpkin puree, velvety and smooth
– ½ cup unsalted butter, softened to room temperature
– ¾ cup light brown sugar, packed with molasses warmth
– 1 large farm-fresh egg, lightly beaten
– 2 cups all-purpose flour, softly spooned and leveled
– 1 tsp baking soda, for a gentle rise
– ½ tsp fine sea salt, to balance the sweetness
– 1 tsp ground cinnamon, warmly aromatic
– ½ tsp ground nutmeg, freshly grated if possible
– ¼ tsp ground ginger, with a subtle kick
– ¼ tsp ground cloves, for deep spice notes
Instructions
1. Preheat your oven to 350°F and line two baking sheets with parchment paper.
2. In a large mixing bowl, cream together the softened unsalted butter and light brown sugar on medium speed for 2 minutes, until pale and fluffy.
3. Tip: Scrape down the bowl sides with a spatula halfway through to ensure even mixing.
4. Add the velvety pumpkin puree and lightly beaten farm-fresh egg to the butter mixture, mixing on low until fully incorporated.
5. In a separate bowl, whisk together the all-purpose flour, baking soda, fine sea salt, ground cinnamon, ground nutmeg, ground ginger, and ground cloves until no streaks remain.
6. Gradually add the dry ingredients to the wet mixture, mixing on low speed just until a soft dough forms—do not overmix.
7. Tip: Overmixing can lead to tough cookies; stop as soon as the flour disappears.
8. Scoop 1½-tablespoon portions of dough onto the prepared baking sheets, spacing them 2 inches apart to allow for spreading.
9. Bake one sheet at a time in the preheated oven for 10–12 minutes, until the edges are lightly golden and the centers look set but soft.
10. Tip: For extra-soft cookies, remove them from the oven when they still appear slightly underdone in the center.
11. Let the cookies cool on the baking sheet for 5 minutes before transferring to a wire rack to cool completely.
Soft and cake-like, these cookies melt with each bite, their gentle spice mingling with the earthy pumpkin. Serve them warm with a drizzle of honey or crumbled over vanilla ice cream for a cozy treat that feels like autumn itself.
Chocolate Dipped Frozen Bananas

Maybe it’s the quiet moments that call for the simplest joys—like these chocolate-dipped frozen bananas, a treat that feels both nostalgic and new, waiting patiently in the freezer for when you need a cool, sweet escape.
8
pieces15
minutesIngredients
- 4 ripe but firm bananas
- 1 cup high-quality dark chocolate chips
- 1 tablespoon creamy coconut oil
- ½ cup finely chopped toasted almonds
- 8 wooden popsicle sticks
Instructions
- Line a baking sheet with parchment paper and set it aside.
- Peel the bananas and slice each one in half crosswise to create 8 pieces.
- Insert a wooden popsicle stick firmly into the cut end of each banana half, pushing about halfway through.
- Place the prepared bananas on the lined baking sheet and freeze for exactly 1 hour, or until solid to the touch.
- Combine the dark chocolate chips and creamy coconut oil in a microwave-safe bowl.
- Microwave the mixture on high for 30 seconds, then stir gently; repeat in 15-second intervals until fully melted and smooth. Tip: Avoid overheating to prevent the chocolate from seizing.
- Remove the frozen bananas from the freezer one at a time to keep them cold.
- Hold a banana by the stick and dip it into the melted chocolate, rotating to coat evenly.
- Allow excess chocolate to drip back into the bowl for a thin, even layer.
- Immediately roll the chocolate-coated banana in the finely chopped toasted almonds, pressing lightly to adhere. Tip: Work quickly so the chocolate sets on the frozen banana.
- Return each finished banana to the parchment-lined baking sheet.
- Once all bananas are coated, freeze them for at least 2 hours, or until the chocolate is fully set and hard. Tip: For easy storage, transfer them to an airtight container after freezing to prevent freezer burn.
Just like that, you have a treat where the crisp chocolate shell gives way to the creamy, ice-cold banana within—perfect for savoring on a warm afternoon or crumbling over a bowl of vanilla bean ice cream for an extra indulgent twist.
Matcha Coconut Ice Cream

Kindling memories of quiet afternoons, this matcha coconut ice cream whispers of tranquility, its gentle green hue and creamy texture offering a moment of sweet stillness in our hurried days. It’s a recipe that unfolds slowly, inviting you to savor each step as much as the final spoonful.
10
minutes7
minutesIngredients
– 2 (13.5-ounce) cans of rich, creamy full-fat coconut milk
– ¾ cup of fine, crystalline granulated sugar
– 3 tablespoons of vibrant, ceremonial-grade matcha powder
– 1 teaspoon of pure, fragrant vanilla extract
– ¼ teaspoon of flaky, delicate sea salt
Instructions
1. Chill the bowl of your ice cream maker in the freezer for at least 24 hours, or until solid, to ensure the mixture freezes quickly and smoothly.
2. Pour both cans of full-fat coconut milk into a medium saucepan over low heat.
3. Whisk in the granulated sugar continuously for 3–4 minutes, until the sugar is fully dissolved and the mixture is slightly warmed.
4. Sift the matcha powder through a fine-mesh sieve into the saucepan to prevent clumps and ensure a silky texture.
5. Whisk vigorously for 2 minutes until the matcha is fully incorporated and the liquid is uniformly pale green.
6. Remove the saucepan from heat and stir in the vanilla extract and sea salt.
7. Let the mixture cool to room temperature, about 30–40 minutes, stirring occasionally.
8. Cover the saucepan with plastic wrap, pressing it directly onto the surface of the mixture to prevent a skin from forming.
9. Refrigerate the mixture for at least 4 hours, or until thoroughly chilled to 40°F.
10. Pour the chilled mixture into the frozen ice cream maker bowl.
11. Churn according to your machine’s instructions for 20–25 minutes, until it reaches a soft-serve consistency.
12. Transfer the ice cream to a freezer-safe container, smoothing the top with a spatula.
13. Freeze for 4–6 hours, or until firm enough to scoop.
Perfectly smooth and subtly earthy, this ice cream melts into a creamy dream on the tongue, with the coconut’s sweetness balancing matcha’s gentle bitterness. Try serving it nestled in toasted coconut bowls or drizzled with a whisper of honey for an extra layer of comfort.
Cashew Cheesecake with Berry Compote
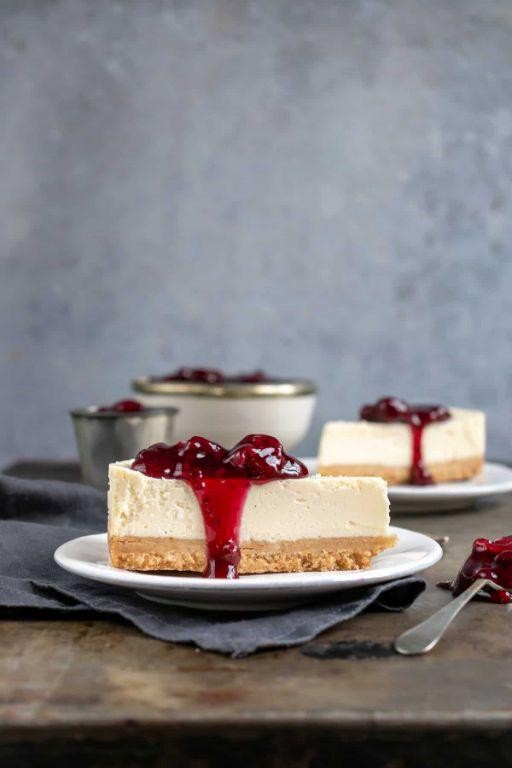
There’s something quietly magical about transforming humble cashews into a velvety, dreamy cheesecake—no dairy required, just patience and a gentle hand. This version, crowned with a jewel-like berry compote, feels like a whispered secret between you and your kitchen, a moment of calm creation on a slow afternoon.
8
servings75
minutes12
minutesIngredients
– 2 cups raw cashews, soaked until plump and creamy
– 1/2 cup pure maple syrup, dark and robust
– 1/4 cup fresh lemon juice, bright and zesty
– 1/3 cup refined coconut oil, melted and silky
– 1 tsp pure vanilla extract, warm and fragrant
– 1/4 tsp fine sea salt, for balance
– 1 1/2 cups mixed berries, frozen and jewel-toned
– 2 tbsp granulated sugar, for gentle sweetness
– 1 tbsp fresh lemon juice, to brighten the compote
Instructions
1. Soak the raw cashews in hot water for 1 hour until they are soft and plump, then drain thoroughly.
2. Combine the soaked cashews, pure maple syrup, fresh lemon juice, melted coconut oil, pure vanilla extract, and fine sea salt in a high-speed blender.
3. Blend on high for 2–3 minutes until the mixture is completely smooth, scraping down the sides once to ensure no lumps remain.
4. Pour the velvety cashew filling into a 7-inch springform pan lined with parchment paper.
5. Tap the pan gently on the counter to release any air bubbles for a silky texture.
6. Freeze the cheesecake for at least 6 hours or until firm to the touch.
7. Combine the frozen mixed berries, granulated sugar, and fresh lemon juice in a small saucepan.
8. Cook over medium heat for 10–12 minutes, stirring occasionally, until the berries break down and the compote thickens slightly.
9. Let the berry compote cool completely to room temperature before using.
10. Remove the cheesecake from the freezer and let it sit at room temperature for 15 minutes to soften slightly.
11. Spread the cooled berry compote evenly over the top of the cheesecake.
12. Slice with a warm knife for clean edges and serve immediately.
Rich and creamy, this cashew cheesecake melts on the tongue with a subtle nuttiness, while the tart berry compote adds a burst of brightness that cuts through the richness. Try serving it with a sprinkle of toasted coconut or a drizzle of extra maple syrup for an extra layer of cozy indulgence.
No-Bake Chocolate Oat Bars
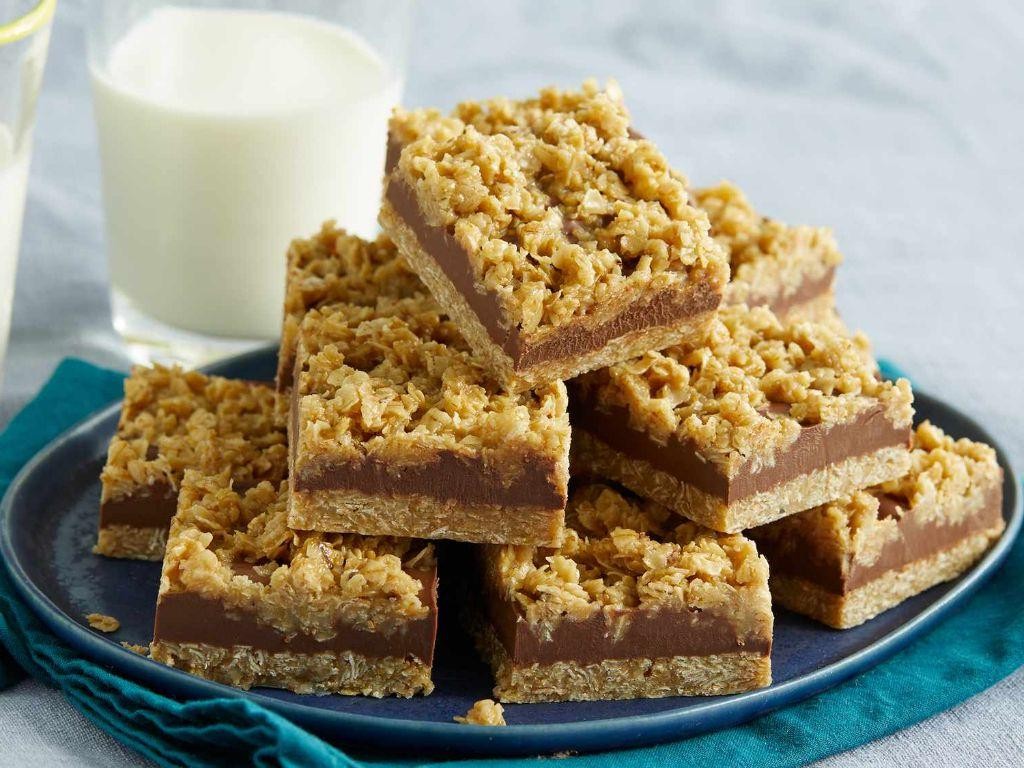
Cradling a warm mug on this quiet afternoon, I find myself craving something simple yet deeply comforting—the kind of treat that asks for little effort but gives back in rich, chocolatey layers. These no-bake bars are my go-to when the oven feels too far away, and the heart needs a gentle, sweet pause.
12
squares15
minutes4
minutesIngredients
– 1 cup creamy, natural peanut butter
– ½ cup golden, raw honey
– ½ cup rich, unsalted butter
– 1 teaspoon fragrant, pure vanilla extract
– 3 cups old-fashioned rolled oats
– 1 cup bittersweet chocolate chips
– ¼ cup finely chopped, roasted almonds
Instructions
1. Line an 8×8-inch baking pan with parchment paper, letting the edges overhang for easy removal later.
2. Combine the creamy peanut butter, golden honey, and rich butter in a medium saucepan over low heat.
3. Stir continuously with a wooden spoon for 3–4 minutes until the mixture is smooth and fully melted, being careful not to let it bubble.
4. Remove the saucepan from the heat and stir in the fragrant vanilla extract until just incorporated.
5. Tip: If the mixture seems too thick, warm it for another minute off the heat—this helps the oats blend evenly.
6. Add the old-fashioned rolled oats to the saucepan and fold gently until every oat is coated in the glossy mixture.
7. Press half of the oat mixture firmly into the prepared pan using the back of a measuring cup to create an even layer.
8. Sprinkle the bittersweet chocolate chips evenly over the base layer in the pan.
9. Tip: For a quicker melt, let the chips sit for a minute on the warm base—they’ll soften without losing shape.
10. Scatter the finely chopped almonds over the chocolate chips for a subtle crunch.
11. Top with the remaining oat mixture, pressing down firmly again to compact the layers.
12. Chill the pan in the refrigerator for at least 2 hours, or until the bars are firm and hold their shape when lifted.
13. Tip: For clean cuts, use a sharp knife warmed under hot water and wiped dry between slices.
14. Lift the bars from the pan using the parchment overhang and slice into 12 even squares.
Soften at room temperature for 10 minutes before serving to let the chocolate yield to the bite. The bars crumble gently, with oats lending a chewy heartiness against the melt of chocolate and the nutty whisper of almonds. Try them alongside a cold glass of milk or crumbled over vanilla ice cream for a humble, layered delight.
Vanilla Coconut Rice Pudding
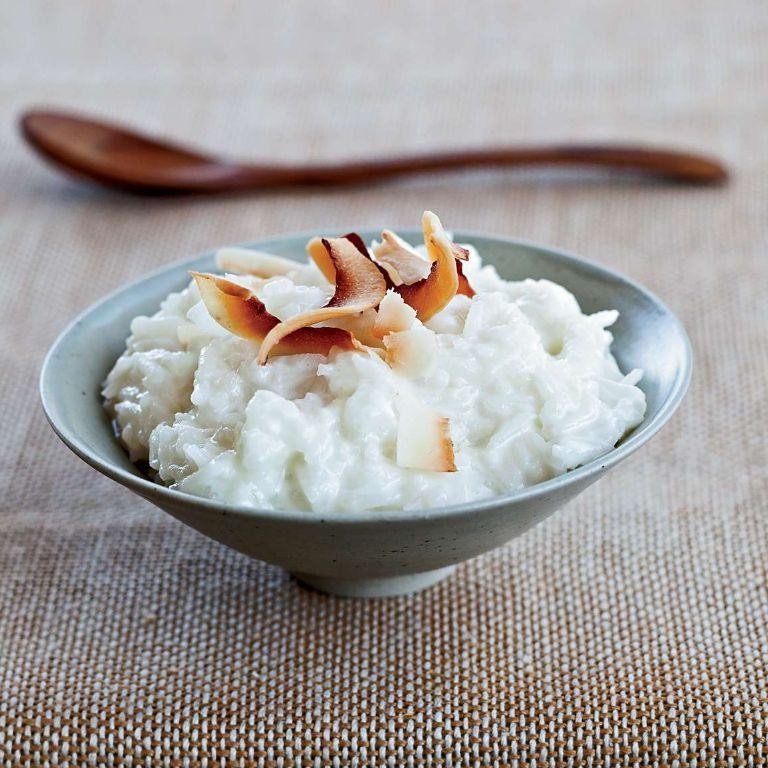
Falling into this recipe feels like wrapping yourself in a soft blanket on a quiet afternoon, where the gentle sweetness of vanilla and the creamy comfort of coconut milk come together in the most soothing way. It’s a humble dessert that whispers of home and warmth, inviting you to slow down and savor each spoonful.
4
servings10
minutes40
minutesIngredients
– 1 cup of fragrant jasmine rice
– 4 cups of creamy full-fat coconut milk
– 1/2 cup of fine granulated sugar
– 1 tablespoon of pure vanilla extract
– 1/4 teaspoon of flaky sea salt
– 1/2 cup of plump golden raisins
– 1 teaspoon of aromatic ground cinnamon
Instructions
1. Rinse 1 cup of fragrant jasmine rice under cool running water until the water runs clear, which removes excess starch for a creamier texture.
2. In a heavy-bottomed saucepan, combine the rinsed rice with 4 cups of creamy full-fat coconut milk over medium heat.
3. Bring the mixture to a gentle simmer, stirring occasionally to prevent sticking, then reduce the heat to low.
4. Cover the saucepan and let it cook for 25 minutes, stirring every 5 minutes to ensure even cooking and prevent clumping.
5. Stir in 1/2 cup of fine granulated sugar, 1 tablespoon of pure vanilla extract, and 1/4 teaspoon of flaky sea salt until fully dissolved.
6. Add 1/2 cup of plump golden raisins and 1 teaspoon of aromatic ground cinnamon, mixing gently to distribute evenly.
7. Continue cooking uncovered for another 10 minutes, or until the pudding thickens to a creamy consistency that coats the back of a spoon.
8. Remove the saucepan from the heat and let it rest for 5 minutes to allow the flavors to meld together.
9. Transfer the pudding to serving bowls while still warm. What emerges is a velvety, comforting pudding where the coconut milk lends a lush creaminess, the vanilla adds a floral depth, and the raisins offer little bursts of sweetness. Try it chilled with a sprinkle of toasted coconut or warm with a drizzle of honey for a cozy twist.
Conclusion
From decadent cakes to creamy puddings, these 32 dairy-free desserts prove you don’t need dairy for delicious indulgence. We hope you find new favorites to satisfy your sweet tooth! Try a recipe this week, leave a comment with your top pick, and share this roundup on Pinterest so others can discover these irresistible treats too.