
Ready to transform your hectic weeknights with minimal effort? We’ve gathered 19 mouthwatering baked meals that are simple to prep and perfect for busy schedules. From cozy casseroles to sheet-pan wonders, these recipes deliver comfort and flavor without the fuss. Dive in and discover your new go-to dinners—you’ll wonder how you ever managed without them!
Cheesy Baked Ziti
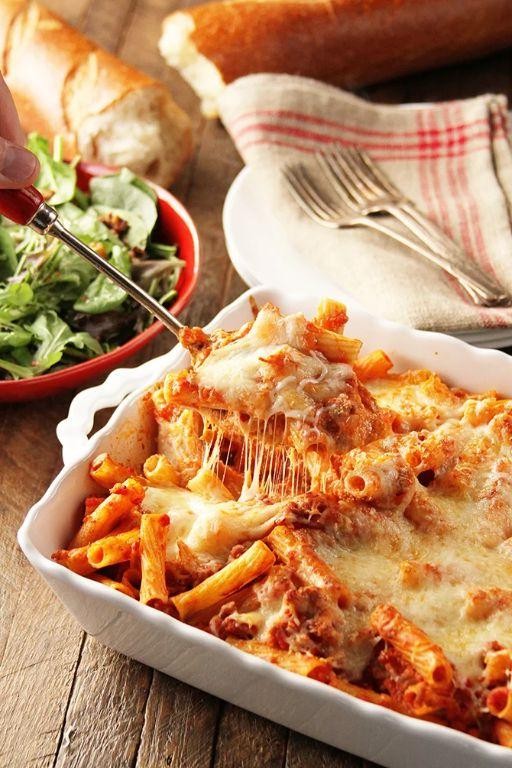
Comfort finds its way into our kitchens on quiet afternoons, this cheesy baked ziti cradling memories of family dinners and the gentle hum of the oven. There’s something deeply soothing about layering pasta with rich tomato sauce and molten cheese, each component melting into the next like pages of a well-loved story. Let’s gather these simple ingredients and create something warm together.
6
servings20
minutes54
minutesIngredients
– a pound of ziti pasta
– a couple tablespoons of olive oil
– one medium yellow onion, finely chopped
– three cloves of garlic, minced
– a 28-ounce can of crushed tomatoes
– a teaspoon of dried oregano
– a pinch of red pepper flakes
– a cup of whole milk ricotta cheese
– two cups of shredded mozzarella cheese
– half a cup of grated Parmesan cheese
– a handful of fresh basil leaves
– salt and freshly ground black pepper
Instructions
1. Preheat your oven to 375°F.
2. Bring a large pot of salted water to a rolling boil.
3. Add the ziti pasta and cook for exactly 8 minutes until al dente.
4. Drain the pasta in a colander but don’t rinse it—the starch helps the sauce cling better.
5. Heat olive oil in a large skillet over medium heat until it shimmers.
6. Add chopped onion and cook for 5 minutes until translucent.
7. Stir in minced garlic and cook for 1 minute until fragrant.
8. Pour in crushed tomatoes, oregano, red pepper flakes, and season with salt and pepper.
9. Simmer the sauce for 15 minutes, stirring occasionally until slightly thickened.
10. Combine the drained pasta with the tomato sauce in the skillet.
11. Spread half the pasta mixture in a 9×13-inch baking dish.
12. Dollop spoonfuls of ricotta cheese evenly over the pasta layer.
13. Sprinkle one cup of mozzarella cheese over the ricotta.
14. Top with remaining pasta mixture.
15. Cover with remaining mozzarella and all the Parmesan cheese.
16. Bake uncovered for 25 minutes until the cheese is golden and bubbly.
17. Let the baked ziti rest for 10 minutes before serving—this helps the layers set beautifully.
18. Tear fresh basil leaves and scatter them over the top just before serving.
Resting transforms this dish into something magical, the cheeses settling into creamy pockets between the tender pasta. Rich tomato notes mingle with the sharp Parmesan and mild ricotta in every forkful. Try serving it alongside a simple green salad with vinaigrette to cut through the richness, or pack the leftovers for tomorrow’s lunch—it reheats wonderfully.
Quick Oven-Roasted Lemon Chicken

Remembering those quiet Sunday afternoons when the kitchen becomes a sanctuary, I find myself returning to this simple roasted chicken—the kind of meal that fills the house with warmth without demanding too much from the day. There’s something comforting in the way lemon and herbs mingle in the air, a gentle promise of a cozy dinner ahead.
2
portions10
minutes40
minutesIngredients
– A couple of bone-in, skin-on chicken thighs (about 1 ½ pounds)
– One large lemon, sliced into thin rounds
– A small handful of fresh rosemary sprigs
– A generous glug of olive oil (about 2 tablespoons)
– A good sprinkle of kosher salt (roughly 1 teaspoon)
– A few cracks of black pepper (about ½ teaspoon)
– A splash of chicken broth (about ¼ cup)
Instructions
1. Preheat your oven to 425°F and position a rack in the middle.
2. Pat the chicken thighs completely dry with paper towels—this helps the skin crisp up beautifully.
3. Arrange the lemon slices and rosemary sprigs in a single layer in a 9×13-inch baking dish.
4. Drizzle the olive oil evenly over both sides of the chicken thighs.
5. Sprinkle the salt and pepper all over the chicken, rubbing gently to adhere.
6. Place the chicken thighs skin-side up on top of the lemon and rosemary bed.
7. Pour the chicken broth around (not over) the chicken to keep the pan moist.
8. Roast for 35–40 minutes, until the skin is golden-brown and crispy.
9. Check for doneness by inserting a thermometer into the thickest part of a thigh—it should read 165°F.
10. Let the chicken rest on the counter for 5–7 minutes before serving to allow juices to redistribute.
Oh, the way the lemon infuses the chicken with its bright, tangy essence—each bite is tender beneath that crackling skin. I love shredding the leftovers into a grain bowl the next day, or serving it alongside roasted potatoes that soak up every bit of the pan juices.
Easy Baked Teriyaki Salmon
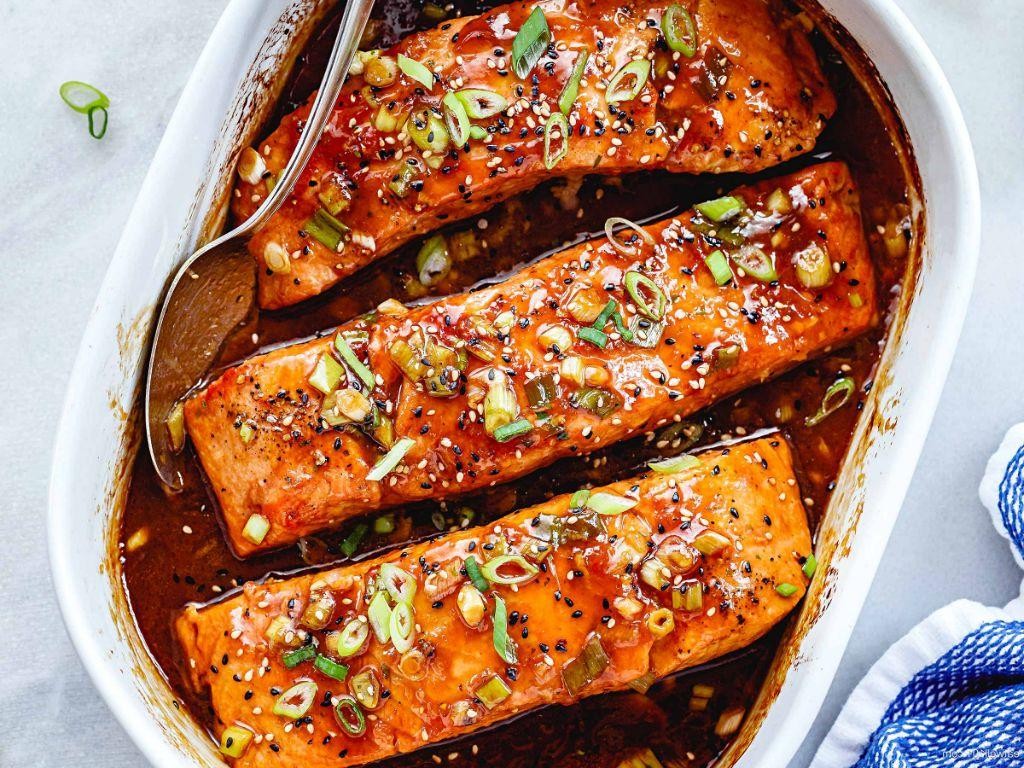
Holding this warm bowl of teriyaki salmon, I remember how simple evenings like these become the ones we cherish most, when the kitchen fills with that sweet-salty aroma and everything slows down just enough to breathe. Here’s how I make it, written just for you.
2
servings10
minutes19
minutesIngredients
– a couple of 6-ounce salmon fillets, skin-on or off
– a generous 1/4 cup of soy sauce
– 2 tablespoons of honey
– a tablespoon of rice vinegar
– a teaspoon of minced garlic
– a half teaspoon of grated ginger
– a splash of sesame oil
– a tablespoon of cornstarch
– 2 tablespoons of cold water
– a sprinkle of sesame seeds
– a handful of sliced green onions
Instructions
1. Preheat your oven to 400°F and line a baking sheet with parchment paper.
2. Pat the salmon fillets completely dry with paper towels—this helps the glaze stick and the skin crisp up if you’re using skin-on.
3. In a small saucepan, whisk together the soy sauce, honey, rice vinegar, minced garlic, and grated ginger over medium heat.
4. Bring the mixture to a gentle simmer, stirring occasionally, for about 2 minutes until the honey dissolves fully.
5. In a separate small bowl, mix the cornstarch with cold water until no lumps remain.
6. Slowly pour the cornstarch slurry into the saucepan, whisking continuously to avoid clumps.
7. Cook the sauce for another 2–3 minutes, until it thickens enough to coat the back of a spoon.
8. Remove the saucepan from the heat and stir in the sesame oil.
9. Place the salmon fillets on the prepared baking sheet, skin-side down if they have skin.
10. Brush half of the teriyaki glaze evenly over the top and sides of each fillet.
11. Bake the salmon for 12–15 minutes, until the edges are flaky and the center is just opaque.
12. Brush the remaining glaze over the salmon right after baking for a glossy finish.
13. Garnish with sesame seeds and sliced green onions while the salmon is still warm.
You’ll love how the salmon flakes apart with a gentle press of your fork, its richness balanced by that sticky-sweet glaze. Try serving it over a bed of jasmine rice with steamed broccoli, or flake it into a grain bowl with avocado and pickled vegetables for something fresh.
Simple Stuffed Bell Peppers

Zestful moments in the kitchen often arrive unexpectedly, like today when the afternoon light slants across the counter and four plump bell peppers wait patiently, their hollow centers promising comfort. There’s something quietly satisfying about filling them with a simple, savory mixture, transforming humble ingredients into a meal that feels like a warm embrace. It’s a gentle process, one that invites you to slow down and savor each step, from the sizzle of onions to the final bubbly bake.
2
portions20
minutes80
minutesIngredients
– 4 large bell peppers, any color you love
– 1 pound of lean ground beef
– 1 cup of uncooked long-grain white rice
– 1 medium yellow onion, finely chopped
– 2 cloves of garlic, minced
– 1 can (15 ounces) of tomato sauce
– a splash of olive oil
– a couple of teaspoons of dried oregano
– a pinch of salt and black pepper
– 1 cup of shredded mozzarella cheese
Instructions
1. Preheat your oven to 375°F (190°C) to ensure it’s ready for baking.
2. Slice the tops off the bell peppers and remove all seeds and membranes from the inside.
3. Bring a large pot of water to a rolling boil and carefully place the hollowed peppers in it.
4. Blanch the peppers for 3–4 minutes until they just start to soften, then drain and set them aside.
5. Heat a splash of olive oil in a large skillet over medium heat until it shimmers.
6. Add the chopped onion and sauté for about 5 minutes until it turns translucent and fragrant.
7. Stir in the minced garlic and cook for another minute, being careful not to let it burn.
8. Add the ground beef to the skillet, breaking it up with a spoon, and cook for 6–8 minutes until no pink remains.
9. Tip: Drain any excess grease from the beef to keep the filling from being too oily.
10. Mix in the uncooked rice, tomato sauce, dried oregano, salt, and black pepper until well combined.
11. Simmer the mixture for 5 minutes, stirring occasionally, to let the flavors meld.
12. Spoon the beef and rice filling evenly into the blanched peppers, packing it gently.
13. Arrange the stuffed peppers upright in a baking dish and pour 1/2 cup of water around the base to prevent sticking.
14. Cover the dish tightly with aluminum foil and bake for 45 minutes at 375°F (190°C).
15. Tip: Check halfway through to ensure the peppers are tender but not collapsing.
16. Remove the foil and sprinkle the shredded mozzarella cheese over the top of each pepper.
17. Return the dish to the oven, uncovered, and bake for another 10–15 minutes until the cheese is melted and bubbly.
18. Tip: Let the peppers rest for 5 minutes after baking so the filling sets and is easier to handle.
19. Each pepper emerges tender yet firm, with the rice absorbing the rich tomato and beef juices for a comforting bite. Enjoy them straight from the oven, or for a twist, serve alongside a crisp green salad to balance the heartiness.
Hassle-Free Baked Tortellini
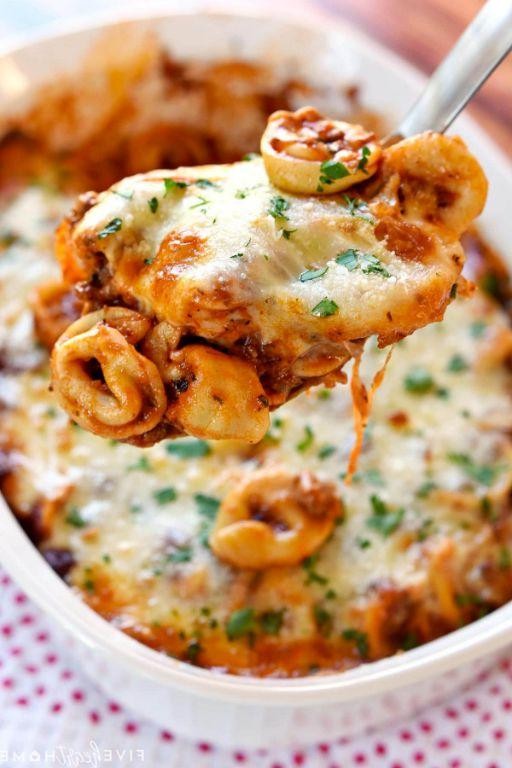
Evenings like this call for something comforting yet effortless, where the oven does most of the work while I simply breathe in the aroma filling the kitchen. This baked tortellini comes together with minimal fuss, letting the rich, melty flavors speak for themselves in every cozy bite.
6
servings15
minutes35
minutesIngredients
– A 20-ounce package of cheese tortellini
– A 24-ounce jar of your favorite marinara sauce
– A cup of shredded mozzarella cheese
– A half cup of grated Parmesan cheese
– A splash of olive oil
– A couple of fresh basil leaves
Instructions
1. Preheat your oven to 375°F to ensure it’s perfectly heated for even baking.
2. Bring a large pot of salted water to a rolling boil over high heat.
3. Add the tortellini and cook for exactly 2 minutes less than the package instructions, as they’ll finish cooking in the oven—this keeps them tender.
4. Drain the tortellini thoroughly in a colander, shaking gently to remove excess water.
5. Pour a splash of olive oil into a 9×13-inch baking dish, coating the bottom lightly.
6. Spread half of the marinara sauce evenly across the bottom of the dish.
7. Arrange the drained tortellini in a single layer over the sauce for uniform cooking.
8. Pour the remaining marinara sauce over the tortellini, covering them completely.
9. Sprinkle the shredded mozzarella cheese evenly over the top, creating a golden crust as it bakes.
10. Follow with the grated Parmesan cheese for an extra savory depth.
11. Cover the dish tightly with aluminum foil to trap steam and prevent drying.
12. Bake in the preheated oven for 20 minutes, until the sauce is bubbly around the edges.
13. Remove the foil and bake for another 10 minutes, or until the cheese is melted and lightly browned.
14. Let the dish rest for 5 minutes after baking—this helps the layers set for cleaner serving.
15. Tear the fresh basil leaves and scatter them over the top just before serving for a bright, herbal note. Delightfully creamy with pockets of gooey cheese, each forkful offers a satisfying contrast to the tangy tomato sauce. Try pairing it with a simple green salad or crusty bread to soak up every last bit, turning a quiet evening into a small celebration.
Effortless Baked Feta Pasta
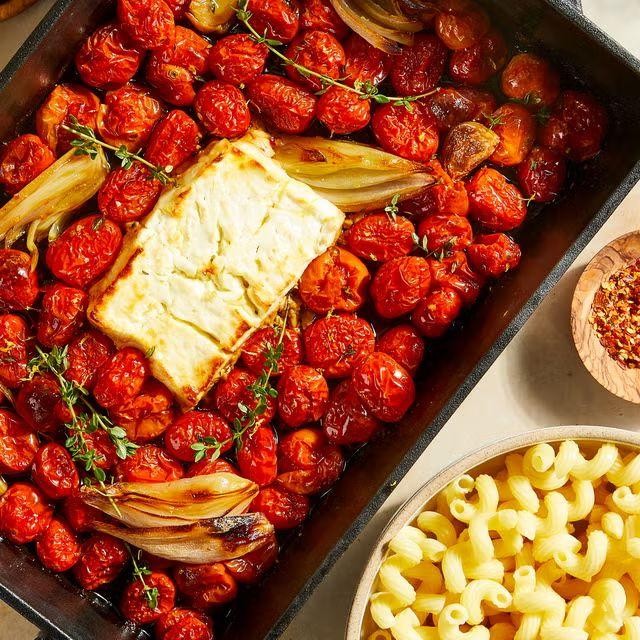
Evenings like this call for something simple yet deeply satisfying, where the oven does most of the work while I sit back and watch the light fade outside my window. There’s a quiet comfort in letting ingredients mingle and transform with little fuss, and this baked feta pasta feels like a warm hug after a long day—creamy, tangy, and effortlessly cozy.
2
servings10
minutes30
minutesIngredients
– a big block of feta cheese (about 8 ounces)
– a couple of cups of cherry tomatoes
– a generous glug of olive oil (about ¼ cup)
– a couple of garlic cloves, thinly sliced
– a pinch of red pepper flakes
– a handful of fresh basil leaves
– 8 ounces of pasta (like penne or fusilli)
– a squeeze of lemon juice (about 1 tablespoon)
Instructions
1. Preheat your oven to 400°F.
2. Place the block of feta in the center of a baking dish.
3. Scatter the cherry tomatoes and sliced garlic around the feta.
4. Drizzle the olive oil evenly over everything, making sure the feta and tomatoes are lightly coated.
5. Sprinkle the red pepper flakes over the top for a subtle kick.
6. Bake in the oven for 30 minutes, until the tomatoes have burst and the feta is soft and slightly golden on top.
7. While the dish bakes, cook the pasta in a large pot of salted boiling water according to package directions until al dente, then drain it, reserving ½ cup of the starchy pasta water.
8. Tip: Reserve that pasta water—it helps create a silky sauce later.
9. Remove the baking dish from the oven and immediately add the fresh basil leaves, letting them wilt in the heat.
10. Use a fork to mash the feta and tomatoes together into a creamy, chunky sauce.
11. Stir in the cooked pasta and a squeeze of lemon juice, adding splashes of the reserved pasta water as needed to loosen the sauce.
12. Tip: Mash the feta while it’s warm for the smoothest texture.
13. Season with salt if needed, but taste first—feta is naturally salty.
14. Tip: Let it sit for a minute off the heat so the pasta absorbs the sauce fully.
Draped over the pasta, the sauce is luxuriously creamy with little bursts of sweet tomato, while the lemon brightens each bite. I love serving it straight from the baking dish, maybe with a extra sprinkle of basil, and watching steam rise into the evening air—it’s the kind of meal that feels both humble and deeply nourishing.
Speedy Chicken Enchilada Casserole

Often, when the evening light turns golden and the kitchen feels like a sanctuary, I find myself craving something comforting yet simple enough to pull together without much fuss. One of those dishes that feels like a warm hug after a long day is this speedy chicken enchilada casserole, layered with familiar flavors and ready in no time. It’s the kind of meal that reminds me why home cooking doesn’t have to be complicated to be deeply satisfying.
2
portions15
minutes30
minutesIngredients
– 2 cups of shredded cooked chicken
– 1 can (10 ounces) of red enchilada sauce
– 1 cup of shredded Monterey Jack cheese
– 6 corn tortillas, cut into quarters
– 1/2 cup of sour cream
– 1/4 cup of chopped fresh cilantro
– a splash of olive oil
– a couple of sliced green onions
Instructions
1. Preheat your oven to 375°F and lightly grease an 8×8-inch baking dish with a splash of olive oil.
2. Spread 1/4 cup of the red enchilada sauce evenly across the bottom of the baking dish.
3. Arrange half of the quartered corn tortillas in a single layer over the sauce, overlapping them slightly to cover the base.
4. Sprinkle 1 cup of the shredded cooked chicken evenly over the tortilla layer.
5. Drizzle 1/2 cup of the red enchilada sauce over the chicken, using the back of a spoon to spread it gently.
6. Dollop 1/4 cup of the sour cream in small spoonfuls across the sauce, then swirl it lightly with a knife for even distribution.
7. Sprinkle half of the shredded Monterey Jack cheese over the sour cream layer.
8. Repeat the layers with the remaining tortillas, chicken, enchilada sauce, sour cream, and cheese.
9. Cover the baking dish with aluminum foil and bake at 375°F for 20 minutes, until the edges are bubbly.
10. Remove the foil and bake for another 5-10 minutes, until the cheese is fully melted and lightly golden on top.
11. Let the casserole rest for 5 minutes after baking to set the layers before slicing.
12. Garnish with the chopped fresh cilantro and sliced green onions just before serving.
Maybe it’s the way the tortillas soften into the saucy layers, or how the Monterey Jack cheese pulls apart in delicate strings, but this casserole always feels like a cozy embrace. The tang from the sour cream balances the mild spice of the enchilada sauce, making it perfect for scooping up with tortilla chips or serving alongside a crisp green salad for a simple, satisfying meal.
Minimalist Twice-Baked Potatoes

Unwrapping these potatoes feels like opening a quiet gift to yourself—the kind of simple comfort that asks for little but gives back so much warmth. There’s something deeply soothing about transforming humble spuds into creamy, twice-baked treasures, especially on a slow afternoon when the kitchen becomes a gentle refuge. Let’s gather what we need and begin.
5
portions20
minutes80
minutesIngredients
– 4 large russet potatoes
– a generous glug of olive oil, about 2 tablespoons
– a big pinch of kosher salt
– ½ cup of sour cream
– ¼ cup of whole milk
– 4 tablespoons of unsalted butter, softened
– a hearty handful of shredded cheddar cheese, roughly 1 cup
– a couple of finely sliced green onions
– a few cracks of freshly ground black pepper
Instructions
1. Preheat your oven to 400°F and line a baking sheet with parchment paper.
2. Scrub the russet potatoes thoroughly under cool running water to remove any dirt, then pat them completely dry with a clean kitchen towel.
3. Rub each potato all over with the olive oil, then sprinkle them evenly with the kosher salt.
4. Use a fork to prick each potato 5–6 times all over—this lets steam escape so they don’t burst in the oven.
5. Place the potatoes directly on the prepared baking sheet and bake for 50–60 minutes, until the skins are crisp and a knife slides easily into the centers.
6. Remove the potatoes from the oven and let them cool just until you can handle them, about 10–15 minutes.
7. Slice each potato in half lengthwise, then carefully scoop the fluffy insides into a medium bowl, leaving a ¼-inch border of potato flesh inside the skins to keep them sturdy.
8. Add the sour cream, whole milk, softened butter, half of the shredded cheddar cheese, the sliced green onions, and black pepper to the bowl with the potato flesh.
9. Mash everything together with a potato masher or fork until smooth and well combined—don’t overmix, or the potatoes can become gluey.
10. Evenly divide the filling back into the potato skins, mounding it slightly.
11. Sprinkle the remaining cheddar cheese over the tops of each stuffed potato half.
12. Return the potatoes to the oven and bake for another 15–20 minutes, until the cheese is fully melted and the edges are golden.
13. For extra browning, switch the oven to broil for the last 1–2 minutes, watching closely to avoid burning.
Done right, these potatoes emerge with a crisp shell giving way to a cloud-like interior, rich with tangy sour cream and the gentle sharpness of cheddar. I love serving them alongside a simple green salad for contrast, or topping them with extra green onions for a fresh, colorful finish.
Family-Favorite Baked Chicken Parmesan
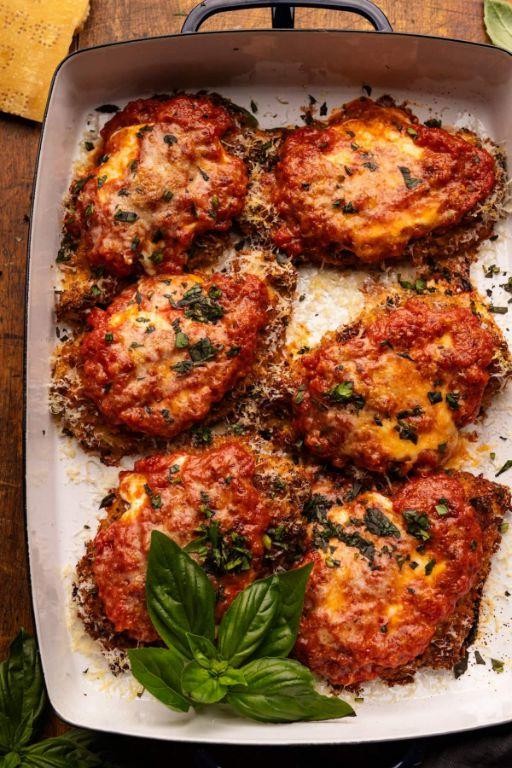
Holding this warm baking dish in my hands, I’m reminded why this recipe has become our Sunday ritual—the way the golden cheese melts into the tomato sauce, the tender chicken beneath, it feels like a quiet embrace after a long week.
2
portions15
minutes40
minutesIngredients
– 1 ½ pounds of boneless, skinless chicken breasts
– A couple of cups of Italian-seasoned breadcrumbs
– About ¾ cup of grated Parmesan cheese
– 2 large eggs
– A splash of milk
– 2 cups of your favorite marinara sauce
– 2 cups of shredded mozzarella cheese
– A drizzle of olive oil
– A pinch of salt and black pepper
Instructions
1. Preheat your oven to 375°F and lightly grease a 9×13-inch baking dish with olive oil.
2. Slice the chicken breasts in half horizontally to create thinner cutlets for even cooking.
3. In a shallow bowl, whisk the eggs with the milk until fully combined.
4. In another bowl, mix the breadcrumbs with the grated Parmesan cheese.
5. Season both sides of each chicken cutlet with salt and black pepper.
6. Dip each chicken piece into the egg mixture, letting any excess drip off.
7. Press the chicken firmly into the breadcrumb mixture to coat it evenly on both sides.
8. Arrange the coated chicken in a single layer in the prepared baking dish.
9. Bake the chicken for 20 minutes, or until the coating is lightly golden and crisp.
10. Remove the dish from the oven and carefully spoon the marinara sauce over each piece of chicken.
11. Sprinkle the shredded mozzarella cheese evenly over the sauce-covered chicken.
12. Return the dish to the oven and bake for another 15–20 minutes, until the cheese is bubbly and starting to brown.
13. Let the chicken rest for 5 minutes before serving to allow the juices to redistribute.
14. Garnish with extra Parmesan if desired. A final bite reveals the crisp breadcrumb crust giving way to juicy chicken, all swaddled in tangy sauce and stretchy cheese—try serving it over a bed of zucchini noodles for a lighter twist that still feels indulgent.
Comforting Baked Macaroni and Cheese
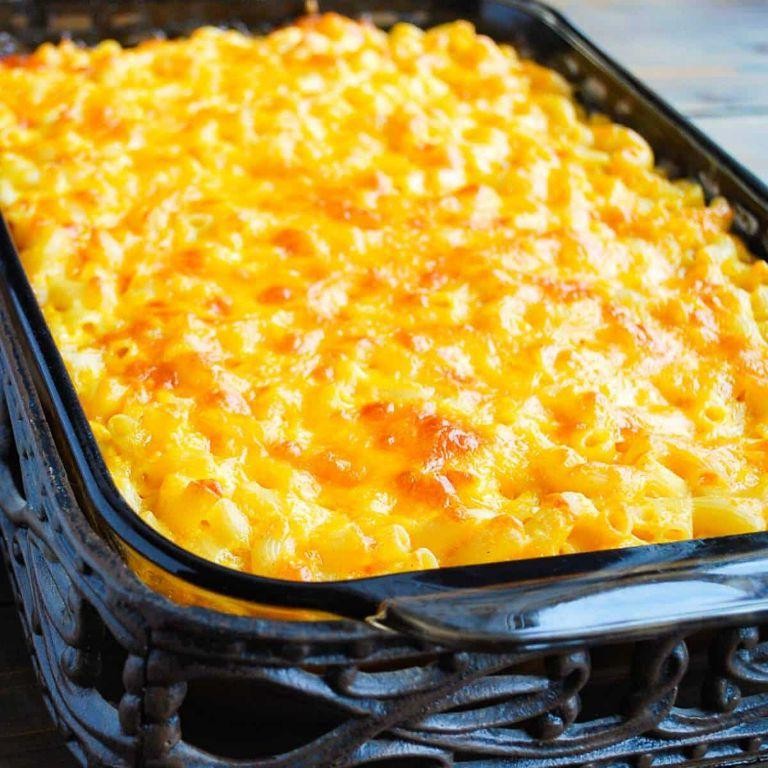
Holding this warm bowl close, I remember how this simple dish became my quiet companion through countless rainy afternoons and chilly evenings. There’s something deeply comforting about the way the cheese bubbles and browns, creating a golden crust that gives way to the creamy pasta beneath. It’s the kind of meal that feels like a gentle hug, wrapping you in warmth from the inside out.
4
servings15
minutes45
minutesIngredients
– About 8 ounces of elbow macaroni
– A generous 4 tablespoons of butter
– A quarter cup of all-purpose flour
– 2 cups of whole milk, warmed just a bit
– 2 cups of shredded sharp cheddar cheese
– Half a cup of grated Parmesan cheese
– A splash of whole milk for final creaminess
– A pinch of salt and black pepper
Instructions
1. Preheat your oven to 375°F and lightly grease a 2-quart baking dish.
2. Cook the elbow macaroni in a large pot of salted boiling water for exactly 7 minutes, until just al dente.
3. Drain the pasta thoroughly but don’t rinse it—the starch helps the sauce cling beautifully.
4. Melt the butter in the same pot over medium heat until it stops foaming.
5. Whisk in the flour continuously for 2 minutes until it forms a smooth, pale paste.
6. Gradually pour in the warmed milk while whisking constantly to prevent lumps.
7. Cook the sauce for 5-6 minutes, stirring frequently, until it thickens enough to coat the back of a spoon.
8. Remove from heat and stir in the cheddar and Parmesan cheeses until completely melted and smooth.
9. Tip: If your sauce seems too thick, add that extra splash of milk to reach a velvety consistency.
10. Gently fold in the cooked macaroni until every piece is coated in cheese sauce.
11. Transfer the mixture to your prepared baking dish and spread it evenly.
12. Bake for 25-30 minutes until the top is golden brown with bubbly edges.
13. Let it rest for 10 minutes before serving—this allows the sauce to set perfectly.
The finished macaroni emerges with a crisp, bronze crust that crackles when you spoon through it, revealing tender pasta swimming in a sauce that’s both sharp from the cheddar and subtly salty from the Parmesan. I love serving it in shallow bowls with a simple green salad on the side, the cool greens providing a lovely contrast to the rich, warm cheese. Sometimes I’ll top individual portions with buttery breadcrumbs for extra texture, though it’s perfectly wonderful just as it is.
Savory Baked Eggplant Parmesan
Baking this eggplant parmesan feels like wrapping yourself in a warm blanket on a cool autumn afternoon, the kind of comfort that settles deep in your bones. There’s something profoundly satisfying about transforming humble eggplant into this layered masterpiece, each step a quiet meditation in the kitchen.
6
servings45
minutes50
minutesIngredients
2 medium eggplants, sliced into ½-inch rounds • a generous sprinkle of kosher salt • about ¾ cup all-purpose flour • 2 large eggs, lightly beaten • 1½ cups Italian-style breadcrumbs • ½ cup grated Parmesan cheese • 3 cups marinara sauce • 8 ounces fresh mozzarella, thinly sliced • a handful of fresh basil leaves • ¼ cup olive oil •
Instructions
1. Arrange eggplant slices in a single layer on a baking sheet lined with paper towels. 2. Sprinkle both sides of eggplant slices generously with kosher salt. 3. Let eggplant sit for 30 minutes to draw out excess moisture. 4. Pat eggplant slices completely dry with fresh paper towels. 5. Preheat your oven to 375°F. 6. Place flour in a shallow bowl. 7. Place beaten eggs in a second shallow bowl. 8. Combine breadcrumbs and Parmesan cheese in a third shallow bowl. 9. Dredge each eggplant slice first in flour, shaking off excess. 10. Dip floured eggplant into beaten eggs, coating completely. 11. Press egg-coated eggplant into breadcrumb mixture, ensuring even coverage. 12. Heat olive oil in a large skillet over medium heat until shimmering. 13. Fry breaded eggplant slices in batches for 3-4 minutes per side until golden brown. 14. Transfer fried eggplant to a paper towel-lined plate to drain excess oil. 15. Spread 1 cup marinara sauce evenly across the bottom of a 9×13 inch baking dish. 16. Arrange a single layer of fried eggplant slices over the sauce. 17. Spoon another cup of marinara sauce over the eggplant layer. 18. Arrange half of the mozzarella slices evenly over the sauce. 19. Scatter half of the fresh basil leaves over the cheese. 20. Repeat layers with remaining eggplant, sauce, mozzarella, and basil. 21. Bake uncovered for 35-40 minutes until cheese is bubbly and golden brown. 22. Let rest for 10 minutes before serving to allow layers to set. My favorite tip: salting the eggplant first prevents it from becoming watery during baking. The finished dish emerges with crispy edges giving way to meltingly tender eggplant, the sharp Parmesan cutting through the rich tomato sauce in perfect balance. Sometimes I serve it over creamy polenta or with crusty bread to soak up every last bit of sauce.
Straightforward Baked Honey Garlic Shrimp
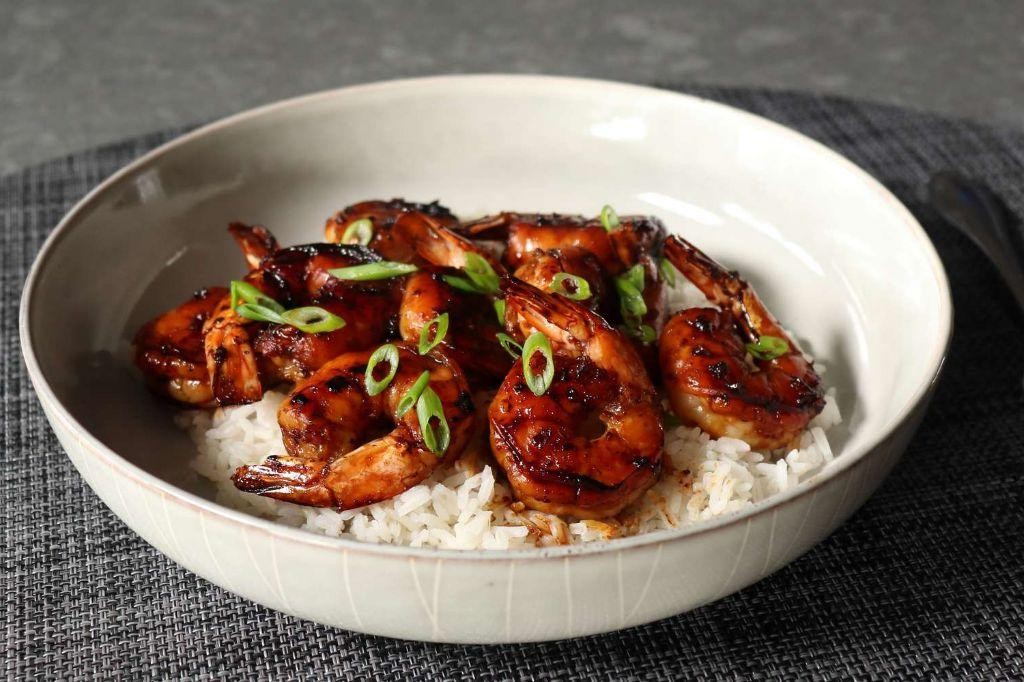
Gently, as the afternoon light fades, I find myself craving something simple yet deeply satisfying—a dish that requires little effort but rewards with every bite. This baked honey garlic shrimp feels like a quiet gift to myself, the kind of meal that turns an ordinary evening into something softly special.
4
servings15
minutes10
minutesIngredients
– 1 pound of large raw shrimp, peeled and deveined
– 3 cloves of garlic, minced
– 2 tablespoons of honey
– 2 tablespoons of soy sauce
– 1 tablespoon of olive oil
– A squeeze of fresh lemon juice
– A pinch of red pepper flakes
– A handful of chopped fresh parsley
Instructions
1. Preheat your oven to 400°F and lightly grease a baking dish with olive oil.
2. Pat the shrimp completely dry with paper towels—this helps them crisp up nicely in the oven.
3. In a small bowl, whisk together the minced garlic, honey, soy sauce, olive oil, lemon juice, and red pepper flakes until smooth.
4. Arrange the shrimp in a single layer in the prepared baking dish.
5. Pour the honey garlic sauce evenly over the shrimp, making sure each piece is coated.
6. Bake for 8–10 minutes, until the shrimp turn pink and opaque—be careful not to overcook, or they’ll become rubbery.
7. Remove the dish from the oven and sprinkle the chopped parsley over the top.
8. Let the shrimp rest for 2 minutes before serving to allow the flavors to settle.
Kind of magical how something so simple can feel so luxurious. The shrimp emerge tender and glazed, with a subtle sweetness from the honey balanced by the gentle heat of red pepper flakes. I love serving these over fluffy rice or tossing them into a crisp salad for a light, satisfying meal.
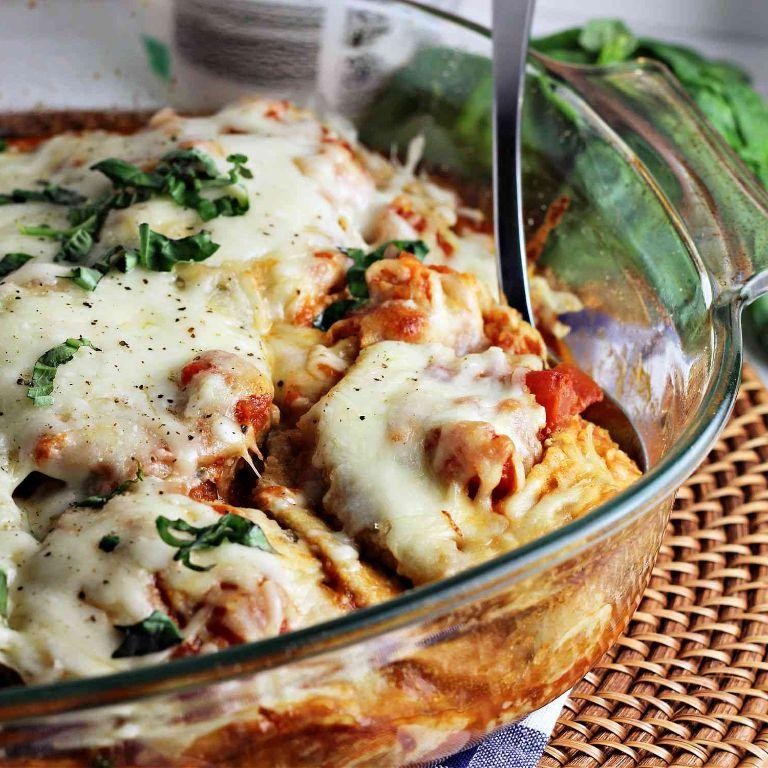
No-Fuss Baked Spaghetti Pie

Falling into the rhythm of the kitchen this evening, I found myself craving something that felt both comforting and effortless—a dish that would fill the house with warmth without demanding too much attention. Sometimes, the simplest meals are the ones that settle deepest in the soul, like this baked spaghetti pie that comes together with gentle hands and a patient oven. It’s the kind of meal that waits quietly for you, offering its humble comforts when you need them most.
6
servings20
minutes55
minutesIngredients
– 8 ounces of spaghetti noodles
– a splash of olive oil, about 1 tablespoon
– a pound of ground beef
– half of a yellow onion, finely chopped
– a couple of cloves of garlic, minced
– a 24-ounce jar of your favorite marinara sauce
– a cup of ricotta cheese
– a generous handful of shredded mozzarella, about 1 ½ cups
– a quarter cup of grated Parmesan cheese
– one large egg, lightly beaten
– a pinch of salt and a few cracks of black pepper
Instructions
1. Preheat your oven to 375°F and lightly grease a 9-inch pie dish with a bit of olive oil.
2. Bring a large pot of salted water to a rolling boil and cook the spaghetti for 8 minutes, until it’s just shy of al dente.
3. Drain the spaghetti thoroughly and return it to the pot, tossing it with that splash of olive oil to keep the strands from sticking.
4. In a large skillet over medium heat, brown the ground beef for 6–8 minutes, breaking it into small crumbles with a wooden spoon as it cooks.
5. Tip: If there’s excess grease, drain it off now for a lighter, less oily finish.
6. Add the chopped onion to the skillet and sauté for 4–5 minutes, until it turns translucent and soft.
7. Stir in the minced garlic and cook for just 1 minute more, until it’s fragrant but not browned.
8. Pour in the marinara sauce, season with a pinch of salt and a few cracks of black pepper, and let it simmer for 5 minutes to meld the flavors.
9. In a medium bowl, mix the ricotta, half of the mozzarella, the Parmesan, and the beaten egg until well combined.
10. Tip: Beating the egg first ensures it incorporates evenly, giving the pie a cohesive, sliceable texture.
11. Gently fold the cooked spaghetti into the cheese mixture, coating every strand evenly.
12. Press half of the spaghetti mixture into the bottom of the prepared pie dish, creating an even layer.
13. Spread the meat sauce over the spaghetti base, leaving a small border around the edges.
14. Top with the remaining spaghetti mixture, smoothing it gently to cover the filling completely.
15. Sprinkle the rest of the mozzarella evenly over the top.
16. Tip: For a golden, bubbly crust, tent the pie loosely with foil for the first 20 minutes, then remove it to let the cheese brown.
17. Bake for 30–35 minutes, until the cheese is melted and the edges are lightly browned.
18. Let the pie rest for 10 minutes before slicing—this helps the layers set neatly.
Perhaps what I love most is the way the edges crisp up just enough to contrast with the tender, saucy center. Each slice holds its shape beautifully, revealing layers of creamy ricotta and rich beef nestled in the spaghetti weave. Try serving it with a simple arugula salad dressed in lemon vinaigrette to cut through the richness, or pack a wedge for a next-day lunch that tastes even better cold.
Quick and Easy Baked Quesadillas

Kind of quietly, on these slow afternoons when the light slants just so through the kitchen window, I find myself reaching for the same few comforting ingredients, the ones that promise warmth without the fuss. It’s a simple ritual, really, folding humble things into something that feels like a small, warm embrace.
1
quesadilla10
minutes17
minutesIngredients
– A couple of large flour tortillas
– About a cup and a half of shredded Monterey Jack cheese
– A heaping half-cup of cooked, shredded chicken
– A couple of tablespoons of finely diced red onion
– A small handful of chopped fresh cilantro
– A light drizzle of olive oil for brushing
Instructions
1. Preheat your oven to 400°F (200°C) and line a large baking sheet with parchment paper.
2. Lay one flour tortilla flat on the prepared baking sheet.
3. Sprinkle half of the shredded Monterey Jack cheese evenly over one half of the tortilla, leaving a small border around the edge.
4. Scatter the shredded chicken evenly over the cheese.
5. Sprinkle the diced red onion and chopped cilantro over the chicken.
6. Top with the remaining shredded Monterey Jack cheese.
7. Fold the bare half of the tortilla over the filled half, pressing down gently.
8. Lightly brush the top of the quesadilla with olive oil using a pastry brush.
9. Bake in the preheated oven for 8-10 minutes, until the bottom is golden brown and crisp.
10. Carefully flip the quesadilla using a spatula.
11. Bake for another 5-7 minutes, until the second side is golden brown and the cheese is completely melted and bubbly.
12. Remove the baking sheet from the oven and transfer the quesadilla to a cutting board.
13. Let it rest for 2 minutes before slicing into wedges with a sharp knife.
But the true reward comes in that first bite—the shatter of the golden, blistered tortilla giving way to a stretchy, molten cheese interior, the chicken tender and the onion offering just a whisper of sharpness. I love to slide the wedges onto a plate next to a cool, crisp salad, or simply eat them straight from the board, the warmth lingering in my hands.
Conclusion
Zesty, simple, and satisfying—these 19 baked meals are your ticket to stress-free weeknight dinners. From cozy casseroles to sheet-pan wonders, there’s something for every craving. Give them a try, and let us know which recipes become your new favorites in the comments below. Loved this roundup? Share the inspiration with fellow home cooks by pinning it on Pinterest!


