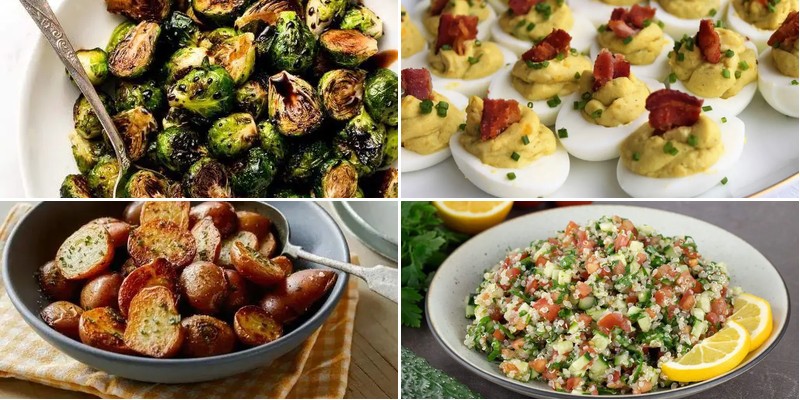
You’ve planned the perfect Easter ham or lamb, but what truly makes a holiday feast memorable are those spectacular side dishes that steal the show. From vibrant spring vegetables to creamy, comforting casseroles, we’ve gathered 23 delightful recipes that will elevate your table and leave your guests raving. Get ready to find your new holiday favorites!
Honey-Glazed Carrots with Thyme
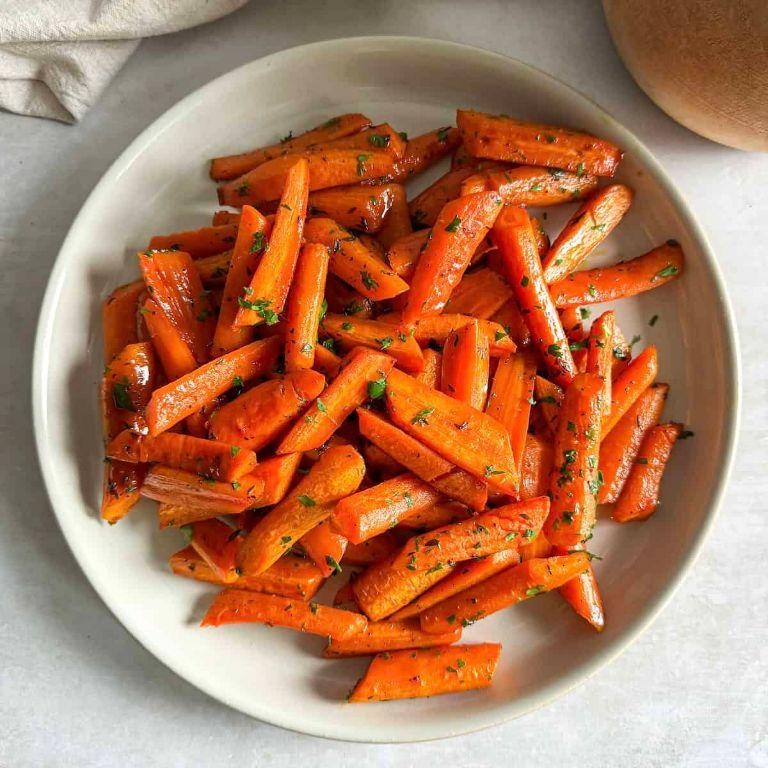
There’s something magical about how honey transforms humble carrots into a sweet, savory side dish that feels both fancy and comforting. You’ll love how the thyme adds that earthy note that makes these carrots taste like they came straight from a cozy fall dinner.
4
servings10
minutes30
minutesIngredients
- About a pound of fresh carrots, peeled and sliced into coins
- A couple tablespoons of good olive oil
- A generous drizzle of honey (around 2 tablespoons)
- A small handful of fresh thyme sprigs
- A pinch of salt and a few cracks of black pepper
- A splash of water (about ¼ cup)
Instructions
- Preheat your oven to 400°F and grab a baking sheet.
- Toss the carrot coins with olive oil, salt, and pepper until they’re evenly coated. Tip: Cutting them similar sizes helps everything cook evenly.
- Spread the carrots in a single layer on the baking sheet—don’t crowd them!
- Roast for 15 minutes until they start to soften and get a little color around the edges.
- Pull the tray out and drizzle honey over the carrots, then scatter the thyme sprigs on top.
- Add that splash of water to the pan—it’ll create steam and keep the honey from burning.
- Toss everything together right on the hot pan so the honey melts and coats each carrot.
- Roast for another 10-15 minutes until the carrots are tender when pierced with a fork and the glaze is sticky and caramelized. Tip: Give them a stir halfway through for even glazing.
- Remove the thyme sprigs before serving—the leaves will have mostly fallen off, flavoring the dish. Tip: If any thyme stems remain, they’re easy to spot and pull out.
You’ll get carrots that are tender but still have a slight bite, with that sweet-sticky glaze and herby aroma. Try serving them over creamy polenta or alongside roast chicken for a meal that feels special but comes together with minimal effort.
Creamy Scalloped Potatoes with Gruyere
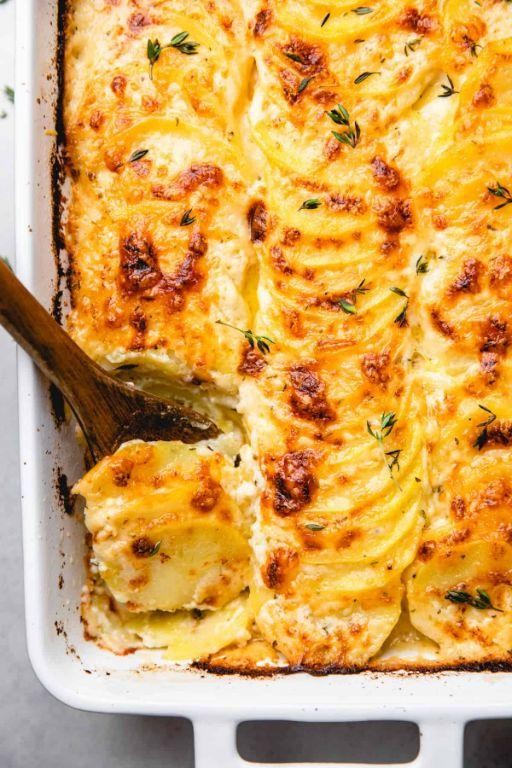
Mmm, picture this: creamy, cheesy potatoes that practically melt in your mouth, with that perfect golden-brown crust on top. You know those cozy Sunday dinners where everyone fights over the last scoop? This is that dish. It’s comfort food at its finest, and surprisingly simple to whip up.
8
servings20
minutes70
minutesIngredients
– 3 pounds of Yukon Gold potatoes, peeled and thinly sliced
– 1 large yellow onion, thinly sliced
– 2 cups of shredded Gruyere cheese
– 1 ½ cups of heavy cream
– ½ cup of whole milk
– 3 cloves of garlic, minced
– 3 tablespoons of unsalted butter
– A generous pinch of salt and black pepper
– A sprinkle of fresh thyme leaves
Instructions
1. Preheat your oven to 375°F and grease a 9×13-inch baking dish with 1 tablespoon of butter.
2. Melt the remaining 2 tablespoons of butter in a saucepan over medium heat.
3. Add the sliced onion and cook for 5 minutes, stirring occasionally, until softened.
4. Stir in the minced garlic and cook for 1 more minute until fragrant.
5. Pour in the heavy cream and whole milk, then add the salt, black pepper, and thyme leaves.
6. Heat the mixture until it just begins to simmer, then remove from heat. (Tip: Don’t let it boil or the cream may separate.)
7. Arrange a single layer of potato slices in the prepared baking dish.
8. Spoon a thin layer of the cream mixture over the potatoes.
9. Sprinkle a handful of shredded Gruyere cheese over the layer.
10. Repeat the layering process—potatoes, cream, cheese—until all ingredients are used, ending with cheese on top.
11. Cover the dish tightly with foil and bake for 45 minutes. (Tip: The foil traps steam, helping the potatoes cook evenly.)
12. Remove the foil and bake for another 20–25 minutes, until the top is golden and bubbly.
13. Let the dish rest for 10 minutes before serving. (Tip: Resting helps the layers set for cleaner slices.)
Oh, that creamy, cheesy goodness! The Gruyere adds a nutty depth that pairs perfectly with the tender potatoes. Serve it alongside a juicy roast or as the star of your vegetarian spread—either way, it’s bound to disappear fast.
Lemon-Garlic Asparagus Bundles
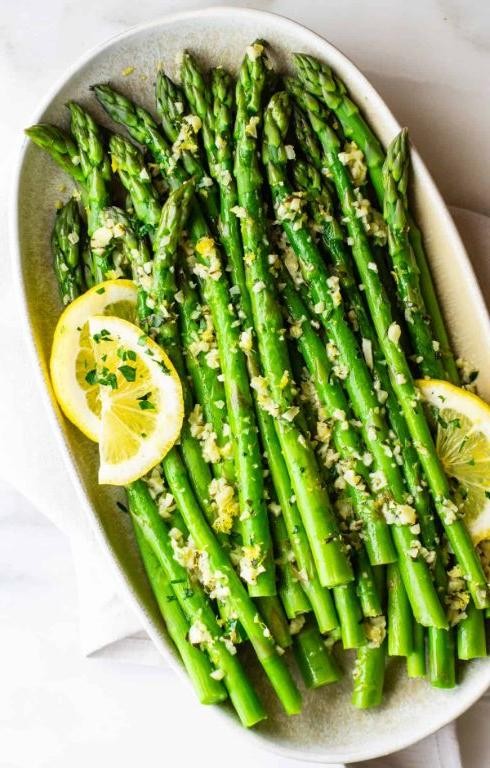
Nothing says spring like fresh asparagus, and these lemon-garlic bundles are the perfect way to show it off. You get tender spears wrapped up with a bright, zesty kick that makes any meal feel special. They come together so quickly, you’ll wonder why you haven’t been making them all along.
3
bundles10
minutes15
minutesIngredients
- a big bunch of asparagus (about 1 pound)
- a couple of cloves of garlic, minced
- the zest and juice from 1 lemon
- a generous drizzle of olive oil (about 2 tablespoons)
- a pinch of salt and black pepper
- a few slices of prosciutto (about 4 ounces)
Instructions
- Preheat your oven to 400°F and line a baking sheet with parchment paper.
- Trim the tough ends off the asparagus by snapping each spear where it naturally breaks—this ensures you don’t end up with woody bits.
- In a large bowl, toss the asparagus with the minced garlic, lemon zest, lemon juice, olive oil, salt, and black pepper until everything is evenly coated.
- Divide the asparagus into 4 equal bundles, arranging about 6–8 spears in each group.
- Wrap each bundle snugly with a slice of prosciutto, starting from the bottom and spiraling up toward the tips to hold the spears together.
- Place the bundles on the prepared baking sheet, making sure they aren’t touching so they crisp up evenly.
- Roast for 12–15 minutes, until the asparagus is tender-crisp and the prosciutto is lightly browned and slightly crispy.
- Let the bundles rest for 2–3 minutes before serving—this helps the flavors settle and makes them easier to handle.
Right out of the oven, these bundles are a textural dream: the asparagus stays juicy with a slight snap, while the prosciutto adds a salty, crisp edge. The lemon-garlic mix brightens everything up, making it a standout side for grilled chicken or even piled atop creamy polenta. Try serving them with an extra squeeze of lemon right at the table for an extra zing that’ll have everyone reaching for seconds.
Deviled Eggs with Avocado and Bacon

Fancy a twist on a classic party snack? You’re going to love these deviled eggs that get a major upgrade with creamy avocado and crispy bacon. They’re the perfect blend of familiar comfort and exciting new flavor that’ll have everyone asking for the recipe.
12
portions20
minutes18
minutesIngredients
– 6 large eggs
– 1 ripe avocado
– 3 slices of thick-cut bacon
– 2 tablespoons of mayonnaise
– 1 tablespoon of fresh lime juice
– A pinch of smoked paprika
– A sprinkle of chopped chives
– A dash of salt
Instructions
1. Place 6 large eggs in a single layer in a saucepan and cover them with cold water by about an inch.
2. Bring the water to a rolling boil over high heat, then immediately remove the pan from heat, cover it, and let the eggs sit for exactly 12 minutes.
3. While the eggs cook, arrange 3 slices of thick-cut bacon on a baking sheet and bake at 400°F for 15-18 minutes until crispy.
4. Transfer the cooked eggs to a bowl of ice water and let them cool completely for about 10 minutes to stop the cooking process.
5. Peel the cooled eggs carefully under running water to help remove the shells cleanly.
6. Slice each egg in half lengthwise and gently pop out the yolks into a medium bowl.
7. Crumble the cooked bacon into small pieces, reserving a tablespoon for garnish.
8. Mash the egg yolks with a fork until they’re fine and crumbly.
9. Add the flesh of 1 ripe avocado to the yolks and mash until mostly smooth with some small chunks.
10. Stir in 2 tablespoons of mayonnaise and 1 tablespoon of fresh lime juice until well combined.
11. Fold in the crumbled bacon (except the reserved tablespoon), a dash of salt, and mix thoroughly.
12. Spoon or pipe the avocado-egg mixture back into the egg white halves.
13. Sprinkle each deviled egg with a pinch of smoked paprika, the reserved bacon pieces, and some chopped chives.
Here’s why these stand out: the avocado makes the filling incredibly creamy while the bacon adds that salty crunch. Try serving them on a platter with extra lime wedges for squeezing – the bright acidity really makes all the flavors pop.
Roasted Brussels Sprouts with Balsamic Glaze
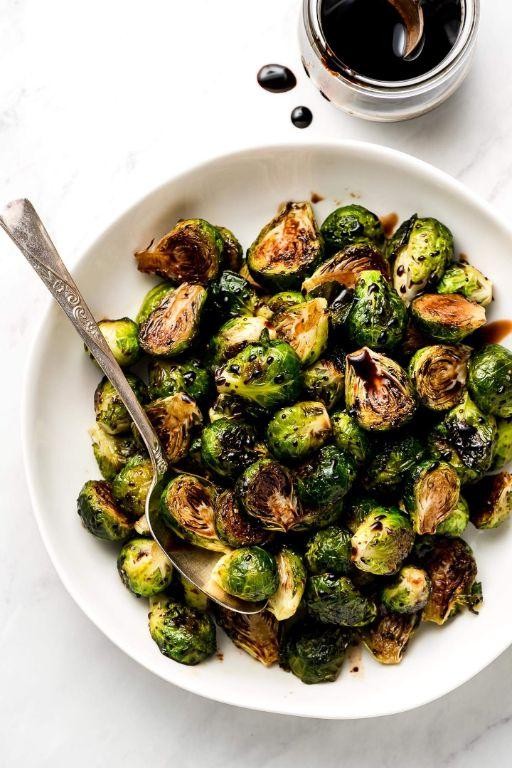
Sometimes you just need a vegetable side that feels a little fancy but is actually super simple to throw together. Seriously, these roasted Brussels sprouts with balsamic glaze are that dish—they transform humble sprouts into something sweet, savory, and totally irresistible.
3
servings10
minutes35
minutesIngredients
– A pound of Brussels sprouts, trimmed and halved
– A couple of tablespoons of olive oil
– A good pinch of salt and black pepper
– A quarter cup of balsamic vinegar
– A tablespoon of honey
Instructions
1. Preheat your oven to 400°F and line a baking sheet with parchment paper.
2. Toss the halved Brussels sprouts with olive oil, salt, and pepper in a large bowl until they’re evenly coated. (Tip: Cutting larger sprouts into quarters helps them cook evenly with the smaller ones.)
3. Spread the sprouts in a single layer on the baking sheet, making sure they aren’t crowded.
4. Roast for 20–25 minutes, until the edges are crispy and deeply browned.
5. While the sprouts roast, combine balsamic vinegar and honey in a small saucepan over medium heat.
6. Bring the mixture to a simmer, then reduce the heat to low and let it cook for 5–7 minutes, stirring occasionally, until it thickens enough to coat the back of a spoon. (Tip: Watch it closely—it can go from perfectly syrupy to burnt quickly!)
7. Remove the sprouts from the oven and drizzle the balsamic glaze over them, tossing gently to coat.
8. Return the tray to the oven for another 3–5 minutes to let the glaze caramelize slightly.
9. Transfer the sprouts to a serving dish.
You’ll love how the crispy, caramelized edges of the sprouts contrast with the tender centers, all wrapped in that tangy-sweet glaze. Try scattering them over a grain bowl with some crumbled goat cheese, or just eat them straight from the pan—no judgment here.
Cheesy Broccoli Casserole
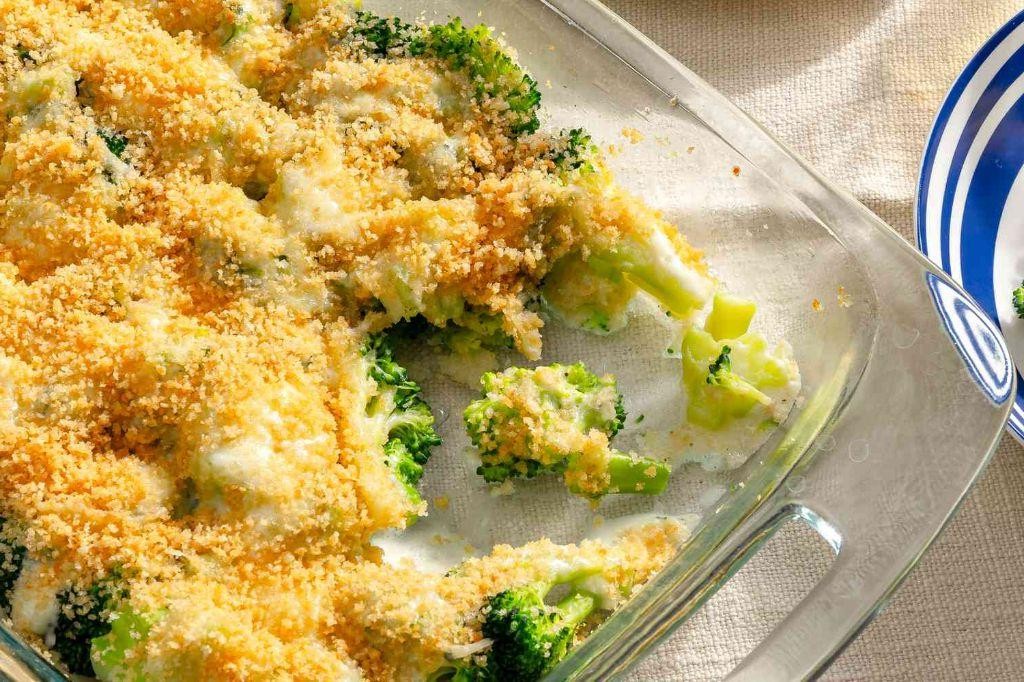
You know those cozy weeknights when you want something comforting but don’t want to spend hours in the kitchen? This cheesy broccoli casserole is your new best friend—it’s creamy, satisfying, and comes together with minimal fuss. Your family will be asking for seconds before you even sit down.
6
servings15
minutes33
minutesIngredients
– 1 large head of fresh broccoli, chopped into bite-sized florets
– 2 cups of shredded sharp cheddar cheese
– 1 can (10.5 ounces) of condensed cream of mushroom soup
– 1/2 cup of whole milk
– 1/2 cup of sour cream
– 1/4 cup of grated Parmesan cheese
– 1 cup of seasoned breadcrumbs
– 2 tablespoons of melted butter
– A pinch of garlic powder
– A pinch of black pepper
Instructions
1. Preheat your oven to 375°F and lightly grease a 9×13-inch baking dish with butter or non-stick spray.
2. Bring a large pot of salted water to a rolling boil over high heat.
3. Add the broccoli florets to the boiling water and cook for exactly 3 minutes until bright green and slightly tender.
4. Immediately drain the broccoli in a colander and run cold water over it to stop the cooking process—this keeps it crisp-tender.
5. In a large mixing bowl, combine the cream of mushroom soup, whole milk, sour cream, garlic powder, and black pepper, whisking until smooth.
6. Fold in the blanched broccoli and 1 1/2 cups of the shredded cheddar cheese until everything is evenly coated.
7. Transfer the mixture to your prepared baking dish, spreading it into an even layer with a spatula.
8. In a small bowl, mix the breadcrumbs, melted butter, and grated Parmesan cheese until crumbly.
9. Sprinkle the remaining 1/2 cup of cheddar cheese evenly over the casserole, then top with the breadcrumb mixture.
10. Bake uncovered for 25–30 minutes, until the top is golden brown and the edges are bubbly. Let it rest for 5 minutes before serving to allow the sauce to thicken. The creamy, cheesy sauce clings to every floret, while the crispy topping adds a delightful crunch. Serve it alongside grilled chicken or scoop it over baked potatoes for a hearty twist.
Maple Roasted Sweet Potatoes with Pecans

There’s something magical about how maple syrup caramelizes on sweet potatoes, creating that perfect balance of sweet and savory. You’re going to love how these come together with minimal effort but deliver maximum flavor. Seriously, this might become your new favorite side dish.
5
servings15
minutes35
minutesIngredients
– About 2 pounds of sweet potatoes, peeled and cubed
– A good glug of olive oil (around 2 tablespoons)
– A generous 1/4 cup of pure maple syrup
– A couple teaspoons of cinnamon
– A big pinch of salt
– A handful of chopped pecans (about 1/2 cup)
Instructions
1. Preheat your oven to 400°F and line a baking sheet with parchment paper.
2. Peel the sweet potatoes and cut them into 1-inch cubes for even cooking.
3. Toss the sweet potato cubes with olive oil until they’re lightly coated all over.
4. Drizzle the maple syrup over the potatoes and toss again to distribute evenly.
5. Sprinkle the cinnamon and salt over the potatoes, then give everything one final toss.
6. Spread the potatoes in a single layer on your prepared baking sheet, making sure they’re not crowded.
7. Roast for 20 minutes, then remove from the oven and scatter the chopped pecans over the top.
8. Return to the oven and roast for another 10-15 minutes until the potatoes are tender when pierced with a fork and the edges are caramelized.
9. Let the potatoes rest for 5 minutes before serving to allow the flavors to settle.
Perfectly caramelized on the outside and tender within, these sweet potatoes have that wonderful sticky-sweet glaze that pairs beautifully with the toasty pecans. They’re fantastic alongside roasted chicken or pork, but honestly, I’ve been known to eat them straight from the baking sheet as a snack.
Tangy Red Cabbage Coleslaw
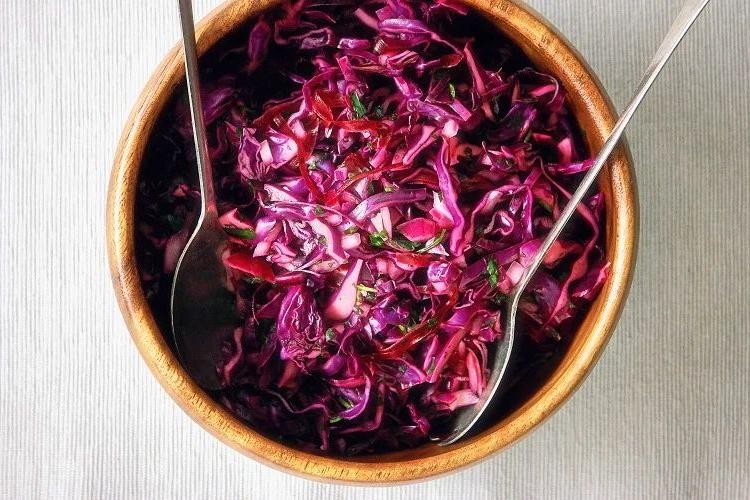
Now, if you’re tired of the same old coleslaw, this tangy red cabbage version is about to become your new go-to. It’s crisp, colorful, and has just the right zing to wake up your taste buds. Perfect for picnics, BBQs, or just jazzing up a weeknight dinner.
3
servings20
minutesIngredients
– Half a medium head of red cabbage, thinly sliced
– A couple of carrots, grated
– Half a cup of mayonnaise
– A quarter cup of apple cider vinegar
– A tablespoon of honey
– A teaspoon of Dijon mustard
– A pinch of salt and a few cracks of black pepper
Instructions
1. Thinly slice half a head of red cabbage using a sharp knife or mandoline for even shreds.
2. Grate a couple of carrots into a large mixing bowl using the large holes of a box grater.
3. Add the sliced red cabbage to the bowl with the carrots.
4. In a separate small bowl, whisk together half a cup of mayonnaise, a quarter cup of apple cider vinegar, a tablespoon of honey, and a teaspoon of Dijon mustard until smooth.
5. Pour the dressing over the cabbage and carrot mixture in the large bowl.
6. Toss everything together with tongs or two large spoons until the vegetables are evenly coated with the dressing.
7. Season with a pinch of salt and a few cracks of black pepper, then toss again to combine.
8. Cover the bowl with plastic wrap and refrigerate for at least 30 minutes to allow the flavors to meld and the cabbage to slightly soften.
9. Give the coleslaw one final toss before serving to redistribute the dressing.
You’ll love how the crisp cabbage holds up against the creamy, tangy dressing. Try it piled high on pulled pork sandwiches or as a bright side to grilled chicken.
Herb-Infused Quinoa Salad
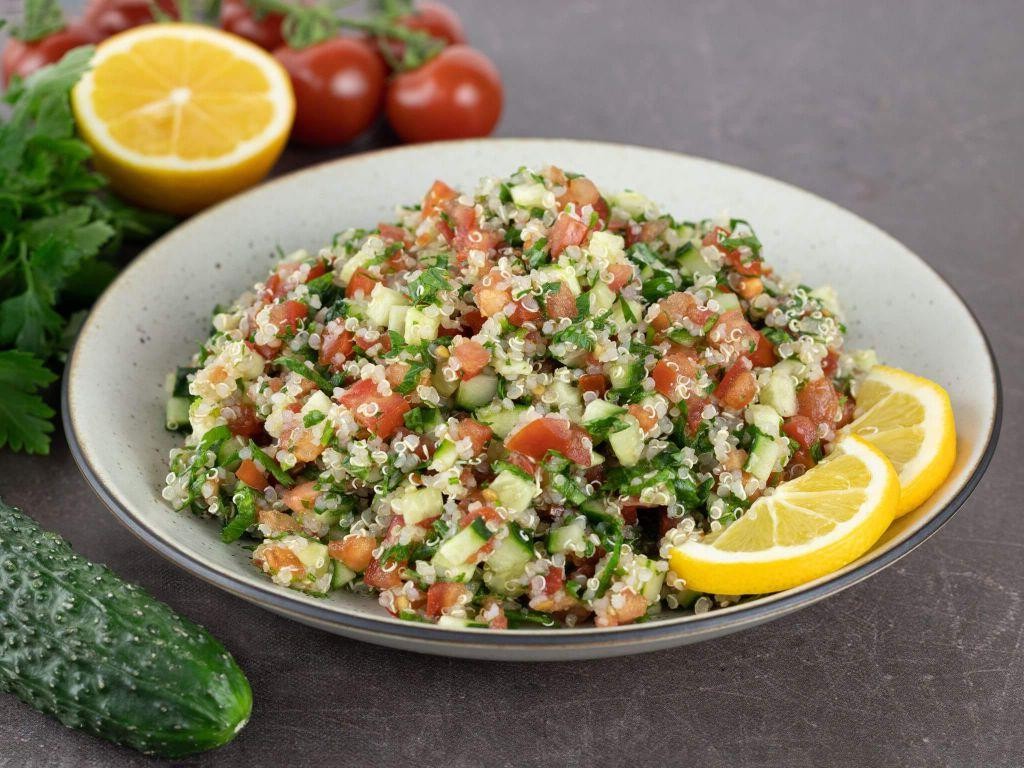
This herb-infused quinoa salad is exactly what you need when you want something fresh, healthy, and packed with flavor. Think of it as your go-to lunch that’s both satisfying and super easy to throw together. You’ll love how the herbs make every bite taste like summer in a bowl.
2
servings15
minutes20
minutesIngredients
– 1 cup of quinoa
– 2 cups of water
– A big handful of fresh parsley, chopped
– A couple of fresh mint leaves, chopped
– A splash of olive oil (about 2 tablespoons)
– Juice from half a lemon
– A pinch of salt
– A pinch of black pepper
Instructions
1. Rinse 1 cup of quinoa under cold water in a fine-mesh strainer for about 30 seconds to remove any bitterness.
2. In a medium saucepan, combine the rinsed quinoa and 2 cups of water, then bring it to a boil over high heat.
3. Once boiling, reduce the heat to low, cover the saucepan, and let it simmer for 15 minutes until the water is fully absorbed.
4. Remove the saucepan from the heat and let the quinoa sit, covered, for 5 minutes to steam and fluff up—this helps prevent it from getting mushy.
5. Transfer the cooked quinoa to a large bowl and let it cool to room temperature for about 10 minutes, stirring occasionally to speed up the process.
6. Add a big handful of chopped fresh parsley and a couple of chopped fresh mint leaves to the cooled quinoa, gently mixing to distribute the herbs evenly.
7. Drizzle in a splash of olive oil (about 2 tablespoons) and the juice from half a lemon, tossing everything together to coat the quinoa lightly.
8. Season with a pinch of salt and a pinch of black pepper, then give it one final mix to ensure the flavors are well blended.
9. Taste and adjust seasoning if needed, but avoid overmixing to keep the herbs vibrant.
Keep this salad chilled for a crisp texture that holds up beautifully. The mint and parsley add a refreshing zing, while the lemon brightens every forkful. Try serving it alongside grilled chicken or stuffed into avocado halves for a creative twist—it’s versatile enough for any meal.
Garlic Parmesan Mashed Potatoes
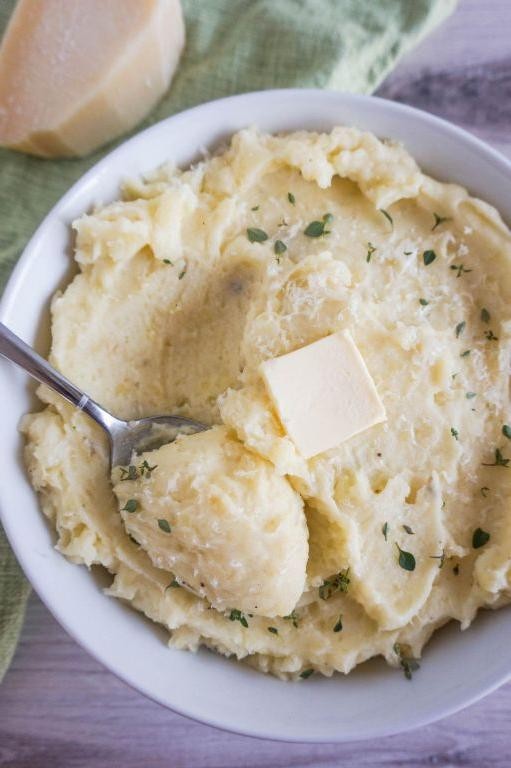
Perfect for cozy nights in, these garlic parmesan mashed potatoes are the ultimate comfort food upgrade. You get creamy, fluffy potatoes with that amazing garlicky, cheesy flavor that makes everything better. Seriously, once you try these, regular mashed potatoes just won’t cut it anymore.
6
servings15
minutes20
minutesIngredients
– About 3 pounds of russet potatoes
– 6 cloves of garlic, peeled
– 1 cup of heavy cream
– 1/2 cup of unsalted butter
– 1 cup of freshly grated parmesan cheese
– A generous pinch of salt
– A few cracks of black pepper
Instructions
1. Peel your russet potatoes and cut them into 1-inch chunks.
2. Place the potato chunks and peeled garlic cloves in a large pot.
3. Cover the potatoes and garlic with cold water by about 2 inches.
4. Add a generous pinch of salt to the water.
5. Bring the pot to a boil over high heat.
6. Once boiling, reduce heat to maintain a gentle boil and cook for 15-20 minutes until the potatoes are fork-tender.
7. While potatoes cook, heat the heavy cream and unsalted butter in a small saucepan over medium heat until the butter melts and the mixture is warm (about 3-4 minutes).
8. Drain the cooked potatoes and garlic thoroughly in a colander.
9. Return the hot potatoes and garlic to the empty pot.
10. Mash the potatoes and garlic with a potato masher until smooth.
11. Gradually pour in the warm cream and butter mixture while continuing to mash.
12. Stir in the freshly grated parmesan cheese until fully incorporated.
13. Season with a few cracks of black pepper.
14. Taste and adjust seasoning with more salt if needed.
You’ll love how incredibly creamy these turn out with just the right amount of garlic flavor that isn’t overpowering. The parmesan adds this wonderful savory depth that makes them perfect alongside roasted chicken or even as a base for your favorite stew. Try topping them with extra parmesan and a drizzle of olive oil for a restaurant-worthy presentation!
Grilled Spring Vegetable Medley
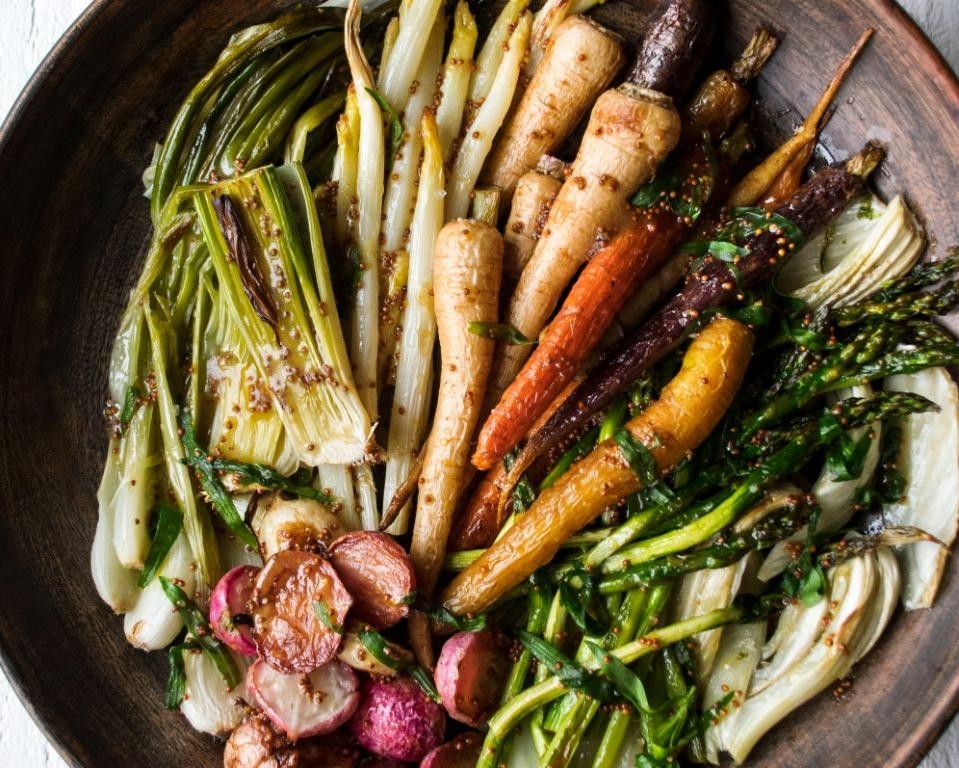
Keeping things simple and seasonal is my motto, especially when spring’s bounty hits the farmers’ market. You’ll love how this grilled veggie mix brings out the best of the season with minimal effort. It’s the perfect side for any barbecue or even as a main over some quinoa.
2
servings15
minutes20
minutesIngredients
– A couple of medium zucchinis, sliced into 1/2-inch thick rounds
– A couple of yellow squash, sliced into 1/2-inch thick rounds
– A big handful of asparagus spears, woody ends snapped off
– A red bell pepper, cut into 1-inch wide strips
– A yellow onion, cut into 1/2-inch thick wedges
– 3 tablespoons of olive oil
– 2 tablespoons of balsamic vinegar
– 2 cloves of garlic, minced
– A generous pinch of kosher salt
– A few cracks of fresh black pepper
Instructions
1. Preheat your grill to medium-high heat, about 400°F.
2. In a large bowl, whisk together the olive oil, balsamic vinegar, minced garlic, kosher salt, and black pepper.
3. Add the zucchini rounds, yellow squash rounds, asparagus spears, bell pepper strips, and onion wedges to the bowl.
4. Toss everything until the vegetables are evenly coated with the marinade.
5. Place the vegetables directly on the grill grates in a single layer, working in batches if needed to avoid crowding.
6. Grill the zucchini and squash for 4-5 minutes per side, until you see clear grill marks and they’re tender-crisp.
7. Grill the asparagus and bell pepper strips for 3-4 minutes per side, until slightly charred but still vibrant.
8. Grill the onion wedges for 6-8 minutes total, flipping once, until they’re softened and have nice charred edges.
9. Tip: Keep a spray bottle of water handy to tame any flare-ups from dripping oil.
10. Remove all vegetables from the grill as they finish cooking and transfer them to a clean platter.
11. Tip: Let the veggies rest for 2-3 minutes before serving—this allows the flavors to meld.
12. Tip: If some pieces cook faster than others, move them to a cooler part of the grill to keep warm without overcooking.
Just pulled from the grill, these veggies have a wonderful smoky sweetness with a satisfying crunch. The balsamic adds a tangy depth that plays perfectly against the char. Try piling them over creamy polenta or folding into warm pasta for an easy spring feast.
Honey-Lemon Green Beans
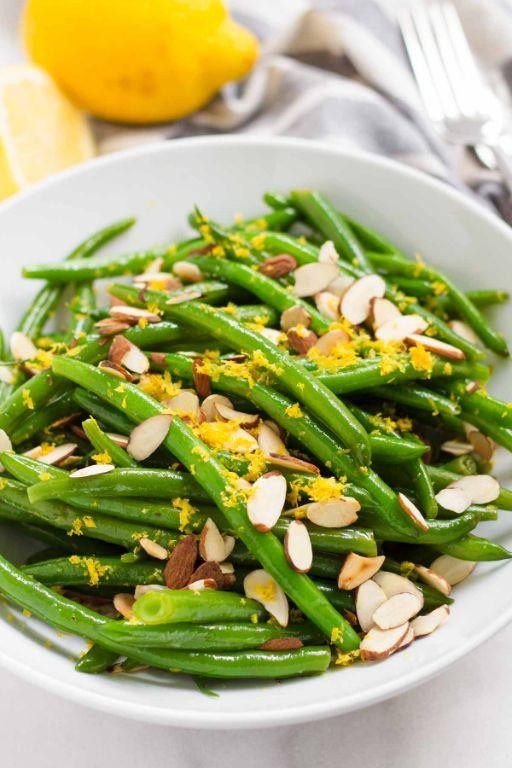
Looking for a veggie side that’s anything but boring? You’ve got to try these honey-lemon green beans—they’re fresh, zesty, and come together in a flash. Perfect for when you want something a little fancy without the fuss.
3
servings10
minutes18
minutesIngredients
– A pound of fresh green beans, ends trimmed
– A couple tablespoons of olive oil
– Two tablespoons of honey
– The juice from one lemon
– A pinch of salt
– A sprinkle of black pepper
Instructions
1. Preheat your oven to 400°F.
2. Toss the green beans with olive oil, salt, and pepper on a baking sheet until they’re evenly coated.
3. Roast the beans for 15–18 minutes, shaking the pan halfway through, until they’re tender with a few browned spots.
4. While the beans roast, whisk together the honey and lemon juice in a small bowl.
5. Tip: Warm the honey for 10 seconds in the microwave if it’s too thick to mix easily.
6. Pull the beans from the oven and drizzle the honey-lemon mixture over them right away.
7. Toss everything gently so the beans soak up the glaze.
8. Tip: Let the beans sit for a minute—the heat helps the flavors meld together.
9. Taste one bean and add an extra pinch of salt if needed.
10. Tip: For extra brightness, zest a bit of lemon over the top before serving.
You’ll love how the beans stay crisp-tender while the honey adds a subtle sweetness that balances the lemon’s tang. They’re fantastic alongside grilled chicken or piled high on a grain bowl for a pop of color and flavor.
Savory Bread Pudding with Spinach and Feta
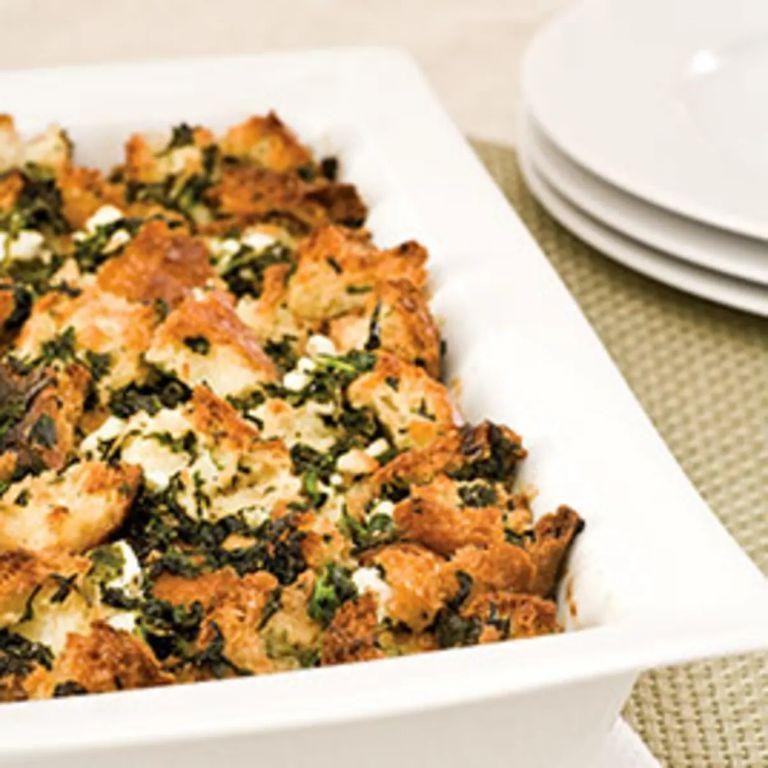
Let’s be honest—sometimes you need a cozy, comforting dish that feels fancy but comes together with pantry staples. Savory bread pudding is your answer, especially when loaded with spinach and tangy feta. It’s the kind of meal that’s perfect for brunch or a simple dinner, and it’s way easier than it looks.
6
servings25
minutes60
minutesIngredients
- About 6 cups of day-old bread cubes (from a rustic loaf)
- A couple of big handfuls of fresh spinach
- 1 cup of crumbled feta cheese
- 4 large eggs
- 2 cups of whole milk
- A splash of heavy cream (about ¼ cup)
- 1 small yellow onion, finely chopped
- 2 cloves of garlic, minced
- 2 tablespoons of olive oil
- ½ teaspoon of salt
- ¼ teaspoon of black pepper
- A pinch of nutmeg
Instructions
- Preheat your oven to 350°F and grease a 9×13-inch baking dish with butter or non-stick spray.
- Heat 2 tablespoons of olive oil in a large skillet over medium heat.
- Add the chopped onion and cook for about 5 minutes, until it’s soft and translucent.
- Stir in the minced garlic and cook for 1 more minute, just until fragrant.
- Tip: Don’t let the garlic brown, or it can turn bitter.
- Add the fresh spinach to the skillet and cook for 2–3 minutes, stirring until it’s wilted and bright green.
- Remove the skillet from the heat and let the spinach mixture cool slightly.
- In a large bowl, whisk together the 4 eggs, 2 cups of whole milk, ¼ cup of heavy cream, ½ teaspoon of salt, ¼ teaspoon of black pepper, and a pinch of nutmeg until well combined.
- Add the 6 cups of bread cubes to the egg mixture, along with the cooked spinach and onions.
- Gently fold everything together, making sure all the bread is coated.
- Let the mixture sit for 10 minutes so the bread can soak up the liquid.
- Tip: This resting time is key for a custardy texture—don’t rush it!
- Stir in 1 cup of crumbled feta cheese, reserving a little to sprinkle on top.
- Transfer the mixture to the prepared baking dish and spread it evenly.
- Sprinkle the remaining feta over the top.
- Bake for 45–50 minutes, until the top is golden brown and the center is set (no jiggle when you gently shake the dish).
- Tip: If the top browns too quickly, loosely tent it with foil for the last 10 minutes.
- Let the bread pudding cool for 5–10 minutes before slicing and serving.
Keep in mind that the edges will be slightly crisp, while the inside stays soft and custardy. The feta adds a salty punch that balances the earthy spinach beautifully. Try serving it with a simple side salad or topped with a fried egg for extra richness.
Rosemary Roasted Baby Potatoes

Zesty and simple, these rosemary roasted baby potatoes are the perfect side dish for any occasion. You’ll love how the crispy exterior gives way to that fluffy interior, all infused with aromatic herbs. Honestly, they’re so good you might just eat them straight from the baking sheet.
3
servings15
minutes45
minutesIngredients
– A couple pounds of baby potatoes
– A generous glug of olive oil (about ¼ cup)
– A few fresh rosemary sprigs
– A good sprinkle of kosher salt (about 1 teaspoon)
– A couple cracks of black pepper (about ½ teaspoon)
– 3 minced garlic cloves
Instructions
1. Preheat your oven to 425°F and line a baking sheet with parchment paper.
2. Wash and thoroughly dry 2 pounds of baby potatoes.
3. Cut any larger potatoes in half so they’re all roughly the same size for even cooking.
4. Toss the potatoes with ¼ cup olive oil in a large bowl until evenly coated.
5. Strip the leaves from 3 rosemary sprigs and chop them finely.
6. Add the chopped rosemary, 1 teaspoon kosher salt, ½ teaspoon black pepper, and 3 minced garlic cloves to the potatoes.
7. Mix everything together until the potatoes are well seasoned.
8. Spread the potatoes in a single layer on your prepared baking sheet.
9. Roast for 25 minutes, then flip each potato with tongs.
10. Continue roasting for another 15-20 minutes until golden brown and crispy.
11. Test for doneness by piercing a potato with a fork – it should slide in easily.
12. Let the potatoes rest for 5 minutes before serving to allow the flavors to settle.
That crispy, golden crust gives way to the most tender, fluffy interior you can imagine. The rosemary and garlic create this incredible aroma that fills your kitchen. Try serving them alongside grilled chicken or crumbling some feta cheese over the top for an extra flavor boost.
Warm Lentil Salad with Caramelized Onions
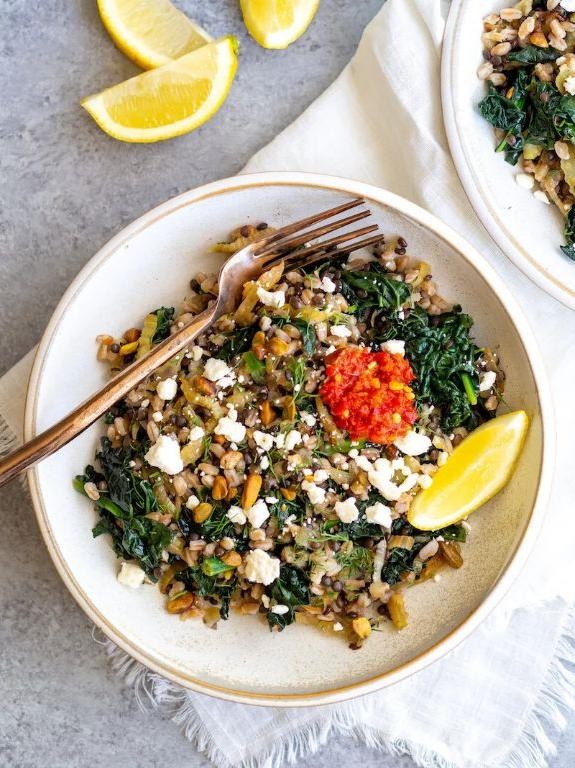
Kind of craving something hearty but still fresh? This warm lentil salad hits all the right notes—it’s cozy, satisfying, and packed with flavor. You’ll love how the sweet caramelized onions play against the earthy lentils.
2
servings10
minutes50
minutesIngredients
– 1 cup of brown lentils
– A couple of large yellow onions, thinly sliced
– 2 tablespoons of olive oil
– A splash of red wine vinegar
– A pinch of salt
– A pinch of black pepper
Instructions
1. Rinse 1 cup of brown lentils under cold water in a fine-mesh strainer to remove any debris.
2. Place the rinsed lentils in a medium pot and cover with 3 cups of water.
3. Bring the lentils to a boil over high heat, then reduce the heat to low and simmer for 20 minutes until tender but not mushy.
4. While the lentils cook, heat 2 tablespoons of olive oil in a large skillet over medium heat.
5. Add the thinly sliced onions to the skillet and cook for 25–30 minutes, stirring occasionally, until they turn deep golden brown and sweet.
6. Drain the cooked lentils and return them to the pot off the heat.
7. Stir the caramelized onions into the warm lentils.
8. Add a splash of red wine vinegar, a pinch of salt, and a pinch of black pepper to the mixture.
9. Gently toss everything together until well combined.
Let this salad cool slightly before digging in—the lentils soak up the flavors beautifully. Serve it over a bed of greens for a light meal or alongside roasted chicken for something heartier.
Buttery Corn on the Cob with Cilantro Lime
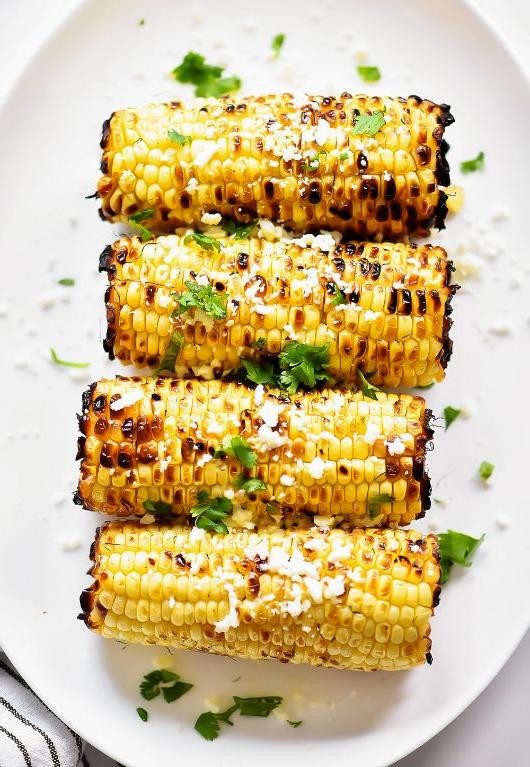
Kind of magical how something so simple can totally steal the show at any summer gathering, right? You’ve probably had corn on the cob before, but this buttery version with a zesty cilantro lime twist is about to become your new favorite. It’s quick, easy, and packed with flavor that’ll have everyone asking for your secret.
3
servings10
minutes7
minutesIngredients
– 4 ears of fresh corn, husks removed
– 4 tablespoons of unsalted butter, softened
– A big handful of fresh cilantro, finely chopped
– Juice from 2 limes
– A pinch of salt
– A pinch of black pepper
Instructions
1. Bring a large pot of water to a rolling boil over high heat.
2. Carefully place the corn ears into the boiling water and cook for exactly 7 minutes.
3. While the corn cooks, mix the softened butter, chopped cilantro, lime juice, salt, and pepper in a small bowl until well combined.
4. Use tongs to remove the corn from the water and transfer to a plate.
5. Pat the corn dry with a paper towel to help the butter mixture stick better.
6. Spread the cilantro lime butter evenly over each hot corn cob using a pastry brush or knife.
7. Serve immediately while the corn is still warm.
Zesty and vibrant, this corn has a perfect balance of creamy butter and bright lime that makes each bite pop. The cilantro adds a fresh, herbal note that pairs beautifully with grilled meats or as a standout side at picnics. Try sprinkling with a little chili powder or cotija cheese for an extra kick if you’re feeling adventurous!
Zesty Cucumber and Tomato Salad
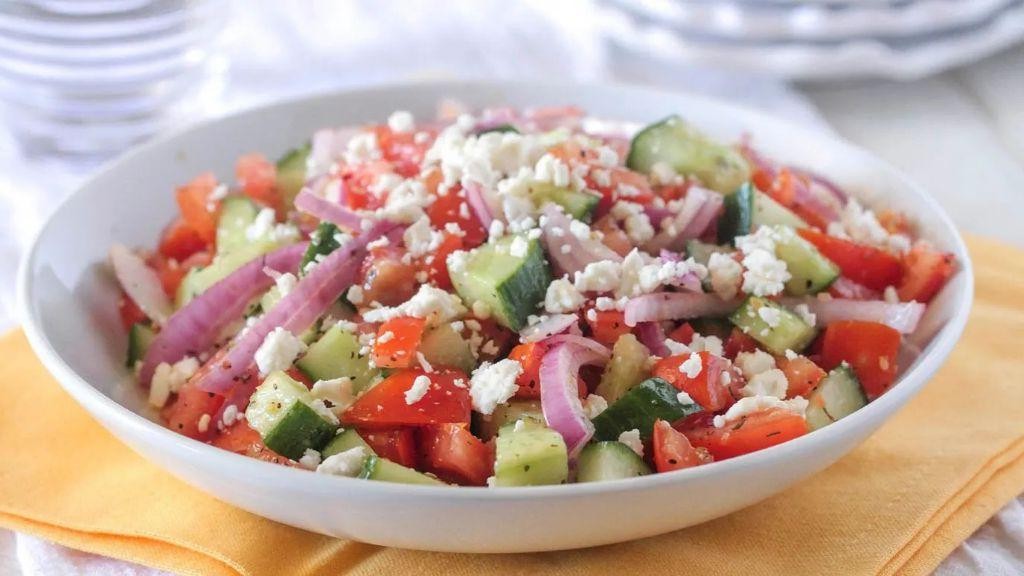
Feeling that late summer heat? You need something crisp, refreshing, and ridiculously easy to throw together. This zesty cucumber and tomato salad is your new go-to for beating the heat with minimal effort and maximum flavor.
3
servings15
minutesIngredients
– 2 large cucumbers
– 4 medium ripe tomatoes
– 1/2 of a small red onion
– A big handful of fresh parsley
– 3 tablespoons of extra virgin olive oil
– 2 tablespoons of red wine vinegar
– 1 tablespoon of fresh lemon juice
– 1 teaspoon of dried oregano
– 1/2 teaspoon of garlic powder
– A generous pinch of salt and black pepper
Instructions
1. Wash the 2 large cucumbers and 4 medium tomatoes thoroughly under cool running water.
2. Pat the cucumbers and tomatoes completely dry with a clean kitchen towel to help the dressing stick better.
3. Slice the cucumbers into thin, even rounds about 1/4-inch thick.
4. Chop the tomatoes into bite-sized chunks, roughly 1-inch pieces.
5. Thinly slice 1/2 of a small red onion into half-moons.
6. Finely chop a big handful of fresh parsley leaves, discarding the thick stems.
7. Combine the sliced cucumbers, chopped tomatoes, sliced red onion, and chopped parsley in a large mixing bowl.
8. In a small separate bowl, whisk together 3 tablespoons of extra virgin olive oil, 2 tablespoons of red wine vinegar, and 1 tablespoon of fresh lemon juice until well combined.
9. Add 1 teaspoon of dried oregano, 1/2 teaspoon of garlic powder, and a generous pinch of salt and black pepper to the dressing mixture.
10. Whisk the dressing vigorously for about 30 seconds until the oil and vinegar are fully emulsified.
11. Pour the dressing over the vegetable mixture in the large bowl.
12. Gently toss everything together with salad tongs or two large spoons until all ingredients are evenly coated with dressing.
13. Let the salad sit at room temperature for exactly 15 minutes to allow the flavors to meld together.
14. Give the salad one final gentle toss before serving.
Crisp cucumbers and juicy tomatoes create the perfect textural contrast in every bite. The zesty dressing soaks in just enough to brighten everything up without making it soggy. Try serving it alongside grilled chicken or spooned over toasted crusty bread for a quick bruschetta-style appetizer.
Baked Cauliflower Gratin with Cheese
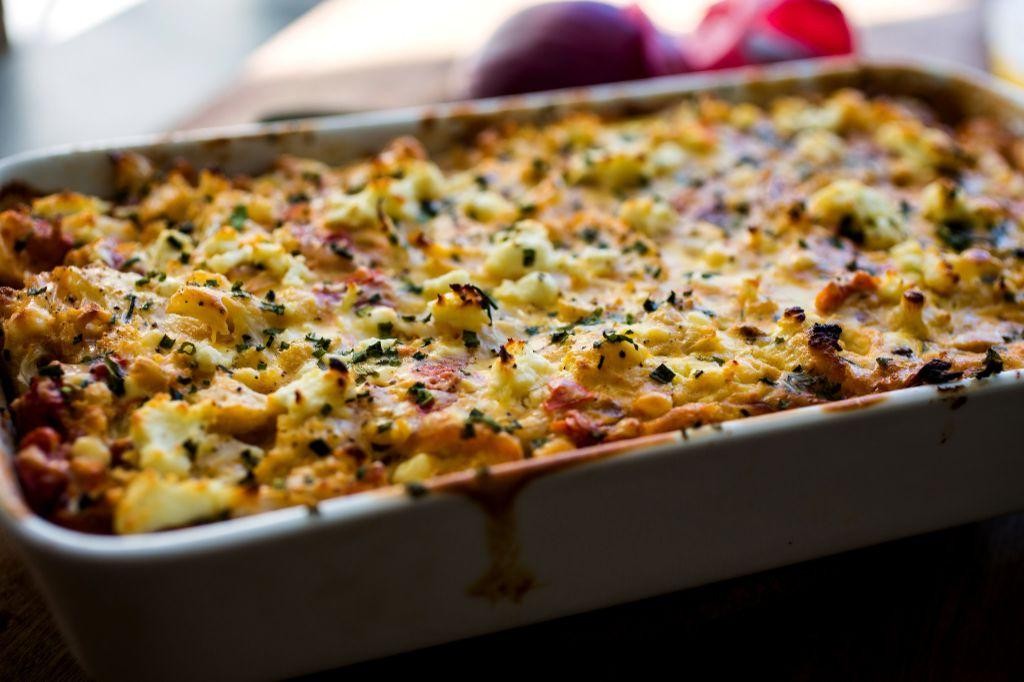
Craving something cozy and cheesy that won’t weigh you down? You’ve got to try this baked cauliflower gratin. It’s the perfect comfort food for a chilly evening, and it comes together with minimal fuss.
6
portions20
minutes40
minutesIngredients
– 1 large head of cauliflower, cut into florets
– 2 cups of shredded sharp cheddar cheese
– 1 cup of heavy cream
– 1/2 cup of grated Parmesan cheese
– 3 tablespoons of butter
– 2 tablespoons of all-purpose flour
– 1/2 teaspoon of garlic powder
– 1/4 teaspoon of freshly grated nutmeg
– A pinch of salt and black pepper
– A handful of breadcrumbs for topping
Instructions
1. Preheat your oven to 375°F.
2. Bring a large pot of salted water to a rolling boil.
3. Add the cauliflower florets and boil for 5 minutes until just tender.
4. Drain the cauliflower thoroughly in a colander. Tip: Let it sit for a minute to steam off excess water—this prevents a watery sauce.
5. In a medium saucepan, melt the butter over medium heat.
6. Whisk in the flour and cook for 1 minute until bubbly and golden.
7. Slowly pour in the heavy cream while whisking constantly to avoid lumps.
8. Stir in the garlic powder, nutmeg, salt, and pepper.
9. Cook the sauce for 3-4 minutes, stirring frequently, until it thickens slightly.
10. Remove the saucepan from the heat.
11. Stir in 1 1/2 cups of the cheddar cheese and all of the Parmesan until melted and smooth.
12. Arrange the drained cauliflower in a single layer in a greased 9×13-inch baking dish.
13. Pour the cheese sauce evenly over the cauliflower.
14. Sprinkle the remaining 1/2 cup of cheddar cheese over the top.
15. Scatter the breadcrumbs evenly over the cheese. Tip: For extra crunch, mix the breadcrumbs with a drizzle of melted butter before sprinkling.
16. Bake for 25-30 minutes until the top is golden brown and bubbly. Tip: Let it rest for 5 minutes before serving—this helps the sauce set beautifully.
17. Remove from the oven and let stand for 5 minutes.
You’ll love the creamy, tender cauliflower beneath that golden, crispy topping. Serve it alongside a simple green salad or as a standout side with roasted chicken—it’s sure to become a new favorite.
Conclusion
Perfect for your Easter table, these 23 delightful side dishes bring color, flavor, and joy to your holiday feast. We hope you find new favorites to share with loved ones! Try a recipe, leave a comment telling us which one you loved most, and don’t forget to pin this roundup on Pinterest for easy reference. Happy cooking!


