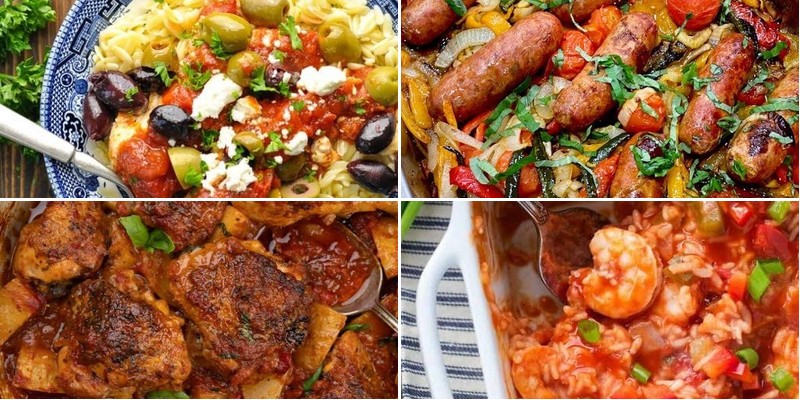
Busy nights call for delicious solutions, and these 35 dump dinner recipes are here to save the day! Simply toss your ingredients together, let them work their magic, and enjoy a comforting, homemade meal with minimal effort. From cozy casseroles to zesty one-pan wonders, there’s something for every craving. Ready to make weeknights easier? Dive into these fuss-free favorites and reclaim your evening!
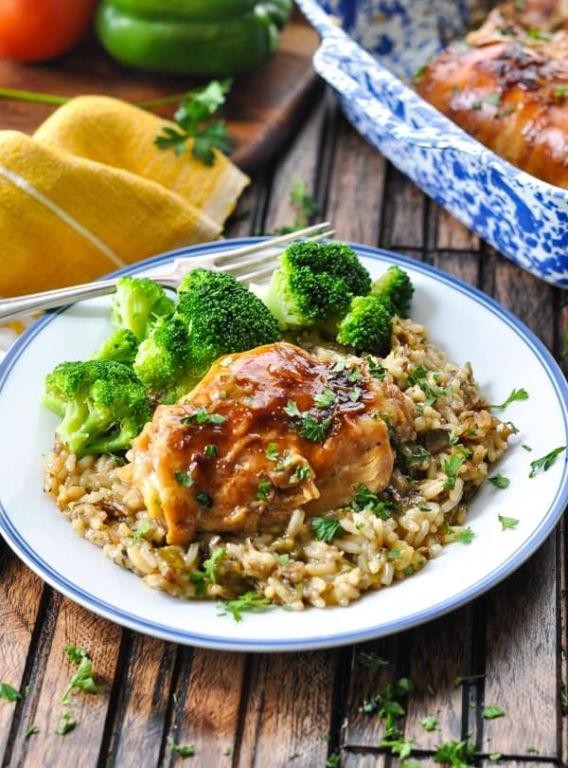
Slow Cooker Chicken and Rice Casserole
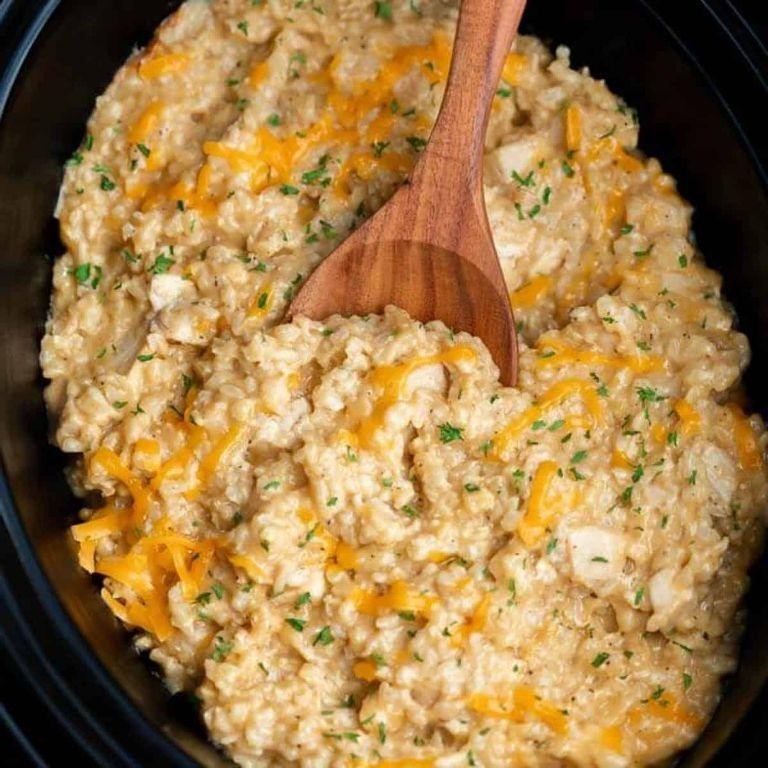
Every time I make this slow cooker chicken and rice casserole, I’m reminded of my grandmother’s kitchen—the comforting aromas that would fill her house on chilly autumn evenings like this one. It’s the perfect set-it-and-forget-it meal for busy weeknights when you want something hearty without the fuss, and the way the rice soaks up all those savory juices is pure magic.
6
servings15
minutes255
minutesIngredients
– 1.5 lbs boneless, skinless chicken thighs (I find thighs stay juicier than breasts during long cooking)
– 1.5 cups long-grain white rice (rinsed well—this prevents gumminess, trust me!)
– 1 medium yellow onion, diced (I always shed a few tears but it’s worth it)
– 3 cloves garlic, minced (fresh is best here for that aromatic punch)
– 1 cup chicken broth (low-sodium lets me control the salt better)
– 1 cup whole milk (the creaminess makes all the difference)
– 1 cup frozen peas (straight from the freezer works perfectly)
– 1 tsp paprika (smoked paprika adds wonderful depth)
– 1/2 tsp dried thyme (rubbed between my fingers to release the oils)
– 2 tbsp unsalted butter (cut into small pieces for even melting)
Instructions
1. Lightly spray your 6-quart slow cooker with cooking spray to prevent sticking.
2. Spread the rinsed rice evenly across the bottom of the slow cooker.
3. Scatter the diced onion and minced garlic over the rice layer.
4. Arrange chicken thighs in a single layer on top of the vegetables.
5. Sprinkle paprika, dried thyme, 1 tsp salt, and 1/2 tsp black pepper evenly over the chicken.
6. Pour chicken broth and milk slowly over everything, being careful not to wash off the seasonings.
7. Dot the surface with small pieces of butter for richness.
8. Cover and cook on LOW for 4 hours—the rice should be tender and most liquid absorbed.
9. Quickly stir in frozen peas, replace the lid, and cook for 15 more minutes until peas are heated through.
10. Let the casserole rest uncovered for 10 minutes before serving to allow the rice to set properly.
Let me tell you, the result is this incredibly creamy texture where the rice practically melts in your mouth while the chicken stays wonderfully tender. That hint of smokiness from the paprika plays beautifully against the sweet pops of peas, making this comfort food that actually feels sophisticated. I love serving it straight from the slow cooker at the table with a simple green salad—it makes even Tuesday night feel like a special occasion.
Easy Dump-and-Bake Meatball Casserole
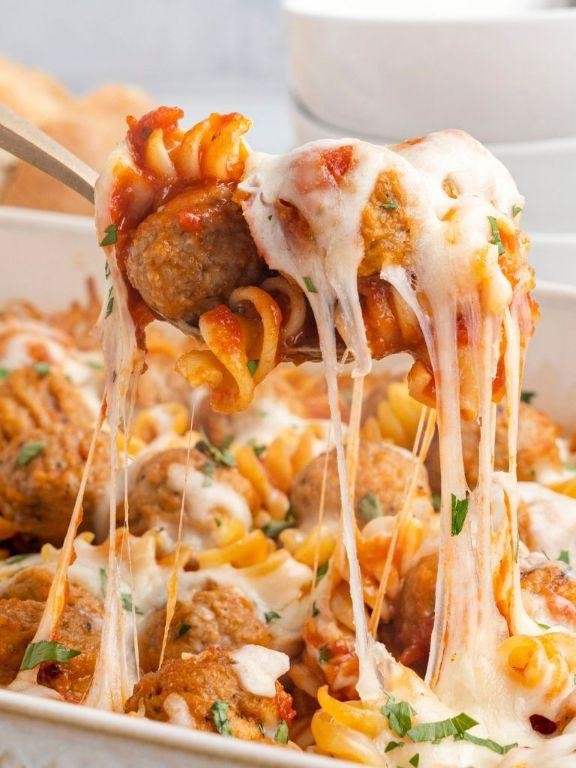
Picture this: it’s been one of those hectic weeknights where even thinking about dinner feels exhausting, but my family still needs something hearty and satisfying. That’s when my trusty dump-and-bake meatball casserole comes to the rescue—minimal effort for maximum comfort. I love how it fills the kitchen with that cozy, savory aroma that makes everyone gather around the table eagerly.
6
servings10
minutes55
minutesIngredients
- 1 pound frozen meatballs (I keep a bag in the freezer for last-minute dinners)
- 24 ounces jarred marinara sauce (my favorite brand has just the right balance of herbs)
- 2 cups shredded mozzarella cheese (I always grab the low-moisture kind for better melting)
- 8 ounces uncooked penne pasta (those little tubes hold the sauce perfectly)
- 1/2 cup grated Parmesan cheese (the freshly grated stuff makes all the difference)
- 1 teaspoon dried oregano (from my little herb garden when possible)
- 1/2 teaspoon garlic powder (because fresh garlic can burn during baking)
- 1 cup water (to help cook the pasta right in the casserole)
Instructions
- Preheat your oven to 375°F and grab a 9×13-inch baking dish—no need to grease it.
- Spread the uncooked penne pasta evenly across the bottom of the baking dish.
- Arrange the frozen meatballs in a single layer over the pasta.
- Pour the marinara sauce evenly over the meatballs and pasta.
- Sprinkle the dried oregano and garlic powder directly over the sauce.
- Pour 1 cup of water over everything—this will create steam to cook the pasta.
- Cover the baking dish tightly with aluminum foil to trap the moisture.
- Bake at 375°F for 40 minutes—the foil keeps the pasta from drying out.
- Remove the baking dish from the oven and carefully take off the foil (watch for steam!).
- Check that the pasta is tender by testing a piece with a fork.
- Spread the shredded mozzarella cheese evenly over the entire casserole.
- Sprinkle the grated Parmesan cheese over the mozzarella layer.
- Return the uncovered baking dish to the oven and bake for 15 more minutes at 375°F.
- Bake until the cheese is completely melted and starting to turn golden in spots.
- Let the casserole rest for 5 minutes before serving—this helps the sauce thicken.
Here’s what makes this casserole special: the penne soaks up all that saucy goodness while staying perfectly al dente, and the meatballs become incredibly tender. I love serving it with a simple green salad and garlic bread for dipping into that cheesy top layer—it’s the kind of meal that makes everyone ask for seconds.
One-Pan Baked Ziti with Sausage
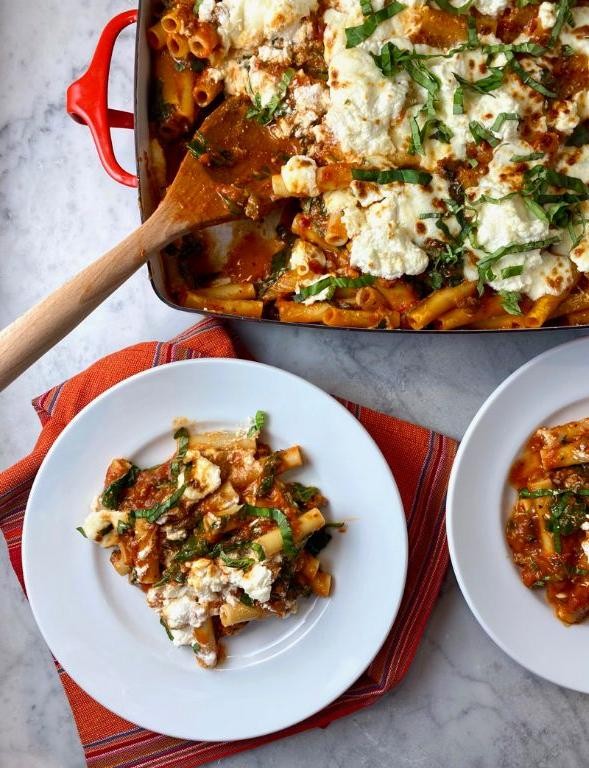
There’s something magical about a meal that comes together in one pan with minimal cleanup—especially on busy weeknights when time is precious. This One-Pan Baked Ziti with Sausage has become my family’s go-to comfort dish, and I love how the flavors meld together while the kitchen fills with that irresistible Italian aroma.
6
servings15
minutes50
minutesIngredients
– 1 lb Italian sausage (I like mild for the kids, but spicy adds great kick)
– 1 medium yellow onion, diced (I always keep these chopped in my fridge for quick meals)
– 3 cloves garlic, minced (fresh is best here—I can smell the difference!)
– 1 (28 oz) can crushed tomatoes (San Marzano are my favorite for their sweet flavor)
– 1 cup water (use it to rinse out that tomato can—no waste!)
– 1 lb ziti pasta (the ridges hold sauce beautifully)
– 1 cup whole milk ricotta cheese (room temp blends smoother)
– 2 cups shredded mozzarella cheese (I buy blocks and shred myself for better melt)
– 1/4 cup grated Parmesan cheese (the good stuff from the refrigerated section)
– 1 tbsp olive oil (extra virgin is my kitchen staple)
– 1 tsp dried basil
– 1/2 tsp red pepper flakes (optional, but I always add just a pinch)
– Salt and black pepper to season
Instructions
1. Preheat your oven to 375°F—this ensures even cooking from the start.
2. Heat 1 tablespoon olive oil in a large oven-safe skillet over medium-high heat for 1 minute until shimmering.
3. Add 1 pound Italian sausage, breaking it into small chunks with a wooden spoon as it cooks.
4. Cook sausage for 6-8 minutes until browned and no pink remains, stirring occasionally.
5. Add diced onion and cook for 3-4 minutes until translucent and softened.
6. Stir in minced garlic and cook for 1 minute until fragrant—don’t let it burn!
7. Pour in crushed tomatoes and 1 cup water, scraping any browned bits from the pan bottom.
8. Add dried basil, red pepper flakes, 1 teaspoon salt, and 1/2 teaspoon black pepper.
9. Bring sauce to a simmer, then reduce heat to maintain gentle bubbles.
10. Stir in 1 pound ziti pasta until fully coated with sauce.
11. Cover skillet tightly with foil and transfer to preheated oven.
12. Bake for 20 minutes until pasta is al dente—test one piece to be sure.
13. Remove skillet from oven carefully—handle will be hot!
14. Dollop ricotta cheese over the pasta in small spoonfuls.
15. Sprinkle mozzarella and Parmesan cheeses evenly across the surface.
16. Return to oven uncovered and bake 10-12 minutes until cheese is golden and bubbly.
17. Let rest 5 minutes before serving—this helps the sauce thicken perfectly.
Knowing this baked ziti emerges with perfectly cooked pasta, creamy ricotta pockets, and that crispy cheese topping keeps me making it monthly. The sausage adds savory depth while the tomatoes provide just enough acidity to balance the richness—it’s comfort food that feels special enough for company but easy enough for Tuesday dinner.
Dump-and-Bake Italian Chicken and Potatoes
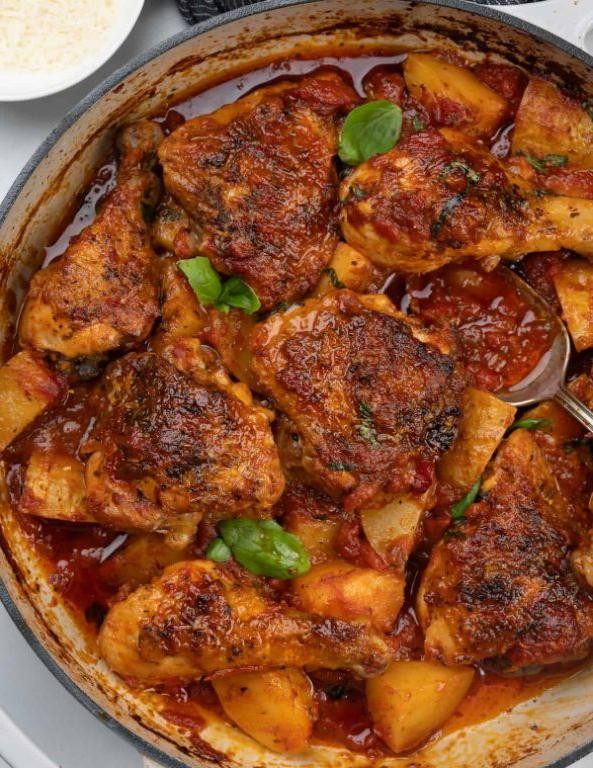
Finally, after a long day of chasing deadlines and answering emails, I found myself craving something comforting yet effortless—the kind of meal that practically cooks itself while I unwind. That’s how this dump-and-bake Italian chicken and potatoes became my weeknight hero, requiring minimal prep and delivering maximum flavor every single time. It’s the dish I turn to when life gets hectic, and trust me, it never disappoints.
4
servings15
minutes50
minutesIngredients
– 1.5 lbs boneless, skinless chicken thighs (I find thighs stay juicier than breasts, but use what you love!)
– 1.5 lbs baby potatoes, halved (no peeling needed—I’m all about saving time)
– 1/4 cup extra virgin olive oil (my go-to for rich flavor)
– 2 tbsp Italian seasoning (I sometimes add an extra pinch for a bolder herb kick)
– 3 cloves garlic, minced (fresh is best here, but I’ve used jarred in a pinch)
– 1 tsp salt (I use fine sea salt for even distribution)
– 1/2 tsp black pepper (freshly ground adds a nice zing)
– 1 lemon, sliced (it brightens everything up—don’t skip it!)
– 1/2 cup chicken broth (low-sodium lets the herbs shine)
Instructions
1. Preheat your oven to 400°F to ensure it’s hot and ready when the dish goes in.
2. In a large mixing bowl, combine the halved baby potatoes, olive oil, minced garlic, Italian seasoning, salt, and black pepper, tossing until everything is evenly coated.
3. Tip: If the potatoes seem dry, drizzle in an extra tablespoon of olive oil to prevent sticking.
4. Transfer the potato mixture to a 9×13-inch baking dish, spreading it into a single layer.
5. Arrange the chicken thighs evenly on top of the potatoes, nestling them slightly into the mixture.
6. Pour the chicken broth evenly over the chicken and potatoes to keep everything moist during baking.
7. Place the lemon slices on top of the chicken for a citrusy aroma that permeates the dish.
8. Cover the baking dish tightly with aluminum foil to trap steam and help the potatoes cook through.
9. Bake at 400°F for 30 minutes, then remove the foil to allow the chicken to brown.
10. Tip: Use a meat thermometer to check that the chicken reaches 165°F internally for safety.
11. Continue baking uncovered for another 15–20 minutes, or until the potatoes are fork-tender and the chicken is golden.
12. Tip: For extra crispiness, broil on high for the final 2–3 minutes, watching closely to avoid burning.
13. Remove from the oven and let rest for 5 minutes before serving to let the juices redistribute.
Juicy chicken and tender potatoes soak up the herb-infused broth, creating a cozy, one-pan wonder that’s perfect for busy evenings. I love serving it straight from the dish with a side of steamed green beans or a simple salad—it’s a meal that feels homemade without the fuss.
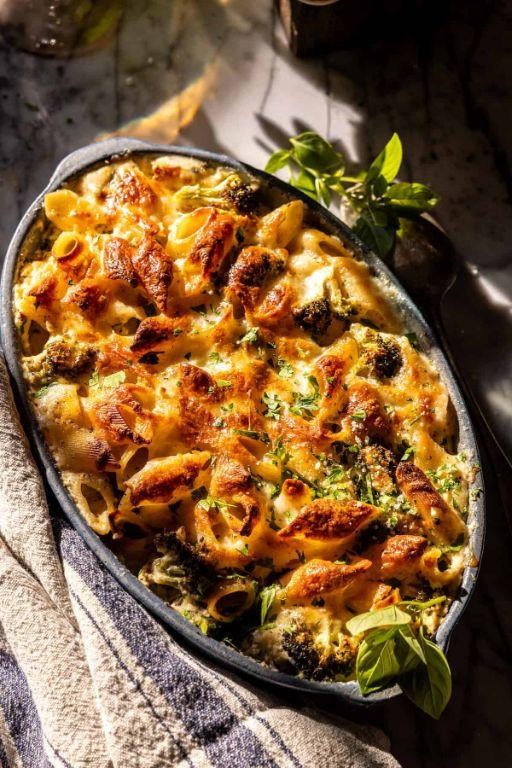
Cheesy Ham and Broccoli Dump Casserole

Oh my goodness, this cheesy ham and broccoli dump casserole is my ultimate weeknight lifesaver—I first threw it together during that chaotic back-to-school season when my kids had activities every night, and it instantly became a family favorite that requires minimal effort but delivers maximum comfort.
6
servings15
minutes36
minutesIngredients
- 1 lb cooked ham, diced (I grab the pre-diced kind from the deli section to save time)
- 4 cups fresh broccoli florets (frozen works in a pinch, but fresh gives that perfect crisp-tender bite)
- 2 cups shredded sharp cheddar cheese (I always buy blocks and shred myself—it melts so much creamier)
- 1 can (10.5 oz) cream of mushroom soup (this is my secret for that rich, saucy base)
- 1 cup whole milk (I find whole milk makes the sauce extra velvety)
- 1/2 cup sour cream (a dollop adds wonderful tanginess)
- 1 tsp garlic powder (because everything’s better with garlic)
- 1/2 tsp black pepper (freshly ground if you have it)
- 12 oz egg noodles (these hold up beautifully and soak up all the cheesy goodness)
Instructions
- Preheat your oven to 375°F and grab a 9×13-inch baking dish—no need to grease it since the sauce prevents sticking.
- Bring a large pot of salted water to a rolling boil over high heat.
- Add the egg noodles to the boiling water and cook for exactly 6 minutes—they’ll finish cooking in the oven, so slightly undercooking prevents mushiness.
- Drain the noodles thoroughly in a colander and immediately return them to the warm pot to keep them from clumping.
- In a medium bowl, whisk together the cream of mushroom soup, whole milk, sour cream, garlic powder, and black pepper until completely smooth.
- Pour the sauce mixture over the drained noodles and stir gently to coat every noodle evenly.
- Fold in the diced ham, broccoli florets, and 1 1/2 cups of the shredded cheddar cheese, reserving the remaining 1/2 cup for topping.
- Transfer the mixture to the baking dish and spread it into an even layer with a spatula.
- Sprinkle the reserved 1/2 cup cheddar cheese evenly over the top for that golden, bubbly crust.
- Bake uncovered for 25–30 minutes, or until the cheese is fully melted and the edges are bubbling vigorously.
- Let the casserole rest on a wire rack for 5–7 minutes before serving—this allows the sauce to thicken slightly for perfect scooping.
Fresh from the oven, this casserole boasts tender noodles enveloped in a creamy, garlicky sauce with pops of savory ham and crisp broccoli. For a fun twist, I love serving it with a side of garlic bread to scoop up every last cheesy bit, or topping individual bowls with crispy fried onions for extra crunch.
Quick Dump-and-Bake Philly Cheesesteak
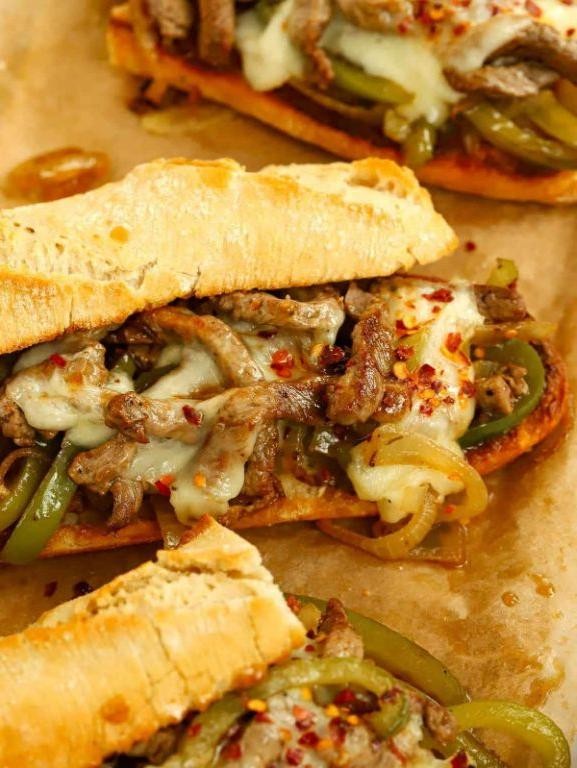
Yesterday, I was craving that iconic Philly cheesesteak flavor but didn’t have the energy for all the slicing and sautéing—so I created this ridiculously easy dump-and-bake version that’s become my new weeknight hero.
3
sandwiches10
minutes45
minutesIngredients
- 1 lb frozen sliced steak (I always keep some in the freezer for emergencies like this)
- 1 large onion, thinly sliced (sweet Vidalia onions are my favorite here—they caramelize beautifully)
- 1 green bell pepper, sliced (I sometimes add a red one too for extra color)
- 8 slices provolone cheese (the melty, stretchy kind—don’t skimp!)
- 1 cup beef broth (low-sodium is my preference to control the salt level)
- 1 tbsp Worcestershire sauce (this secret ingredient adds that deep umami flavor)
- 1 tsp garlic powder (fresh minced garlic works too, but powder distributes more evenly)
- 4 hoagie rolls (toasted with butter if you’re feeling fancy like I usually am)
Instructions
- Preheat your oven to 375°F—this moderate temperature cooks everything evenly without drying out the meat.
- Combine the frozen steak slices, onion, bell pepper, beef broth, Worcestershire sauce, and garlic powder in a 9×13 inch baking dish, spreading everything in an even layer.
- Cover the baking dish tightly with aluminum foil—this creates steam that helps tenderize the frozen meat while it cooks.
- Bake for 35 minutes, then carefully remove the foil (watch for steam!) and give everything a good stir.
- Arrange the provolone cheese slices evenly over the hot meat and vegetable mixture, overlapping slightly for maximum meltiness.
- Return the uncovered dish to the oven and bake for another 8-10 minutes, until the cheese is completely melted and bubbly with golden spots.
- While the cheese melts, lightly toast your hoagie rolls—this prevents them from getting soggy when you add the filling.
- Use a slotted spoon to drain excess liquid as you scoop the cheesesteak mixture onto the toasted rolls.
Buttery, melty provolone blankets the tender steak and sweet caramelized vegetables in every bite. The toasted roll provides the perfect crunch against the juicy filling—sometimes I’ll even serve these open-faced with a side of crispy steak fries for the ultimate comfort meal.
Simple Dump-and-Bake Ravioli with Marinara
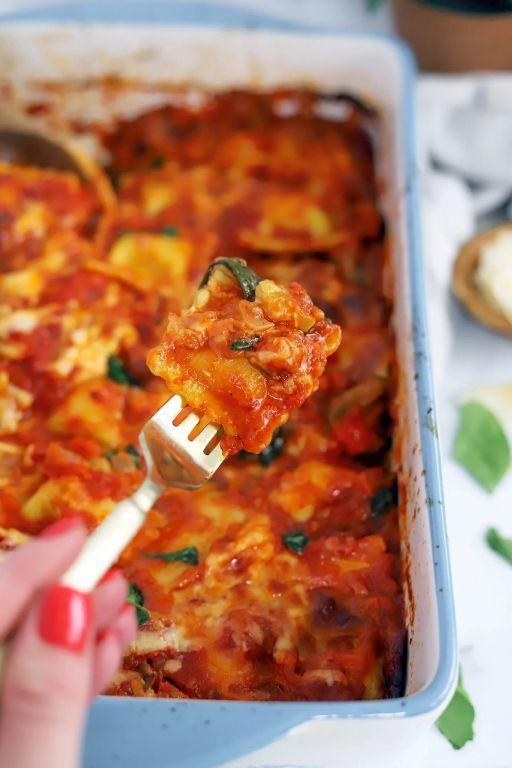
Ever have one of those days where even boiling water feels like too much effort? That was me last Tuesday after back-to-back Zoom meetings, staring into my pantry with desperation. Luckily, I discovered this magical dump-and-bake ravioli that requires zero prep work and delivers maximum comfort.
2
servings5
minutes50
minutesIngredients
- 1 (20 oz) package frozen cheese ravioli – I keep a few bags in the freezer for emergency dinners
- 1 (24 oz) jar marinara sauce – my nonna would disapprove, but Rao’s is my guilty pleasure
- 2 cups shredded mozzarella cheese – I always buy the block and shred it myself for better melt
- 1/2 cup grated Parmesan cheese – the good stuff from the refrigerated section, not the shaky can
- 1 tbsp olive oil – extra virgin is my kitchen workhorse
- 1 tsp dried basil – from my little herb garden that somehow survives my neglect
Instructions
- Preheat your oven to 375°F – this gives the ravioli time to start thawing while the oven heats.
- Pour the olive oil into a 9×13 inch baking dish and swirl it around to coat the bottom evenly.
- Spread the frozen ravioli in a single layer across the bottom of the oiled baking dish.
- Pour the entire jar of marinara sauce over the ravioli, making sure to cover each piece completely.
- Sprinkle the dried basil evenly over the saucy ravioli for that fresh herb flavor.
- Cover the baking dish tightly with aluminum foil and place it in the preheated oven.
- Bake covered for 30 minutes – the foil trap creates steam that cooks the frozen ravioli perfectly.
- Remove the baking dish from the oven and carefully take off the foil (watch for steam!).
- Evenly distribute the shredded mozzarella cheese over the hot ravioli and sauce.
- Sprinkle the grated Parmesan cheese over the mozzarella layer.
- Return the uncovered baking dish to the oven and bake for 15 more minutes.
- Check that the cheese is fully melted and bubbly with golden spots around the edges.
- Let the dish rest on your stovetop for 5 minutes before serving – this prevents lava-hot cheese burns.
Last night I served this to my picky nephew who declared it “better than pizza” – the highest compliment in our house. The ravioli emerge tender but still hold their shape, while the cheese forms this glorious stretchy blanket over the robust marinara. Leftovers (if you have any) make amazing next-day lunches when crisped up in the air fryer.
Dump-and-Stir Taco Casserole
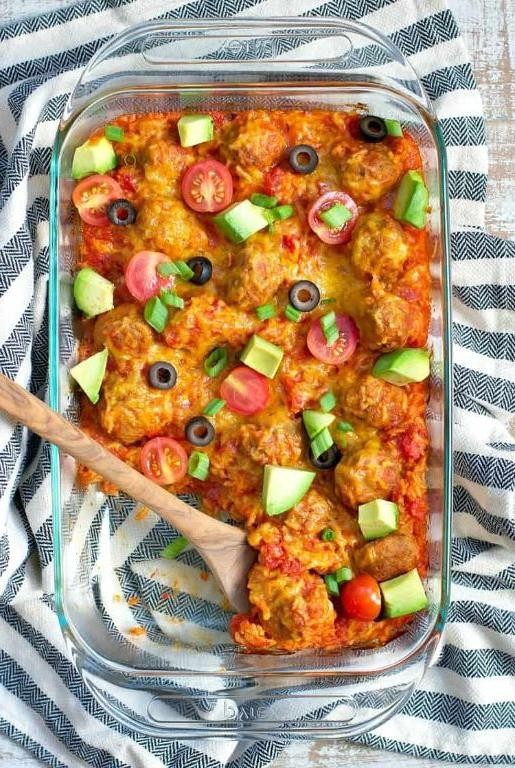
Now, I know what you’re thinking—another casserole recipe? But trust me, this Dump-and-Stir Taco Casserole is the ultimate weeknight lifesaver that even my picky eaters devour. I first threw this together during one of those chaotic evenings when soccer practice and work deadlines collided, and it’s been in our regular rotation ever since.
6
servings15
minutes30
minutesIngredients
– 1 lb ground beef (I like 85/15 for optimal flavor without being too greasy)
– 1 packet taco seasoning (the store-bought kind is my secret for consistent flavor)
– 1 can (15 oz) black beans, drained and rinsed (don’t skip rinsing—it makes all the difference)
– 1 can (15 oz) corn kernels, drained (I keep these stocked for last-minute meals)
– 1 can (10 oz) diced tomatoes with green chilies (Rotel is my go-to for that extra kick)
– 2 cups shredded cheddar cheese (I always buy block cheese and shred it myself for better melting)
– 1 bag (10 oz) tortilla chips (the sturdy restaurant-style ones hold up best)
– 1 cup sour cream (full-fat gives the creamiest texture)
– ½ cup sliced black olives (my husband’s addition that surprisingly works perfectly)
Instructions
1. Preheat your oven to 375°F—this ensures even cooking from the moment it goes in.
2. Brown 1 lb ground beef in a large skillet over medium-high heat for 8-10 minutes, breaking it into crumbles with a wooden spoon.
3. Drain any excess grease from the skillet—this prevents a soggy casserole.
4. Stir in 1 packet taco seasoning and ¼ cup water, simmering for 2 minutes until fragrant.
5. Combine the seasoned beef, 1 can drained black beans, 1 can drained corn, and 1 can diced tomatoes with green chilies in a large mixing bowl.
6. Crush ¾ of the tortilla chips by hand directly into the bowl—leaving some larger pieces adds nice texture.
7. Gently fold everything together until evenly distributed.
8. Transfer the mixture to a 9×13 inch baking dish, spreading it into an even layer.
9. Sprinkle 2 cups shredded cheddar cheese evenly over the top.
10. Bake at 375°F for 20 minutes, until the cheese is fully melted and bubbly around the edges.
11. Remove from oven and let rest for 5 minutes—this helps the layers set for cleaner slicing.
12. Top with dollops of 1 cup sour cream and sprinkle with ½ cup sliced black olives.
Perfectly cheesy with just the right crunch from those tortilla chips, this casserole delivers all the taco flavors we love without the assembly line. I sometimes serve it with extra chips for scooping or over a bed of crisp lettuce for a taco salad twist—leftovers (if there are any!) taste even better the next day.
Effortless Dump-and-Bake Cajun Shrimp and Rice

Busy weeknights call for recipes that practically cook themselves, and this one-pan wonder has become my go-to when I’m craving bold flavor without the fuss. Just last Tuesday, I threw this together while helping my daughter with homework—it’s that simple!
3
servings15
minutes45
minutesIngredients
- 1 lb raw large shrimp, peeled and deveined (I always keep a bag in the freezer for emergencies)
- 1 ½ cups long-grain white rice (not instant—the texture makes all the difference)
- 1 can (14.5 oz) diced tomatoes with their juices (the liquid helps cook the rice perfectly)
- 2 cups chicken broth (I use low-sodium to control the saltiness)
- 1 bell pepper, diced (any color works, but red adds nice sweetness)
- 1 onion, chopped (yellow onions are my preference for this)
- 2 tbsp Cajun seasoning (my homemade blend beats store-bought every time)
- 1 tbsp olive oil (extra virgin is what I always reach for)
- 3 cloves garlic, minced (fresh only—the jarred stuff just isn’t the same)
Instructions
- Preheat your oven to 375°F—this ensures even cooking from the moment the dish goes in.
- Pour the olive oil into a 9×13 inch baking dish, swirling to coat the bottom evenly.
- Add the rice, diced tomatoes with juices, chicken broth, bell pepper, onion, and minced garlic directly to the baking dish.
- Sprinkle the Cajun seasoning over the mixture and stir everything together until well combined.
- Arrange the raw shrimp in a single layer on top of the rice mixture. Tip: Pat the shrimp dry with paper towels first—this helps them sear slightly rather than steam.
- Cover the baking dish tightly with aluminum foil—this creates the steam needed to cook the rice properly.
- Bake for 30 minutes at 375°F—set a timer so you don’t forget!
- Remove the foil carefully (steam will be hot) and check if the rice has absorbed most of the liquid.
- Return to the oven uncovered and bake for another 10-15 minutes until the shrimp are pink and opaque. Tip: Don’t overcook the shrimp—they should be just firm to the touch.
- Remove from oven and let rest for 5 minutes before serving. Tip: This resting time allows the rice to absorb any remaining moisture and firm up perfectly.
Just imagine breaking through that tender shrimp into the fluffy, spice-infused rice—it’s seriously restaurant-quality from your own oven. I love serving this straight from the baking dish with a big green salad, and the leftovers somehow taste even better the next day.
No-Fuss Dump-and-Bake Chicken Alfredo
Busy weeknights call for recipes that practically cook themselves, and this dump-and-bake chicken alfredo has become my family’s savior. Between soccer practice and work deadlines, I’ve perfected this one-pan wonder that requires zero pre-cooking—just toss everything in and let the oven work its magic. Honestly, it’s so simple that my teenager can make it when I’m running late, which happens more often than I’d like to admit!
2
servings10
minutes45
minutesIngredients
– 1.5 lbs boneless, skinless chicken breasts (I always buy the thin-cut ones to save time)
– 12 oz fettuccine pasta (the wider noodles hold the sauce better in my opinion)
– 4 cups chicken broth (I swear by low-sodium so I can control the salt)
– 1 cup heavy cream (room temperature blends more smoothly)
– 1 cup grated Parmesan cheese (the real stuff, not the powdery kind)
– 3 cloves garlic, minced (fresh garlic makes all the difference)
– 1 tsp Italian seasoning (my secret is adding an extra pinch)
– 1/2 tsp black pepper (freshly ground if you have it)
– 1/4 tsp salt (adjust after baking since the cheese adds saltiness)
Instructions
1. Preheat your oven to 375°F—I always use an oven thermometer to ensure accuracy.
2. Place raw chicken breasts in a single layer in a 9×13 inch baking dish.
3. Arrange uncooked fettuccine noodles around and over the chicken breasts.
4. Pour chicken broth evenly over the pasta and chicken.
5. Add minced garlic directly over the ingredients in the dish.
6. Sprinkle Italian seasoning, black pepper, and salt evenly across everything.
7. Cover the baking dish tightly with aluminum foil—this creates steam to cook the pasta properly.
8. Bake at 375°F for 35 minutes until the chicken reaches 165°F internally.
9. Remove the baking dish from the oven and carefully take off the foil.
10. Pour room temperature heavy cream evenly over the hot pasta and chicken.
11. Sprinkle grated Parmesan cheese across the entire surface.
12. Return to the oven uncovered and bake for 10 more minutes at 375°F until the cheese melts and sauce thickens.
13. Use two forks to shred the chicken directly in the baking dish.
14. Stir everything together until the sauce coats all ingredients evenly.
15. Let the dish rest for 5 minutes before serving—this allows the sauce to thicken perfectly.
Unbelievably creamy and comforting, this chicken alfredo develops a rich, velvety sauce that clings to every noodle while the chicken stays incredibly tender. I love serving it straight from the baking dish with a simple side salad for contrast, though my kids prefer it with extra Parmesan sprinkled on top. The best part? That golden-brown cheesy crust that forms on top gives it that restaurant-quality finish without any of the fuss.
Sausage and Pepper Dump-and-Roast
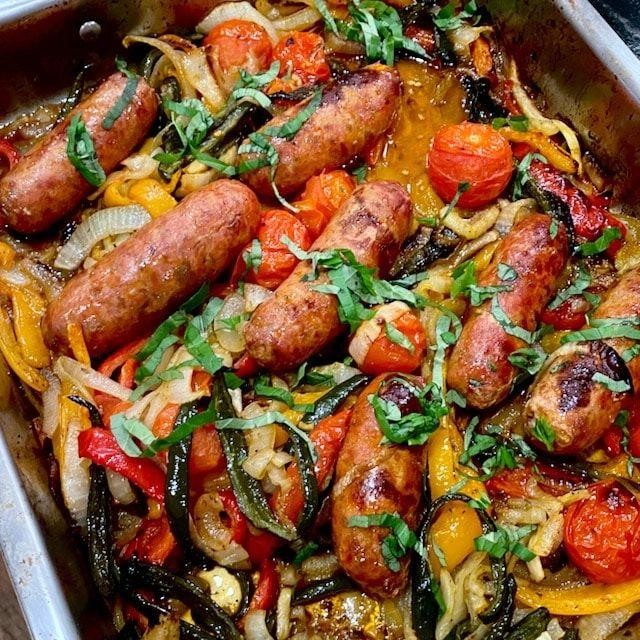
Nothing beats coming home after a long day and having dinner practically make itself. That’s exactly what happened last Tuesday when I threw together this sausage and pepper dump-and-roast situation—it’s become my new favorite lazy dinner hack that tastes anything but lazy.
2
servings15
minutes50
minutesIngredients
- 1.5 lbs Italian sausage links (I like the hot variety for some kick, but sweet works too)
- 3 bell peppers, any color (I grab whatever looks freshest at the market—today it’s red, yellow, and orange)
- 1 large yellow onion (the kind that makes you cry just thinking about chopping it)
- 3 tbsp extra virgin olive oil (my trusty bottle that lives right by the stove)
- 4 cloves garlic, minced (because everything’s better with garlic)
- 1 tsp dried oregano (rubbed between my palms to wake up the flavor)
- 1/2 tsp red pepper flakes (optional, but I always add them for heat)
- 1 tsp kosher salt (I prefer the larger crystals for seasoning)
- 1/2 tsp black pepper, freshly ground
Instructions
- Preheat your oven to 400°F—this high heat will give us those beautiful caramelized edges.
- Slice bell peppers into 1-inch wide strips, removing seeds and membranes.
- Cut onion into similar 1-inch chunks for even cooking.
- Place sausage links, pepper strips, and onion chunks in a 9×13 inch baking dish.
- Drizzle olive oil over everything—tip: pour it over your hands first to distribute evenly.
- Sprinkle minced garlic, oregano, red pepper flakes, salt, and black pepper across the ingredients.
- Toss everything with your hands until well coated—this gets the seasoning into every nook.
- Arrange sausage links in a single layer, not touching, to ensure proper browning.
- Roast for 25 minutes, then flip each sausage link—tip: use tongs to avoid piercing the casings.
- Continue roasting for another 20-25 minutes until sausages reach 160°F internally and peppers are tender with charred spots.
- Remove from oven and let rest 5 minutes—tip: this allows juices to redistribute through the sausages.
The sausages emerge juicy with snappy casings, while the peppers become meltingly tender with sweet, caramelized edges. Tonight I’m serving it over creamy polenta to soak up all those glorious pan juices, but it’s equally fantastic stuffed into crusty rolls for the ultimate sandwich situation.
Teriyaki Chicken Dump Dinner

A few weeks ago, I was racing against the clock to get dinner on the table before my son’s soccer practice, and that’s when this ridiculously easy Teriyaki Chicken Dump Dinner became our new weeknight hero. All you do is toss everything into one pan and let the oven work its magic while you tackle the million other things on your to-do list.
3
servings15
minutes50
minutesIngredients
– 1.5 lbs boneless, skinless chicken thighs (I find thighs stay juicier than breasts in this long bake)
– 1 cup low-sodium soy sauce (this is my secret to controlling saltiness since the sauce reduces)
– 1/2 cup honey (local if you have it – it gives a lovely floral note)
– 3 tbsp rice vinegar (that tang cuts through the sweetness perfectly)
– 2 tsp minced garlic from a jar (no shame in my time-saving game)
– 1 tsp grated fresh ginger (I keep peeled ginger frozen for moments like this)
– 1 tbsp cornstarch (this is crucial for that glossy, restaurant-style sauce)
– 1 lb broccoli florets (fresh works best here as frozen can get mushy)
– 1 tbsp sesame oil (don’t skip this – it adds that authentic nutty finish)
Instructions
1. Preheat your oven to 375°F – this gives us that perfect balance between cooking through and caramelizing.
2. Pat the chicken thighs completely dry with paper towels – this helps them brown instead of steam.
3. Arrange chicken thighs in a single layer in a 9×13 inch baking dish.
4. Whisk together soy sauce, honey, rice vinegar, garlic, and ginger in a medium bowl until fully combined.
5. Pour the sauce mixture evenly over the chicken in the baking dish.
6. Cover the dish tightly with aluminum foil and bake for 30 minutes – the steam created helps tenderize the chicken.
7. Remove the baking dish from the oven and carefully uncover, watching for steam.
8. In a small bowl, mix cornstarch with 2 tablespoons of the hot liquid from the baking dish to create a slurry.
9. Stir the cornstarch slurry back into the sauce surrounding the chicken until fully incorporated.
10. Add broccoli florets around the chicken, nestling them into the sauce.
11. Return the uncovered dish to the oven and bake for another 20 minutes until broccoli is tender-crisp and sauce has thickened.
12. Drizzle sesame oil over the entire dish and gently toss to coat everything evenly.
My favorite thing about this dish is how the chicken becomes fall-apart tender while the broccoli soaks up that sticky-sweet teriyaki glaze. Maybe serve it over fluffy jasmine rice to catch every last drop of that incredible sauce, or pack the leftovers cold for a fantastic next-day lunch that actually gets better as the flavors meld.
Vegetable and Curry Chickpea Dump Stew
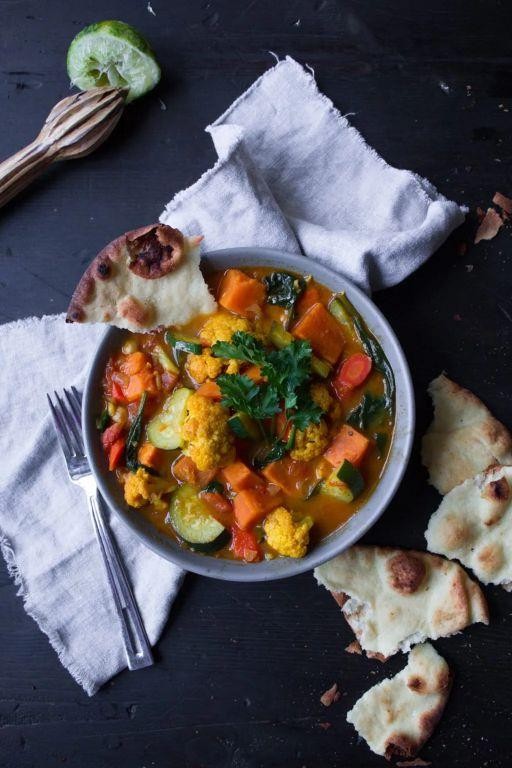
When the weather turns chilly and I’m craving something hearty but don’t want to spend hours in the kitchen, this vegetable and curry chickpea dump stew is my absolute go-to. It’s the kind of effortless meal that fills my tiny apartment with the most incredible aromas while requiring minimal effort—perfect for those busy weeknights when cooking feels like a chore.
5
servings15
minutes34
minutesIngredients
– 2 tablespoons extra virgin olive oil (my go-to for that fruity depth)
– 1 large yellow onion, diced (I always keep these on hand—they’re the foundation of so many good meals)
– 3 cloves garlic, minced (fresh is best here, though I’ve been known to use the jarred kind when I’m really pressed for time)
– 1 tablespoon curry powder (I use a medium-spice blend that my local market makes)
– 2 (15-ounce) cans chickpeas, drained and rinsed (I give them a good rinse to reduce that canned liquid taste)
– 4 cups vegetable broth (low-sodium lets me control the salt better)
– 2 large carrots, chopped into ½-inch pieces (the sweet crunch they add is worth the extra chopping)
– 2 cups chopped kale, stems removed (I massage it first to make it more tender)
– 1 (14.5-ounce) can diced tomatoes, undrained (the juice adds nice acidity)
– ½ teaspoon salt (I start with this and adjust at the end)
– ¼ teaspoon black pepper (freshly ground if I’m feeling fancy)
Instructions
1. Heat the olive oil in a large Dutch oven or heavy-bottomed pot over medium heat until it shimmers.
2. Add the diced onion and cook for 5-7 minutes, stirring occasionally, until the onion turns translucent and the edges begin to brown slightly.
3. Stir in the minced garlic and cook for exactly 1 minute until fragrant but not browned—burnt garlic can make the whole stew bitter.
4. Sprinkle the curry powder over the onion mixture and cook for 30 seconds to toast the spices, which really wakes up their flavor.
5. Add the drained chickpeas and stir to coat them in the spiced onion mixture.
6. Pour in the vegetable broth, scraping any browned bits from the bottom of the pot—those little flavor gems make all the difference.
7. Add the chopped carrots, diced tomatoes with their juice, salt, and black pepper.
8. Bring the stew to a boil, then immediately reduce the heat to maintain a gentle simmer.
9. Cover the pot and simmer for 20 minutes until the carrots are tender when pierced with a fork but still hold their shape.
10. Stir in the chopped kale and cook uncovered for 5 more minutes until the kale has wilted and turned bright green.
Gorgeously chunky and warmly spiced, this stew develops an even deeper flavor if you let it sit for 10 minutes off the heat before serving. I love how the chickpeas stay firm while the carrots soften just enough, and the kale adds that perfect pop of green. Sometimes I’ll serve it over a scoop of quinoa or with crusty bread for dipping—it’s equally delicious either way.
Lemon Garlic Salmon Dump and Bake

A few weeks ago, I discovered this magical method when I was rushing to get dinner on the table before my book club arrived—now it’s my go-to for busy weeknights when I want something impressive with minimal effort. This lemon garlic salmon dump and bake recipe has saved me more times than I can count, and it always gets rave reviews from my family, who swear it tastes like it came from a fancy restaurant.
5
servings10
minutes15
minutesIngredients
– 1.5 lbs salmon fillets (I always look for wild-caught—the flavor is so much richer)
– 3 tbsp extra virgin olive oil (this is my go-to for everything from salads to roasting)
– 4 garlic cloves, minced (fresh is best here—I keep a jar of pre-minced for emergencies)
– 1 lemon, thinly sliced (room temp lemons release more juice, so I take mine out 30 minutes ahead)
– 1 tsp dried oregano (crush it between your palms to wake up the oils)
– ½ tsp salt (I use fine sea salt for even distribution)
– ¼ tsp black pepper (freshly cracked makes all the difference)
Instructions
1. Preheat your oven to 400°F—this ensures even cooking from the moment the salmon goes in.
2. Pat the salmon fillets completely dry with paper towels to help the seasoning stick and promote browning.
3. Place the salmon skin-side down in a 9×13-inch baking dish—I line mine with foil for easier cleanup.
4. Drizzle the olive oil evenly over the salmon, making sure every part is lightly coated.
5. Sprinkle the minced garlic, oregano, salt, and black pepper directly onto the salmon.
6. Arrange the lemon slices in a single layer over the top of the salmon—they’ll infuse flavor as they bake.
7. Bake for 12–15 minutes, until the salmon flakes easily with a fork and reaches 145°F internally.
8. Let the salmon rest for 3 minutes before serving—this allows the juices to redistribute. Creamy, flaky salmon with bright lemon and aromatic garlic makes this dish feel both comforting and elegant. I love serving it over quinoa with the pan juices drizzled on top, or flaking it into tacos with avocado crema for a fun twist.
Mediterranean Dump-and-Bake Pasta
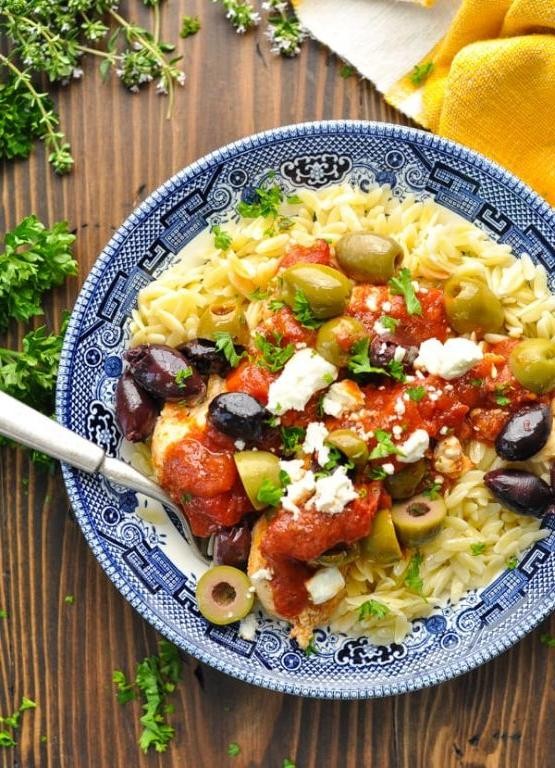
Gosh, I discovered this Mediterranean dump-and-bake pasta during one of those hectic weeks when my kids had back-to-back soccer practices and I needed something delicious that practically cooked itself. There’s something magical about throwing everything into one dish and letting the oven do all the work while you tackle life’s other demands.
6
servings15
minutes50
minutesIngredients
– 1 pound penne pasta (I always keep a few boxes in my pantry for emergency dinners)
– 1 (28-ounce) can crushed tomatoes (San Marzano are my favorite for their sweet flavor)
– 2 cups vegetable broth (homemade if I have it, but boxed works perfectly)
– 1/4 cup extra virgin olive oil (the good stuff from my last trip to the Italian market)
– 4 cloves garlic, minced (fresh only—I never use jarred for this recipe)
– 1 teaspoon dried oregano (crush it between your fingers to release the oils)
– 1/2 teaspoon red pepper flakes (adjust based on your heat preference)
– 1 (15-ounce) can chickpeas, drained and rinsed (I love the protein boost)
– 1 cup Kalamata olives, pitted and halved (these add such a nice briny punch)
– 8 ounces feta cheese, crumbled (I buy the block and crumble it myself for better texture)
– 1/2 cup fresh parsley, chopped (save some for garnish at the end)
Instructions
1. Preheat your oven to 375°F and grab a 9×13-inch baking dish—no need to grease it.
2. Pour the dry penne pasta directly into the baking dish, spreading it evenly across the bottom.
3. Add the crushed tomatoes, vegetable broth, and extra virgin olive oil directly over the pasta.
4. Sprinkle in the minced garlic, dried oregano, and red pepper flakes.
5. Add the drained chickpeas and halved Kalamata olives to the mixture.
6. Use a large spoon to thoroughly combine all ingredients until the pasta is fully coated in liquid.
7. Cover the baking dish tightly with aluminum foil to trap steam—this helps the pasta cook evenly.
8. Bake at 375°F for 35 minutes, then remove the foil carefully to avoid steam burns.
9. Stir the pasta mixture thoroughly, scraping any stuck bits from the bottom and edges.
10. Sprinkle the crumbled feta cheese evenly over the top of the pasta.
11. Return to the oven uncovered and bake for another 15 minutes at 375°F until the cheese is lightly golden and the pasta is al dente.
12. Remove from oven and let rest for 5 minutes—this allows the sauce to thicken slightly.
13. Garnish with the fresh chopped parsley just before serving.
Last night I served this with a simple arugula salad, and the creamy feta against the tangy tomatoes was absolute perfection. Leftovers taste even better the next day when the flavors have really melded together—if there are any leftovers, that is!
Dump-and-Bake BBQ Chicken and Rice
Dump-and-bake recipes have saved my sanity on more than one hectic weeknight, and this BBQ chicken and rice version is my latest obsession. During last month’s crazy schedule, I discovered that throwing everything into one pan and letting the oven do the work creates the most comforting meal with minimal cleanup. Honestly, it’s become my go-to when I want something hearty without the fuss.
5
servings15
minutes60
minutesIngredients
– 1.5 lbs boneless, skinless chicken thighs (I find thighs stay juicier than breasts in baked dishes)
– 1 cup long-grain white rice (I always rinse mine to remove excess starch)
– 1.5 cups chicken broth (low-sodium is my preference to control saltiness)
– 1 cup BBQ sauce (I’m partial to sweet and smoky varieties)
– 1 small yellow onion, diced (my trick is to chop it fine so it melts into the dish)
– 2 cloves garlic, minced (fresh garlic makes all the difference here)
– 1 tbsp olive oil (extra virgin is my kitchen staple)
– 1 tsp smoked paprika (this adds that wonderful depth)
– ½ tsp black pepper (freshly ground gives the best flavor)
Instructions
1. Preheat your oven to 375°F and grab a 9×13 inch baking dish.
2. Pour the olive oil into the baking dish and swirl to coat the bottom evenly.
3. Spread the rinsed rice in an even layer across the bottom of the dish.
4. Sprinkle the diced onion and minced garlic evenly over the rice.
5. Arrange the chicken thighs in a single layer on top of the rice mixture.
6. In a medium bowl, whisk together the chicken broth, BBQ sauce, smoked paprika, and black pepper until fully combined.
7. Pour the liquid mixture evenly over the chicken and rice, making sure all rice is submerged.
8. Cover the baking dish tightly with aluminum foil, creating a seal around the edges.
9. Place the covered dish in the preheated oven and bake for 45 minutes.
10. After 45 minutes, carefully remove the foil (watch for steam!) and check if the rice has absorbed most liquid.
11. Return the uncovered dish to the oven and bake for another 15 minutes until the chicken reaches 165°F internally.
12. Remove from oven and let rest for 5 minutes before serving. But honestly, the waiting is the hardest part when your kitchen smells this good. Beyond just being incredibly easy, this dish delivers tender chicken that falls apart with a fork and rice that’s perfectly infused with BBQ flavor. I love serving it straight from the baking dish with a simple green salad, and the leftovers somehow taste even better the next day.
Tex-Mex Dump-and-Bake Casserole

Gosh, I remember the first time I threw together this Tex-Mex casserole on a busy weeknight—it was one of those “what’s left in the pantry?” moments that turned into a family favorite. Now, I make it whenever I need a comforting, no-fuss dinner that still feels special. Honestly, it’s my go-to when I’m craving something hearty but don’t want to babysit the stove.
6
servings15
minutes61
minutesIngredients
– 1 pound ground beef (I like 85/15 for a bit of richness, but lean works too)
– 1 (15-ounce) can black beans, rinsed and drained (I always give them a good shake in the colander to avoid mushiness)
– 1 (15-ounce) can corn kernels, drained (frozen works in a pinch, but canned is quicker for this dump-and-bake style)
– 1 (10-ounce) can diced tomatoes with green chilies (like Rotel—it adds just the right kick)
– 1 cup shredded cheddar cheese (I grab pre-shredded to save time, but freshly grated melts smoother)
– 1 (1-ounce) packet taco seasoning (my kids love the mild kind, but spicy is great for adults)
– 1 cup uncooked long-grain white rice (rinsing it first keeps the casserole from getting gummy)
– 2 cups water (I use tap water, but broth adds extra flavor if you have it)
– 1 tablespoon olive oil (extra virgin is my pantry staple for a light, fruity note)
Instructions
1. Preheat your oven to 375°F—this ensures even cooking from the start, and I always set a timer so I don’t forget it’s on.
2. Heat 1 tablespoon olive oil in a large skillet over medium-high heat until it shimmers, about 1 minute.
3. Add 1 pound ground beef to the skillet and cook, breaking it up with a spatula, until it’s fully browned and no pink remains, roughly 6–8 minutes.
4. Drain any excess grease from the skillet—I tilt it and use a paper towel to soak it up for a less greasy result.
5. Stir in 1 packet taco seasoning and cook for 1 minute until fragrant, which really wakes up the spices.
6. Transfer the beef mixture to a 9×13-inch baking dish and spread it evenly across the bottom.
7. Layer 1 cup uncooked rice over the beef, spreading it in a thin, even layer to help it cook uniformly.
8. Top with 1 can black beans, 1 can corn, and 1 can diced tomatoes with green chilies, spreading each in its own layer without stirring.
9. Pour 2 cups water evenly over the entire mixture—I do this slowly so it seeps down to the rice without disturbing the layers.
10. Cover the baking dish tightly with aluminum foil, crimping the edges to trap steam, which is key for cooking the rice perfectly.
11. Bake at 375°F for 45 minutes, then remove the foil and check that the rice is tender and liquid is absorbed—if not, recover and bake 5 more minutes.
12. Sprinkle 1 cup shredded cheddar cheese evenly over the top and bake uncovered for 5–7 minutes, until the cheese is fully melted and bubbly.
13. Let the casserole rest for 5 minutes out of the oven—this helps the layers set and makes serving easier. Very satisfying, this casserole emerges with a creamy, cheesy top and a hearty base where the rice soaks up all the Tex-Mex flavors. I love scooping it into bowls and topping with fresh cilantro or a dollop of sour cream for extra zing—it’s a meal that always brings everyone to the table.
Conclusion
Keeping dinner simple doesn’t mean sacrificing flavor! These 35 dump dinners are your secret weapon for stress-free, delicious meals on even the busiest nights. We hope you find some new family favorites—give them a try and let us know which ones you love in the comments below. Don’t forget to share this roundup on Pinterest to help other busy cooks discover these easy recipes!


