Entertaining a crowd doesn’t have to be stressful! Whether you’re hosting a family reunion, holiday feast, or casual get-together, we’ve gathered 32 delicious dinner recipes perfect for feeding large groups. From comforting casseroles to impressive mains that wow, these crowd-pleasing dishes will make your gathering memorable. Get ready to find your next go-to recipe that keeps everyone coming back for seconds—let’s dive in!
Herb-Crusted Roast Beef with Root Vegetables
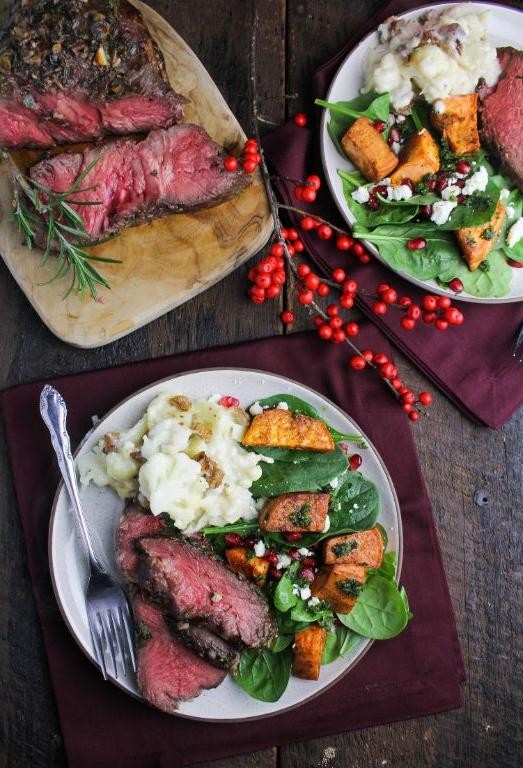
Tired of the same old Sunday dinner that makes your family’s eyes glaze over faster than a donut? This herb-crusted roast beef with root vegetables is about to become your kitchen’s main character—it’s so flavorful, even your picky eater might voluntarily eat a carrot. Seriously, it’s the cozy, impressive meal you’ll want to brag about on social media (after you’ve devoured it, of course).
6
servings20
minutes75
minutesIngredients
– A 3-pound beef roast (like chuck or round)
– A couple of tablespoons of olive oil
– A big handful of fresh rosemary, chopped
– A big handful of fresh thyme, chopped
– 3 cloves of garlic, minced
– A generous pinch of salt and black pepper
– 4 medium carrots, peeled and chopped into chunks
– 3 parsnips, peeled and chopped into chunks
– 1 large onion, cut into wedges
Instructions
1. Preheat your oven to 375°F.
2. Pat the beef roast completely dry with paper towels—this helps the crust get crispy, not steamy.
3. In a small bowl, mix the olive oil, rosemary, thyme, minced garlic, salt, and pepper into a paste.
4. Rub the herb paste evenly all over the entire surface of the roast.
5. Arrange the carrot chunks, parsnip chunks, and onion wedges in a single layer in a roasting pan.
6. Place the herb-coated roast directly on top of the vegetables in the pan.
7. Roast in the preheated oven for about 25 minutes per pound, or until a meat thermometer inserted into the thickest part reads 135°F for medium-rare.
8. Let the roast rest on a cutting board for 15 minutes before slicing—this keeps the juices inside instead of on your cutting board.
9. While the roast rests, give the vegetables a stir and pop them back in the oven for 5-10 minutes if they need more browning.
10. Slice the roast against the grain into ½-inch thick pieces.
11. Serve the sliced roast beef alongside the roasted root vegetables.
Seriously, that herb crust forms a savory, crackly blanket over the tender, pink-centered beef. The roasted root vegetables soak up all those meaty juices, turning sweet and caramelized at the edges. Slice it thin for sandwiches the next day, or go full feast mode with a side of horseradish cream for dipping—either way, it’s a winner.
Creamy Chicken Alfredo Bake

Ready to turn your kitchen into the most comforting Italian restaurant this side of your microwave? This creamy chicken Alfredo bake is basically a warm, cheesy hug in casserole form—the kind of dish that makes you forget you ever had a bad day. Let’s get bubbling!
6
servings20
minutes50
minutesIngredients
– A couple of boneless, skinless chicken breasts
– A generous glug of olive oil
– A pinch of salt and a few cracks of black pepper
– A box of fettuccine pasta
– A stick of unsalted butter
– 4 cloves of garlic, minced
– 2 cups of heavy cream
– A big handful of grated Parmesan cheese
– A cup of shredded mozzarella cheese
– A sprinkle of fresh parsley, chopped
Instructions
1. Preheat your oven to 375°F and grab a 9×13-inch baking dish.
2. Drizzle olive oil over the chicken breasts, then season both sides with salt and pepper.
3. Heat a large skillet over medium-high heat and cook the chicken for 6–7 minutes per side, until the internal temperature hits 165°F and the outside is golden brown.
4. Transfer the chicken to a cutting board and let it rest for 5 minutes—this keeps it juicy! (Tip: Don’t skip the rest; it’s key for tender meat.)
5. While the chicken rests, cook the fettuccine according to the package directions until al dente, then drain it.
6. In the same skillet, melt the butter over medium heat and sauté the minced garlic for 1 minute until fragrant.
7. Pour in the heavy cream, bring it to a gentle simmer, and let it cook for 3 minutes, stirring occasionally.
8. Stir in the grated Parmesan until the sauce is smooth and creamy. (Tip: Grate your own Parmesan for a richer flavor—no pre-shredded stuff!)
9. Chop the rested chicken into bite-sized pieces and add it to the sauce, along with the cooked fettuccine, tossing to coat everything evenly.
10. Pour the mixture into the baking dish and top with shredded mozzarella.
11. Bake for 20–25 minutes, until the cheese is bubbly and lightly browned on top. (Tip: For extra crispiness, broil for the last 2 minutes.)
12. Garnish with fresh parsley before serving.
Keep those forks ready—this bake emerges with a golden, cheesy crust giving way to tender pasta and creamy sauce that clings to every bite. Serve it straight from the dish with a side of garlic bread for dipping, or pack the leftovers (if there are any!) for a lunch that’ll make your coworkers jealous.
Slow-Cooked Pulled Pork Sliders
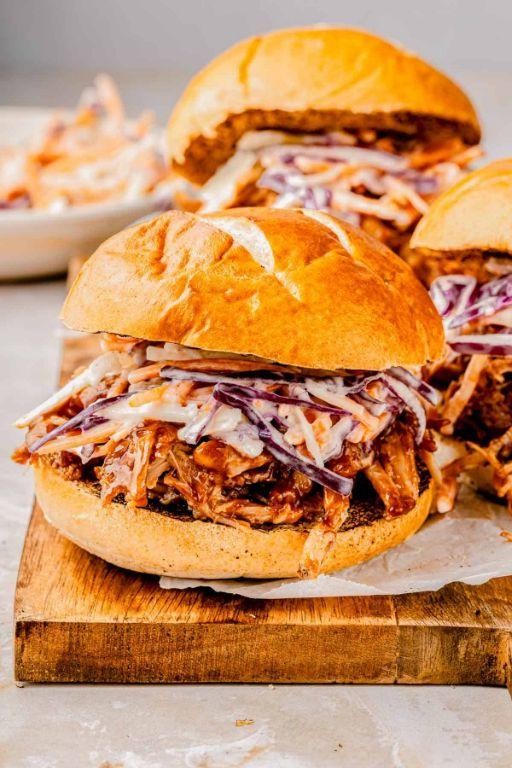
Oh, the glorious slow dance of pork and patience—these sliders are basically a cozy blanket for your taste buds, transforming humble pork shoulder into tender, shreddable magic that’ll make you the hero of any game day or lazy Sunday. Picture this: juicy, spice-rubbed pork that falls apart with a gentle nudge, piled high on soft buns with a tangy kick—it’s the kind of low-effort, high-reward meal that’ll have your friends begging for the secret (spoiler: it’s mostly just time doing the heavy lifting). Trust me, your slow cooker is about to become your new best friend.
12
sliders15
minutes480
minutesIngredients
– A 3 to 4-pound pork shoulder (bone-in or out, your call)
– A couple of tablespoons of brown sugar
– A good sprinkle of smoked paprika (about 1 tablespoon)
– A teaspoon of garlic powder
– A teaspoon of onion powder
– A half teaspoon of cumin
– A generous pinch of salt and black pepper
– A splash of apple cider vinegar (around ¼ cup)
– A ½ cup of your favorite BBQ sauce
– A dozen slider buns
– Optional: a handful of pickles or coleslaw for topping
Instructions
1. Pat the pork shoulder dry with paper towels—this helps the spice rub stick better and gives you a nicer crust.
2. In a small bowl, mix together the brown sugar, smoked paprika, garlic powder, onion powder, cumin, salt, and black pepper until well combined.
3. Rub the spice mixture evenly all over the pork shoulder, covering every nook and cranny for maximum flavor penetration.
4. Place the seasoned pork shoulder into your slow cooker, fat-side up if it has one, to let the fat render down and keep the meat moist.
5. Pour the apple cider vinegar and BBQ sauce around the pork (not directly on top, to avoid washing off the rub).
6. Cover the slow cooker and cook on low for 8 hours—yes, low and slow is key here for that fall-apart tenderness; don’t peek too often or you’ll let the heat escape!
7. After 8 hours, check if the pork shreds easily with two forks; if it resists, give it another 30–60 minutes until it’s fork-tender.
8. Carefully remove the pork from the slow cooker onto a cutting board, leaving the juices behind.
9. Use two forks to shred the pork completely, discarding any large fat pieces or bone if present.
10. Tip: Skim off excess fat from the juices in the slow cooker with a spoon for a leaner result, then mix some of the juices back into the shredded pork to keep it juicy.
11. Pile the pulled pork onto slider buns, top with pickles or coleslaw if you’re feeling fancy, and serve immediately.
Perfectly tender and infused with smoky-sweet vibes, this pork practically melts in your mouth, with a subtle tang from the vinegar cutting through the richness. Serve these sliders with extra BBQ sauce for dipping, or get wild and stack them with crispy onion rings for a crunch that’ll make your taste buds throw a party.
Hearty Vegetarian Chili with Cornbread
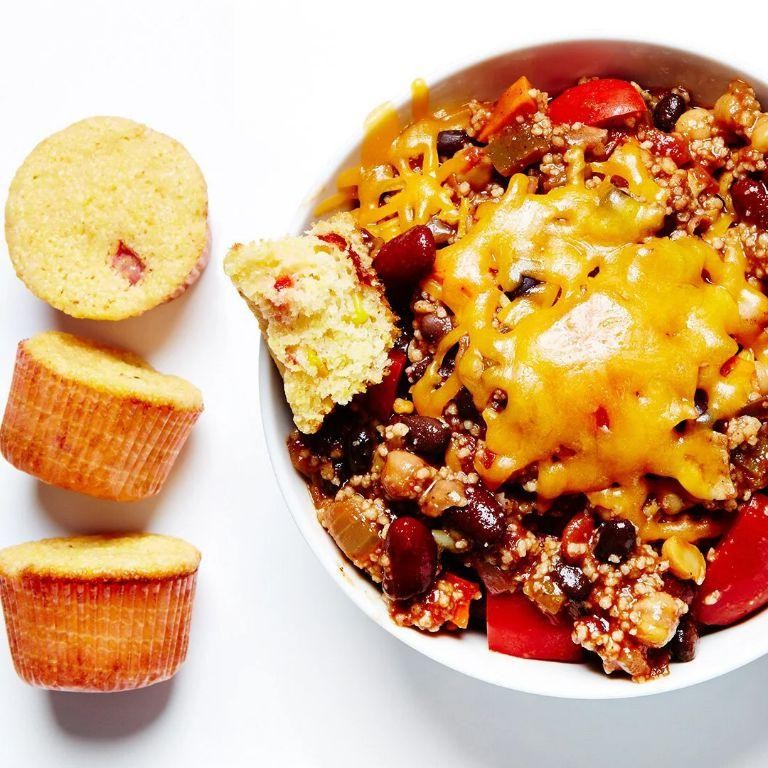
Veggie lovers, rejoice! This isn’t your average, timid chili—it’s a bold, flavor-packed fiesta in a bowl that’ll make even the most devoted carnivores question their life choices. Get ready to cozy up with a bowl of pure comfort that’s secretly healthy (but we won’t tell if you don’t).
6
servings20
minutes49
minutesIngredients
– A couple of tablespoons of olive oil
– 1 large yellow onion, chopped
– 3 cloves of garlic, minced
– 1 red bell pepper, diced
– 2 tablespoons of chili powder
– 1 teaspoon of ground cumin
– A 15-ounce can of kidney beans, drained and rinsed
– A 15-ounce can of black beans, drained and rinsed
– A 28-ounce can of crushed tomatoes
– 1 cup of frozen corn
– 2 cups of vegetable broth
– A splash of lime juice
– A handful of fresh cilantro, chopped
– 1 box of cornbread mix (plus whatever it calls for—usually an egg and some milk)
Instructions
1. Heat 2 tablespoons of olive oil in a large pot over medium heat for 1 minute until it shimmers.
2. Add 1 chopped large yellow onion and cook for 5 minutes, stirring occasionally, until it turns translucent.
3. Stir in 3 minced garlic cloves and 1 diced red bell pepper, cooking for another 3 minutes until fragrant.
4. Sprinkle in 2 tablespoons of chili powder and 1 teaspoon of ground cumin, toasting for 30 seconds to unlock their flavors (this deepens the chili’s richness).
5. Pour in a 28-ounce can of crushed tomatoes, 2 cups of vegetable broth, and bring to a gentle boil.
6. Reduce heat to low, add 1 drained and rinsed 15-ounce can of kidney beans, 1 drained and rinsed 15-ounce can of black beans, and 1 cup of frozen corn, then simmer uncovered for 25 minutes.
7. While the chili simmers, preheat your oven to 400°F and prepare the cornbread batter according to the box instructions, mixing just until combined to avoid a tough texture.
8. Bake the cornbread in a greased 8×8-inch pan for 18–20 minutes, or until a toothpick inserted in the center comes out clean.
9. Stir a splash of lime juice and a handful of chopped fresh cilantro into the chili right before serving to brighten the flavors.
10. Ladle the chili into bowls and crumble a square of warm cornbread on top for the ultimate cozy experience. Who says comfort food can’t have a little sass? This chili boasts a thick, hearty texture with beans that hold their shape, while the cornbread adds a sweet, crumbly contrast that soaks up the smoky, slightly spicy broth—perfect for dunking or devouring straight from the pot while binge-watching your favorite show.
Savoury Garlic Parmesan Pasta
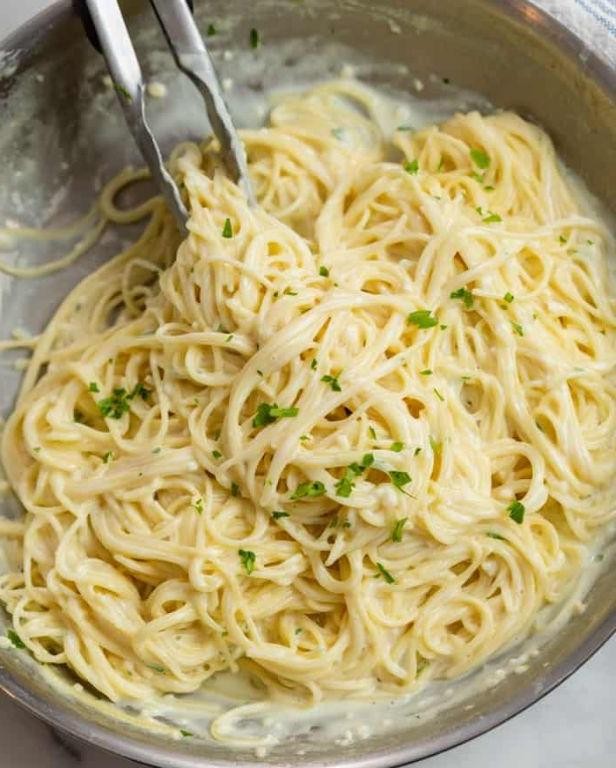
Oh, the glorious garlicky goodness that awaits! This Savoury Garlic Parmesan Pasta is basically a hug in a bowl—the kind that whispers sweet nothings to your taste buds while boldly declaring its cheesy, garlicky love from the rooftops. It’s the ultimate weeknight hero that’ll make you feel like a culinary rockstar with minimal effort.
4
servings10
minutes15
minutesIngredients
– 8 ounces of your favorite pasta (we’re talking a solid handful)
– 4 tablespoons of butter (because butter makes everything better)
– 4 cloves of garlic, minced (go big or go home)
– A splash of heavy cream (about 1/2 cup)
– A generous 1/2 cup of grated Parmesan cheese (the real stuff, please)
– A pinch of salt and a couple of cracks of black pepper
– A handful of fresh parsley, chopped (for that pop of green)
Instructions
1. Bring a large pot of salted water to a rolling boil over high heat.
2. Add the pasta and cook for 8–10 minutes, stirring occasionally, until it’s al dente (tip: taste a piece at 8 minutes to avoid mushiness).
3. While the pasta cooks, melt the butter in a large skillet over medium heat.
4. Add the minced garlic and sauté for 1–2 minutes, until fragrant but not browned (tip: keep an eye on it—burnt garlic is a tragedy).
5. Pour in the heavy cream and bring to a gentle simmer, stirring constantly.
6. Reduce the heat to low and stir in the grated Parmesan until the sauce is smooth and creamy.
7. Drain the cooked pasta, reserving 1/4 cup of pasta water.
8. Add the drained pasta to the skillet with the sauce, tossing to coat evenly.
9. If the sauce is too thick, gradually stir in the reserved pasta water until it reaches your desired consistency (tip: this starchy water is liquid gold for sauciness).
10. Season with salt and pepper, then garnish with fresh parsley.
Keep that fork handy because this pasta is irresistibly creamy with a bold garlic punch that’s balanced by the salty, nutty Parmesan. Serve it straight from the skillet for maximum cozy vibes, or pair it with a crisp salad to cut through the richness—either way, it’s a dish that’ll have everyone begging for seconds.
Lemon Herb Baked Salmon
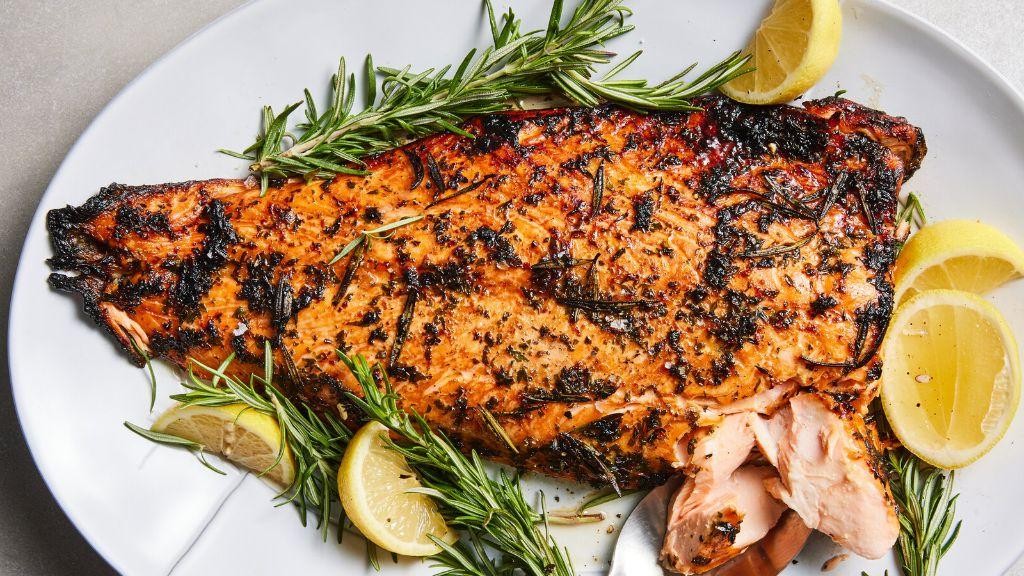
Brace yourselves, salmon lovers—this lemon herb baked situation is about to become your weeknight superhero, rescuing you from boring dinners with zero fuss and maximum flavor. It’s so easy, you’ll wonder why you ever ordered takeout, and so delicious, your taste buds might just throw a little party. Get ready to impress yourself (and maybe your cat, who’s definitely judging your cooking skills).
2
servings10
minutes15
minutesIngredients
– A couple of 6-ounce salmon fillets (skin-on or off, your call!)
– A generous glug of olive oil (about 2 tablespoons)
– The juice of one whole lemon (plus extra slices for fancy-pants presentation)
– A small handful of fresh parsley, chopped
– A sprinkle of dried oregano (about 1 teaspoon)
– A pinch of salt and a few cracks of black pepper
– A couple of garlic cloves, minced (because garlic makes everything better)
Instructions
1. Preheat your oven to 400°F and grab a baking sheet—line it with parchment paper to avoid a sticky situation later.
2. Pat those salmon fillets completely dry with paper towels; this helps the seasoning stick and gives you a crispier top (trust me, soggy salmon is a sad salmon).
3. Drizzle the olive oil over both sides of the fillets, rubbing it in like you’re giving them a mini spa treatment.
4. Squeeze the lemon juice evenly over the salmon, making sure every bite gets that zesty kick.
5. Sprinkle the minced garlic, chopped parsley, dried oregano, salt, and black pepper all over the fillets—don’t be shy, coat them like they’re headed to a flavor festival.
6. Lay a couple of lemon slices on top of each fillet for extra citrus vibes and a pretty look.
7. Pop the baking sheet into the preheated oven and bake for 12–15 minutes, until the salmon flakes easily with a fork and has an internal temperature of 145°F (no guesswork here!).
8. Let it rest for 2–3 minutes off the heat—this keeps it juicy instead of drying out into fish jerky.
Know that first bite? It’s flaky, buttery, and bursting with bright lemon and herby goodness. Serve it over a bed of quinoa for a healthy twist, or crumble it into tacos with a dollop of Greek yogurt—because why should Tuesday dinners be boring?
Stuffed Bell Peppers with Quinoa and Black Beans

Ever had a vegetable so generous it offers to carry dinner inside itself? Enter the humble bell pepper, nature’s edible bowl that’s about to get seriously stuffed with goodness. These colorful vessels are begging to be filled with a quinoa and black bean situation that’ll make your taste buds do a happy dance.
2
servings20
minutes53
minutesIngredients
– 4 big, beautiful bell peppers (any color that makes you happy)
– 1 cup of quinoa, rinsed like it owes you money
– 2 cups of vegetable broth (the good stuff)
– 1 can of black beans, drained and rinsed
– 1 yellow onion, diced with feeling
– 3 cloves of garlic, minced until it can’t mince no more
– 1 cup of corn kernels (frozen works perfectly)
– 1 cup of shredded Monterey Jack cheese
– 2 tablespoons of olive oil
– A generous pinch of chili powder
– A couple of shakes of cumin
– A good squeeze of lime juice
– A handful of fresh cilantro, chopped
– Salt and pepper to make it all behave
Instructions
1. Preheat your oven to 375°F and grab a baking dish that fits all four peppers comfortably.
2. Slice the tops off the bell peppers and remove all the seeds and membranes—get in there like you’re cleaning out your car after a road trip.
3. Drizzle the peppers with 1 tablespoon of olive oil, sprinkle with salt, and place them cut-side up in the baking dish.
4. Bake the empty peppers for 15 minutes—this pre-cooking step prevents that dreaded crunchy pepper situation.
5. While the peppers are baking, heat the remaining olive oil in a large skillet over medium heat.
6. Add the diced onion and cook for 5 minutes until it turns translucent and smells amazing.
7. Toss in the minced garlic and cook for 1 more minute—don’t let it burn or it’ll get bitter!
8. Add the rinsed quinoa to the skillet and toast it for 2 minutes, stirring constantly until it smells nutty.
9. Pour in the vegetable broth, bring to a boil, then reduce heat to low, cover, and simmer for 15 minutes.
10. Fluff the cooked quinoa with a fork, then stir in the black beans, corn, chili powder, cumin, and half the cheese.
11. Mix in the lime juice and chopped cilantro, then season with salt and pepper until it tastes right to you.
12. Remove the partially baked peppers from the oven and carefully fill them with the quinoa mixture, packing it in like you’re stuffing a suitcase for vacation.
13. Top each pepper with the remaining cheese and return to the oven for 20 minutes, until the cheese is bubbly and golden.
14. Let the peppers rest for 5 minutes before serving—this allows the filling to set and prevents mouth burns.
Outrageously satisfying with that perfect textural contrast between the tender pepper and hearty filling! The quinoa brings that delightful pop while the black beans add creamy substance, all wrapped in melty cheese goodness. Try serving these with a dollop of cool sour cream or scooping the filling onto tortilla chips for next-level nachos.
Classic Lasagna with Fresh Basil
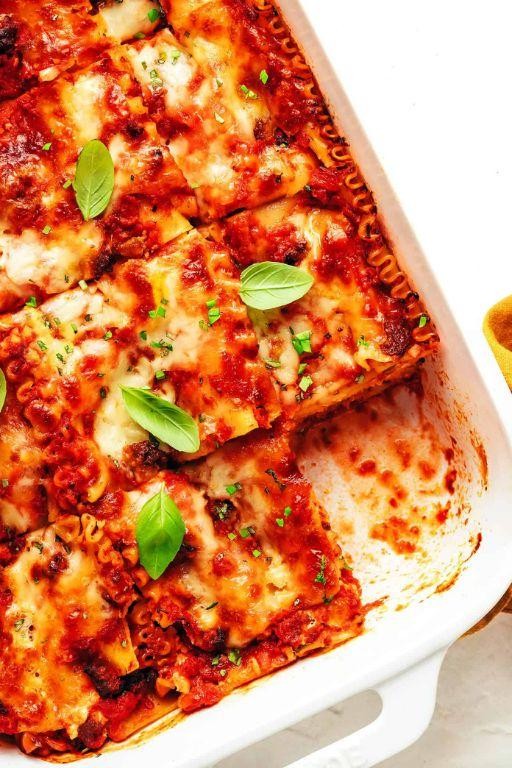
Oh, the glorious layers of cheesy, saucy goodness that is lasagna—it’s basically a cozy edible hug for your soul, and this classic version with fresh basil is here to make your taste buds do a happy dance. Forget the frozen stuff; we’re building a masterpiece from scratch that’ll have you feeling like a kitchen rockstar in no time. Let’s dive in and get those noodles bubbling!
8
servings25
minutes60
minutesIngredients
– A box of lasagna noodles (about 12 sheets)
– A pound of ground beef (go for the lean kind to keep it from getting too greasy)
– A couple of jars of your favorite marinara sauce (around 4 cups total)
– A big container of ricotta cheese (about 2 cups)
– A couple of cups of shredded mozzarella cheese
– A good handful of grated Parmesan cheese (about 1/2 cup)
– A splash of olive oil
– A small onion, finely chopped
– A few cloves of garlic, minced
– A bunch of fresh basil leaves (save some for garnish!)
– A pinch of salt and a crack of black pepper
Instructions
1. Preheat your oven to 375°F so it’s ready to bake your lasagna to perfection.
2. Bring a large pot of salted water to a rolling boil—it should look like a bubbly hot tub for noodles.
3. Add the lasagna noodles and cook for 8-10 minutes until they’re al dente (just tender but still firm when you bite into one).
4. Drain the noodles in a colander and lay them flat on a baking sheet to prevent sticking—this little trick saves you from noodle chaos later.
5. Heat a splash of olive oil in a large skillet over medium-high heat until it shimmers.
6. Add the chopped onion and cook for 4-5 minutes until it turns translucent and smells sweet.
7. Toss in the minced garlic and cook for 1 minute more until fragrant—don’t let it burn, or it’ll taste bitter.
8. Crumble in the ground beef and cook for 6-8 minutes, breaking it up with a spoon, until it’s browned all over and no pink remains.
9. Stir in the marinara sauce, bring it to a simmer, and let it bubble gently for 5 minutes to meld the flavors.
10. In a bowl, mix the ricotta cheese with a pinch of salt and a crack of black pepper until smooth.
11. Spread a thin layer of the meat sauce on the bottom of a 9×13-inch baking dish to prevent sticking.
12. Place 4 lasagna noodles side by side over the sauce, slightly overlapping them.
13. Dollop half of the ricotta mixture over the noodles and spread it evenly with a spatula.
14. Sprinkle a third of the mozzarella and a third of the Parmesan over the ricotta layer.
15. Tear a handful of fresh basil leaves and scatter them over the cheese for a burst of herbal freshness.
16. Repeat the layers: sauce, noodles, ricotta, cheeses, and basil, ending with a final layer of noodles.
17. Top with the remaining meat sauce and sprinkle the rest of the mozzarella and Parmesan evenly.
18. Cover the dish with foil and bake for 25 minutes to cook everything through.
19. Remove the foil and bake for another 10-15 minutes until the cheese is golden and bubbly.
20. Let the lasagna rest for 10 minutes before slicing—this helps the layers set so you get clean cuts.
Rich, cheesy layers meld with that herby basil kick for a texture that’s both creamy and satisfyingly firm. Serve it up with a crisp salad to balance the richness, or go all-in and pair it with garlic bread for the ultimate comfort feast. Leftovers? They’re even better the next day—if you can resist eating it all in one sitting!
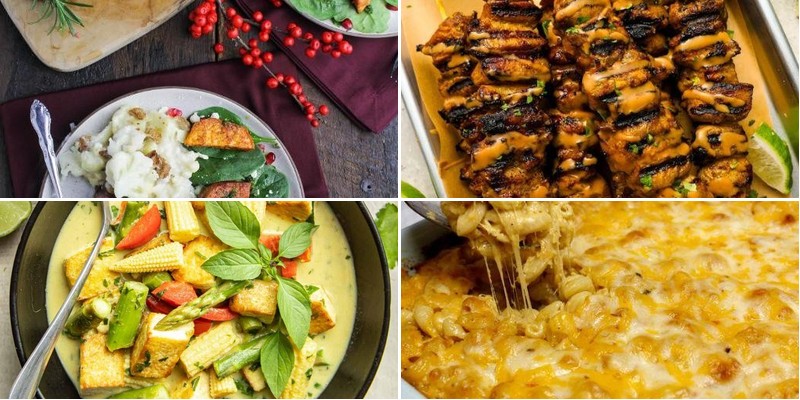
Marinated Grilled Chicken Skewers

Get ready to rescue your taste buds from boring chicken dinners with these flavor-packed marinated grilled skewers that’ll make your grill the hottest spot in the neighborhood. Seriously, these juicy, char-kissed beauties are about to become your go-to summer obsession, turning ordinary weeknights into backyard fiestas where even the pickiest eaters will be begging for seconds. Trust me, your grill has been waiting its whole life for this moment.
8
skewers150
minutes12
minutesIngredients
– About 1.5 pounds of chicken breast, cut into 1-inch chunks
– A generous 1/4 cup of olive oil
– A couple of juicy lemons for squeezing
– 3 cloves of garlic, minced like they owe you money
– 2 tablespoons of honey for that sweet magic
– 1 tablespoon of smoked paprika
– A solid teaspoon of dried oregano
– A good pinch of salt and black pepper
– A splash of soy sauce for umami goodness
– Your favorite wooden skewers, soaked in water
Instructions
1. Soak 8-10 wooden skewers in water for at least 30 minutes to prevent burning on the grill.
2. Cut 1.5 pounds of chicken breast into uniform 1-inch chunks for even cooking.
3. In a large bowl, whisk together 1/4 cup olive oil, juice from 2 lemons, 3 minced garlic cloves, 2 tablespoons honey, 1 tablespoon smoked paprika, 1 teaspoon dried oregano, 1 teaspoon salt, 1/2 teaspoon black pepper, and 1 tablespoon soy sauce until well combined.
4. Add chicken chunks to the marinade, tossing to coat every piece thoroughly.
5. Cover the bowl and refrigerate for at least 2 hours, or up to 8 hours for maximum flavor penetration.
6. Preheat your grill to medium-high heat, about 400°F, and lightly oil the grates.
7. Thread marinated chicken pieces onto soaked skewers, leaving small gaps between chunks for even heat circulation.
8. Place skewers on the hot grill and cook for 4-6 minutes per side, until chicken reaches 165°F internally and has nice grill marks.
9. Rotate skewers occasionally to prevent burning and ensure all sides get that beautiful char.
10. Remove skewers from grill and let rest for 3-5 minutes before serving to allow juices to redistribute.
What emerges from the fire are tender, juicy chicken bites with a perfect balance of smoky sweetness and zesty brightness that’ll have everyone reaching for more. The exterior gets this irresistible caramelized crust while the interior stays remarkably moist, making these skewers fantastic served over fluffy rice, tucked into warm tortillas, or even chopped up for the world’s best chicken salad. Honestly, the only problem you’ll have is deciding which delicious way to devour them first!
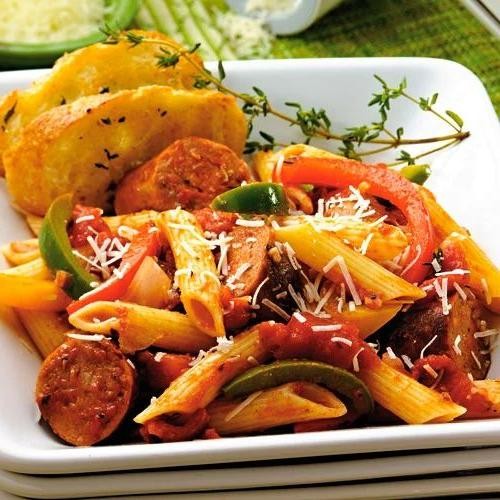
Spicy Sausage and Penne Pasta
Brace yourselves, pasta lovers—this spicy sausage and penne situation is about to become your weeknight superhero, rescuing you from bland dinners with zero apologies and maximum flavor fireworks. It’s the kind of dish that winks at you from the stove, promising a little heat, a lot of heart, and absolutely no fuss. Consider it your edible high-five for adulting (mostly) successfully.
5
servings15
minutes35
minutesIngredients
– A glug of olive oil (about 2 tablespoons)
– 1 pound of spicy Italian sausage, casings removed if they’re being shy
– 1 medium yellow onion, diced like it owes you money
– 3 cloves of garlic, minced with gusto
– A 28-ounce can of crushed tomatoes, because we’re not messing around
– A splash of heavy cream (around 1/4 cup)
– 1 pound of penne pasta, ready for their saucy destiny
– A generous handful of grated Parmesan cheese (about 1/2 cup)
– Salt and freshly ground black pepper to make it all sing
Instructions
1. Bring a large pot of salted water to a rolling boil over high heat.
2. While the water heats, heat 2 tablespoons of olive oil in a large skillet over medium-high heat.
3. Add 1 pound of spicy Italian sausage to the skillet, breaking it into small crumbles with a wooden spoon.
4. Cook the sausage for 6-8 minutes, stirring occasionally, until it’s browned and no longer pink.
5. Add 1 diced yellow onion to the skillet and cook for 4-5 minutes until softened and translucent.
6. Stir in 3 minced garlic cloves and cook for 1 minute until fragrant (don’t let it burn—nobody wants bitter garlic drama).
7. Pour in the 28-ounce can of crushed tomatoes, bring to a simmer, then reduce heat to low.
8. Let the sauce simmer uncovered for 15 minutes to thicken and develop flavor.
9. Meanwhile, add 1 pound of penne to the boiling water and cook for 10-12 minutes until al dente (tip: taste a piece at 10 minutes to avoid mushy pasta).
10. Drain the cooked penne, reserving 1/2 cup of pasta water for later.
11. Stir 1/4 cup of heavy cream into the sauce until fully incorporated.
12. Add the drained penne to the skillet, tossing to coat evenly in the sauce.
13. If the sauce is too thick, gradually add reserved pasta water until it reaches your desired consistency (tip: the starch in the water helps the sauce cling to every noodle).
14. Stir in 1/2 cup of grated Parmesan cheese until melted and creamy.
15. Season with salt and freshly ground black pepper to taste.
16. Remove from heat and let it rest for 2 minutes (tip: this allows the flavors to marry and the sauce to thicken slightly).
This beauty delivers a saucy, clingy texture that coats every penne ridge like a cozy sweater, with the spicy sausage bringing a gentle kick that’s balanced by the creamy tomato base. Try serving it straight from the skillet with extra Parmesan for a rustic, “I meant to do that” presentation, or pack it for lunch and watch coworkers eye your container with envy.
Maple-Glazed Roasted Ham
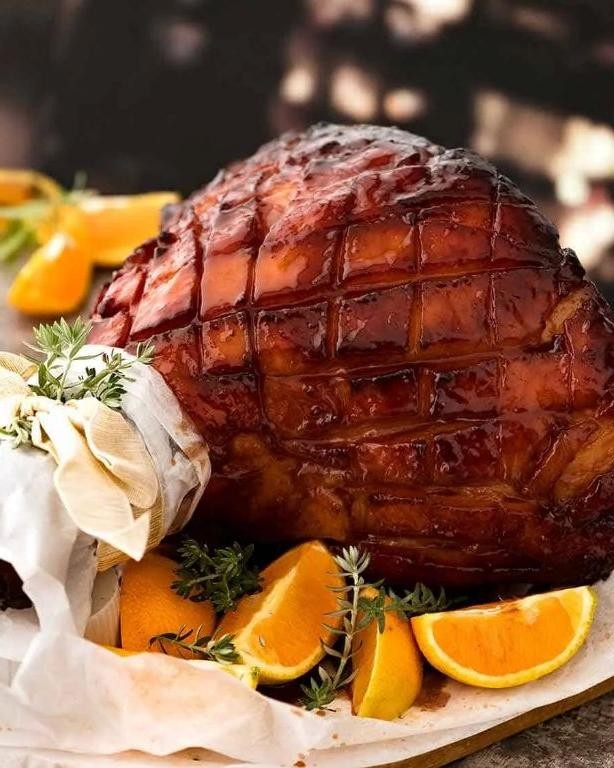
Kick your basic ham to the curb, because this maple-glazed masterpiece is about to become the star of your table and the hero of your holiday leftovers. We’re talking sweet, sticky, and seriously impressive with minimal effort—because who has time for complicated when there’s feasting to be done? Get ready for a flavor explosion that’ll have your guests begging for the recipe.
8
servings15
minutes110
minutesIngredients
– One big ol’ 8-pound fully cooked, bone-in ham
– A generous 1/2 cup of pure maple syrup (none of that pancake stuff!)
– A couple of tablespoons of Dijon mustard
– A good glug (that’s 2 tablespoons) of apple cider vinegar
– A solid pinch (1/4 teaspoon) of ground cloves
– A few good cracks of black pepper
Instructions
1. Preheat your oven to a toasty 325°F and grab a roasting pan.
2. Place that beautiful 8-pound ham right in the pan, flat side down.
3. Score the ham fat in a diamond pattern about 1/4-inch deep—this lets the glaze get all up in there.
4. Whisk together your 1/2 cup maple syrup, 2 tablespoons Dijon mustard, 2 tablespoons apple cider vinegar, 1/4 teaspoon ground cloves, and black pepper in a small bowl until it’s smooth and glossy.
5. Brush half of that glorious glaze all over the ham, making sure to get into those score marks.
6. Tent the ham loosely with aluminum foil and pop it in the oven.
7. Roast for 1 hour and 30 minutes—this low and slow heat warms it through without drying it out.
8. Remove the foil and brush with the remaining glaze.
9. Crank the oven up to 425°F and roast uncovered for another 15-20 minutes until the glaze is bubbly and caramelized.
10. Pull that beauty out and let it rest for 15 minutes before slicing—this keeps all the juices right where they belong.
Dive into that sticky, crackly crust giving way to the juiciest, most flavorful ham you’ve ever carved. The sweet maple and tangy mustard create a perfect balance that’ll have everyone reaching for seconds. Try serving thick slices on fluffy biscuits with a drizzle of the pan drippings for the ultimate next-day sandwich situation.
Sheet Pan Shrimp Fajitas
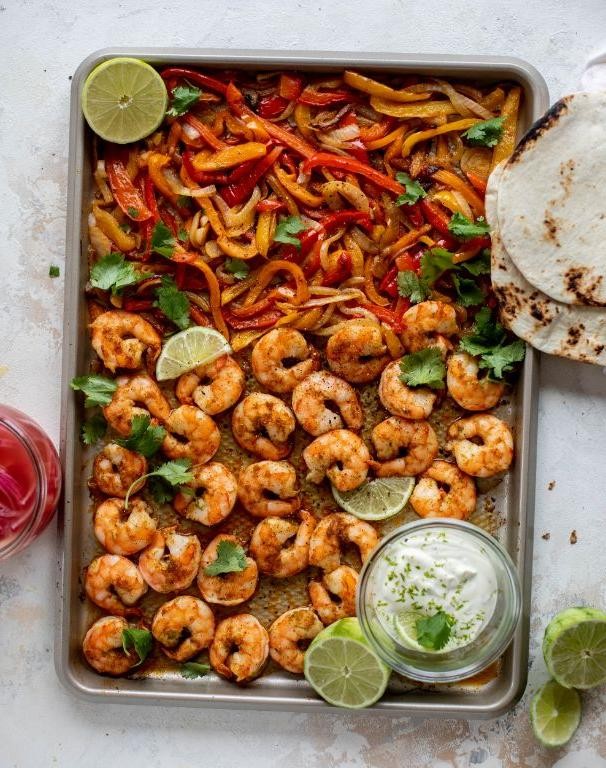
Ready to ditch the skillet chaos and embrace the glorious simplicity of sheet pan cooking? These shrimp fajitas are your new weeknight superhero, delivering maximum flavor with minimal cleanup—because who has time for scrubbing pans after a long day? Seriously, your future self will thank you for this one.
4
servings15
minutes22
minutesIngredients
– A couple of pounds of large, raw shrimp, peeled and deveined
– 3 colorful bell peppers (red, yellow, and green), sliced into strips
– A large red onion, thinly sliced
– A generous glug of olive oil (about 3 tablespoons)
– The juice from 2 fresh limes
– 2 teaspoons of chili powder
– 1 teaspoon of ground cumin
– 1 teaspoon of smoked paprika
– A good pinch of salt and a few cracks of black pepper
– A handful of fresh cilantro, roughly chopped
– Warm flour tortillas for serving
Instructions
1. Preheat your oven to 425°F and line a large, rimmed baking sheet with parchment paper for easy cleanup.
2. In a large bowl, toss the sliced bell peppers and red onion with 2 tablespoons of olive oil, 1 teaspoon of chili powder, 1/2 teaspoon of cumin, 1/2 teaspoon of smoked paprika, and half of the salt and black pepper until evenly coated.
3. Spread the seasoned vegetables in a single layer on the prepared baking sheet and roast for 15 minutes, or until they just start to soften and develop a slight char at the edges.
4. While the vegetables roast, pat the shrimp completely dry with paper towels—this helps them get a nice sear instead of steaming.
5. In the same bowl (fewer dishes!), toss the dried shrimp with the remaining 1 tablespoon of olive oil, 1 teaspoon of chili powder, 1/2 teaspoon of cumin, 1/2 teaspoon of smoked paprika, the rest of the salt and black pepper, and the juice of 1 lime.
6. Remove the baking sheet from the oven and push the vegetables to one side, then arrange the shrimp in a single layer on the empty side.
7. Return the sheet pan to the oven and roast for 5–7 minutes, until the shrimp are pink, opaque, and slightly curled.
8. Remove the pan from the oven and immediately squeeze the juice from the second lime over everything, then sprinkle with the fresh cilantro.
9. Serve the shrimp and vegetables directly from the pan with warm flour tortillas.
Let’s talk about that perfect texture: the shrimp stay juicy and tender while the peppers get a delightful smoky-charred edge. Pile everything into a warm tortilla with a dollop of cool sour cream or a sprinkle of cotija cheese for a fiesta in every bite—no passport required.
Homemade Macaroni and Cheese
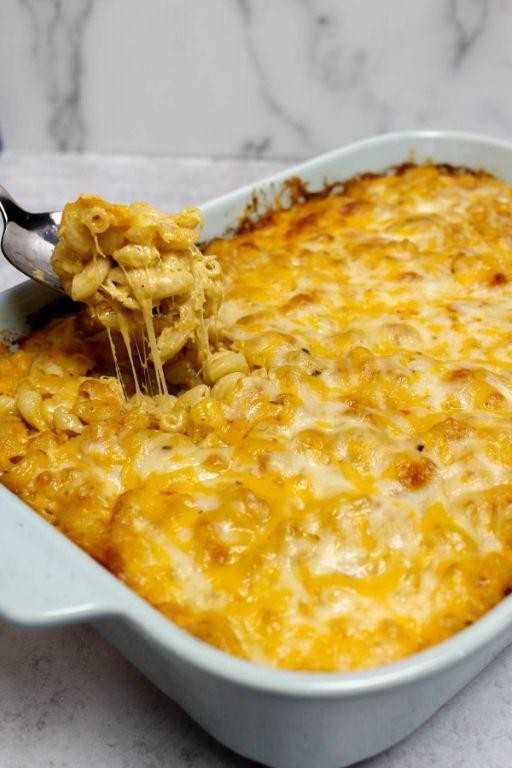
Every time I think about mac and cheese, my stomach does a little happy dance—it’s the ultimate comfort food that’s basically a hug in a bowl. Seriously, who can resist that creamy, cheesy goodness? Let’s ditch the boxed stuff and make a version so good, you’ll want to high-five your pasta.
2
servings10
minutes15
minutesIngredients
- a couple of cups of elbow macaroni
- a generous 2 cups of shredded sharp cheddar cheese
- a splash of whole milk (about 1/2 cup)
- a couple of tablespoons of butter
- a spoonful of all-purpose flour (about 2 tablespoons)
- a pinch of salt and black pepper
- a dash of paprika (optional, for a little kick)
Instructions
- Bring a large pot of salted water to a rolling boil over high heat.
- Add the elbow macaroni to the boiling water and cook for exactly 8 minutes, stirring occasionally to prevent sticking.
- Drain the macaroni in a colander and set it aside—don’t rinse it, as the starch helps the cheese sauce cling better.
- In the same pot, melt the butter over medium heat until it’s bubbly and fragrant.
- Whisk in the all-purpose flour and cook for 1 minute, stirring constantly to form a smooth paste (this is your roux, and it’s key for thickening).
- Gradually pour in the whole milk while whisking continuously to avoid lumps, and cook for 2-3 minutes until the mixture thickens slightly.
- Reduce the heat to low and stir in the shredded sharp cheddar cheese until it’s fully melted and the sauce is smooth.
- Season the cheese sauce with a pinch of salt, black pepper, and a dash of paprika for extra flavor depth.
- Add the drained macaroni back to the pot and toss everything together until the pasta is evenly coated in the cheesy sauce.
- Serve immediately while it’s hot and gooey. Now, nothing beats that first bite where the cheese pulls in all the right ways—it’s creamy, tangy from the cheddar, and just begging to be paired with crispy bacon or served alongside a fresh salad for balance. Trust me, this dish is a crowd-pleaser that’ll have everyone asking for seconds!
Thai Green Curry with Tofu

Ever had one of those days where your taste buds are screaming for adventure but your energy level is whispering “takeout menu”? Enter this Thai green curry with tofu—it’s the culinary equivalent of a tropical vacation in a bowl, minus the sunburn and overpriced souvenirs. Get ready to whip up a dish that’ll make your kitchen smell like a Bangkok street food stall, all while keeping it plant-based and downright delightful.
4
servings20
minutes18
minutesIngredients
– A 14-ounce block of firm tofu, pressed and cubed
– A couple of tablespoons of vegetable oil
– One 13.5-ounce can of coconut milk
– A quarter cup of Thai green curry paste
– A tablespoon of brown sugar
– A tablespoon of soy sauce
– A splash of lime juice (about a tablespoon)
– A cup of sliced bell peppers (any color you fancy)
– A handful of fresh basil leaves
– A cup of jasmine rice, cooked according to package directions
Instructions
1. Press the tofu block for 15 minutes using paper towels and a heavy pan to remove excess water, then cut it into 1-inch cubes.
2. Heat 2 tablespoons of vegetable oil in a large skillet over medium-high heat until it shimmers, about 2 minutes.
3. Add the tofu cubes and cook for 5–7 minutes, flipping halfway, until golden brown on all sides.
4. Remove the tofu from the skillet and set it aside on a plate.
5. In the same skillet, add the Thai green curry paste and cook for 1 minute, stirring constantly, until fragrant.
6. Pour in the can of coconut milk, scraping the bottom of the skillet to incorporate any browned bits.
7. Stir in 1 tablespoon of brown sugar and 1 tablespoon of soy sauce until fully dissolved.
8. Add the sliced bell peppers and simmer for 5 minutes, stirring occasionally, until they soften slightly.
9. Return the tofu to the skillet and cook for another 3 minutes to heat through.
10. Turn off the heat and stir in 1 tablespoon of lime juice and the handful of fresh basil leaves.
11. Serve the curry immediately over cooked jasmine rice.
Just imagine that first bite: creamy coconut milk hugs the crispy tofu, while the curry paste delivers a gentle heat that’s balanced by zesty lime and sweet basil. For a fun twist, scoop it into lettuce cups or pair it with crunchy cucumber slices to add a refreshing crunch that’ll make every spoonful a mini celebration.
Beef Stir-Fry with Broccoli
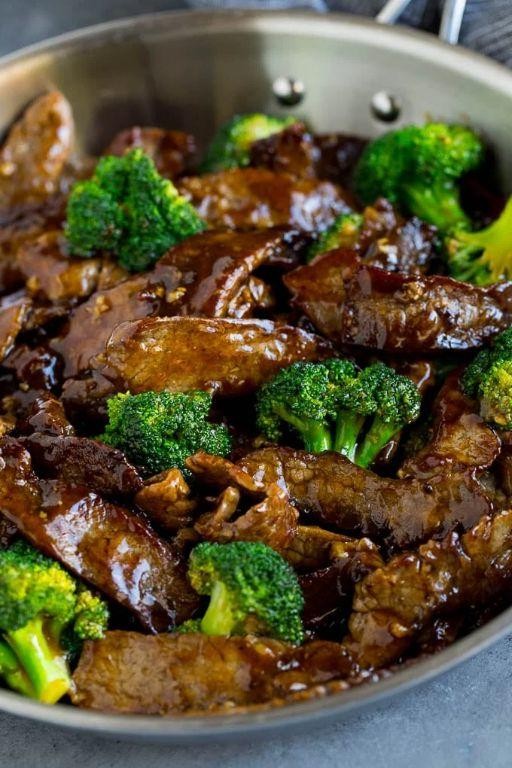
Famished for something that’ll make your taste buds do a happy dance without requiring a culinary degree? Let’s dive into a beef stir-fry with broccoli that’s so speedy, it’s basically dinner on a deadline—perfect for those nights when takeout is tempting, but your wallet says, “Nope.”
5
servings15
minutes10
minutesIngredients
– A pound of flank steak, sliced thin against the grain
– A couple of cups of broccoli florets
– A splash of vegetable oil (about 2 tbsp)
– 3 cloves of garlic, minced
– A thumb-sized piece of ginger, grated
– A quarter cup of soy sauce
– A tablespoon of cornstarch
– A teaspoon of sesame oil
– A pinch of red pepper flakes (if you like a little kick)
Instructions
1. In a medium bowl, toss the sliced flank steak with cornstarch until evenly coated—this little trick helps the beef stay tender and soak up the sauce like a sponge.
2. Heat vegetable oil in a large skillet or wok over high heat until it shimmers, about 1–2 minutes.
3. Add the beef slices in a single layer and sear for 2 minutes per side until browned but not fully cooked through; remove the beef to a plate to avoid overcooking.
4. Toss broccoli florets into the same hot skillet and stir-fry for 3–4 minutes until they turn bright green and slightly tender—listen for that satisfying sizzle!
5. Push the broccoli to one side, add minced garlic and grated ginger to the empty space, and cook for 30 seconds until fragrant to wake up those flavors.
6. Return the beef to the skillet, pour in soy sauce and sesame oil, and sprinkle in red pepper flakes if using.
7. Stir everything together and cook for another 2–3 minutes until the sauce thickens and coats the beef and broccoli evenly.
8. Remove from heat immediately to keep the veggies crisp-tender and the beef juicy.
Whoa, that was fast! You’ve got a dish with tender beef, crisp broccoli, and a savory-sweet sauce that clings to every bite. Serve it over fluffy rice or noodles, or get fancy by stuffing it into lettuce wraps for a crunchy, low-carb twist—either way, it’s a weeknight win.
Baked Ziti with Italian Sausage
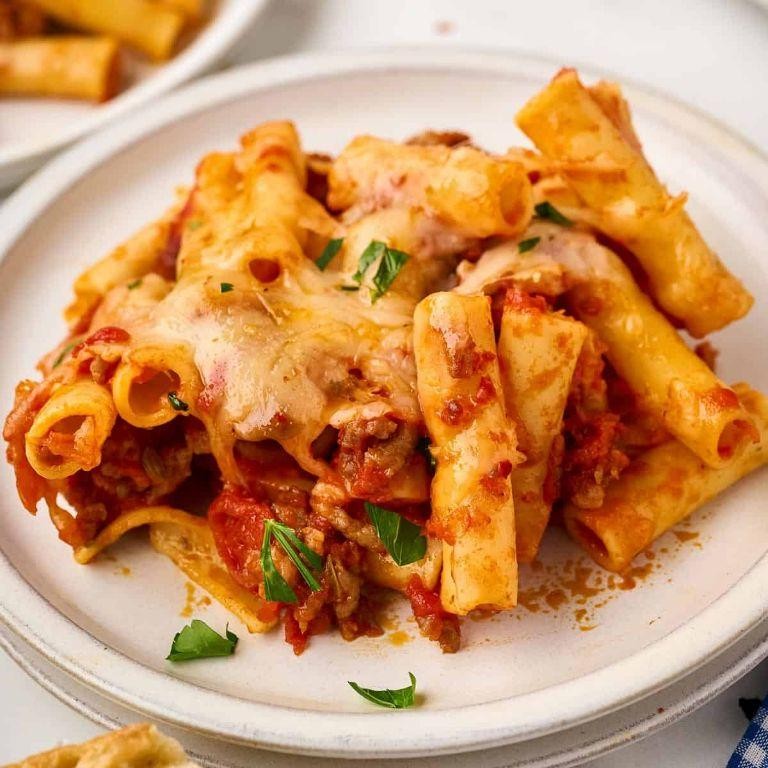
Get ready to fall in love with your oven all over again! This baked ziti is the cozy, cheesy hug your weeknight desperately needs—think Italian comfort food that’s basically a party in a baking dish, guaranteed to make you the star of the dinner table (and maybe earn you a few marriage proposals).
8
servings25
minutes50
minutesIngredients
– A pound of sweet Italian sausage (casings removed, if you please)
– A box of ziti pasta (about 1 pound)
– A jar of your favorite marinara sauce (around 24 ounces)
– A couple of cups of shredded mozzarella cheese
– A good handful of grated Parmesan cheese (about ½ cup)
– A splash of olive oil (about 1 tablespoon)
– A small onion, finely chopped
– A few cloves of garlic, minced
– A pinch of salt and a crack of black pepper
– A sprinkle of dried oregano (about 1 teaspoon)
Instructions
1. Preheat your oven to 375°F—this ensures even baking and that glorious golden top.
2. Bring a large pot of salted water to a rolling boil (tip: salt it like the sea for perfectly seasoned pasta).
3. Add the ziti and cook for exactly 8 minutes until al dente (it’ll finish cooking in the oven, so don’t overdo it!).
4. Drain the pasta and set it aside.
5. Heat 1 tablespoon of olive oil in a large skillet over medium-high heat.
6. Add the chopped onion and cook for 4–5 minutes until translucent and fragrant.
7. Crumble in the Italian sausage and cook for 6–8 minutes, breaking it up with a spoon until no pink remains.
8. Stir in the minced garlic and dried oregano, cooking for 1 more minute until aromatic.
9. Pour in the marinara sauce, season with a pinch of salt and black pepper, and simmer for 5 minutes to let the flavors meld.
10. In a large mixing bowl, combine the cooked ziti and sausage sauce, tossing gently to coat every noodle.
11. Transfer half of the ziti mixture to a 9×13-inch baking dish.
12. Sprinkle 1 cup of shredded mozzarella and ¼ cup of Parmesan evenly over the layer.
13. Top with the remaining ziti mixture, then cover with the rest of the mozzarella and Parmesan.
14. Bake uncovered for 20–25 minutes until the cheese is bubbly and lightly browned (tip: broil for the last 2 minutes for extra crispiness!).
15. Let it rest for 5 minutes before serving—this helps the layers set and prevents a lava-like burn.
Perfectly gooey with a crispy cheese crust, this ziti delivers savory sausage and tangy tomato in every forkful. Serve it with a simple green salad to cut the richness, or go all-in and pair it with garlic bread for the ultimate carb-loaded feast.
Conclusion
Excitingly, these 32 recipes make feeding a crowd stress-free and delicious! From comforting classics to impressive dishes, there’s something for every taste. We’d love to hear which recipes become your go-tos—drop a comment with your favorites below. Don’t forget to pin this article to your Pinterest boards so you can easily find these crowd-pleasers for your next gathering. Happy cooking!


