Forget skipping breakfast or grabbing something unhealthy on busy mornings! We’ve gathered 18 delicious, diet-friendly breakfast recipes to give your day a healthy, energizing start. From quick smoothies to satisfying egg dishes, these options are perfect for home cooks looking to nourish their bodies without sacrificing flavor. Get ready to transform your morning routine—let’s dive into these tasty ideas!
Overnight Oats with Chia Seeds and Berries
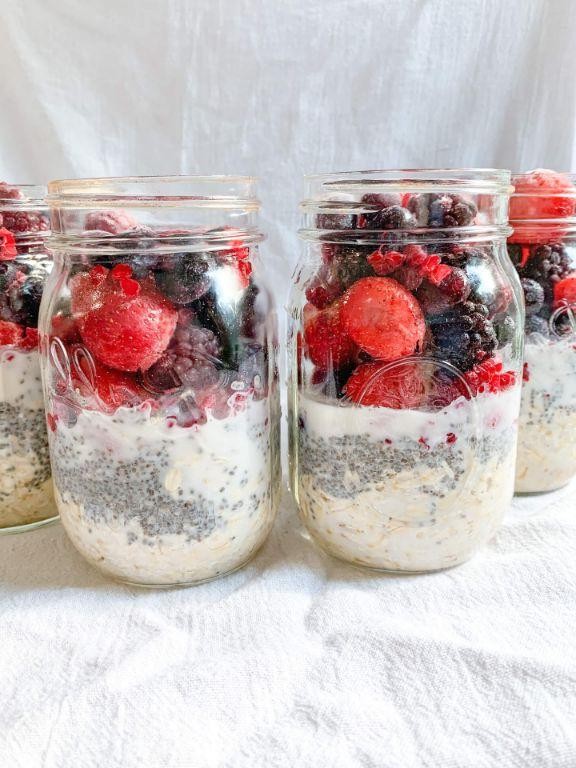
Mornings just got a whole lot more magical with this overnight oats situation—it’s basically breakfast that makes itself while you’re off dreaming of tropical vacations and winning the lottery. No more frantic scrambling or sad, soggy cereal; just a jar of creamy, dreamy goodness waiting to brighten your day. Seriously, your future well-rested self will thank you profusely.
1
servings10
minutesIngredients
– A half cup of old-fashioned rolled oats (the sturdy kind that won’t turn to mush)
– A tablespoon of chia seeds (for that delightful pudding-like thickness)
– A half cup of your favorite milk (dairy, almond, oat—you do you)
– A big handful of mixed berries (fresh or frozen, no judgment here)
– A drizzle of maple syrup, about a tablespoon (for a touch of sweetness)
– A tiny pinch of salt (trust me, it makes all the flavors pop)
Instructions
1. Grab a mason jar or any container with a tight-fitting lid—this is your overnight oats vessel.
2. Pour in the half cup of old-fashioned rolled oats, making sure they’re evenly distributed at the bottom.
3. Sprinkle the tablespoon of chia seeds over the oats; they’ll work their thickening magic as they soak.
4. Add the half cup of milk, swirling it gently to coat the oats and chia seeds completely.
5. Tip: If you’re using frozen berries, toss them in now—they’ll thaw overnight and release juicy goodness.
6. Drop in the big handful of mixed berries, pressing them lightly into the mixture if you’re feeling fancy.
7. Drizzle the tablespoon of maple syrup over everything for that sweet, cozy vibe.
8. Add the tiny pinch of salt to balance the flavors and give it a subtle boost.
9. Securely screw on the lid and give the jar a good shake—like you’re celebrating a mini victory.
10. Pop it in the fridge for at least 6 hours, or ideally overnight, so the oats can fully absorb the liquid.
11. Tip: For extra creaminess, give it a stir after the first hour to prevent chia clumps.
12. When ready to eat, give it another stir and add a splash of milk if it’s too thick for your liking.
13. Tip: Top with extra fresh berries or a sprinkle of nuts for crunch—because texture is everything.
Yum, this overnight oats creation is a total game-changer with its luscious, pudding-like texture and bursts of sweet-tart berry goodness. Serve it straight from the jar for a rustic vibe or layer it in a glass with extra fruit for an Instagram-worthy parfait. However you dish it up, it’s the effortless breakfast hero you never knew you needed.
Avocado and Egg Whole Grain Toast
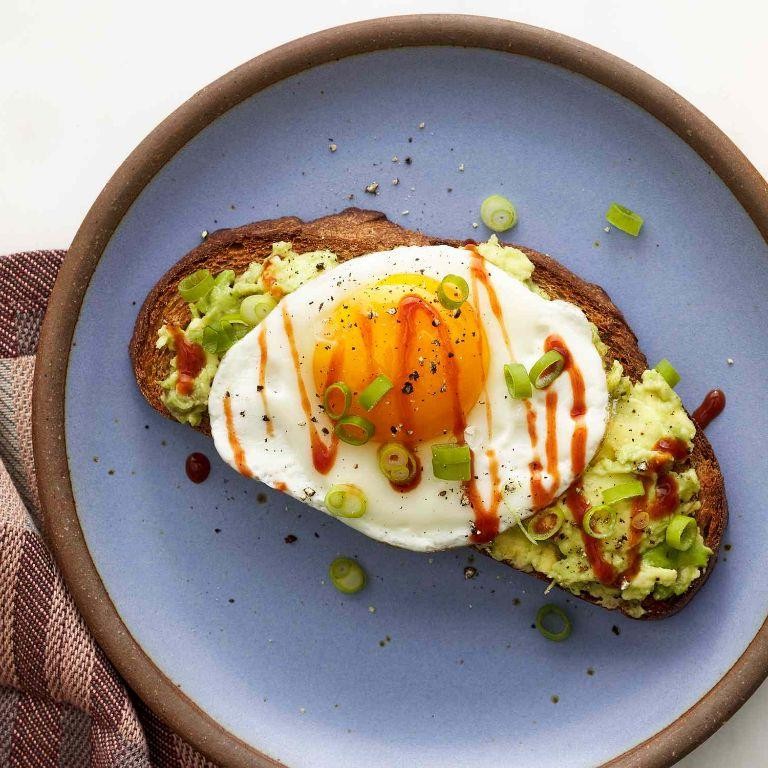
Yikes, your boring breakfast routine called—it wants its sad cereal back! Let’s upgrade your morning with this avocado and egg masterpiece that’s basically a party on toast, guaranteed to make your taste buds do a happy dance.
2
servings10
minutes12
minutesIngredients
– 2 slices of sturdy whole grain bread (the kind that can handle some serious topping action)
– 1 perfectly ripe avocado (you want it slightly soft but not mushy)
– A couple of large eggs
– A generous drizzle of extra virgin olive oil
– A big pinch of flaky sea salt
– A few cracks of freshly ground black pepper
– A squeeze of fresh lemon juice (about half a lemon’s worth)
– A sprinkle of red pepper flakes for a little kick
Instructions
1. Preheat your oven to 400°F and place the whole grain bread slices directly on the middle rack.
2. Toast the bread for 5-7 minutes until the edges are golden brown and crispy (flip halfway through for even browning).
3. While the bread toasts, heat a non-stick skillet over medium heat and add a drizzle of olive oil.
4. Crack the eggs directly into the skillet and cook for 3-4 minutes until the whites are fully set but the yolks are still runny.
5. Pro tip: Cover the skillet with a lid for the last minute to help the egg whites cook through without flipping.
6. Halve the avocado, remove the pit, and scoop the flesh into a small bowl.
7. Mash the avocado with a fork until slightly chunky, then stir in the lemon juice, salt, and black pepper.
8. Pro tip: Adding lemon juice immediately prevents the avocado from turning brown while you finish other steps.
9. Remove the toasted bread from the oven and spread the mashed avocado evenly across both slices.
10. Carefully place one cooked egg on top of each avocado-covered toast slice.
11. Finish with a final sprinkle of red pepper flakes and an extra pinch of sea salt.
12. Pro tip: Use kitchen shears to neatly trim any unruly egg white edges for picture-perfect presentation.
Creamy avocado melts into the nooks of that crunchy whole grain toast, while the runny yolk creates a luxurious sauce that ties everything together. Try stacking these open-faced beauties with extra crispy bacon tucked underneath, or slice them into dippable soldiers for the ultimate breakfast experience—your Instagram feed will thank you.
Spinach and Feta Omelette

Feeling that morning slump and tired of the same old breakfast routine? Let’s shake things up with this spinach and feta omelette that’s so delicious, it might just convince you to become a morning person. This fluffy, cheesy masterpiece is basically a hug for your taste buds and takes less time than scrolling through your social media feed.
1
servings5
minutes4
minutesIngredients
– A couple of large eggs
– A generous handful of fresh spinach
– A good sprinkle of crumbled feta cheese
– A splash of milk
– A pat of butter
– A pinch of salt
– A quick grind of black pepper
Instructions
1. Crack your eggs into a medium bowl and add the splash of milk, pinch of salt, and grind of black pepper.
2. Whisk everything together vigorously for about 30 seconds until the mixture is completely smooth and pale yellow.
3. Place a non-stick skillet over medium heat and add the pat of butter, letting it melt completely and start to foam slightly.
4. Pour the egg mixture into the hot skillet and let it cook undisturbed for 30 seconds until the edges just begin to set.
5. Use a spatula to gently push the cooked edges toward the center, tilting the pan to let the uncooked egg run to the edges.
6. Continue this pushing and tilting motion for about 1-2 minutes until the top is mostly set but still slightly wet.
7. Sprinkle the generous handful of fresh spinach evenly over one half of the omelette.
8. Top the spinach with the good sprinkle of crumbled feta cheese.
9. Carefully use your spatula to lift the unfilled side of the omelette and fold it over the spinach and feta filling.
10. Cook for another 30-45 seconds until the cheese starts to melt and the spinach wilts slightly.
11. Slide the finished omelette onto a plate, being careful to keep it folded. But honestly, who doesn’t love a little rustic charm if it breaks?
12. Let it rest for 1 minute before cutting into it – this helps the eggs set completely and makes for cleaner slices. Because nobody wants scrambled eggs pretending to be an omelette, right?
Buttery, creamy feta melts into every fluffy egg fold while the spinach adds just enough earthy freshness to keep things interesting. Serve this beauty alongside some crispy toast for the ultimate breakfast experience, or get fancy and top it with a dollop of Greek yogurt and fresh dill for a next-level brunch situation.
Banana Protein Pancakes
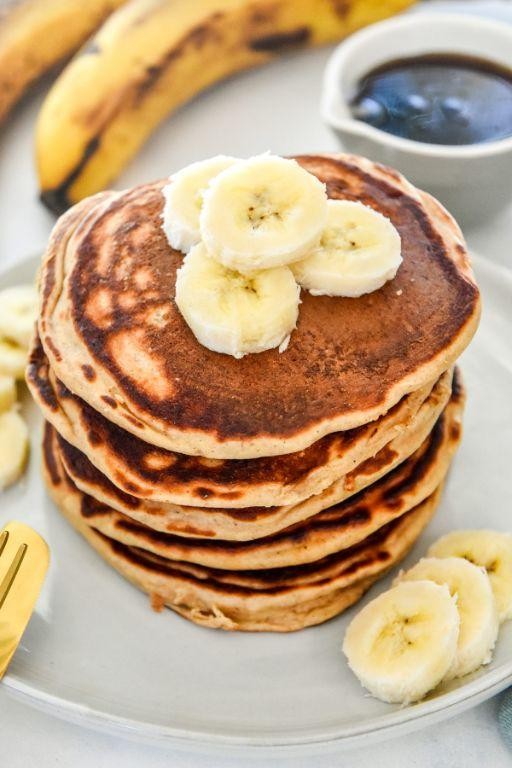
Virtually every morning, my banana-loving heart battles between grabbing a sad desk banana or actually making something delicious—until I discovered these protein-packed pancakes that turn that mushy fruit into fluffy breakfast magic. Seriously, these will make you actually excited to wake up before your alarm goes off.
2
servings10
minutes15
minutesIngredients
– 2 ripe bananas (the spottier, the sweeter!)
– 2 large eggs
– A heaping scoop of vanilla protein powder
– A couple of tablespoons of oat flour
– A splash of vanilla extract
– A pinch of baking powder
– A dash of cinnamon
– A pat of butter for cooking
Instructions
1. Mash your two ripe bananas in a medium bowl until they form a smooth paste with just a few small lumps.
2. Crack two large eggs directly into the banana mash and whisk vigorously until fully combined and slightly frothy.
3. Add one heaping scoop of vanilla protein powder to the wet mixture and stir until no dry pockets remain.
4. Sprinkle in two tablespoons of oat flour, a pinch of baking powder, and a dash of cinnamon, then mix gently—overmixing makes pancakes tough!
5. Heat a non-stick skillet over medium-low heat (about 325°F) and melt a pat of butter until it sizzles lightly.
6. Pour 1/4 cup portions of batter into the skillet, cooking 2-3 pancakes at a time without crowding the pan.
7. Cook for 2-3 minutes until bubbles form on the surface and the edges look set.
8. Flip each pancake carefully and cook for another 1-2 minutes until golden brown on both sides.
9. Transfer cooked pancakes to a wire rack instead of stacking them—this keeps them from getting soggy.
10. Repeat with remaining batter, adding more butter to the skillet between batches as needed.
But these aren’t just any pancakes—they’re delightfully dense yet moist with caramelized banana sweetness in every bite. Try stacking them high with Greek yogurt and berry compote, or go wild by crumbling them over oatmeal for a breakfast-on-breakfast situation that’ll make your taste buds do a happy dance.
Greek Yogurt Parfait with Mixed Nuts
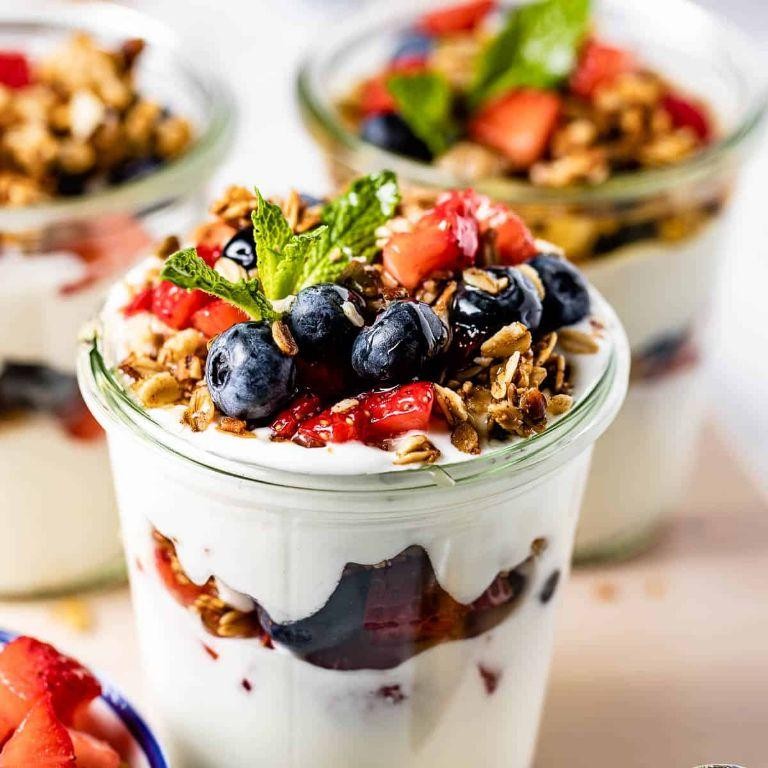
Darlings, if your breakfast routine has become as exciting as watching paint dry, prepare for a flavor fiesta that’ll make your taste buds do the cha-cha! This Greek yogurt parfait is basically a party in a glass that requires zero cooking skills but delivers maximum deliciousness.
1
parfait10
minutesIngredients
– A couple of cups of thick Greek yogurt
– A generous drizzle of honey
– A handful of your favorite mixed nuts (almonds, walnuts, and pecans work beautifully)
– A splash of vanilla extract
– A sprinkle of cinnamon
– About a cup of fresh berries (strawberries, blueberries, or raspberries)
Instructions
1. Grab your favorite clear glass or jar to show off those beautiful layers.
2. Spoon about half a cup of Greek yogurt into the bottom of your glass, creating an even layer.
3. Drizzle one tablespoon of honey over the yogurt layer in a zigzag pattern.
4. Sprinkle half of your mixed nuts evenly across the honey layer.
5. Add half of your fresh berries, arranging them carefully around the edges for visual appeal.
6. Repeat steps 2 through 5 to create a second identical layer.
7. Add the splash of vanilla extract directly to the remaining yogurt before your final layer.
8. Finish with a light dusting of cinnamon over the very top.
9. Let the parfait sit in the refrigerator for exactly 10 minutes to allow the flavors to meld together.
10. Serve immediately with a long spoon to dig through all the delicious strata.
My goodness, the contrast between the creamy yogurt and crunchy nuts creates the most satisfying texture symphony! The honey seeps into every layer, creating little pockets of sweetness that’ll make you feel like you discovered buried treasure. Try serving these in mini mason jars for a portable breakfast that looks almost too pretty to eat – almost.
Quinoa Breakfast Bowl with Veggies
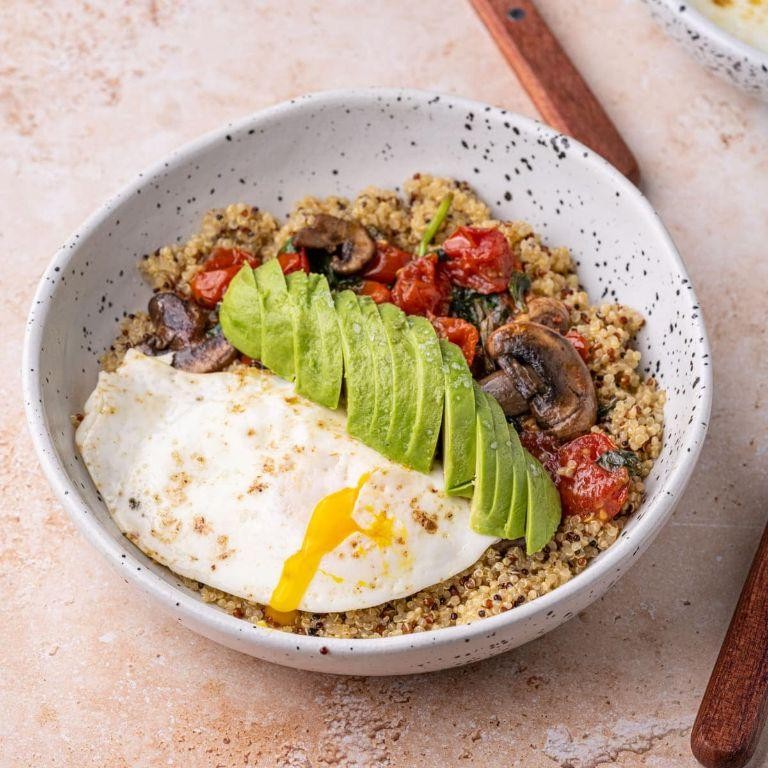
Nailed that morning scramble for something that doesn’t scream “sad desk breakfast”? This quinoa breakfast bowl with veggies is here to rescue your AM routine from the clutches of boring toast. It’s basically a party in a bowl that actually makes you want to get out of bed—no alarm snooze required.
2
bowls10
minutes25
minutesIngredients
– 1 cup of quinoa (rinsed, because nobody wants bitter breakfast)
– 2 cups of water (for cooking, not swimming)
– A glug of olive oil (about 1 tbsp)
– A couple of garlic cloves, minced (because flavor is non-negotiable)
– 1 red bell pepper, chopped into little confetti pieces
– A big handful of spinach (about 2 cups, it wilts down to almost nothing)
– 2 eggs (the star players)
– A splash of soy sauce (about 1 tbsp, for that umami kick)
– A pinch of red pepper flakes (if you like a little morning drama)
Instructions
1. Rinse 1 cup of quinoa under cold water in a fine-mesh strainer for 1 minute to remove the natural saponin coating that can make it taste bitter.
2. Combine the rinsed quinoa and 2 cups of water in a medium saucepan, bring to a boil over high heat, then reduce heat to low, cover, and simmer for 15 minutes until the water is absorbed and little “tails” appear on the quinoa grains.
3. Heat 1 tbsp olive oil in a large skillet over medium heat until it shimmers, about 1 minute.
4. Add the minced garlic and sauté for 30 seconds until fragrant but not browned—burnt garlic is breakfast’s enemy.
5. Toss in the chopped red bell pepper and cook for 4-5 minutes, stirring occasionally, until slightly softened and bright in color.
6. Stir in the spinach and cook for 1-2 minutes until just wilted, using tongs to mix it evenly with the peppers.
7. Push the veggie mixture to one side of the skillet and crack 2 eggs directly into the empty space.
8. Cook the eggs for 2-3 minutes until the whites are fully set but the yolks are still runny, or flip for over-easy if you prefer no drippy situations.
9. Fluff the cooked quinoa with a fork and divide it between two bowls.
10. Top the quinoa with the veggie and egg mixture from the skillet.
11. Drizzle 1 tbsp soy sauce over each bowl and sprinkle with red pepper flakes if using.
But wait, there’s more! The creamy yolk mingling with the fluffy quinoa creates a saucy situation that’s downright addictive. Serve it with avocado slices or a sprinkle of feta for extra flair—because breakfast should never play it safe.
Sugar-Free Apple Cinnamon Muffins
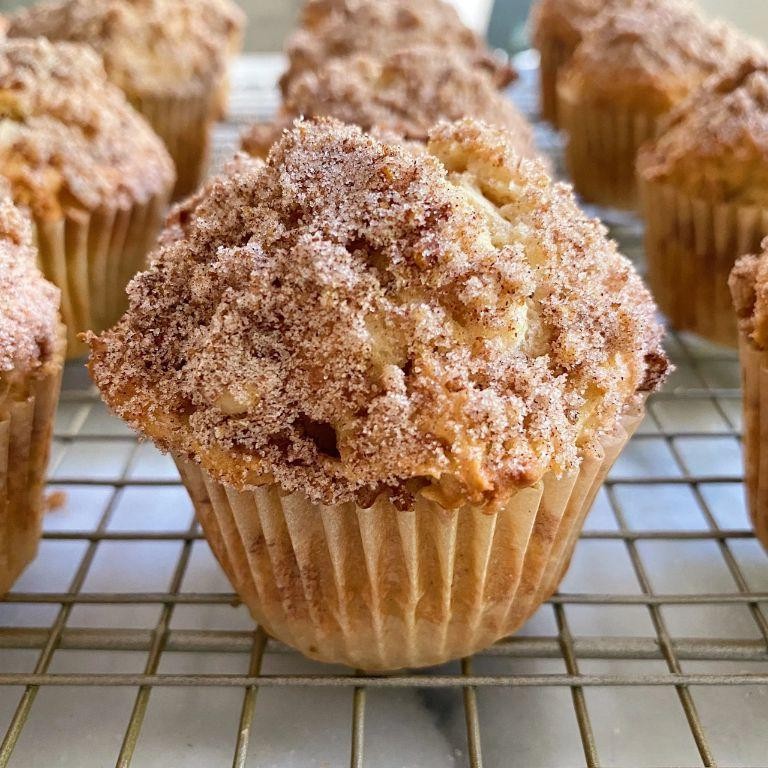
Venture into the world of guilt-free baking where these sugar-free apple cinnamon muffins are basically autumn’s way of giving you a delicious hug without the sugar crash. Seriously, your taste buds won’t even notice what’s missing—they’ll be too busy doing a happy dance.
12
muffins15
minutes22
minutesIngredients
– 2 cups of all-purpose flour (the trusty backbone)
– 1 tablespoon of baking powder (for that perfect rise)
– 1 teaspoon of cinnamon (the cozy spice hero)
– A couple of large eggs (the binding superstars)
– 1 cup of unsweetened applesauce (nature’s sweetener in disguise)
– 1/2 cup of melted coconut oil (for moist magic)
– A splash of vanilla extract (because vanilla makes everything better)
– 1/2 cup of chopped apples (for little bursts of fruity joy)
Instructions
1. Preheat your oven to 375°F and line a muffin tin with paper liners or give it a light greasing.
2. In a large bowl, whisk together the 2 cups of all-purpose flour, 1 tablespoon of baking powder, and 1 teaspoon of cinnamon until they’re best friends. Tip: Sift the flour first to avoid lumps and ensure a fluffy texture—it’s a game-changer!
3. In a separate bowl, beat the 2 large eggs until they’re frothy, then stir in the 1 cup of unsweetened applesauce, 1/2 cup of melted coconut oil, and that splash of vanilla extract.
4. Pour the wet ingredients into the dry ingredients and gently fold everything together until just combined; don’t overmix or you’ll end up with tough muffins. Tip: A few streaks of flour are totally fine—it keeps them tender.
5. Gently fold in the 1/2 cup of chopped apples, distributing them evenly so every bite gets a sweet surprise.
6. Divide the batter evenly among the muffin cups, filling each about two-thirds full to allow for rising without overflow.
7. Bake in the preheated oven for 18–22 minutes, or until a toothpick inserted into the center comes out clean and the tops are golden brown. Tip: Rotate the pan halfway through baking for even browning—no sad, lopsided muffins here!
8. Let the muffins cool in the pan for 5 minutes before transferring them to a wire rack to cool completely.
Fresh from the oven, these muffins boast a tender, moist crumb with cozy cinnamon warmth and juicy apple bits in every bite. For a fun twist, crumble one over Greek yogurt for a parfait-style breakfast, or simply enjoy them warm with a pat of butter—they’re so good, you might forget they’re sugar-free!
Smoothie Bowl with Almond Butter
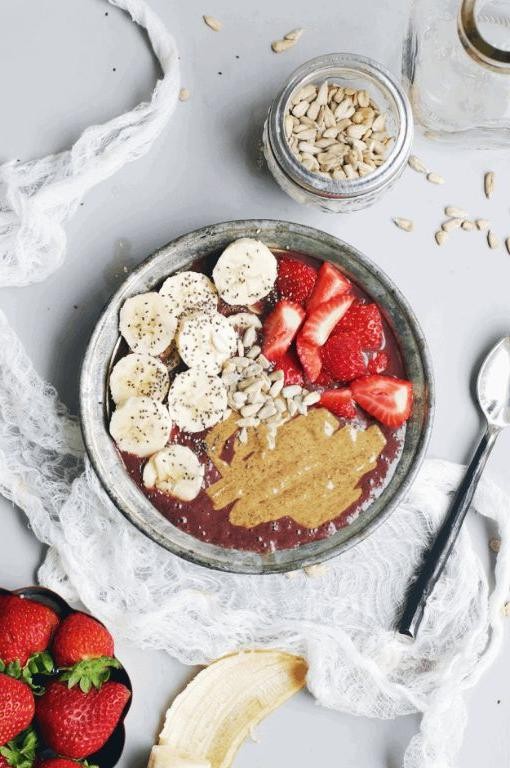
Who needs a boring breakfast when you can dive face-first into a bowl that looks like a tropical vacation and tastes like dessert decided to get healthy? This almond butter smoothie bowl is basically a party in a bowl that won’t judge you for eating it with a spoon the size of a small shovel. Trust me, your morning routine just got a major glow-up.
1
bowl10
minutesIngredients
– 2 frozen bananas (because nobody has time to wait for fresh ones to freeze)
– A heaping ¼ cup of creamy almond butter (the kind that makes you want to eat it with a spoon straight from the jar)
– ½ cup of frozen mixed berries (the more colorful, the better your Instagram pics)
– A big splash of unsweetened almond milk (about ⅓ cup, but eyeball it like a pro)
– A couple of tablespoons of maple syrup (for when life needs extra sweetness)
– Your favorite toppings – we’re talking granola, coconut flakes, fresh fruit, the works!
Instructions
1. Grab your blender and toss in those frozen bananas – they’re the secret to getting that thick, ice-cream-like texture without actually using ice cream.
2. Add the frozen mixed berries – they’ll give your bowl that gorgeous purple-pink hue and a nice tart kick.
3. Spoon in that glorious almond butter – pro tip: if your almond butter is super thick, microwave it for 15 seconds first so it blends smoothly.
4. Pour in the almond milk slowly while the blender is running on low – start with ¼ cup and add more if needed to get things moving.
5. Drizzle in the maple syrup – taste as you go because sweetness preferences are as personal as your Netflix recommendations.
6. Blend on high for 45-60 seconds until completely smooth and thick enough to eat with a spoon – it should look like soft-serve ice cream, not a drinkable smoothie.
7. Pour your masterpiece into a bowl immediately – work quickly because this stuff thickens up fast once it hits the bowl.
8. Top with all your favorite goodies – get creative with patterns or just dump everything on top like the breakfast rebel you are.
This bowl delivers the creamiest texture that’ll make you forget it’s actually good for you, with the almond butter adding this rich, nutty depth that plays perfectly against the bright berry tang. Try serving it in a hollowed-out pineapple half for maximum tropical vibes, or layer it with granola at the bottom for a surprise crunch in every bite.
Vegan Tofu Scramble with Kale

Fabulous news for anyone who thinks vegan breakfasts are just sad fruit plates! This tofu scramble is here to shake up your morning routine with more personality than your coffee mug collection. Get ready to transform that block of tofu into a savory, satisfying masterpiece that’ll make you forget eggs ever existed.
2
servings10
minutes15
minutesIngredients
– 1 block of firm tofu, pressed and crumbled
– A couple of big handfuls of kale, stems removed and chopped
– A generous glug of olive oil (about 2 tablespoons)
– A splash of soy sauce (about 1 tablespoon)
– A pinch of turmeric (about 1/2 teaspoon) for that golden hue
– A dash of garlic powder (about 1 teaspoon)
– A sprinkle of nutritional yeast (about 2 tablespoons)
– A squeeze of lemon juice (about 1 tablespoon)
– A pinch of salt and black pepper to wake everything up
Instructions
1. Heat 2 tablespoons of olive oil in a large skillet over medium heat until it shimmers.
2. Crumble the pressed tofu directly into the hot skillet using your hands or a fork.
3. Cook the tofu for 5-7 minutes, stirring occasionally, until it starts to turn lightly golden around the edges.
4. Sprinkle 1/2 teaspoon turmeric over the tofu and stir continuously for 1 minute to evenly distribute the color.
5. Add 1 teaspoon garlic powder and cook for 30 seconds until fragrant.
6. Pour in 1 tablespoon soy sauce and stir to coat all the tofu crumbles.
7. Add the chopped kale and cook for 3-4 minutes until wilted but still bright green.
8. Sprinkle 2 tablespoons nutritional yeast over the mixture and stir to combine.
9. Squeeze 1 tablespoon fresh lemon juice over everything and stir.
10. Season with salt and black pepper, then cook for 1 final minute to blend flavors.
11. Remove from heat and let rest for 2 minutes before serving. Perfectly fluffy with savory depth from the nutritional yeast and bright pops from the lemon, this scramble deserves to be piled high on toast or stuffed into breakfast tacos with avocado and hot sauce.
Zucchini and Carrot Fritters
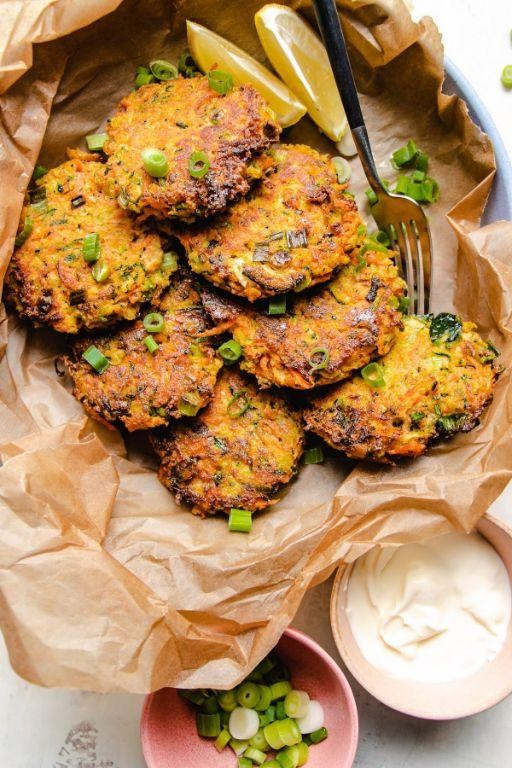
Crispy, golden, and secretly packed with veggies, these zucchini and carrot fritters are the ultimate way to trick yourself (and your family) into eating more greens—or rather, oranges and greens. They’re so delightfully crunchy and savory, you’ll forget they’re basically a salad in disguise. Trust me, your taste buds will throw a party, and your fridge’s veggie drawer will finally feel appreciated.
8
portions15
minutes24
minutesIngredients
– A couple of medium zucchinis, grated
– A couple of medium carrots, grated
– A generous pinch of salt
– 1 large egg, beaten
– 1/4 cup all-purpose flour
– 2 tablespoons grated Parmesan cheese
– 1/2 teaspoon garlic powder
– A splash of olive oil for frying
– A dollop of sour cream for serving (optional, but highly recommended)
Instructions
1. Grate the zucchinis and carrots using a box grater into a large bowl.
2. Sprinkle the salt over the grated veggies and let them sit for 10 minutes to draw out excess moisture.
3. Squeeze the grated zucchini and carrot mixture firmly with your hands over the sink to remove as much liquid as possible—this prevents soggy fritters.
4. Add the beaten egg, flour, Parmesan cheese, and garlic powder to the bowl with the squeezed veggies.
5. Mix everything together until just combined; don’t overmix or the fritters might become tough.
6. Heat a large non-stick skillet over medium heat and add enough olive oil to lightly coat the bottom.
7. Drop 1/4 cup portions of the mixture into the skillet, flattening them slightly with a spatula.
8. Cook for 3–4 minutes per side, until golden brown and crispy—flip when the edges look set.
9. Transfer the cooked fritters to a paper towel-lined plate to absorb any excess oil.
10. Repeat with the remaining mixture, adding more olive oil to the skillet as needed.
But these fritters aren’t just pretty; they’re a textural dream with a crispy exterior giving way to a tender, veggie-packed center. Serve them warm with a cool dollop of sour cream to balance the savory kick, or stack them high for a fun, fork-free appetizer that’ll disappear faster than you can say “more please.”
Almond Flour Banana Bread
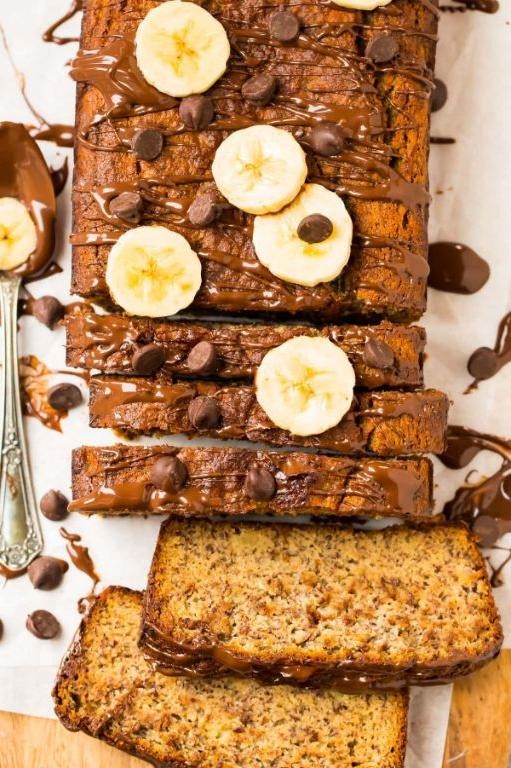
Brace yourself for a banana bread revelation that’s so delightfully nutty and moist, it might just become your new kitchen obsession. This almond flour version skips the gluten but packs all the cozy, comforting vibes you crave, with a tender crumb that’ll have you sneaking slices straight from the pan. Let’s turn those spotty bananas into something spectacular—no fancy skills required, just a whisk and a whole lot of enthusiasm.
1
loaf15
minutes55
minutesIngredients
– 3 super ripe bananas (the spottier, the sweeter!)
– 3 large eggs
– 1/4 cup of maple syrup (for that natural sweetness)
– 1/3 cup of melted coconut oil
– 1 tsp of vanilla extract (a generous splash)
– 2 1/2 cups of almond flour (fine-ground works best)
– 1 tsp of baking soda (the lift master)
– 1/2 tsp of cinnamon (a cozy dash)
– A pinch of salt (to balance the sweetness)
– A handful of chocolate chips (because why not?)
Instructions
1. Preheat your oven to 350°F and grease a standard 9×5-inch loaf pan—this ensures your bread slides out beautifully later.
2. In a large bowl, mash the ripe bananas with a fork until smooth, with just a few lumps for texture.
3. Crack in the eggs, then add the maple syrup, melted coconut oil, and vanilla extract, whisking everything until well combined.
4. Tip: If your coconut oil solidifies upon contact with cool ingredients, briefly warm the mixture by placing the bowl over a pot of simmering water for a minute, stirring gently.
5. In a separate bowl, whisk together the almond flour, baking soda, cinnamon, and salt to avoid any clumps in your batter.
6. Gradually fold the dry ingredients into the wet mixture using a spatula, stirring just until no flour streaks remain—overmixing can make the bread dense.
7. Gently stir in the chocolate chips, saving a few to sprinkle on top for a pretty finish.
8. Pour the batter into the prepared loaf pan, smoothing the top with your spatula, and scatter the reserved chocolate chips over it.
9. Bake for 50–60 minutes, or until a toothpick inserted into the center comes out clean (a few crumbs are fine, but no wet batter).
10. Tip: If the top browns too quickly, loosely tent it with aluminum foil halfway through baking to prevent burning.
11. Let the bread cool in the pan for 10 minutes, then transfer it to a wire rack to cool completely—this helps it set without getting soggy.
12. Tip: For easier slicing, wrap the cooled loaf in plastic wrap and let it rest overnight; the flavors meld and the texture firms up perfectly.
Lo and behold, you’ve got a loaf that’s irresistibly moist with a subtle nuttiness from the almond flour, punctuated by melty chocolate pockets. Serve it warm with a smear of almond butter for breakfast, or toast a slice and top it with fresh berries for a simple dessert that feels downright decadent.
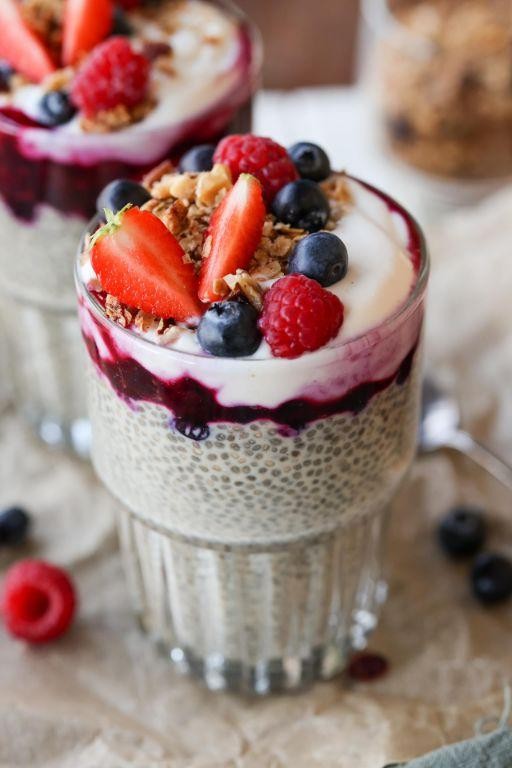
Berry Chia Seed Pudding
Yikes, is your breakfast routine more boring than watching paint dry? Let’s fix that with this berry chia seed pudding that’s so easy, you could make it while sleepwalking—and it actually tastes like dessert for breakfast!
5
servings15
minutes7
minutesIngredients
– 1/2 cup of chia seeds (the tiny powerhouses)
– 2 cups of milk (any kind you fancy)
– A generous drizzle of maple syrup (about 2 tablespoons)
– A big handful of mixed berries (fresh or frozen)
– A splash of vanilla extract (because everything’s better with vanilla)
– A couple of lemon squeezes (about 1 tablespoon of juice)
Instructions
1. Grab a medium-sized bowl and pour in your 2 cups of milk.
2. Whisk in the 1/2 cup of chia seeds immediately to prevent clumping—seriously, don’t walk away or they’ll stick together like gossipy neighbors.
3. Stir in the 2 tablespoons of maple syrup, splash of vanilla extract, and 1 tablespoon of lemon juice until everything is well combined.
4. Cover the bowl tightly with plastic wrap and refrigerate it for at least 4 hours, or overnight if you’re patient (tip: this is when the chia seeds work their magic and thicken up).
5. While the pudding chills, toss your handful of mixed berries into a small saucepan over medium heat.
6. Cook the berries for 5-7 minutes, mashing them gently with a spoon until they break down into a saucy consistency (tip: if using frozen berries, no need to thaw—just add an extra minute or two).
7. Remove the berry compote from the heat and let it cool completely to room temperature.
8. Once the pudding has thickened (it should coat the back of a spoon), give it a good stir to smooth out any lumps.
9. Layer the chia pudding and berry compote in serving glasses, starting with pudding and alternating with compote.
10. Chill the assembled pudding for another 30 minutes before serving to let the flavors mingle (tip: this extra time makes the texture perfectly creamy).
Look at that gorgeous layered creation! The pudding turns out luxuriously thick with a subtle sweetness, while the berries add a tangy punch that’ll make your taste buds do a happy dance. Try topping it with crunchy granola for breakfast or crumbled cookies for a sneaky dessert—either way, you’ve just upgraded your snack game big time.
Egg White and Turkey Bacon Wrap

Just when you thought your breakfast routine couldn’t get more exciting, along comes this protein-packed powerhouse that’ll make your boring old scrambled eggs weep with envy. Juggling morning madness? This wrap’s got your back—and your taste buds—covered.
1
wrap5
minutes10
minutesIngredients
- 4 large egg whites (about 1/2 cup)
- 3 slices of turkey bacon
- 1 whole wheat tortilla (the big 10-inch kind)
- A couple of big handfuls of fresh spinach
- A splash of olive oil (about 1 tablespoon)
- A generous pinch of salt and a few cracks of black pepper
Instructions
- Heat a non-stick skillet over medium heat and cook your turkey bacon for 3-4 minutes per side until crispy and golden brown.
- Remove the turkey bacon from the skillet and place it on a paper towel-lined plate to drain excess grease.
- Wipe out the skillet with a paper towel, then add your splash of olive oil and return to medium heat.
- Pour in your egg whites and sprinkle with that generous pinch of salt and few cracks of pepper.
- Gently scramble the egg whites for 2-3 minutes until they’re fully set but still moist—don’t overcook them or they’ll get rubbery.
- Lay your whole wheat tortilla on a clean surface and pile those big handfuls of spinach right in the center.
- Spoon your fluffy egg whites evenly over the spinach bed.
- Break your crispy turkey bacon into pieces and scatter them over the egg whites.
- Fold the bottom edge of the tortilla up about 2 inches, then tightly roll from one side to the other, tucking as you go to keep all the goodness inside.
- Slice your wrap diagonally in half—because diagonal cuts just taste better, obviously.
You’ll love how the fluffy egg whites play against the crispy turkey bacon, all wrapped up in that soft tortilla hug. Your taste buds will be doing a happy dance with every crunchy, protein-packed bite—perfect for eating one-handed while you conquer your morning.
Cottage Cheese with Fresh Pineapple
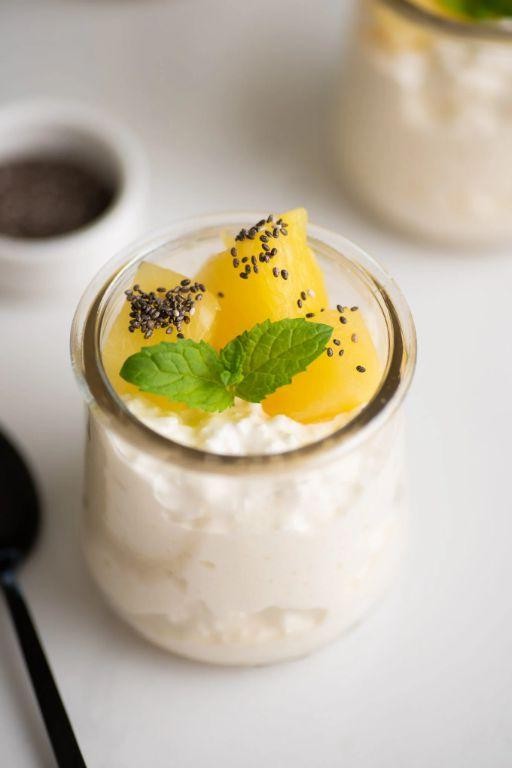
Venture into the world of ridiculously easy, protein-packed deliciousness that’s about to become your new obsession—no cooking required, just pure, unadulterated joy in a bowl. This cottage cheese and fresh pineapple combo is the snack that thinks it’s a dessert, and honestly, we’re here for the identity crisis.
1
servings10
minutesIngredients
– A generous cup of cottage cheese (go for the small-curd, creamy kind—trust me)
– About a cup of fresh pineapple chunks (because canned just doesn’t have the same zing)
– A tiny drizzle of honey, maybe a teaspoon if you’re feeling fancy
– A sprinkle of toasted coconut flakes, like a couple of tablespoons for that crunch
Instructions
1. Grab a medium-sized bowl and scoop in that glorious cup of cottage cheese.
2. Chop your fresh pineapple into bite-sized chunks—aim for pieces about 1/2 inch big so they mix in nicely without overwhelming the spoon.
3. Gently fold the pineapple chunks into the cottage cheese until they’re evenly distributed; this keeps the cottage cheese from getting watery.
4. Drizzle that teaspoon of honey over the top in a zigzag pattern—it’s not just for looks, it helps sweeten every bite.
5. Sprinkle the toasted coconut flakes evenly across the surface for a nutty crunch that contrasts the creamy texture.
6. Serve immediately to enjoy the cool, creamy cottage cheese with the juicy pineapple at its peak freshness. Now, that first bite? It’s a creamy, tangy dream with bursts of tropical sweetness that’ll make you forget you’re eating something healthy. Try it chilled for a refreshing snack or layer it in a parfait glass for a fancy-looking treat that’s secretly effortless.
Multigrain Waffles with Berries
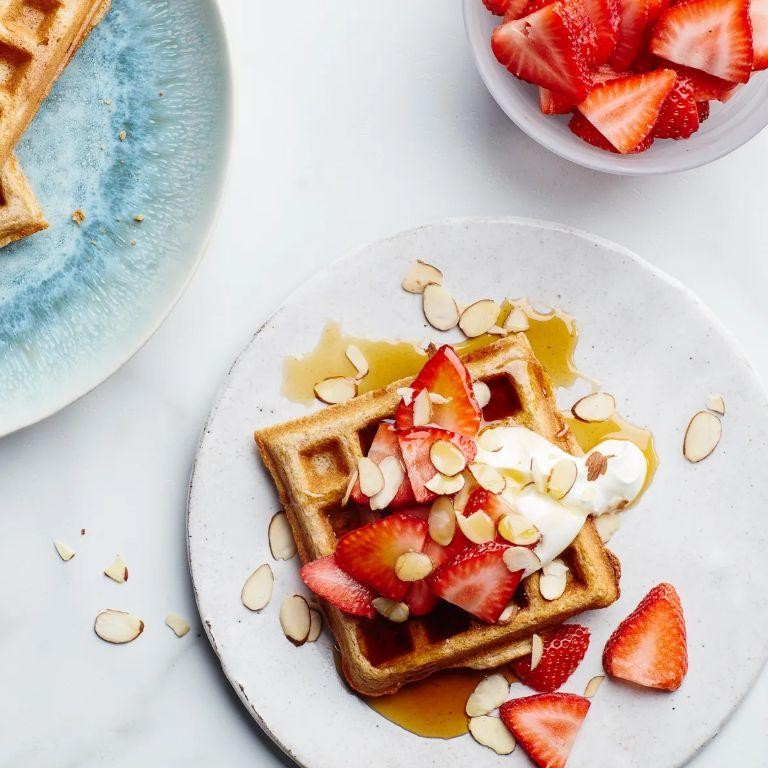
Rise and shine, sleepyheads! If your morning routine needs a serious flavor upgrade, these multigrain waffles with berries are about to become your new best friends—they’re basically a hug for your taste buds with a side of crunch. Ready to ditch the boring breakfast blues? Let’s waffle our way to deliciousness!
2
waffles10
minutes20
minutesIngredients
– 1 cup of multigrain flour (the hero of our story)
– 2 large eggs, because every great dish needs a binding buddy
– 1 cup of buttermilk for that tangy twist
– 2 tablespoons of melted butter, because butter makes everything better
– 1 tablespoon of honey for a touch of natural sweetness
– 1 teaspoon of baking powder to get those waffles fluffy
– A pinch of salt to balance the party
– 1 cup of mixed fresh berries (think strawberries, blueberries, or whatever’s looking perky)
– A splash of vanilla extract for that cozy aroma
Instructions
1. Preheat your waffle iron to 375°F—no lukewarm relationships here, we want sizzle!
2. Whisk together the multigrain flour, baking powder, and salt in a large bowl until they’re best friends. Tip: Sift the flour if it’s clumpy for a smoother batter.
3. In another bowl, beat the eggs lightly, then stir in the buttermilk, melted butter, honey, and vanilla extract until combined. Tip: Use room-temperature ingredients to avoid a lumpy mess.
4. Pour the wet ingredients into the dry ones and gently mix until just combined—overmixing is the enemy of fluffiness!
5. Fold in the mixed berries gently, so they don’t get smashed and turn your batter purple (unless you’re into that aesthetic).
6. Lightly grease the preheated waffle iron with butter or cooking spray to prevent sticking disasters.
7. Scoop about ½ cup of batter onto the center of the iron, close the lid, and cook for 4–5 minutes until golden brown and crisp. Tip: Don’t peek too early, or you’ll lose that perfect steam rise!
8. Carefully remove the waffle and repeat with the remaining batter. Voilà, you’ve got a stack of goodness! Vibrant and bursting with berry goodness, these waffles boast a nutty crunch from the multigrain base that pairs perfectly with the juicy fruit pockets. Serve them stacked high with extra berries and a drizzle of maple syrup for a breakfast that’s basically a celebration on a plate—your taste buds will thank you!
Cauliflower Hash Browns

Jazz up your breakfast game with cauliflower hash browns—because regular potatoes called in sick, and this cruciferous understudy is ready for its standing ovation. Who knew that swapping spuds for cauliflower could turn your morning plate into a crispy, guilt-free fiesta? Get ready to flip, sizzle, and devour these golden patties that’ll make you forget carbs ever existed.
8
patties15
minutes20
minutesIngredients
– One large head of cauliflower, riced up real fine
– A couple of large eggs, because they’re the glue that holds dreams together
– Half a cup of shredded cheddar cheese, for that melty magic
– A quarter cup of all-purpose flour, to keep things from falling apart
– Two tablespoons of olive oil, for sizzling in the pan
– A teaspoon of garlic powder, because flavor is non-negotiable
– Half a teaspoon of paprika, for a smoky kick
– A generous pinch of salt and black pepper, to make your taste buds dance
Instructions
1. Preheat your oven to 400°F and line a baking sheet with parchment paper—trust me, it’s a cleanup lifesaver.
2. Chop the cauliflower into florets and pulse them in a food processor until they resemble rice-like crumbs, about 10-15 seconds (tip: don’t over-process, or you’ll end up with mush).
3. Transfer the riced cauliflower to a microwave-safe bowl and microwave on high for 4 minutes to soften it and release excess moisture.
4. Let the cauliflower cool for 5 minutes, then squeeze it firmly in a clean kitchen towel over the sink to remove as much liquid as possible—this is key for crispiness.
5. In a large mixing bowl, combine the dried cauliflower, eggs, cheddar cheese, flour, garlic powder, paprika, salt, and black pepper.
6. Mix everything with your hands until well combined and the mixture holds together when pressed.
7. Heat the olive oil in a large skillet over medium-high heat until it shimmers, about 2 minutes.
8. Scoop about 1/4 cup of the cauliflower mixture per hash brown and shape it into 1/2-inch thick patties with your hands.
9. Carefully place the patties in the hot skillet, cooking 3-4 at a time to avoid crowding (tip: give them space so they crisp up evenly).
10. Cook for 3-4 minutes per side, or until golden brown and firm to the touch.
11. Transfer the hash browns to the prepared baking sheet and bake in the preheated oven for 10 minutes to ensure they’re cooked through and extra crispy.
12. Remove from the oven and let them cool on the sheet for 2 minutes before serving.
So there you have it—crispy on the outside, tender on the inside, with a cheesy, savory flavor that’ll have you reaching for seconds. Serve these bad boys alongside poached eggs for a brunch upgrade, or stack ’em high with avocado slices for a Insta-worthy meal that’s as fun to eat as it is to make.
Pumpkin Spice and Oatmeal Bars
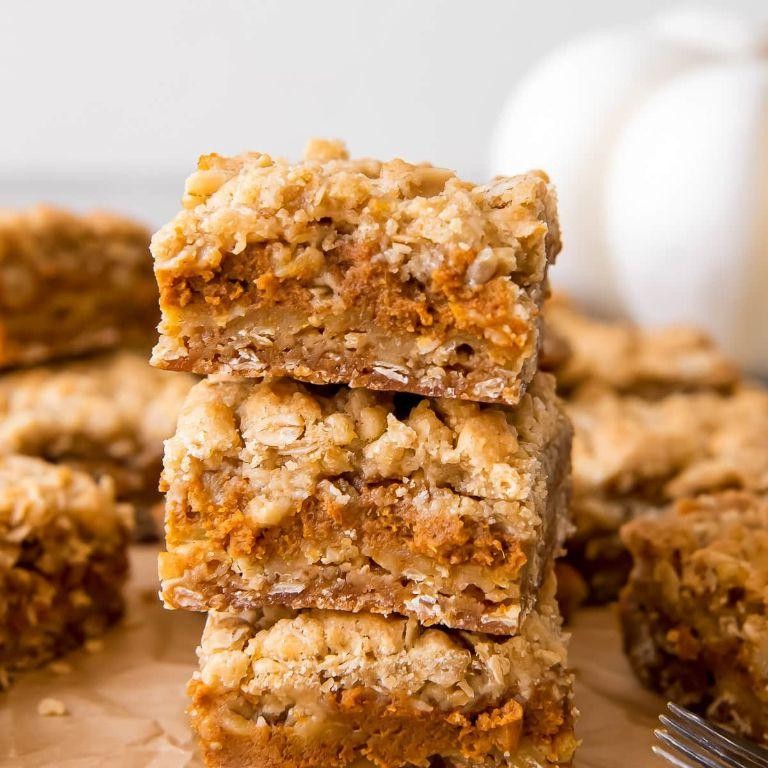
Virtually every fall, we find ourselves drowning in pumpkin spice everything—but these bars? They’re the cozy, chewy life raft we didn’t know we needed. Imagine your favorite oatmeal cookie and a pumpkin spice latte had a deliciously wholesome baby, and you’re halfway there. Let’s bake some magic, shall we?
16
bars15
minutes30
minutesIngredients
– 2 cups of old-fashioned rolled oats (the kind that makes you feel virtuous)
– 1 cup of canned pumpkin puree (not pie filling, unless you want a sugar shock)
– ½ cup of maple syrup, because autumn deserves that golden hug
– ⅓ cup of melted coconut oil, for a touch of tropical whimsy
– 1 large egg, lightly beaten—no shell surprises, please
– 1 teaspoon of vanilla extract, a splash of liquid comfort
– 1 tablespoon of pumpkin pie spice, because basic is beautiful
– ½ teaspoon of baking soda, the tiny leavening hero
– A generous pinch of salt, to keep things interesting
Instructions
1. Preheat your oven to 350°F and grab an 8×8-inch baking pan—line it with parchment paper so your bars don’t stage a sticky rebellion.
2. In a large bowl, whisk together the pumpkin puree, maple syrup, melted coconut oil, beaten egg, and vanilla extract until smooth. Tip: If your coconut oil resolidifies, warm the mixture gently—no one wants chunky oil drama.
3. Sprinkle in the pumpkin pie spice, baking soda, and that pinch of salt, then stir until everything is well acquainted.
4. Fold in the rolled oats with a spatula, making sure every oat is coated in that spiced pumpkin goodness. Tip: Don’t overmix—clumpy is charming here.
5. Spread the batter evenly into your prepared pan, using the spatula to press it down firmly. This ensures your bars bake up dense and chewy, not crumbly.
6. Bake for 25–30 minutes, or until the edges are golden brown and the center feels set when you gently press it. Tip: A toothpick inserted should come out clean, but a few crumbs are fine—we’re not aiming for desert-dry.
7. Let the pan cool completely on a wire rack before slicing into bars, unless you enjoy warm, gooey chaos (which, honestly, we support).
Let’s be real: these bars are the chewy, spiced hug your taste buds crave. They’re perfect with a dollop of whipped cream for dessert or crumbled over yogurt for a breakfast that says, “I adulted today.” Store them in an airtight container—if they last that long.
Conclusion
Morning fuel for a healthy day! These 18 breakfast recipes make eating well delicious and easy. Try them out, leave a comment with your favorite, and share this roundup on Pinterest to inspire others. Happy cooking!