Kickstart your journey to vibrant health with these 32 delectable, defined-dish recipes! Whether you’re craving quick weeknight dinners, seasonal favorites bursting with flavor, or wholesome comfort food that nourishes the soul, this roundup is your ultimate guide. We’ve curated a collection that proves healthy eating can be deliciously simple and incredibly satisfying. Ready to transform your kitchen? Dive in and discover your new go-to meals!
Whole30 Chicken Fried Cauliflower Rice

Crafted for those seeking wholesome comfort without compromise, this Whole30 Chicken Fried Cauliflower Rice transforms humble ingredients into a vibrant, satisfying meal. Its golden-brown allure and aromatic blend of ginger and garlic promise a dish that’s both nourishing and deeply flavorful, perfect for a weeknight dinner or meal-prep triumph.
Serving: 4 | Pre Time: 15 minutes | Cooking Time: 20 minutes
Ingredients
– A large head of cauliflower, riced (about 4 cups)
– A pound of boneless, skinless chicken thighs, cut into bite-sized pieces
– A couple of large eggs, lightly beaten
– A medium yellow onion, finely diced
– Three cloves of garlic, minced
– A tablespoon of fresh ginger, grated
– A quarter cup of coconut aminos
– Two tablespoons of avocado oil
– A splash of toasted sesame oil
– A handful of frozen peas and carrots
– Two green onions, thinly sliced
– A pinch of sea salt and black pepper
Instructions
1. Heat one tablespoon of avocado oil in a large skillet or wok over medium-high heat until shimmering, about 2 minutes.
2. Add the chicken pieces in a single layer, seasoning with a pinch of sea salt and black pepper, and cook undisturbed for 4–5 minutes until golden brown on one side.
3. Flip the chicken and cook for another 3–4 minutes until fully cooked through, then transfer to a plate and set aside.
4. In the same skillet, add the remaining tablespoon of avocado oil and the diced onion, sautéing for 3–4 minutes until translucent and fragrant.
5. Stir in the minced garlic and grated ginger, cooking for 30–45 seconds until aromatic but not browned.
6. Add the riced cauliflower to the skillet, spreading it evenly, and cook without stirring for 2–3 minutes to develop a slight char—this mimics the texture of traditional fried rice.
7. Push the cauliflower to one side of the skillet and pour the beaten eggs into the empty space, scrambling them for 1–2 minutes until just set before mixing into the cauliflower.
8. Return the cooked chicken to the skillet, along with the frozen peas and carrots, stirring to combine.
9. Pour in the coconut aminos and a splash of toasted sesame oil, tossing everything together and cooking for 2–3 minutes until heated through and well-coated.
10. Remove from heat and fold in the sliced green onions for a fresh finish.
Each bite offers a delightful contrast: tender chicken, crisp-tender vegetables, and cauliflower rice that’s surprisingly hearty with a subtle nuttiness from the sesame oil. Serve it straight from the skillet for a cozy meal, or top with a fried egg for extra richness, making it a versatile centerpiece that celebrates wholesome eating without sacrificing depth or satisfaction.
Spicy Shrimp and Cauliflower Grits
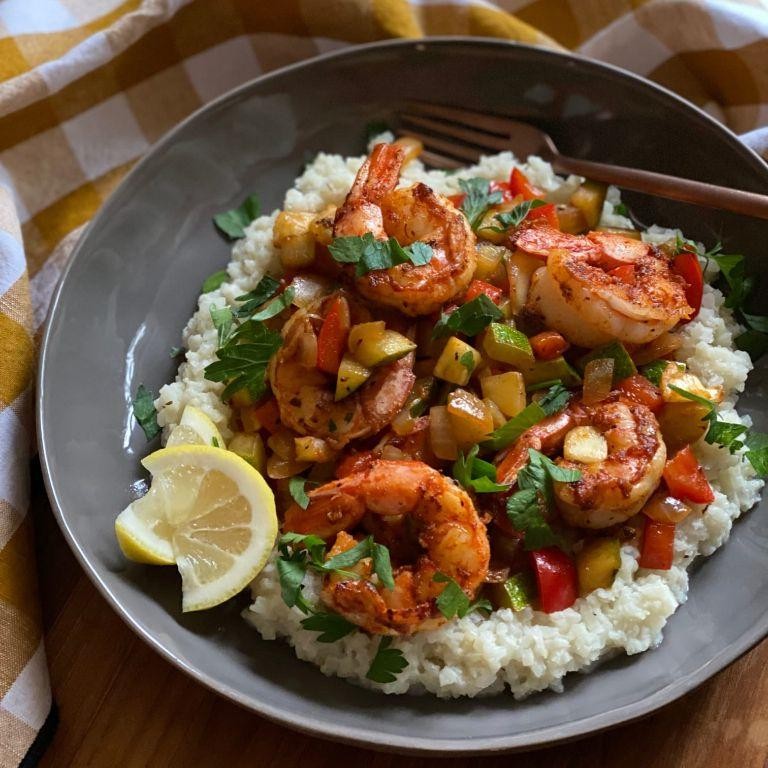
Savor the bold fusion of Southern comfort and coastal flair with this elevated weeknight wonder, where plump shrimp bathed in a fiery sauce nestle atop creamy, garlic-infused cauliflower grits. This dish transforms humble ingredients into a restaurant-worthy meal that’s surprisingly simple to prepare, offering a lighter twist on a classic without sacrificing an ounce of flavor.
Serving: 4 | Pre Time: 15 minutes | Cooking Time: 25 minutes
Ingredients
– A large head of cauliflower, cut into florets
– A couple of tablespoons of olive oil
– A splash of heavy cream
– A generous handful of shredded sharp cheddar cheese
– A couple of cloves of garlic, minced
– A pound of large shrimp, peeled and deveined
– A teaspoon of smoked paprika
– Half a teaspoon of cayenne pepper (or more if you like it hot!)
– A tablespoon of butter
– A squeeze of fresh lemon juice
– A small bunch of fresh parsley, chopped for garnish
– Salt and freshly ground black pepper
Instructions
1. Preheat your oven to 400°F and line a baking sheet with parchment paper.
2. Toss the cauliflower florets with 1 tablespoon of olive oil, salt, and pepper, then spread them in a single layer on the baking sheet.
3. Roast the cauliflower for 20 minutes, or until tender and lightly golden at the edges—this deepens the flavor for the grits.
4. Transfer the roasted cauliflower to a food processor and pulse until it resembles coarse crumbs, similar to grits.
5. In a medium saucepan over medium heat, warm 1 tablespoon of olive oil and sauté half the minced garlic for 30 seconds until fragrant.
6. Add the processed cauliflower, heavy cream, and cheddar cheese to the saucepan, stirring until the cheese melts and the mixture is creamy, about 3-4 minutes; season with salt and pepper to taste, then cover and set aside.
7. Pat the shrimp dry with paper towels—this helps them sear properly instead of steaming.
8. In a large skillet over medium-high heat, melt the butter and remaining olive oil, then add the shrimp in a single layer without overcrowding.
9. Cook the shrimp for 2 minutes per side, until they turn pink and opaque, then sprinkle with smoked paprika, cayenne pepper, and the remaining minced garlic.
10. Stir the shrimp for another minute to coat in the spices, then finish with a squeeze of lemon juice to brighten the dish.
11. To serve, spoon the creamy cauliflower grits onto plates, top with the spicy shrimp, and garnish with chopped parsley.
Rich and velvety, the cauliflower grits provide a smooth, comforting base that perfectly balances the shrimp’s spicy kick, while the fresh parsley adds a pop of color and herbaceous note. For a creative twist, try serving it in individual cast-iron skillets straight from the oven to keep it warm, or pair it with a crisp green salad to cut through the richness.
Creamy Cashew Chicken Lettuce Wraps
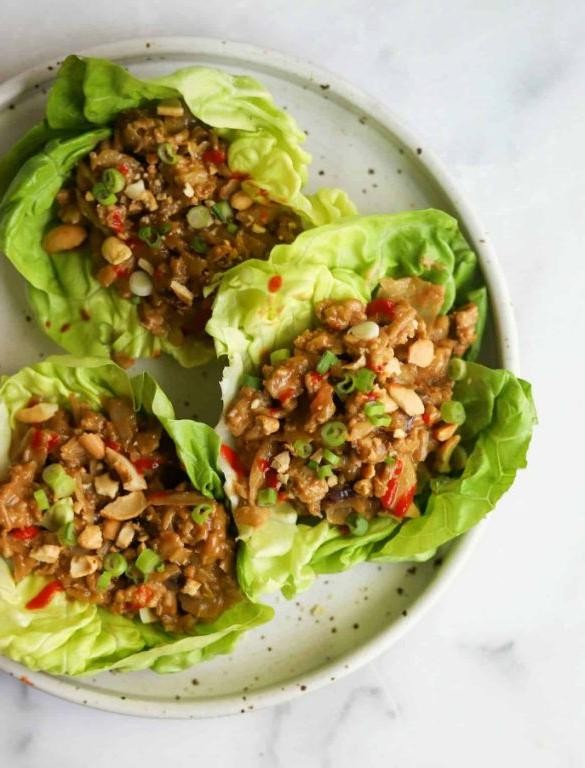
Radiantly simple yet sophisticated, these Creamy Cashew Chicken Lettuce Wraps transform humble ingredients into a dish that feels both nourishing and indulgent. Imagine tender chicken and crunchy cashews enveloped in a luxuriously smooth sauce, all cradled in crisp, fresh lettuce leaves—a perfect harmony of textures and flavors that’s as suitable for a weeknight dinner as it is for impressing guests.
Serving: 4 | Pre Time: 15 minutes | Cooking Time: 20 minutes
Ingredients
– A couple of boneless, skinless chicken breasts, cut into bite-sized pieces
– A splash of olive oil
– A small yellow onion, finely diced
– Two cloves of garlic, minced
– A third of a cup of raw cashews
– A cup of chicken broth
– A quarter cup of heavy cream
– A tablespoon of soy sauce
– A teaspoon of cornstarch mixed with a tablespoon of water
– A head of butter lettuce, leaves separated and rinsed
– Salt and freshly ground black pepper
Instructions
1. Heat a splash of olive oil in a large skillet over medium-high heat until it shimmers.
2. Add the chicken pieces in a single layer, seasoning with a pinch of salt and pepper, and cook for 5–7 minutes until golden brown on all sides and no longer pink inside; remove to a plate and set aside.
3. In the same skillet, reduce heat to medium, add the diced onion, and sauté for 3–4 minutes until softened and translucent.
4. Stir in the minced garlic and cook for 30 seconds until fragrant, being careful not to let it burn.
5. Add the raw cashews to the skillet and toast for 2–3 minutes, stirring frequently, until lightly golden and aromatic.
6. Pour in the chicken broth, heavy cream, and soy sauce, scraping up any browned bits from the bottom of the skillet with a wooden spoon.
7. Bring the mixture to a gentle simmer and let it cook for 5 minutes to allow the flavors to meld.
8. Whisk the cornstarch slurry into the sauce and continue simmering for 2–3 minutes until thickened to a creamy consistency that coats the back of a spoon.
9. Return the cooked chicken to the skillet, stirring to coat evenly in the sauce, and heat through for 2 minutes.
10. Arrange the butter lettuce leaves on a serving platter, spoon the creamy chicken mixture into each leaf, and garnish with extra cashews if desired.
Unbelievably creamy yet light, the velvety sauce clings to every morsel of chicken, while the cashews add a delightful crunch that contrasts with the tender meat. For a vibrant twist, top each wrap with a sprinkle of chopped green onions or a drizzle of sriracha to elevate the flavors even further.
Hoisin-Glazed Pork Tenderloin with Broccoli
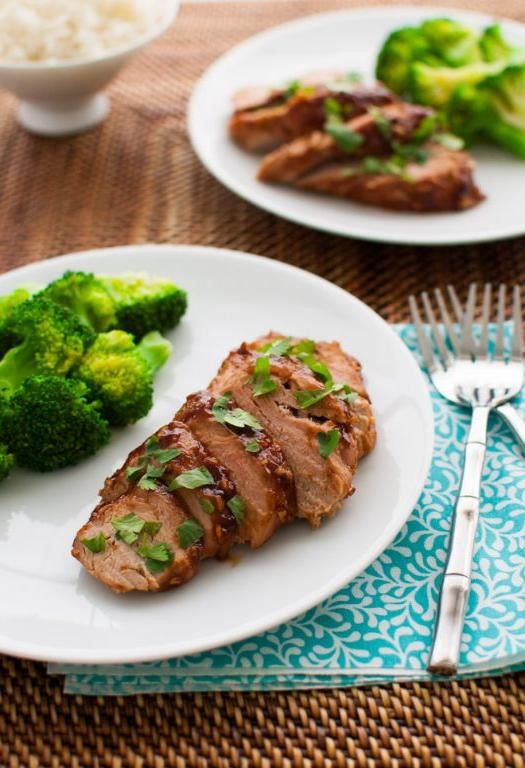
Kick off your weeknight dinner with this effortlessly elegant hoisin-glazed pork tenderloin, where sweet-salty Asian-inspired sauce meets tender, juicy pork and crisp-tender broccoli in a harmonious one-pan wonder. Perfectly balanced and ready in under an hour, it transforms simple ingredients into a restaurant-quality meal that feels both comforting and sophisticated. Let the rich, glossy glaze caramelize into a sticky perfection that will have everyone asking for seconds.
Serving: 4 | Pre Time: 15 minutes | Cooking Time: 25 minutes
Ingredients
– A couple of pork tenderloins, about 1 to 1.5 pounds total
– A good glug of olive oil, about 2 tablespoons
– A generous 1/2 cup of hoisin sauce
– A couple of tablespoons of soy sauce
– A splash of rice vinegar, about 1 tablespoon
– A teaspoon of grated fresh ginger
– A couple of cloves of garlic, minced
– A head of broccoli, cut into florets
– Salt and freshly ground black pepper, to season
Instructions
1. Preheat your oven to 400°F and pat the pork tenderloins dry with paper towels to ensure a good sear.
2. Season the pork all over generously with salt and pepper.
3. Heat the olive oil in a large oven-safe skillet over medium-high heat until shimmering, about 2 minutes.
4. Sear the pork tenderloins, turning occasionally, until browned on all sides, about 6-8 minutes total.
5. While the pork sears, whisk together the hoisin sauce, soy sauce, rice vinegar, ginger, and garlic in a small bowl to make the glaze.
6. Remove the skillet from heat and brush half of the glaze evenly over the pork tenderloins.
7. Transfer the skillet to the preheated oven and roast for 15-20 minutes, or until the internal temperature of the pork reaches 145°F on an instant-read thermometer.
8. Meanwhile, steam the broccoli florets until crisp-tender, about 4-5 minutes, then drain and set aside.
9. Remove the skillet from the oven, transfer the pork to a cutting board, and let it rest for 5 minutes to allow the juices to redistribute.
10. While the pork rests, add the steamed broccoli to the skillet with the remaining glaze and toss over low heat for 1-2 minutes to coat and warm through.
11. Slice the pork tenderloin into 1/2-inch thick medallions.
12. Serve the sliced pork alongside the glazed broccoli, drizzling any extra pan sauce over the top.
Glazed to a deep, mahogany sheen, the pork emerges succulent and fork-tender, while the broccoli retains a vibrant crunch that contrasts beautifully with the sticky-sweet sauce. For a creative twist, serve it over a bed of fluffy jasmine rice or alongside a crisp Asian slaw to soak up every last drop of that irresistible hoisin glaze.
Zucchini Noodle Pad Thai
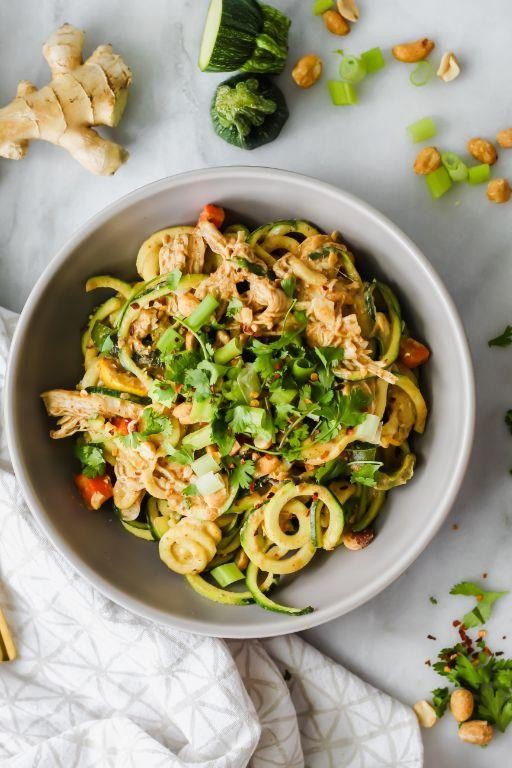
Radiantly reimagining a beloved Thai classic, this Zucchini Noodle Pad Thai offers a vibrant, vegetable-forward twist that feels both indulgent and nourishing. By swapping traditional rice noodles for crisp, spiralized zucchini, it delivers a lighter yet satisfying meal that comes together with stunning speed and simplicity, perfect for a weeknight dinner that doesn’t compromise on flavor.
Serving: 2 | Pre Time: 15 minutes | Cooking Time: 10 minutes
Ingredients
– 2 medium zucchini, spiralized into noodles
– A couple of boneless, skinless chicken breasts, thinly sliced
– A splash of vegetable oil
– 2 cloves of garlic, minced
– A handful of bean sprouts
– 2 green onions, chopped
– A quarter cup of chopped peanuts
– For the sauce: 3 tablespoons of fish sauce, 2 tablespoons of lime juice, 1 tablespoon of brown sugar, and a teaspoon of tamarind paste
– A couple of eggs, lightly beaten
– A lime wedge or two for serving
Instructions
1. In a small bowl, whisk together the fish sauce, lime juice, brown sugar, and tamarind paste until the sugar dissolves completely to make the Pad Thai sauce.
2. Heat a large skillet or wok over medium-high heat and add a splash of vegetable oil, swirling to coat the pan evenly.
3. Add the thinly sliced chicken breasts to the hot skillet and cook for 4-5 minutes, stirring occasionally, until they are no longer pink and have a light golden sear.
4. Push the chicken to one side of the skillet and pour the beaten eggs into the empty space, letting them set for about 30 seconds before scrambling gently with a spatula.
5. Stir in the minced garlic and cook for 30 seconds until fragrant, being careful not to let it burn.
6. Add the spiralized zucchini noodles to the skillet, tossing everything together to combine.
7. Pour the prepared Pad Thai sauce over the zucchini and chicken mixture, stirring continuously to coat everything evenly for 2-3 minutes until the zucchini is just tender but still has a slight crunch.
8. Fold in the bean sprouts and chopped green onions, cooking for an additional minute to warm them through.
9. Remove the skillet from the heat and divide the Pad Thai between two plates.
10. Top each serving with the chopped peanuts and garnish with lime wedges on the side.
Light and lively, this dish boasts a delightful contrast between the tender chicken, the crisp zucchini noodles, and the crunchy peanuts, all enveloped in a tangy-sweet sauce that sings with umami depth. For a creative twist, try serving it in lettuce cups for a handheld appetizer or alongside a cool cucumber salad to balance the rich flavors.
Korean Beef Bowls with Cucumber Salad
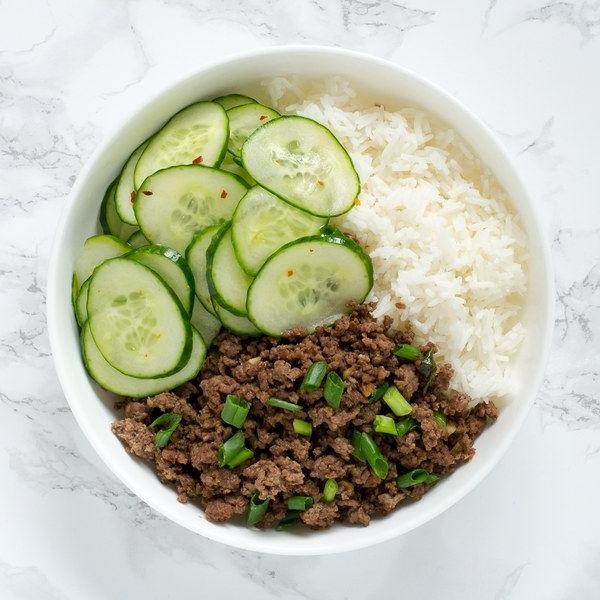
Aromatic and deeply satisfying, Korean beef bowls with cucumber salad offer a harmonious balance of savory, sweet, and refreshing elements that come together in under thirty minutes. This dish transforms simple ingredients into a vibrant meal, perfect for busy weeknights when you crave something both comforting and exciting. The tender marinated beef paired with crisp, tangy cucumber creates a delightful contrast that feels both indulgent and wholesome.
Serving: 4 | Pre Time: 15 minutes | Cooking Time: 10 minutes
Ingredients
– 1 pound of ground beef (I like 85% lean for flavor)
– 3 cloves of garlic, minced
– a thumb-sized piece of fresh ginger, grated
– 1/3 cup of soy sauce
– 2 tablespoons of brown sugar
– 1 tablespoon of sesame oil
– a splash of rice vinegar (about 1 tablespoon)
– 1 tablespoon of vegetable oil
– 2 medium cucumbers, thinly sliced
– a couple of green onions, chopped
– 1 teaspoon of toasted sesame seeds
– cooked white rice for serving (about 4 cups)
Instructions
1. In a small bowl, whisk together the soy sauce, brown sugar, sesame oil, rice vinegar, minced garlic, and grated ginger until the sugar dissolves completely.
2. Heat the vegetable oil in a large skillet or wok over medium-high heat until it shimmers, about 1 minute.
3. Add the ground beef to the hot skillet, breaking it apart with a spatula into small crumbles.
4. Cook the beef for 5-7 minutes, stirring occasionally, until it is fully browned and no pink remains. Tip: Avoid overcrowding the pan to ensure even browning.
5. Pour the prepared sauce over the cooked beef in the skillet, stirring to coat every piece evenly.
6. Reduce the heat to medium and let the beef simmer in the sauce for 2-3 minutes, until the sauce thickens slightly and coats the beef. Tip: Simmering helps the flavors meld together beautifully.
7. While the beef simmers, combine the thinly sliced cucumbers and chopped green onions in a medium bowl.
8. Sprinkle the toasted sesame seeds over the cucumber mixture and toss gently to combine. Tip: For extra crunch, toast the sesame seeds in a dry pan for 30 seconds before using.
9. Divide the cooked white rice among four bowls, creating a base in each.
10. Spoon the saucy beef evenly over the rice in each bowl.
11. Top each beef bowl with a generous portion of the cucumber salad.
Creating this dish yields tender, flavorful beef with a glossy sauce that clings to each grain of rice, while the cucumber salad adds a crisp, cooling contrast. Consider serving it with a fried egg on top for added richness, or pack the components separately for a vibrant lunch that stays fresh. The interplay of savory, sweet, and tangy notes makes every bite a delightful experience, perfect for sharing or savoring solo.
Butternut Squash and Sausage Skillet
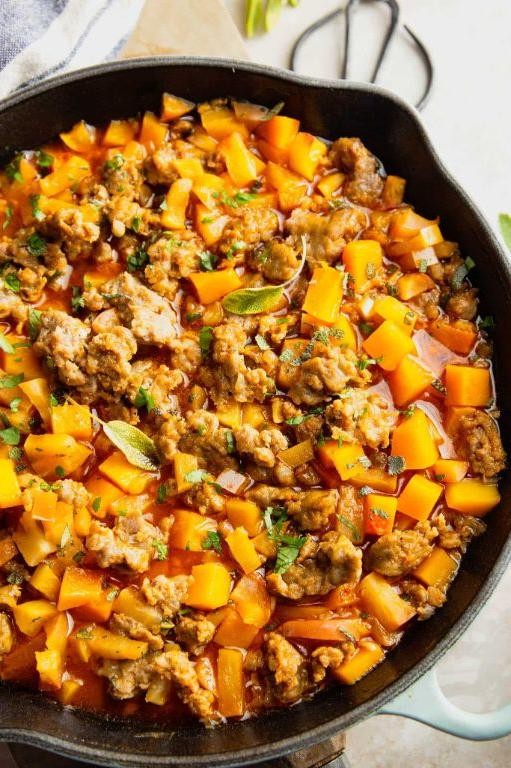
Elegant yet deeply comforting, this butternut squash and sausage skillet transforms humble autumn ingredients into a vibrant one-pan meal that’s as nourishing as it is visually striking. Imagine tender, caramel-edged squash mingling with savory sausage and aromatic herbs—a dish that feels both rustic and refined, perfect for a cozy weeknight or an effortless dinner party centerpiece. It’s the kind of recipe that fills your kitchen with an irresistible, hearty fragrance, promising warmth in every bite.
Serving: 4 | Pre Time: 15 minutes | Cooking Time: 30 minutes
Ingredients
– A couple of links of sweet Italian sausage (about 1 pound), casings removed
– 1 medium butternut squash (about 2 pounds), peeled, seeded, and cut into 1-inch cubes
– 1 yellow onion, diced
– 3 cloves garlic, minced
– A splash of olive oil (about 2 tablespoons)
– 1 teaspoon dried thyme
– ½ teaspoon smoked paprika
– A pinch of red pepper flakes (optional)
– ½ cup low-sodium chicken broth
– A handful of fresh parsley, chopped
– Salt and freshly ground black pepper
Instructions
1. Heat a large, oven-safe skillet over medium-high heat and add the olive oil.
2. Add the sausage, breaking it into small crumbles with a wooden spoon, and cook for 5–7 minutes until browned and cooked through. Tip: Don’t overcrowd the pan—this ensures the sausage gets a nice sear instead of steaming.
3. Transfer the cooked sausage to a plate, leaving about 1 tablespoon of fat in the skillet.
4. Add the diced onion to the skillet and cook for 3–4 minutes until softened and translucent.
5. Stir in the minced garlic and cook for 30 seconds until fragrant, being careful not to let it burn.
6. Add the butternut squash cubes to the skillet along with the dried thyme, smoked paprika, red pepper flakes (if using), and a generous pinch of salt and pepper.
7. Cook, stirring occasionally, for 8–10 minutes until the squash begins to soften and develop golden edges. Tip: Resist the urge to stir too often—allowing the squash to sit undisturbed helps it caramelize.
8. Pour in the chicken broth, scraping up any browned bits from the bottom of the pan, then return the cooked sausage to the skillet.
9. Reduce the heat to medium-low, cover the skillet, and simmer for 10–12 minutes until the squash is fork-tender and the liquid has reduced slightly. Tip: Check the squash at the 10-minute mark—if it’s still firm, continue cooking for another 2–3 minutes.
10. Remove from heat and stir in the chopped parsley.
11. Taste and adjust seasoning with additional salt and pepper if needed.
You’ll love how the squash turns meltingly tender against the hearty, spiced sausage, with a subtle smokiness from the paprika tying it all together. Serve it straight from the skillet over creamy polenta or with crusty bread to soak up the savory juices, and watch it become an instant cold-weather favorite.
Lemon Herb Grilled Salmon
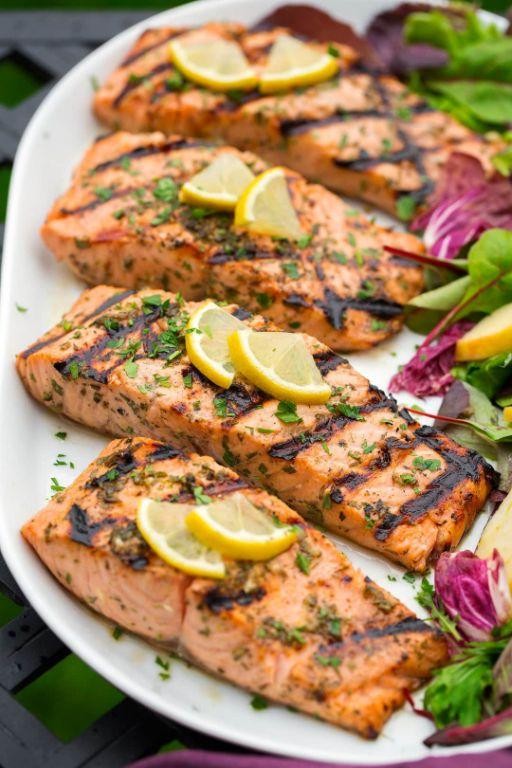
A perfectly grilled salmon fillet, kissed with lemon and fragrant herbs, transforms an ordinary weeknight into an elegant occasion. This Lemon Herb Grilled Salmon recipe delivers moist, flaky fish with a bright, aromatic crust, requiring minimal effort for maximum flavor. It’s a dish that feels both special and effortlessly achievable, ideal for impressing guests or treating yourself to a restaurant-quality meal at home.
Serving: 4 | Pre Time: 15 minutes | Cooking Time: 12 minutes
Ingredients
– Four 6-ounce salmon fillets, skin-on or skinless
– A generous ¼ cup of extra virgin olive oil
– The zest and juice from two large lemons
– A couple of minced garlic cloves
– A handful of fresh dill, finely chopped
– A handful of fresh parsley, finely chopped
– A good pinch of kosher salt
– A few cracks of freshly ground black pepper
Instructions
1. Pat the salmon fillets completely dry with paper towels to ensure a good sear.
2. In a medium bowl, whisk together the olive oil, lemon zest, lemon juice, minced garlic, chopped dill, chopped parsley, kosher salt, and black pepper to create the marinade.
3. Place the salmon fillets in a shallow dish or a large resealable plastic bag.
4. Pour the marinade over the salmon, ensuring all fillets are evenly coated.
5. Let the salmon marinate at room temperature for 10 minutes; for deeper flavor, marinate in the refrigerator for up to 30 minutes, but avoid longer as the acid can start to ‘cook’ the fish.
6. While the salmon marinates, preheat your grill to medium-high heat, aiming for a surface temperature of about 400°F.
7. Lightly oil the grill grates with a paper towel dipped in a bit of vegetable oil to prevent sticking.
8. Place the salmon fillets on the hot grill, presentation-side down.
9. Grill the salmon for 5 to 6 minutes without moving it to develop a beautiful sear.
10. Carefully flip each fillet using a thin, wide spatula.
11. Grill for an additional 4 to 6 minutes, until the salmon is opaque throughout and flakes easily with a fork; the internal temperature should reach 145°F when checked with an instant-read thermometer.
12. Transfer the grilled salmon to a clean platter and let it rest for 3 minutes before serving to allow the juices to redistribute.
Flaky and tender, the salmon boasts a subtly crisp exterior from the grill, giving way to a moist interior infused with the bright, herbal marinade. The lemon provides a clean acidity that cuts through the richness of the fish, making each bite perfectly balanced. For a creative presentation, serve it atop a bed of quinoa salad or with grilled asparagus, drizzling any remaining pan juices over the top for an extra burst of flavor.
Garlic Butter Steak and Potatoes
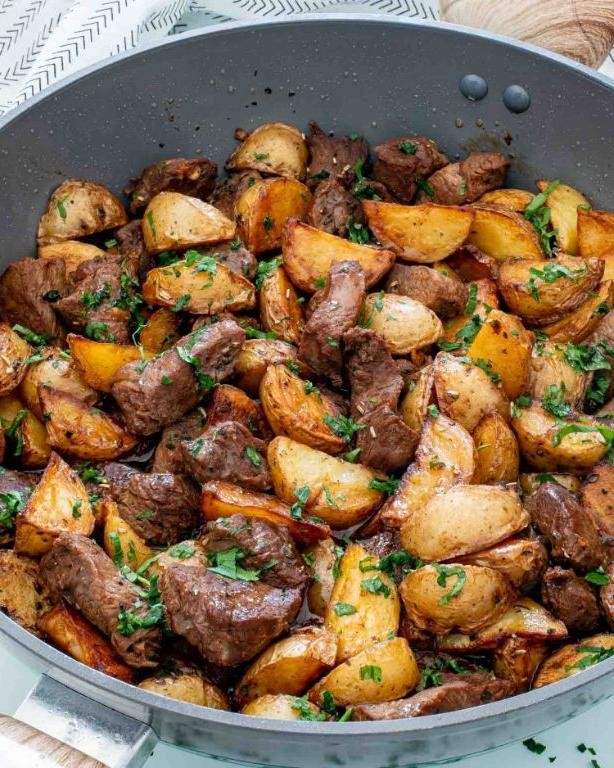
Brimming with rustic charm and sophisticated flavor, this garlic butter steak and potatoes transforms simple ingredients into a showstopping meal. Imagine tender, juicy steak seared to perfection, paired with crispy golden potatoes, all bathed in a luxurious garlic-infused butter sauce that will have everyone reaching for seconds. It’s the kind of hearty, elegant dish that feels both comforting and celebratory, perfect for a cozy dinner party or a special weeknight treat.
Serving: 4 | Pre Time: 15 minutes | Cooking Time: 25 minutes
Ingredients
– A couple of pounds of ribeye or New York strip steaks, about 1-inch thick
– A pound and a half of baby potatoes, halved
– A generous 1/4 cup of unsalted butter, divided
– A good glug of olive oil, about 2 tablespoons
– A whole head of garlic, cloves minced (that’s about 8-10 cloves!)
– A couple of sprigs of fresh rosemary
– A splash of beef broth, roughly 1/4 cup
– A big pinch of kosher salt and freshly cracked black pepper
Instructions
1. Pat the steaks completely dry with paper towels and season them generously on all sides with kosher salt and black pepper.
2. Preheat your oven to 400°F (200°C).
3. In a large, oven-safe skillet, heat the olive oil over medium-high heat until it shimmers, about 2 minutes.
4. Add the halved baby potatoes to the hot skillet, cut-side down, and cook without moving for 5-7 minutes to develop a deep golden-brown crust.
5. Transfer the skillet with the potatoes to the preheated oven and roast for 15 minutes, or until the potatoes are tender when pierced with a fork.
6. While the potatoes roast, heat a separate cast-iron or heavy-bottomed skillet over high heat until very hot, about 3 minutes.
7. Carefully place the seasoned steaks in the hot, dry skillet and sear undisturbed for 4 minutes to form a rich, caramelized crust.
8. Flip the steaks and cook for another 3-4 minutes for medium-rare, or until your desired doneness is reached (use a meat thermometer: 130°F for medium-rare, 140°F for medium).
9. Transfer the cooked steaks to a cutting board, tent loosely with foil, and let them rest for 10 minutes—this allows the juices to redistribute for maximum tenderness.
10. In the same skillet used for the steak, reduce the heat to medium-low and melt 2 tablespoons of the butter.
11. Add the minced garlic and rosemary sprigs, cooking for just 60-90 seconds until fragrant but not browned to avoid bitterness.
12. Pour in the beef broth to deglaze the pan, scraping up all the flavorful browned bits from the bottom with a wooden spoon.
13. Remove the skillet from the heat and swirl in the remaining 2 tablespoons of cold butter until the sauce is glossy and slightly thickened.
14. Slice the rested steak against the grain into 1/2-inch thick strips.
15. Arrange the roasted potatoes on a serving platter, top with the sliced steak, and drizzle the entire dish with the warm garlic butter sauce.
Kaleidoscopic in texture and deeply savory, this dish offers the perfect contrast between the crisp, golden potatoes and the melt-in-your-mouth steak. The garlic butter sauce, infused with rosemary, ties every element together with its rich, aromatic flavor. For a vibrant twist, serve it alongside a simple arugula salad dressed with lemon vinaigrette to cut through the richness.
Buffalo Chicken Stuffed Peppers

Kickstarting your weeknight dinner rotation with a bold twist on a classic, these Buffalo Chicken Stuffed Peppers transform humble bell peppers into vessels of fiery, creamy delight. They offer the perfect balance of spicy, tangy, and savory flavors, all baked to tender perfection for a meal that feels both comforting and sophisticated.
Serving: 4 | Pre Time: 15 minutes | Cooking Time: 30 minutes
Ingredients
– 4 large bell peppers, any color you fancy
– About 1.5 pounds of cooked, shredded chicken breast
– A good 1/2 cup of your favorite Buffalo sauce
– A solid 8 ounces of cream cheese, softened to room temp
– A generous cup of shredded sharp cheddar cheese
– A couple of green onions, thinly sliced
– A big pinch of salt and a few cracks of black pepper
– A little drizzle of olive oil, just to coat
Instructions
1. Preheat your oven to 375°F (190°C) and line a baking sheet with parchment paper for easy cleanup.
2. Slice the bell peppers in half lengthwise and carefully remove all the seeds and white membranes from the inside.
3. Place the pepper halves cut-side up on the prepared baking sheet and lightly drizzle the insides with olive oil, rubbing it around to coat evenly.
4. In a large mixing bowl, combine the shredded chicken, Buffalo sauce, softened cream cheese, half of the shredded cheddar, and most of the sliced green onions (save some for garnish). Season the mixture with the salt and black pepper.
5. Use a fork or your hands to mix everything together thoroughly until the cream cheese is fully incorporated and the chicken is evenly coated. Tip: If your cream cheese is too cold, the mixture will be lumpy; letting it soften ensures a smooth, cohesive filling.
6. Divide the chicken mixture evenly among the pepper halves, packing it in firmly and mounding it slightly on top.
7. Sprinkle the remaining shredded cheddar cheese evenly over the top of each stuffed pepper.
8. Bake in the preheated oven for 25-30 minutes. You’re looking for the peppers to become tender (a fork should pierce them easily) and the cheese on top to be melted, bubbly, and lightly golden in spots.
9. Remove the baking sheet from the oven and let the peppers rest for about 5 minutes before serving. Tip: This resting time allows the filling to set slightly, making them easier to handle and eat.
10. Garnish with the reserved sliced green onions just before serving. Tip: For an extra cooling contrast, a dollop of ranch or blue cheese dressing on the side is a classic and delicious pairing.
Gloriously messy and utterly satisfying, each bite delivers a tender-crisp pepper giving way to the creamy, zesty chicken filling. The melted cheddar forms a perfect, slightly crisp cap that contrasts beautifully with the soft interior. Serve them straight from the baking sheet for a casual family dinner, or plate them individually over a bed of crisp romaine for a deconstructed salad presentation that feels effortlessly elegant.
Coconut Curry Chicken Meatballs

Kick off your weeknight dinner rotation with these aromatic Coconut Curry Chicken Meatballs, where tender ground chicken mingles with fragrant spices before being simmered in a luxuriously creamy coconut curry sauce. This dish transforms simple ingredients into an elegant, restaurant-worthy meal that’s surprisingly straightforward to prepare. Perfect for impressing guests or treating yourself to something special, it delivers complex flavors with minimal fuss.
Serving: 4 | Pre Time: 15 minutes | Cooking Time: 25 minutes
Ingredients
– For the meatballs: 1 pound of ground chicken, a couple of cloves of garlic (minced), about 1 tablespoon of fresh ginger (grated), a quarter cup of panko breadcrumbs, 1 large egg, a splash of soy sauce, and a pinch of salt and pepper.
– For the curry: 1 tablespoon of olive oil, 1 small onion (diced), 1 tablespoon of curry powder, a 13.5-ounce can of coconut milk, a cup of chicken broth, and a squeeze of lime juice.
Instructions
1. Preheat your oven to 400°F and line a baking sheet with parchment paper.
2. In a large bowl, combine the ground chicken, minced garlic, grated ginger, panko breadcrumbs, egg, soy sauce, salt, and pepper until just mixed—overworking can make the meatballs tough.
3. Shape the mixture into 1-inch meatballs, placing them on the prepared baking sheet about an inch apart.
4. Bake the meatballs for 15 minutes, or until they reach an internal temperature of 165°F and are lightly golden.
5. While baking, heat the olive oil in a large skillet over medium heat and sauté the diced onion for 5 minutes until softened.
6. Stir in the curry powder and cook for 1 minute to toast the spices, which deepens their flavor.
7. Pour in the coconut milk and chicken broth, bringing the mixture to a gentle simmer for 10 minutes to let the sauce thicken slightly.
8. Add the baked meatballs to the skillet, spooning the sauce over them, and simmer for an additional 5 minutes to allow the flavors to meld.
9. Finish with a squeeze of lime juice just before serving to brighten the dish.
Now, these meatballs boast a tender, juicy interior that contrasts beautifully with the rich, velvety curry sauce, infused with warm spices and a hint of citrus. Serve them over a bed of fluffy jasmine rice or with naan bread for soaking up every last drop, making each bite a harmonious blend of comfort and sophistication.
Balsamic Glazed Bruschetta Chicken
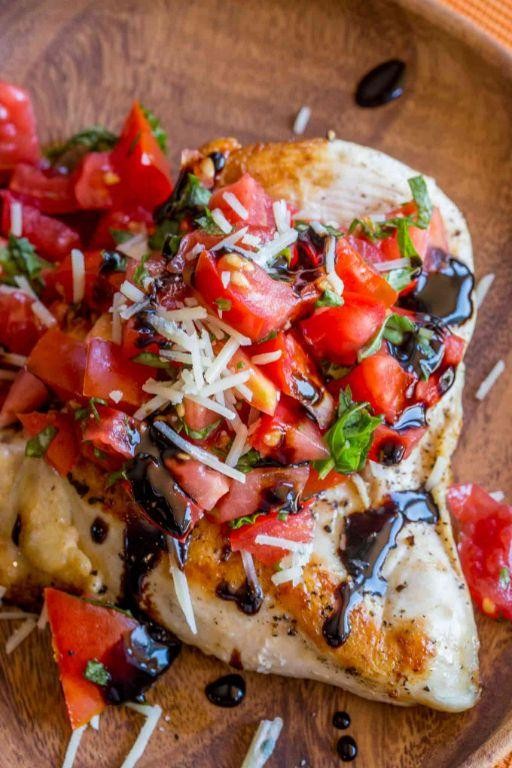
Lusciously balancing the rustic charm of Italian bruschetta with the comforting appeal of a weeknight chicken dinner, this Balsamic Glazed Bruschetta Chicken transforms simple ingredients into an elegant, restaurant-worthy meal. Imagine juicy chicken breasts, seared to golden perfection, then draped in a glossy, sweet-tart balsamic reduction and crowned with a vibrant, garlicky tomato-basil topping. It’s a dish that feels both celebratory and effortlessly achievable, promising to become a new staple in your culinary repertoire.
Serving: 4 | Pre Time: 15 minutes | Cooking Time: 20 minutes
Ingredients
– 4 boneless, skinless chicken breasts (about 1.5 pounds total)
– A good glug of olive oil (about 2 tablespoons)
– A generous pinch of kosher salt and freshly ground black pepper
– 1 pint of cherry tomatoes, halved
– A couple of cloves of garlic, minced
– A big handful of fresh basil leaves, chopped
– A splash of balsamic vinegar (about 1/2 cup)
– A tablespoon of honey
Instructions
1. Pat the 4 chicken breasts completely dry with paper towels, then season both sides generously with kosher salt and black pepper.
2. Heat the 2 tablespoons of olive oil in a large skillet over medium-high heat until it shimmers, about 2 minutes.
3. Carefully add the chicken breasts to the hot skillet and cook without moving for 5-7 minutes, until a deep golden-brown crust forms on the bottom. (Tip: Don’t crowd the pan; cook in batches if needed for the best sear.)
4. Flip the chicken and cook for another 5-7 minutes, or until the internal temperature reaches 165°F when checked with an instant-read thermometer. Transfer the chicken to a plate and tent loosely with foil.
5. In the same skillet, reduce the heat to medium and add the halved cherry tomatoes and minced garlic. Cook, stirring occasionally, for 3-4 minutes until the tomatoes just begin to soften and release their juices.
6. Stir in the chopped fresh basil and cook for 1 more minute, then transfer this tomato-basil mixture to a bowl.
7. Pour the 1/2 cup of balsamic vinegar and 1 tablespoon of honey into the now-empty skillet. Bring to a simmer over medium heat, then reduce the heat to medium-low. (Tip: Use a silicone spatula to scrape up any flavorful browned bits from the pan into the sauce.)
8. Let the sauce simmer gently for 4-5 minutes, stirring frequently, until it reduces by about half and thickens to a syrup-like consistency that coats the back of a spoon.
9. Return the cooked chicken breasts to the skillet, turning them once or twice in the glaze until they are evenly coated. (Tip: For extra shine, spoon the glaze over the top of each breast.)
10. Plate the glazed chicken and spoon the reserved tomato-basil mixture over the top.
Each bite offers a delightful contrast: the tender, savory chicken against the sticky-sweet glaze and the bright, juicy burst of tomatoes. For a complete meal, serve it over a bed of creamy polenta or alongside a simple arugula salad to let the vibrant flavors truly shine.
Thai Basil Chicken Stir-fry
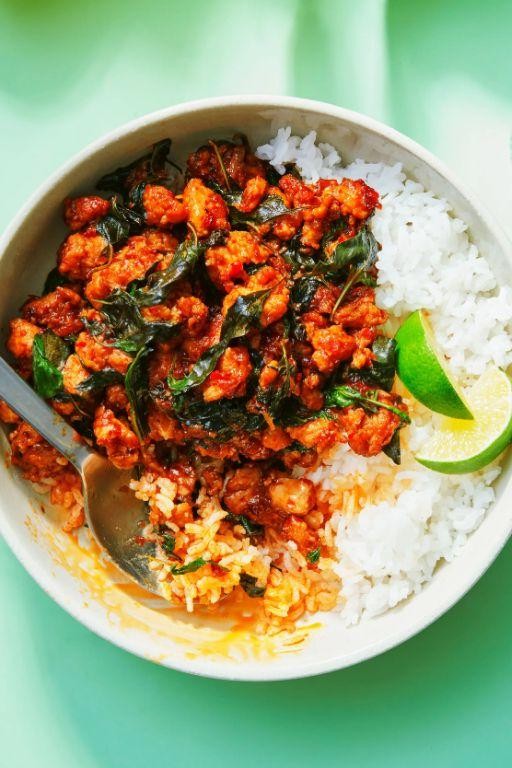
Crisp, aromatic, and bursting with vibrant flavors, this Thai Basil Chicken Stir-fry transforms humble ingredients into an unforgettable weeknight dinner. With its perfect balance of savory, sweet, and spicy notes, it’s a dish that feels both exotic and comforting. Ready in mere minutes, it promises a restaurant-quality meal from your own kitchen.
Serving: 4 | Pre Time: 15 minutes | Cooking Time: 10 minutes
Ingredients
– 1.5 pounds of boneless, skinless chicken thighs, cut into bite-sized pieces
– A good glug of vegetable oil (about 2 tablespoons)
– 4 cloves of garlic, minced
– A couple of Thai chilies, thinly sliced (or 1-2 serranos)
– 1 medium yellow onion, thinly sliced
– 1 red bell pepper, thinly sliced
– A big splash of oyster sauce (about 3 tablespoons)
– A splash of soy sauce (about 2 tablespoons)
– A splash of fish sauce (about 1 tablespoon)
– A teaspoon of granulated sugar
– A big handful of fresh Thai basil leaves (about 1 cup packed)
– Cooked jasmine rice, for serving
Instructions
1. Heat the vegetable oil in a large wok or skillet over high heat until it shimmers, about 1 minute.
2. Add the chicken pieces in a single layer and cook without stirring for 2 minutes to achieve a golden sear.
3. Stir the chicken and continue cooking for 3-4 more minutes until it’s fully cooked through and no longer pink.
4. Push the chicken to one side of the pan and add the minced garlic and sliced chilies to the empty space. Cook for 30 seconds until fragrant.
5. Add the sliced onion and red bell pepper to the pan, stirring everything together.
6. Cook the vegetables for 2-3 minutes until they just begin to soften but still retain a slight crunch.
7. Pour in the oyster sauce, soy sauce, fish sauce, and sugar directly over the chicken and vegetables.
8. Stir continuously for 1-2 minutes until the sauce thickens slightly and coats everything evenly.
9. Remove the pan from the heat and immediately stir in the fresh Thai basil leaves until they just wilt from the residual heat.
10. Serve immediately over hot jasmine rice.
Succulent chicken coated in a glossy, savory sauce pairs beautifully with the crisp-tender vegetables and the anise-like fragrance of wilted basil. For a creative twist, try wrapping spoonfuls in crisp lettuce cups or topping it with a fried egg for extra richness.
Vegetable and Quinoa Stuffed Peppers

Vibrant bell peppers, hollowed and brimming with a savory quinoa medley, transform into a stunning centerpiece that marries wholesome ingredients with elegant presentation. This dish celebrates the natural sweetness of roasted peppers while showcasing a hearty filling that’s both nutritious and deeply satisfying. Perfect for a cozy dinner or an impressive gathering, it’s a versatile recipe that delights the senses with every bite.
Serving: 4 | Pre Time: 20 minutes | Cooking Time: 45 minutes
Ingredients
– 4 large bell peppers, any color you like
– 1 cup of quinoa, rinsed well to remove any bitterness
– 2 cups of vegetable broth
– 1 tablespoon of olive oil
– 1 medium onion, finely chopped
– 2 cloves of garlic, minced
– 1 zucchini, diced into small pieces
– 1 cup of corn kernels, fresh or frozen
– A couple of handfuls of baby spinach
– A splash of soy sauce or tamari
– A sprinkle of salt and black pepper, to your liking
Instructions
1. Preheat your oven to 375°F (190°C) and line a baking dish with parchment paper.
2. Slice the tops off the bell peppers, remove the seeds and membranes, and place them upright in the baking dish.
3. In a medium saucepan, combine the rinsed quinoa and vegetable broth, bring to a boil, then reduce heat to low, cover, and simmer for 15 minutes until the liquid is absorbed and quinoa is fluffy.
4. Heat the olive oil in a large skillet over medium heat, add the chopped onion, and sauté for 5 minutes until translucent and fragrant.
5. Stir in the minced garlic and cook for 1 minute more, being careful not to let it burn.
6. Add the diced zucchini and corn kernels to the skillet, cooking for 7-8 minutes until the vegetables are tender and slightly golden.
7. Fold in the cooked quinoa, baby spinach, and a splash of soy sauce, mixing until the spinach wilts and everything is well combined; season with salt and black pepper.
8. Spoon the quinoa mixture evenly into the prepared bell peppers, packing it gently to fill them completely.
9. Cover the baking dish with aluminum foil and bake for 30 minutes, then remove the foil and bake for an additional 15 minutes until the peppers are tender and the tops are lightly browned.
10. Let the stuffed peppers cool for 5 minutes before serving to allow the flavors to meld.
Fluffy quinoa mingles with tender vegetables in a symphony of textures, while the roasted peppers offer a subtle sweetness that balances the savory filling. For a creative twist, top with a dollop of Greek yogurt or a sprinkle of fresh herbs just before serving, enhancing the dish with a creamy or aromatic finish that elevates it from simple to sublime.
Crispy Sesame Tofu with Steamed Vegetables

Oftentimes, the most satisfying meals are those that balance crispiness with freshness, and this Crispy Sesame Tofu with Steamed Vegetables delivers exactly that—a harmonious blend of golden, crunchy tofu and tender, vibrant vegetables, all brought together with a glossy, savory-sweet sesame glaze. It’s a dish that feels both indulgent and wholesome, perfect for a quick weeknight dinner or an impressive lunch. With minimal prep and straightforward techniques, you’ll have a restaurant-quality meal on the table in no time.
Serving: 4 | Pre Time: 15 minutes | Cooking Time: 20 minutes
Ingredients
– A 14-ounce block of extra-firm tofu, pressed and cut into 1-inch cubes
– 2 tablespoons of cornstarch
– 3 tablespoons of vegetable oil, divided
– 3 cloves of garlic, minced
– A 1-inch piece of fresh ginger, grated
– ¼ cup of low-sodium soy sauce
– 2 tablespoons of honey
– 1 tablespoon of rice vinegar
– 1 teaspoon of toasted sesame oil
– 2 tablespoons of sesame seeds
– 4 cups of mixed vegetables (like broccoli florets, sliced carrots, and snap peas)
– A splash of water for steaming
Instructions
1. Pat the tofu cubes dry with paper towels, then toss them in a bowl with the cornstarch until evenly coated—this helps create that crispy exterior when frying.
2. Heat 2 tablespoons of vegetable oil in a large non-stick skillet over medium-high heat until shimmering, about 2 minutes.
3. Add the tofu cubes in a single layer, cooking for 3–4 minutes per side until golden brown and crisp, then transfer to a plate lined with paper towels to drain excess oil.
4. In the same skillet, reduce the heat to medium and add the remaining 1 tablespoon of vegetable oil, swirling to coat the pan.
5. Sauté the minced garlic and grated ginger for 30–60 seconds until fragrant, being careful not to burn them to avoid bitterness.
6. Pour in the soy sauce, honey, rice vinegar, and toasted sesame oil, stirring constantly for 1–2 minutes until the sauce thickens slightly and bubbles.
7. Return the crispy tofu to the skillet, tossing gently to coat each piece in the sauce, then sprinkle with sesame seeds and remove from heat.
8. While the tofu cooks, place the mixed vegetables in a steamer basket over a pot with a splash of boiling water, covering and steaming for 4–5 minutes until tender-crisp—test with a fork for doneness.
9. Serve the sesame-coated tofu immediately over the steamed vegetables, drizzling any extra sauce from the skillet on top.
Simply irresistible, the tofu offers a satisfying crunch that gives way to a soft interior, while the vegetables add a fresh, clean contrast. For a creative twist, try serving it over quinoa or brown rice, or garnish with sliced green onions and a sprinkle of red pepper flakes for a hint of heat.
Blackened Fish Tacos with Mango Salsa

Picture this: a vibrant, sun-drenched platter where flaky, spice-crusted fish meets the sweet-tart pop of fresh mango salsa, all nestled in warm tortillas. This blackened fish taco recipe transforms simple ingredients into a restaurant-worthy meal that’s surprisingly easy to master at home.
Serving: 4 | Pre Time: 20 minutes | Cooking Time: 10 minutes
Ingredients
- 4 white fish fillets, like tilapia or cod
- 2 tablespoons of blackening spice blend (paprika, garlic powder, onion powder, cayenne, thyme, oregano)
- A couple of tablespoons of olive oil
- 8 small flour or corn tortillas
- 1 ripe mango, diced
- Half a red onion, finely chopped
- A handful of fresh cilantro, chopped
- Juice from 1 lime
- A pinch of salt
Instructions
- Pat the fish fillets completely dry with paper towels to ensure a good sear.
- Rub both sides of each fillet evenly with the blackening spice blend.
- Heat a large skillet over medium-high heat and add the olive oil until it shimmers, about 1 minute.
- Carefully place the seasoned fish in the hot skillet; cook for 3-4 minutes per side until the crust is dark and the fish flakes easily with a fork.
- Transfer the cooked fish to a plate and let it rest for 2 minutes before flaking it into large chunks.
- While the fish rests, warm the tortillas in a dry skillet over medium heat for about 30 seconds per side, or wrap them in a damp towel and microwave for 30 seconds.
- In a medium bowl, combine the diced mango, chopped red onion, chopped cilantro, lime juice, and a pinch of salt; gently toss to mix.
- Assemble each taco by placing a portion of flaked fish on a warm tortilla and topping it generously with the mango salsa.
You’ll love the contrast between the crispy, aromatic crust of the fish and the juicy, refreshing salsa. For a fun twist, serve these tacos with a side of creamy avocado crema or extra lime wedges for squeezing over the top.
Italian Sausage and Kale Soup

Hearty and wholesome, this Italian Sausage and Kale Soup is the ultimate comfort in a bowl, perfect for chilly evenings when you crave something deeply satisfying yet nourishing. Its rich, savory broth, studded with robust sausage and tender greens, comes together with minimal effort for maximum flavor, making it an ideal weeknight dinner that feels special enough for company. Let’s gather our ingredients and get simmering.
Serving: 4 | Pre Time: 15 minutes | Cooking Time: 35 minutes
Ingredients
– A couple of tablespoons of olive oil
– 1 pound of sweet or hot Italian sausage, casings removed
– 1 medium yellow onion, diced
– 3 cloves of garlic, minced
– A couple of medium carrots, chopped
– 2 stalks of celery, chopped
– 6 cups of chicken broth
– 1 (14.5-ounce) can of diced tomatoes, with their juices
– 1 teaspoon of dried oregano
– 1 bay leaf
– A big bunch of kale, stems removed and leaves chopped
– A splash of red wine vinegar
– Salt and freshly ground black pepper, to season
Instructions
1. Heat 2 tablespoons of olive oil in a large Dutch oven or heavy pot over medium-high heat until shimmering, about 1 minute.
2. Add 1 pound of Italian sausage, breaking it up with a wooden spoon into bite-sized pieces, and cook until browned and cooked through, 6–8 minutes, stirring occasionally.
3. Using a slotted spoon, transfer the cooked sausage to a plate, leaving the rendered fat in the pot—this adds incredible flavor to the soup base.
4. Reduce the heat to medium, add the diced onion, chopped carrots, and chopped celery to the pot, and sauté until softened, about 5–7 minutes, stirring frequently to prevent burning.
5. Stir in the minced garlic and cook until fragrant, about 30 seconds, being careful not to let it brown.
6. Pour in 6 cups of chicken broth and the can of diced tomatoes with their juices, scraping up any browned bits from the bottom of the pot for extra depth.
7. Add 1 teaspoon of dried oregano and 1 bay leaf, then return the cooked sausage to the pot, bringing everything to a gentle boil.
8. Reduce the heat to low, cover, and simmer for 20 minutes to allow the flavors to meld, stirring occasionally.
9. Stir in the chopped kale leaves and cook until wilted and tender, about 5 minutes—for a brighter green, add the kale just before serving.
10. Remove the pot from the heat, discard the bay leaf, and stir in a splash of red wine vinegar to brighten the soup.
11. Season with salt and freshly ground black pepper to taste, adjusting as needed.
Earthy and robust, this soup boasts a velvety broth that clings to each spoonful, with the kale adding a pleasant chew against the savory sausage. Serve it piping hot with a crusty loaf of bread for dipping, or top with a sprinkle of grated Parmesan and a drizzle of olive oil for an extra layer of richness.
Sweet and Spicy Teriyaki Meatballs
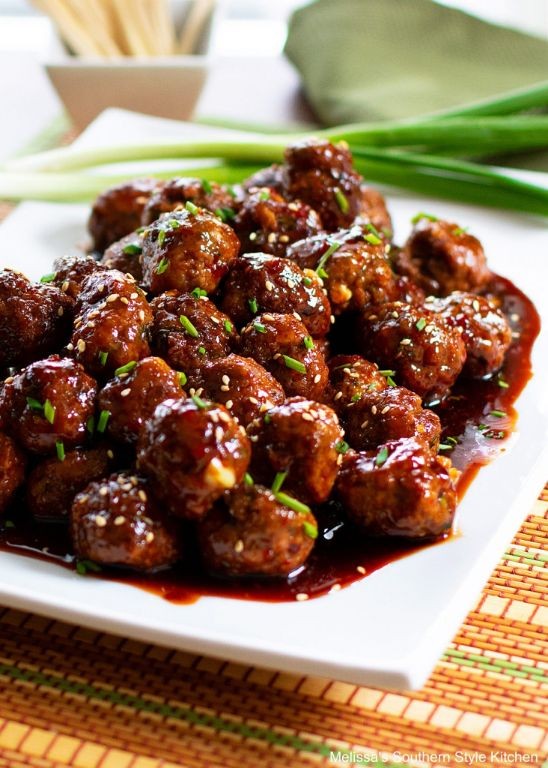
Zesty and sophisticated, these Sweet and Spicy Teriyaki Meatballs transform a weeknight staple into an elegant affair, where the deep umami of teriyaki meets a gentle kick of heat. Imagine tender, juicy meatballs glazed in a glossy, caramelized sauce that clings perfectly to each bite—a dish that’s as impressive for a dinner party as it is comforting for a cozy meal at home. With just a handful of pantry staples, you can create this crowd-pleaser that balances sweet, savory, and spicy notes in every mouthful.
Serving: 4 | Pre Time: 15 minutes | Cooking Time: 25 minutes
Ingredients
– A pound of ground beef (I like 85/15 for juiciness)
– A couple of cloves of garlic, minced
– A quarter cup of panko breadcrumbs
– One large egg
– A splash of soy sauce (about 2 tablespoons)
– A tablespoon of grated fresh ginger
– Half a cup of teriyaki sauce
– Two tablespoons of honey
– A teaspoon of sriracha (adjust if you want more heat!)
– A tablespoon of vegetable oil
– A tablespoon of sesame seeds for garnish
– A couple of green onions, thinly sliced
Instructions
1. Preheat your oven to 400°F and line a baking sheet with parchment paper.
2. In a large bowl, combine the ground beef, minced garlic, panko breadcrumbs, egg, soy sauce, and grated ginger—mix gently with your hands just until incorporated to avoid tough meatballs.
3. Shape the mixture into 1-inch meatballs, placing them on the prepared baking sheet about an inch apart for even cooking.
4. Bake the meatballs in the preheated oven for 15 minutes, or until they’re browned and cooked through with an internal temperature of 160°F.
5. While the meatballs bake, whisk together the teriyaki sauce, honey, and sriracha in a small saucepan over medium heat until smooth and slightly thickened, about 5 minutes—this creates a rich glaze that won’t be too runny.
6. Heat the vegetable oil in a large skillet over medium-high heat, then add the baked meatballs and pour the sauce over them, tossing gently to coat evenly.
7. Simmer the meatballs in the sauce for 5–7 minutes, stirring occasionally, until the sauce thickens and clings to the meatballs, giving them a shiny, caramelized finish.
8. Remove from heat and sprinkle with sesame seeds and sliced green onions before serving.
9. Here, the meatballs emerge tender and juicy, with a sticky-sweet glaze that carries a subtle warmth from the sriracha, making them irresistible over steamed rice or tucked into lettuce wraps for a fresh twist. Their glossy texture and balanced flavors ensure they’ll become a repeat favorite in your kitchen.
Conclusion
You’ve just discovered a treasure trove of 32 wholesome recipes designed to fuel your healthy lifestyle. We hope this collection inspires your next delicious meal. Try a recipe, leave a comment with your favorite, and don’t forget to share this roundup on Pinterest to spread the inspiration!