
There’s something magical about December evenings that calls for warm, comforting meals to share with loved ones. As the temperatures drop and daylight fades earlier, our kitchens become cozy havens filled with inviting aromas. We’ve gathered 33 delicious dinner recipes perfect for these chilly nights—think hearty stews, creamy pastas, and seasonal favorites that will warm you from the inside out. Let’s dive into these comforting dishes!
Roasted Garlic and Herb-Crusted Prime Rib
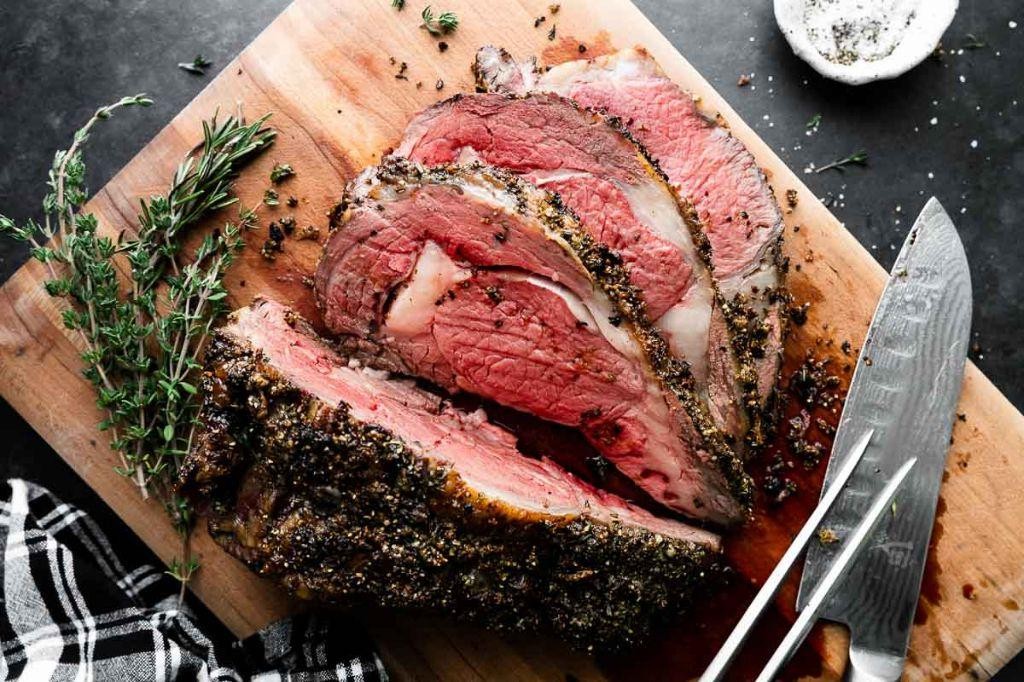
Look, I know prime rib sounds fancy and intimidating—like that distant relative who only wears cashmere—but trust me, this roasted garlic and herb-crusted version is basically a cozy holiday sweater for your taste buds. It’s the kind of showstopper that’ll have your guests whispering sweet nothings to their plates.
6
servings15
minutes140
minutesIngredients
- 1 (5-6 lb) prime rib roast—because bigger is always better, right?
- 8 garlic cloves, minced (fresh only, no jarred nonsense—your future self will thank you)
- 1/4 cup extra virgin olive oil—my go-to for that fruity, luxurious base
- 2 tbsp fresh rosemary, finely chopped (dried herbs are for emergencies, not celebrations)
- 2 tbsp fresh thyme leaves—strip them gently, no need to bully the stems
- 1 tbsp coarse sea salt—it’s the crunch that makes the crust sing
- 1 tsp freshly cracked black pepper—pre-ground is a crime against flavor
Instructions
- Preheat your oven to 450°F—yes, it needs to be screaming hot for that initial sear.
- Pat the prime rib completely dry with paper towels; a dry surface means a crispier crust, my friend.
- In a small bowl, mash the minced garlic into the olive oil until it forms a loose paste.
- Rub the garlic-oil mixture evenly over the entire surface of the prime rib—get in there like you’re giving it a spa day.
- Sprinkle the rosemary, thyme, sea salt, and black pepper over the roast, pressing gently so the herbs stick.
- Place the roast fat-side up in a roasting pan fitted with a rack—this lets heat circulate for even cooking.
- Roast at 450°F for exactly 20 minutes to form that gorgeous, herb-speckled crust.
- Reduce the oven temperature to 325°F without opening the door—trust the process, no peeking!
- Continue roasting until a meat thermometer inserted into the thickest part reads 120°F for medium-rare, about 1.5 to 2 hours.
- Transfer the roast to a cutting board and let it rest for 20 minutes—this is non-negotiable for juicy slices.
Velvety and rich, each slice boasts a crackling herb crust that gives way to buttery-soft, pink-centered meat. Serve it thickly carved with a side of horseradish cream or—dare I say—atop garlic-rubbed toast for a next-level sandwich situation.
Slow-Cooked Beef Bourguignon
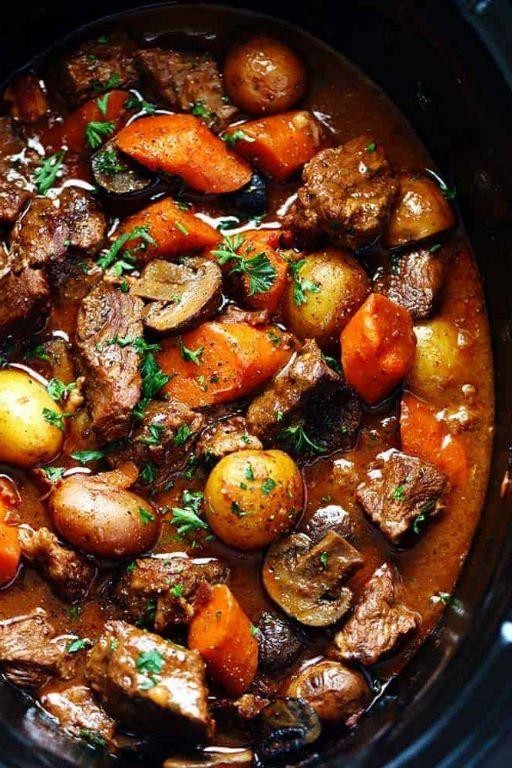
Alright, let’s get cozy with a dish that basically hugs you from the inside out. Slow-Cooked Beef Bourguignon is the ultimate comfort food flex—it’s fancy enough to impress your in-laws but lazy enough to make on a Tuesday while binge-watching your favorite show. This French classic gets a low-and-slow makeover that turns tough beef into melt-in-your-mouth magic, all while your kitchen smells like a Parisian bistro (minus the accordion music).
6
servings25
minutes485
minutesIngredients
- 2 lbs beef chuck roast, cut into 2-inch cubes (go for the well-marbled stuff—fat equals flavor, friends!)
- 6 slices thick-cut bacon, chopped (because everything’s better with bacon, obviously)
- 1 large yellow onion, diced (I cry every time, but it’s worth it)
- 3 carrots, peeled and sliced into 1-inch chunks (don’t skip the peeling—nobody wants dirt in their dinner)
- 8 oz cremini mushrooms, halved (baby bellas work too, but creminis have that earthy vibe)
- 3 cloves garlic, minced (fresh only—jarred garlic is a crime against humanity)
- 2 cups dry red wine, like Pinot Noir (use something you’d actually drink, not “cooking wine”)
- 2 cups beef broth (low-sodium is my go-to so you can control the salt)
- 2 tbsp tomato paste (the secret umami booster)
- 1 tbsp all-purpose flour (for that silky sauce thickener)
- 2 tbsp extra virgin olive oil (my trusty sidekick for sautéing)
- 1 tsp dried thyme (fresh is great, but dried holds up better in the slow cooker)
- 1 bay leaf (remove it later—nobody wants to chew on a leaf)
- Salt and freshly ground black pepper (season as you go, people!)
Instructions
- Pat the beef cubes completely dry with paper towels—this is crucial for getting a good sear without steaming.
- Season the beef generously with salt and pepper on all sides.
- Heat 1 tablespoon of olive oil in a large skillet over medium-high heat until shimmering.
- Sear the beef in batches, turning to brown all sides, about 3-4 minutes per batch. Tip: Don’t overcrowd the pan, or you’ll end up with gray beef instead of a gorgeous crust.
- Transfer the seared beef to your slow cooker.
- In the same skillet, add the chopped bacon and cook until crispy, about 5-7 minutes.
- Remove the bacon with a slotted spoon and add it to the slow cooker, leaving the bacon fat in the skillet.
- Add the diced onion and carrots to the skillet and sauté until softened, about 5 minutes.
- Stir in the minced garlic and cook for 1 minute until fragrant—careful not to burn it!
- Sprinkle the flour over the veggies and stir constantly for 1 minute to cook off the raw flour taste.
- Whisk in the tomato paste and red wine, scraping up all the browned bits from the bottom of the pan.
- Pour the wine mixture into the slow cooker over the beef and bacon.
- Add the beef broth, thyme, bay leaf, and halved mushrooms to the slow cooker. Tip: Layer the mushrooms on top so they steam and don’t get mushy.
- Cover and cook on low for 8 hours or on high for 4 hours. Tip: Resist the urge to peek—every time you lift the lid, you add 15-20 minutes to the cooking time.
- Remove the bay leaf and season with additional salt and pepper if needed before serving.
Unbelievably tender beef that practically dissolves at the touch of a fork, swimming in a rich, wine-infused sauce that’s deep enough to write poetry about. Serve it over creamy mashed potatoes or buttery egg noodles to soak up every last drop, or go full French and pair it with a crusty baguette for dipping—because let’s be real, the sauce is the real star here.
Creamy Turkey and Wild Rice Soup

Picture this: you’re cozied up on the couch, wrapped in your favorite blanket, and the only thing missing is a bowl of something warm, creamy, and ridiculously comforting. Enter this Creamy Turkey and Wild Rice Soup—the culinary equivalent of a warm hug that somehow manages to be both elegant and completely approachable.
2
servings15
minutes70
minutesIngredients
- 1 tablespoon extra virgin olive oil (my go-to for that fruity kick)
- 1 cup diced yellow onion (the sweet ones are my favorite—they caramelize like a dream)
- 2 cloves garlic, minced (fresh only, please—none of that jarred stuff!)
- 1 cup sliced carrots (I like them thin so they soften quickly)
- 1 cup sliced celery (the crispier, the better for texture)
- 1 cup wild rice blend (rinsed well to remove excess starch)
- 4 cups chicken broth (low-sodium is my preference—you control the salt)
- 2 cups shredded cooked turkey (leftover Thanksgiving turkey works wonders here)
- 1 cup heavy cream (room temperature to prevent curdling when added)
- 1 teaspoon dried thyme (rubbed between your palms to wake up the oils)
- Salt and black pepper (to your liking, but don’t be shy!)
Instructions
- Heat 1 tablespoon extra virgin olive oil in a large pot over medium heat until shimmering, about 1 minute.
- Add 1 cup diced yellow onion and sauté, stirring frequently, until translucent and slightly golden, about 5–7 minutes.
- Stir in 2 cloves minced garlic and cook for 1 minute until fragrant—don’t let it brown!
- Tip: Toasting the rice before adding liquid enhances its nutty flavor and prevents mushiness.
- Add 1 cup wild rice blend to the pot and toast, stirring constantly, for 2 minutes.
- Pour in 4 cups chicken broth and bring to a rolling boil over high heat.
- Reduce heat to low, cover the pot, and simmer for 45 minutes until the rice is tender but still chewy.
- Stir in 1 cup sliced carrots and 1 cup sliced celery, then cover and simmer for 10 more minutes until vegetables are fork-tender.
- Tip: Add shredded turkey late in the process to keep it moist and prevent overcooking.
- Fold in 2 cups shredded cooked turkey and 1 teaspoon dried thyme, heating through for 3–4 minutes.
- Reduce heat to the lowest setting and slowly stir in 1 cup room temperature heavy cream.
- Tip: Always temper cream by adding it off-heat and stirring gradually to avoid separation.
- Season with salt and black pepper to taste, then simmer gently for 2–3 minutes until warmed through.
Now, behold the magic: the soup boasts a velvety, rich broth that clings to every grain of wild rice, while the tender turkey and crisp-tender veggies add just the right amount of texture. Serve it in a hollowed-out bread bowl for maximum coziness, or top with a sprinkle of fresh parsley if you’re feeling fancy—either way, it’s pure comfort in a spoon.
Maple-Glazed Baked Ham
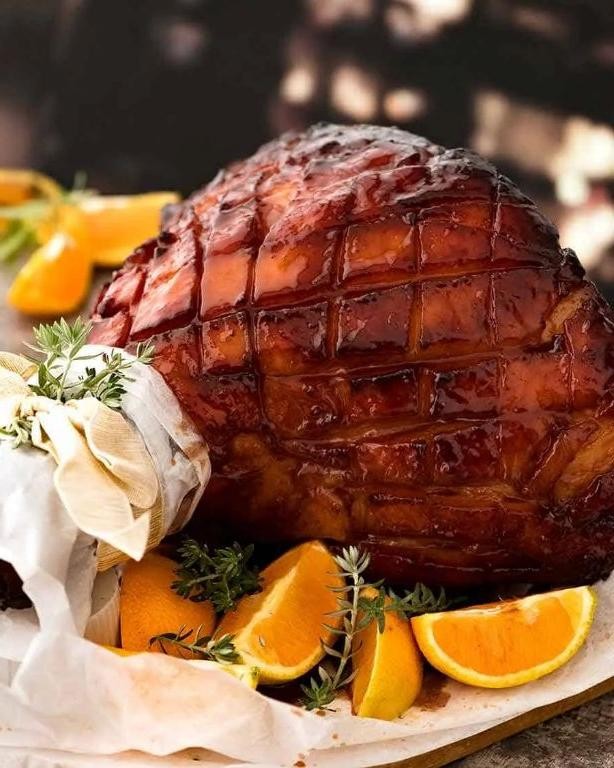
Fancy a ham that’ll make your taste buds do a happy dance? This maple-glazed beauty is the star of any holiday table or Tuesday night dinner—because who says you need an excuse for something this delicious? It’s sweet, savory, and guaranteed to disappear faster than your in-laws’ awkward small talk.
16
servings20
minutes140
minutesIngredients
– 1 (8-10 lb) fully cooked bone-in ham (I always go for spiral-cut—it makes serving so much easier)
– 1 cup pure maple syrup (the real stuff, none of that pancake syrup imposter)
– 1/2 cup packed brown sugar (dark brown for that deep molasses flavor)
– 1/4 cup Dijon mustard (this adds the perfect tangy counterpoint)
– 2 tbsp apple cider vinegar (just a splash to balance the sweetness)
– 1 tsp ground cinnamon (my secret weapon for warmth)
– 1/2 tsp ground cloves (use fresh-ground if you have them)
– 1/4 tsp cayenne pepper (trust me, this tiny kick makes all the difference)
Instructions
1. Preheat your oven to 325°F and position the rack in the lower third of the oven.
2. Remove all packaging from the ham and place it cut-side down in a roasting pan.
3. Score the ham in a diamond pattern about 1/4-inch deep across the entire surface.
4. Cover the ham tightly with aluminum foil and bake for 1 hour and 30 minutes.
5. While the ham bakes, whisk together maple syrup, brown sugar, Dijon mustard, apple cider vinegar, cinnamon, cloves, and cayenne pepper in a small saucepan.
6. Bring the glaze mixture to a simmer over medium heat, stirring constantly until the sugar dissolves completely.
7. Reduce heat to low and cook the glaze for 3 minutes until slightly thickened.
8. Remove the ham from the oven and carefully peel back the aluminum foil.
9. Brush half of the warm glaze evenly over the entire surface of the ham.
10. Return the ham to the oven uncovered and bake for another 30 minutes.
11. Remove the ham from the oven and brush with the remaining glaze.
12. Increase the oven temperature to 400°F and return the ham to the oven.
13. Bake for 10-15 minutes until the glaze is bubbly and caramelized.
14. Remove the ham from the oven and let it rest for 20 minutes before slicing.
That glossy, crackly crust gives way to the most tender, juicy ham underneath—each slice practically glistens with that perfect sweet-savory balance. Serve it thick-cut on biscuits for breakfast the next day, or chop it up for the best ham salad you’ll ever make.
Stuffed Acorn Squash with Quinoa and Cranberries

Who says vegetables can’t be the main event? This stuffed acorn squash is basically autumn’s answer to a perfectly packed suitcase—everything you need for a cozy, satisfying meal, all tucked neatly inside a gorgeous edible vessel. Get ready to impress your taste buds and your Instagram followers with this showstopper!
3
portions20
minutes50
minutesIngredients
- 2 medium acorn squash (look for ones that stand upright without wobbling—your future stable stuffing depends on it!)
- 1 cup quinoa (rinsed thoroughly—unless you enjoy that bitter saponin surprise)
- 2 cups vegetable broth (homemade if you’re fancy, boxed if you’re human)
- 1/2 cup dried cranberries (the chewy, tart little gems that make everything better)
- 1/4 cup chopped pecans (toasted, because life’s too short for bland nuts)
- 2 tbsp pure maple syrup (the real stuff—no pancake imposters allowed)
- 1 tbsp extra virgin olive oil (my go-to for roasting perfection)
- 1/2 tsp cinnamon (for that warm hug in spice form)
- 1/4 tsp sea salt (flaky style, because we’re fancy like that)
Instructions
- Preheat your oven to 400°F—this is where the squash magic begins.
- Slice each acorn squash in half vertically and scoop out the seeds with a sturdy spoon.
- Brush the cut sides of squash with olive oil and place cut-side down on a parchment-lined baking sheet.
- Roast for 25 minutes at 400°F until the flesh yields easily when poked with a fork.
- While squash roasts, rinse quinoa in a fine-mesh strainer until water runs clear to remove bitter saponins.
- Combine rinsed quinoa and vegetable broth in a saucepan, bring to a boil, then reduce heat to low.
- Cover and simmer quinoa for 15 minutes until all liquid is absorbed and little spirals appear.
- Remove quinoa from heat, fluff with a fork, and let stand covered for 5 minutes to finish steaming.
- Toast pecans in a dry skillet over medium heat for 3-4 minutes, shaking frequently until fragrant.
- In a large bowl, combine cooked quinoa, toasted pecans, dried cranberries, maple syrup, cinnamon, and sea salt.
- Flip roasted squash halves cut-side up and divide quinoa mixture evenly among them, packing gently.
- Return stuffed squash to oven and bake at 400°F for 10 more minutes until filling is heated through.
Every bite delivers the perfect textural symphony—tender squash, fluffy quinoa, chewy cranberries, and crunchy pecans all dancing together. The maple-cinnamon warmth makes this feel like dessert masquerading as dinner, especially when served with an extra drizzle of syrup for the rebels at the table.
Spicy Sausage and White Bean Stew

There’s something magical about a stew that can simultaneously warm your soul and wake up your taste buds—this spicy sausage and white bean creation is exactly that kind of kitchen wizardry. Think of it as your cozy blanket with a sneaky kick, perfect for those nights when you want comfort with a little attitude. Trust me, your slow cooker (and your future self) will thank you for this one.
2
servings15
minutes40
minutesIngredients
- 1 lb spicy Italian sausage (casings removed—I like the extra kick, but mild works if you’re spice-shy)
- 1 tbsp extra virgin olive oil (my go-to for that fruity depth)
- 1 medium yellow onion, diced (because nobody has time for tears)
- 2 cloves garlic, minced (fresh only—jarred garlic is a crime in my kitchen)
- 2 (15 oz) cans cannellini beans, rinsed and drained (they’re creamier than navy beans, fight me)
- 1 (14.5 oz) can diced tomatoes, undrained (they bring their own saucy party)
- 4 cups chicken broth (low-sodium so you control the salt)
- 1 tsp dried oregano (rub it between your palms to wake up the oils)
- 1/2 tsp crushed red pepper flakes (adjustable, but life’s better with a little heat)
- 1/4 cup chopped fresh parsley (for that bright finish)
Instructions
- Heat 1 tbsp olive oil in a large pot or Dutch oven over medium-high heat until it shimmers.
- Add 1 lb spicy Italian sausage, breaking it into small crumbles with a wooden spoon, and cook for 6-8 minutes until browned and no pink remains.
- Tip: If there’s excess grease, drain all but 1 tbsp to keep things flavorful but not greasy.
- Stir in 1 diced onion and cook for 4-5 minutes until softened and translucent.
- Add 2 minced garlic cloves and cook for 1 minute until fragrant—don’t let it burn!
- Pour in 4 cups chicken broth, scraping the bottom of the pot to lift any browned bits (that’s free flavor, folks).
- Stir in 2 cans rinsed cannellini beans, 1 can diced tomatoes, 1 tsp dried oregano, and 1/2 tsp red pepper flakes.
- Bring the stew to a boil, then reduce heat to low, cover, and simmer for 25 minutes to let the flavors marry.
- Tip: For a thicker stew, mash a few beans against the pot side with your spoon halfway through.
- Stir in 1/4 cup fresh parsley and simmer uncovered for 5 more minutes.
- Tip: Taste and adjust salt only at the end, since the sausage and broth add saltiness as it cooks.
You’ll love the creamy beans against the spicy sausage, with just enough broth to sop up with crusty bread. Yes, this stew is begging to be served in a hollowed-out bread bowl or over polenta for maximum coziness—leftovers taste even better the next day, if they last that long.
Winter Vegetable Pot Pie
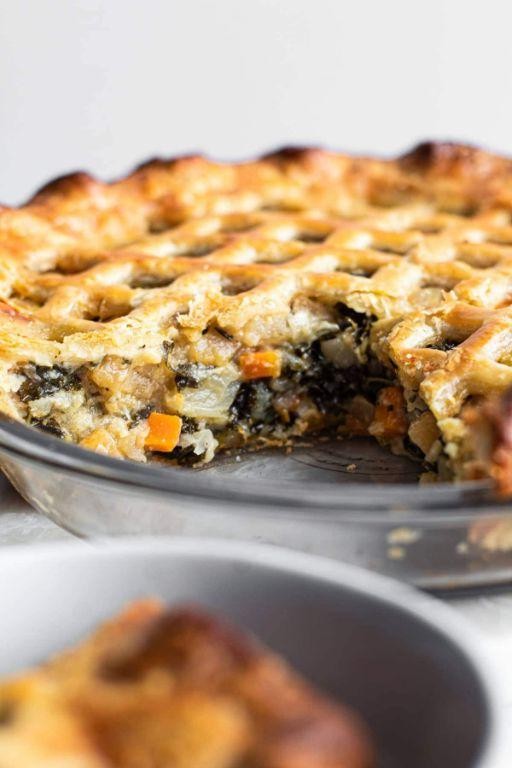
Aren’t you tired of winter turning your produce drawer into a sad, root vegetable graveyard? Let’s transform those earthy treasures into the coziest, flakiest pot pie that’ll make you forget there’s a frost advisory outside. This isn’t just comfort food—it’s a vegetable revolution in pastry form.
6
portions25
minutes65
minutesIngredients
– 2 cups all-purpose flour (I always sift mine first for extra flakiness)
– 1 cup unsalted butter, chilled and cubed (cold butter equals flaky layers, trust me)
– 1/3 cup ice water (seriously, use ice water—your pastry will thank you)
– 2 cups diced butternut squash (the sweetest winter warrior)
– 1 cup chopped carrots (the orange crunch that never disappoints)
– 1 cup frozen peas (my freezer MVP for instant color)
– 1 diced onion (the aromatic foundation of all good things)
– 2 cloves minced garlic (because everything’s better with garlic)
– 3 cups vegetable broth (homemade if you’re fancy, boxed if you’re human)
– 1/2 cup heavy cream (the secret to that luxurious sauce)
– 1 tbsp olive oil (extra virgin is my ride-or-die)
– 1 tsp dried thyme (winter’s favorite herb)
– Salt and pepper (the dynamic duo of seasoning)
Instructions
1. Combine 2 cups flour and 1/2 tsp salt in a large bowl.
2. Cut in 1 cup chilled butter cubes until mixture resembles coarse crumbs.
3. Gradually add 1/3 cup ice water, mixing until dough just comes together.
4. Divide dough in half, shape into disks, wrap in plastic, and refrigerate for 30 minutes.
5. Heat 1 tbsp olive oil in a large oven-safe skillet over medium heat.
6. Sauté 1 diced onion until translucent, about 5 minutes.
7. Add 2 cloves minced garlic and cook for 1 minute until fragrant.
8. Stir in 2 cups diced butternut squash and 1 cup chopped carrots.
9. Pour in 3 cups vegetable broth and bring to a simmer.
10. Cook vegetables until tender but not mushy, about 15 minutes.
11. Stir in 1 cup frozen peas and 1 tsp dried thyme.
12. Mix 2 tbsp flour with 1/2 cup heavy cream until smooth.
13. Gradually stir cream mixture into vegetables to thicken sauce.
14. Season with salt and pepper to your preference.
15. Roll out one dough disk to fit over skillet filling.
16. Place dough over vegetable mixture, crimping edges to seal.
17. Cut slits in top crust for steam to escape.
18. Brush crust with beaten egg for golden finish (optional but recommended).
19. Bake at 375°F for 35-40 minutes until crust is golden brown.
20. Let rest for 10 minutes before serving.
Buttery crust shatters to reveal a steaming vegetable mediance that’s somehow both hearty and elegant. Serve this beauty right from the skillet for maximum rustic charm, or plate individual portions with a crisp winter salad for contrast. Either way, you’ve just turned basic roots into extraordinary comfort.
Classic Chicken and Dumplings
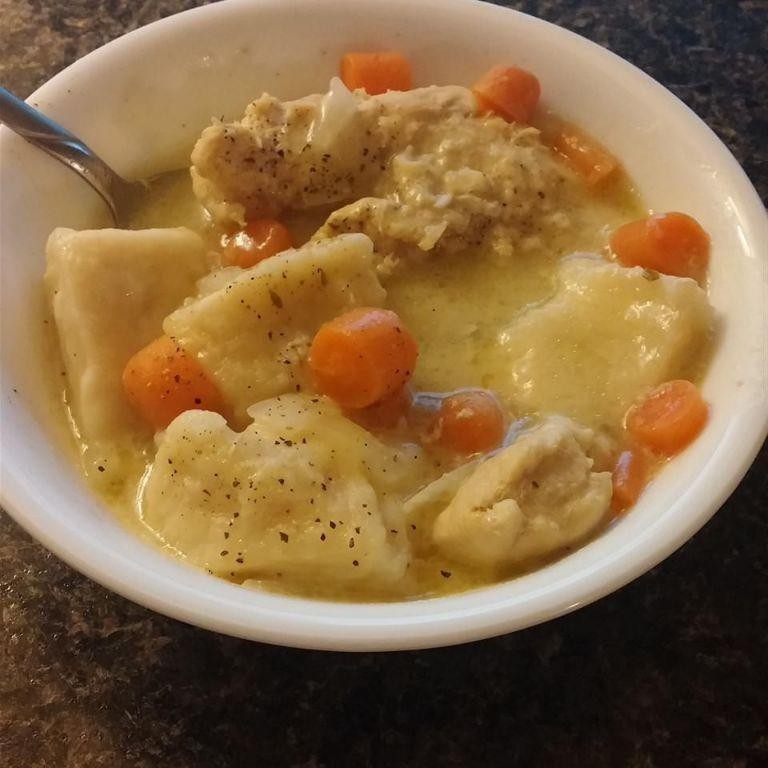
Brace yourselves, comfort food enthusiasts, because we’re about to dive into the glorious, steamy world of the coziest dish your grandma wishes she invented. This isn’t just soup with floating dough—it’s a fluffy, savory hug in a bowl that will make you forget all your troubles, or at least the fact that you burned the last batch. Get ready to transform simple ingredients into pure, unadulterated joy.
2
servings20
minutes60
minutesIngredients
- 2 tbsp of extra virgin olive oil (my go-to for that fruity base note)
- 1 large yellow onion, diced (the bigger, the more tears of joy)
- 2 carrots, chopped into rustic, chunky pieces (no perfectly uniform slices here, we’re keeping it real)
- 2 celery stalks, sliced (the unsung hero of the flavor trio)
- 1.5 lbs of boneless, skinless chicken thighs (trust me, thighs over breasts for maximum juiciness)
- 6 cups of chicken broth (homemade if you’re fancy, boxed if you’re smart and efficient)
- 1 cup of all-purpose flour, plus more for dusting (the magical cloud maker)
- 2 tsp of baking powder (the secret to fluffy, pillow-like dumplings)
- 1/2 tsp of salt (because life needs seasoning)
- 1/2 cup of whole milk (the richer, the better for tender dumplings)
- 2 tbsp of unsalted butter, chilled and cubed (cold butter is key for flaky layers)
- 1/4 cup of fresh parsley, finely chopped (for a pop of color and freshness)
Instructions
- Heat 2 tbsp of extra virgin olive oil in a large, heavy-bottomed pot or Dutch oven over medium-high heat until it shimmers.
- Add the diced yellow onion, chopped carrots, and sliced celery stalks to the pot, and sauté for 6-8 minutes, stirring occasionally, until the onions are translucent and the vegetables have slightly softened.
- Season 1.5 lbs of boneless, skinless chicken thighs with a pinch of salt and add them to the pot, cooking for 5-7 minutes per side until golden brown on the outside (they don’t need to be fully cooked through yet).
- Pour in 6 cups of chicken broth, scraping the bottom of the pot to lift any browned bits for extra flavor, and bring the mixture to a gentle boil.
- Reduce the heat to low, cover the pot, and let it simmer for 25 minutes to allow the chicken to become tender and the flavors to meld together.
- While the stew simmers, prepare the dumpling dough by combining 1 cup of all-purpose flour, 2 tsp of baking powder, and 1/2 tsp of salt in a medium mixing bowl.
- Cut 2 tbsp of chilled, cubed unsalted butter into the flour mixture using a pastry cutter or your fingers until the mixture resembles coarse crumbs (Tip: Work quickly to keep the butter cold for fluffier dumplings).
- Stir in 1/2 cup of whole milk just until the dough comes together, being careful not to overmix to avoid tough dumplings.
- Remove the cooked chicken thighs from the pot using tongs, shred them with two forks, and return the shredded chicken to the broth.
- Drop heaping tablespoons of the dumpling dough directly into the simmering stew, spacing them evenly to prevent sticking (Tip: Don’t stir the dumplings once they’re in—let them steam and puff up on their own).
- Cover the pot and simmer for 15 minutes without peeking to allow the dumplings to cook through and become light and fluffy.
- Uncover the pot and check that the dumplings are cooked by inserting a toothpick into the center of one—it should come out clean.
- Stir in 1/4 cup of finely chopped fresh parsley just before serving to brighten the dish (Tip: Adding herbs at the end preserves their fresh flavor and vibrant color).
My goodness, the result is pure comfort magic—tender shreds of chicken swimming in a savory broth, topped with fluffy, cloud-like dumplings that soak up all that goodness. Serve this in your coziest bowl on a chilly evening, and maybe, just maybe, drizzle a little hot sauce over the top for a spicy kick that cuts through the richness.
Braised Lamb Shanks with Red Wine and Rosemary
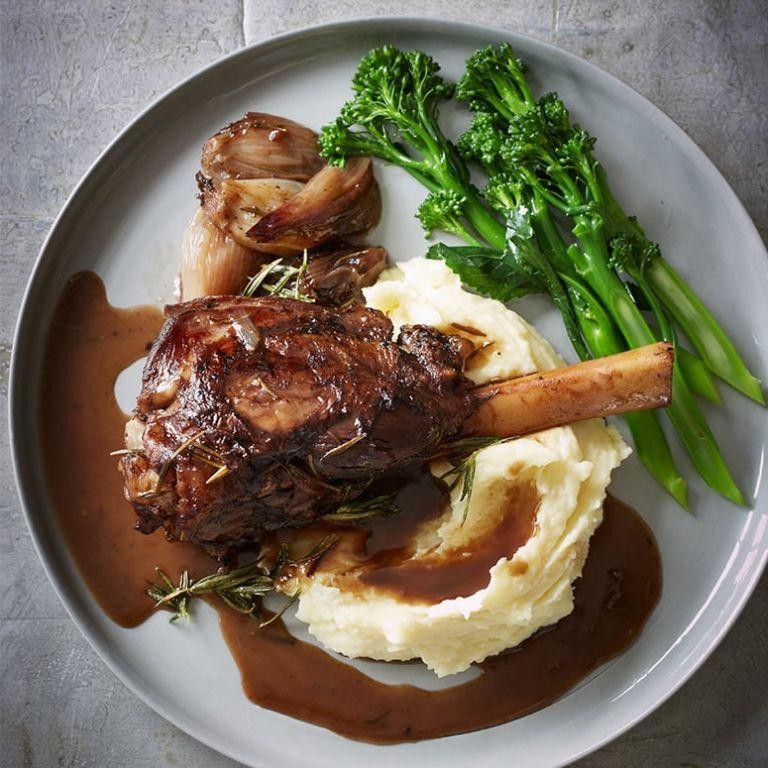
Hearty enough to make your taste buds do a happy dance, these braised lamb shanks are the culinary equivalent of a warm hug on a chilly day—tender, flavorful, and guaranteed to impress even your most discerning dinner guests. With red wine and rosemary working their magic, this dish transforms humble ingredients into a show-stopping meal that’s surprisingly simple to pull off.
2
servings15
minutes195
minutesIngredients
- 4 lamb shanks (about 1 lb each)—because bigger is always better when it comes to flavor.
- 2 tbsp extra virgin olive oil (my go-to for that fruity kick).
- 1 large yellow onion, diced—no tears, just triumphs!
- 4 garlic cloves, minced (fresh is best, but I won’t judge if you cheat with pre-minced).
- 2 cups dry red wine (like Cabernet Sauvignon—save a glass for the chef).
- 4 cups beef broth (low-sodium lets you control the salt).
- 3 sprigs fresh rosemary (dried just doesn’t pack the same punch).
- 2 tbsp tomato paste (the secret umami booster).
- Salt and black pepper to taste (be generous, but don’t go salt-bae crazy).
Instructions
- Preheat your oven to 325°F—low and slow is the name of the game here.
- Pat the lamb shanks completely dry with paper towels to ensure a perfect sear.
- Season the lamb shanks generously on all sides with salt and black pepper.
- Heat the extra virgin olive oil in a large, oven-safe Dutch oven over medium-high heat until shimmering.
- Sear the lamb shanks for 3-4 minutes per side until deeply browned, working in batches if needed to avoid crowding.
- Transfer the seared lamb shanks to a plate and set aside.
- Add the diced yellow onion to the same pot and sauté for 5 minutes until softened and translucent.
- Stir in the minced garlic and cook for 1 minute until fragrant—don’t let it burn!
- Add the tomato paste and cook for 2 minutes, stirring constantly to deepen its flavor.
- Pour in the dry red wine, scraping up any browned bits from the bottom of the pot.
- Simmer the wine for 5 minutes to reduce it by half and cook off the alcohol.
- Return the lamb shanks to the pot, along with any accumulated juices.
- Pour in the beef broth and add the fresh rosemary sprigs, ensuring the liquid nearly covers the shanks.
- Bring the mixture to a gentle simmer on the stovetop.
- Cover the pot tightly with a lid and transfer it to the preheated oven.
- Braise for 2.5 to 3 hours until the lamb is fork-tender and easily pulls away from the bone.
- Remove the pot from the oven and let the lamb shanks rest in the braising liquid for 15 minutes before serving. Marvelous and melt-in-your-mouth, these lamb shanks boast a rich, savory sauce that clings to every bite. Serve them over creamy polenta or mashed potatoes to soak up every last drop, and watch as your guests swoon over the fall-off-the-bone perfection.
Butternut Squash and Sage Risotto

Gather ’round, risotto rookies and squash enthusiasts! This butternut squash and sage risotto is about to become your new autumn obsession—creamy, dreamy, and guaranteed to impress even your most skeptical dinner guests (looking at you, Uncle Bob who thinks risotto is just “fancy rice”).
5
servings20
minutes55
minutesIngredients
– 1 medium butternut squash, peeled and cubed (about 4 cups—trust me, you’ll want every last golden nugget)
– 1 ½ cups Arborio rice (non-negotiable for that perfect creamy texture)
– 4 cups vegetable broth, kept warm (cold broth is the enemy of smooth risotto)
– 1 large yellow onion, finely diced (I cry every time, but it’s worth it)
– 3 cloves garlic, minced (because more garlic is always the answer)
– ½ cup dry white wine (something you’d actually drink—none of that “cooking wine” nonsense)
– ½ cup grated Parmesan cheese, plus extra for serving (the salty, cheesy crown this dish deserves)
– ¼ cup extra virgin olive oil (my go-to for that fruity kick)
– 2 tbsp unsalted butter (because everything’s better with butter)
– 10-12 fresh sage leaves (crispy fried sage makes everything fancy)
– Salt and freshly ground black pepper (season as you go, people!)
Instructions
1. Preheat your oven to 400°F and line a baking sheet with parchment paper.
2. Toss the cubed butternut squash with 1 tablespoon olive oil, ½ teaspoon salt, and ¼ teaspoon black pepper on the prepared baking sheet.
3. Roast the squash for 25-30 minutes until tender and lightly caramelized at the edges.
4. While squash roasts, heat vegetable broth in a separate saucepan and maintain at a gentle simmer.
5. Heat remaining olive oil in a large, heavy-bottomed pot over medium heat.
6. Add diced onion and cook for 5-7 minutes until translucent but not browned.
7. Stir in minced garlic and cook for 1 minute until fragrant.
8. Add Arborio rice to the pot and toast for 2 minutes, stirring constantly until grains look slightly translucent around the edges.
9. Pour in white wine and cook while stirring until the liquid is fully absorbed—this should take about 2 minutes.
10. Pro Tip: Add warm broth one ladleful at a time, waiting until each addition is nearly absorbed before adding the next.
11. Continue adding broth and stirring for 18-20 minutes until rice is creamy but still al dente.
12. Pro Tip: Maintain a steady simmer throughout—too hot and the rice will cook unevenly, too cool and it’ll become mushy.
13. Gently fold in the roasted butternut squash during the last 5 minutes of cooking.
14. Remove risotto from heat and stir in Parmesan cheese and butter until fully incorporated.
15. Pro Tip: For crispy sage garnish, heat 1 tablespoon olive oil in a small skillet over medium-high and fry sage leaves for 15-20 seconds until crisp.
16. Season risotto with additional salt and pepper if needed.Zesty, creamy, and utterly comforting, this risotto achieves that perfect balance where each spoonful delivers sweet squash, earthy sage, and rich Parmesan in creamy harmony. Serve it family-style in your prettiest bowl, topped with those crispy sage leaves and an extra snowfall of Parmesan—because let’s be real, there’s no such thing as too much cheese.
Savory Mushroom and Lentil Shepherd’s Pie

Zesty, cozy, and downright magical—this isn’t your grandma’s shepherd’s pie (unless your grandma is secretly a plant-based wizard). Savory Mushroom and Lentil Shepherd’s Pie swaps the meat for earthy mushrooms and protein-packed lentils, all smothered under a cloud of creamy mashed potatoes. It’s the ultimate comfort food that’ll have even carnivores asking for seconds.
6
servings25
minutes85
minutesIngredients
– 1.5 lbs Yukon Gold potatoes, peeled and quartered (their buttery texture makes the mash irresistible)
– 1/2 cup whole milk, warmed (cold milk makes potatoes sad—trust me)
– 4 tbsp unsalted butter, cubed (because everything’s better with butter)
– 1 large yellow onion, diced (the flavor foundation)
– 8 oz cremini mushrooms, sliced (they’re meaty little flavor sponges)
– 1 cup brown lentils, rinsed (no soaking needed—hooray for lazy cooks)
– 2 cups vegetable broth (low-sodium lets you control the salt)
– 2 tbsp tomato paste (it adds a sneaky umami punch)
– 1 tsp smoked paprika (for that “is there bacon in here?” vibe)
– 2 tbsp all-purpose flour (the thickening hero)
– 2 tbsp olive oil (extra virgin is my go-to for sautéing)
Instructions
1. Place potatoes in a large pot, cover with cold water, and bring to a boil over high heat.
2. Reduce heat to medium and simmer potatoes for 15–18 minutes, until easily pierced with a fork.
3. Drain potatoes thoroughly and return them to the warm pot to evaporate excess moisture.
4. Mash potatoes with a potato masher until no large lumps remain.
5. Stir in warm milk and cubed butter until the mash is smooth and creamy.
6. Preheat oven to 400°F and lightly grease a 9×9-inch baking dish.
7. Heat olive oil in a large skillet over medium heat until shimmering.
8. Add diced onion and cook for 5–7 minutes, stirring occasionally, until translucent.
9. Stir in sliced mushrooms and cook for 8–10 minutes until browned and tender.
10. Sprinkle flour over the mushroom mixture and cook for 1 minute, stirring constantly.
11. Add tomato paste and smoked paprika, stirring for 30 seconds to toast the spices.
12. Pour in vegetable broth and rinsed lentils, scraping up any browned bits from the pan.
13. Bring to a simmer, then reduce heat to low and cook uncovered for 25–30 minutes, until lentils are tender and liquid has thickened.
14. Spread the lentil mixture evenly in the prepared baking dish.
15. Carefully spoon mashed potatoes over the top, spreading to cover completely.
16. Use a fork to create decorative peaks on the potato surface for extra crispy bits.
17. Bake for 20–25 minutes until the filling is bubbly and potatoes are golden.
18. Let rest for 10 minutes before serving to allow the filling to set.
Remarkably satisfying, this pie delivers a creamy potato blanket over a deeply savory lentil and mushroom filling. The smoky paprika adds a warm hug of flavor, while the crispy potato peaks give every bite textural excitement. Serve it with a simple green salad to cut through the richness, or enjoy leftovers straight from the fridge—it’s even better the next day.
Caramelized Onion and Goat Cheese Tart

Oh, the humble onion—who knew it could transform into such a sweet, savory superstar? This caramelized onion and goat cheese tart is basically a fancy pizza that decided to wear its Sunday best, and trust me, your taste buds will throw a party. Let’s dive into this flaky, creamy masterpiece that’s easier to make than explaining why you ate half the tart before dinner.
4
portions15
minutes55
minutesIngredients
- 1 sheet frozen puff pastry, thawed (I keep it cold until the last second to avoid a sad, flat situation)
- 2 large yellow onions, thinly sliced (embrace the tears—it’s flavor in disguise!)
- 2 tbsp unsalted butter (because everything’s better with butter, right?)
- 1 tbsp extra virgin olive oil (my go-to for that fruity kick)
- 4 oz goat cheese, crumbled (room temp spreads like a dream)
- 1 tsp fresh thyme leaves (skip the dried stuff—fresh is worth the snip)
- 1/4 tsp salt (just enough to make the onions sing)
- 1/4 tsp black pepper (freshly ground, please—it’s a game-changer)
Instructions
- Preheat your oven to 400°F and line a baking sheet with parchment paper.
- Roll out the puff pastry on the prepared sheet to about 1/8-inch thickness, then prick it all over with a fork to prevent puffing.
- Heat the butter and olive oil in a large skillet over medium-low heat until the butter melts completely.
- Add the sliced onions to the skillet and cook, stirring occasionally, for 25–30 minutes until they turn a deep golden brown and smell sweet.
- Sprinkle the salt and black pepper over the onions, stir to combine, and cook for 1 more minute.
- Spread the caramelized onions evenly over the puff pastry, leaving a 1-inch border around the edges.
- Dot the crumbled goat cheese and fresh thyme leaves on top of the onions.
- Fold the pastry edges over the filling to create a rustic crust, pressing gently to seal.
- Bake for 20–25 minutes until the pastry is puffed and golden brown, and the cheese is slightly melted.
- Let the tart cool on the baking sheet for 5 minutes before slicing. Did you know letting it rest prevents a soggy bottom? It’s a pro move for crispiness.
Dig into this tart and you’ll get a buttery, flaky crust that shatters with each bite, paired with creamy goat cheese and sweet, jammy onions. Serve it warm with a side salad for a lazy brunch, or slice it into squares and watch it vanish at your next potluck—fair warning, it’s that irresistible.
Pork Tenderloin with Apple-Onion Chutney

Dazzling your dinner guests just got ridiculously easy with this pork tenderloin that practically cooks itself while you whip up the most addictive apple-onion chutney you’ll ever smear on anything. Seriously, this dish is so foolproof you could probably teach your cat to make it (though I don’t recommend letting them near the stove). Get ready for your new favorite weeknight hero that tastes fancy without the fuss.
5
servings15
minutes40
minutesIngredients
– 1 pork tenderloin (about 1.5 lbs) – get the good stuff, it makes all the difference
– 2 tbsp olive oil – my trusty extra virgin never lets me down
– 1 tsp kosher salt – flaky goodness for that perfect crust
– ½ tsp black pepper – freshly ground, because pre-ground is just sad pepper dust
– 2 apples, peeled and diced – I’m team Honeycrisp for their sweet-tart punch
– 1 large yellow onion, thinly sliced – the tears are worth it, I promise
– ¼ cup brown sugar – for that caramelized magic
– 2 tbsp apple cider vinegar – the tangy backbone of our chutney
– ½ tsp cinnamon – just enough to whisper “autumn” without shouting it
Instructions
1. Preheat your oven to 400°F – no cheating, let it fully heat for even cooking.
2. Pat the pork tenderloin completely dry with paper towels – this is your golden ticket to that beautiful sear.
3. Rub the pork all over with olive oil, then season generously with kosher salt and black pepper.
4. Heat an oven-safe skillet over medium-high heat for 2 minutes until properly hot.
5. Sear the pork tenderloin for 2 minutes per side until you’ve got a gorgeous golden-brown crust on all sides.
6. Transfer the entire skillet to the preheated oven and roast for 15-18 minutes until the internal temperature reads 145°F on a meat thermometer.
7. While the pork roasts, heat the remaining olive oil in a separate saucepan over medium heat.
8. Add the sliced onion and cook for 6-8 minutes, stirring occasionally, until softened and slightly golden.
9. Stir in the diced apples and cook for another 4 minutes until they begin to soften.
10. Add the brown sugar, apple cider vinegar, and cinnamon, stirring to combine everything beautifully.
11. Reduce heat to low and simmer the chutney for 8-10 minutes, stirring occasionally, until the apples are tender but not mushy.
12. Remove the pork from the oven and let it rest on a cutting board for exactly 5 minutes – this keeps all those precious juices locked in.
13. Slice the pork into 1-inch thick medallions against the grain for maximum tenderness.
14. Serve the sliced pork topped generously with the warm apple-onion chutney.
Gloriously tender pork meets that sweet-savory chutney in a texture party where juicy meets chunky perfection. The caramelized apples practically melt into the onions creating this sticky-sweet situation that plays so nicely against the savory pork. Try serving it over creamy polenta or alongside roasted Brussels sprouts for a dinner that’ll have everyone asking for your “secret” recipe.
Cheesy Polenta with Roasted Brussels Sprouts
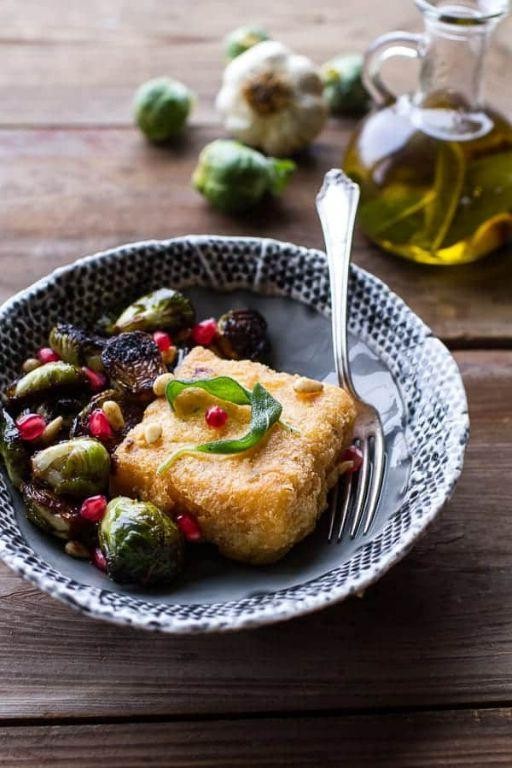
Brace yourselves, comfort food enthusiasts, because we’re about to turn humble cornmeal and unfairly maligned sprouts into a weeknight hero that will make you forget all your troubles (or at least the ones that can’t be solved with cheese). This dish is the culinary equivalent of a cozy sweater for your soul, proving that sometimes the simplest combinations are the most spectacular.
2
servings15
minutes45
minutesIngredients
- 1 cup coarse-ground polenta (the good stuff with some texture)
- 4 cups vegetable broth (homemade if you’re fancy, boxed if you’re smart)
- 1 pound Brussels sprouts, trimmed and halved (the little cabbages that could)
- 3 tablespoons extra virgin olive oil (my go-to for everything except dessert)
- 1/2 cup grated Parmesan cheese (the salty, nutty kind that makes everything better)
- 1/2 cup shredded sharp cheddar cheese (because one cheese is a tragedy, two is a party)
- 2 cloves garlic, minced (fresh only, we’re not savages)
- 1/2 teaspoon red pepper flakes (for a gentle wake-up call)
- Salt and black pepper (the dynamic duo of seasoning)
Instructions
- Preheat your oven to 400°F and line a baking sheet with parchment paper.
- Toss the halved Brussels sprouts with 2 tablespoons of olive oil, ensuring each sprout gets properly coated.
- Spread the sprouts in a single layer on the prepared baking sheet, cut-side down for maximum caramelization.
- Roast for 20-25 minutes until the edges are crispy and deeply browned, shaking the pan halfway through.
- While sprouts roast, bring vegetable broth to a rolling boil in a heavy-bottomed saucepan.
- Slowly whisk in the polenta in a steady stream to prevent lumps from forming.
- Reduce heat to low and simmer for 25-30 minutes, stirring frequently with a wooden spoon until thickened.
- Stir in both Parmesan and cheddar cheeses until completely melted and incorporated.
- Heat remaining 1 tablespoon olive oil in a small skillet over medium heat.
- Add minced garlic and red pepper flakes, cooking for 1 minute until fragrant but not browned.
- Stir the garlic oil mixture into the finished polenta for an extra flavor boost.
- Season the polenta with salt and black pepper to your preference.
- Divide the creamy polenta among bowls and top generously with roasted Brussels sprouts.
Finally, behold your masterpiece: the polenta should be luxuriously smooth with just enough grit to remind you it came from corn, while the sprouts provide that perfect crispy-tender contrast. For maximum drama, serve this in shallow bowls with an extra snowfall of Parmesan and maybe a fried egg on top if you’re feeling extra indulgent—it’s the kind of meal that makes Tuesday feel like a celebration.
Baked Ziti with Ricotta and Mozzarella

Tired of the same old pasta routine? This baked ziti with ricotta and mozzarella is about to become your new cheesy obsession—it’s basically a cozy hug in a baking dish, minus the awkward small talk. Perfect for when you want to impress without the stress, this dish delivers layers of saucy, cheesy goodness that’ll have everyone fighting for the corner piece (you know, the one with the extra crispy edges). Let’s dive in and make some magic!
8
servings20
minutes50
minutesIngredients
- 1 pound ziti pasta (I always grab the ridged kind—it holds the sauce like a champ)
- 24 ounces marinara sauce (go for your favorite jarred brand to save time, or homemade if you’re feeling fancy)
- 15 ounces ricotta cheese (full-fat for that creamy dreaminess, trust me)
- 2 cups shredded mozzarella cheese (I like to shred my own—it melts so much better than the pre-shredded stuff)
- 1/2 cup grated Parmesan cheese (the salty kick that ties it all together)
- 1 large egg (room temp, please—it blends into the ricotta without curdling)
- 1 tablespoon olive oil (extra virgin is my go-to for a fruity hint)
- 1 teaspoon salt (for seasoning the pasta water—don’t skip it!)
- 1/2 teaspoon black pepper (freshly ground adds a little zing)
- 1 teaspoon dried oregano (because herbs make everything better)
Instructions
- Preheat your oven to 375°F—this ensures it’s ready to go when your ziti is assembled.
- Bring a large pot of water to a rolling boil over high heat, then add 1 teaspoon salt and 1 tablespoon olive oil to prevent sticking.
- Add 1 pound ziti pasta to the boiling water and cook for 8-10 minutes, stirring occasionally, until it’s al dente (just tender with a slight bite).
- Drain the pasta in a colander, but don’t rinse it—the starch helps the sauce cling better.
- In a medium bowl, combine 15 ounces ricotta cheese, 1 large egg, 1/2 teaspoon black pepper, and 1 teaspoon dried oregano, mixing until smooth.
- Tip: Let the ricotta sit out for 10 minutes before mixing to avoid lumps.
- Spread a thin layer of 24 ounces marinara sauce on the bottom of a 9×13-inch baking dish to prevent sticking.
- Add half of the drained ziti to the dish, spreading it evenly.
- Dollop half of the ricotta mixture over the pasta, then spoon half of the remaining marinara sauce on top.
- Sprinkle 1 cup shredded mozzarella cheese and 1/4 cup grated Parmesan cheese over the sauce.
- Repeat the layers with the remaining pasta, ricotta mixture, marinara sauce, mozzarella, and Parmesan.
- Cover the dish tightly with aluminum foil and bake at 375°F for 25 minutes to meld the flavors.
- Tip: Spray the foil with cooking spray to keep the cheese from sticking.
- Remove the foil and bake for another 10-15 minutes, until the cheese is bubbly and golden brown on top.
- Tip: Let it rest for 5-10 minutes before serving—this helps the layers set for cleaner slices.
Dig into that glorious mess of creamy ricotta pockets and stretchy mozzarella strands, all nestled in saucy pasta perfection. Serve it with a crisp salad to cut through the richness, or go all-in and pair it with garlic bread for the ultimate comfort meal. Leftovers? They’re even better the next day—if there are any left!
Seafood Paella with Chorizo and Peas

Sizzling, vibrant, and packed with personality—this seafood paella with chorizo and peas is the life of any dinner party, bringing Spanish sunshine to your table without the airfare. It’s a one-pan wonder that’s as fun to make as it is to devour, with chorizo adding a smoky kick and peas popping like confetti. Trust me, your skillet has never been this excited.
6
servings25
minutes40
minutesIngredients
- 1 ½ cups short-grain rice (I swear by bomba rice—it soaks up flavor like a sponge)
- 8 oz Spanish chorizo, sliced into ¼-inch rounds (the smokier, the better—it’s the party starter)
- 1 lb large shrimp, peeled and deveined (keep those tails on for dramatic flair)
- 1 lb mussels, scrubbed and debearded (discard any that won’t close—they’re not invited)
- 1 cup frozen peas (no need to thaw—they’ll wake up in the pan)
- 1 medium yellow onion, finely diced (this is where the flavor foundation begins)
- 4 cloves garlic, minced (because more garlic is always the answer)
- 4 cups chicken broth, warmed (hot broth keeps the rice cooking evenly—no cold shocks!)
- 1 tsp smoked paprika (for that warm, cozy hug of flavor)
- ¼ cup extra virgin olive oil (my go-to for a fruity, rich base)
- 1 pinch saffron threads (the golden ticket—toast them first for maximum aroma)
- 1 lemon, cut into wedges (for a zesty finish that cuts through the richness)
- Salt to taste (I’m generous here—season as you go!)
Instructions
- Heat ¼ cup extra virgin olive oil in a large, wide skillet over medium heat until it shimmers, about 2 minutes.
- Add 8 oz sliced Spanish chorizo and cook for 4–5 minutes, stirring occasionally, until the edges crisp and release their oils.
- Stir in 1 diced yellow onion and cook for 5–7 minutes, until softened and translucent.
- Add 4 minced garlic cloves and 1 tsp smoked paprika, stirring for 1 minute until fragrant—don’t let the garlic brown!
- Toast 1 pinch saffron threads in the pan for 30 seconds to unlock their floral notes (tip: crumble them between your fingers first).
- Pour in 1 ½ cups short-grain rice and stir to coat evenly with the oil and spices, toasting for 2 minutes until lightly golden.
- Pour 4 cups warmed chicken broth into the skillet, bring to a boil, then reduce heat to low and simmer uncovered for 15 minutes.
- Arrange 1 lb shrimp and 1 lb mussels evenly over the rice, nestling them gently into the surface.
- Scatter 1 cup frozen peas across the top and cook for another 10–12 minutes, until the rice is tender and liquid is absorbed (tip: avoid stirring now to develop that coveted socarrat crust).
- Remove from heat, cover the skillet with a lid or foil, and let rest for 5 minutes to steam the seafood through.
- Discard any mussels that haven’t opened—they’re not worth the risk.
- Season with salt to taste and garnish with lemon wedges for squeezing over just before serving.
Who knew a single skillet could deliver such a fiesta? The rice emerges tender yet distinct, with a subtle crunch at the bottom, while the chorizo infuses every bite with smoky warmth. Serve it straight from the pan with crusty bread to sop up the juices—it’s a showstopper that begs for a crowd.
Coq au Vin with Bacon and Pearl Onions

Who says fancy French food has to be intimidating? This coq au vin is basically a cozy sweater for your taste buds—rich, comforting, and guaranteed to make you feel like a culinary rockstar without the stress. Let’s turn that chicken into a masterpiece!
4
servings25
minutes105
minutesIngredients
- 4 thick-cut bacon slices, chopped (because everything’s better with bacon, right?)
- 1 whole chicken, cut into 8 pieces (skin-on for maximum flavor, trust me)
- 1 cup pearl onions, peeled (the frozen ones are a lifesaver here)
- 2 cups red wine (a bold Cabernet Sauvignon is my go-to for depth)
- 2 cups chicken broth (low-sodium so you control the salt)
- 3 garlic cloves, minced (fresh only—none of that jarred stuff)
- 8 oz cremini mushrooms, sliced (they hold their shape beautifully)
- 2 tbsp tomato paste (it adds a lovely richness)
- 2 tbsp all-purpose flour (for that perfect sauce thickness)
- 3 tbsp unsalted butter (divided, because butter makes everything better)
- 2 tbsp fresh thyme leaves (skip the dried—fresh herbs are worth it)
- 1 bay leaf (remove it before serving or someone might get a surprise)
- Salt and freshly ground black pepper (season as you go, my friends)
Instructions
- Preheat your oven to 325°F—low and slow is the key to tender chicken.
- Cook the chopped bacon in a large Dutch oven over medium heat for 8-10 minutes until crispy, then transfer to a paper towel-lined plate.
- Season the chicken pieces generously with salt and pepper on all sides.
- Brown the chicken in the bacon fat over medium-high heat for 5-6 minutes per side until golden, then set aside.
- Sauté the pearl onions and mushrooms in the same pot with 1 tbsp butter for 6-7 minutes until lightly browned.
- Stir in the minced garlic and tomato paste, cooking for 1 minute until fragrant.
- Sprinkle the flour over the vegetables and cook for 2 minutes, stirring constantly to form a roux.
- Pour in the red wine, scraping up any browned bits from the bottom of the pot—that’s flavor gold!
- Add the chicken broth, thyme, bay leaf, and crispy bacon, then bring to a simmer.
- Return the chicken to the pot, submerging it in the liquid, cover, and braise in the preheated oven for 1 hour 15 minutes.
- Remove the pot from the oven and discard the bay leaf.
- Stir in the remaining 2 tbsp butter until melted and the sauce is glossy.
- Let the dish rest for 10 minutes before serving to allow the flavors to meld.
Keep that last bit of sauce for dipping crusty bread—you won’t regret it. The chicken falls off the bone into a velvety, wine-kissed gravy that’s pure comfort in a bowl. Serve it over mashed potatoes or buttery egg noodles to soak up every delicious drop, and watch it become an instant family favorite.
Vegetarian Moussaka with Eggplant and Tomato Sauce

Oh, the humble eggplant—often overlooked in the produce aisle, but today it’s the star of this show! This vegetarian moussaka is a cozy, layered masterpiece that’ll have even the carnivores asking for seconds, and trust me, it’s easier to whip up than it looks.
6
portions25
minutes65
minutesIngredients
- 2 large eggplants, sliced into ½-inch rounds (go for firm, shiny ones—no sad, wrinkly eggplants allowed!)
- 2 tbsp extra virgin olive oil (my go-to for that fruity kick)
- 1 large yellow onion, diced (because sweetness matters)
- 3 cloves garlic, minced (fresh only—jarred garlic is a crime here)
- 1 (28-oz) can crushed tomatoes (I prefer San Marzano for their bright acidity)
- 1 cup vegetable broth (low-sodium lets you control the salt)
- 1 tsp dried oregano (crush it between your fingers to wake up the flavor)
- ½ tsp ground cinnamon (a sneaky pinch that makes it magical)
- 1 cup grated Parmesan cheese (the real deal, not the shaky stuff)
- 1 cup whole milk ricotta cheese (room temp blends smoother)
- 1 large egg, lightly beaten (room temp eggs here prevent curdling)
- ¼ cup all-purpose flour (for dusting—keeps things from getting soggy)
- Salt and black pepper, to taste (be generous—layer by layer!)
Instructions
- Preheat your oven to 400°F and line a baking sheet with parchment paper.
- Arrange the eggplant slices in a single layer on the baking sheet, brush both sides with 1 tbsp olive oil, and sprinkle with salt.
- Roast the eggplant for 20 minutes, flipping halfway, until tender and lightly browned.
- While the eggplant roasts, heat the remaining 1 tbsp olive oil in a large skillet over medium heat.
- Add the diced onion and cook for 5-7 minutes, stirring occasionally, until softened and translucent.
- Stir in the minced garlic and cook for 1 minute until fragrant—don’t let it burn!
- Pour in the crushed tomatoes, vegetable broth, dried oregano, and cinnamon, then season with salt and pepper.
- Simmer the sauce uncovered for 15 minutes, stirring occasionally, until slightly thickened.
- In a medium bowl, mix the ricotta, Parmesan, beaten egg, and a pinch of black pepper until smooth.
- Lightly dust the bottom of a 9×13-inch baking dish with flour to prevent sticking.
- Layer half the roasted eggplant slices evenly in the dish.
- Spread half the tomato sauce over the eggplant, then repeat with the remaining eggplant and sauce.
- Dollop the ricotta mixture over the top and spread it into an even layer.
- Bake at 375°F for 30 minutes, until the top is golden and bubbly.
- Let the moussaka rest for 10 minutes before slicing to set the layers.
Finally, slice into this beauty and marvel at the creamy, spiced layers that hug each other like a warm blanket. The eggplant melts into the tangy tomato sauce, while the cheesy topping adds a rich, comforting finish—serve it with a crisp green salad to cut through the richness, and watch it disappear faster than you can say “seconds, please!”
Conclusion
Perfect for warming up those chilly December nights, this collection of 33 cozy dinner recipes offers comfort and ease for busy home cooks. We hope you find new favorites to share around your table! Don’t forget to leave a comment telling us which dish you loved most, and pin this article on Pinterest to save these ideas for later.


