Easter’s hopping our way, and what better way to celebrate than with a table full of charming, delicious treats? We’ve gathered 24 absolutely adorable recipes that are perfect for your festive feast, from sweet bunny-shaped delights to savory springtime favorites. Get ready to delight your family and friends with these cute creations—let’s dive into the list and make this Easter extra special!
Bunny Butt Cupcakes

Cupcakes that look like adorable bunny butts? Yes, you read that right—these whimsical treats are hopping into your kitchen to bring a dose of pure, unadulterated joy to any spring gathering or just a Tuesday that needs brightening. Imagine fluffy vanilla cupcakes topped with a cloud of frosting and a cute little tail, because why should bunnies have all the fun? Let’s get baking and turn your dessert table into a whimsical wonderland!
Serving: 12 | Pre Time: 20 minutes | Cooking Time: 18 minutes
Ingredients
– 1 ½ cups all-purpose flour (I always sift mine first for extra fluffiness)
– 1 cup granulated sugar (the sweet heart of any good cupcake)
– ½ cup unsalted butter, softened (room temp is key here for smooth mixing)
– 2 large eggs, at room temperature (they blend better and prevent curdling)
– ½ cup whole milk (for that rich, moist crumb)
– 1 tsp vanilla extract (pure vanilla is my go-to for the best flavor)
– 1 ½ tsp baking powder (the magic leavener that makes them rise)
– ¼ tsp salt (just a pinch to balance the sweetness)
– 2 cups powdered sugar (for the frosting that holds it all together)
– ½ cup unsalted butter, softened (yes, more butter—it’s worth it!)
– 1 tsp vanilla extract (double the vanilla, double the fun)
– 2-3 tbsp whole milk (adjust to get that perfect piping consistency)
– 12 pink marshmallows (for the bunny tails—cuteness overload!)
Instructions
1. Preheat your oven to 350°F and line a 12-cup muffin tin with cupcake liners.
2. In a medium bowl, whisk together 1 ½ cups all-purpose flour, 1 ½ tsp baking powder, and ¼ tsp salt until well combined.
3. In a large mixing bowl, cream ½ cup softened unsalted butter and 1 cup granulated sugar together on medium speed for 2-3 minutes until light and fluffy.
4. Add 2 large eggs one at a time to the butter mixture, beating well after each addition to incorporate fully.
5. Mix in 1 tsp vanilla extract until just blended into the wet ingredients.
6. Gradually add the dry flour mixture to the wet ingredients, alternating with ½ cup whole milk, beginning and ending with the dry mix, and beat on low speed until just combined—tip: don’t overmix to avoid tough cupcakes.
7. Divide the batter evenly among the 12 cupcake liners, filling each about two-thirds full.
8. Bake in the preheated oven for 18 minutes, or until a toothpick inserted into the center comes out clean—tip: rotate the pan halfway through for even baking.
9. Remove the cupcakes from the oven and let them cool in the pan for 5 minutes before transferring to a wire rack to cool completely.
10. While the cupcakes cool, make the frosting by beating ½ cup softened unsalted butter in a bowl until smooth.
11. Gradually add 2 cups powdered sugar, 1 tsp vanilla extract, and 2-3 tbsp whole milk, beating on medium speed until light and fluffy—tip: add milk slowly to control consistency for easy piping.
12. Once cupcakes are fully cooled, pipe or spread the frosting onto each one in a circular mound.
13. Gently press a pink marshmallow into the center of each frosted cupcake to create the bunny tail.
Buttery and light, these cupcakes boast a tender crumb that melts in your mouth, with the vanilla frosting adding a creamy sweetness that perfectly complements the playful marshmallow tail. Serve them at Easter brunches or as a surprise treat for kids—they’re guaranteed to spark smiles and maybe even a few giggles as everyone admires those adorable bunny butts!
Carrot-Shaped Cheese Ball
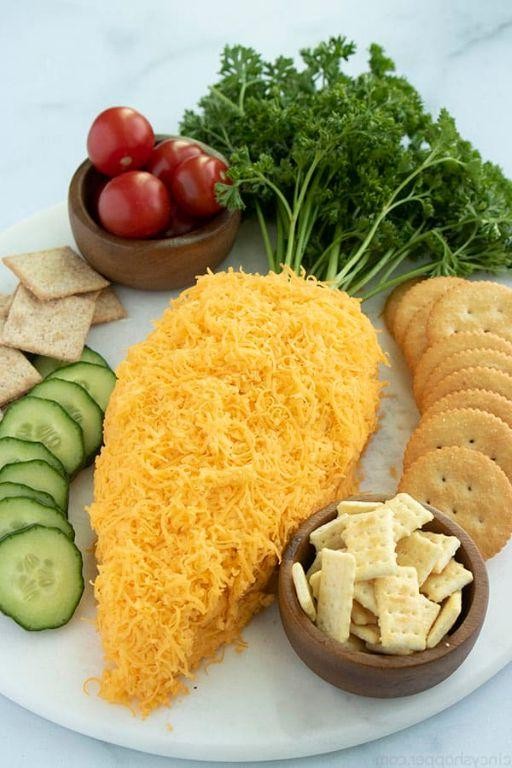
Hilariously, this carrot-shaped cheese ball is the party snack that looks like you spent hours crafting, when really, it’s just a cleverly disguised blob of deliciousness. It’s the ultimate edible prank for your holiday table, guaranteed to make guests do a double-take before diving in. Trust me, it’s way more fun than a regular old cheese ball.
Serving: 12 | Pre Time: 25 minutes | Cooking Time: 0 minutes
Ingredients
– 16 ounces cream cheese, softened to room temperature for easy mixing (I leave mine out for a good hour)
– 1 1/2 cups shredded sharp cheddar cheese, the extra-sharp kind is my go-to for a bold flavor punch
– 1/2 cup finely chopped pecans, toasted for a nutty crunch
– 3 green onions, thinly sliced, using both the white and green parts
– 1 teaspoon Worcestershire sauce, for that savory umami kick
– 1/2 teaspoon garlic powder
– 1/4 teaspoon smoked paprika
– 1/4 teaspoon salt
– 1 bunch fresh parsley, for the carrot “greens”
– 1/4 cup shredded cheddar cheese, reserved for rolling
Instructions
1. In a large mixing bowl, combine the 16 ounces of softened cream cheese, 1 1/2 cups of shredded sharp cheddar cheese, 1/2 cup of finely chopped toasted pecans, the sliced green onions, 1 teaspoon of Worcestershire sauce, 1/2 teaspoon of garlic powder, 1/4 teaspoon of smoked paprika, and 1/4 teaspoon of salt.
2. Use a sturdy spatula or your clean hands to mix everything together thoroughly until fully incorporated and no streaks of cream cheese remain. Tip: If the mixture feels too stiff, let it warm up a bit more at room temperature for easier handling.
3. Shape the cheese mixture into a rough cone or carrot shape on a clean work surface, about 6 inches long and 3 inches wide at the base.
4. Roll the shaped cheese ball in the reserved 1/4 cup of shredded cheddar cheese, pressing gently to coat the entire surface evenly. Tip: For better adhesion, chill the shaped ball in the refrigerator for 10 minutes before rolling in the cheese.
5. Transfer the coated cheese ball to a serving platter.
6. Take the bunch of fresh parsley and trim the stems to about 2 inches long.
7. Insert the parsley stems firmly into the top of the cheese ball to create the carrot’s leafy greens, arranging them to look natural and bushy. Tip: For a sturdier hold, use a small knife to make a shallow hole in the cheese ball before inserting the parsley.
8. Refrigerate the completed carrot-shaped cheese ball for at least 1 hour to firm up before serving.
Kick off your gathering with this whimsical centerpiece! The texture is gloriously creamy and spreadable with a satisfying crunch from the pecans, while the flavor boasts a tangy, cheesy sharpness balanced by smoky paprika. Serve it with crackers or veggie sticks, and watch it disappear faster than you can say “bunny bait”—it’s a conversation starter that tastes as good as it looks.
Peeps Fruit Kabobs

Gather ’round, fellow snack enthusiasts, because we’re about to turn those sugary marshmallow Peeps into the life of the party with these hilariously simple Peeps Fruit Kabobs. This is the ultimate hack for when you need a festive, no-fuss treat that’ll have both kids and adults giggling with delight.
Serving: 8 | Pre Time: 15 minutes | Cooking Time: 0 minutes
Ingredients
– 8 yellow marshmallow Peeps (the classic chick shape is my go-to for maximum whimsy)
– 1 cup fresh strawberries, hulled and halved (I prefer plump, ripe ones for a juicy burst)
– 1 cup fresh pineapple chunks (about 1-inch pieces—trust me, the tropical sweetness balances the Peeps perfectly)
– 8 wooden skewers, 6 inches long (soak them in water for 10 minutes first to prevent scorching, a little trick I learned the hard way!)
Instructions
1. Soak 8 wooden skewers in a bowl of water for exactly 10 minutes to prevent them from burning or splintering later.
2. Pat the skewers dry with a clean kitchen towel to remove excess water.
3. Thread one marshmallow Peep onto the pointed end of a skewer, pushing it about halfway down.
4. Add one strawberry half directly next to the Peep on the skewer.
5. Follow with one pineapple chunk, sliding it snugly against the strawberry.
6. Repeat steps 3–5 for the remaining 7 skewers, arranging all ingredients in the same order.
7. Arrange the completed kabobs on a serving platter, spacing them evenly to prevent sticking.
8. Serve immediately at room temperature for the best texture and flavor.
Vividly colorful and delightfully silly, these kabobs offer a playful contrast of chewy Peeps with juicy, fresh fruit. Try drizzling them with a bit of melted chocolate for an extra indulgent twist, or pack them for a picnic where they’re sure to steal the show!
Easter Egg Oreo Truffles

Gather ’round, fellow sweet-tooth adventurers, because we’re about to transform a classic cookie into a festive, bite-sized masterpiece that’s almost too cute to eat (almost!). These Easter Egg Oreo Truffles are the perfect excuse to get a little messy in the kitchen and create something delightfully shareable for your spring celebrations.
Serving: 24 truffles | Pre Time: 30 minutes | Cooking Time: 0 minutes
Ingredients
– 1 (14.3 oz) package of Oreo cookies (the classic kind—no fancy flavors needed, but feel free to get wild if you’re feeling adventurous!)
– 1 (8 oz) block of full-fat cream cheese, softened to room temperature (this is non-negotiable for smooth blending—trust me, I’ve learned the hard way with cold cream cheese lumps!)
– 12 oz of white chocolate candy melts or almond bark (I swear by candy melts for their foolproof melting consistency, but high-quality white chocolate chips work in a pinch)
– 2-3 drops of gel food coloring in pastel shades like pink, blue, and yellow (liquid food coloring can make the chocolate seize, so gel is my secret weapon for vibrant hues without the drama)
– Optional: Sprinkles or edible glitter for that extra festive sparkle (because why not make them Instagram-worthy?)
Instructions
1. Place the entire package of Oreo cookies (creme filling and all) into a food processor and pulse until you have fine, uniform crumbs—no big chunks allowed!
2. Transfer the Oreo crumbs to a large mixing bowl and add the softened cream cheese, using a spatula to mash and mix until fully combined into a thick, uniform dough. Tip: If the mixture feels too sticky, pop it in the fridge for 10 minutes—it’ll be much easier to handle.
3. Line a baking sheet with parchment paper. Scoop about 1 tablespoon of the dough and roll it between your palms to form a smooth, egg-shaped ball, then place it on the sheet. Repeat until all dough is used, then freeze the balls for 15 minutes to firm up.
4. While the truffles chill, melt the white candy melts according to package directions, usually in 30-second intervals in the microwave, stirring between each until smooth. Divide the melted chocolate into separate bowls and stir in a drop or two of gel food coloring to create pastel shades.
5. Remove the truffles from the freezer. Using a fork or dipping tool, dunk one truffle into a bowl of colored chocolate, tap off the excess, and return it to the parchment paper. Tip: Work quickly to prevent the truffles from softening—if they get too warm, pop the sheet back in the freezer for 5 minutes.
6. Immediately add sprinkles or glitter to the wet chocolate before it sets, then repeat with remaining truffles, using different colors as desired. Let the chocolate harden completely at room temperature, about 20-30 minutes. Tip: For a super-smooth finish, you can do a second quick dip after the first layer dries.
7. These truffles are best served slightly chilled. They boast a rich, fudgy center with a satisfying crunch from the Oreo crumbs, all wrapped in a sweet, pastel shell. Try arranging them in a nest of shredded coconut or serving them alongside a pot of coffee for a playful Easter brunch surprise—they disappear faster than you can say “hoppy spring!”
Cute Chick Deviled Eggs
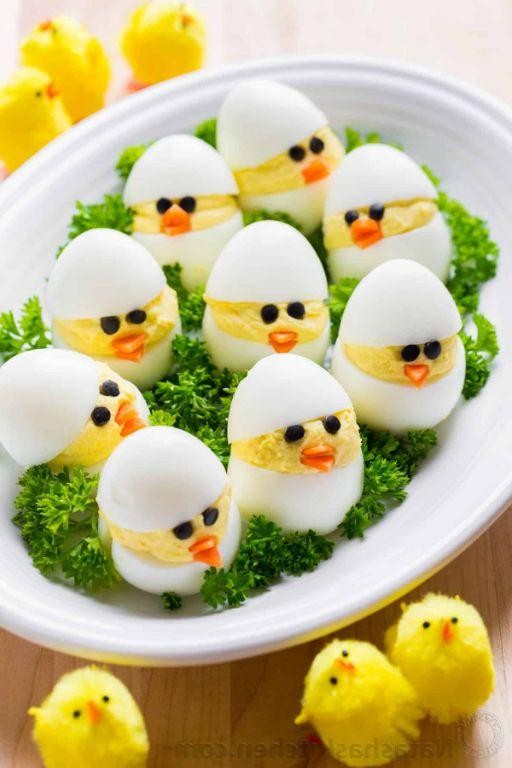
Muster your cuteness cravings because these adorable chick-shaped deviled eggs are about to hatch some serious party fun. They’re the perfect blend of classic flavor and playful presentation, guaranteed to make your guests crack a smile before they even take a bite. Let’s get pecking!
Serving: 12 | Pre Time: 20 minutes | Cooking Time: 15 minutes
Ingredients
– 6 large eggs (I prefer room temp eggs here for easier peeling—trust me on this!)
– 3 tablespoons mayonnaise (the real, full-fat kind is my go-to for maximum creaminess)
– 1 teaspoon yellow mustard
– 1/4 teaspoon white vinegar (a tiny splash brightens everything up)
– 1/8 teaspoon paprika, plus extra for garnish
– Salt, to taste (I use a generous pinch of kosher salt)
– 12 whole black peppercorns (for the chick’s cute little eyes)
– 1 small carrot, peeled (for crafting tiny orange beaks)
Instructions
1. Place 6 large eggs in a single layer in a saucepan and cover them with cold water by 1 inch.
2. Bring the water to a rolling boil over high heat, then immediately cover the pan and remove it from the heat.
3. Let the eggs sit, covered, for exactly 12 minutes to achieve perfectly cooked, firm yolks without that gray ring.
4. Transfer the eggs to a bowl of ice water using a slotted spoon and let them cool completely for 10 minutes—this stops the cooking and makes peeling a breeze.
5. Gently tap each egg on the counter and roll it to crack the shell, then peel under cool running water.
6. Slice each peeled egg in half lengthwise with a sharp knife.
7. Carefully pop the yolks into a medium bowl and arrange the 12 white halves on a serving plate.
8. Mash the yolks thoroughly with a fork until no large lumps remain.
9. Add 3 tablespoons mayonnaise, 1 teaspoon yellow mustard, 1/4 teaspoon white vinegar, 1/8 teaspoon paprika, and a generous pinch of salt to the yolks.
10. Stir the mixture vigorously until completely smooth and creamy.
11. Spoon or pipe the yolk filling evenly into the hollows of the egg white halves.
12. Cut 24 tiny, triangular slivers from the peeled carrot to create beak shapes.
13. Press 2 carrot slivers into the filling of each egg half to form a beak, pointing them toward the center.
14. Gently press 2 whole black peppercorns above each beak to create eyes.
15. Lightly dust the tops of the filled eggs with a pinch of paprika for a final pop of color.
Kick back and admire your flock! These chicks boast a delightfully smooth, rich filling that contrasts with the tender egg white, all with a tangy, savory kick. Serve them on a bed of fresh parsley ‘grass’ for a springtime centerpiece, or let them rule the roost at your next picnic—they’re almost too cute to eat (but you totally will).
Easter Bunny Lemon Tarts

Easter just got a whole lot zestier, folks! Forget the chocolate bunnies—these sunny little tarts are the real springtime heroes, packing a puckery punch that’ll make your taste buds do a happy dance. Trust me, they’re so good, the Easter Bunny might just trade in his carrot for one.
Serving: 12 tarts | Pre Time: 25 minutes | Cooking Time: 15 minutes
Ingredients
- 1 ½ cups all-purpose flour (I always sift mine first for extra flakiness)
- ½ cup unsalted butter, cold and cubed (the colder, the flakier the crust—trust me on this)
- ¼ cup granulated sugar
- 1 large egg yolk (room temp is my secret for a smoother dough)
- 1 cup fresh lemon juice, strained (about 4–5 lemons—no bottled stuff, please!)
- ¾ cup granulated sugar
- 3 large eggs
- ½ cup unsalted butter, cubed (room temp blends like a dream)
- Zest of 2 lemons (for that bright, sunny kick)
- Powdered sugar, for dusting (a snowy finish makes everything better)
Instructions
- Preheat your oven to 375°F (190°C) and lightly grease a 12-cup muffin tin.
- In a food processor, pulse the flour, cold cubed butter, and ¼ cup sugar until it resembles coarse crumbs.
- Add the egg yolk and pulse just until the dough comes together—don’t overmix, or it’ll get tough.
- Divide the dough into 12 balls, press each into a muffin cup, and prick the bottoms with a fork to prevent puffing.
- Bake the crusts for 10 minutes, until lightly golden, then let them cool slightly. Tip: If they puff up, gently press them down with a spoon while warm.
- While the crusts bake, whisk the lemon juice, ¾ cup sugar, eggs, and lemon zest in a saucepan until smooth.
- Cook the mixture over medium heat, stirring constantly with a wooden spoon, until it thickens to a pudding-like consistency, about 5–7 minutes. Tip: Don’t let it boil, or it might curdle—low and slow is key!
- Remove the pan from heat and whisk in the room-temperature butter until fully melted and silky.
- Pour the lemon curd into the pre-baked crusts, filling them almost to the top.
- Bake the tarts for 5 minutes, just to set the filling, then transfer them to a wire rack to cool completely. Tip: For a crack-free top, avoid opening the oven door during baking.
- Once cooled, dust the tarts generously with powdered sugar before serving.
Oh, the joy of that first bite! The crust shatters into buttery flakes, giving way to a velvety, tangy-sweet curd that’s pure sunshine in a tart shell. Serve these beauties on a pastel platter with fresh berries for a festive touch, or just sneak one with your morning coffee—no judgment here.
Pastel Meringue Kisses
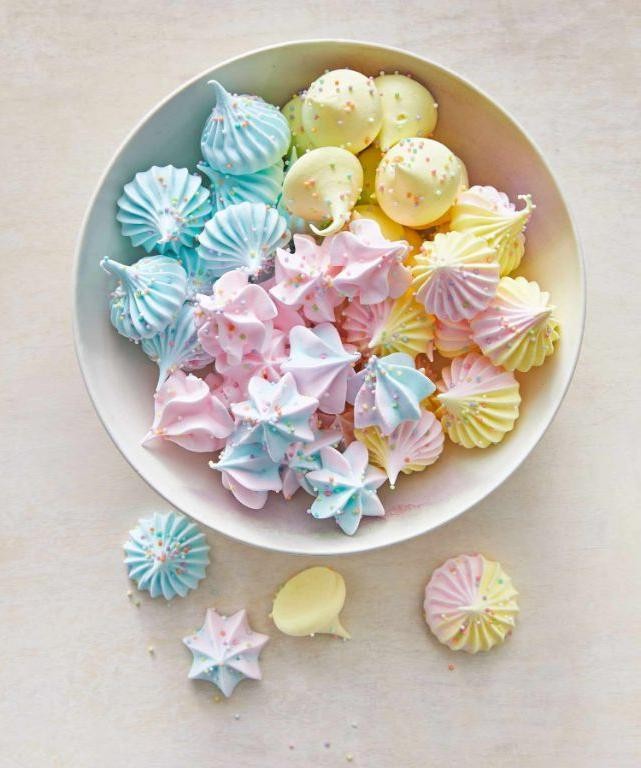
Let’s be real—sometimes you need a dessert that’s equal parts elegant and effortless, and these Pastel Meringue Kisses are just the ticket. Picture light-as-air meringue clouds tinted in soft pastels, with a delicate crisp shell giving way to a chewy, marshmallowy center that’ll have you sneaking just one more… or three.
Serving: 24 kisses | Pre Time: 20 minutes | Cooking Time: 90 minutes
Ingredients
– 3 large egg whites, at room temperature (I let mine sit out for 30 minutes—trust me, they whip up fluffier this way)
– ¾ cup granulated sugar
– ¼ teaspoon cream of tartar, my secret weapon for stable peaks
– ¼ teaspoon vanilla extract, pure please, for that warm background note
– Gel food coloring in pastel shades (a tiny drop goes a long way—I’m partial to soft pink and mint green)
Instructions
1. Preheat your oven to 200°F (93°C) and line two baking sheets with parchment paper.
2. In the bowl of a stand mixer fitted with the whisk attachment, combine the egg whites and cream of tartar.
3. Beat on medium speed until foamy, about 1 minute.
4. Gradually add the granulated sugar, 1 tablespoon at a time, while beating on medium-high speed.
5. Continue beating until stiff, glossy peaks form, about 5-7 minutes total—the meringue should hold its shape when you lift the whisk.
6. Tip: Feel the meringue between your fingers; if it’s gritty, keep beating until smooth.
7. Beat in the vanilla extract until just combined, about 30 seconds.
8. Divide the meringue into separate bowls if using multiple colors.
9. Add a tiny drop of gel food coloring to each bowl and fold gently with a spatula until evenly tinted—avoid overmixing to keep the volume.
10. Tip: Use a toothpick to add color sparingly; you can always add more but can’t take it away!
11. Transfer each colored meringue to a piping bag fitted with a large star tip.
12. Pipe 1-inch kisses onto the prepared baking sheets, spacing them about 1 inch apart.
13. Place in the preheated oven and bake for 90 minutes, then turn off the oven.
14. Let the meringues cool completely in the oven with the door closed for at least 1 hour to prevent cracking.
15. Tip: Don’t peek while baking—sudden temperature changes can cause them to deflate.
16. Once cooled, gently peel the meringues off the parchment paper.
Delightfully crisp on the outside with a soft, chewy interior, these kisses melt in your mouth with a subtle vanilla sweetness. Serve them piled high on a cake stand for a whimsical touch at parties, or crumble them over ice cream for an instant upgrade—they’re almost too pretty to eat, but trust me, you’ll get over it fast.
Chocolate Nests with Jelly Beans
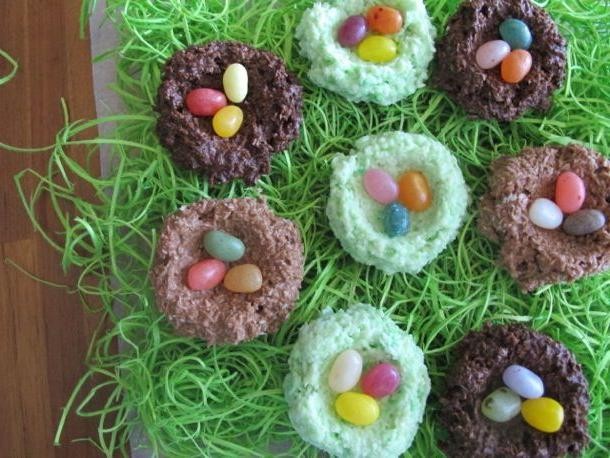
Yikes, it’s that time of year again—the season when your kitchen counter is overrun with chocolate, and you’re desperately searching for a treat that’s as fun to make as it is to eat. Well, fear not, because these Chocolate Nests with Jelly Beans are here to save your sanity (and your sweet tooth) with a whimsical twist that’ll have everyone chirping with delight. They’re the perfect no-bake project for when you want something adorable without turning on the oven—trust me, your future self will thank you for this one!
Serving: 12 | Pre Time: 15 minutes | Cooking Time: 0 minutes
Ingredients
– 2 cups of semi-sweet chocolate chips (I always go for the good stuff—it melts like a dream and tastes richer, but feel free to use milk chocolate if you’re feeling extra sweet)
– 3 cups of chow mein noodles (yes, the crunchy kind from the Asian aisle—they’re the secret to that perfect nest texture, and no, you can’t sub spaghetti here, trust me!)
– 1 cup of jelly beans (pick your favorite colors—I’m partial to the classic pastel mix for a springy vibe, but go wild with whatever makes you smile)
– 1 tablespoon of coconut oil (this little magic trick helps the chocolate stay smooth and glossy, and I swear by it for easy dipping)
Instructions
1. Line a baking sheet with parchment paper and set it aside—this prevents sticky messes later, and I’ve learned the hard way that skipping it is a recipe for disaster.
2. In a microwave-safe bowl, combine the chocolate chips and coconut oil, then microwave on high for 30 seconds, stirring thoroughly until completely melted and smooth (tip: if it’s not fully melted, zap it in 15-second bursts to avoid burning—patience is key here!).
3. Pour the chow mein noodles into the melted chocolate mixture, and use a spatula to gently fold them until every noodle is evenly coated—this might take a minute, but don’t rush it or you’ll end up with clumps.
4. Scoop about 1/4 cup of the chocolate-coated noodles onto the prepared baking sheet, and use your fingers to shape each mound into a small nest with a slight depression in the center (tip: lightly wet your fingers with water to prevent sticking—it’s a game-changer for neat nests!).
5. Immediately place 3-4 jelly beans into the center of each nest, pressing them gently so they adhere to the chocolate before it sets—work quickly here, as the chocolate firms up fast at room temperature.
6. Let the nests sit at room temperature for at least 1 hour, or until the chocolate is completely hardened and no longer tacky to the touch (tip: if you’re in a hurry, pop them in the fridge for 20 minutes, but avoid freezing or they might sweat later).
Buttery and crisp, these nests offer a delightful crunch from the noodles that contrasts perfectly with the smooth, rich chocolate—it’s like a textural party in your mouth! Serve them on a platter as a playful centerpiece at your next gathering, or tuck them into Easter baskets for a surprise that’s sure to hatch smiles all around.
Bunny Carrot Cake Cookies
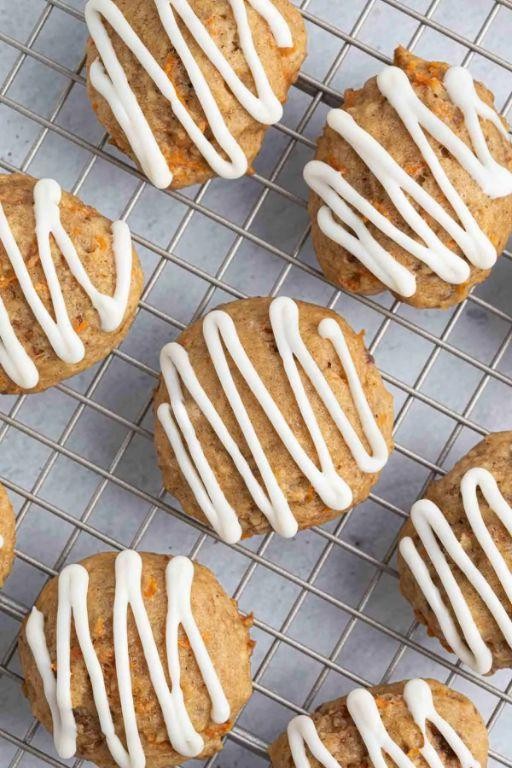
Ever had a carrot cake that hopped right off the plate and into cookie form? Meet your new spring obsession: fluffy, spiced cookies packed with shredded carrots and crowned with a dreamy cream cheese frosting. They’re like a garden party for your taste buds, minus the actual gardening.
Serving: 24 cookies | Pre Time: 20 minutes | Cooking Time: 12 minutes
Ingredients
- 1 ½ cups all-purpose flour (spooned and leveled to avoid dense cookies—trust me on this)
- 1 tsp baking soda
- 1 ½ tsp ground cinnamon (the cozy spice that makes everything better)
- ½ tsp ground nutmeg (just a pinch for warmth)
- ½ tsp salt
- ½ cup unsalted butter, softened (I leave mine on the counter for an hour—it creams like a dream)
- ¾ cup packed light brown sugar (for that molasses-y depth)
- ¼ cup granulated sugar
- 1 large egg, at room temperature (it blends smoother, promise!)
- 1 tsp pure vanilla extract
- 1 ½ cups finely shredded carrots (about 2 medium carrots—I use a box grater and avoid the pre-shredded bagged kind, which can be too dry)
- ½ cup chopped walnuts (optional, but they add a lovely crunch)
- 4 oz cream cheese, softened (full-fat for the best texture)
- 2 tbsp unsalted butter, softened
- 1 cup powdered sugar, sifted (no lumps allowed!)
- ½ tsp pure vanilla extract
Instructions
- Preheat your oven to 350°F and line two baking sheets with parchment paper.
- In a medium bowl, whisk together the all-purpose flour, baking soda, ground cinnamon, ground nutmeg, and salt until fully combined. Tip: Whisking aerates the dry ingredients for lighter cookies.
- In a large bowl, use an electric mixer on medium speed to beat the softened unsalted butter, packed light brown sugar, and granulated sugar for 2 minutes until fluffy and pale.
- Add the room temperature large egg and 1 tsp pure vanilla extract to the butter mixture, beating on medium speed for 1 minute until smooth.
- Gradually add the dry flour mixture to the wet butter mixture, mixing on low speed just until no white streaks remain, about 30 seconds. Tip: Overmixing can lead to tough cookies, so stop as soon as it’s combined.
- Fold in the finely shredded carrots and chopped walnuts (if using) with a spatula until evenly distributed.
- Scoop 1-tablespoon portions of dough onto the prepared baking sheets, spacing them 2 inches apart.
- Bake in the preheated 350°F oven for 10–12 minutes, until the edges are lightly golden and the centers look set. Tip: They’ll firm up as they cool, so don’t overbake.
- Let the cookies cool on the baking sheets for 5 minutes, then transfer to a wire rack to cool completely, about 30 minutes.
- While the cookies cool, make the frosting: In a medium bowl, beat the softened cream cheese and 2 tbsp softened unsalted butter with an electric mixer on medium speed for 1 minute until smooth.
- Add the sifted powdered sugar and ½ tsp pure vanilla extract, beating on low speed initially to avoid a sugar cloud, then increase to medium speed for 2 minutes until creamy.
- Once the cookies are completely cool, spread or pipe about 1 teaspoon of frosting onto each cookie.
Get ready for cookies that are soft and cake-like with a hint of spice from the cinnamon and nutmeg, balanced by the sweet, tangy frosting. Serve them stacked high on a platter for a brunch centerpiece, or tuck one into a lunchbox for a surprise treat that’ll make any day brighter.
Mini Easter Basket Cupcakes
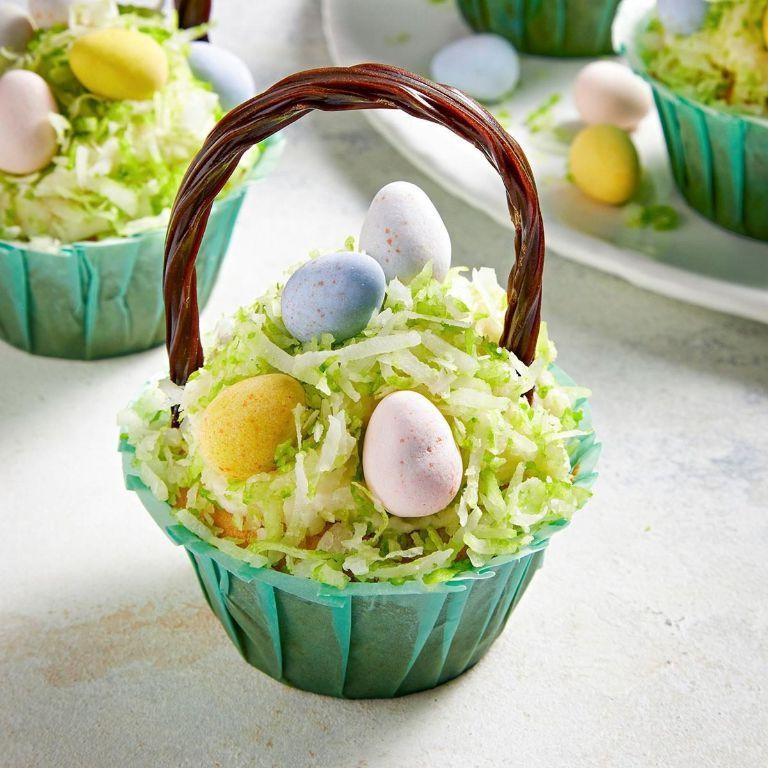
Yikes, it’s that time of year again—the Easter bunny is hopping closer, and your dessert table is begging for something adorable and delicious. Enter these Mini Easter Basket Cupcakes, the perfect bite-sized treat that’s equal parts cute and crave-worthy. They’re basically spring in cupcake form, guaranteed to make both kids and adults do a happy dance.
Serving: 24 | Pre Time: 20 minutes | Cooking Time: 18 minutes
Ingredients
– 1 ½ cups all-purpose flour (I always sift mine first for fluffier cupcakes)
– 1 cup granulated sugar (trust me, it’s the sweet spot)
– ½ cup unsalted butter, softened (room temp is key for smooth mixing)
– 2 large eggs, at room temperature (they blend better, promise!)
– ¾ cup whole milk (I use whole for richness, but any works)
– 1 tsp vanilla extract (pure vanilla is my go-to for that warm flavor)
– 1 ½ tsp baking powder (fresh baking powder makes them rise perfectly)
– ¼ tsp salt (a pinch balances the sweetness)
– Green food coloring (a few drops for that grassy basket look)
– 24 mini pretzel twists (for the basket handles—get the thin ones!)
– ½ cup shredded coconut (sweetened, toasted lightly for crunch)
– 24 jelly beans or small candy eggs (Easter-themed colors, of course)
Instructions
1. Preheat your oven to 350°F (175°C) and line a 24-cup mini muffin tin with paper liners.
2. In a medium bowl, whisk together the all-purpose flour, baking powder, and salt until fully combined.
3. In a large mixing bowl, cream the softened unsalted butter and granulated sugar with an electric mixer on medium speed for 2–3 minutes, until light and fluffy.
4. Add the room-temperature eggs one at a time, beating well after each addition, then mix in the vanilla extract.
5. Gradually add the flour mixture to the butter mixture, alternating with the whole milk, starting and ending with the flour, and mix on low speed just until smooth—don’t overmix!
6. Stir in 4–5 drops of green food coloring until the batter is evenly tinted like fresh grass.
7. Spoon the batter into the prepared liners, filling each about two-thirds full to allow for rising.
8. Bake in the preheated oven for 16–18 minutes, or until a toothpick inserted into the center of a cupcake comes out clean.
9. Remove the cupcakes from the oven and let them cool in the tin for 5 minutes, then transfer to a wire rack to cool completely—this prevents soggy bottoms.
10. Once cooled, sprinkle the shredded coconut over the tops to mimic basket filler.
11. Gently press a mini pretzel twist into each cupcake to form a basket handle, ensuring it’s secure but not too deep.
12. Top each with 1–2 jelly beans or small candy eggs nestled in the coconut.
Easter magic is served! These cupcakes boast a tender, moist crumb with a hint of vanilla, while the coconut adds a delightful crunch and the pretzel handles a salty contrast. For a fun twist, arrange them on a platter with edible flowers or serve alongside a chocolate bunny for a full springtime spread.
Springtime Deviled Egg Chicks
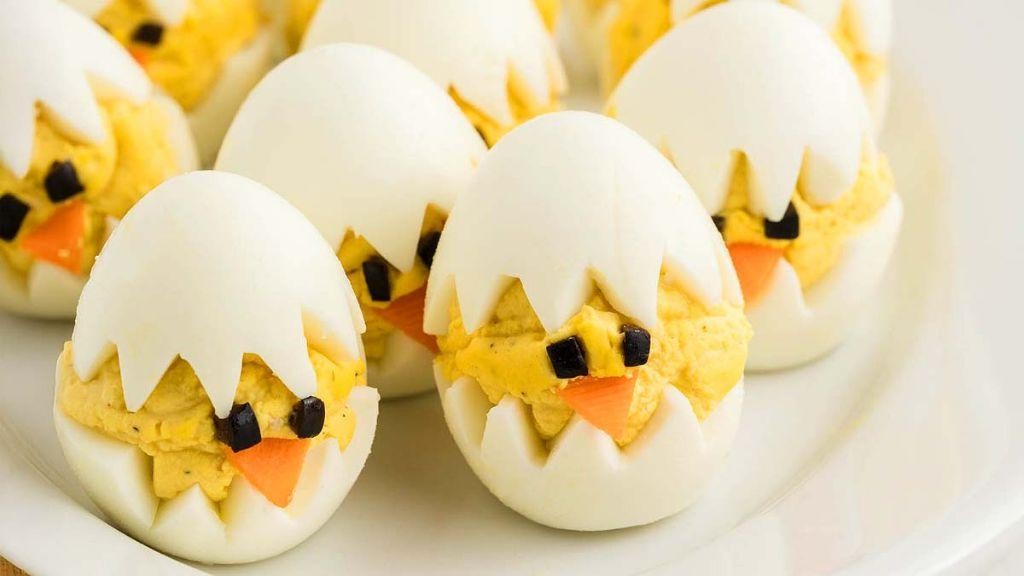
Gather ’round, egg enthusiasts, because we’re about to hatch the cutest, most chuckle-worthy appetizer of the season. These little chicks are the perfect way to add a dash of springtime whimsy to your table, and they’re so simple you’ll be clucking with joy. Trust me, they’re egg-cellent for Easter brunch, baby showers, or any gathering that needs a pop of personality and flavor.
Serving: 12 chicks | Pre Time: 15 minutes | Cooking Time: 12 minutes
Ingredients
– 6 large eggs (I prefer room temp eggs here for easier peeling—just let them sit out for 30 minutes)
– 1/4 cup mayonnaise (full-fat for that luscious, creamy texture we all crave)
– 1 tsp Dijon mustard (my secret weapon for a little tangy kick)
– 1/8 tsp paprika, plus extra for dusting (smoked paprika adds a lovely depth)
– 1/8 tsp salt (a pinch of kosher salt works wonders)
– 1/8 tsp black pepper (freshly ground, please!)
– 12 small black olives (for the eyes—get the pitted kind to save time)
– 1 small carrot (for the adorable little beaks)
Instructions
1. Place your 6 room-temperature eggs in a single layer in a medium saucepan and cover them with cold water by about 1 inch.
2. Bring the water to a rolling boil over high heat, then immediately cover the pan and remove it from the heat. Let the eggs sit, covered, for exactly 12 minutes. (Tip: This steaming method prevents overcooking and gives you perfect, tender yolks every time.)
3. While the eggs cook, prepare an ice bath by filling a large bowl with cold water and ice cubes.
4. After 12 minutes, use a slotted spoon to transfer the hot eggs directly into the ice bath. Let them cool completely for about 10 minutes—this stops the cooking and makes the shells a breeze to peel.
5. Gently tap each egg on the counter and roll it between your palms to crackle the shell, then peel under cool running water. Pat the peeled eggs dry with a paper towel.
6. Carefully slice off the top third of each egg lengthwise. (Tip: Use a sharp paring knife and a gentle sawing motion for clean cuts.)
7. Scoop out the yolks from both the tops and bottoms into a medium bowl, placing the hollowed egg whites on a serving plate.
8. To the bowl with yolks, add the 1/4 cup mayonnaise, 1 tsp Dijon mustard, 1/8 tsp paprika, 1/8 tsp salt, and 1/8 tsp black pepper.
9. Mash everything together with a fork until completely smooth and creamy. (Tip: For extra fluffiness, you can press the mixture through a fine-mesh sieve.)
10. Spoon or pipe the yolk filling back into the hollowed egg white bottoms, mounding it slightly.
11. Place the egg white tops back on at a jaunty angle to create the “chick’s” head.
12. Cut 12 small triangles from the carrot for beaks and 24 tiny circles from the black olives for eyes. Press a carrot triangle and two olive circles into the filling of each chick to form the face.
13. Lightly dust the tops with a pinch of extra paprika for a rosy-cheeked effect.
Look at that flock of cuteness! These deviled egg chicks boast a luxuriously smooth, creamy filling with a delightful tang from the Dijon, all cradled in a tender egg white. Serve them nestled on a bed of fresh parsley “grass” for a full spring garden scene, or let them peek out from a deviled egg tray—they’re guaranteed to be the star of any snack table.
Baby Lamb Cake Pops
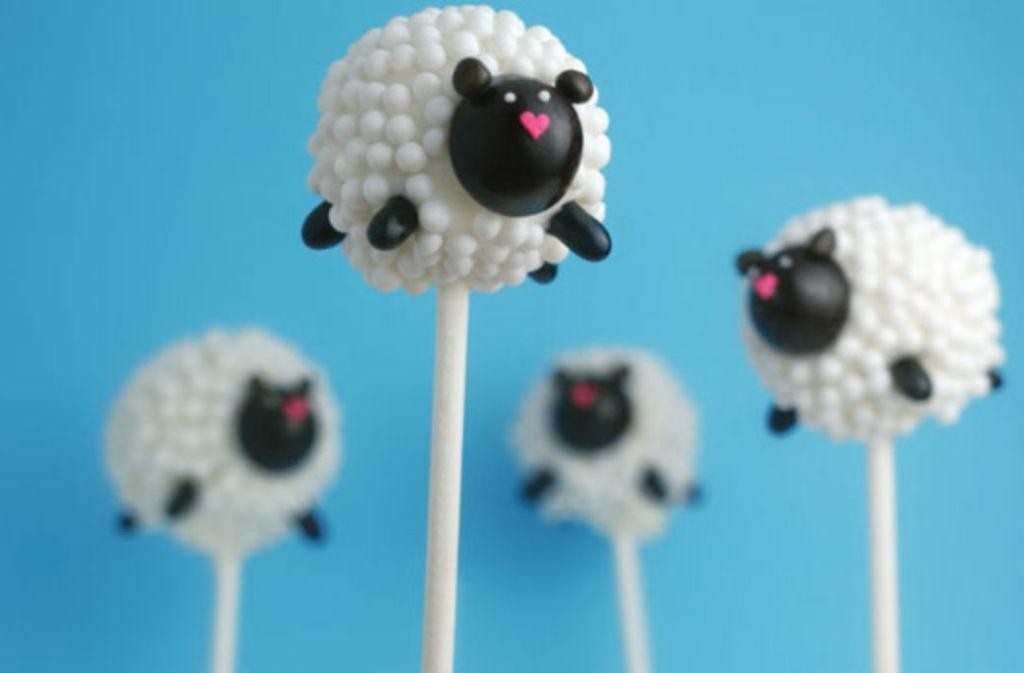
Nope, you didn’t misread—these Baby Lamb Cake Pops are the adorable, bite-sized treat that’ll have everyone flocking to your dessert table like, well, lambs to a party! Think moist cake, creamy frosting, and a chocolate coating that’s just begging to be nibbled. Trust me, they’re so cute you might feel a tiny bit guilty eating them… but only for a second.
Serving: 24 pops | Pre Time: 30 minutes | Cooking Time: 25 minutes
Ingredients
– 1 box vanilla cake mix (I swear by Betty Crocker Super Moist for that fluffy texture)
– 3 large eggs, at room temp—this helps them blend smoothly without overmixing
– ½ cup vegetable oil (a neutral oil keeps the cake light, but melted butter works too if you’re feeling fancy)
– 1 cup water (tap is fine, but filtered gives it a clean taste)
– 1 cup vanilla frosting from a can (yes, canned! It’s a time-saver and binds the pops perfectly)
– 2 cups white chocolate chips (I prefer Ghirardelli for their smooth melt)
– 24 lollipop sticks (find them in the baking aisle—they’re your pop’s best friend)
– ½ cup pink candy melts (for the ears; Wilton brand melts like a dream)
– Black edible marker (for the faces; a steady hand is key here!)
Instructions
1. Preheat your oven to 350°F and grease a 9×13-inch baking pan lightly with oil or non-stick spray.
2. In a large bowl, combine the vanilla cake mix, eggs, vegetable oil, and water, mixing with a hand mixer on medium speed for 2 minutes until smooth—tip: don’t overmix, or the cake can get tough.
3. Pour the batter into the prepared pan and bake for 25 minutes, or until a toothpick inserted in the center comes out clean.
4. Let the cake cool completely in the pan on a wire rack for 30 minutes—this prevents the frosting from melting later.
5. Crumble the cooled cake into fine crumbs in a large bowl using your hands or a fork.
6. Add the vanilla frosting to the crumbs and mix with a spatula until it forms a dough-like consistency that holds together when squeezed.
7. Roll the mixture into 24 small, 1-inch balls and place them on a parchment-lined baking sheet.
8. Insert a lollipop stick into each ball, pushing it about halfway through, and freeze for 15 minutes to firm up—tip: this keeps them from falling apart when dipping.
9. Melt the white chocolate chips in a microwave-safe bowl in 30-second intervals, stirring between each, until smooth and fluid.
10. Dip each cake ball into the melted white chocolate, swirling to coat completely, and let excess drip off by tapping the stick gently on the bowl’s edge.
11. Stand the dipped pops upright in a styrofoam block or cup to set for 10 minutes.
12. Melt the pink candy melts separately in a small bowl using the same microwave method.
13. Use a toothpick to dab two small dots of pink melt on each pop for ears, then let set for 5 minutes.
14. Draw cute faces on the pops with the black edible marker once fully set—tip: practice on paper first if you’re nervous!
15. Serve immediately or store in an airtight container at room temperature for up to 3 days.
Perfectly soft and crumbly on the inside with a sweet, creamy vanilla flavor, these pops are like little clouds of joy. The white chocolate shell adds a satisfying snap, while the pink ears and playful faces make them irresistible for kids’ parties or Easter brunch—try sticking them in a floral foam “meadow” for a whimsical display!
Rainbow Easter Marshmallow Pops
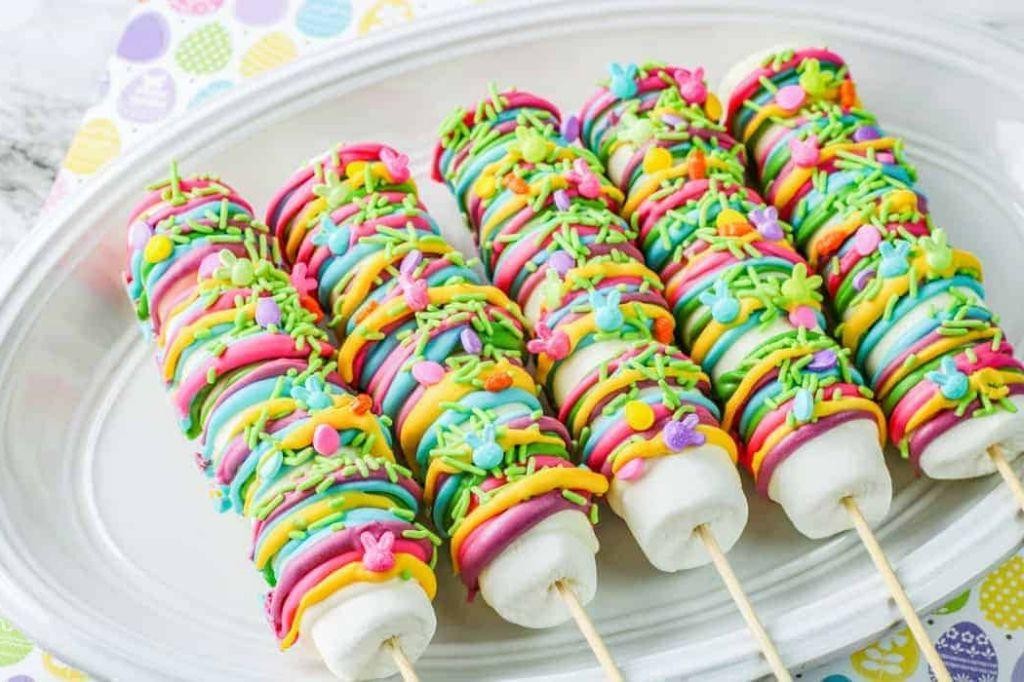
Picture this: you’re staring at a sad bag of marshmallows, dreaming of something more festive than just tossing them into hot cocoa. Well, dream no more, because these Rainbow Easter Marshmallow Pops are about to become your new favorite way to celebrate spring—no fancy skills required, just a willingness to get a little colorful and a lot sticky!
Serving: 12 pops | Pre Time: 20 minutes | Cooking Time: 5 minutes
Ingredients
– 12 large marshmallows (the fluffy, pillow-like kind—skip the mini ones for this project!)
– 12 lollipop sticks or paper straws (I prefer sturdy sticks to avoid any wobbly disasters)
– 1 cup white chocolate chips (go for the good-quality ones; they melt smoother and taste less waxy)
– 1 tablespoon coconut oil (this is my secret weapon for a silky, drip-friendly coating)
– ½ cup rainbow sprinkles (the jimmies type works best for even coverage—trust me on this)
– ½ cup shredded sweetened coconut (optional, but it adds a fun tropical twist if you’re feeling adventurous)
Instructions
1. Line a baking sheet with parchment paper and set it aside—this will be your pop-drying station.
2. Insert one lollipop stick into the center of each marshmallow, pushing about halfway through to secure it firmly.
3. In a microwave-safe bowl, combine the white chocolate chips and coconut oil.
4. Microwave the mixture on high for 30 seconds, then stir vigorously until smooth; if needed, heat in 15-second bursts, stirring after each, to avoid scorching (tip: overheating can cause the chocolate to seize, so patience is key!).
5. Hold a marshmallow pop by the stick and dip it into the melted white chocolate, swirling to coat completely.
6. Allow excess chocolate to drip off for about 10 seconds back into the bowl—this prevents messy pooling at the base.
7. While the coating is still wet, immediately roll the pop in rainbow sprinkles or shredded coconut, covering it evenly (tip: work quickly here, as the chocolate sets fast at room temperature!).
8. Place the finished pop on the prepared baking sheet, stick-side up.
9. Repeat steps 5–8 with all remaining marshmallow pops.
10. Let the pops sit at room temperature for at least 30 minutes, or until the coating is fully set and firm to the touch (tip: if you’re in a hurry, pop them in the fridge for 10 minutes, but avoid condensation by letting them come to room temp before serving).
Finally, these pops are a crunchy, sweet delight with a gooey marshmallow center that kids and adults alike will adore. For a creative twist, arrange them in a vase like a bouquet or tie them with ribbon as edible party favors—they’re almost too pretty to eat, but trust me, you’ll want to dig in!
Cute Carrot Patch Brownies

Ditch the boring brownies—these Cute Carrot Patch Brownies are here to dig up some fun in your kitchen! Imagine fudgy chocolate squares topped with a garden of crushed Oreo “dirt” and candy carrot decorations, perfect for spring celebrations or just because you deserve a whimsical treat. Trust me, they’re so adorable, you’ll almost feel guilty taking a bite… almost.
Serving: 9 | Pre Time: 20 minutes | Cooking Time: 30 minutes
Ingredients
- 1 cup all-purpose flour (spooned and leveled to avoid dense brownies)
- 1 cup granulated sugar (I use cane sugar for a slight caramel note)
- 1/2 cup unsalted butter, melted and slightly cooled (room temp is key for smooth mixing)
- 2 large eggs, at room temperature (they blend better with the batter)
- 1/3 cup unsweetened cocoa powder (Dutch-processed gives a richer flavor)
- 1 tsp vanilla extract (pure vanilla is my go-to for that warm aroma)
- 1/2 tsp baking powder
- 1/4 tsp salt (a pinch balances the sweetness perfectly)
- 8 Oreo cookies, crushed into fine crumbs (for that “dirt” topping—extra filling is a bonus!)
- 12 orange candy melts or orange-colored white chocolate, melted (for shaping cute carrots)
- Green frosting or green candy melts for carrot tops (a piping bag makes it easy)
Instructions
- Preheat your oven to 350°F and grease an 8×8-inch baking pan, then line it with parchment paper for easy removal.
- In a large bowl, whisk together the melted butter and granulated sugar until smooth and glossy, about 2 minutes. Tip: Let the butter cool slightly so it doesn’t cook the eggs.
- Add the room temperature eggs one at a time, whisking well after each addition until fully incorporated.
- Stir in the vanilla extract until evenly distributed throughout the mixture.
- In a separate bowl, sift together the all-purpose flour, unsweetened cocoa powder, baking powder, and salt to avoid lumps.
- Gradually fold the dry ingredients into the wet mixture using a spatula, mixing just until no flour streaks remain—overmixing can make the brownies tough.
- Pour the batter into the prepared pan and spread it evenly with the spatula.
- Bake in the preheated oven for 25–30 minutes, or until a toothpick inserted into the center comes out with a few moist crumbs (not wet batter). Tip: Start checking at 25 minutes to prevent overbaking.
- Remove the pan from the oven and let the brownies cool completely in the pan on a wire rack, about 1 hour.
- While cooling, crush the Oreo cookies into fine crumbs using a food processor or sealed bag and rolling pin.
- Melt the orange candy melts in a microwave-safe bowl in 30-second intervals, stirring between each, until smooth. Tip: Use a piping bag or plastic bag with a corner snipped to pipe small carrot shapes onto parchment paper, then let them set at room temperature for 10 minutes.
- Once the brownies are cool, sprinkle the crushed Oreo crumbs evenly over the top to create a “dirt” layer.
- Arrange the candy carrots on top of the crumbs, pressing them gently into place.
- Pipe small green frosting or melted green candy melts onto each carrot for the tops, mimicking fresh greens.
These brownies boast a fudgy, moist texture with a deep chocolate flavor that pairs wonderfully with the crunchy Oreo topping. The playful carrot decorations add a sweet, creamy contrast—serve them at a garden party or as a surprise in lunchboxes to spark joy. They’re so visually charming, you might just catch yourself snapping a photo before digging in!
Easter Bunny Cinnamon Rolls
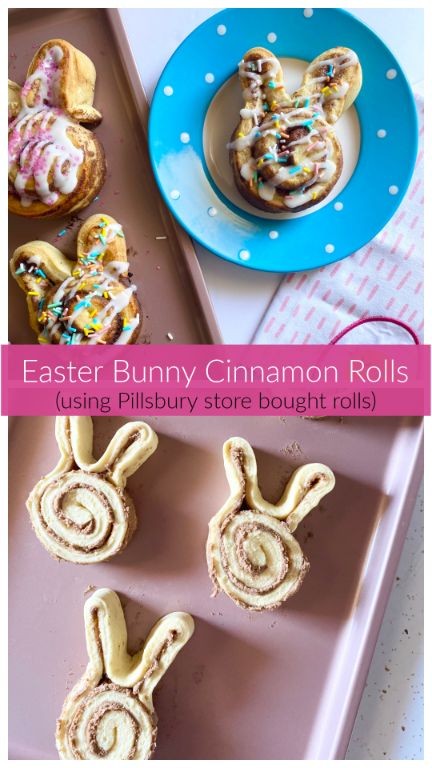
Venture into the kitchen for a treat that’ll make your Easter brunch the talk of the town—these Easter Bunny Cinnamon Rolls are a fluffy, sweet, and downright adorable twist on a classic. Imagine pulling apart warm, gooey spirals that look like little bunnies, perfect for delighting kids and impressing adults with your baking prowess. Trust me, once you see those cute bunny ears peeking out, you’ll be hopping with joy!
Serving: 12 | Pre Time: 20 minutes | Cooking Time: 25 minutes
Ingredients
– 1 cup whole milk, warmed to about 110°F (I like it just warm to the touch—too hot and it’ll kill the yeast!)
– 2 ¼ teaspoons active dry yeast (that’s one standard packet, folks)
– ½ cup granulated sugar, divided (half for the dough, half for the filling—it’s a sweet deal)
– 4 ½ cups all-purpose flour, plus extra for dusting (I always keep a little extra on hand for sticky situations)
– 1 teaspoon salt (a pinch to balance all that sweetness)
– 2 large eggs, at room temperature (they mix in smoother this way, promise)
– ½ cup unsalted butter, softened (I use the good stuff for that rich flavor)
– 2 tablespoons ground cinnamon (the star of the show—don’t skimp!)
– 1 cup powdered sugar (for the glaze that ties it all together)
– 2 tablespoons heavy cream (or milk if you’re out, but cream makes it extra luscious)
Instructions
1. In a large bowl, combine the warmed whole milk, active dry yeast, and ¼ cup of the granulated sugar; let it sit for 5 minutes until frothy.
2. Tip: If it doesn’t bubble, your milk might be too hot or the yeast is old—start over for best results.
3. Add the all-purpose flour, salt, eggs, and softened unsalted butter to the yeast mixture.
4. Mix with a dough hook on medium speed for 5 minutes until a smooth dough forms.
5. Tip: If the dough feels too sticky, add a tablespoon of flour at a time until it pulls away from the bowl.
6. Place the dough in a greased bowl, cover with a towel, and let it rise in a warm spot for 1 hour until doubled in size.
7. On a floured surface, roll the dough into a 12×18-inch rectangle.
8. Sprinkle the remaining ¼ cup granulated sugar and ground cinnamon evenly over the dough.
9. Starting from a long side, tightly roll the dough into a log and pinch the seam to seal.
10. Cut the log into 12 equal slices using a sharp knife or dental floss for clean cuts.
11. Tip: For bunny shapes, gently pinch the top of each roll to form two “ears” before baking.
12. Arrange the rolls in a greased 9×13-inch baking dish, cover, and let rise for 30 minutes.
13. Preheat your oven to 350°F while the rolls rise.
14. Bake the rolls for 20-25 minutes until golden brown and cooked through.
15. In a small bowl, whisk together powdered sugar and heavy cream until smooth for the glaze.
16. Drizzle the glaze over the warm rolls immediately after baking.
Yum, these rolls emerge from the oven with a soft, pillowy texture and a cinnamon-sugar swirl that’s irresistibly gooey. Serve them warm with a side of fresh fruit or a dollop of whipped cream for an extra festive touch—they’re so cute, you might just want to snap a photo before devouring!
Conclusion
Savor these 24 adorable Easter recipes to make your feast festive and fun! From sweet treats to savory delights, there’s something for everyone to enjoy. We’d love to hear which recipes become your favorites—leave a comment below and share this roundup on Pinterest to spread the Easter joy. Happy cooking!


