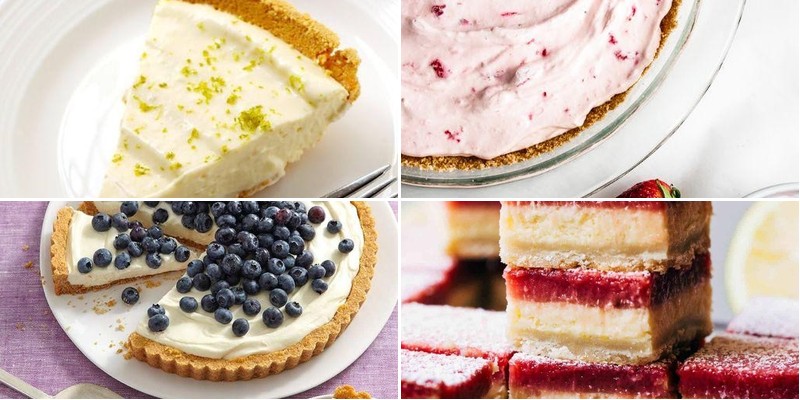
Many of us adore the creamy, tangy goodness of cream cheese but don’t always have time for baking. If you’re craving quick, no-fuss recipes that deliver big on flavor, you’ve come to the right place! From dreamy dips and savory spreads to luscious desserts, these 20 delicious ideas will transform your cream cheese into effortless comfort food favorites. Get ready to be inspired—let’s dive in!
No-Bake Cream Cheese Strawberry Pie
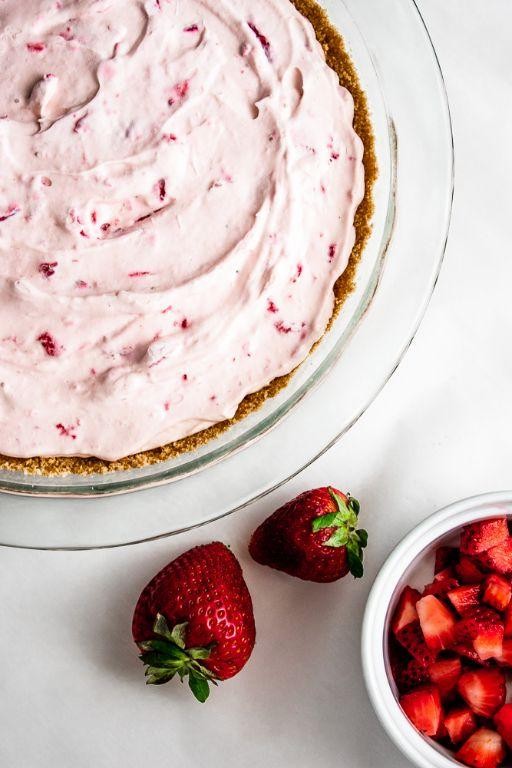
Kind of craving something sweet but don’t want to turn on the oven? You’ve come to the right place. This no-bake strawberry pie comes together with minimal effort and delivers maximum creamy, fruity satisfaction that’ll have everyone asking for seconds.
8
servings50
minutesIngredients
For the crust:
– 1 ½ cups graham cracker crumbs
– ⅓ cup granulated sugar
– 6 tbsp unsalted butter, melted
For the filling:
– 16 oz cream cheese, softened to room temperature
– 1 cup powdered sugar
– 1 tsp vanilla extract
– 1 cup heavy whipping cream
For the topping:
– 2 cups fresh strawberries, hulled and sliced
– ¼ cup granulated sugar
Instructions
1. Combine 1 ½ cups graham cracker crumbs and ⅓ cup granulated sugar in a medium bowl.
2. Pour 6 tbsp melted unsalted butter over the crumb mixture and stir until all crumbs are evenly moistened.
3. Press the crumb mixture firmly into the bottom and up the sides of a 9-inch pie plate using the bottom of a measuring cup.
4. Chill the crust in the refrigerator for 30 minutes to set.
5. Beat 16 oz softened cream cheese with an electric mixer on medium speed until smooth and creamy, about 2 minutes.
6. Gradually add 1 cup powdered sugar to the cream cheese while mixing on low speed.
7. Mix in 1 tsp vanilla extract until fully incorporated.
8. In a separate bowl, whip 1 cup heavy whipping cream on high speed until stiff peaks form, about 3-4 minutes.
9. Gently fold the whipped cream into the cream cheese mixture until no white streaks remain.
10. Spread the filling evenly into the chilled crust using a spatula.
11. Combine 2 cups sliced strawberries and ¼ cup granulated sugar in a small bowl, tossing gently to coat.
12. Let the strawberries macerate for 15 minutes to release their juices.
13. Arrange the sweetened strawberry slices over the cream cheese filling in a circular pattern.
14. Drizzle any remaining strawberry juices over the top of the pie.
15. Refrigerate the pie for at least 4 hours, or until the filling is completely set.
Decadently creamy and bursting with fresh strawberry flavor, this pie delivers the perfect contrast between the crisp graham cracker crust and the lush filling. The macerated berries create a beautiful glossy topping that makes it look as impressive as it tastes. Try serving it with extra fresh berries on the side or a dollop of whipped cream for an extra special treat.
Cream Cheese Peanut Butter Bars
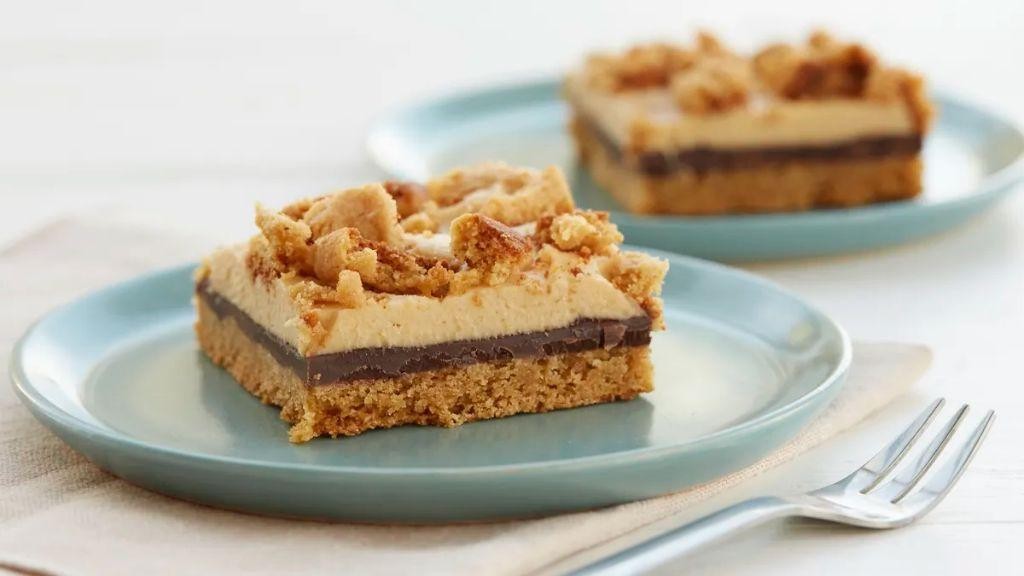
Aren’t you always looking for that perfect no-bake treat that comes together in minutes? These cream cheese peanut butter bars are your new go-to dessert when you need something impressive but effortless. You’ll love how the creamy layers melt in your mouth with that perfect sweet-salty balance.
16
squares25
minutesIngredients
For the crust:
– 2 cups graham cracker crumbs
– 1/2 cup unsalted butter, melted
– 1/4 cup granulated sugar
For the cream cheese layer:
– 8 oz cream cheese, softened to room temperature
– 1 cup creamy peanut butter
– 1 cup powdered sugar
– 1 tsp vanilla extract
For the topping:
– 1 cup semi-sweet chocolate chips
– 1/4 cup heavy cream
Instructions
1. Combine 2 cups graham cracker crumbs, 1/2 cup melted butter, and 1/4 cup granulated sugar in a medium bowl.
2. Press the crust mixture firmly into the bottom of a 9×9 inch baking pan using the bottom of a measuring cup.
3. Chill the crust in the refrigerator for 15 minutes while you prepare the filling.
4. Beat 8 oz softened cream cheese with an electric mixer on medium speed until smooth and creamy.
5. Add 1 cup creamy peanut butter to the cream cheese and mix until fully combined.
6. Gradually add 1 cup powdered sugar to the mixture, scraping down the sides of the bowl as needed.
7. Mix in 1 tsp vanilla extract until the filling is uniform in texture.
8. Spread the cream cheese peanut butter filling evenly over the chilled crust using an offset spatula.
9. Return the pan to the refrigerator and chill for 30 minutes to set the filling.
10. Combine 1 cup semi-sweet chocolate chips and 1/4 cup heavy cream in a microwave-safe bowl.
11. Microwave the chocolate mixture in 30-second intervals, stirring between each, until completely smooth.
12. Pour the melted chocolate ganache over the chilled cream cheese layer and spread evenly.
13. Refrigerate the bars for at least 2 hours, or until completely firm.
14. Cut into 16 squares using a sharp knife wiped clean between cuts for neat edges.
Cutting these bars cold ensures you get clean, beautiful slices every time. The contrast between the crunchy graham cracker base, creamy peanut butter center, and rich chocolate topping creates pure dessert magic. Consider sprinkling with sea salt flakes before serving for an extra flavor boost that makes these bars truly unforgettable.
Lemon Cream Cheese Frosting Dip
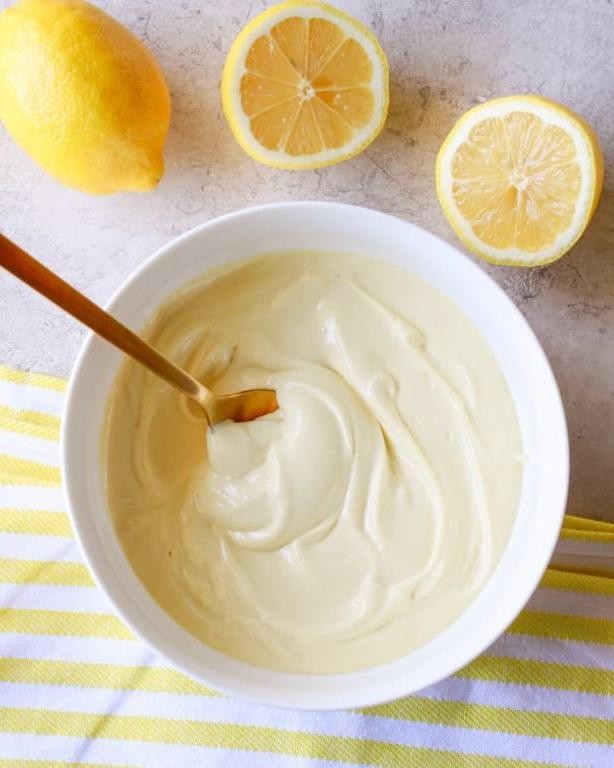
Mmm, you know that moment when you’re craving something sweet but don’t want to commit to baking a whole cake? This lemon cream cheese frosting dip is your answer—it’s basically the best part of lemon cake, ready to scoop up with your favorite dippers in minutes. Seriously, it’s so good you might just eat it with a spoon.
8
servings15
minutesIngredients
For the dip:
- 8 oz cream cheese, softened to room temperature
- 1/2 cup unsalted butter, softened to room temperature
- 2 cups powdered sugar
- 2 tbsp fresh lemon juice
- 1 tsp lemon zest
- 1 tsp vanilla extract
- 1/4 tsp salt
Instructions
- Place the softened cream cheese and butter in a large mixing bowl.
- Beat with an electric mixer on medium speed for 2 minutes until completely smooth and no lumps remain. Tip: Make sure both ingredients are truly at room temperature—this prevents a grainy texture.
- Add the powdered sugar gradually, mixing on low speed until incorporated.
- Increase mixer speed to medium-high and beat for 1 minute until fluffy.
- Pour in the fresh lemon juice and vanilla extract.
- Mix on medium speed for 30 seconds until fully combined.
- Add the lemon zest and salt. Tip: Use a microplane for the zest to get fine shreds without the bitter white pith.
- Beat for another 30 seconds until the zest is evenly distributed.
- Scrape down the sides of the bowl with a spatula to ensure everything is mixed well.
- Transfer the dip to a serving bowl and refrigerate for at least 30 minutes before serving. Tip: Chilling helps the flavors meld and gives the dip a perfect scoopable consistency.
Velvety smooth with a bright, tangy kick from fresh lemon, this dip strikes that perfect balance between rich cream cheese and zesty citrus. Try it with graham crackers, fresh strawberries, or even spread on vanilla wafers—it’s dangerously addictive and always disappears fast at parties.
No-Bake Oreo Cheesecake
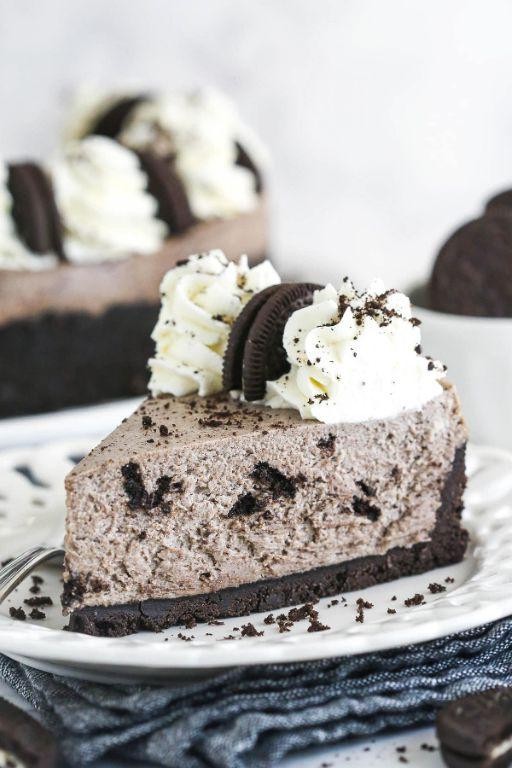
Aren’t you just craving something sweet but don’t want to turn on the oven? This no-bake Oreo cheesecake is your new best friend—it’s creamy, dreamy, and comes together in no time. You’ll love how easy it is to whip up this crowd-pleaser for any occasion.
8
portions30
minutesIngredients
For the crust:
- 24 Oreo cookies
- 5 tablespoons unsalted butter, melted
For the filling:
- 16 ounces cream cheese, softened to room temperature
- 1 cup powdered sugar
- 1 teaspoon vanilla extract
- 1 ½ cups heavy whipping cream
- 12 Oreo cookies, coarsely chopped
Instructions
- Place 24 Oreo cookies in a food processor and pulse until they form fine crumbs.
- Pour the melted butter over the Oreo crumbs and stir until fully combined.
- Press the mixture firmly into the bottom of a 9-inch springform pan using the bottom of a measuring cup. Tip: Pressing firmly prevents the crust from crumbling when you slice the cheesecake.
- Refrigerate the crust for 15 minutes to set while you prepare the filling.
- In a large bowl, beat the softened cream cheese with an electric mixer on medium speed until smooth and creamy, about 2 minutes.
- Add the powdered sugar and vanilla extract to the cream cheese and beat until fully incorporated.
- In a separate bowl, whip the heavy whipping cream on high speed until stiff peaks form, about 3–4 minutes. Tip: Chill your bowl and beaters in the freezer for 10 minutes beforehand to help the cream whip faster.
- Gently fold the whipped cream into the cream cheese mixture until no white streaks remain.
- Stir in the coarsely chopped Oreo cookies by hand.
- Spread the filling evenly over the chilled crust.
- Cover the pan with plastic wrap and refrigerate for at least 6 hours, or overnight. Tip: For the creamiest texture, don’t rush the chilling time—it allows the flavors to meld perfectly.
This cheesecake sets up with a velvety smooth texture that melts in your mouth, balanced by the crunch of Oreo bits throughout. The rich chocolate crust pairs beautifully with the tangy cream cheese filling. Try topping slices with extra crushed Oreos or a drizzle of chocolate sauce for an extra-decadent treat.
Easy No-Bake Cream Cheese Tart
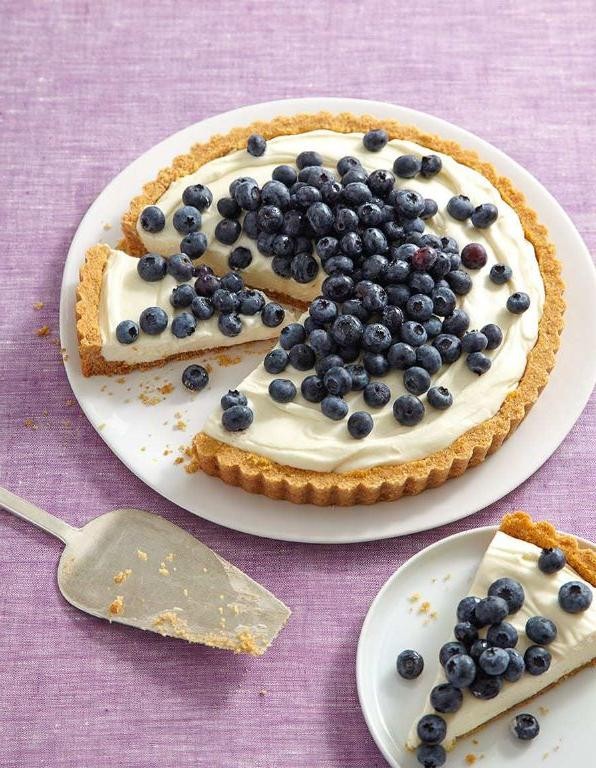
Zesty, creamy, and ridiculously simple—this no-bake tart is your new go-to dessert when you want something impressive without turning on the oven. You just need a few basic ingredients and about 15 minutes of hands-on time. Seriously, it’s easier than deciding what to watch on Netflix tonight.
8
servings15
minutesIngredients
For the crust:
– 1 ½ cups graham cracker crumbs
– 6 tbsp unsalted butter, melted
– 2 tbsp granulated sugar
For the filling:
– 16 oz cream cheese, softened to room temperature
– 1 cup powdered sugar
– 1 tsp vanilla extract
– 1 cup heavy whipping cream
For topping (optional):
– Fresh berries or fruit of your choice
Instructions
1. Combine graham cracker crumbs, melted butter, and granulated sugar in a medium bowl until the mixture resembles wet sand.
2. Press the crust mixture firmly into the bottom and slightly up the sides of a 9-inch tart pan with a removable bottom.
3. Chill the crust in the refrigerator for 15 minutes to set while you prepare the filling.
4. Beat the softened cream cheese with an electric mixer on medium speed for 2 minutes until completely smooth and lump-free.
5. Add powdered sugar and vanilla extract to the cream cheese, beating for another 1 minute until fully incorporated.
6. In a separate bowl, whip the heavy cream on high speed for 3-4 minutes until stiff peaks form.
7. Gently fold the whipped cream into the cream cheese mixture using a spatula until no white streaks remain.
8. Spread the filling evenly over the chilled crust, smoothing the top with an offset spatula.
9. Refrigerate the tart for at least 4 hours, or until the filling is firm to the touch.
10. Top with fresh berries just before serving if desired.
Light and creamy with just the right amount of sweetness, this tart has a velvety texture that melts in your mouth. The graham cracker crust adds a satisfying crunch that contrasts beautifully with the smooth filling. Try serving it with a drizzle of chocolate sauce or a sprinkle of lemon zest for an extra flavor boost.
Blueberry Cream Cheese Truffles

Sometimes you need a dessert that feels fancy but comes together with minimal fuss. These blueberry cream cheese truffles are just that—creamy, fruity bites perfect for parties or a sweet treat. You’ll love how simple they are to make.
24
truffles60
minutesIngredients
For the truffle filling:
- 8 oz cream cheese, softened
- 1/2 cup powdered sugar
- 1/2 cup dried blueberries
- 1 tsp vanilla extract
For the coating:
- 1 cup white chocolate chips
- 1 tsp coconut oil
- 1/4 cup crushed graham crackers
Instructions
- Place the softened cream cheese in a medium mixing bowl.
- Add the powdered sugar and vanilla extract to the bowl.
- Use an electric mixer on medium speed to beat the mixture until completely smooth, about 2 minutes.
- Fold in the dried blueberries with a spatula until evenly distributed.
- Cover the bowl with plastic wrap and refrigerate for 1 hour to firm up the mixture. Tip: Chilling makes the filling easier to roll and less sticky.
- Line a baking sheet with parchment paper.
- Scoop 1 tablespoon of the chilled mixture and roll it into a ball between your palms.
- Place each ball on the prepared baking sheet.
- Freeze the truffles for 30 minutes until firm. Tip: Freezing prevents the truffles from melting when dipped in warm chocolate.
- Combine the white chocolate chips and coconut oil in a microwave-safe bowl.
- Microwave in 30-second intervals, stirring after each, until fully melted and smooth.
- Use a fork to dip each frozen truffle into the melted chocolate, coating completely.
- Allow excess chocolate to drip off before returning the truffle to the parchment paper.
- Sprinkle the tops with crushed graham crackers immediately after dipping. Tip: Add toppings right away so they stick before the chocolate sets.
- Let the truffles sit at room temperature for 20 minutes until the coating is firm.
Here’s what you can expect: a velvety cream cheese center with chewy blueberry bits, all wrapped in a crisp white chocolate shell. The graham cracker crumbs add a subtle crunch that balances the sweetness beautifully. Try serving them on a platter with fresh mint leaves for a pop of color.
Raspberry Cream Cheese Dessert Cups
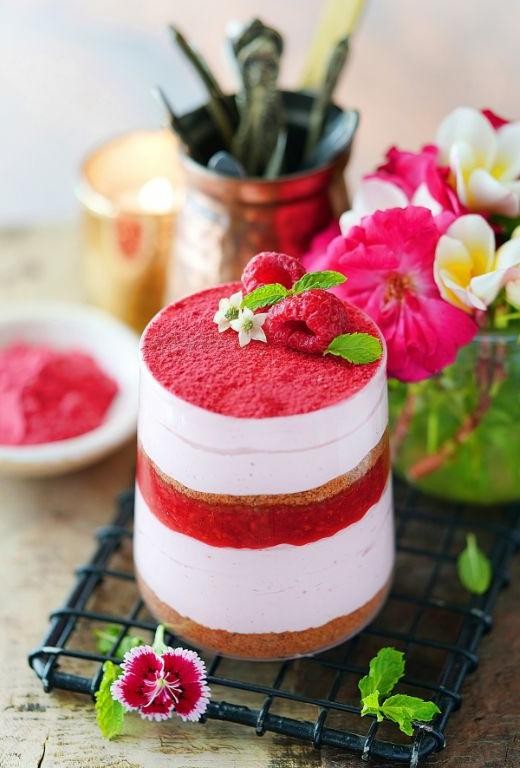
Just when you think dessert can’t get any easier, these raspberry cream cheese cups come along. They’re the perfect little treat for when you want something fancy but don’t have hours to spend in the kitchen. You’ll love how the creamy filling pairs with that sweet-tart raspberry sauce.
6
portions25
minutes8
minutesIngredients
For the crust:
– 1 cup graham cracker crumbs
– 3 tbsp melted butter
– 1 tbsp granulated sugar
For the filling:
– 8 oz cream cheese, softened
– 1/2 cup powdered sugar
– 1 tsp vanilla extract
– 1/2 cup heavy cream
For the raspberry sauce:
– 2 cups fresh raspberries
– 1/4 cup granulated sugar
– 1 tbsp lemon juice
– 1 tsp cornstarch mixed with 1 tbsp water
Instructions
1. Combine graham cracker crumbs, melted butter, and 1 tablespoon sugar in a medium bowl.
2. Press 2 tablespoons of the crumb mixture firmly into the bottom of each of 6 dessert cups.
3. Chill the crusts in the refrigerator for 15 minutes to set.
4. Beat softened cream cheese with an electric mixer on medium speed until smooth and creamy, about 2 minutes.
5. Add powdered sugar and vanilla extract to the cream cheese, beating until fully incorporated.
6. In a separate bowl, whip heavy cream until stiff peaks form, about 3-4 minutes.
7. Gently fold the whipped cream into the cream cheese mixture until no white streaks remain.
8. Divide the cream cheese filling evenly among the chilled crusts, smoothing the tops.
9. Refrigerate the filled cups while preparing the raspberry sauce, at least 30 minutes.
10. Combine raspberries, 1/4 cup sugar, and lemon juice in a small saucepan over medium heat.
11. Cook the raspberry mixture, stirring frequently, until the berries break down and release their juices, about 5-7 minutes.
12. Stir the cornstarch slurry into the raspberry mixture and cook for 1 more minute until slightly thickened.
13. Strain the raspberry sauce through a fine-mesh sieve to remove seeds, pressing with a spatula to extract all the liquid.
14. Cool the raspberry sauce to room temperature, about 20 minutes.
15. Spoon 2 tablespoons of cooled raspberry sauce over each cream cheese cup just before serving.
Perfectly creamy meets delightfully tart in these little cups. The smooth cream cheese filling contrasts beautifully with the vibrant raspberry sauce, while the graham cracker crust adds just the right crunch. Try topping them with fresh mint or serving alongside shortbread cookies for an extra special presentation.
No-Bake Banana Cream Cheese Pudding
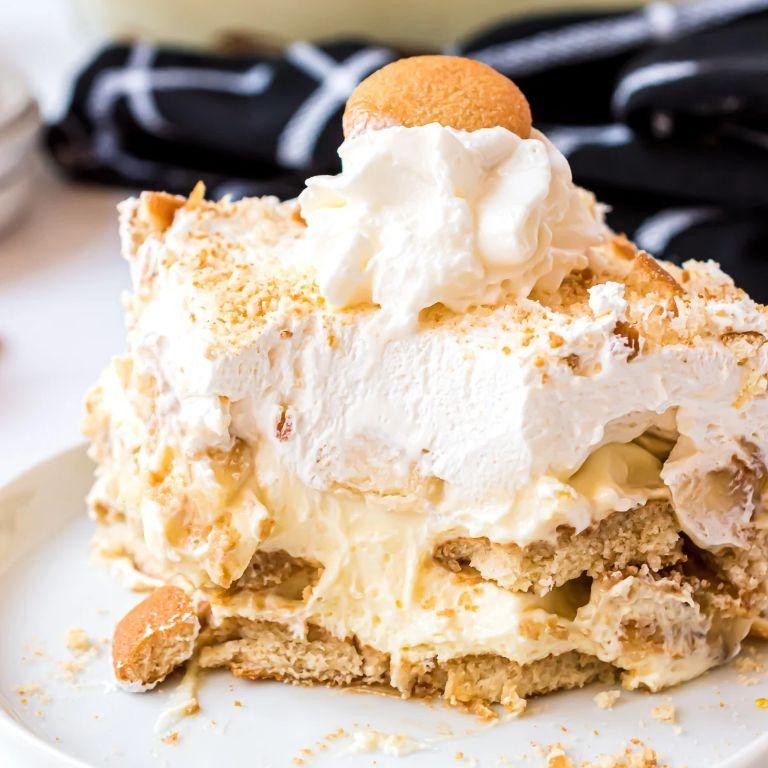
Ever have those bananas turning spotty on your counter and wonder what magic you could make? You’re about to turn them into the creamiest, dreamiest no-bake dessert that comes together in minutes. This banana cream cheese pudding is your new go-to for satisfying that sweet tooth without ever turning on the oven.
12
servings25
minutesIngredients
- For the crust:
- 2 cups graham cracker crumbs
- 1/2 cup unsalted butter, melted
- 2 tbsp granulated sugar
- For the filling:
- 8 oz cream cheese, softened to room temperature
- 1/2 cup granulated sugar
- 2 tsp vanilla extract
- 2 cups heavy whipping cream, cold
- 3 ripe bananas, sliced into 1/4-inch rounds
- 3.4 oz package instant vanilla pudding mix
- 2 cups whole milk, cold
Instructions
- Combine 2 cups graham cracker crumbs, 1/2 cup melted unsalted butter, and 2 tbsp granulated sugar in a medium bowl.
- Press the crumb mixture firmly into the bottom of a 9×13-inch baking dish using the bottom of a measuring cup. Tip: Pressing firmly prevents the crust from crumbling when you slice servings.
- Place the crust in the refrigerator to set for 15 minutes.
- Beat 8 oz softened cream cheese, 1/2 cup granulated sugar, and 2 tsp vanilla extract in a large bowl with an electric mixer on medium speed until smooth and creamy, about 2 minutes.
- Pour 2 cups cold heavy whipping cream into a separate chilled bowl.
- Whip the cream on high speed until stiff peaks form, about 3-4 minutes. Tip: Chill your bowl and beaters beforehand for faster, fluffier whipped cream.
- Fold the whipped cream gently into the cream cheese mixture until no white streaks remain.
- Spread half of the cream cheese mixture evenly over the chilled crust.
- Arrange 3 sliced bananas in a single layer over the cream cheese layer.
- Whisk 3.4 oz instant vanilla pudding mix with 2 cups cold whole milk in a medium bowl for 2 minutes until thickened.
- Spread the pudding evenly over the banana layer.
- Top with the remaining cream cheese mixture, spreading it smoothly to the edges.
- Cover the dish with plastic wrap and refrigerate for at least 4 hours, or until fully set. Tip: For best texture, don’t skip the full chilling time—it allows the layers to firm up perfectly.
So creamy and rich, each spoonful delivers a smooth pudding layer with bursts of fresh banana and that tangy cream cheese goodness. Serve it chilled in mason jars for a portable treat, or top with extra banana slices and a drizzle of caramel right before serving to impress your friends.
Lemon Raspberry Cream Cheese Bars
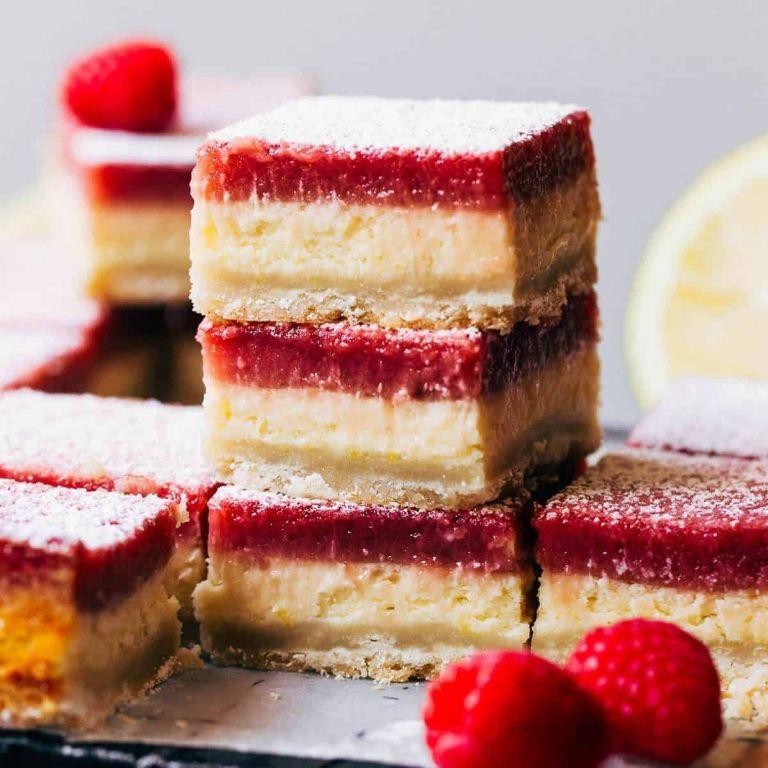
Let’s be real—you deserve a dessert that’s both impressive and surprisingly simple to make. Lemon raspberry cream cheese bars deliver that perfect sweet-tart balance you crave, with a creamy filling and buttery crust that comes together in no time. They’re the kind of treat that looks like you spent hours in the kitchen but secretly comes together with minimal fuss.
9
squares20
minutes43
minutesIngredients
For the Crust
- 1 ½ cups graham cracker crumbs
- ⅓ cup granulated sugar
- 6 tbsp unsalted butter, melted
For the Filling
- 16 oz cream cheese, softened to room temperature
- ½ cup granulated sugar
- 2 large eggs
- ¼ cup fresh lemon juice
- 1 tbsp lemon zest
- 1 tsp vanilla extract
For the Topping
- 1 cup fresh raspberries
- 2 tbsp granulated sugar
Instructions
- Preheat your oven to 350°F.
- Line an 8×8 inch baking pan with parchment paper, leaving some overhang on two sides for easy removal.
- Combine 1 ½ cups graham cracker crumbs and ⅓ cup granulated sugar in a medium bowl.
- Pour 6 tbsp melted unsalted butter over the crumb mixture.
- Stir until the mixture resembles wet sand and all crumbs are moistened.
- Press the crust mixture firmly into the bottom of your prepared pan using the bottom of a measuring cup to create an even layer.
- Bake the crust for 8 minutes until lightly golden around the edges.
- Remove the crust from the oven and let it cool while you prepare the filling.
- In a large bowl, beat 16 oz softened cream cheese with an electric mixer on medium speed until smooth and creamy.
- Add ½ cup granulated sugar and beat until fully incorporated.
- Beat in 2 large eggs one at a time, mixing just until combined after each addition.
- Mix in ¼ cup fresh lemon juice, 1 tbsp lemon zest, and 1 tsp vanilla extract until the filling is smooth.
- Pour the filling over the cooled crust and spread it evenly with a spatula.
- Scatter 1 cup fresh raspberries evenly over the filling.
- Sprinkle 2 tbsp granulated sugar over the raspberries.
- Bake for 30-35 minutes until the edges are set but the center still has a slight jiggle.
- Let the bars cool completely in the pan on a wire rack for 1 hour.
- Transfer the pan to the refrigerator and chill for at least 4 hours or overnight.
- Use the parchment paper overhang to lift the bars from the pan.
- Cut into 9 squares with a sharp knife wiped clean between cuts for neat edges.
Now you’ve got these gorgeous bars with their creamy texture and bright berry tang. The contrast between the rich cream cheese layer and the burst of raspberry makes each bite exciting. Nothing beats serving them slightly chilled with an extra sprinkle of lemon zest or alongside a scoop of vanilla ice cream for the ultimate dessert experience.
No-Bake Pumpkin Cream Cheese Cake
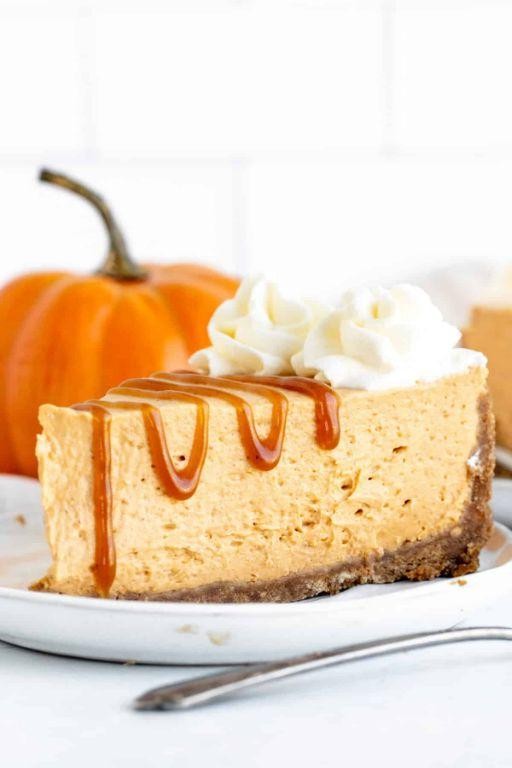
Aren’t you just craving that perfect fall dessert that comes together without turning on your oven? This no-bake pumpkin cream cheese cake is exactly what you need when you want something impressive but effortless. You’ll love how the creamy pumpkin filling pairs with that graham cracker crust.
8
servings25
minutesIngredients
For the crust:
– 2 cups graham cracker crumbs
– 1/2 cup unsalted butter, melted
– 1/4 cup granulated sugar
For the filling:
– 16 oz cream cheese, softened to room temperature
– 1 cup canned pumpkin puree
– 1 cup powdered sugar
– 1 tsp pumpkin pie spice
– 1/2 tsp vanilla extract
– 1 cup heavy whipping cream
For topping:
– 1/2 cup heavy whipping cream
– 2 tbsp powdered sugar
Instructions
1. Combine 2 cups graham cracker crumbs, 1/2 cup melted butter, and 1/4 cup granulated sugar in a medium bowl.
2. Press the crust mixture firmly into the bottom of a 9-inch springform pan using the bottom of a measuring cup.
3. Chill the crust in the refrigerator for 15 minutes while you prepare the filling.
4. Beat 16 oz softened cream cheese with an electric mixer on medium speed for 2 minutes until smooth and creamy.
5. Add 1 cup pumpkin puree, 1 cup powdered sugar, 1 tsp pumpkin pie spice, and 1/2 tsp vanilla extract to the cream cheese.
6. Mix on low speed for 1 minute until all ingredients are fully incorporated.
7. In a separate bowl, whip 1 cup heavy whipping cream with clean beaters on high speed for 3-4 minutes until stiff peaks form.
8. Gently fold the whipped cream into the pumpkin mixture using a spatula until no white streaks remain.
9. Spread the filling evenly over the chilled crust using an offset spatula.
10. Cover the pan with plastic wrap and refrigerate for at least 6 hours, or overnight for best results.
11. Before serving, whip 1/2 cup heavy whipping cream with 2 tbsp powdered sugar until soft peaks form.
12. Pipe or spread the whipped cream over the chilled cake.
Decadent doesn’t even begin to describe this creamy dream of a dessert. The smooth pumpkin filling melts in your mouth while that graham cracker crust provides the perfect crunchy contrast. Try serving it with a drizzle of caramel sauce or topped with toasted pecans for an extra special presentation.
Chocolate Cream Cheese Mousse
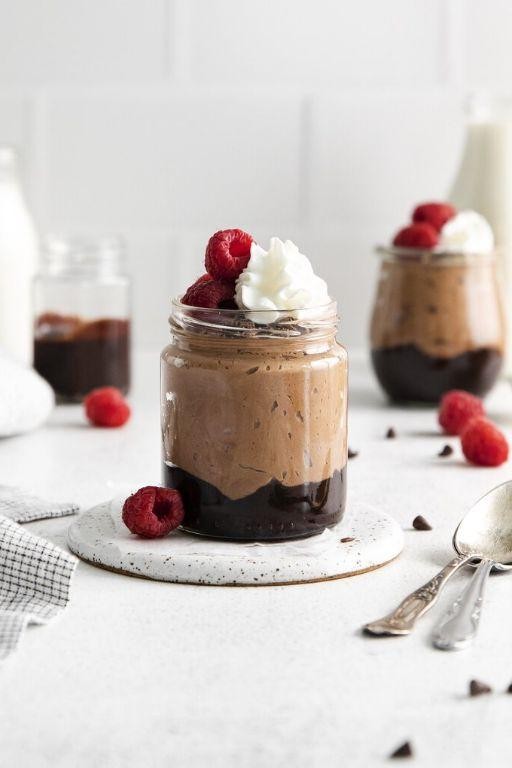
Ugh, you know those days when only something rich and chocolatey will do? This chocolate cream cheese mousse is your answer. It’s surprisingly simple to whip up and feels totally indulgent.
6
servings25
minutes2
minutesIngredients
For the chocolate mixture:
– 8 oz semisweet chocolate, chopped
– 1/4 cup heavy cream
For the cream cheese mixture:
– 8 oz cream cheese, softened to room temperature
– 1/2 cup powdered sugar
– 1 tsp vanilla extract
For whipping:
– 1 cup heavy cream, chilled
Instructions
1. Place the chopped semisweet chocolate and 1/4 cup heavy cream in a microwave-safe bowl.
2. Microwave the chocolate mixture on high for 30 seconds, then stir thoroughly.
3. Continue microwaving in 15-second intervals, stirring after each, until the chocolate is completely melted and smooth.
4. Set the melted chocolate aside to cool for 10 minutes at room temperature.
5. In a separate large bowl, beat the softened cream cheese with an electric mixer on medium speed for 1 minute until creamy.
6. Add the powdered sugar and vanilla extract to the cream cheese.
7. Beat the cream cheese mixture on medium speed for 2 minutes until completely smooth and no sugar lumps remain.
8. Pour the cooled chocolate mixture into the cream cheese mixture.
9. Beat on low speed just until fully combined, about 30 seconds.
10. In another chilled bowl, pour the 1 cup chilled heavy cream.
11. Whip the cold cream on high speed with clean beaters until stiff peaks form, about 2-3 minutes.
12. Gently fold the whipped cream into the chocolate mixture using a rubber spatula, making sure to scrape the bottom and sides.
13. Continue folding until no white streaks remain and the mixture is uniformly chocolate-colored.
14. Divide the mousse evenly among 6 serving glasses or bowls.
15. Cover each serving tightly with plastic wrap.
16. Refrigerate the mousse for at least 4 hours, or until firmly set.
Wow, the texture is incredibly light and airy yet rich from the cream cheese. The chocolate flavor shines through without being overly sweet. Try serving it with fresh raspberries or crushed pretzels for a sweet-salty twist that’s absolutely addictive.
No-Bake Key Lime Cream Cheese Pie
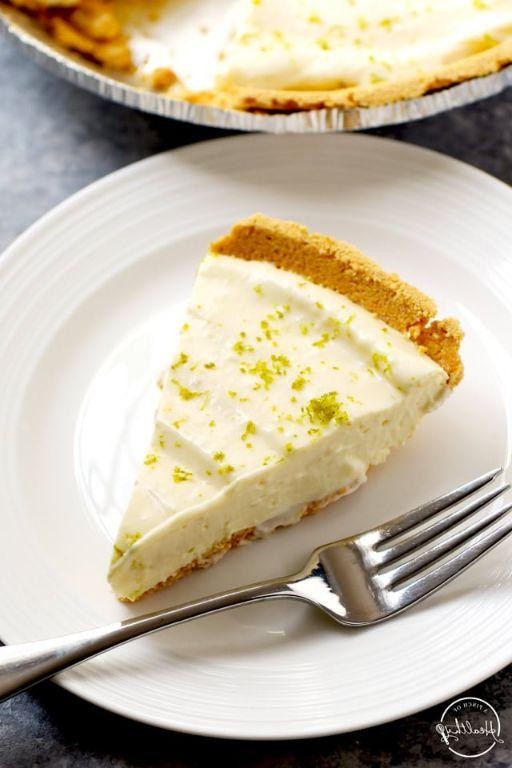
Dreading turning on your oven in this heat? You’re in luck! This no-bake key lime cream cheese pie comes together with minimal effort and maximum refreshment. It’s the perfect cool treat for warm days when you want something impressive without the kitchen sweat.
8
servings30
minutesIngredients
For the crust:
- 1 ½ cups graham cracker crumbs
- ⅓ cup granulated sugar
- 6 tablespoons unsalted butter, melted
For the filling:
- 16 ounces cream cheese, softened to room temperature
- 1 (14-ounce) can sweetened condensed milk
- ⅔ cup key lime juice
- 1 tablespoon key lime zest
- 1 cup heavy whipping cream
Instructions
- Combine 1 ½ cups graham cracker crumbs and ⅓ cup granulated sugar in a medium bowl.
- Pour 6 tablespoons melted unsalted butter over the crumb mixture.
- Stir until the crumbs are evenly moistened and resemble wet sand.
- Press the crust mixture firmly into the bottom and up the sides of a 9-inch pie plate. Tip: Use the bottom of a measuring cup to press the crust evenly for a firm base.
- Chill the crust in the refrigerator for 15 minutes while you prepare the filling.
- Beat 16 ounces softened cream cheese in a large bowl with an electric mixer on medium speed for 2 minutes until smooth and creamy.
- Pour in 1 can sweetened condensed milk and mix on low speed until fully incorporated.
- Add ⅔ cup key lime juice and 1 tablespoon key lime zest to the cream cheese mixture.
- Mix on medium speed for 1 minute until the filling is smooth and uniform in color.
- In a separate bowl, whip 1 cup heavy whipping cream with clean beaters on high speed for 3-4 minutes until stiff peaks form. Tip: Chill your bowl and beaters in the freezer for 10 minutes beforehand for faster whipping.
- Gently fold the whipped cream into the key lime mixture until no white streaks remain.
- Pour the filling into the chilled crust and spread evenly with a spatula.
- Cover the pie loosely with plastic wrap. Tip: Press the plastic directly onto the filling surface to prevent a skin from forming.
- Refrigerate the pie for at least 4 hours, or until firmly set.
Zesty and creamy, this pie delivers a perfect balance of tangy lime and sweet richness that melts on your tongue. The graham cracker crust provides a satisfying crunch against the velvety filling. Try garnishing with extra lime zest and whipped cream rosettes for an elegant presentation, or serve it straight from the fridge for an instant cool-down treat.
Conclusion
A fantastic collection of no-bake cream cheese delights awaits! From creamy dips to luscious desserts, these recipes prove you don’t need an oven to create something spectacular. We’d love to hear which recipes become your favorites—drop us a comment below and share this tasty roundup on Pinterest for fellow food lovers to discover!


