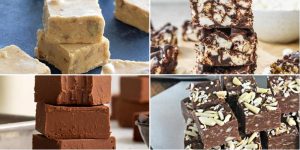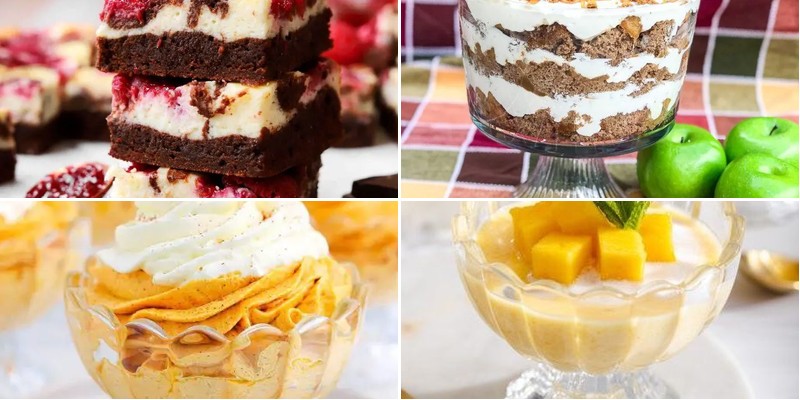
Welcome to dessert paradise! If you love the creamy magic that happens when cream cheese meets Cool Whip, you’re in for a treat. We’ve gathered 24 irresistible no-bake delights that are perfect for potlucks, parties, or satisfying your sweet tooth. From fluffy fruit dips to dreamy layered desserts, these easy recipes will become your go-to favorites. Ready to discover your next obsession? Let’s dive in!
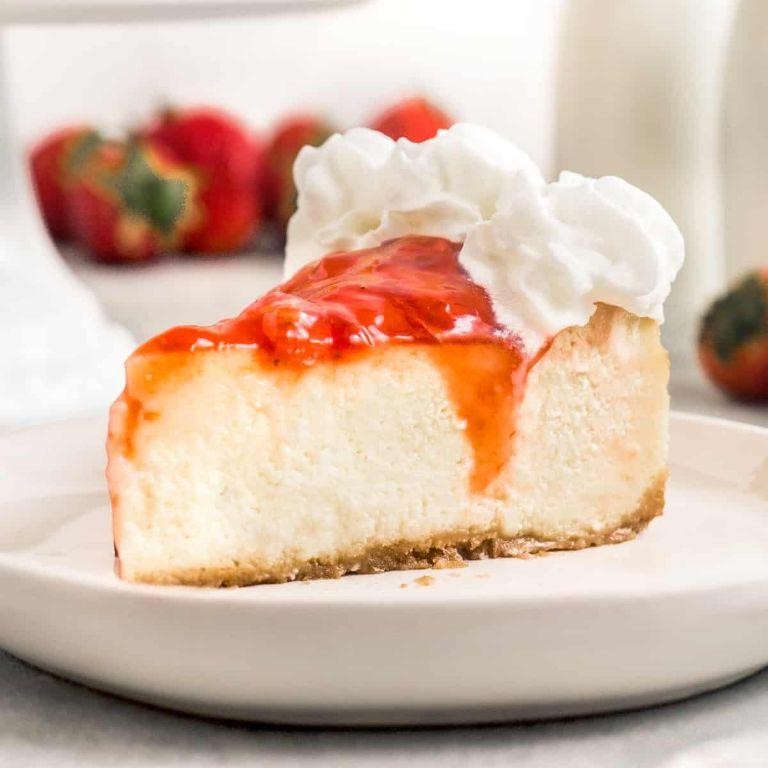
No-Bake Strawberry Cream Cheese Pie
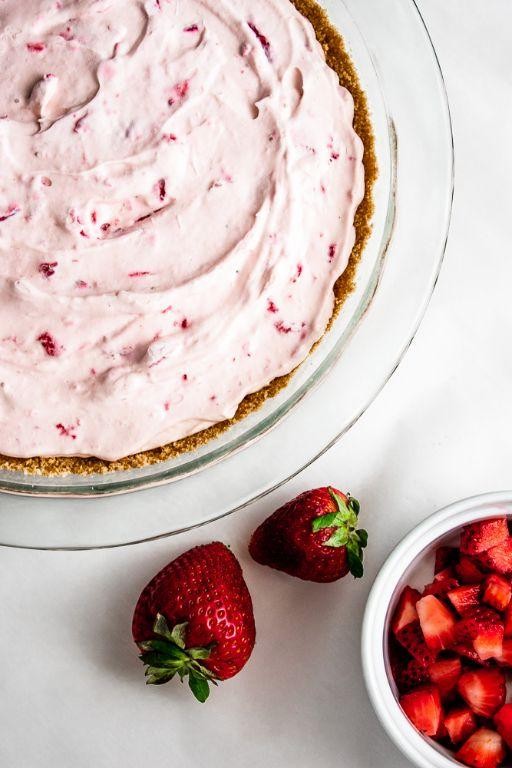
Lately, I’ve been craving something that feels like a gentle hug from summer, something that requires no oven but delivers all the comfort. This no-bake strawberry cream cheese pie came to me during one of those quiet afternoons when the kitchen felt more like a sanctuary than a workspace. It’s the kind of dessert that whispers rather than shouts, perfect for when you want sweetness without the fuss.
8
servings30
minutes7
minutesIngredients
– For the crust: 1 ½ cups graham cracker crumbs, ⅓ cup granulated sugar, 6 tbsp unsalted butter (melted)
– For the filling: 8 oz cream cheese (softened), 1 cup powdered sugar, 1 tsp vanilla extract, 1 cup heavy whipping cream
– For the topping: 2 cups fresh strawberries (hulled and sliced), ¼ cup granulated sugar, 1 tbsp cornstarch, ¼ cup water
Instructions
1. Combine 1 ½ cups graham cracker crumbs, ⅓ cup granulated sugar, and 6 tbsp melted unsalted butter in a medium bowl until the mixture resembles wet sand.
2. Press the crust mixture firmly into the bottom and up the sides of a 9-inch pie dish using the back of a measuring cup to create an even layer.
3. Chill the crust in the refrigerator for 30 minutes to set while you prepare the filling.
4. Beat 8 oz softened cream cheese with 1 cup powdered sugar and 1 tsp vanilla extract in a large bowl on medium speed for 2 minutes until smooth and creamy.
5. In a separate bowl, whip 1 cup heavy whipping cream on high speed for 3-4 minutes until stiff peaks form.
6. Gently fold the whipped cream into the cream cheese mixture until no white streaks remain, being careful not to deflate the airiness.
7. Spread the filling evenly over the chilled crust with a spatula, smoothing the top.
8. Refrigerate the pie for 1 hour to allow the filling to firm up slightly.
9. Combine 2 cups sliced strawberries, ¼ cup granulated sugar, 1 tbsp cornstarch, and ¼ cup water in a saucepan over medium heat.
10. Cook the strawberry mixture for 5-7 minutes, stirring constantly, until it thickens into a glossy sauce and bubbles gently.
11. Cool the strawberry topping for 15 minutes at room temperature until warm but not hot.
12. Arrange the remaining fresh strawberry slices over the chilled filling in a circular pattern.
13. Pour the cooled strawberry sauce evenly over the arranged strawberries, allowing it to drip slightly down the sides.
14. Refrigerate the completed pie for at least 4 hours, or preferably overnight, until fully set.
Now, the pie emerges cool and firm, with a creamy filling that melts against the crisp graham cracker crust. Notes of sweet strawberry mingle with the subtle tang of cream cheese, creating a balance that feels both indulgent and light. Try serving slices with a sprinkle of crushed pistachios or alongside iced tea for a lazy weekend treat that requires nothing but enjoyment.
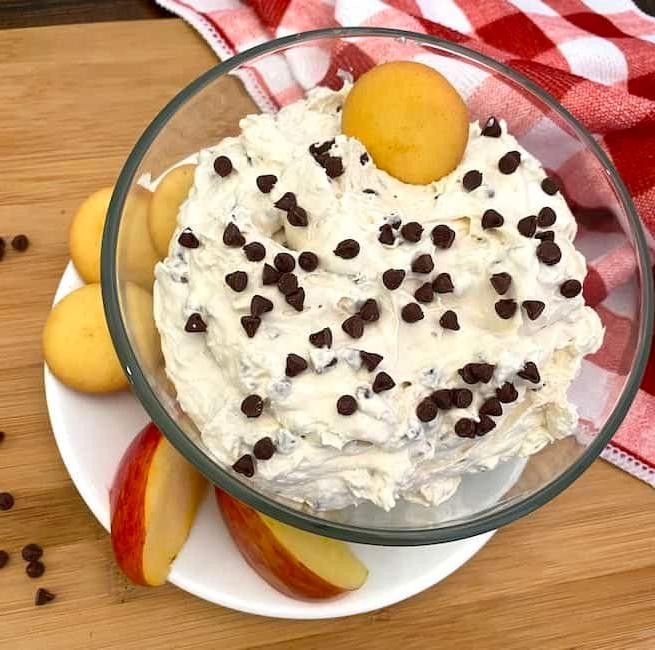
Easy Cream Cheese Cool Whip Fruit Dip
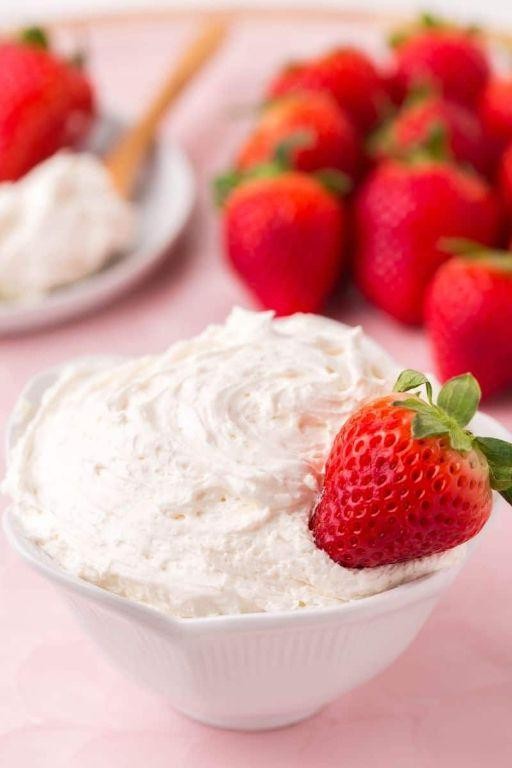
Cradling the cool ceramic bowl in my hands, I remember how this simple dip first appeared at a summer gathering years ago, its creamy sweetness cutting through the humid afternoon air like a gentle breeze. Sometimes the most comforting recipes are the ones that require no cooking at all, just a few quiet moments of stirring and folding before they’re ready to share. This cool whip fruit dip has become my go-to for those occasions when I want something effortlessly elegant yet deeply satisfying.
1
bowl15
minutesIngredients
– For the dip base: 8 ounces cream cheese, softened at room temperature for 2 hours
– For the dip base: 1 cup powdered sugar, sifted
– For the dip base: 1 teaspoon pure vanilla extract
– For the whipped texture: 8 ounces Cool Whip, thawed in refrigerator for 4 hours
Instructions
1. Place the softened cream cheese in a large mixing bowl.
2. Beat the cream cheese with an electric mixer on medium speed for 2 minutes until completely smooth and free of lumps.
3. Add the sifted powdered sugar to the cream cheese.
4. Beat the mixture on low speed for 1 minute until the powdered sugar is incorporated.
5. Increase the mixer speed to medium and beat for 2 additional minutes until the mixture becomes light and fluffy.
6. Add the vanilla extract to the cream cheese mixture.
7. Beat on low speed for 30 seconds until the vanilla is fully incorporated.
8. Gently fold in the thawed Cool Whip using a rubber spatula, making sweeping motions from the bottom of the bowl to the top.
9. Continue folding for about 1 minute until no white streaks remain and the mixture is uniformly creamy.
10. Transfer the dip to a serving bowl using the rubber spatula.
11. Cover the bowl tightly with plastic wrap.
12. Refrigerate the dip for at least 1 hour before serving to allow the flavors to meld.
Effortlessly creamy and delicately sweet, this dip transforms ordinary fruit into something magical, its cloud-like texture clinging to strawberry slices and apple wedges with gentle persistence. I love serving it in hollowed-out pineapple halves for tropical gatherings, or with cinnamon-dusted pear slices when autumn arrives, watching how the vanilla notes dance between the fruit’s natural sweetness and the dip’s cool embrace.
Lemon Blueberry Cream Cheese Parfait
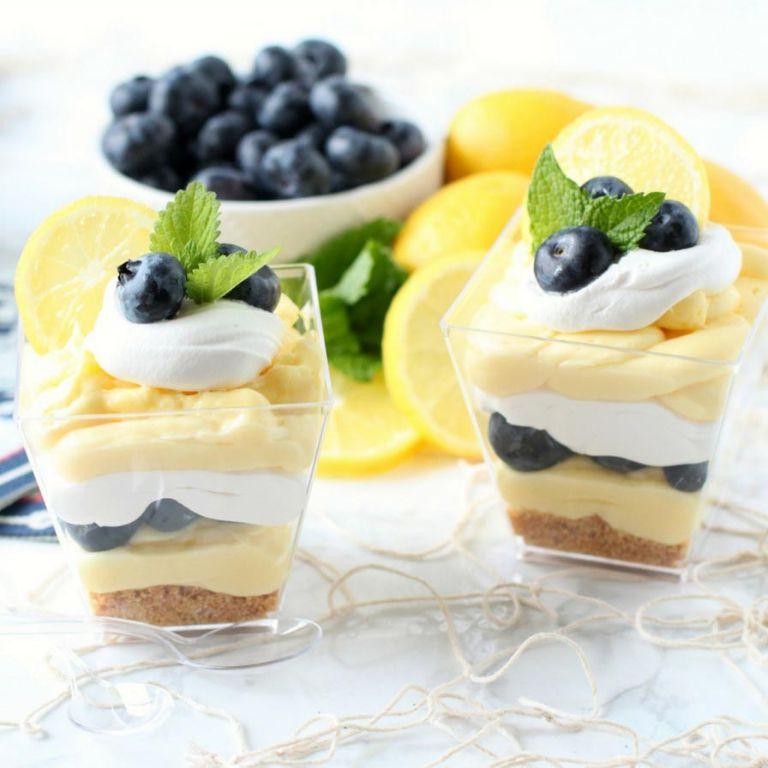
Years have a way of softening memories, but some flavors remain sharp and clear, like the bright tang of lemon and the gentle sweetness of blueberries that I’m layering into this simple parfait today. It’s a quiet dessert for quiet moments, one that asks for little more than a spoon and a bit of patience as the textures settle into something soft and complete. You could make it in a hurry, but I find it’s better when assembled slowly, almost thoughtfully, like arranging flowers in a vase.
3
servings25
minutes7
minutesIngredients
For the blueberry sauce:
– 1 cup fresh blueberries
– 2 tbsp granulated sugar
– 1 tbsp lemon juice
– 1 tsp cornstarch mixed with 1 tbsp cold water
For the cream cheese layer:
– 8 oz cream cheese, softened to room temperature
– 1/4 cup powdered sugar
– 1/2 cup heavy cream
– 1 tsp vanilla extract
– Zest of 1 lemon
For assembly:
– 1 cup graham cracker crumbs
– Fresh mint leaves for garnish (optional)
Instructions
1. Combine 1 cup fresh blueberries, 2 tbsp granulated sugar, and 1 tbsp lemon juice in a small saucepan over medium heat.
2. Cook the blueberry mixture for 5 minutes, stirring occasionally until the berries release their juices and begin to soften.
3. Whisk 1 tsp cornstarch with 1 tbsp cold water in a separate small bowl until no lumps remain.
4. Stir the cornstarch slurry into the blueberry mixture and continue cooking for 2 more minutes until the sauce thickens noticeably.
5. Remove the blueberry sauce from heat and let it cool completely to room temperature, which will take about 20-30 minutes.
6. While the sauce cools, beat 8 oz softened cream cheese with 1/4 cup powdered sugar using an electric mixer on medium speed for 2 minutes until smooth and creamy.
7. In a separate chilled bowl, whip 1/2 cup heavy cream with 1 tsp vanilla extract until stiff peaks form, which should take about 3-4 minutes.
8. Gently fold the whipped cream into the cream cheese mixture until fully incorporated, being careful not to deflate the air bubbles.
9. Stir the zest of 1 lemon into the cream cheese mixture until evenly distributed.
10. Spoon 2 tablespoons of graham cracker crumbs into the bottom of each serving glass.
11. Layer 1/4 cup of the cream cheese mixture over the crumbs in each glass.
12. Spoon 2 tablespoons of the cooled blueberry sauce over the cream cheese layer.
13. Repeat the layers once more, ending with a final drizzle of blueberry sauce on top.
14. Refrigerate the assembled parfaits for at least 1 hour before serving to allow the flavors to meld.
15. Garnish with fresh mint leaves if desired just before serving.
What surprises me most about this parfait is how the textures transform in the refrigerator—the graham crumbs soften just enough to become cake-like, while the cream cheese layer firms into something between mousse and cheesecake. The lemon zest keeps everything bright against the jammy blueberries, and I sometimes serve these in vintage teacups for afternoon visitors, watching how the purple sauce bleeds slightly into the white layers like watercolor on paper.
Chocolate Chip Cream Cheese Fluff
Just thinking about how some of the coziest moments happen when you’re standing in the kitchen, letting ingredients whisper their stories. Joy settles in when simple things like cream cheese and chocolate chips transform into something softly magical, something that feels like a quiet afternoon wrapped in sweetness.
5
portions15
minutesIngredients
For the cream cheese mixture:
- 8 ounces cream cheese, softened to room temperature
- 1/2 cup granulated sugar
- 1 teaspoon vanilla extract
- 1 cup heavy whipping cream
For folding in:
- 1/2 cup mini chocolate chips
Instructions
- Place the softened cream cheese in a large mixing bowl and beat with an electric mixer on medium speed for 1 minute, until completely smooth and no lumps remain.
- Add the granulated sugar and vanilla extract to the cream cheese and beat on medium speed for 2 minutes, scraping down the sides of the bowl once, until the mixture is fully combined and slightly fluffy.
- Pour the heavy whipping cream into a separate chilled mixing bowl and beat on high speed for 3 to 4 minutes, until stiff peaks form that hold their shape when the beaters are lifted.
- Gently fold the whipped cream into the cream cheese mixture using a rubber spatula, making wide, sweeping motions to maintain as much air as possible until no white streaks remain.
- Add the mini chocolate chips to the bowl and fold them in gently with 5 to 6 folds, just until evenly distributed throughout the mixture.
- Spoon the fluff into serving bowls or a large airtight container and refrigerate for at least 2 hours to allow the flavors to meld and the texture to firm slightly.
But what emerges from the fridge is a cloud-like treat—cool, creamy, and punctuated by tiny bursts of melted chocolate. It’s lovely scooped into mini cones for a playful twist, or simply eaten by the spoonful when the light outside turns golden and slow.
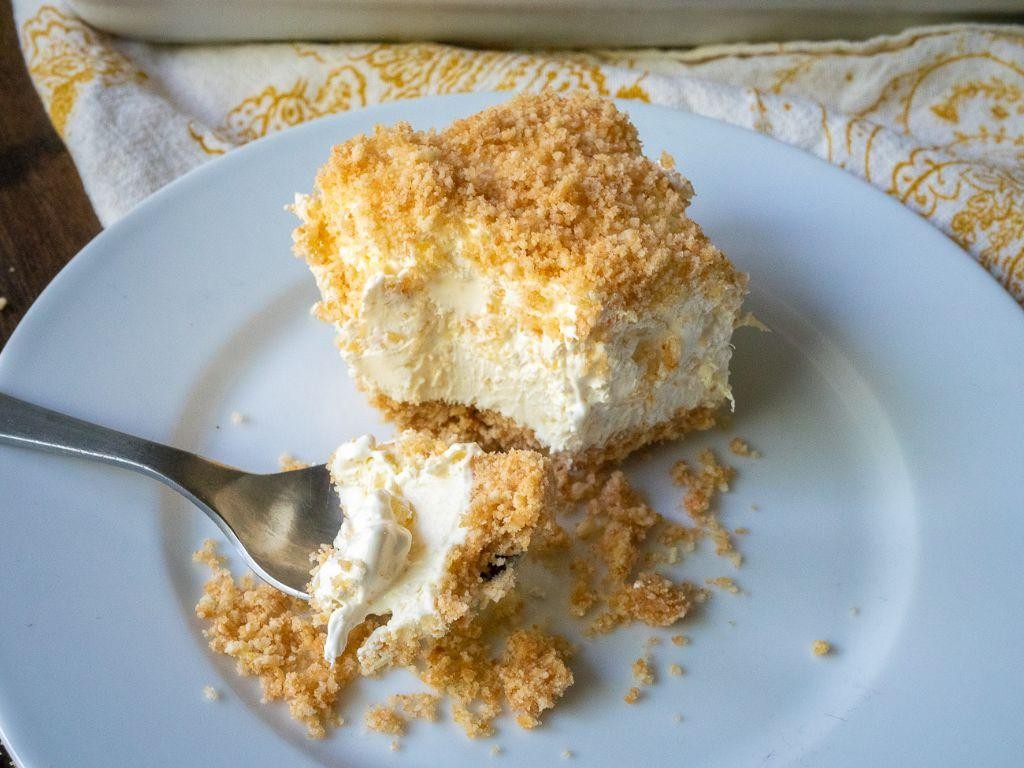
Cream Cheese Cool Whip Layered Dessert
Now and then, a dessert comes along that feels like a gentle exhale after a long day—something soft, cool, and effortlessly layered, much like the quiet moments we collect. This cream cheese Cool Whip layered dessert is just that, a no-bake refuge built in a simple dish, waiting to be sliced and savored slowly.
12
servings25
minutesIngredients
For the crust:
– 2 cups graham cracker crumbs
– 1/2 cup unsalted butter, melted
– 1/4 cup granulated sugar
For the cream cheese layer:
– 16 oz cream cheese, softened to room temperature
– 1 cup powdered sugar
– 1 tsp vanilla extract
For the topping:
– 8 oz Cool Whip, thawed
– Fresh berries or chocolate shavings for garnish (optional)
Instructions
1. In a medium bowl, combine 2 cups graham cracker crumbs, 1/2 cup melted unsalted butter, and 1/4 cup granulated sugar until the mixture resembles wet sand.
2. Press the crust mixture firmly and evenly into the bottom of a 9×13-inch baking dish using the back of a spoon or measuring cup.
3. Chill the crust in the refrigerator for 15 minutes to help it set.
4. In a large mixing bowl, beat 16 oz softened cream cheese with an electric mixer on medium speed for 2 minutes until smooth and lump-free.
5. Gradually add 1 cup powdered sugar to the cream cheese, beating on low speed until fully incorporated.
6. Mix in 1 tsp vanilla extract until just combined.
7. Gently fold in half of the 8 oz thawed Cool Whip into the cream cheese mixture using a spatula, being careful not to deflate the mixture.
8. Spread the cream cheese layer evenly over the chilled crust with an offset spatula, smoothing the top.
9. Dollop the remaining Cool Whip over the cream cheese layer and spread it gently to cover the surface completely.
10. Cover the dessert with plastic wrap and refrigerate for at least 4 hours, or overnight, to allow the layers to firm.
11. Just before serving, garnish with fresh berries or chocolate shavings if desired, then slice into squares with a clean, sharp knife.
Delicate and cloud-like, each bite melts into a sweet, tangy creaminess balanced by the sandy crunch below. Try serving it in small mason jars for a portable treat, or top with seasonal fruit to let its simplicity shine through the layers.
Banana Pudding Cream Cheese Delight
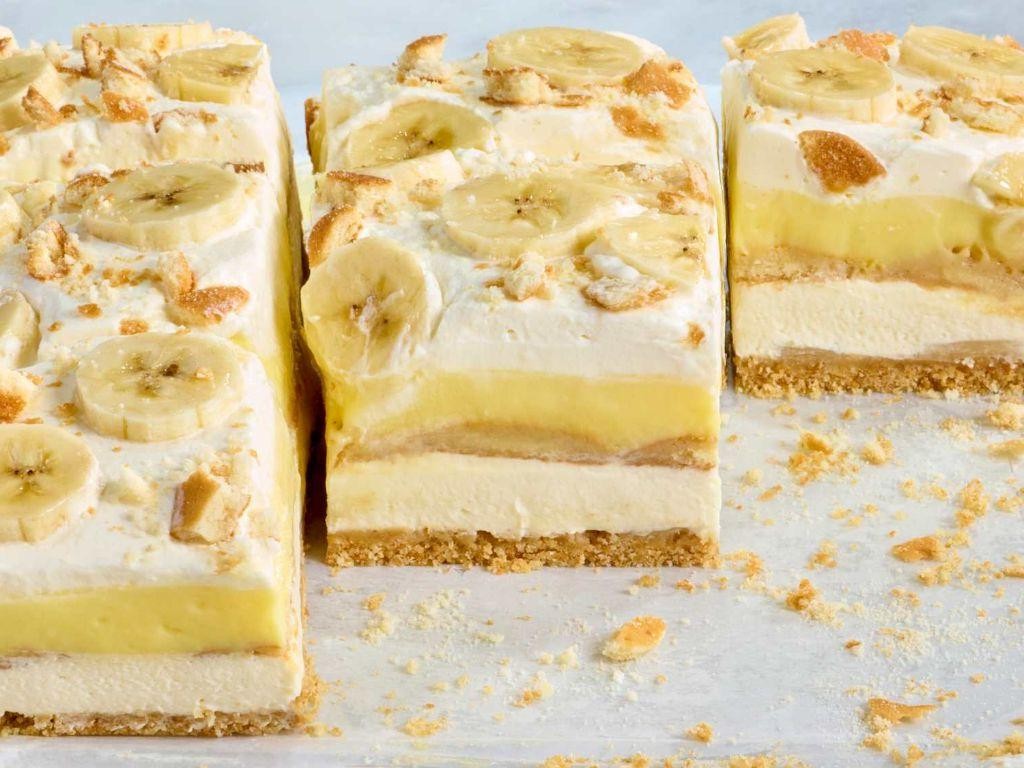
Vividly remembering the way my grandmother’s kitchen smelled on Sunday afternoons, I find myself drawn to recipes that feel like a warm embrace. This banana pudding cream cheese delight is one of those desserts that wraps you in comfort, layer by gentle layer, with each spoonful feeling like a quiet moment of solace.
9
portions30
minutes8
minutesIngredients
For the crust:
– 2 cups vanilla wafer crumbs
– 1/2 cup unsalted butter, melted
For the cream cheese layer:
– 8 oz cream cheese, softened to room temperature
– 1/2 cup granulated sugar
– 1 tsp vanilla extract
For the pudding and assembly:
– 2 cups whole milk
– 1 (3.4 oz) package instant vanilla pudding mix
– 3 medium bananas, sliced 1/4-inch thick
– 1 cup heavy whipping cream
– 2 tbsp powdered sugar
Instructions
1. Preheat your oven to 350°F.
2. Combine the vanilla wafer crumbs and melted butter in a medium bowl until the crumbs are evenly moistened.
3. Press the crumb mixture firmly into the bottom of a 9×9-inch baking dish to form an even layer.
4. Bake the crust for 8 minutes, or until lightly golden and fragrant.
5. Remove the crust from the oven and let it cool completely on a wire rack, about 30 minutes.
6. Tip: Pressing the crust with the bottom of a measuring cup helps create a compact, even base that won’t crumble when sliced.
7. In a separate bowl, beat the softened cream cheese, granulated sugar, and vanilla extract with an electric mixer on medium speed until smooth and creamy, about 2 minutes.
8. Spread the cream cheese mixture evenly over the cooled crust.
9. Arrange the banana slices in a single layer over the cream cheese mixture.
10. Tip: Slicing the bananas just before assembling prevents them from browning and maintains their fresh flavor.
11. In another bowl, whisk together the whole milk and instant vanilla pudding mix for 2 minutes, until thickened.
12. Pour the pudding over the banana layer and spread it evenly with a spatula.
13. In a chilled bowl, whip the heavy whipping cream and powdered sugar with an electric mixer on high speed until stiff peaks form, about 3-4 minutes.
14. Tip: Chilling the bowl and beaters beforehand helps the whipped cream whip up faster and hold its shape better.
15. Spread the whipped cream over the pudding layer.
16. Cover the dish with plastic wrap and refrigerate for at least 4 hours, or until set.
Kindness in a dessert comes through in its layers—the creamy, tangy cheese against the sweet pudding, the soft bananas melting into the crisp crust. Serve it chilled in small jars for a portable treat, or scoop it into bowls and watch the stripes of flavor and texture blend into one comforting bite.
Pineapple Dream Dessert Bars
Wandering through my grandmother’s recipe box this afternoon, I found this faded card tucked between her famous lemon bars and that impossible chocolate cake, its edges softened by time and flour-dusted fingers. Something about the handwritten “Pineapple Dream” in her looping script made me pause, remembering how these bars would appear on summer picnic tables, their sunny sweetness cutting through the humid air. I decided to make them right then, measuring and mixing as the afternoon light slanted gold across the kitchen counter.
16
squares30
minutes17
minutesIngredients
For the crust:
– 2 cups graham cracker crumbs
– 1/2 cup unsalted butter, melted
– 1/4 cup granulated sugar
For the filling:
– 16 oz cream cheese, softened to room temperature
– 1 cup powdered sugar
– 1 tsp vanilla extract
– 8 oz whipped topping, thawed
For the pineapple layer:
– 20 oz crushed pineapple, drained thoroughly
– 1/4 cup granulated sugar
– 1 tbsp cornstarch
Instructions
1. Preheat your oven to 350°F and line an 8×8 inch baking pan with parchment paper, leaving some overhang on two sides for easy removal later.
2. Combine 2 cups graham cracker crumbs, 1/2 cup melted butter, and 1/4 cup granulated sugar in a medium bowl until the mixture resembles wet sand.
3. Press the crust mixture firmly into the prepared pan using the bottom of a measuring cup to create an even layer.
4. Bake the crust for 10 minutes at 350°F until lightly golden and fragrant, then transfer to a wire rack to cool completely.
5. While the crust cools, beat 16 oz softened cream cheese with an electric mixer on medium speed until completely smooth and free of lumps.
6. Gradually add 1 cup powdered sugar to the cream cheese, scraping down the bowl sides periodically to ensure even mixing.
7. Mix in 1 tsp vanilla extract until just incorporated into the cream cheese mixture.
8. Gently fold 8 oz thawed whipped topping into the cream cheese mixture using a spatula, being careful not to deflate the air bubbles.
9. Spread the cream cheese filling evenly over the completely cooled crust, smoothing the top with an offset spatula.
10. In a small saucepan, combine 20 oz thoroughly drained crushed pineapple, 1/4 cup granulated sugar, and 1 tbsp cornstarch, stirring until no cornstarch lumps remain.
11. Cook the pineapple mixture over medium heat for 5-7 minutes, stirring constantly until it thickens and becomes translucent.
12. Spread the warm pineapple mixture evenly over the cream cheese layer, working quickly before it sets.
13. Refrigerate the dessert bars for at least 4 hours, or preferably overnight, to allow the layers to set properly.
14. Use the parchment paper overhang to lift the entire dessert from the pan before cutting into 16 squares with a sharp knife wiped clean between cuts.
My favorite part remains that moment when the knife first slices through—the crisp crust giving way to the cloud-like cream cheese, then meeting the jewel-bright pineapple layer that somehow tastes both tropical and comforting. Maybe tomorrow I’ll serve these chilled bars with toasted coconut sprinkled over top, or perhaps alongside strong coffee for that perfect sweet-bitter balance my grandmother always loved.
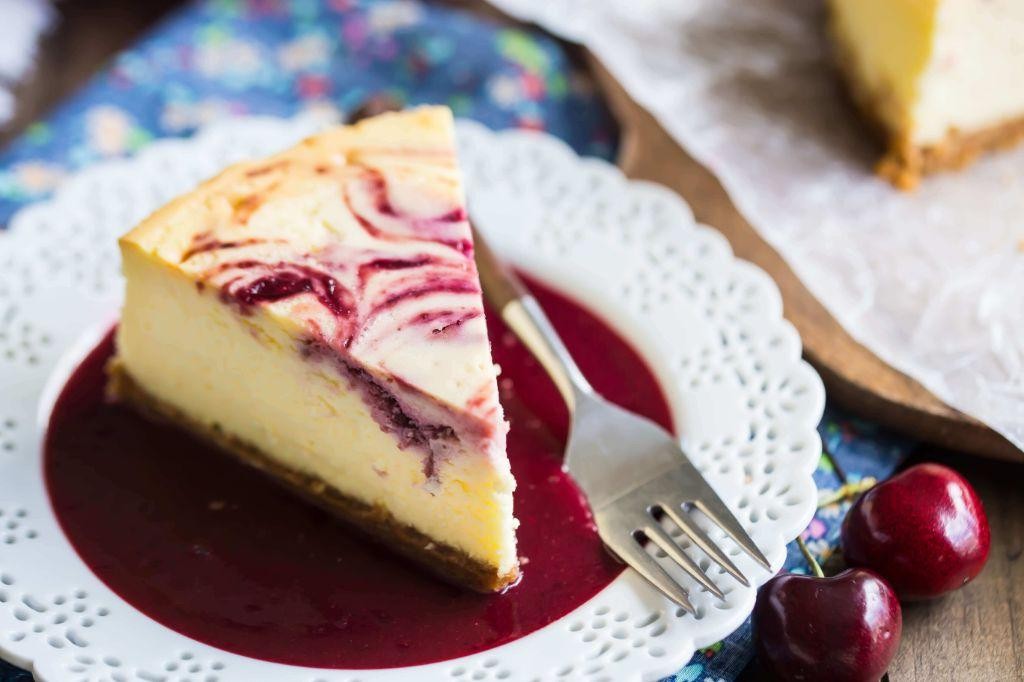
Cherry Cream Cheese Swirl Cake
Perhaps there’s something quietly magical about the way tart cherries and creamy cheese can transform an ordinary afternoon into something worth remembering, their swirls creating edible poetry in a simple cake pan.
8
servings20
minutes60
minutesIngredients
For the cake batter:
– 2 cups all-purpose flour
– 1 ½ cups granulated sugar
– 1 tsp baking powder
– ½ tsp baking soda
– ½ tsp salt
– ¾ cup unsalted butter, softened
– 3 large eggs
– 1 cup buttermilk
– 1 tsp vanilla extract
For the cherry swirl:
– 1 ½ cups frozen cherries, thawed
– ¼ cup granulated sugar
– 1 tbsp cornstarch
For the cream cheese layer:
– 8 oz cream cheese, softened
– ¼ cup granulated sugar
– 1 large egg
Instructions
1. Preheat your oven to 350°F and generously grease a 9-inch springform pan, making sure to coat the sides thoroughly to prevent sticking.
2. In a medium bowl, whisk together 2 cups all-purpose flour, 1 ½ cups granulated sugar, 1 tsp baking powder, ½ tsp baking soda, and ½ tsp salt until no streaks remain.
3. Using an electric mixer on medium speed, beat ¾ cup softened unsalted butter until pale and fluffy, about 2 minutes.
4. Add 3 large eggs one at a time, beating for 30 seconds after each addition until fully incorporated.
5. Reduce mixer speed to low and alternately add the dry ingredients and 1 cup buttermilk in three additions, beginning and ending with dry ingredients.
6. Stir in 1 tsp vanilla extract by hand until the batter is smooth and evenly mixed.
7. Pour two-thirds of the batter into the prepared pan and spread evenly with a spatula.
8. In a small saucepan, combine 1 ½ cups thawed cherries, ¼ cup granulated sugar, and 1 tbsp cornstarch, then cook over medium heat for 5 minutes until thickened and glossy.
9. In a separate bowl, beat 8 oz softened cream cheese with ¼ cup granulated sugar until smooth, then mix in 1 large egg until fully combined.
10. Dollop the cream cheese mixture over the batter in the pan, then spoon the cherry mixture over the cream cheese layer.
11. Top with remaining cake batter and use a knife to create deep, swirling motions through all three layers, reaching the bottom of the pan.
12. Bake at 350°F for 55-60 minutes until the top is golden and a toothpick inserted near the center comes out with just a few moist crumbs.
13. Cool the cake in the pan on a wire rack for 30 minutes before carefully releasing the springform sides.
Just out of the oven, this cake settles into the most tender crumb imaginable, with pockets of tart cherry cutting through the rich cream cheese swirls. I love serving slightly warm slices with a dusting of powdered sugar that melts into the marbled surface, or chilled the next day when the flavors have deepened into something even more complex.
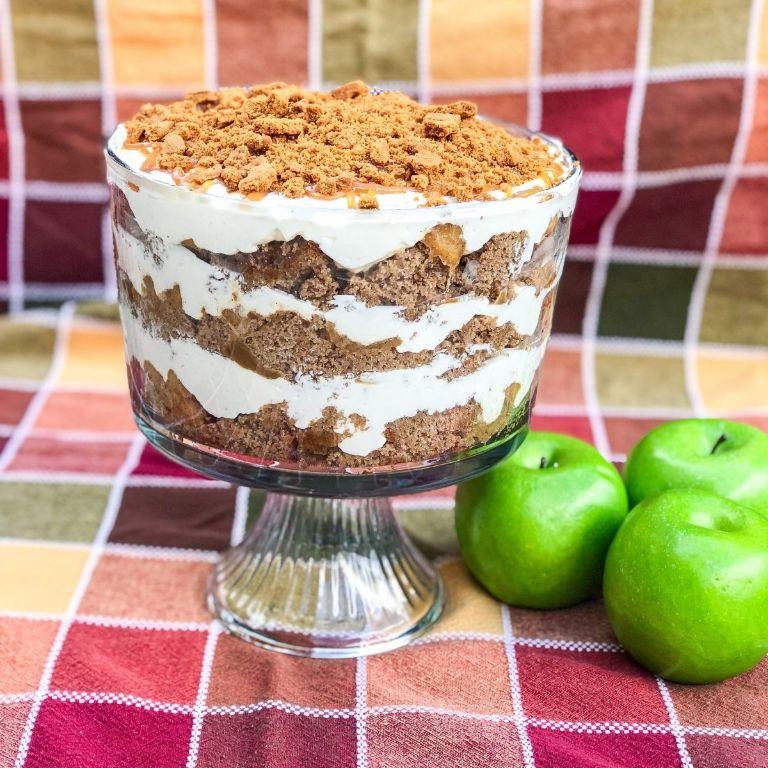
Caramel Apple Cream Cheese Trifle
A gentle autumn afternoon finds me craving something that bridges summer’s lightness with fall’s warmth, something layered with memory and comfort. Caramel apple cream cheese trifle came to mind today, its components whispering of orchard visits and cozy kitchens. There’s something deeply satisfying about building a dessert that reveals its beauty only when spooned into a bowl.
8
servings30
minutes25
minutesIngredients
For the caramel apple layer:
– 4 large Granny Smith apples, peeled and diced into ½-inch cubes
– ½ cup granulated sugar
– ¼ cup water
– ½ cup heavy cream
– 2 tablespoons unsalted butter
– 1 teaspoon vanilla extract
– ½ teaspoon ground cinnamon
For the cream cheese layer:
– 16 ounces cream cheese, softened to room temperature
– 1 cup powdered sugar
– 1 teaspoon vanilla extract
– 2 cups heavy cream, chilled
For assembly:
– 1 pound pound cake, cut into 1-inch cubes
Instructions
1. Combine diced apples, granulated sugar, and water in a large saucepan over medium heat.
2. Cook the apple mixture for 12-15 minutes, stirring occasionally, until apples are tender but still hold their shape.
3. Stir in ½ cup heavy cream, butter, 1 teaspoon vanilla extract, and cinnamon until fully incorporated.
4. Continue cooking the caramel apple mixture for another 5-7 minutes until slightly thickened, then remove from heat to cool completely.
5. Tip: Allow the caramel apples to cool completely before assembling to prevent melting the cream layers.
6. In a large mixing bowl, beat softened cream cheese with an electric mixer on medium speed for 2 minutes until smooth and creamy.
7. Gradually add powdered sugar and 1 teaspoon vanilla extract to the cream cheese, beating until fully combined.
8. In a separate chilled bowl, whip 2 cups heavy cream until stiff peaks form, about 3-4 minutes.
9. Gently fold the whipped cream into the cream cheese mixture until no white streaks remain.
10. Tip: Fold gently to maintain airiness in the cream cheese layer for optimal texture.
11. Arrange one-third of the pound cake cubes in the bottom of a 4-quart trifle dish.
12. Spoon one-third of the cooled caramel apple mixture over the pound cake layer.
13. Spread one-third of the cream cheese mixture evenly over the apples.
14. Repeat layers twice more, ending with the cream cheese mixture on top.
15. Cover the trifle with plastic wrap and refrigerate for at least 4 hours, preferably overnight.
16. Tip: Chilling overnight allows flavors to meld and creates the perfect scoopable texture.
17. The finished trifle reveals beautiful layers when served, with the tender apples melting into the creamy cheese and soft cake. That first spoonful delivers autumn in a bowl—warm spices against cool cream, sweet caramel balancing tart apples. Try serving it in individual mason jars for a portable treat that still shows off those lovely layers.
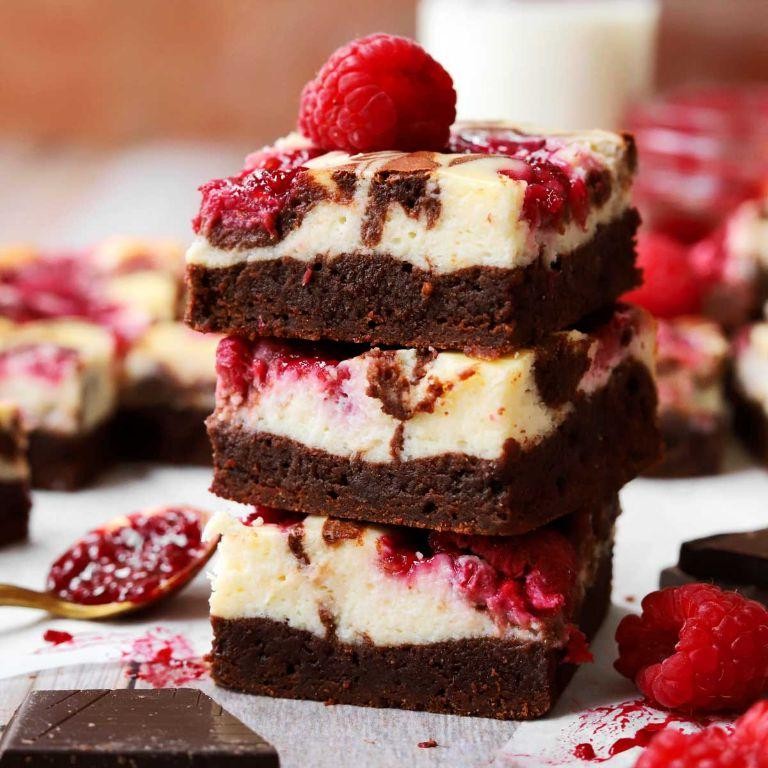
Raspberry Cream Cheese Marble Brownies
Lately, I’ve been craving something that bridges the gap between rich, fudgy chocolate and the bright, tart sweetness of berries, a quiet comfort to enjoy with a cup of tea as the afternoon light fades. Raspberry cream cheese marble brownies are just that—a delightful swirl of two worlds in one pan, simple to make yet feeling wonderfully special.
16
squares25
minutes38
minutesIngredients
For the Brownie Batter
– 1 cup unsalted butter
– 1 ½ cups granulated sugar
– ¾ cup unsweetened cocoa powder
– 3 large eggs
– 1 tsp vanilla extract
– 1 cup all-purpose flour
– ½ tsp salt
For the Cream Cheese Swirl
– 8 oz cream cheese, softened to room temperature
– ¼ cup granulated sugar
– 1 large egg
– ½ cup seedless raspberry jam
Instructions
1. Preheat your oven to 350°F and line an 8×8 inch baking pan with parchment paper, leaving an overhang on two sides for easy removal.
2. Melt 1 cup of unsalted butter in a medium saucepan over low heat, stirring occasionally until fully liquid.
3. Remove the saucepan from the heat and whisk in 1 ½ cups granulated sugar and ¾ cup unsweetened cocoa powder until the mixture is smooth and glossy.
4. Let the chocolate mixture cool for 5 minutes to avoid cooking the eggs, then whisk in 3 large eggs one at a time, followed by 1 tsp vanilla extract.
5. Gently fold in 1 cup all-purpose flour and ½ tsp salt with a spatula until just combined and no dry streaks remain; avoid overmixing for fudgy brownies.
6. In a separate bowl, beat 8 oz softened cream cheese with ¼ cup granulated sugar using an electric mixer on medium speed until creamy, about 2 minutes.
7. Beat 1 large egg into the cream cheese mixture until fully incorporated and smooth.
8. Spread about two-thirds of the brownie batter evenly into the prepared pan.
9. Dollop the cream cheese mixture and ½ cup seedless raspberry jam in alternating spoonfuls over the brownie layer.
10. Top with the remaining brownie batter in small dollops.
11. Drag a knife or skewer through the layers in a zigzag pattern to create a marbled effect, being careful not to overmix and muddy the swirls.
12. Bake for 35–40 minutes, or until the edges are set and a toothpick inserted into the brownie portion comes out with a few moist crumbs attached.
13. Let the brownies cool completely in the pan on a wire rack for at least 2 hours before slicing to ensure clean cuts.
14. Use the parchment overhang to lift the brownies out, then cut into squares with a sharp knife wiped clean between slices.
Very much like a hidden treasure, these brownies offer a fudgy, dark chocolate base that gives way to pockets of tangy cream cheese and bursts of raspberry jam. The marbled top looks almost too pretty to eat, but one bite reveals a perfect balance—serve them slightly warmed with a dollop of whipped cream or crumbled over vanilla ice cream for an extra indulgent treat.
Light and Fluffy Cream Cheese Cheesecake
Under the soft glow of the kitchen light, there’s something quietly magical about transforming simple ingredients into a dessert that feels both elegant and comforting—a cream cheese cheesecake that promises a delicate, airy texture with every slice.
1
cheesecake25
minutes70
minutesIngredients
For the crust:
– 1 1/2 cups graham cracker crumbs
– 1/4 cup granulated sugar
– 6 tbsp unsalted butter, melted
For the filling:
– 24 oz cream cheese, softened to room temperature
– 3/4 cup granulated sugar
– 3 large eggs, at room temperature
– 1 tsp vanilla extract
– 1/2 cup sour cream
Instructions
1. Preheat your oven to 325°F and lightly grease a 9-inch springform pan.
2. In a medium bowl, combine the graham cracker crumbs, 1/4 cup sugar, and melted butter until the mixture resembles wet sand.
3. Press the crust mixture firmly into the bottom of the prepared pan, using the back of a measuring cup to create an even layer.
4. Bake the crust for 10 minutes at 325°F, then remove it from the oven and let it cool completely on a wire rack.
5. In a large mixing bowl, beat the softened cream cheese with an electric mixer on medium speed until it is completely smooth and free of lumps, about 2 minutes.
6. Gradually add the 3/4 cup sugar to the cream cheese, continuing to beat until the mixture is creamy and well combined.
7. Add the eggs one at a time, beating just until each egg is incorporated before adding the next to avoid overmixing.
8. Mix in the vanilla extract and sour cream on low speed until the filling is uniform and silky.
9. Pour the filling over the cooled crust and smooth the top with a spatula.
10. Place the springform pan into a larger baking dish and create a water bath by pouring hot water into the outer dish until it reaches halfway up the sides of the springform pan.
11. Bake the cheesecake at 325°F for 50-60 minutes, or until the edges are set but the center still jiggles slightly when gently shaken.
12. Turn off the oven, crack the door open, and let the cheesecake cool inside for 1 hour to prevent cracking.
13. Remove the cheesecake from the oven and water bath, then cool completely on a wire rack before refrigerating for at least 4 hours or overnight.
14. Run a thin knife around the edge of the pan before releasing the springform collar to serve.
Let each forkful melt away to reveal its cloud-like texture, with the subtle tang of cream cheese balanced by vanilla’s warmth—try topping slices with fresh berry compote or a drizzle of salted caramel for an extra touch of indulgence.
Peach Cream Cheese Whip Parfait
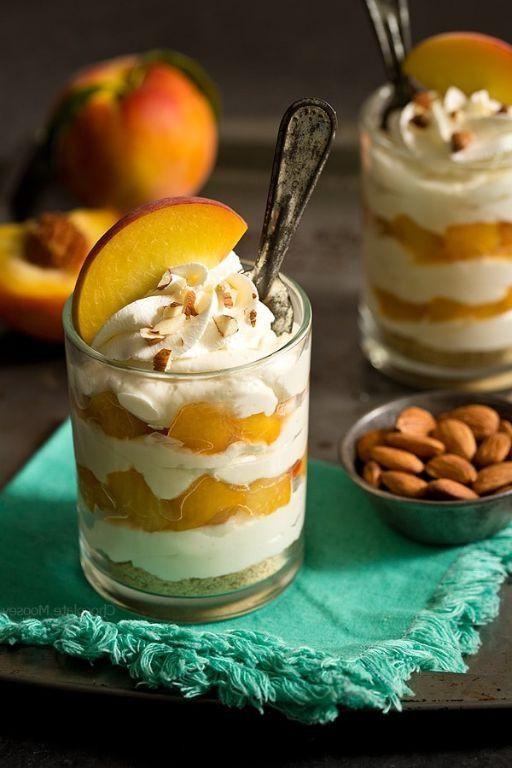
Nestled between the fading warmth of summer and the crisp arrival of autumn, this peach cream cheese whip parfait feels like a quiet, sweet farewell to long, sun-drenched afternoons. It’s a simple layering of soft textures and gentle flavors, a dessert that asks for little effort but offers a moment of pure, creamy comfort. Making it feels less like following a recipe and more like arranging a small, edible still life, piece by piece.
4
servings25
minutesIngredients
For the peach layer:
– 2 cups fresh peaches, peeled and diced into 1/2-inch cubes
– 1/4 cup granulated sugar
– 1 tbsp fresh lemon juice
For the cream cheese whip:
– 8 oz full-fat cream cheese, softened to room temperature for 30 minutes
– 1/2 cup heavy whipping cream, chilled
– 1/3 cup powdered sugar
– 1 tsp pure vanilla extract
Instructions
1. Combine the diced peaches, granulated sugar, and lemon juice in a medium bowl.
2. Let the peach mixture sit at room temperature for 20 minutes to macerate and release its natural juices.
3. Place the softened cream cheese in a large mixing bowl.
4. Use an electric hand mixer on medium speed to beat the cream cheese for 1 minute until smooth and free of lumps.
5. Add the powdered sugar and vanilla extract to the cream cheese.
6. Beat the mixture on medium speed for 2 minutes until fully combined and slightly fluffy.
7. Pour the chilled heavy whipping cream into a separate, clean mixing bowl.
8. Whip the heavy cream on high speed for 3–4 minutes until stiff peaks form that hold their shape when the beaters are lifted.
9. Gently fold the whipped cream into the cream cheese mixture using a spatula, using broad, sweeping motions to maintain airiness.
10. Spoon 2 tablespoons of the cream cheese whip into the bottom of each serving glass.
11. Top with 2 tablespoons of the macerated peaches and their accumulated juices.
12. Repeat the layers once more, ending with a final dollop of cream cheese whip.
13. Chill the assembled parfaits in the refrigerator for at least 1 hour before serving to allow the flavors to meld.
Soft clouds of cream cheese whip cradle the syrupy, tender peaches, creating a dessert that’s both lush and light. The subtle tang from the cream cheese cuts through the fruit’s sweetness, making each spoonful feel balanced and refreshing. For a lovely presentation, serve these in clear glasses garnished with a thin, fresh peach slice or a sprinkle of cinnamon just before bringing them to the table.
Oreo Cream Cheese Dessert Salad
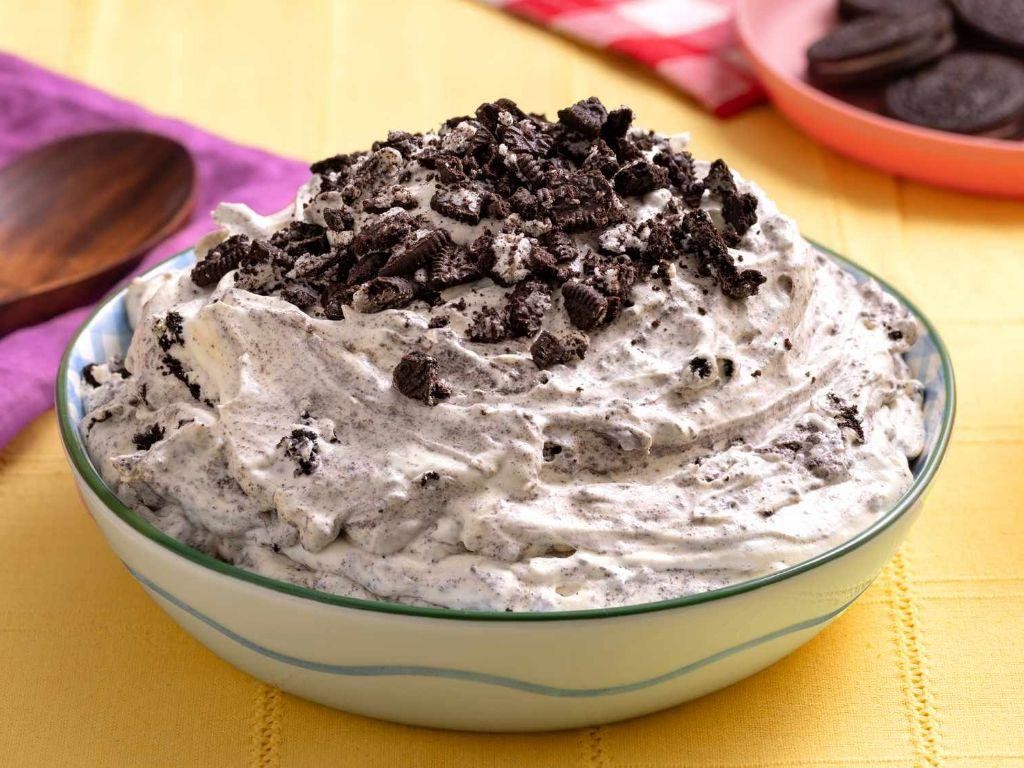
Lately, I’ve been craving something that bridges the gap between a proper dessert and a casual treat, something you can scoop into a bowl after a long day without any fuss. This Oreo cream cheese dessert salad is exactly that—a no-bake, creamy indulgence that comes together with minimal effort. It feels like a little secret, a recipe that’s both comforting and delightfully simple.
8
servings15
minutesIngredients
For the creamy base:
– 8 ounces cream cheese, softened to room temperature
– 1/2 cup granulated sugar
– 1 teaspoon vanilla extract
For folding in:
– 8 ounces frozen whipped topping, thawed
– 20 Oreo cookies, coarsely crushed
Instructions
1. Place the softened cream cheese in a large mixing bowl.
2. Add the granulated sugar and vanilla extract to the bowl.
3. Use an electric mixer on medium speed to beat the mixture for 2 minutes, or until completely smooth and no lumps remain.
4. Gently fold in the thawed whipped topping with a spatula until fully incorporated and no white streaks are visible.
5. Add the coarsely crushed Oreo cookies to the creamy mixture.
6. Fold the cookies in gently just until evenly distributed, being careful not to overmix to keep some cookie chunks intact.
7. Cover the bowl tightly with plastic wrap.
8. Refrigerate the dessert for at least 2 hours, or until thoroughly chilled and set.
You’ll love how the creamy, smooth base contrasts with the satisfying crunch of Oreo pieces, each bite a mix of rich cream cheese and chocolate cookie. Try serving it in individual cups with a drizzle of chocolate syrup, or layer it in a trifle dish with extra cookies for a stunning presentation.
Pumpkin Spice Cream Cheese Mousse
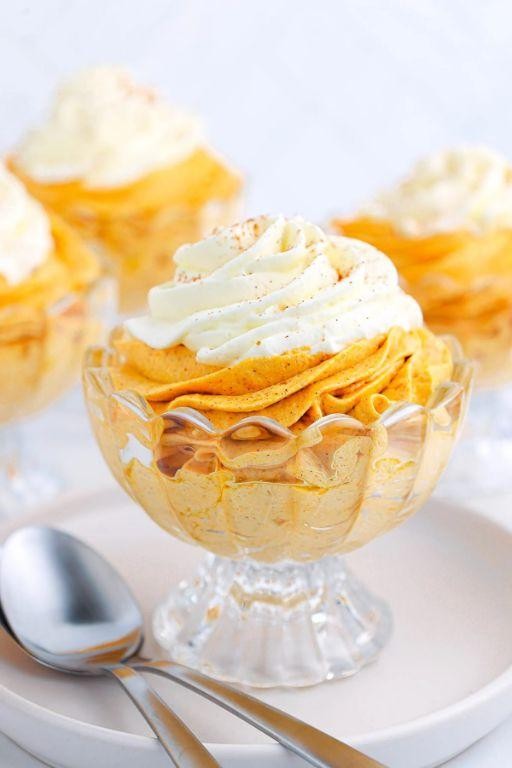
Gently, as October’s crisp air settles in, I find myself craving the kind of dessert that feels like a warm embrace, something light yet deeply comforting that captures the very soul of the season. This pumpkin spice cream cheese mousse is just that—a cloud-like treat that whispers of cinnamon, nutmeg, and cozy evenings. It’s simple to make, requiring little more than a bowl and a whisk, yet it delivers a richness that belies its effortless preparation.
4
servings15
minutesIngredients
For the mousse base:
– 8 oz cream cheese, softened to room temperature
– 1 cup heavy cream
– 1/2 cup powdered sugar
– 1 tsp vanilla extract
For the pumpkin spice flavor:
– 1/2 cup canned pumpkin puree
– 1 tsp ground cinnamon
– 1/4 tsp ground nutmeg
– 1/4 tsp ground ginger
Instructions
1. Place the cream cheese in a large mixing bowl and beat it with an electric mixer on medium speed for 2 minutes, or until it is completely smooth and free of lumps.
2. Add the powdered sugar and vanilla extract to the cream cheese and beat on low speed for 1 minute, just until the ingredients are fully incorporated.
3. Pour in the heavy cream and switch the mixer to high speed, whipping the mixture for 3-4 minutes until stiff peaks form that hold their shape when the beaters are lifted.
4. In a separate small bowl, combine the pumpkin puree, cinnamon, nutmeg, and ginger, stirring with a spatula for 1 minute until the spices are evenly distributed throughout the pumpkin.
5. Gently fold the spiced pumpkin mixture into the cream cheese base using a rubber spatula, making wide, sweeping motions to maintain the airy texture until no streaks remain.
6. Divide the mousse evenly among 4 serving glasses, tapping each glass lightly on the counter to settle the contents and remove any air pockets.
7. Cover the glasses with plastic wrap and refrigerate the mousse for at least 2 hours, or until it is thoroughly chilled and set.
Once chilled, the mousse transforms into a velvety, almost ethereal creation that melts on the tongue with a balance of tangy cream cheese and warm, spiced pumpkin. O, the joy of scooping into its fluffy layers—I love serving it in vintage coupe glasses with a sprinkle of extra cinnamon on top, or for a textural contrast, alongside crisp gingersnap cookies for dipping.
Mango Cream Cheese Cloud Pudding
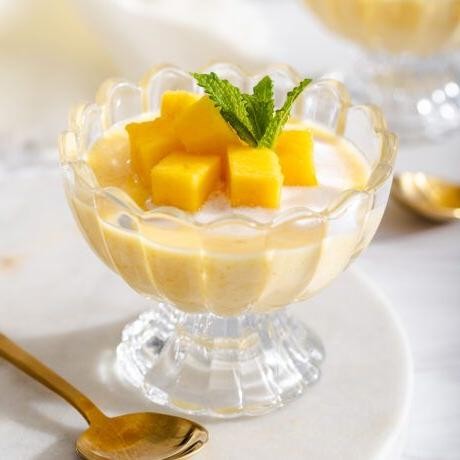
Beneath the gentle hum of the refrigerator, I found myself craving something soft and sweet today, something to cradle the last of summer’s warmth. This mango cream cheese cloud pudding came to mind, a dessert that feels like a quiet sigh of relief. It’s simple to make, yet each spoonful carries the bright, tropical whisper of mango and the comforting richness of cream cheese.
2
servings25
minutes10
minutesIngredients
For the mango layer:
– 2 ripe mangoes, peeled and cubed
– 1/4 cup granulated sugar
– 1 tbsp fresh lemon juice
For the cream cheese cloud:
– 8 oz cream cheese, softened to room temperature
– 1/2 cup heavy cream
– 1/4 cup powdered sugar
– 1 tsp vanilla extract
For assembly:
– 1/2 cup graham cracker crumbs
Instructions
1. Place the cubed mangoes, granulated sugar, and lemon juice in a blender.
2. Blend on high speed for 45 seconds, or until the mixture is completely smooth and no chunks remain.
3. Pour the mango puree into a small saucepan over medium heat.
4. Cook the puree for 8–10 minutes, stirring constantly with a wooden spoon, until it thickens slightly and coats the back of the spoon.
5. Transfer the cooked mango puree to a bowl and let it cool to room temperature for 20 minutes.
6. In a separate mixing bowl, combine the softened cream cheese, powdered sugar, and vanilla extract.
7. Use an electric mixer on medium speed to beat the cream cheese mixture for 2 minutes, or until it is smooth and free of lumps.
8. In another chilled bowl, pour the heavy cream.
9. Whip the heavy cream on high speed for 3–4 minutes, until stiff peaks form that hold their shape when the beaters are lifted.
10. Gently fold the whipped cream into the cream cheese mixture using a spatula, taking care not to deflate the airiness.
11. Spoon half of the cream cheese cloud mixture into the bottom of four serving glasses.
12. Divide the cooled mango puree evenly among the glasses, spreading it over the cream layer.
13. Top each glass with the remaining cream cheese cloud mixture.
14. Sprinkle 2 tablespoons of graham cracker crumbs over each pudding.
15. Chill the puddings in the refrigerator for at least 1 hour before serving to allow the flavors to meld.
Kindly, this pudding settles into a dreamy contrast—the silky cream cheese cloud giving way to the vibrant, fruity mango beneath. I love serving it in clear glasses to showcase the layers, perhaps with a mint leaf perched on top for a touch of green. It’s a dessert that feels both indulgent and light, like a sweet secret kept between spoonfuls.
Tropical Cream Cheese Ambrosia
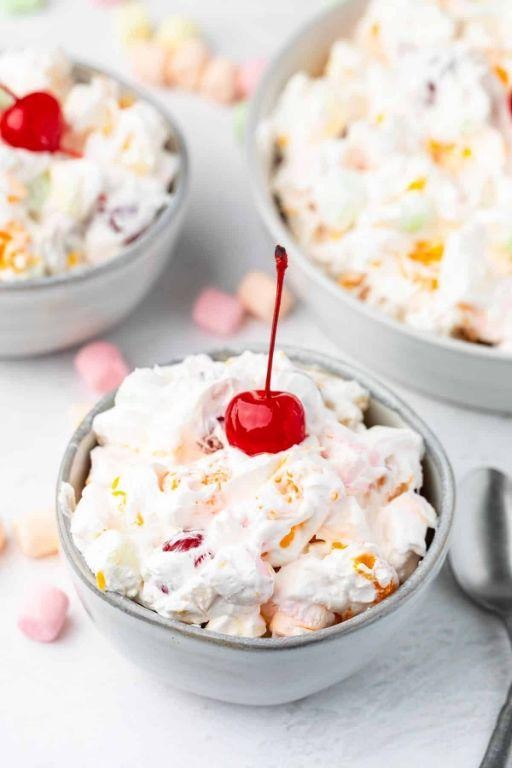
Perhaps it’s the way the afternoon light filters through my kitchen window that makes me crave something both comforting and tropical, a dessert that bridges seasons with its creamy texture and bright fruit notes. This ambrosia feels like a gentle escape, a sweet pause in an ordinary day where cream cheese provides richness against the playful sweetness of pineapple and coconut. There’s something quietly joyful about preparing it, measuring each ingredient with care as if crafting a small edible memory.
8
servings20
minutesIngredients
For the cream cheese base:
- 8 oz cream cheese, softened to room temperature
- 1/2 cup granulated sugar
- 1 cup heavy whipping cream
- 1 tsp vanilla extract
For the tropical fruit mixture:
- 1 (20 oz) can crushed pineapple, thoroughly drained
- 1 cup sweetened shredded coconut
- 1 (11 oz) can mandarin oranges, drained
- 1/2 cup maraschino cherries, halved
Instructions
- Place the cream cheese in a large mixing bowl and beat with an electric mixer on medium speed for 2 minutes until completely smooth and free of lumps.
- Add the granulated sugar to the cream cheese and continue beating for 1 minute until fully incorporated and the mixture appears fluffy.
- Pour in the heavy whipping cream and vanilla extract, then beat on medium-high speed for 3-4 minutes until stiff peaks form and the mixture holds its shape when the beaters are lifted.
- Gently fold in the thoroughly drained crushed pineapple using a spatula, making sure to incorporate it evenly without deflating the creamy mixture.
- Add the sweetened shredded coconut and fold gently until distributed throughout the mixture.
- Carefully fold in the drained mandarin oranges and halved maraschino cherries, preserving their shape while evenly distributing them.
- Transfer the completed ambrosia to a serving bowl, cover tightly with plastic wrap, and refrigerate for at least 4 hours to allow flavors to meld and texture to firm.
Kindly remember that proper draining of the canned fruits prevents a watery final texture, while room temperature cream cheese ensures a silky smooth base without graininess. The chilled ambrosia develops a delightful contrast between the fluffy cream cheese cloud and the bursts of tropical fruit, with the coconut adding subtle texture throughout. Serve it in chilled glasses layered with crumbled vanilla wafers for added crunch, or spoon it over pound cake slices for a more substantial dessert that celebrates both creaminess and brightness.
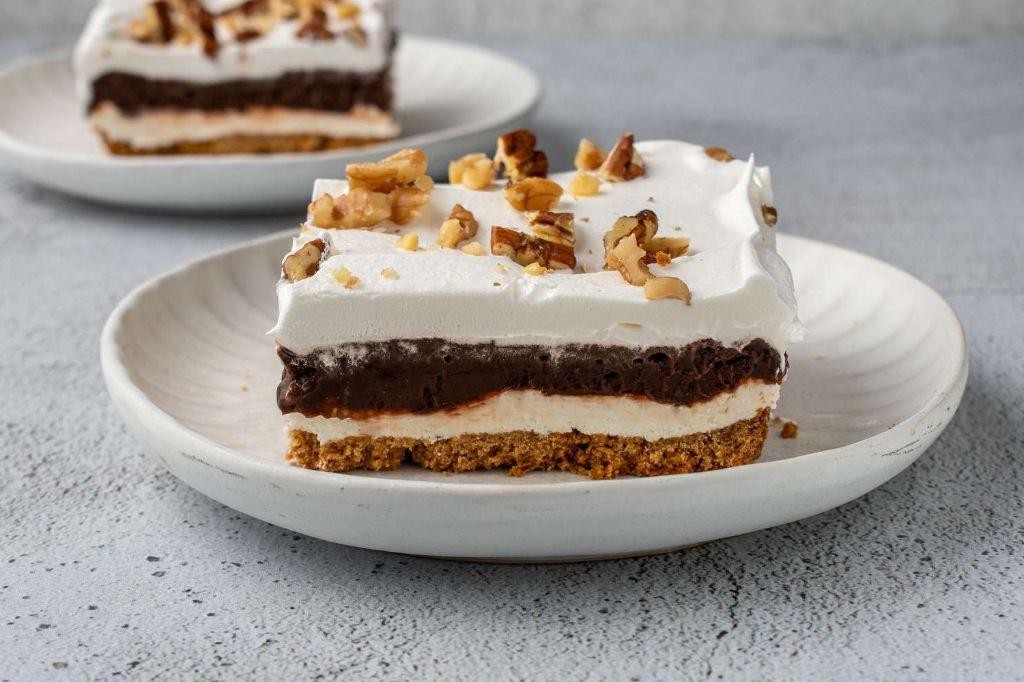
Mocha Cream Cheese Icebox Cake

Evenings like this call for something that requires no oven, just patience and the gentle magic of time. Every layer of this mocha cream cheese icebox cake settles into the next, creating a dessert that feels both indulgent and quietly comforting, like a secret shared over coffee.
12
servings25
minutesIngredients
For the coffee soak:
– 1 cup strong brewed coffee, cooled to room temperature
– 2 tbsp granulated sugar
For the mocha cream:
– 16 oz cream cheese, softened to room temperature
– 1 cup heavy whipping cream
– 3/4 cup powdered sugar
– 1/4 cup unsweetened cocoa powder
– 1 tsp vanilla extract
For assembly:
– 1 (14.4 oz) package chocolate graham crackers
– Chocolate shavings for garnish (optional)
Instructions
1. Combine 1 cup cooled brewed coffee and 2 tbsp granulated sugar in a shallow bowl, stirring until the sugar fully dissolves.
2. Beat 16 oz softened cream cheese in a large bowl with an electric mixer on medium speed for 2 minutes until completely smooth and free of lumps.
3. Sift 3/4 cup powdered sugar and 1/4 cup cocoa powder directly into the cream cheese to prevent clumps.
4. Add 1 tsp vanilla extract to the cream cheese mixture, then beat on low speed for 1 minute until fully incorporated.
5. Pour 1 cup heavy whipping cream into a separate chilled bowl and whip on high speed for 3-4 minutes until stiff peaks form.
6. Gently fold the whipped cream into the cream cheese mixture using a spatula, making sure to scrape the bowl’s bottom to fully combine.
7. Spread approximately 1/2 cup of the mocha cream evenly across the bottom of a 9×13-inch baking dish.
8. Dip 6 chocolate graham crackers one at a time into the coffee soak for 2 seconds per side, then arrange them in a single layer over the cream.
9. Spread 1 cup mocha cream over the graham crackers, ensuring it reaches all edges.
10. Repeat the layering process—dipping graham crackers, arranging, and spreading cream—until you have 4 complete layers, ending with a cream layer.
11. Cover the dish tightly with plastic wrap, pressing it directly onto the cream’s surface to prevent a skin from forming.
12. Refrigerate the cake for at least 8 hours or overnight until the graham crackers have fully softened.
13. Sprinkle chocolate shavings over the top just before serving if desired.
But the true magic happens in the waiting—those quiet hours transform crisp layers into something cake-soft, with the mocha cream becoming velvety against the subtle bitterness of coffee-soaked chocolate. Serve thick slices cold, perhaps with an extra dusting of cocoa, and notice how the flavors deepen the longer it sits, making it even better on the second day when the coffee notes have fully bloomed.
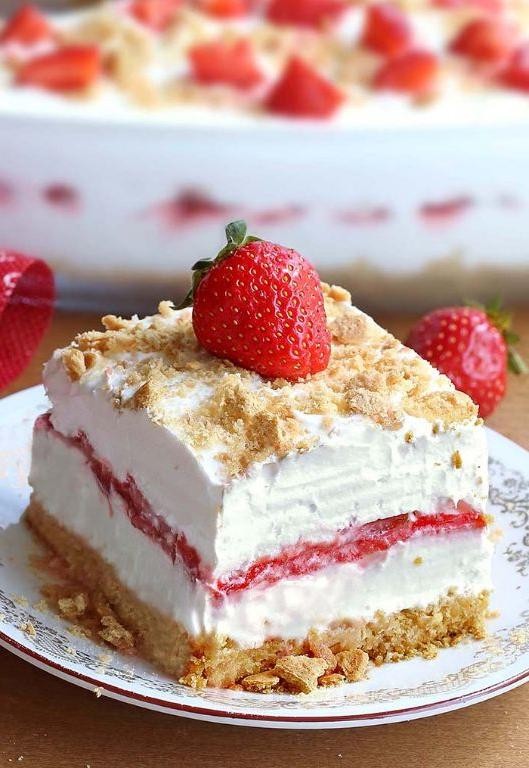
Strawberry Cream Cheese Dessert Lasagna
Holding this chilled creation in my hands, I’m reminded how some desserts whisper rather than shout—this strawberry cream cheese dessert lasagna unfolds like a quiet afternoon memory, layer by gentle layer. It’s the kind of sweet that feels both nostalgic and new, a no-bake treasure that settles softly on the tongue.
12
servings30
minutesIngredients
For the crust:
– 2 cups graham cracker crumbs
– 1/2 cup unsalted butter, melted
– 1/4 cup granulated sugar
For the cream cheese layer:
– 16 oz cream cheese, softened to room temperature
– 1 cup powdered sugar
– 1 tsp vanilla extract
– 1 cup heavy whipping cream
For the strawberry layer:
– 2 cups fresh strawberries, hulled and thinly sliced
– 1/4 cup granulated sugar
– 1 tbsp lemon juice
For assembly:
– 8 oz whipped topping, thawed
– Additional sliced strawberries for garnish
Instructions
1. Combine 2 cups graham cracker crumbs, 1/2 cup melted butter, and 1/4 cup granulated sugar in a medium bowl until the mixture resembles wet sand.
2. Press the crumb mixture firmly into the bottom of a 9×13-inch baking dish using the bottom of a measuring cup to create an even layer.
3. Chill the crust in the refrigerator for 15 minutes while preparing the filling—this helps prevent crumbling when adding subsequent layers.
4. In a large mixing bowl, beat 16 oz softened cream cheese with an electric mixer on medium speed for 2 minutes until completely smooth and free of lumps.
5. Gradually add 1 cup powdered sugar to the cream cheese while mixing on low speed, then increase to medium and beat for 1 minute until fully incorporated.
6. Pour in 1 tsp vanilla extract and mix for 30 seconds until the fragrance blooms throughout the mixture.
7. In a separate chilled bowl, whip 1 cup heavy whipping cream on high speed for 3-4 minutes until stiff peaks form that hold their shape when the beaters are lifted.
8. Gently fold the whipped cream into the cream cheese mixture using a spatula, making broad sweeping motions to maintain airiness—this creates the cloud-like texture characteristic of the layer.
9. Spread the cream cheese mixture evenly over the chilled crust, reaching all corners of the dish.
10. In a medium bowl, toss 2 cups sliced strawberries with 1/4 cup granulated sugar and 1 tbsp lemon juice, then let macerate for 10 minutes until the berries release their juices and glisten.
11. Arrange the sweetened strawberry slices in a single layer over the cream cheese filling, reserving any accumulated juice.
12. Carefully spread 8 oz thawed whipped topping over the strawberry layer, using the back of a spoon to create gentle swirls on the surface.
13. Garnish with additional sliced strawberries arranged in a decorative pattern.
14. Cover the dessert lasagna with plastic wrap and refrigerate for at least 4 hours, though overnight chilling allows the flavors to marry and the layers to set perfectly.
Unwrapping this dessert reveals delicate strata that hold their shape yet yield effortlessly to the spoon. The crisp graham cracker base gives way to pillowy cream cheese, then bursts of bright strawberry, all wrapped in cloud-like whipped topping—serve it chilled in clear glasses to showcase the beautiful layers, or slice it neatly for a stunning presentation that belies its simple preparation.
Conclusion
Kitchens across North America will love these 24 irresistible cream cheese Cool Whip delights! From no-bake cheesecakes to fluffy fruit dips, these recipes offer endless sweet possibilities perfect for any occasion. We’d love to hear which recipes become your favorites—leave a comment below and don’t forget to share this delicious roundup on Pinterest for fellow dessert lovers to discover!