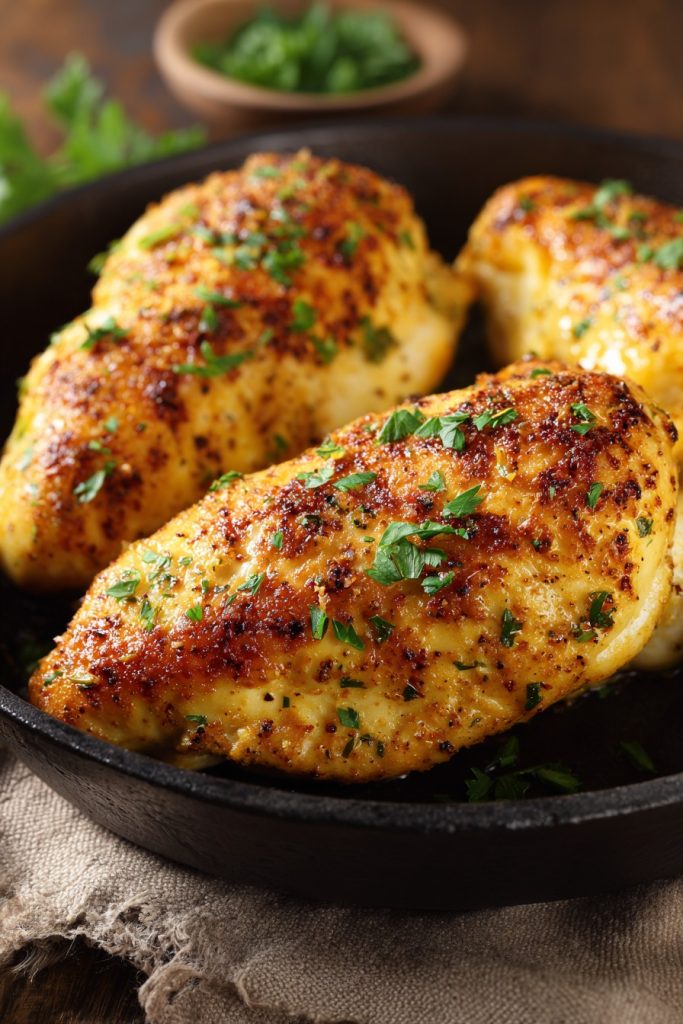
Every time I walk into Cracker Barrel, that buttery baked chicken calls my name like a siren song of comfort food. Even if you’re miles from the nearest location, this recipe brings that iconic Southern flavor right to your kitchen, complete with that golden crust and juicy interior that makes this dish legendary.
Why This Recipe Works
- The combination of buttermilk and seasoned flour creates an incredibly tender chicken with a crispy, flavorful crust that stays crunchy even after baking
- Baking at 375°F allows the chicken to cook through evenly without drying out, while the butter basting keeps every bite moist and rich
- Using a combination of smoked paprika, garlic powder, and onion powder replicates that signature Cracker Barrel flavor profile that keeps people coming back for more
- The simple ingredient list means you can whip this up any night of the week without special shopping trips
- This method produces consistently perfect results whether you’re cooking for two or feeding a hungry family
Ingredients
- 4 bone-in, skin-on chicken thighs (about 2 pounds total)
- 4 bone-in, skin-on chicken drumsticks (about 1.5 pounds total)
- 2 cups buttermilk
- 2 cups all-purpose flour
- 2 tablespoons smoked paprika
- 1 tablespoon garlic powder
- 1 tablespoon onion powder
- 2 teaspoons salt
- 1 teaspoon black pepper
- 1/2 teaspoon cayenne pepper (optional)
- 1 cup unsalted butter, melted
- Fresh parsley, chopped (for garnish)
Equipment Needed
- Large mixing bowls (2)
- Whisk
- Rimmed baking sheet
- Wire rack that fits inside baking sheet
- Tongs
- Pastry brush
- Measuring cups and spoons
- Paper towels
Instructions

Prepare the Chicken and Marinade
Pat the chicken pieces completely dry with paper towels – this is crucial for getting that crispy skin we all love. In a large bowl, pour the buttermilk and add the chicken pieces, making sure each piece is fully submerged. Cover the bowl with plastic wrap and refrigerate for at least 4 hours, though overnight is even better if you have the time. This buttermilk bath works magic by tenderizing the chicken and adding that tangy flavor that cuts through the richness. The acids in the buttermilk break down proteins, resulting in incredibly juicy meat that stays moist even through the baking process. Trust me, don’t skip this step – it’s what separates good fried chicken from great fried chicken.
Create the Seasoned Flour Coating
In another large bowl, whisk together the flour, smoked paprika, garlic powder, onion powder, salt, black pepper, and cayenne pepper if using. The key here is to whisk until all the spices are evenly distributed – no one wants a bite that’s all paprika and no garlic! I like to taste a tiny pinch of the flour mixture to check the seasoning balance. The smoked paprika gives that signature smoky depth, while the garlic and onion powders provide the savory backbone. This flour mixture should look like a beautiful rusty orange color when properly mixed. Make sure there are no clumps of spices hiding in the flour, as they can create bitter spots on your finished chicken.
Coat the Chicken Pieces
Remove the chicken from the buttermilk, letting excess drip off but don’t shake it too vigorously – you want a thin layer to remain for the flour to adhere to. Working with one piece at a time, place the chicken in the flour mixture and press firmly to ensure complete coverage. Lift the piece, shake off excess flour, then dip it back into the buttermilk for a second coating. Return to the flour mixture and press again, creating that double-dredge that gives us that extra crispy, craggy crust we’re after. The second dip creates little pockets and layers that will crisp up beautifully in the oven. Place each coated piece on a wire rack set over a baking sheet while you finish the remaining chicken.
Arrange and Begin Baking
Preheat your oven to 375°F and position a rack in the center. Arrange the chicken pieces on the wire rack, making sure they aren’t touching each other – this allows hot air to circulate evenly around each piece. Pour the melted butter into a small bowl and using a pastry brush, generously brush each piece of chicken with butter, getting into all the nooks and crannies of the flour coating. The butter will help the crust brown beautifully and add that rich flavor. Place the baking sheet in the preheated oven and bake for 30 minutes. After 30 minutes, the chicken should be starting to turn golden brown but still needs more time to cook through and crisp up.
Butter Baste and Finish Baking
Remove the baking sheet from the oven and carefully brush each piece of chicken with more melted butter – this second basting ensures maximum flavor and helps achieve that deep golden color we want. Use tongs to turn each piece over, then brush the other side with butter as well. Return the chicken to the oven and continue baking for another 25-35 minutes. The chicken is done when the internal temperature reaches 165°F on an instant-read thermometer inserted into the thickest part without touching bone, and the crust is deep golden brown and crispy. If some pieces are browning faster than others, you can rotate the baking sheet halfway through this final baking time.
Rest and Serve
Once the chicken reaches 165°F, remove it from the oven and let it rest on the wire rack for at least 10 minutes before serving. This resting period allows the juices to redistribute throughout the meat – if you cut into it immediately, all those precious juices will run out and leave you with dry chicken. While it rests, the crust will continue to crisp up slightly as it cools. Garnish with freshly chopped parsley for a pop of color and freshness that contrasts beautifully with the rich chicken. Serve immediately while still warm – this chicken is best eaten fresh from the oven when the crust is at its crispiest.
Tips and Tricks
For the absolute crispiest skin, let the coated chicken sit on the wire rack at room temperature for 30 minutes before baking – this allows the flour coating to hydrate fully and creates a sturdier crust that won’t fall off during baking. If you’re really serious about crunch, you can even refrigerate the coated chicken uncovered for an hour before baking, which helps dry out the surface even more. When measuring flour, always spoon it into the measuring cup and level it off – packing flour down can lead to using too much and creating a thick, doughy coating rather than a light, crispy one. If you don’t have buttermilk, you can make a quick substitute by adding 1 tablespoon of lemon juice or white vinegar to 1 cup of milk and letting it sit for 5 minutes until it curdles slightly. For extra flavor, try adding a tablespoon of hot sauce to the buttermilk marinade – it won’t make the chicken spicy but will add depth and complexity to the flavor profile. When brushing with butter, make sure your pastry brush is silicone rather than natural bristles, which can shed into your food. If you want to make this ahead, you can coat the chicken and refrigerate it on the wire rack for up to 4 hours before baking – just add an extra 5 minutes to the baking time since it’s going into the oven cold. For easy cleanup, line your baking sheet with aluminum foil before placing the wire rack on top – the butter drippings can be messy but this makes cleanup a breeze. If your chicken is browning too quickly but isn’t cooked through, tent it loosely with aluminum foil for the remaining baking time. For maximum crispiness, make sure your oven is fully preheated before putting the chicken in – an oven thermometer can help verify your oven’s actual temperature since many home ovens run hot or cold.
Recipe Variations
- For a gluten-free version, replace the all-purpose flour with a 1:1 gluten-free flour blend and add 1 teaspoon of xanthan gum to help the coating adhere properly. The baking time may need to be reduced by 5-10 minutes as gluten-free coatings can brown faster.
- Create an Italian-inspired version by replacing the paprika with 2 tablespoons of dried Italian seasoning and adding 1/4 cup of grated Parmesan cheese to the flour mixture. Serve with marinara sauce for dipping.
- For a spicy kick, increase the cayenne pepper to 2 teaspoons and add 1 tablespoon of chili powder to the flour mixture. You can also add 2 teaspoons of hot sauce to the buttermilk marinade.
- Make it lemon-herb by adding the zest of 2 lemons to the flour mixture and stirring in 2 tablespoons of chopped fresh herbs like thyme, rosemary, and oregano. Brush with lemon butter instead of plain butter.
- For a healthier version, use skinless chicken pieces and replace half of the butter with olive oil. The crust won’t be quite as crispy but will still be delicious and significantly lower in saturated fat.
Frequently Asked Questions
Can I use boneless chicken for this recipe?
Absolutely! Boneless, skinless chicken breasts or thighs work well, but you’ll need to adjust the cooking time. For boneless pieces, reduce the initial baking time to 20 minutes and the second bake to 15-20 minutes, checking for an internal temperature of 165°F. The crust may not get quite as crispy without the skin, but brushing generously with butter will help. I recommend cutting larger breasts in half horizontally to create thinner cutlets that cook more evenly and stay juicy.
Why did my coating fall off during baking?
This usually happens for one of three reasons: not patting the chicken dry before marinating, not pressing the flour coating firmly enough onto the chicken, or moving the chicken too much during baking. Make sure to really press the flour into the chicken during both coatings to create a good bond. Also, avoid opening the oven door frequently during baking as temperature fluctuations can cause the coating to contract and separate from the chicken.
Can I make this recipe without buttermilk?
Yes, you can substitute regular milk mixed with 1 tablespoon of lemon juice or vinegar per cup of milk, but buttermilk really is worth seeking out for this recipe. The thicker consistency of buttermilk helps the flour adhere better, and the tangy flavor is part of what makes this taste like the Cracker Barrel original. If you’re in a pinch, Greek yogurt thinned with a little milk can also work as a substitute.
How do I store and reheat leftovers?
Store leftover chicken in an airtight container in the refrigerator for up to 3 days. To reheat, place on a wire rack over a baking sheet and bake at 375°F for 10-15 minutes until heated through and crispy. Avoid microwaving as it will make the coating soggy. The chicken can also be frozen after baking – cool completely, wrap tightly, and freeze for up to 2 months. Reheat from frozen in a 375°F oven for 20-25 minutes.
Can I use an air fryer for this recipe?
You can adapt this for an air fryer! Prepare the chicken as directed, then air fry at 375°F for 20-25 minutes, flipping halfway through and brushing with butter at both flipping stages. You may need to work in batches depending on your air fryer size. The results will be slightly different – crispier but possibly drier – so keep a close eye on it and check the internal temperature frequently.
Summary
This Cracker Barrel copycat recipe delivers incredibly juicy, flavorful chicken with a crispy, buttery crust that will have your family thinking you brought home takeout. Perfect for Sunday dinner or any night you need some comfort food magic.
Cracker Barrel Butter Baked Chicken
5
servings20
minutes55
minutesIngredients
Instructions
- 1 Pat chicken dry and marinate in buttermilk for at least 4 hours
- 2 Whisk together flour and spices in separate bowl
- 3 Coat chicken in flour mixture, dip back in buttermilk, then coat again in flour
- 4 Arrange on wire rack, brush with butter, bake at 375°F for 30 minutes
- 5 Brush with more butter, flip chicken, bake another 25-35 minutes until 165°F
- 6 Rest 10 minutes before serving garnished with parsley