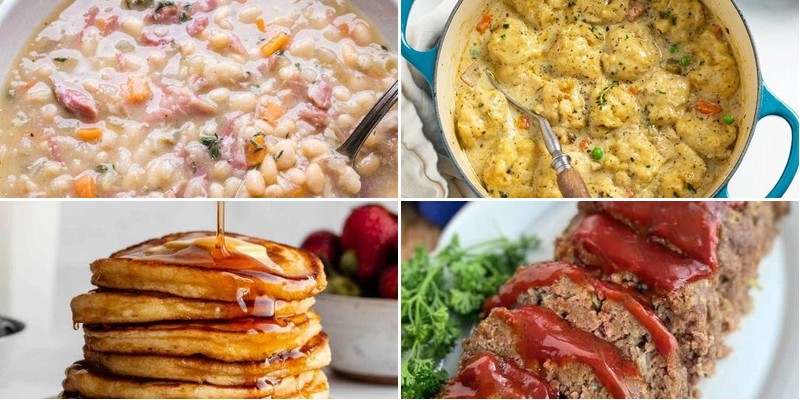
Sometimes nothing beats the comforting embrace of homestyle cooking. We’ve gathered 21 delectable country recipes that bring warmth and flavor straight to your kitchen—think hearty casseroles, flaky biscuits, and slow-simmered stews. Perfect for cozy family dinners or weekend feasts, these dishes celebrate simple, satisfying ingredients. Ready to fill your home with delicious aromas? Dive into our roundup and discover your next favorite meal!
Southern Fried Chicken with Buttermilk Gravy

Beneath the golden October light, I find myself drawn back to this kitchen ritual, the one that fills the house with a warmth that feels like a gentle, familiar embrace. It’s a quiet process of transformation, turning simple pieces of chicken into something deeply comforting and soul-satisfying.
8
portions270
minutes90
minutesIngredients
For the Chicken Brine & Coating
– 4 cups buttermilk
– 1 tbsp hot sauce
– 1 whole chicken, cut into 8 pieces (about 3-4 lbs)
– 2 cups all-purpose flour
– 1 tbsp paprika
– 2 tsp garlic powder
– 2 tsp onion powder
– 1 tsp cayenne pepper
– 1 tbsp salt
– 1 tsp black pepper
For Frying & Gravy
– 4 cups vegetable oil
– 3 tbsp pan drippings
– 3 tbsp all-purpose flour
– 2 cups whole milk
– 1/2 tsp salt
– 1/4 tsp black pepper
Instructions
1. Combine 4 cups buttermilk and 1 tbsp hot sauce in a large bowl.
2. Submerge 8 pieces of chicken in the buttermilk mixture, ensuring each piece is fully coated.
3. Cover the bowl and refrigerate for at least 4 hours, or ideally overnight, for maximum tenderness and flavor penetration.
4. In a separate large bowl, whisk together 2 cups all-purpose flour, 1 tbsp paprika, 2 tsp garlic powder, 2 tsp onion powder, 1 tsp cayenne pepper, 1 tbsp salt, and 1 tsp black pepper.
5. Remove one piece of chicken from the buttermilk, letting excess liquid drip off.
6. Dredge the chicken piece thoroughly in the seasoned flour mixture, pressing gently to ensure an even, clumpy coating that will create a craggy crust.
7. Place the coated chicken on a wire rack and repeat with remaining pieces.
8. Let the breaded chicken rest on the rack for 15 minutes to help the coating adhere during frying.
9. Pour 4 cups vegetable oil into a large, heavy-bottomed Dutch oven, filling it no more than halfway.
10. Heat the oil over medium-high heat until it reaches 350°F on a deep-fry thermometer.
11. Carefully lower 3-4 chicken pieces into the hot oil using tongs, being sure not to overcrowd the pot.
12. Fry for 12-15 minutes, turning pieces occasionally, until the crust is deep golden brown and an instant-read thermometer inserted into the thickest part reads 165°F.
13. Transfer fried chicken to a clean wire rack set over a baking sheet to drain, which helps keep the bottom crust crisp.
14. Repeat frying process with remaining chicken pieces, allowing oil to return to 350°F between batches.
15. Carefully pour off all but 3 tbsp of the hot frying oil from the Dutch oven, leaving the browned bits at the bottom.
16. Whisk 3 tbsp all-purpose flour into the 3 tbsp reserved pan drippings over medium heat, cooking for 2 minutes until the mixture turns light brown and smells nutty.
17. Gradually whisk in 2 cups whole milk, stirring constantly to prevent lumps from forming.
18. Continue cooking and whisking for 5-7 minutes until the gravy thickens enough to coat the back of a spoon.
19. Stir in 1/2 tsp salt and 1/4 tsp black pepper, then remove from heat.
Nothing compares to that first bite through the shatteringly crisp crust into the impossibly juicy meat beneath, the peppery gravy adding a creamy, tangy counterpoint. I love serving it over thick-sliced white bread to soak up every last drop, or with a simple side of collard greens for a truly comforting meal that feels like home.
Hearty Beef Stew with Root Vegetables
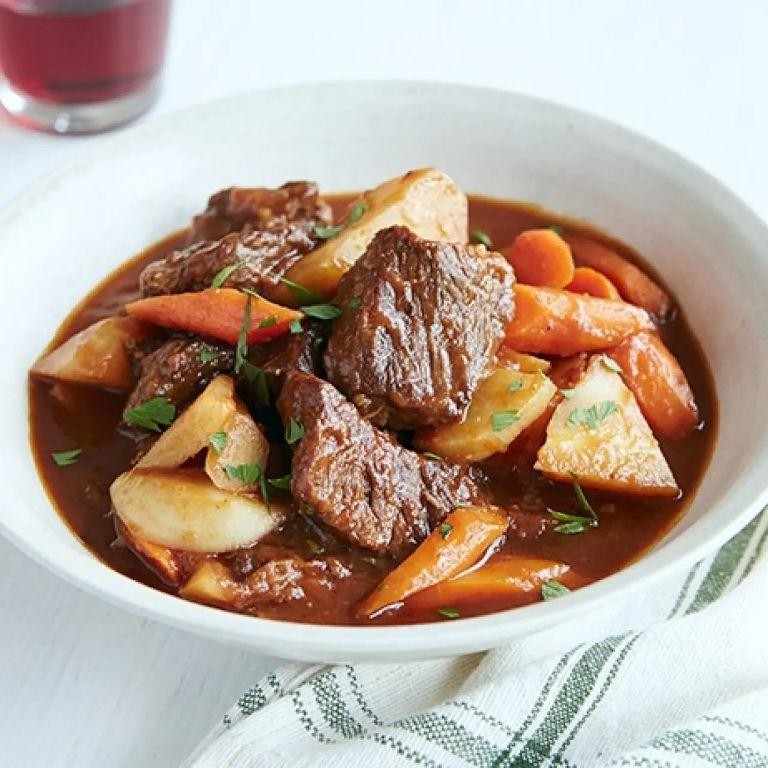
Perhaps there’s something deeply comforting about watching steam rise from a heavy pot as autumn settles in, the rich aroma of simmering beef and earthy vegetables filling the kitchen with warmth that seems to slow time itself. Preparing this stew feels less like cooking and more like tending to something ancient and nourishing, each ingredient adding its own quiet story to the pot. It’s the kind of meal that asks for patience and rewards it with depth and tenderness.
6
servings25
minutes165
minutesIngredients
- For Browning the Beef:
- 2 pounds beef chuck, cut into 1-inch cubes
- 2 tablespoons olive oil
- 1 teaspoon salt
- 1/2 teaspoon black pepper
- For the Aromatics and Liquid:
- 1 large yellow onion, chopped
- 3 cloves garlic, minced
- 1/4 cup all-purpose flour
- 4 cups beef broth
- 1 cup red wine
- 2 tablespoons tomato paste
- For the Root Vegetables and Herbs:
- 3 large carrots, peeled and cut into 1-inch pieces
- 2 parsnips, peeled and cut into 1-inch pieces
- 2 large potatoes, peeled and cut into 1-inch cubes
- 2 sprigs fresh thyme
- 1 bay leaf
Instructions
- Pat the beef chuck cubes completely dry with paper towels to ensure a proper sear.
- Heat 2 tablespoons olive oil in a large Dutch oven over medium-high heat until it shimmers.
- Season the beef with 1 teaspoon salt and 1/2 teaspoon black pepper.
- Add half the beef to the pot in a single layer, leaving space between pieces to avoid steaming.
- Sear for 4-5 minutes without moving until a deep brown crust forms on the bottom.
- Flip each piece and sear for another 4 minutes until browned on all sides.
- Transfer the seared beef to a plate and repeat with the remaining beef.
- Reduce heat to medium and add the chopped onion to the pot, scraping up any browned bits with a wooden spoon.
- Cook the onion for 6-7 minutes until softened and translucent.
- Add the minced garlic and cook for 1 minute until fragrant.
- Sprinkle 1/4 cup all-purpose flour over the onions and garlic, stirring constantly for 2 minutes to cook out the raw flour taste.
- Whisk in 4 cups beef broth gradually until no flour lumps remain.
- Stir in 1 cup red wine and 2 tablespoons tomato paste until fully incorporated.
- Return all the seared beef and any accumulated juices to the pot.
- Add 2 sprigs fresh thyme and 1 bay leaf to the liquid.
- Bring the stew to a gentle simmer, then reduce heat to low.
- Cover the pot and simmer for 1 hour and 30 minutes, stirring occasionally to prevent sticking.
- Add the carrot pieces, parsnip pieces, and potato cubes to the pot.
- Continue simmering covered for another 45-60 minutes until the vegetables are fork-tender and the beef shreds easily with a fork.
- Remove and discard the thyme sprigs and bay leaf before serving.
The beef becomes so tender it nearly melts apart, while the root vegetables maintain just enough structure to provide satisfying texture against the rich, wine-kissed broth. I love serving this in shallow bowls with a thick slice of crusty bread for dipping, or sometimes spooning it over creamy polenta to make the meal feel even more substantial as the evenings grow colder.
Classic Homemade Cornbread
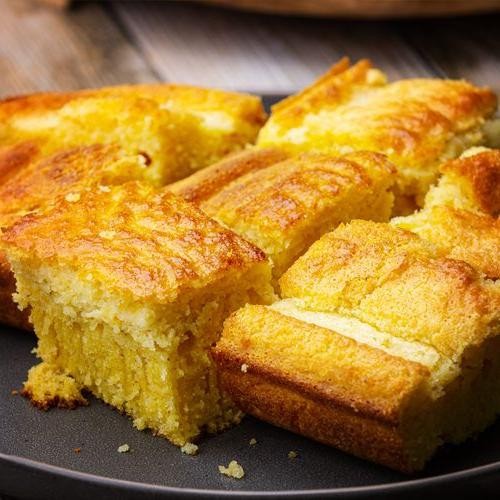
As autumn leaves begin their slow descent outside my window, I find myself drawn to the simple comfort of cornbread, that humble golden square that holds so much memory in its crumb. There’s something deeply reassuring about the ritual of measuring cornmeal, the earthy scent that fills the kitchen, the way this bread seems to understand the need for quiet nourishment on cooling evenings.
8
servings15
minutes25
minutesIngredients
For the dry mixture:
– 1 cup yellow cornmeal
– 1 cup all-purpose flour
– 1/4 cup granulated sugar
– 1 tablespoon baking powder
– 1 teaspoon salt
For the wet mixture:
– 1 cup whole milk
– 1/4 cup unsalted butter, melted
– 1 large egg
Instructions
1. Preheat your oven to 400°F and place a 9-inch cast iron skillet inside to heat for exactly 10 minutes.
2. Whisk together 1 cup yellow cornmeal, 1 cup all-purpose flour, 1/4 cup granulated sugar, 1 tablespoon baking powder, and 1 teaspoon salt in a large bowl until no streaks remain.
3. In a separate bowl, beat 1 large egg until pale yellow, about 30 seconds of vigorous whisking.
4. Pour 1 cup whole milk and 1/4 cup melted unsalted butter into the beaten egg, stirring until fully incorporated.
5. Tip: Pour the wet ingredients into the dry mixture all at once, folding gently with a spatula until just combined—overmixing creates tough cornbread.
6. Carefully remove the hot skillet from the oven using oven mitts and immediately pour in the batter—it should sizzle upon contact.
7. Tip: The hot skillet creates a beautifully crisp crust, so don’t skip the preheating step.
8. Bake at 400°F for 20-25 minutes until the edges pull away from the pan and a toothpick inserted in the center comes out completely clean.
9. Tip: Let the cornbread rest in the skillet for 5 minutes before slicing—this allows the crumb to set properly.
10. Transfer to a wire rack to cool slightly, about 10 minutes, before serving.
But what I love most is how the crust gives way to that tender, slightly crumbly interior, the subtle sweetness playing against the corn’s earthy notes. Sometimes I’ll drizzle honey over warm slices, or crumble it into a bowl of chili, watching how it soaks up the flavors while still maintaining its comforting identity.
Savory Chicken and Dumplings

Venturing into the kitchen on this quiet evening feels like returning to something deeply familiar, the way the steam rises from the pot promising comfort that settles not just in the stomach but in the soul, a gentle reminder of simpler times when a meal could mend a weary day.
3
servings15
minutes46
minutesIngredients
For the chicken base:
– 1 lb boneless, skinless chicken breasts, cut into 1-inch pieces
– 2 tbsp olive oil
– 1 medium yellow onion, diced
– 2 carrots, peeled and sliced into 1/4-inch rounds
– 2 celery stalks, sliced
– 4 cups chicken broth
– 1 tsp dried thyme
– 1/2 tsp black pepper
– 1 tsp salt
For the dumplings:
– 1 cup all-purpose flour
– 2 tsp baking powder
– 1/2 tsp salt
– 1/2 cup whole milk
– 2 tbsp unsalted butter, melted
Instructions
1. Heat 2 tbsp olive oil in a large Dutch oven over medium-high heat until shimmering.
2. Add 1 lb chicken pieces and cook for 6-8 minutes, turning occasionally, until golden brown on all sides.
3. Transfer the chicken to a clean plate using a slotted spoon, leaving the drippings in the pot.
4. Add the diced onion, sliced carrots, and sliced celery to the pot and cook for 5-7 minutes, stirring occasionally, until the onions become translucent.
5. Pour in 4 cups chicken broth, scraping the bottom of the pot to release any browned bits for extra flavor.
6. Return the cooked chicken to the pot and add 1 tsp dried thyme, 1/2 tsp black pepper, and 1 tsp salt.
7. Bring the mixture to a gentle boil, then reduce heat to maintain a steady simmer at 200°F for 15 minutes.
8. While the soup simmers, whisk together 1 cup flour, 2 tsp baking powder, and 1/2 tsp salt in a medium bowl.
9. Stir in 1/2 cup whole milk and 2 tbsp melted butter until just combined, being careful not to overmix the dumpling batter.
10. Drop tablespoon-sized portions of the dumpling batter directly into the simmering soup, spacing them evenly across the surface.
11. Cover the pot tightly and simmer for 15 minutes without lifting the lid, which allows the dumplings to steam properly and become light and fluffy.
12. Remove from heat and let stand covered for 5 minutes before serving to allow the dumplings to set.
13. Ladle the chicken and dumplings into bowls, ensuring each serving gets both broth and dumplings.
Fluffy dumplings float like clouds in the rich broth, their soft texture contrasting with the tender chicken and crisp-tender vegetables. For a cozy presentation, serve in wide, shallow bowls that let the steam rise gently, perhaps with a sprinkle of fresh parsley if you have some on hand, making an ordinary Tuesday feel like a special occasion.
Rustic Country Apple Pie
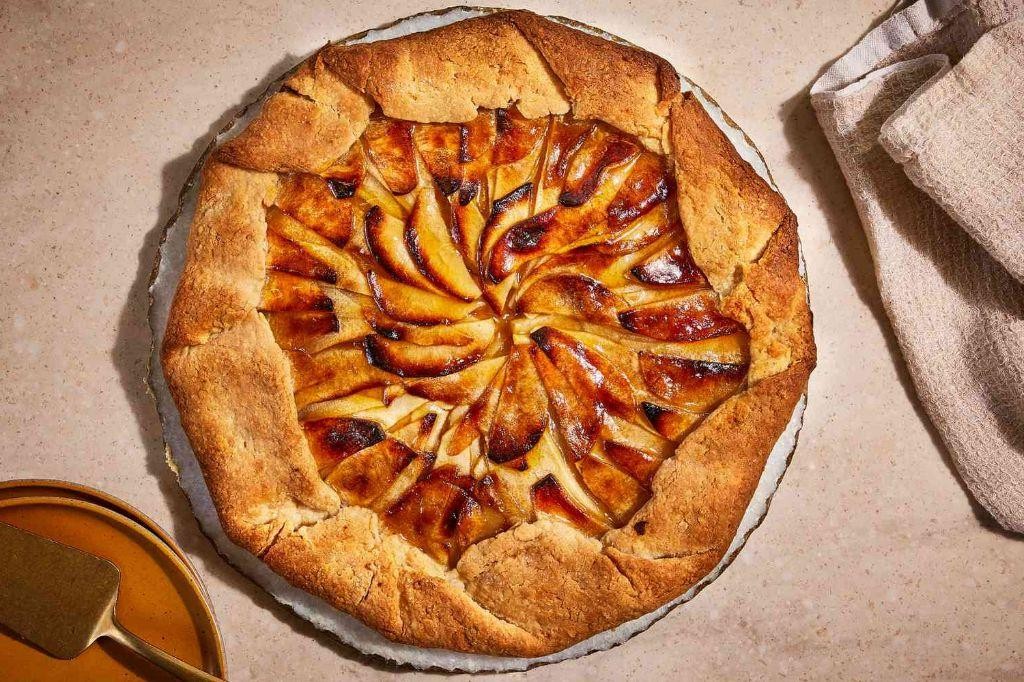
Falling leaves and crisp autumn air always bring me back to this simple comfort, the kind that fills the kitchen with the warm, spiced scent of memories and soft, buttery pastry. It’s a humble pie, really, one that asks for little more than patience and the willingness to embrace a little rustic imperfection. This is the recipe I turn to when I need a quiet afternoon and a slice of honest, homemade goodness.
8
servings90
minutes60
minutesIngredients
For the Crust:
- 2 ½ cups all-purpose flour
- 1 cup unsalted butter, cold and cubed
- 1 tsp salt
- 6-8 tbsp ice water
For the Filling:
- 6 cups Granny Smith apples, peeled, cored, and sliced ¼-inch thick
- ¾ cup granulated sugar
- ¼ cup all-purpose flour
- 1 tsp ground cinnamon
- ¼ tsp ground nutmeg
- 1 tbsp lemon juice
- 2 tbsp unsalted butter, cut into small pieces
For Assembly:
- 1 large egg, beaten
- 1 tbsp coarse sugar
Instructions
- Combine 2 ½ cups all-purpose flour and 1 tsp salt in a large bowl.
- Cut 1 cup cold, cubed unsalted butter into the flour mixture using a pastry cutter until the mixture resembles coarse crumbs with some pea-sized butter pieces remaining. Tip: Keeping the butter cold is crucial for a flaky crust, so work quickly and handle the dough as little as possible.
- Sprinkle 6-8 tbsp ice water, 1 tablespoon at a time, over the flour mixture, stirring gently with a fork until the dough just holds together when pressed.
- Divide the dough into two equal discs, wrap each tightly in plastic wrap, and refrigerate for at least 1 hour.
- Preheat your oven to 375°F.
- In a separate large bowl, toss 6 cups of sliced Granny Smith apples with 1 tbsp lemon juice.
- Add ¾ cup granulated sugar, ¼ cup all-purpose flour, 1 tsp ground cinnamon, and ¼ tsp ground nutmeg to the apples, stirring gently to coat evenly. Tip: Granny Smith apples hold their shape well during baking, providing a firm texture that contrasts beautifully with the soft filling.
- Roll out one disc of chilled dough on a floured surface into a 12-inch circle.
- Carefully transfer the rolled dough to a 9-inch pie dish, gently pressing it into the bottom and sides.
- Spoon the apple filling into the crust, mounding it slightly in the center.
- Dot the top of the filling evenly with 2 tbsp of small unsalted butter pieces.
- Roll out the second disc of dough into an 11-inch circle.
- Place the second dough circle over the filling.
- Trim the excess dough from the edges, leaving a ½-inch overhang.
- Crimp the edges of the crust together firmly using your fingers or a fork to seal.
- Cut four 2-inch slits in the top crust to allow steam to escape.
- Brush the entire top crust evenly with 1 beaten large egg.
- Sprinkle 1 tbsp coarse sugar over the egg-washed crust. Tip: The egg wash and coarse sugar create a beautifully golden, sparkling finish that adds a subtle crunch.
- Place the pie on a baking sheet to catch any drips and bake at 375°F for 50-60 minutes, or until the crust is deep golden brown and the filling is bubbling visibly through the slits.
- Transfer the pie to a wire rack and let it cool completely for at least 3 hours before slicing.
Under a lattice of golden pastry, the filling settles into a tender, jam-like consistency that holds the sharp sweetness of the apples in perfect balance. Each slice offers a flaky, buttery crust that shatters delicately against the soft, spiced fruit within. I love serving it still slightly warm, with a sharp cheddar cheese melted over the top or a drizzle of cold, heavy cream for a contrast that feels both nostalgic and new.
Creamy Southern-Style Macaroni and Cheese

Lately, I’ve been thinking about how some dishes feel like a warm embrace, the kind that settles deep in your bones on a quiet evening. This creamy Southern-style macaroni and cheese is one of those recipes, simple in its ingredients but rich in comfort, each bite a soft reminder of home. Making it feels like a slow, deliberate ritual, one that fills the kitchen with a gentle, cheesy aroma that promises something deeply satisfying.
6
servings20
minutes45
minutesIngredients
– For the pasta: 8 ounces elbow macaroni
– For the sauce: 4 tablespoons unsalted butter, 1/4 cup all-purpose flour, 2 cups whole milk, 1 teaspoon dry mustard, 1/2 teaspoon garlic powder, 1/2 teaspoon onion powder, 1/2 teaspoon paprika, 1/2 teaspoon salt, 1/4 teaspoon black pepper, 2 cups shredded sharp cheddar cheese, 1 cup shredded Monterey Jack cheese
– For the topping: 1/2 cup panko breadcrumbs, 2 tablespoons melted unsalted butter
Instructions
1. Preheat your oven to 350°F and lightly grease a 2-quart baking dish.
2. Bring a large pot of salted water to a rolling boil over high heat.
3. Add 8 ounces of elbow macaroni to the boiling water and cook for 7 minutes, stirring occasionally to prevent sticking, until just al dente.
4. Drain the pasta in a colander and set it aside; do not rinse to help the sauce cling better.
5. In a large saucepan, melt 4 tablespoons of unsalted butter over medium heat until it bubbles gently.
6. Whisk in 1/4 cup of all-purpose flour and cook for 1 minute, stirring constantly, to form a pale golden roux.
7. Gradually pour in 2 cups of whole milk while whisking continuously to avoid lumps.
8. Add 1 teaspoon dry mustard, 1/2 teaspoon garlic powder, 1/2 teaspoon onion powder, 1/2 teaspoon paprika, 1/2 teaspoon salt, and 1/4 teaspoon black pepper, whisking until fully incorporated.
9. Cook the sauce for 5–7 minutes, stirring often, until it thickens enough to coat the back of a spoon.
10. Remove the saucepan from the heat and stir in 2 cups of shredded sharp cheddar and 1 cup of shredded Monterey Jack cheese until melted and smooth.
11. Gently fold the drained macaroni into the cheese sauce until evenly coated.
12. Transfer the mixture to the prepared baking dish and spread it into an even layer.
13. In a small bowl, toss 1/2 cup panko breadcrumbs with 2 tablespoons of melted unsalted butter until lightly moistened.
14. Sprinkle the breadcrumb mixture evenly over the macaroni to create a topping.
15. Bake uncovered for 25–30 minutes, or until the top is golden brown and the edges bubble gently.
16. Let it rest for 5 minutes before serving to allow the sauce to set slightly.
The finished dish emerges with a creamy, velvety interior that contrasts beautifully with the crisp, buttery crust, offering a balance of sharp cheddar and mild Monterey Jack flavors. For a cozy twist, try serving it alongside roasted vegetables or topping it with a sprinkle of fresh herbs like chives to brighten each comforting bite.
Old-Fashioned Meatloaf with Tomato Glaze
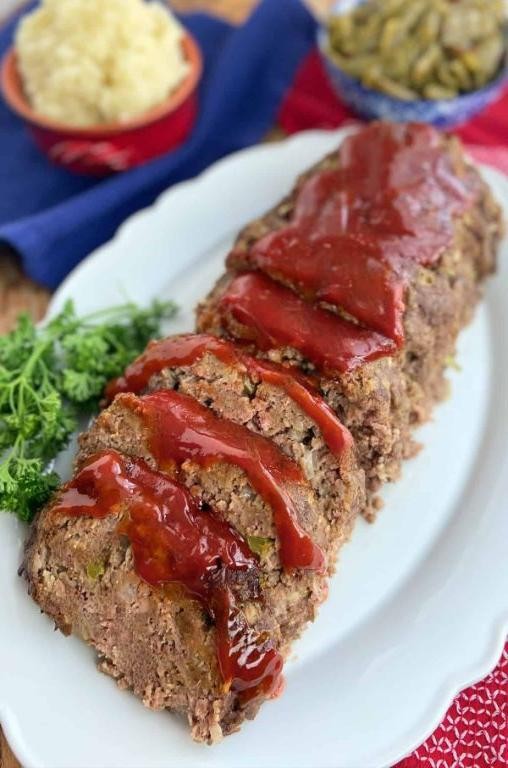
Gently, the way autumn light falls through kitchen windows, this recipe unfolds—a humble comfort that asks for little but gives back warmth and nourishment in every savory slice.
8
servings20
minutes60
minutesIngredients
- For the meatloaf:
- 2 pounds ground beef (80/20 blend)
- 1 cup breadcrumbs
- 1 large onion, finely chopped
- 2 large eggs
- 1/2 cup whole milk
- 2 tablespoons Worcestershire sauce
- 1 teaspoon salt
- 1/2 teaspoon black pepper
- 1 teaspoon garlic powder
- For the tomato glaze:
- 1/2 cup ketchup
- 2 tablespoons brown sugar
- 1 tablespoon apple cider vinegar
Instructions
- Preheat your oven to 350°F.
- Lightly grease a 9×5-inch loaf pan with cooking spray.
- In a large mixing bowl, combine the ground beef, breadcrumbs, chopped onion, eggs, milk, Worcestershire sauce, salt, black pepper, and garlic powder.
- Use your hands to gently mix the ingredients until just combined—overmixing can make the meatloaf dense.
- Transfer the mixture to the prepared loaf pan, pressing it evenly into the corners.
- In a small bowl, whisk together the ketchup, brown sugar, and apple cider vinegar until smooth.
- Spread the tomato glaze evenly over the top of the meatloaf, covering the surface completely.
- Bake the meatloaf in the preheated oven for 1 hour, or until the internal temperature reaches 160°F when checked with a meat thermometer.
- Let the meatloaf rest in the pan for 10 minutes before slicing—this helps the juices redistribute and keeps it moist.
- Carefully remove the meatloaf from the pan using a spatula, slice into 1-inch thick pieces, and serve warm.
Kindly, this meatloaf yields a tender, juicy crumble with a sweet-tangy glaze that caramelizes into a sticky crust. Leftovers make excellent sandwiches the next day, tucked between slices of toasted bread with a swipe of mayonnaise and crisp lettuce.
Country-Style Biscuits and Sausage Gravy
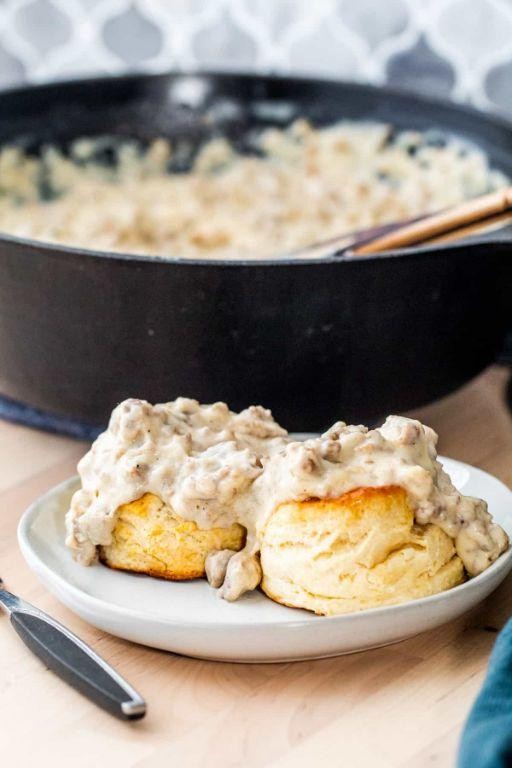
Perhaps there’s something deeply comforting about the way flour dusts the countertop on a quiet morning, the simple ritual of creating something warm and substantial before the day truly begins. This recipe for country-style biscuits and sausage gravy feels like that kind of quiet, grounding practice, a humble dish that fills the kitchen with the most welcoming aroma.
6
portions15
minutes27
minutesIngredients
- For the Biscuits
- 2 cups all-purpose flour
- 1 tablespoon baking powder
- 1/2 teaspoon salt
- 1/2 cup cold unsalted butter, cubed
- 3/4 cup cold whole milk
- For the Sausage Gravy
- 1 pound bulk breakfast sausage
- 1/4 cup all-purpose flour
- 3 cups whole milk
- 1/2 teaspoon black pepper
- 1/4 teaspoon salt
Instructions
- Preheat your oven to 450°F.
- Whisk together 2 cups of all-purpose flour, 1 tablespoon of baking powder, and 1/2 teaspoon of salt in a large bowl.
- Cut 1/2 cup of cold, cubed unsalted butter into the flour mixture using a pastry cutter or your fingertips until the mixture resembles coarse crumbs with some pea-sized butter pieces remaining.
- Pour 3/4 cup of cold whole milk into the flour-butter mixture.
- Stir the mixture with a fork until a shaggy dough just comes together; do not overmix.
- Turn the dough out onto a lightly floured surface.
- Gently pat the dough into a 1-inch thick rectangle.
- Fold the dough in half and pat it down again to a 1-inch thickness; this creates flaky layers.
- Use a 2.5-inch round biscuit cutter to cut out biscuits, pressing straight down without twisting.
- Place the cut biscuits on an ungreased baking sheet, arranging them so they are just touching.
- Bake the biscuits at 450°F for 12-15 minutes, or until the tops are golden brown.
- While the biscuits bake, cook 1 pound of bulk breakfast sausage in a large skillet over medium heat, breaking it into small crumbles with a spatula.
- Continue cooking the sausage for 8-10 minutes until it is fully browned and no pink remains.
- Sprinkle 1/4 cup of all-purpose flour over the cooked sausage in the skillet.
- Cook the flour and sausage mixture for 1 minute, stirring constantly, to cook out the raw flour taste.
- Slowly pour in 3 cups of whole milk while stirring continuously to prevent lumps from forming.
- Add 1/2 teaspoon of black pepper and 1/4 teaspoon of salt to the gravy.
- Bring the gravy to a simmer, then reduce the heat to low.
- Cook the gravy for 5-7 minutes, stirring frequently, until it thickens to a creamy, coating consistency.
Draped over a warm, split biscuit, the creamy gravy clings in thick, savory ribbons, its richness perfectly balanced by the flaky, tender layers beneath. The coarse black pepper provides little bursts of warmth that cut through the comforting fat, making this a dish that feels both rustic and deeply satisfying, especially when served with a softly fried egg on the side.
Smoky Barbecue Baked Beans
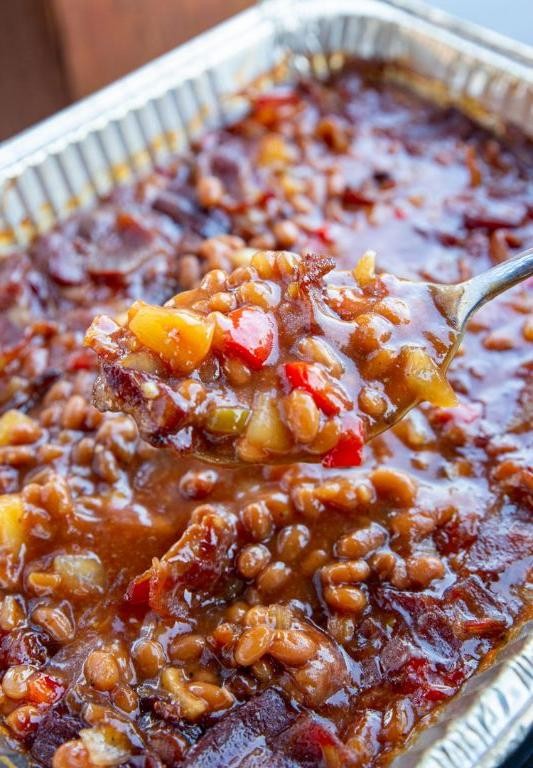
Nestled in the quiet of the evening, with the oven humming softly, there’s something deeply comforting about preparing a dish that feels like a warm embrace. These smoky barbecue baked beans, with their rich, slow-cooked aroma, invite a moment of stillness and reflection, as if each ingredient holds a story waiting to be told. It’s a simple pleasure, really, one that fills the kitchen with a gentle, savory sweetness, reminding me of lazy afternoons and shared meals.
8
servings20
minutes210
minutesIngredients
- For the base
- 1 pound dried navy beans
- 6 cups water
- 1 medium yellow onion, finely chopped
- 4 cloves garlic, minced
- For the sauce
- 1 cup ketchup
- 1/2 cup molasses
- 1/4 cup apple cider vinegar
- 2 tablespoons Dijon mustard
- 2 tablespoons Worcestershire sauce
- 1 tablespoon smoked paprika
- 1 teaspoon liquid smoke
- 1/2 teaspoon black pepper
Instructions
- Rinse 1 pound dried navy beans under cold running water in a colander for 1 minute to remove any dust or debris.
- Place the rinsed beans in a large pot and add 6 cups water, ensuring the beans are fully submerged.
- Bring the pot to a boil over high heat, then reduce the heat to low and simmer uncovered for 1 hour, stirring occasionally to prevent sticking.
- Drain the beans in a colander and discard the cooking liquid.
- Preheat the oven to 325°F to ensure even, gentle baking.
- Finely chop 1 medium yellow onion into 1/4-inch pieces for even cooking and flavor distribution.
- Mince 4 cloves garlic until fine to release their aromatic oils.
- In a medium bowl, whisk together 1 cup ketchup, 1/2 cup molasses, 1/4 cup apple cider vinegar, 2 tablespoons Dijon mustard, 2 tablespoons Worcestershire sauce, 1 tablespoon smoked paprika, 1 teaspoon liquid smoke, and 1/2 teaspoon black pepper until fully combined.
- Combine the drained beans, chopped onion, minced garlic, and sauce mixture in a 3-quart baking dish, stirring gently to coat all ingredients evenly.
- Cover the baking dish tightly with aluminum foil to trap steam and prevent drying.
- Bake in the preheated oven at 325°F for 2 hours, until the beans are tender and the sauce has thickened slightly.
- Remove the foil and bake uncovered for an additional 30 minutes to allow the top to develop a caramelized crust.
- Let the baked beans rest at room temperature for 10 minutes before serving to allow the flavors to meld. Tip: For extra smokiness, stir in an additional 1/2 teaspoon liquid smoke after baking if desired.
Oozing with a sticky, molasses-kissed glaze, these beans boast a velvety texture that melts on the tongue, punctuated by the gentle crunch of softened onions. The deep, smoky notes from the paprika and liquid smoke weave through each bite, making them perfect spooned over grilled cornbread or nestled beside slow-cooked ribs for a hearty, soul-satisfying meal.
Homemade Chicken Pot Pie
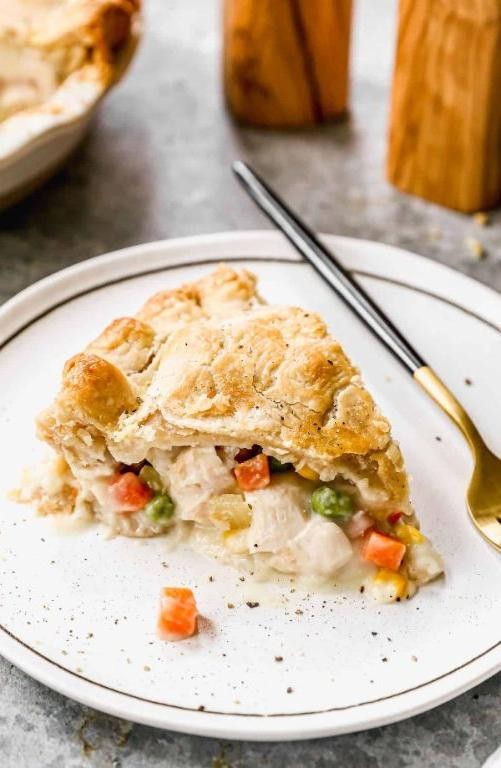
Unfolding the pastry dough on my floured countertop this afternoon, I found myself thinking about how this simple act connects us to generations of home cooks who’ve sought comfort in a golden-crusted pie. There’s something deeply reassuring about the ritual of preparing a chicken pot pie, each step measured and deliberate, creating not just a meal but a moment of quiet nourishment.
6
portions25
minutes50
minutesIngredients
For the filling:
– 2 cups cooked chicken, shredded
– 1 cup frozen peas
– 1 cup carrots, diced
– 1/2 cup celery, chopped
– 1/3 cup unsalted butter
– 1/3 cup all-purpose flour
– 1 3/4 cups chicken broth
– 2/3 cup whole milk
– 1 teaspoon salt
– 1/2 teaspoon black pepper
– 1/2 teaspoon dried thyme
For the crust:
– 1 package refrigerated pie crust (2 crusts)
– 1 egg, beaten
Instructions
1. Preheat your oven to 425°F and place a baking sheet on the middle rack.
2. Melt 1/3 cup unsalted butter in a large skillet over medium heat.
3. Add 1/2 cup chopped celery and 1 cup diced carrots, cooking for 6-8 minutes until slightly softened.
4. Sprinkle 1/3 cup all-purpose flour over the vegetables, stirring constantly for 2 minutes to cook out the raw flour taste.
5. Gradually whisk in 1 3/4 cups chicken broth, making sure no lumps form.
6. Stir in 2/3 cup whole milk until the sauce thickens to a gravy consistency.
7. Add 1 teaspoon salt, 1/2 teaspoon black pepper, and 1/2 teaspoon dried thyme.
8. Fold in 2 cups shredded cooked chicken and 1 cup frozen peas, then remove from heat.
9. Unfold one pie crust into a 9-inch pie dish, pressing it gently against the sides.
10. Pour the chicken mixture into the crust-lined dish, spreading it evenly.
11. Place the second pie crust over the filling, crimping the edges together with your fingers.
12. Cut four 1-inch slits in the top crust to allow steam to escape.
13. Brush the beaten egg over the entire top crust for golden browning.
14. Place the pie on the preheated baking sheet and bake for 30-35 minutes.
15. Rotate the pie halfway through baking for even browning.
16. Remove when the crust is deep golden brown and filling is bubbling.
17. Let the pie rest for 15 minutes before serving to allow the filling to set.
Just out of the oven, the flaky crust shatters beautifully against the rich, creamy filling where tender chicken and sweet peas create pockets of comfort in every bite. Serve slices alongside a simple green salad dressed with lemon vinaigrette to cut through the richness, or enjoy a wedge reheated the next day when the flavors have deepened even further.
Fluffy Buttermilk Pancakes with Maple Syrup

Beneath the quiet morning light, there’s something profoundly comforting about watching batter transform into golden clouds on a griddle. These pancakes carry the gentle tang of buttermilk and the warmth of maple in every tender bite. They’re the kind of breakfast that makes you linger at the table just a little longer.
5
servings10
minutes20
minutesIngredients
For the Dry Mix
- 1 ½ cups all-purpose flour
- 2 tablespoons granulated sugar
- 1 teaspoon baking powder
- ½ teaspoon baking soda
- ½ teaspoon salt
For the Wet Mix
- 1 ¼ cups buttermilk
- 1 large egg
- 3 tablespoons unsalted butter, melted
- 1 teaspoon vanilla extract
For Cooking and Serving
- 2 tablespoons unsalted butter for greasing
- ½ cup maple syrup
Instructions
- Whisk together 1 ½ cups all-purpose flour, 2 tablespoons granulated sugar, 1 teaspoon baking powder, ½ teaspoon baking soda, and ½ teaspoon salt in a large bowl until no streaks remain.
- In a separate medium bowl, whisk 1 ¼ cups buttermilk, 1 large egg, 3 tablespoons melted unsalted butter, and 1 teaspoon vanilla extract until fully combined and smooth.
- Pour the wet ingredients into the dry ingredients and gently fold with a spatula until just combined—small lumps are fine to avoid tough pancakes.
- Let the batter rest undisturbed for 5 minutes to allow the baking soda to activate with the buttermilk.
- Heat a non-stick skillet or griddle over medium heat until a drop of water sizzles and evaporates within 2 seconds.
- Melt ½ tablespoon of unsalted butter on the hot surface, swirling to coat evenly.
- Pour ¼ cup portions of batter onto the skillet, spacing them 2 inches apart to allow for spreading.
- Cook for 2–3 minutes until bubbles form on the surface and the edges look set and slightly dry.
- Flip each pancake carefully with a thin spatula and cook for another 1–2 minutes until the underside is golden brown.
- Transfer cooked pancakes to a warm oven at 200°F to keep them fluffy while repeating with remaining batter, regreasing the skillet as needed.
- Warm ½ cup maple syrup in a small saucepan over low heat for 2 minutes, stirring once, until just heated through.
- Serve pancakes immediately drizzled with warm maple syrup.
Gently stack these golden rounds and watch how they cradle the syrup in their soft folds. The interior stays remarkably tender with a subtle tang that balances the maple’s sweetness. For a cozy twist, layer them with sliced bananas and a sprinkle of cinnamon between each pancake.
Country Ham and Bean Soup
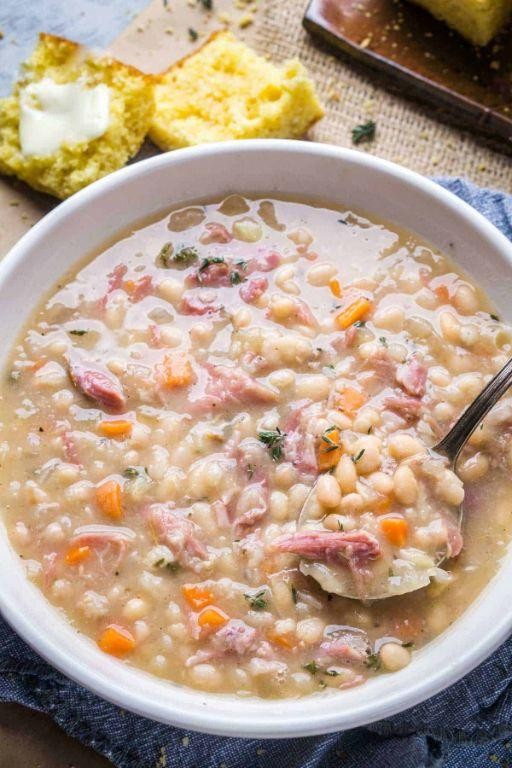
Wandering through autumn afternoons always brings me back to this simple, sturdy soup that simmers away while the world outside turns golden. There’s something deeply comforting about the way the ham infuses the broth, and the beans soften into creamy little pillows that warm you from the inside out. It’s the kind of meal that asks for nothing more than a quiet moment and a sturdy spoon.
6
servings20
minutes130
minutesIngredients
– For the base: 1 tablespoon olive oil, 1 large yellow onion (diced), 2 medium carrots (peeled and sliced into 1/4-inch rounds), 2 celery stalks (sliced)
– For the broth and beans: 8 ounces country ham (diced), 6 cups low-sodium chicken broth, 1 pound dried navy beans (rinsed and picked over), 2 bay leaves, 1/2 teaspoon black pepper
– For finishing: 2 tablespoons chopped fresh parsley
Instructions
1. Heat 1 tablespoon olive oil in a large stockpot over medium heat until it shimmers.
2. Add 1 diced yellow onion, 2 sliced carrots, and 2 sliced celery stalks to the pot.
3. Sauté the vegetables for 8–10 minutes, stirring occasionally, until the onion is translucent and the carrots have slightly softened.
4. Stir in 8 ounces diced country ham and cook for 3–4 minutes until it releases its salty fragrance.
5. Pour in 6 cups low-sodium chicken broth, scraping the bottom of the pot to lift any browned bits.
6. Add 1 pound rinsed dried navy beans, 2 bay leaves, and 1/2 teaspoon black pepper to the pot.
7. Bring the soup to a boil over high heat, then immediately reduce the heat to low.
8. Cover the pot and simmer for 1 hour 30 minutes to 2 hours, until the beans are tender but not mushy.
9. Remove the pot from the heat and discard the 2 bay leaves.
10. Stir in 2 tablespoons chopped fresh parsley just before serving.
Creamy beans mingle with salty ham in a broth that’s both light and deeply satisfying. I love ladling it into wide, shallow bowls and topping it with an extra sprinkle of parsley for a fresh contrast. Sometimes, I’ll tuck a slice of crusty bread alongside to soak up every last drop.
Golden Grilled Corn on the Cob

Holding this warm ear of corn, its golden kernels glistening in the late afternoon light, I’m reminded how some of summer’s simplest pleasures arrive wrapped in husks. There’s something quietly magical about transforming humble corn into this smoky, butter-kissed delight that feels both rustic and deeply comforting. It’s the kind of food that makes you want to eat slowly, savoring each sweet, charred kernel while the day softens around you.
4
servings10
minutes35
minutesIngredients
For preparing the corn:
– 4 ears fresh corn, husks intact
– 2 tbsp olive oil
– 1 tsp kosher salt
For finishing:
– 4 tbsp unsalted butter, softened
– 1/4 tsp smoked paprika
– 1 tbsp chopped fresh parsley
Instructions
1. Peel back the corn husks carefully without detaching them, then remove all silk threads from each ear of corn.
2. Brush each ear of corn evenly with 1/2 tablespoon of olive oil, making sure to coat all sides.
3. Sprinkle 1/4 teaspoon of kosher salt evenly over each oiled ear of corn.
4. Pull the husks back up to cover the kernels completely, which helps prevent burning while allowing steam to cook the corn.
5. Preheat your grill to medium heat (350-400°F) with the lid closed for 15 minutes.
6. Place the husk-covered corn directly on the grill grates and close the lid.
7. Grill for 15-20 minutes, turning the corn every 5 minutes with tongs to ensure even cooking.
8. Check for doneness by carefully peeling back a small section of husk – the kernels should appear plump and bright yellow.
9. Remove the corn from the grill using heatproof gloves, as the husks will be very hot.
10. Carefully pull back the husks completely and discard them, or use as natural handles.
11. In a small bowl, mix the softened butter with smoked paprika and chopped parsley until well combined.
12. Brush the herb butter mixture generously over all sides of each hot ear of corn.
13. Serve immediately while the corn is still warm and the butter is melting.
As you bite into that first kernel, notice how the smoky char gives way to bursts of sweet juice, while the herbed butter creates a rich, savory coating that clings to each ridge. The contrast between the slightly crisp exterior and tender interior makes each bite interesting, and serving these alongside grilled meats or crumbling cotija cheese over the top elevates this simple pleasure into something truly memorable.
Classic Southern Pecan Pie
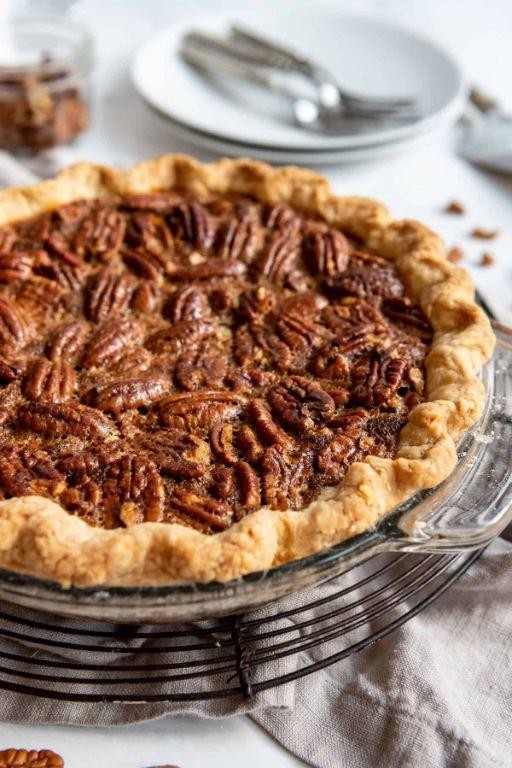
Perhaps there’s something deeply comforting about the way this pie fills the kitchen with its caramel-sweet aroma, a scent that seems to slow time itself as it bakes. It reminds me of quiet autumn afternoons when the light turns golden and the world feels still, each ingredient measured with care and intention. This classic dessert holds memories in its rich, nutty filling and flaky crust, a simple yet profound pleasure worth savoring slowly.
8
servings20
minutes55
minutesIngredients
For the crust:
– 1 9-inch unbaked pie crust, chilled
For the filling:
– 3 large eggs, room temperature
– 1 cup light corn syrup
– 1 cup granulated sugar
– 2 tablespoons unsalted butter, melted
– 1 teaspoon pure vanilla extract
– 1/4 teaspoon salt
– 1 1/2 cups pecan halves
Instructions
1. Preheat your oven to 350°F (175°C) and position a rack in the center.
2. Place the chilled pie crust in a 9-inch pie dish, gently pressing it into the corners without stretching.
3. In a large mixing bowl, whisk the 3 eggs until they become pale and frothy, about 1 minute of vigorous whisking.
4. Add 1 cup light corn syrup and 1 cup granulated sugar to the eggs, whisking continuously until fully incorporated.
5. Pour in 2 tablespoons melted butter, 1 teaspoon vanilla extract, and 1/4 teaspoon salt, whisking until the mixture becomes smooth and glossy.
6. Arrange 1 1/2 cups pecan halves evenly across the bottom of the unbaked pie crust.
7. Slowly pour the filling mixture over the pecans, allowing it to settle around the nuts without disturbing their arrangement.
8. Place the pie on a baking sheet to catch any potential spills and transfer it to the preheated oven.
9. Bake for 50-60 minutes until the center puffs slightly and a knife inserted near the edge comes out clean.
10. Remove the pie from the oven and place it on a wire cooling rack for at least 4 hours to set completely.
The filling firms into a firm-yet-yielding texture that holds its shape when sliced, while the pecans maintain a satisfying crunch against the smooth, buttery sweetness. Serve it slightly warmed with a dollop of freshly whipped cream, or enjoy a slice cold with strong black coffee for contrast.
Roasted Garlic Mashed Potatoes
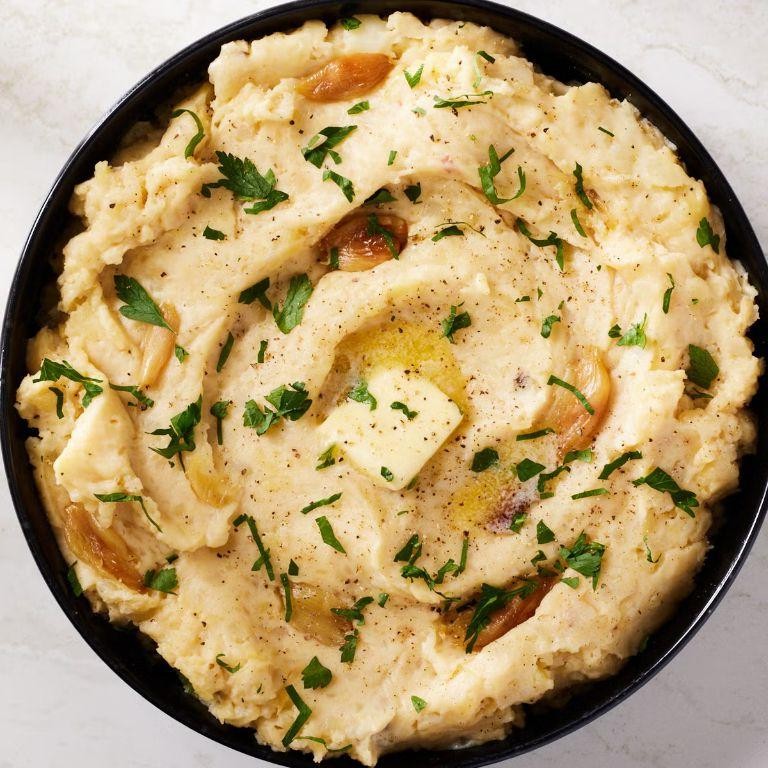
Mellow evenings call for comfort food that feels like a warm embrace, and these roasted garlic mashed potatoes are exactly that. The slow-roasted garlic melts into creamy potatoes with a depth that makes ordinary mashed potatoes seem like a distant memory. There’s something quietly satisfying about transforming simple ingredients into a dish that feels both humble and deeply nourishing.
5
servings15
minutes60
minutesIngredients
For roasting the garlic:
– 1 head garlic
– 1 tbsp olive oil
For the mashed potatoes:
– 2 lbs Yukon Gold potatoes, peeled and quartered
– 4 tbsp unsalted butter
– 1/2 cup whole milk, warmed
– 1 tsp salt
– 1/4 tsp black pepper
Instructions
1. Preheat your oven to 400°F.
2. Slice the top off the head of garlic to expose the cloves.
3. Drizzle the garlic with 1 tbsp olive oil and wrap it tightly in aluminum foil.
4. Roast the garlic for 40 minutes until the cloves are soft and golden brown.
5. While the garlic roasts, place 2 lbs peeled and quartered Yukon Gold potatoes in a large pot.
6. Cover the potatoes with cold water by 1 inch and bring to a boil over high heat.
7. Reduce heat to medium and simmer for 15-20 minutes until potatoes are fork-tender.
8. Drain the potatoes thoroughly and return them to the warm pot.
9. Squeeze the roasted garlic cloves from their skins into the potatoes.
10. Add 4 tbsp unsalted butter, 1/2 cup warmed whole milk, 1 tsp salt, and 1/4 tsp black pepper.
11. Mash the mixture with a potato masher until smooth and creamy.
12. Taste and adjust seasoning if needed, being careful not to overmix.
Golden and velvety, these potatoes have a texture that’s both cloud-like and substantial, with the roasted garlic lending a sweet, caramelized depth rather than sharpness. They’re wonderful served alongside roasted chicken or spooned into a bowl with a pool of rich gravy, but I’ve also loved them spread thick on crusty bread the next day, cold from the fridge.
Conclusion
Zesty, comforting, and utterly delicious—these 21 country recipes bring the heart of homestyle cooking right to your kitchen. We hope you find new favorites to share around your table. Don’t forget to leave a comment telling us which dish you loved most, and pin this article on Pinterest to save these gems for later!


