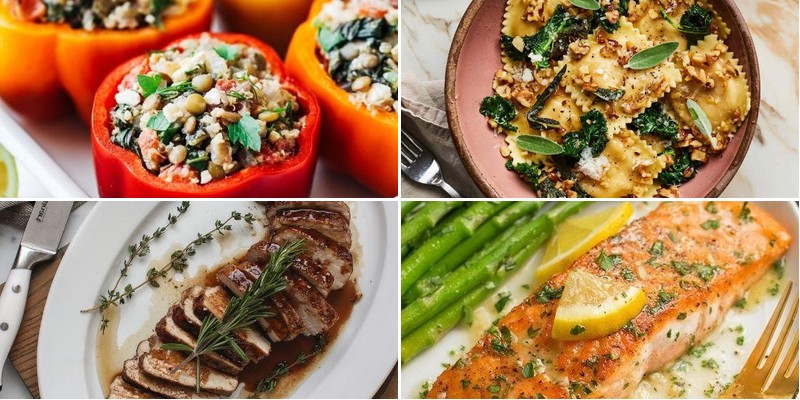
Even the most enthusiastic home cooks sometimes need fresh inspiration for weeknight dinners. That’s where this collection of 29 irresistible recipes comes in—packed with comforting classics, quick fixes, and flavorful twists to make every evening meal something special. Ready to shake up your dinner routine? Dive into these delicious ideas and find your next family favorite!
Creamy Tuscan Chicken with Sun-Dried Tomatoes
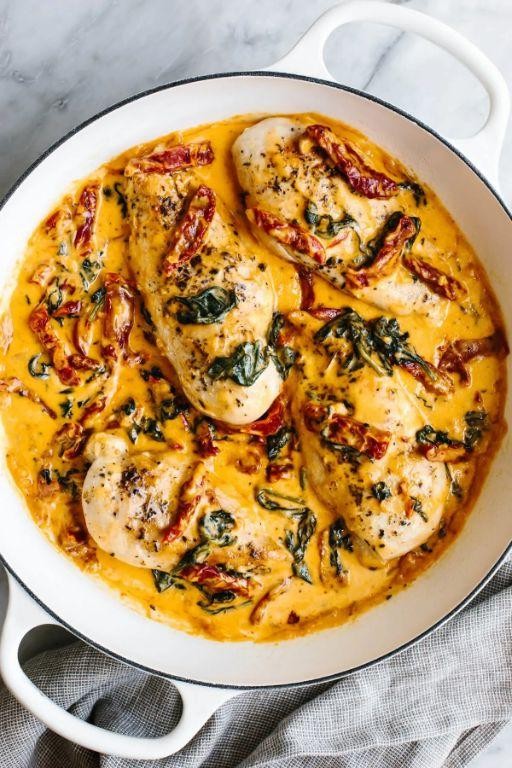
Oftentimes, the best meals come from those chaotic evenings when I need something comforting yet elegant enough to feel like I’ve treated myself. This creamy Tuscan chicken, inspired by a sun-drenched memory from a trip to Italy, has become my go-to for turning a hectic Tuesday into something special. I love how the sun-dried tomatoes add a sweet-tangy punch that cuts through the richness of the sauce.
5
servings15
minutes25
minutesIngredients
- 1.5 pounds boneless, skinless chicken breasts, pounded to ¾-inch thickness
- 2 tablespoons extra-virgin olive oil
- 3 cloves garlic, minced
- ½ cup sun-dried tomatoes in oil, drained and julienned
- 1 cup heavy cream
- ½ cup freshly grated Parmigiano-Reggiano cheese
- 2 cups fresh baby spinach
- 1 teaspoon dried Italian seasoning
- Kosher salt and freshly ground black pepper
Instructions
- Season both sides of the chicken breasts evenly with 1 teaspoon kosher salt and ½ teaspoon black pepper.
- Heat the extra-virgin olive oil in a large skillet over medium-high heat until it shimmers, about 2 minutes.
- Place the chicken breasts in the skillet and sear for 6–7 minutes per side, until the internal temperature reaches 165°F and the exterior is golden brown.
- Transfer the chicken to a clean plate and tent loosely with foil to rest.
- Reduce the skillet heat to medium and add the minced garlic, sautéing for 45–60 seconds until fragrant but not browned.
- Stir in the julienned sun-dried tomatoes and dried Italian seasoning, toasting for 1 minute to deepen their flavors.
- Pour in the heavy cream, scraping the bottom of the skillet to incorporate any browned bits.
- Simmer the sauce for 3–4 minutes, stirring occasionally, until it thickens slightly and coats the back of a spoon.
- Whisk in the freshly grated Parmigiano-Reggiano cheese until fully melted and the sauce is smooth.
- Add the fresh baby spinach and wilt for 1–2 minutes, stirring gently until just softened.
- Return the rested chicken and any accumulated juices to the skillet, spooning the sauce over the top.
- Heat for 2 minutes to warm the chicken through before serving.
Finally, the velvety sauce clings to every bite of tender chicken, while the sun-dried tomatoes offer little bursts of tangy sweetness against the earthy spinach. I love serving this over al dente fettuccine or with crusty bread to soak up every last drop of that luxurious cream sauce—it’s a dish that feels both rustic and refined, perfect for a cozy dinner that still impresses.
Pan-Seared Salmon with Lemon Garlic Butter
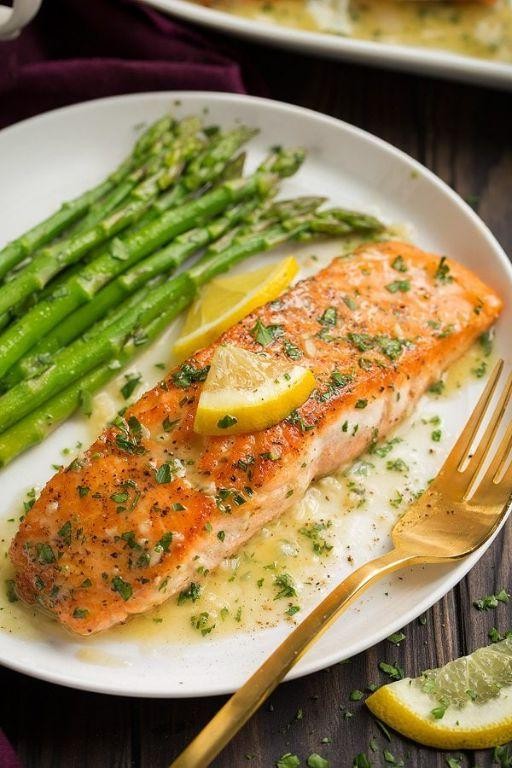
Diving into my kitchen after a long workday always feels therapeutic, and this pan-seared salmon has become my go-to weeknight luxury. There’s something magical about that crispy skin giving way to tender, flaky fish that makes even Tuesday feel special.
4
servings10
minutes8
minutesIngredients
- 4 (6-ounce) skin-on salmon fillets, patted dry
- 2 tablespoons extra-virgin olive oil
- 1 teaspoon kosher salt
- ½ teaspoon freshly cracked black pepper
- 4 tablespoons unsalted European-style butter
- 3 garlic cloves, thinly sliced
- 1 lemon, juiced (about 3 tablespoons)
- 2 tablespoons fresh parsley, finely chopped
Instructions
- Season salmon fillets evenly on both sides with kosher salt and freshly cracked black pepper.
- Heat a large stainless steel skillet over medium-high heat until water droplets sizzle and evaporate immediately upon contact.
- Add extra-virgin olive oil to the hot skillet, swirling to coat the surface evenly.
- Place salmon fillets skin-side down in the skillet, pressing gently with a spatula for 10 seconds to ensure full skin contact.
- Cook undisturbed for 4-6 minutes until the skin releases easily from the pan and appears golden brown and crisp.
- Flip salmon fillets using a fish spatula and cook flesh-side down for exactly 2 minutes for medium-rare doneness.
- Transfer salmon to a warm plate, leaving any rendered fat in the skillet.
- Reduce heat to medium-low and add unsalted European-style butter to the skillet.
- Add thinly sliced garlic cloves and cook for 45-60 seconds until fragrant but not browned.
- Remove skillet from heat and immediately stir in fresh lemon juice to prevent curdling.
- Whisk in finely chopped fresh parsley until the sauce emulsifies slightly.
- Spoon the lemon garlic butter sauce over the plated salmon fillets.
Flaky perfection awaits with that crackling skin giving way to moist, medium-rare flesh bathed in the bright, garlicky butter sauce. I love serving this over creamy polenta to catch every drop of that glorious sauce, or alongside roasted asparagus for a complete meal that feels restaurant-worthy yet comes together in minutes.
Vegetarian Thai Green Curry
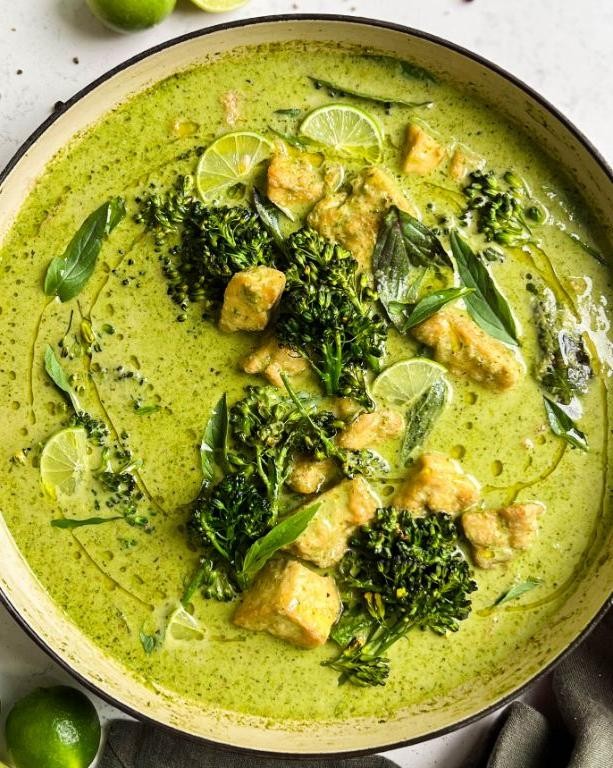
Diving into my kitchen today, I’m reminded of that sweltering summer evening when I first discovered the magic of Thai cuisine—the way fragrant herbs can transform simple vegetables into something extraordinary. This vegetarian green curry has become my go-to comfort dish, perfect for those nights when I want something vibrant yet soothing after a long day of recipe testing.
3
servings15
minutes20
minutesIngredients
– 2 tablespoons virgin coconut oil
– 1 medium yellow onion, finely diced
– 4 cloves garlic, minced
– 1 tablespoon freshly grated ginger
– 3 tablespoons Thai green curry paste
– 1 (13.5-ounce) can full-fat coconut milk
– 1 cup vegetable broth
– 1 medium eggplant, cut into 1-inch cubes
– 1 red bell pepper, sliced into thin strips
– 1 cup fresh Thai basil leaves
– 2 tablespoons fresh lime juice
– 1 teaspoon coconut sugar
– ½ teaspoon fine sea salt
Instructions
1. Heat virgin coconut oil in a large Dutch oven over medium heat until shimmering, about 2 minutes.
2. Add finely diced yellow onion and sauté until translucent, approximately 4-5 minutes.
3. Stir in minced garlic and freshly grated ginger, cooking until fragrant, about 60 seconds.
4. Incorporate Thai green curry paste, toasting for 2 minutes while stirring constantly to deepen flavors.
5. Pour in full-fat coconut milk, scraping the bottom of the pot to incorporate any browned bits.
6. Add vegetable broth and bring the mixture to a gentle simmer.
7. Submerge 1-inch eggplant cubes in the liquid and cook for 8 minutes until slightly softened.
8. Introduce sliced red bell pepper strips and continue simmering for 4 minutes until crisp-tender.
9. Stir in coconut sugar and fine sea salt until fully dissolved.
10. Remove from heat and fold in fresh Thai basil leaves until just wilted.
11. Finish with fresh lime juice, stirring gently to combine.
Final touches make this curry truly special—the eggplant becomes meltingly tender while the bell peppers retain a satisfying crunch. For an elegant presentation, I love serving it over jasmine rice with extra basil scattered on top, creating beautiful contrast between the vibrant green herbs and creamy yellow sauce.
Balsamic Glazed Pork Tenderloin

Whenever I’m craving something elegant yet surprisingly simple, this balsamic glazed pork tenderloin immediately comes to mind—it’s the dish I turn to when impressing dinner guests without spending hours in the kitchen, and the rich, tangy-sweet aroma that fills my home always brings back memories of cozy autumn evenings with friends gathered around the table.
4
servings15
minutes28
minutesIngredients
– 1 (1.5-pound) pork tenderloin, silver skin removed
– 2 tablespoons extra-virgin olive oil
– 1 teaspoon fine sea salt
– ½ teaspoon freshly cracked black pepper
– 3 garlic cloves, minced
– ½ cup high-quality balsamic vinegar
– 2 tablespoons pure maple syrup
– 1 tablespoon Dijon mustard
– 1 teaspoon fresh rosemary leaves, finely chopped
– 1 tablespoon unsalted butter, chilled and cubed
Instructions
1. Preheat your oven to 400°F and position a rack in the center.
2. Pat the pork tenderloin completely dry using paper towels.
3. Rub the tenderloin evenly with olive oil, sea salt, and black pepper.
4. Heat a large oven-safe skillet over medium-high heat for 2 minutes until properly heated.
5. Sear the tenderloin for 2 minutes per side until a golden-brown crust forms.
6. Transfer the skillet directly to the preheated oven and roast for 15 minutes.
7. Whisk together balsamic vinegar, maple syrup, Dijon mustard, and minced garlic in a small bowl.
8. Remove the skillet from the oven and carefully pour the glaze mixture over the pork.
9. Return the skillet to the oven and continue roasting for 8 more minutes.
10. Insert an instant-read thermometer into the thickest part of the pork, ensuring it registers 145°F.
11. Transfer the pork to a cutting board and let it rest for 5 minutes undisturbed.
12. Place the skillet with remaining glaze over medium heat and simmer for 3 minutes until slightly thickened.
13. Whisk the chilled butter cubes into the reduced glaze until fully emulsified.
14. Stir in the finely chopped fresh rosemary.
15. Slice the rested pork into ½-inch thick medallions using a sharp carving knife.
16. Arrange the pork medallions on a serving platter and drizzle generously with the finished glaze. Seriously, the contrast between the caramelized crust and juicy interior makes this dish unforgettable—the glaze forms a glossy, sticky coating that clings to each slice, while the pork remains remarkably tender. I love serving it over creamy polenta or alongside roasted root vegetables to soak up every last drop of that complex sweet-tangy sauce.
Spaghetti Carbonara with Crispy Prosciutto

Every time I crave something comforting yet elegant, this spaghetti carbonara with crispy prosciutto comes to mind—it’s the dish I turn to after a long day when I want restaurant-quality flavors without the fuss. I first discovered this twist during a trip to Rome, where a tiny trattoria added crispy cured meat to their carbonara, and I’ve been hooked ever since, tweaking it to perfection in my own kitchen.
2
servings15
minutes15
minutesIngredients
– 8 ounces dried spaghetti
– 4 ounces thinly sliced prosciutto, cut into 1/2-inch strips
– 3 large pasture-raised eggs, lightly beaten
– 1 cup freshly grated Pecorino Romano cheese
– 1/2 cup freshly grated Parmigiano-Reggiano cheese
– 2 cloves garlic, minced
– 1/4 cup extra-virgin olive oil
– 1 teaspoon freshly cracked black pepper
– 1/4 teaspoon fine sea salt
Instructions
1. Bring a large pot of salted water to a rolling boil over high heat.
2. Add the dried spaghetti and cook for 9–11 minutes, stirring occasionally, until al dente (the pasta should have a slight bite when tested).
3. While the pasta cooks, heat the extra-virgin olive oil in a large skillet over medium heat until shimmering, about 2 minutes.
4. Add the prosciutto strips and cook for 3–4 minutes, stirring frequently, until crispy and lightly browned.
5. Stir in the minced garlic and cook for 30 seconds, just until fragrant, to avoid burning.
6. In a medium bowl, whisk together the lightly beaten pasture-raised eggs, Pecorino Romano, Parmigiano-Reggiano, freshly cracked black pepper, and fine sea salt until smooth.
7. Reserve 1/2 cup of the starchy pasta water, then drain the spaghetti thoroughly.
8. Immediately transfer the hot spaghetti to the skillet with the prosciutto and garlic, tossing to coat evenly in the oil.
9. Remove the skillet from heat and let it cool for 1 minute to prevent the eggs from scrambling when added.
10. Pour the egg and cheese mixture over the pasta, stirring vigorously and adding reserved pasta water 1 tablespoon at a time until the sauce is creamy and clings to the spaghetti.
11. Serve immediately in warmed bowls. Keep in mind that the residual heat from the pasta will continue to thicken the sauce, so work quickly for the best texture. Knowing how the creamy, velvety sauce clings to each strand of spaghetti, with the salty crunch of prosciutto and a hint of garlic, makes this dish irresistible. I love topping it with extra cracked pepper and serving it alongside a crisp arugula salad for a balanced meal that feels both rustic and refined.
Sizzling Beef Fajitas with Peppers
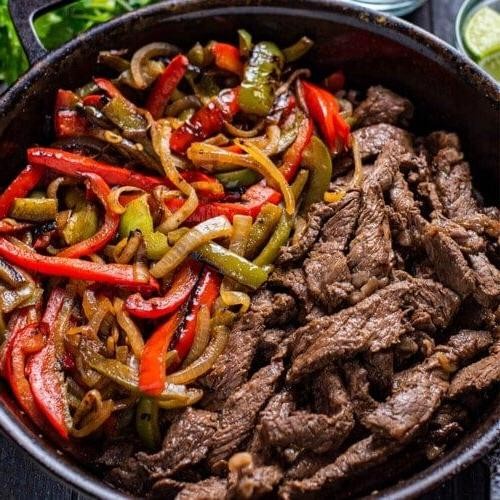
Over the years, I’ve found that some of the best meals come from sizzling skillets and colorful peppers—this beef fajita recipe is no exception. I first perfected it during a summer cookout when friends kept asking for seconds, and now it’s my go-to for weeknight dinners that feel festive. There’s something magical about that smoky aroma filling the kitchen that always brings everyone to the table.
8
portions25
minutes12
minutesIngredients
– 1.5 lbs flank steak, thinly sliced against the grain
– 3 tbsp avocado oil, divided
– 2 tbsp freshly squeezed lime juice
– 4 garlic cloves, minced
– 1 tsp ground cumin
– 1 tsp smoked paprika
– 1/2 tsp chipotle powder
– 1 large yellow onion, sliced into 1/4-inch strips
– 2 red bell peppers, julienned
– 2 green bell peppers, julienned
– 1/4 cup chopped fresh cilantro
– 8 flour tortillas (6-inch)
– Kosher salt, to season
Instructions
1. Combine the sliced flank steak, 2 tablespoons avocado oil, lime juice, minced garlic, cumin, smoked paprika, and chipotle powder in a large bowl.
2. Season the mixture generously with kosher salt and marinate at room temperature for 20 minutes to allow the flavors to penetrate the meat.
3. Heat a large cast-iron skillet over high heat until it begins to lightly smoke, about 3-4 minutes.
4. Add the remaining 1 tablespoon avocado oil to the skillet, swirling to coat the surface evenly.
5. Place the marinated beef in a single layer and sear undisturbed for 2 minutes to develop a caramelized crust.
6. Flip the beef slices using tongs and cook for an additional 90 seconds until medium-rare.
7. Transfer the beef to a clean plate, letting it rest while you cook the vegetables.
8. Add the sliced onion and julienned bell peppers to the same skillet, scraping up any browned bits from the bottom.
9. Sauté the vegetables over medium-high heat for 6-7 minutes until slightly charred but still crisp-tender.
10. Return the rested beef and any accumulated juices to the skillet, tossing to combine with the vegetables.
11. Warm the flour tortillas in a dry skillet over medium heat for 30 seconds per side until pliable and lightly toasted.
12. Stir the chopped fresh cilantro into the beef and pepper mixture just before serving.
Vibrant and sizzling straight from the skillet, these fajitas offer tender beef with a subtle smoky heat that plays beautifully against the sweet crunch of peppers. I love serving them family-style with extra lime wedges for squeezing, and the charred edges of the vegetables add wonderful texture against the soft tortillas.
Stuffed Bell Peppers with Quinoa
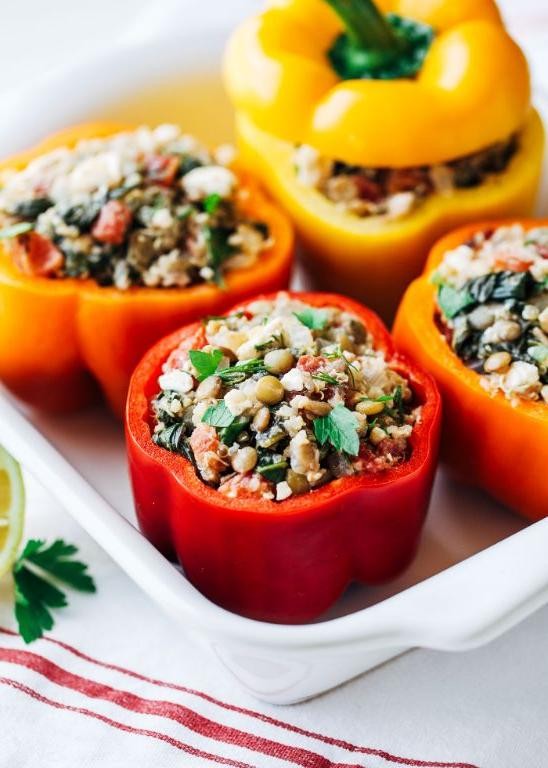
Sometimes the most satisfying meals come from emptying the refrigerator, and these stuffed bell peppers were born from exactly that kind of creative kitchen moment. I love how the colorful bell pepper shells become edible bowls, making cleanup a breeze after a busy day. This version with quinoa and Italian sausage has become my family’s favorite weeknight comfort food.
4
servings20
minutes40
minutesIngredients
- 4 large bell peppers, mixed colors, tops removed and seeded
- 1 cup uncooked quinoa, rinsed thoroughly
- 1 pound sweet Italian sausage, casings removed
- 1 medium yellow onion, finely diced
- 3 garlic cloves, minced
- 1 cup marinara sauce
- 1/2 cup freshly grated Parmigiano-Reggiano cheese
- 2 tablespoons extra virgin olive oil
- 1 teaspoon dried oregano
- 1/2 teaspoon crushed red pepper flakes
- 1/4 cup fresh basil leaves, chiffonade-cut
- Kosher salt and freshly ground black pepper
Instructions
- Preheat your oven to 375°F and lightly brush the bell peppers with 1 tablespoon of olive oil, placing them cut-side up in a baking dish.
- Cook the quinoa according to package instructions using a 2:1 water-to-quinoa ratio, then fluff with a fork and set aside. Tip: Letting quinoa steam off-heat for 5 minutes after cooking prevents it from becoming mushy.
- Heat the remaining olive oil in a large skillet over medium-high heat and brown the Italian sausage, breaking it into small crumbles with a wooden spoon.
- Add the diced onion and cook for 4-5 minutes until translucent, then stir in the minced garlic and cook for 30 seconds until fragrant.
- Combine the cooked quinoa, sausage mixture, marinara sauce, oregano, red pepper flakes, and half of the Parmigiano-Reggiano in a large bowl, seasoning with 1 teaspoon kosher salt and 1/2 teaspoon black pepper.
- Stuff the pepper shells generously with the quinoa mixture, mounding it slightly above the rim. Tip: Pack the filling firmly to prevent collapsing during baking.
- Sprinkle the remaining cheese over the stuffed peppers and bake for 25-30 minutes until the peppers are tender-crisp and the filling is heated through.
- Broil for 2-3 minutes until the cheese develops golden-brown spots, watching carefully to prevent burning.
- Remove from oven and let rest for 5 minutes before serving. Tip: Resting allows the filling to set for cleaner slicing.
- Garnish with fresh basil chiffonade and serve immediately.
Zesty and satisfying, these peppers offer a wonderful textural contrast between the tender-crisp vegetable shell and the hearty quinoa filling. The Italian sausage infuses every bite with savory depth, while the melted Parmigiano-Reggiano creates a beautiful golden crust. For an elegant presentation, slice them into rings and serve over a bed of arugula dressed with lemon vinaigrette.
Classic Chicken Alfredo Pasta
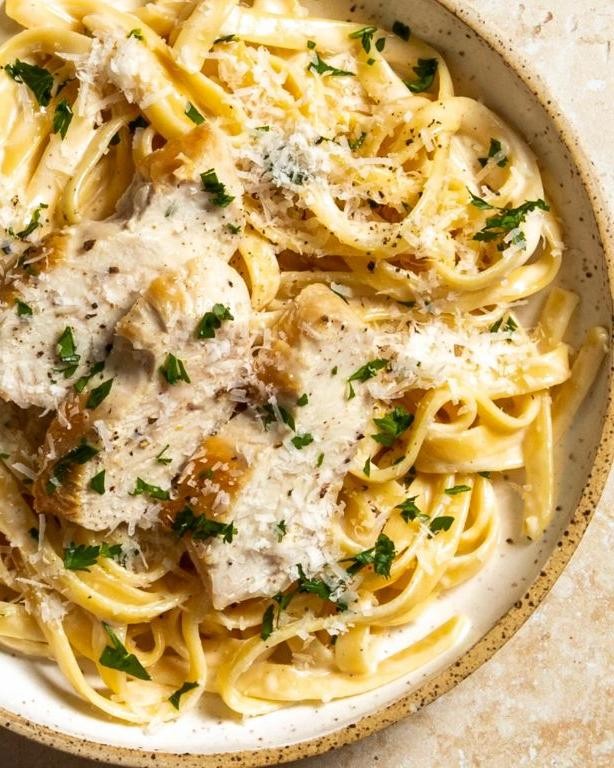
Diving into my recipe archives always brings back memories of cozy family dinners, and this Classic Chicken Alfredo Pasta recipe is one I’ve perfected over countless Sunday suppers. There’s something magical about how the creamy sauce clings to each strand of pasta that never fails to comfort the soul.
5
servings15
minutes25
minutesIngredients
– 12 ounces dried fettuccine pasta
– 1 pound boneless, skinless chicken breasts, sliced into 1/2-inch strips
– 2 tablespoons extra virgin olive oil
– 4 tablespoons unsalted European-style butter
– 3 garlic cloves, minced
– 2 cups heavy cream
– 1 cup freshly grated Parmigiano-Reggiano cheese
– 1/4 teaspoon freshly grated nutmeg
– 1 tablespoon fresh Italian parsley, finely chopped
– Kosher salt and freshly cracked black pepper
Instructions
1. Bring a large pot of heavily salted water to a rolling boil at 212°F.
2. Add fettuccine pasta and cook for 8-10 minutes until al dente, stirring occasionally to prevent sticking.
3. While pasta cooks, season chicken strips generously with kosher salt and freshly cracked black pepper on both sides.
4. Heat olive oil in a large skillet over medium-high heat until shimmering, about 2 minutes.
5. Add chicken strips in a single layer and sear for 4-5 minutes per side until golden brown and internal temperature reaches 165°F.
6. Transfer cooked chicken to a clean plate and tent with foil to retain moisture.
7. Reduce skillet heat to medium and add unsalted European-style butter.
8. Once butter melts and foams subside, add minced garlic and sauté for 45-60 seconds until fragrant but not browned.
9. Pour heavy cream into the skillet and bring to a gentle simmer, stirring constantly with a wooden spoon.
10. Gradually whisk in freshly grated Parmigiano-Reggiano cheese until completely melted and sauce thickens slightly, about 3-4 minutes.
11. Stir in freshly grated nutmeg and adjust seasoning with additional kosher salt if needed.
12. Drain cooked pasta, reserving 1/2 cup pasta water, and immediately add pasta to the cream sauce.
13. Toss pasta vigorously with tongs, adding reserved pasta water 2 tablespoons at a time until sauce reaches desired consistency.
14. Return cooked chicken to the skillet and gently fold into the pasta mixture.
15. Garnish with finely chopped fresh Italian parsley just before serving.
Every bite delivers that luxurious silkiness where the al dente pasta provides the perfect textural contrast to the velvety sauce. I love serving this family-style in a warm bowl with extra Parmigiano-Reggiano for grating at the table, and it pairs beautifully with a crisp green salad to cut through the richness.
Herb-Crusted Rack of Lamb with Red Wine Sauce
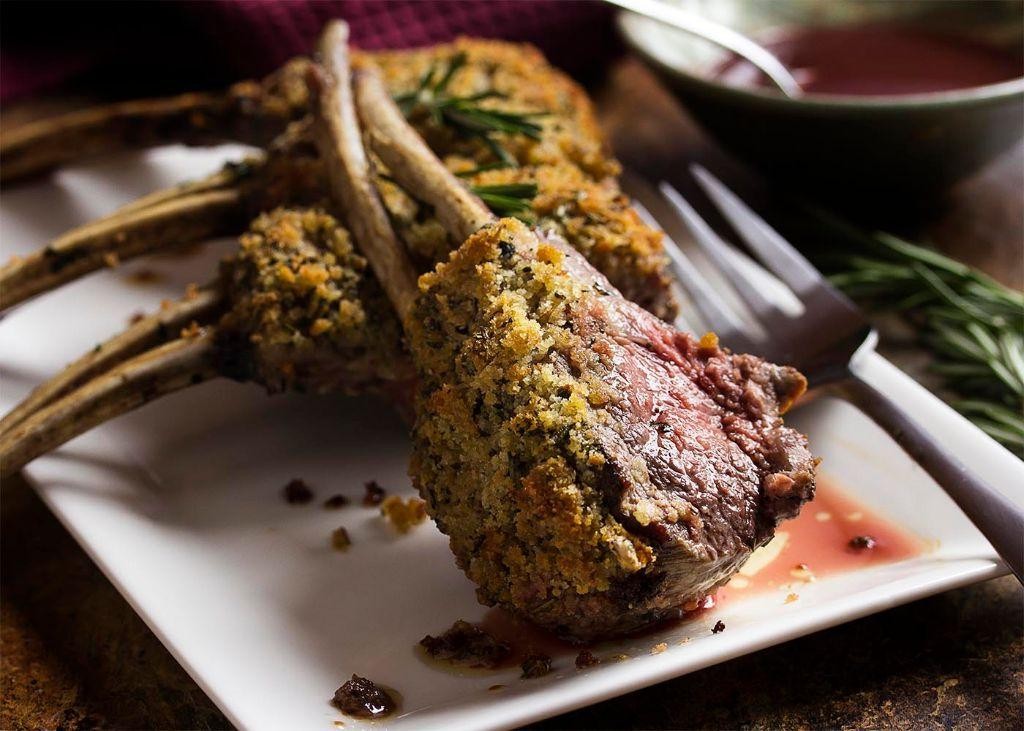
Heavenly aromas of rosemary and garlic filled my kitchen last Sunday, transporting me straight back to that tiny Parisian bistro where I first fell in love with perfectly cooked lamb. Honestly, there’s something magical about how a simple herb crust transforms this elegant cut into pure comfort food that feels both special and completely approachable.
2
portions20
minutes40
minutesIngredients
– 1 (1.5 lb) frenched rack of lamb
– 3 tbsp Dijon mustard
– 1/2 cup panko breadcrumbs
– 1/4 cup fresh rosemary, finely chopped
– 3 garlic cloves, minced
– 2 tbsp extra virgin olive oil
– 1 tsp flaky sea salt
– 1/2 tsp freshly cracked black pepper
– 1 cup dry red wine
– 1/2 cup beef demi-glace
– 2 tbsp unsalted butter, chilled
– 1 shallot, finely diced
Instructions
1. Preheat your oven to 400°F and position the rack in the center.
2. Pat the frenched rack of lamb completely dry with paper towels.
3. Score the fat cap in a crosshatch pattern, being careful not to cut into the meat.
4. Season all sides of the lamb with flaky sea salt and freshly cracked black pepper.
5. Heat extra virgin olive oil in a heavy oven-safe skillet over medium-high heat until shimmering.
6. Sear the lamb fat-side down for 3 minutes until golden brown and rendered.
7. Flip and sear the meat side for 2 minutes until a crust forms.
8. Remove the lamb from the skillet and let it rest on a plate.
9. Combine panko breadcrumbs, finely chopped fresh rosemary, and minced garlic cloves in a small bowl.
10. Brush the entire fat cap of the lamb with Dijon mustard using a pastry brush.
11. Press the breadcrumb mixture firmly onto the mustard-coated surface.
12. Return the lamb to the skillet crust-side up and transfer to the preheated oven.
13. Roast for 15-18 minutes until the internal temperature reaches 130°F for medium-rare.
14. Remove the lamb from the oven and transfer to a cutting board to rest for 10 minutes.
15. While the lamb rests, add finely diced shallot to the same skillet over medium heat.
16. Sauté the shallot for 2 minutes until translucent and fragrant.
17. Deglaze the pan with dry red wine, scraping up all the browned bits with a wooden spoon.
18. Simmer the wine until reduced by half, about 4-5 minutes.
19. Whisk in beef demi-glace until fully incorporated and smooth.
20. Remove the sauce from heat and swirl in chilled unsalted butter until emulsified.
21. Carve the lamb between the bones into individual chops.
Tip: Letting the meat rest ensures juices redistribute for maximum tenderness.
Tip: Deglazing properly captures all the flavorful fond from searing.
Tip: Swirling in cold butter off-heat creates a glossy, restaurant-quality sauce.
Unbelievably tender meat yields to the slightest pressure of your fork, while the crisp herb crust provides satisfying texture contrast. That rich red wine sauce, with its deep umami notes, clings beautifully to each succulent chop. I love serving these over creamy polenta with roasted asparagus for a complete meal that always impresses dinner guests.
Shrimp and Grits with Cajun Spice
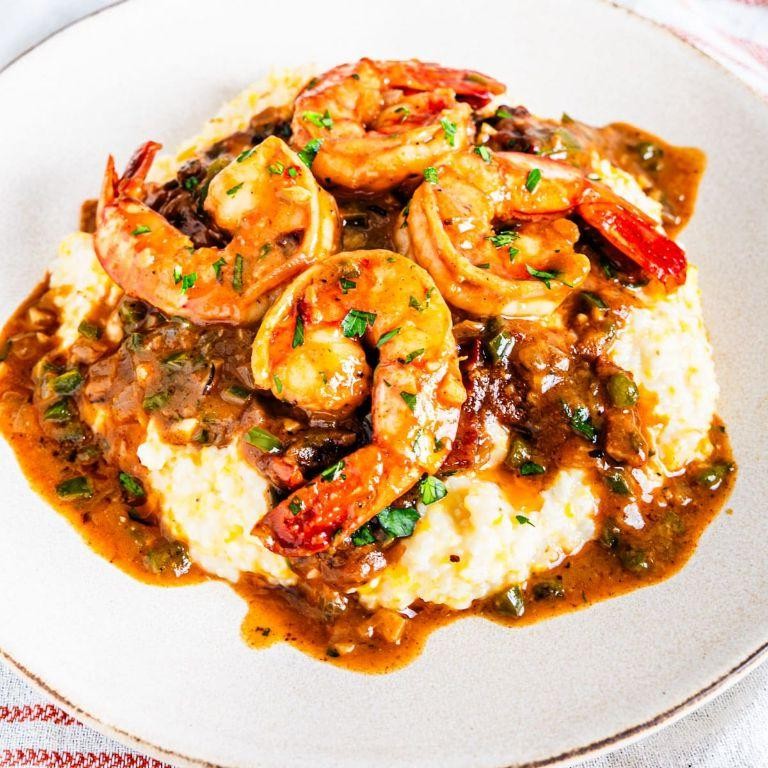
A sizzling skillet of shrimp and grits has become my ultimate comfort food, especially during these crisp autumn evenings when I crave something both elegant and satisfying. After perfecting this recipe through countless Sunday suppers, I’ve found that the key lies in balancing the creamy stone-ground grits with properly seared shrimp that pop with Cajun spices. There’s something magical about how the aromas fill my kitchen, transporting me straight to the Louisiana bayou even from my cozy Midwest home.
3
servings15
minutes43
minutesIngredients
– 1 cup stone-ground white grits
– 4 cups whole milk
– 2 tablespoons clarified butter
– 1 pound wild-caught large shrimp, peeled and deveined
– 2 tablespoons Cajun spice blend
– ½ cup heavy cream
– ¼ cup grated aged white cheddar cheese
– 3 slices thick-cut applewood smoked bacon, diced
– 1 small yellow onion, finely diced
– 1 red bell pepper, finely diced
– 2 garlic cloves, minced
– 2 tablespoons fresh parsley, chopped
– 1 tablespoon fresh lemon juice
Instructions
1. Combine stone-ground grits and whole milk in a heavy-bottomed saucepan over medium heat, whisking constantly for 2 minutes until mixture begins to steam.
2. Reduce heat to low and simmer grits for 25 minutes, stirring every 5 minutes with a wooden spoon to prevent sticking and achieve optimal creaminess.
3. Stir heavy cream and grated aged white cheddar into the grits until fully incorporated and glossy, about 2 minutes of vigorous stirring.
4. Cook diced applewood smoked bacon in a cast-iron skillet over medium-high heat for 6-8 minutes until fat renders and bacon becomes crispy.
5. Remove bacon with a slotted spoon, leaving 2 tablespoons of rendered bacon fat in the skillet for building flavor layers.
6. Sauté finely diced yellow onion and red bell pepper in the bacon fat for 4-5 minutes until vegetables soften and develop slight caramelization around the edges.
7. Add minced garlic and cook for 45 seconds until fragrant but not browned, being careful not to burn the delicate garlic.
8. Pat shrimp completely dry with paper towels, then toss with Cajun spice blend until evenly coated on all surfaces.
9. Increase skillet heat to high and sear shrimp in a single layer for 90 seconds per side until they curl and develop a deep golden crust.
10. Remove skillet from heat and immediately drizzle shrimp with fresh lemon juice to brighten flavors and stop the cooking process.
11. Fold crispy bacon and chopped fresh parsley into the shrimp mixture, gently combining all components.
12. Spoon creamy grits into shallow bowls and top with the shrimp mixture, allowing the spicy sauce to mingle with the cheesy grits.
Ultimate satisfaction comes from that first bite where the creamy, cheesy grits meet the spicy, perfectly seared shrimp. The contrast between the smooth grits and crispy bacon creates a textural symphony that’s absolutely irresistible. For an elegant presentation, I love serving this in wide, shallow bowls garnished with extra parsley and a lemon wedge for squeezing over at the table.
Simple Vegan Stir-Fry with Tofu and Vegetables
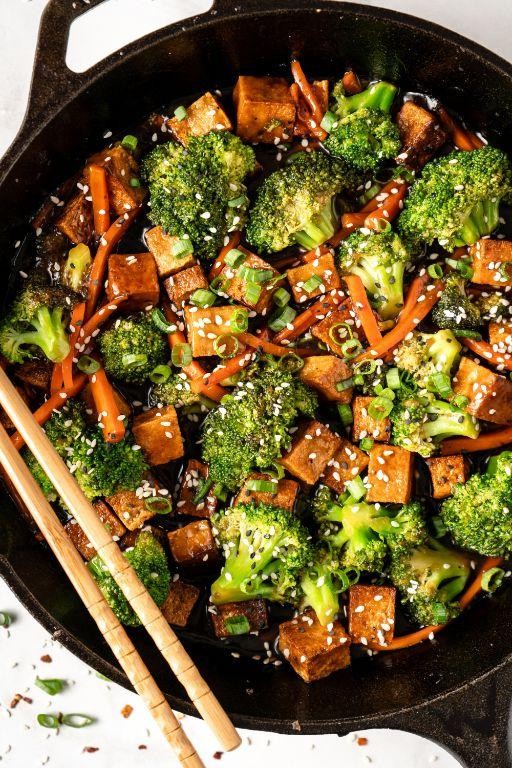
Sometimes the simplest meals are the ones that hit the spot after a long day, especially when you can whip them up in under 30 minutes with ingredients you likely already have on hand. I developed this particular stir-fry recipe during a busy week when my fridge was filled with random vegetables, and it’s since become my go-to for a quick, satisfying, and healthy dinner that never fails to please.
5
servings20
minutes25
minutesIngredients
– 14 ounces extra-firm tofu, pressed and cubed
– 2 tablespoons avocado oil
– 1 large yellow onion, thinly sliced
– 3 cloves garlic, minced
– 1 tablespoon freshly grated ginger
– 1 red bell pepper, julienned
– 1 cup broccoli florets
– 1 large carrot, cut into matchsticks
– 3 tablespoons tamari
– 1 tablespoon maple syrup
– 1 teaspoon toasted sesame oil
– 2 teaspoons cornstarch
– 1/4 cup vegetable broth
– 2 scallions, thinly sliced
– 1 tablespoon toasted sesame seeds
Instructions
1. Press the 14 ounces of extra-firm tofu for 15 minutes using a tofu press or by placing it between paper towels with a heavy pan on top to remove excess moisture, then cut it into 1-inch cubes.
2. Heat 1 tablespoon of avocado oil in a large wok or skillet over medium-high heat until it shimmers, about 1 minute.
3. Add the cubed tofu and pan-fry for 8–10 minutes, turning occasionally, until golden brown and crisp on all sides; transfer to a plate.
4. Heat the remaining 1 tablespoon of avocado oil in the same wok over medium-high heat until hot.
5. Sauté the thinly sliced yellow onion for 3–4 minutes until translucent and slightly softened.
6. Add the minced garlic and freshly grated ginger, stirring constantly for 30 seconds until fragrant to prevent burning.
7. Incorporate the julienned red bell pepper, broccoli florets, and carrot matchsticks, stir-frying for 5–6 minutes until the vegetables are tender-crisp and bright in color.
8. In a small bowl, whisk together the tamari, maple syrup, toasted sesame oil, cornstarch, and vegetable broth until smooth to create a lump-free sauce.
9. Return the cooked tofu to the wok with the vegetables.
10. Pour the sauce mixture over the tofu and vegetables, stirring continuously for 2–3 minutes until the sauce thickens and coats everything evenly.
11. Remove from heat and fold in the sliced scallions and toasted sesame seeds.
What I love most about this stir-fry is the contrast between the crisp-tender vegetables and the chewy, golden tofu, all brought together by that savory-sweet glaze. For a fun twist, serve it over quinoa or stuff it into warm tortillas for a quick wrap—it’s versatile enough to make any weeknight feel special.
Savory Mushroom Risotto with Parmesan

Wandering through the farmers market last weekend, I couldn’t resist the earthy aroma of fresh cremini mushrooms, which immediately inspired me to create this comforting risotto. There’s something magical about the slow, rhythmic stirring that transforms simple ingredients into creamy perfection—it’s my favorite Sunday cooking ritual that always makes the house smell incredible.
3
servings20
minutes35
minutesIngredients
- 1½ cups Arborio rice
- 8 ounces fresh cremini mushrooms, thinly sliced
- 1 medium yellow onion, finely diced
- 3 cloves garlic, minced
- ½ cup dry white wine
- 6 cups homemade chicken stock, kept at a gentle simmer
- ¾ cup freshly grated Parmigiano-Reggiano cheese
- 3 tablespoons unsalted European-style butter
- 2 tablespoons extra virgin olive oil
- 1 teaspoon fine sea salt
- ½ teaspoon freshly cracked black pepper
- 2 tablespoons fresh Italian parsley, finely chopped
Instructions
- Heat the extra virgin olive oil in a heavy-bottomed Dutch oven over medium heat until shimmering.
- Sauté the finely diced yellow onion for 4-5 minutes until translucent and fragrant.
- Add the minced garlic and cook for 45 seconds until aromatic but not browned.
- Stir in the thinly sliced cremini mushrooms and cook for 6-7 minutes until they release their liquid and develop golden edges.
- Add the Arborio rice to the pot and toast for 2 minutes, stirring constantly until the grains become slightly translucent around the edges.
- Pour in the dry white wine and cook while stirring until completely absorbed, about 2 minutes.
- Begin adding the simmering chicken stock one ladleful at a time, waiting until each addition is fully absorbed before adding the next.
- Continue this process for 18-20 minutes, maintaining a steady simmer and constant gentle stirring to develop the creamy starch.
- Test the rice for doneness—it should be al dente with a slight bite in the center.
- Remove from heat and stir in the unsalted European-style butter until fully incorporated.
- Fold in the freshly grated Parmigiano-Reggiano cheese until the risotto becomes luxuriously creamy.
- Season with fine sea salt and freshly cracked black pepper, then garnish with finely chopped fresh Italian parsley.
You’ll notice the risotto has that perfect creamy consistency where it slowly spreads across the plate rather than sitting in a stiff mound. The earthy mushroom flavor pairs beautifully with the salty complexity of the Parmigiano-Reggiano—try serving it alongside seared scallops or topped with a perfectly fried egg for an extra layer of richness.
Roasted Honey-Garlic Shrimp Skewers

A sizzling summer evening last July had me craving something that felt both elegant and effortless—enter these roasted honey-garlic shrimp skewers, which have since become my go-to for quick, impressive dinners. I love how the sweet and savory glaze caramelizes under high heat, filling the kitchen with an aroma that always draws my family to the table early. Honestly, it’s the kind of dish that makes weeknight cooking feel like a celebration.
4
skewers15
minutes9
minutesIngredients
- 1 pound large wild-caught shrimp, peeled and deveined
- 3 tablespoons raw honey
- 4 cloves garlic, finely minced
- 2 tablespoons extra-virgin olive oil
- 1 tablespoon freshly squeezed lemon juice
- 1 teaspoon smoked paprika
- ½ teaspoon fine sea salt
- ¼ teaspoon freshly cracked black pepper
- 2 tablespoons chopped fresh flat-leaf parsley
- 8-inch bamboo skewers, soaked in water for 30 minutes
Instructions
- Preheat your oven to 425°F and line a rimmed baking sheet with parchment paper.
- Pat the shrimp completely dry using paper towels to ensure proper searing.
- Thread 4-5 shrimp onto each soaked bamboo skewer, piercing through both the head and tail for secure placement.
- Arrange the skewers in a single layer on the prepared baking sheet.
- In a small bowl, whisk together the honey, minced garlic, olive oil, lemon juice, smoked paprika, sea salt, and black pepper until fully emulsified.
- Brush half of the honey-garlic glaze evenly over the shrimp skewers, coating both sides thoroughly.
- Roast the skewers for 5 minutes at 425°F until the shrimp just begin to turn pink at the edges.
- Remove the baking sheet and carefully flip each skewer using tongs.
- Brush the remaining glaze over the shrimp and return to the oven for 3-4 more minutes, until the shrimp are opaque and the glaze is bubbly and caramelized.
- Sprinkle the finished skewers with chopped fresh parsley before serving.
Nothing beats the sticky, glossy perfection of these skewers straight from the oven. The shrimp remain incredibly juicy inside while the edges get slightly crisp from the honey caramelization. I love serving them over coconut rice with a extra squeeze of lemon to cut through the sweetness, or even tossing them into a vibrant grain bowl for a complete meal.
Butternut Squash Ravioli with Brown Butter Sage Sauce
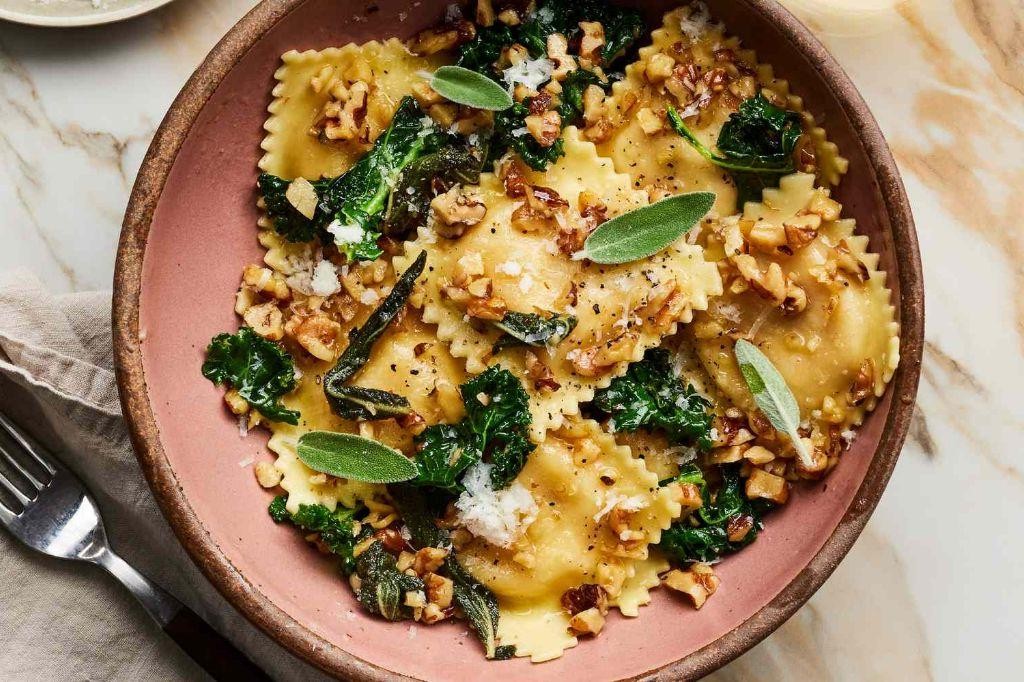
Tucked away in my recipe binder between stained pages and hastily written notes lies my absolute favorite autumn creation—this butternut squash ravioli recipe came to me during a particularly crisp October farmers’ market visit, when the squash practically glowed in their wooden crates and I knew I had to transform them into something extraordinary.
5
portions60
minutes55
minutesIngredients
– 1 medium butternut squash, halved lengthwise and seeded
– 2 tablespoons extra virgin olive oil
– 1/4 teaspoon freshly grated nutmeg
– 1/8 teaspoon ground cinnamon
– 2 cups “00” flour
– 3 pasture-raised eggs, lightly beaten
– 1/2 cup whole milk ricotta cheese
– 1/4 cup freshly grated Parmigiano-Reggiano
– 1/2 cup unsalted European-style butter
– 12 fresh sage leaves
– 1/4 teaspoon Maldon sea salt flakes
Instructions
1. Preheat your oven to 400°F and line a baking sheet with parchment paper.
2. Brush the cut sides of the butternut squash with olive oil and place cut-side down on the prepared baking sheet.
3. Roast the squash for 45 minutes until the flesh yields easily to a fork and develops caramelized edges.
4. Scoop the warm squash flesh into a food processor, discarding the skin.
5. Add nutmeg, cinnamon, ricotta, and Parmigiano-Reggiano to the processor, then pulse until smooth and well-combined.
6. Create a well in the center of the flour on a clean work surface and pour in the beaten eggs.
7. Gradually incorporate the flour into the eggs using a fork until a shaggy dough forms.
8. Knead the dough by hand for 8-10 minutes until it becomes smooth and elastic, then wrap in plastic and rest at room temperature for 30 minutes.
9. Divide the dough into four equal portions and roll each through a pasta machine, starting at the widest setting and progressing to the second-thinnest setting.
10. Place tablespoon-sized mounds of filling 2 inches apart on one pasta sheet, then brush around the filling with water.
11. Lay a second pasta sheet over the filling and press firmly around each mound to seal, eliminating air pockets.
12. Cut individual ravioli using a fluted pastry wheel, creating 2-inch squares.
13. Bring a large pot of heavily salted water to a rolling boil over high heat.
14. Melt the butter in a large skillet over medium heat until it foams, then subsides and develops golden brown specks.
15. Add the sage leaves to the browned butter and fry for 45 seconds until crisp but not darkened.
16. Cook the ravioli in batches for 3-4 minutes until they float to the surface and the edges appear tender.
17. Use a spider strainer to transfer the cooked ravioli directly into the brown butter sauce.
18. Gently toss the ravioli in the sauce to coat evenly, then divide among warm plates.
19. Finish each serving with a sprinkle of Maldon sea salt flakes and additional grated Parmigiano-Reggiano.
Creating perfectly thin pasta dough requires patience—don’t rush the resting period as it allows the gluten to relax for easier rolling. When sealing ravioli, press firmly around the filling to prevent breakage during cooking, and always test one ravioli first to confirm cooking time. Brown butter demands attention—remove it from heat the moment you see amber-colored specks forming to prevent burning.
Creamy squash filling contrasts beautifully with the delicate pasta wrapper, while the nutty brown butter and crispy sage create layers of earthy complexity. For an elegant presentation, I love arranging these ravioli on a bed of sautéed wild mushrooms or garnishing with toasted pumpkin seeds for added crunch.
Conclusion
Ultimately, these 29 irresistible recipes offer endless inspiration for creating memorable meals that will delight your family and friends. We hope you’ll try a few favorites, share your cooking successes in the comments below, and pin this collection to your Pinterest boards for easy reference. Happy cooking!


