Ever find yourself staring into the refrigerator abyss at 3 PM, contemplating whether cold pizza qualifies as a balanced snack? Enter these coconut energy balls—the edible equivalent of a superhero landing that’ll save you from making questionable dietary decisions. These little globes of glory are so simple, even your cat could probably make them (though I don’t recommend letting Fluffy near the food processor).
Why This Recipe Works
- These energy balls are the culinary version of a Swiss Army knife—they’re portable, require zero baking, and won’t judge you when you eat three in one sitting. The combination of dates and coconut creates a texture that’s somehow both chewy and melt-in-your-mouth, like if a brownie and a macaroon had a delicious love child.
- We’re using medjool dates because they’re the Beyoncé of dried fruit—naturally sweet, perfectly moist, and they don’t need any backup dancers (aka added sugar) to shine. Their sticky goodness acts as nature’s edible glue, holding everything together without any artificial binders.
- The coconut flakes aren’t just for decoration—they’re like tiny flavor parachutes that deliver tropical vibes directly to your taste buds while providing just enough texture to keep things interesting. Toasting them first is like giving them a spa day—they emerge more fragrant and complex.
- This recipe understands that adulting is hard enough without complicated snack prep. With only five main ingredients and equipment you probably already own, these come together faster than you can say “I’ll just have one more.”
- They’re freezer-friendly, which means you can make a batch large enough to survive the apocalypse and have emergency snacks ready for when your energy levels drop faster than your motivation to fold laundry.
Ingredients
- 2 cups pitted medjool dates (about 20-24 dates)
- 1 ½ cups unsweetened shredded coconut, divided
- ½ cup rolled oats (the old-fashioned kind, not the instant ones that gave up on life)
- ¼ cup almond butter (the creamy kind that doesn’t separate like my last relationship)
- 2 tablespoons chia seeds (tiny but mighty)
- 1 teaspoon vanilla extract (the good stuff, not the imitation sadness)
- ¼ teaspoon sea salt (to make all the other ingredients play nice together)
Equipment Needed
- Food processor (the workhorse of no-bake recipes)
- Baking sheet
- Parchment paper (the unsung hero of easy cleanup)
- Measuring cups and spoons
- Small bowl for toasting coconut
- Your clean hands (the most versatile kitchen tool you own)
Instructions
Toast the Coconut Flakes
Let’s start by giving our coconut flakes their moment in the spotlight. Spread ½ cup of the shredded coconut on a baking sheet in a single layer—no coconut piles allowed, we’re not building snowmen here. Pop them into a preheated 350°F oven for 5-7 minutes, but don’t you dare walk away to check Instagram. Stay within viewing distance because coconut goes from perfectly golden to charcoal briquette faster than you can say “crisis.” You’ll know they’re ready when your kitchen smells like a tropical vacation and the flakes have transformed from pale white to a beautiful light golden brown. Remove them immediately and let them cool completely—hot coconut will melt your almond butter and create a sticky situation worthy of a crime scene investigation. Pro tip: If you’re feeling extra fancy, you can toast these in a dry skillet on the stove, but that requires actual attention span, so choose your adventure wisely.
Process the Base Ingredients
Combine and Chill the Dough
Transfer your beautifully processed mixture to a medium bowl and add the cooled toasted coconut. Use your hands (washed, please—we’re not animals) to mix everything together until the toasted coconut is evenly distributed. This is where you get to play with your food—squeeze and knead the dough like it owes you money until it forms one unified mass. Now cover the bowl with plastic wrap or a lid and refrigerate for 30-45 minutes. This chilling step isn’t optional unless you enjoy sticky fingers that could double as flypaper. The cold helps the fats in the almond butter firm up and makes the dough much easier to handle. While you wait, you can do productive things like washing the food processor parts or just stare at the refrigerator and contemplate life choices.
Shape the Energy Balls
Remove your chilled dough from the refrigerator—it should feel firm but still pliable, like modeling clay that smells like heaven. Using a tablespoon measure or cookie scoop, portion out the dough into roughly 1-inch balls. Roll each portion between your palms with firm but gentle pressure—think of it as giving each ball a comforting hand massage. If the dough starts sticking to your hands, dampen them slightly with water, but don’t overdo it unless you want coconut soup. Aim for 20-24 balls total, but don’t stress about making them perfectly uniform—they’re homemade, not robot-made. As you finish each ball, place it on a parchment-lined baking sheet. Pro tip: If you want perfectly round balls, roll them once, then give them a second roll after 5 minutes to smooth out any imperfections.
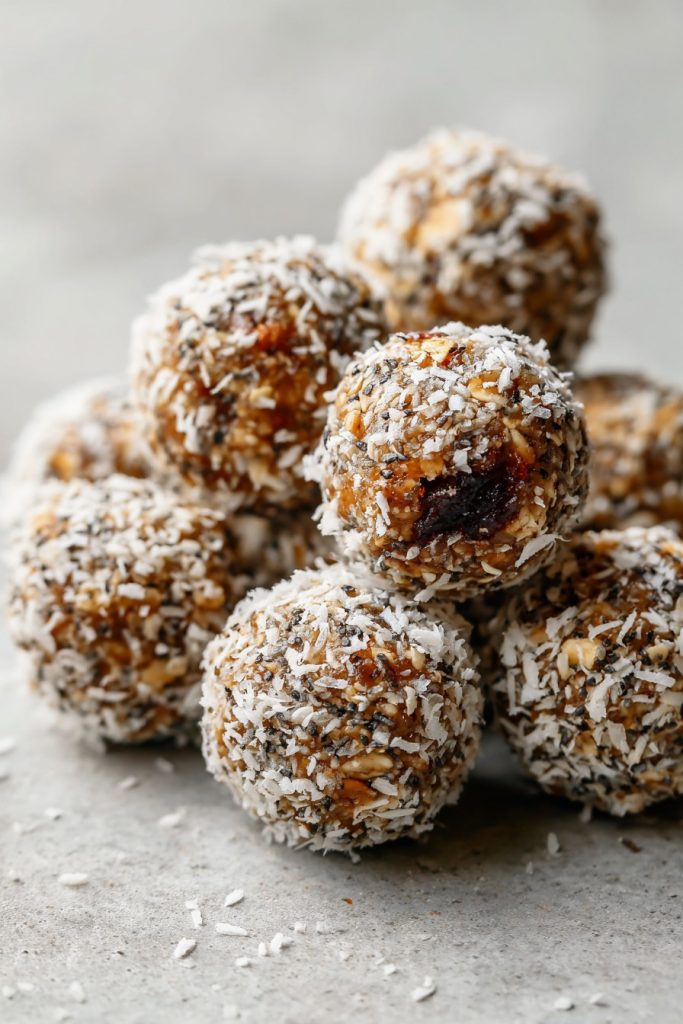
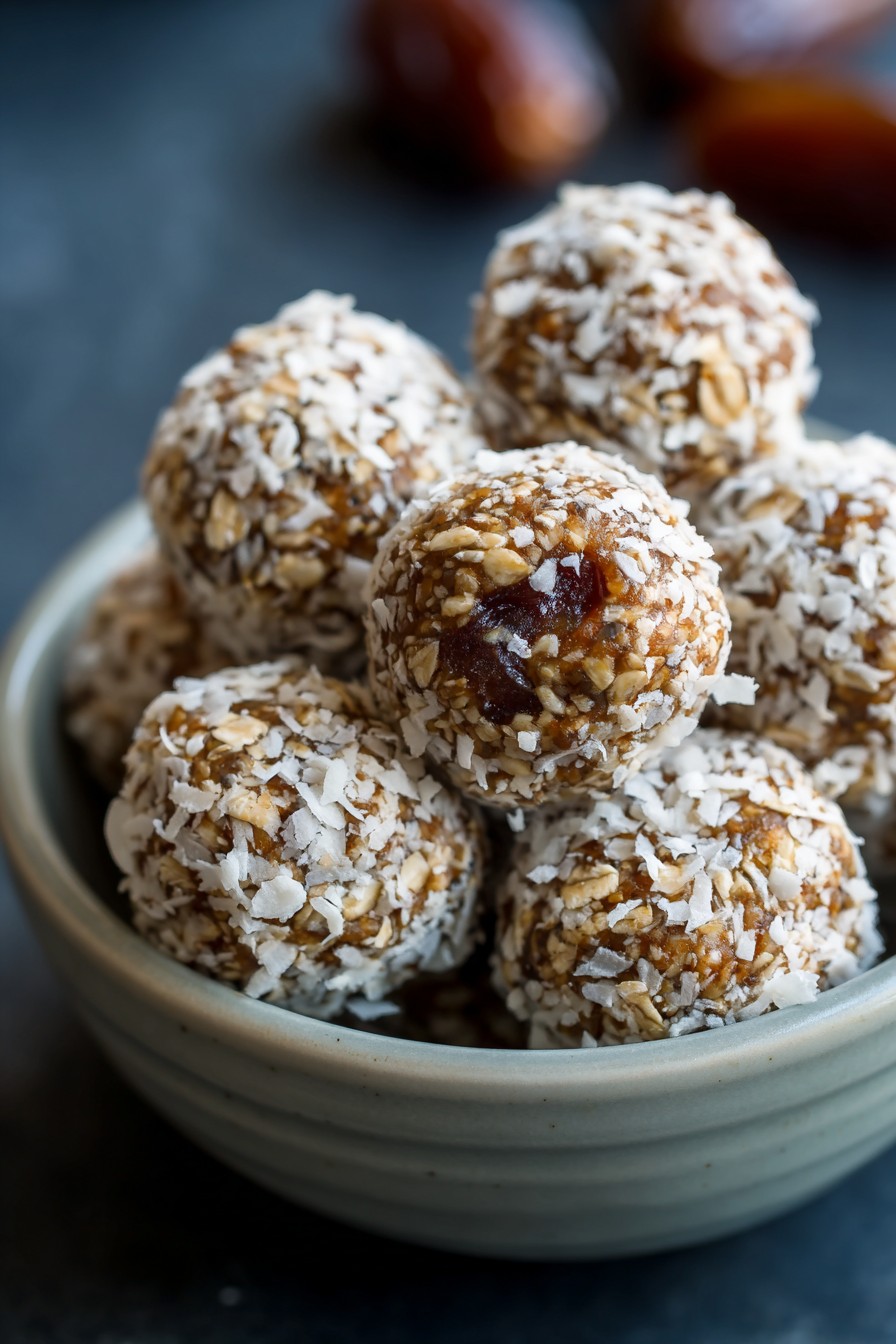
Coat and Final Chill
Now for the fancy part—take that remaining ½ cup of untoasted shredded coconut and spread it out on a small plate. Roll each energy ball in the coconut until it’s lightly coated on all sides, like giving them little coconut sweaters. This not only makes them look professional but also prevents them from sticking together during storage. Return the coated balls to the parchment-lined baking sheet and pop them back into the refrigerator for at least 1 hour to set completely. This final chill transforms them from “maybe I made a mistake” to “I’m a kitchen genius” texture. If you’re impatient, you can technically eat them now, but they’ll be softer and more likely to fall apart during handling—kind of like eating ice cream before it’s fully frozen.
Storage and Serving
Once fully chilled and firm, transfer your coconut energy balls to an airtight container. They’ll keep happily in the refrigerator for up to 2 weeks, though let’s be real—they probably won’t last that long. For long-term storage, you can freeze them for up to 3 months in a freezer-safe container or bag. When serving, they’re perfect straight from the fridge, but if you prefer a softer texture, let them sit at room temperature for 10-15 minutes before eating. These make excellent pre-workout snacks, afternoon pick-me-ups, or “I survived another Zoom meeting” rewards. Pro tip: Layer them between parchment paper in your storage container to prevent coconut sweater loss during transport.
Tips and Tricks
If your dates are drier than a British comedy, you’ll need to rehydrate them before using. Simply place the pitted dates in a heatproof bowl and cover with boiling water. Let them soak for 10-15 minutes until plump and soft, then drain thoroughly and pat dry with paper towels. Excess moisture is the enemy of proper energy ball texture, so make sure they’re not dripping wet before processing. For the almond butter, natural varieties that separate are fine—just give them a good stir before measuring. If you find your mixture is too dry even after processing, add another tablespoon of almond butter or even a teaspoon of water. Conversely, if it’s too wet, add more oats or coconut until it reaches the desired consistency.
When toasting coconut, keep in mind that it continues to cook after removal from heat, so pull it when it’s slightly lighter than your target color. Burnt coconut tastes bitter and will ruin your entire batch—trust me, I’ve learned this the hard way so you don’t have to. For perfectly uniform balls, use a small cookie scoop or tablespoon measure to portion the dough before rolling. If you’re making these for gifts or parties, you can get fancy by rolling some in cocoa powder, crushed nuts, or even matcha powder for variety. The chia seeds can be substituted with hemp hearts or ground flax seeds if preferred, though chia works particularly well because they help absorb excess moisture.
If you’re making these during humid weather, you might need to chill the dough longer between steps. Humidity is the arch-nemesis of no-bake recipes, so don’t skip the chilling times. For maximum freshness, store these in single layers separated by parchment paper rather than piled together. When freezing, flash freeze them first on a baking sheet for 1-2 hours before transferring to containers to prevent them from sticking together. If you want to add mix-ins like mini chocolate chips or dried fruit, fold them in by hand after processing the base mixture to avoid over-processing. And remember—the first ball you roll will probably look a bit rough, but you’ll hit your stride by the third or fourth one, I promise.
Recipe Variations
- Chocolate Coconut Delight: Add ¼ cup cocoa powder to the food processor with the other ingredients and fold in ⅓ cup mini chocolate chips after processing. This creates a flavor that’s basically an M&M that went to college and came back with a philosophy degree—deep, complex, and slightly pretentious in the best way.
- Tropical Vacation: Replace the almond butter with coconut butter and add ¼ cup chopped dried pineapple and 2 tablespoons chopped macadamia nuts. Close your eyes while eating these and you can almost hear ocean waves instead of your neighbor’s lawnmower.
- Cookie Dough Fantasy: Use cashew butter instead of almond butter and add ¼ teaspoon cinnamon. Roll the finished balls in crushed graham crackers instead of coconut for that nostalgic childhood flavor without the raw egg anxiety.
- Superfood Boost: Add 2 tablespoons of maca powder and 1 tablespoon of spirulina to the mixture. These will make you feel so healthy you might spontaneously start doing yoga, but fair warning—they’ll turn an interesting shade of green that might alarm casual observers.
- Nut-Free Version: Substitute sunflower seed butter for the almond butter and use gluten-free oats if needed. Perfect for when you want to share with friends who have more dietary restrictions than a maximum-security prison.
Frequently Asked Questions
Can I use a different type of date?
While medjool dates are the VIPs of the date world due to their natural softness and caramel-like flavor, you can use deglet noor dates in a pinch. However, deglet noor dates are typically drier and smaller, so you’ll need to increase the quantity to about 2 ½ cups and definitely soak them in hot water for 20-30 minutes until pliable. Drain them thoroughly and pat dry before using, and you might need to add an extra tablespoon of almond butter to compensate for their lower moisture content. The texture will be slightly different, but still delicious—like the difference between a luxury sedan and a reliable economy car, both will get you where you need to go.
Why are my energy balls too soft and not holding shape?
This usually happens when either your dates were too moist, you didn’t chill the dough long enough, or you got overzealous with the almond butter. The fix is simple—pop them back in the refrigerator for another hour or two. If they’re still too soft, you can roll each ball in additional shredded coconut or oats to absorb excess moisture and help them firm up. For future batches, make sure your dates are soft but not wet, and measure the almond butter precisely rather than eyeballing it. Remember that these firm up significantly during chilling, so don’t panic if they seem soft right after rolling—they’re like teenagers, they need time to figure themselves out.
Can I make these without a food processor?
Absolutely, though it requires more elbow grease and the patience of a saint. You’ll need to chop the dates very finely with a sharp knife—we’re talking “confetti at a wedding” level of fine. Then mix everything together in a large bowl, using your hands to really work the ingredients together until they form a cohesive dough. This method works better if your dates are particularly soft, and you might need to add an extra tablespoon of almond butter to help bind everything. The texture will be slightly chunkier, but still delicious—think rustic charm versus polished perfection. Just be prepared for a serious arm workout and possibly questioning your life choices halfway through.
How long do these actually last?
In an airtight container in the refrigerator, these coconut energy balls will maintain their perfect texture for about 2 weeks, though I’ve never managed to keep them around that long without intervention from snack thieves (including myself). In the freezer, they’ll stay fresh for up to 3 months. The signs that they’re past their prime include drying out, becoming excessively hard, or developing an off smell. If they start looking sad, you can crumble them over yogurt or oatmeal for a delicious topping. Proper storage is key—use containers that actually seal rather than that one Tupperware with the questionable lid that everyone keeps meaning to replace.
Can I reduce the sugar content?
The dates are the primary sweetener here, and while they’re natural sugars, you can reduce the quantity slightly by using 1 ½ cups dates and increasing the oats to ¾ cup. The texture will be denser and less sweet, but still edible. You could also substitute half the dates with unsweetened dried apricots or prunes for a different flavor profile with slightly less sweetness. However, keep in mind that the dates aren’t just sweeteners—they’re also the main binding agent, so reducing them too much will result in crumbly balls that fall apart faster than New Year’s resolutions. Sometimes you have to embrace the sweetness for the greater good of structural integrity.
Summary
These coconut energy balls are the snack equivalent of a reliable friend who always shows up with coffee when you need it most. With minimal effort and maximum flavor, they’ll rescue you from afternoon slumps and questionable vending machine choices. Make a batch today—your future self will thank you during that 3 PM hunger emergency.


